
I have TextView with text that changed dynamically. This text contain strings like <a href='myWord'>myWord</a>. I want that after click to this «link» myWord appear in the EditText in the same activity.
This is my code:
txt.setText(Html.fromHtml("...<a href='link'>link</a>..."));
txt.setMovementMethod(LinkMovementMethod.getInstance());
It’s work well for URLs inside href attribute, but there is an error for another format.
I found a lot of similar questions on the StackOverflow but all of them were about url links. In my app I want create «link» inside activity.
In general, I can change tag to some another if it’s depend…
Please help me!
Thank you!
——SOLVED——
Thank you Jacob Phillips for idea!
May it will be interesting someone in future.
This is a code:
//This is my string;
String str = "<b>Text</b> which contains one <a href='#'>link</a> and another <a href='#'>link</a>";
//TextView;
TextView txt = new TextView(this);
//Split string to parts:
String[] devFull = data[v.getId()][1].split("<a href='#'>");
//Adding first part:
txt.append(Html.fromHtml(devFull[0]));
//Creating array for parts with links (they amount always will devFull.length-1):
SpannableString[] link = new SpannableString[devFull.length-1];
//local vars:
ClickableSpan[] cs = new ClickableSpan[devFull.length-1];
String linkWord;
String[] devDevFull = new String[2];

for(int i=1; i<devFull.length; i++){
    //obtaining 'clear' link
    devDevFull = devFull[i].split("</a>");
    link[i-1] = new SpannableString(devDevFull[0]);
    linkWord = devDevFull[0];
    cs[i-1] = new ClickableSpan(){
        private String w = linkWord;
        @Override
        public void onClick(View widget) {
            // here you can use w (linkWord)
        }
    };
    link[i-1].setSpan(cs[i-1], 0, linkWord.length(), 0);
    txt.append(link[i-1]);
    try{
        txt.append(Html.fromHtml(devDevFull[1]));
    }
    catch(Exception e){}
}

Would you be willing to pay for a course that teaches iOS development?
Related Articles
- Write an Interview Experience
- Interview Preparation For Software Developers
- Must Coding Questions — Company-wise
- Must Do Coding Questions — Topic-wise
- Company-wise Practice Problems
- Company Preparation
- Competitive Programming
- Software Design-Patterns
- Company-wise Interview Experience
- Experienced — Interview Experiences
- Internship — Interview Experiences
- Analysis of Algorithms
- Searching Algorithms
- Sorting Algorithms
- Pattern Searching
- Geometric Algorithms
- Mathematical Algorithms
- Randomized Algorithms
- Greedy Algorithms
- Dynamic Programming
- Divide & Conquer
- Backtracking
- Branch & Bound
- All Algorithms
- HTML
- CSS
- JavaScript
- jQuery
- PHP
- Bootstrap
- AngularJS
- ReactJS
- NodeJS
- p5.js
- Lodash.js
- jQwidget
- jQuery-UI
- WordPress
- Tailwind CSS
- JSON
- jQuery Mobile
- Collect.js
- Pure CSS
- Bulma
- Foundation
- Materialize CSS
- Semantic-UI
- TypeScript
- SVG
- Express.js
- Ant Design
- React Design
- Tensorflow.js
- Machine Learning Introduction
- Data PreProcessing
- Supervised Learning
- UnSupervised Learning
- Reinforcement Learning
- Dimensionality Reduction
- Natural Language Processing
- Neural Networks
- ML – Applications
- GATE CS Notes
- Gate Corner
- Previous Year GATE Papers
- Last Minute Notes (LMNs)
- Important Topic — GATE 2021
- GATE 2021 Course
- C Quiz
- C++ Quiz
- Java Quiz
- Python Quiz
- HTML Quiz
- CSS Quiz
- JavaScript Quiz
- Data Structures Quiz
- Algorithms Quiz
- Topic-wise MCQs
- School Programming
- Number System & Arithmetic
- Algebra
- Trigonomitry
- Statistics
- Probability
- Geometry
- Mensuration
- Calculus
- Class 8 Physics Notes
- Class 9 Physics Notes
- Class 10 Physics Notes
- Class 11 Physics Notes
- Class 8 Chemistry Notes
- Class 9 Chemistry Notes
- Class 10 Chemistry
Interview Preparation
Algorithms
Web Technologies
Machine Learning
GATE 2021
QUIZ Section
School Content
Improve Article
Save Article
Like Article
Improve Article
Save Article
Like Article
In this article, we are going to implement a very important feature related to TextView. Here we are making part of a string or a substring to act as a substring. This feature is important while writing a blog because it may be possible that for certain points we want to redirect the user to a link. So here we are going to learn how to implement that feature. A sample GIF is given below to get an idea about what we are going to do in this article. Note that we are going to implement this project using the Java language.

Step by Step Implementation
Step 1: Create a New Project
To create a new project in Android Studio please refer to How to Create/Start a New Project in Android Studio. Note that select Java as the programming language.
Step 2: Working with the activity_main.xml file
Navigate to the app > res > layout > activity_main.xml and add the below code to that file. Below is the code for the activity_main.xml file.
XML
<?xml version="1.0" encoding="utf-8"?>
<LinearLayout
android:layout_width="match_parent"
android:layout_height="match_parent"
android:orientation="vertical"
tools:context=".MainActivity">
<TextView
android:id="@+id/text_view"
android:layout_width="wrap_content"
android:layout_height="wrap_content"
android:text="First Click THIS and then THIS "
android:textColor="@color/black"
android:textSize="20sp"
app:layout_constraintBottom_toBottomOf="parent"
app:layout_constraintLeft_toLeftOf="parent"
app:layout_constraintRight_toRightOf="parent"
app:layout_constraintTop_toTopOf="parent" />
</LinearLayout>
Step 3: Working with the MainActivity.java file
Go to the MainActivity.java file and refer to the following code. Below is the code for the MainActivity.java file. Comments are added inside the code to understand the code in more detail.
Java
import android.os.Bundle;
import android.text.SpannableString;
import android.text.Spanned;
import android.text.method.LinkMovementMethod;
import android.text.style.ClickableSpan;
import android.view.View;
import android.widget.TextView;
import android.widget.Toast;
import androidx.appcompat.app.AppCompatActivity;
public class MainActivity extends AppCompatActivity {
@Override
protected void onCreate(Bundle savedInstanceState) {
super.onCreate(savedInstanceState);
setContentView(R.layout.activity_main);
TextView textView = findViewById(R.id.text_view);
String text = "First Click THIS and then THIS ";
SpannableString ss = new SpannableString(text);
ClickableSpan clickableSpan1 = new ClickableSpan() {
public void onClick(View widget) {
Toast.makeText(MainActivity.this, "First Clickable Text", Toast.LENGTH_SHORT).show();
}
};
ClickableSpan clickableSpan2 = new ClickableSpan() {
@Override
public void onClick(View widget) {
Toast.makeText(MainActivity.this, "Second Clickable Text", Toast.LENGTH_SHORT).show();
}
};
ss.setSpan(clickableSpan1, 12, 16, Spanned.SPAN_EXCLUSIVE_EXCLUSIVE);
ss.setSpan(clickableSpan2, 26, 30, Spanned.SPAN_EXCLUSIVE_EXCLUSIVE);
textView.setText(ss);
textView.setMovementMethod(LinkMovementMethod.getInstance());
}
}
Output:
Like Article
Save Article
We use cookies to ensure you have the best browsing experience on our website. By using our site, you
acknowledge that you have read and understood our
Cookie Policy &
Privacy Policy
As you all know, we can set click listener on textview like we use to set it in other controls (Button, ImageView etc).
- textview.setOnClickListener(new View.OnClickListener()
- {
- @Override
- public void onClick(View v)
- {
- }
- });
But what if I want the listener for only some text? For example, “This is demo Android program,” now I want the click listener just for the word “Android.” Yes, this is possible by using ClickableSpan.
If the object of ClickableSpan is attached with TextView with a movement method of LinkmovementMethod, the text click will call onClick(View) method.
Syntax
- ClickableSpan clickableSpan = new ClickableSpan()
- {
- @Override
- public void onClick(View textView)
- {
- }
- @Override
- public void updateDrawState(TextPaint ds)
- {
- super.updateDrawState(ds);
- }
- };
Now you need to attach this object with your SpannableString.
- SpannableString ss =new SpannableString(«This is demo android program»);
- ss.setSpan(clickableSpan,13,19,Spanned.SPAN_EXCLUSIVE_EXCLUSIVE);
Attributes of setSpan
- object of ClickableSpan.
- start position of text
- end position of text
Now you need to set that text in your TextView and most importantly, set setMovementMethod() on TextView.
- textView.setText(ss);
- textView.setMovementMethod(LinkMovementMethod.getInstance());
Here you are done, whenever you click on ”Android,” the onClick() method of ClickableSpan will be called.
Let’s see one example program for more than one click listener on TextView.
activity_main.xml
- <RelativeLayout
- xmlns:android=«http://schemas.android.com/apk/res/android»
- xmlns:tools=«http://schemas.android.com/tools» android:layout_width=«match_parent»
- android:layout_height=«match_parent»
- android:padding=«20dp»>
- <TextView android:id=«@+id/txtData»
- android:layout_width=«wrap_content»
- android:textAppearance=«?android:attr/textAppearanceLarge»
- android:layout_height=«wrap_content» />
- </RelativeLayout>
MainActivity.java
- public class MainActivity extends Activity
- {
- private TextView txtData;
- @Override
- protected void onCreate(Bundle savedInstanceState)
- {
- super.onCreate(savedInstanceState);
- setContentView(R.layout.activity_main);
- txtData = (TextView) findViewById(R.id.txtData);
- String text = «I love to do programming in @Android @IOS @JAVA»;
- SpannableString spanString = new SpannableString(text);
- Matcher matcher = Pattern.compile(«@([A-Za-z0-9_-]+)»).matcher(spanString);
- while (matcher.find())
- {
- spanString.setSpan(new ForegroundColorSpan(Color.parseColor(«#0000FF»)), matcher.start(), matcher.end(), 0);
- final String tag = matcher.group(0);
- ClickableSpan clickableSpan = new ClickableSpan()
- {
- @Override
- public void onClick(View textView)
- {
- Log.e(«click», «click « + tag);
- String searchText = tag.replace(«@», «»);
- Intent browserIntent = new Intent(Intent.ACTION_VIEW, Uri.parse(«https://www.google.co.in/search?q=» + searchText));
- startActivity(browserIntent);
- }
- @Override
- public void updateDrawState(TextPaint ds)
- {
- super.updateDrawState(ds);
- }
- };
- spanString.setSpan(clickableSpan, matcher.start(), matcher.end(), Spanned.SPAN_EXCLUSIVE_EXCLUSIVE);
- }
- txtData.setText(spanString);
- txtData.setMovementMethod(LinkMovementMethod.getInstance());
- }
- }
The TextView is a widget in Android that allows you to display text to the user. It is also possible to use the Android TextView widget to create a hyperlink which can load a web page in a mobile web browser when clicked.
To create a clickable hyperlink in your Android app using the TextView widget follow the steps below.
- Create a new String resource in the strings.xml resource file representing the text to be placed inside the TextView
- In your String resource use HTML markup to insert the hyperlink using an anchor tag
- Add a TextView in the layout of your Activity or Fragment and use the android:text attribute on the TextView to reference the String resource containing the hyperlink
- In your Activity or Fragment class use the setMovementMethod(…) on the TextView to enable the hyperlink
In the article below I will include Java and Kotlin code samples that show how to create a hyperlink using the Android TextView following the steps listed above.
I have also included some additional instructions along with code samples written in Kotlin for using links in Android apps in different ways such as:
- How to Change the Hyperlink Text Color in a TextView
- How to Create a Clickable Link to a Website Using a Button in Android
- How to Create a Clickable Link to Another Activity in a TextView
Below is a screenshot of an Android app we will be building in this tutorial for creating a hyperlink using the Android TextView widget. When the hyperlink is selected the app will open a mobile web browser and navigate the user to the website https://learntodroid.com

In this tutorial will cover the following steps for creating a hyperlink using the Android TextView widget.
- Creating a String Resource for the Hyperlink in HTML Markup
- Creating an Activity Layout File with a TextView
- Enabling the TextView Hyperlink in the Activity or Fragment Class
I will include code excerpts embedded into this tutorial. For step 3, I have included code samples for both Kotlin and Java.
I have created a video tutorial embedded below on how to create a hyperlink inside a TextView in an Android app. The code written in this video tutorial is also available on GitHub.
Creating a String Resource for the Hyperlink in HTML Markup
The first part of this tutorial for creating a hyperlink using the Android TextView widget will require you to add a new String Resource into the strings.xml file that will represent the text that will be used by the TextView for the hyperlink.
You will need to use HTML markup when writing your hyperlink in your resource file. This means you will need to use an anchor tag and use the href attribute on the anchor tag to capture the URI. Inside the anchor tag you will also need to add some text that will be displayed as a hyperlink to the user in the app.
You can also add a description to the link above or next to the link by adding some text outside of the anchor text in the String Resource. In my example I have also added a new line between my description of the link and the clickable link.
See the code sample of the strings.xml resource file below containing the hyperlink String resource.
Creating an Activity Layout File with a TextView
The next step in this tutorial will involve setting up the layout file for your Activity or Fragment that will contain the hyperlink TextView.
When you are creating the TextView in the layout file you will need to take care of a few things.
- Give the TextView an id using the “android:id” attribute so that you can reference it in the next part of the tutorial in your Activity or Fragment class
- Use the “android:text” attribute to reference the String resource you have created above for your hyperlink
- If you the text shown in the TextView is going to spill over one row consider centering the TextView by setting the “android:textAlignment” attribute to the value of “center”
See the code sample of the activity_main.xml layout resource file below containing a TextView to be shown inside a ConstraintLayout.
Enabling the TextView Hyperlink in the Activity or Fragment Class
The final step of this tutorial involves enabling the hyperlink to be clickable in your Activity or Fragment class by using the setMovementMethod(…) on the TextView.
The setMovementMethod(…) takes a MovementMethod as a parameter. In this tutorial we will be making use of the LinkMovementMethod allow the hyperlink to be clickable and to handle the launching of the web browser and navigation to the link in the browser when selected.
Java Example
See the code sample of the MainActivity.java Activity class file below showing the enabling of the hyperlink using setMovementMethod(…)
Kotlin Example
See the code sample of the MainActivity.kt Activity class file below showing the enabling of the hyperlink using setMovementMethod(…)
How to Change the Hyperlink Text Color in a TextView
By default the hyperlinks shown in your Android TextView widget will be displayed in a dark pink text color with an underline.
You can change the default color of the text of the hyperlink using the setLinkTextColor(…) method on the TextView.
See the code sample of the MainActivity.kt Activity class file below setting the color of the hyperlink in the TextView to blue using setLinkTextColor(…)
See a screenshot showing the hyperlink inside the TextView in blue using the code from the excerpt above.

How to Create a Clickable Link to a Website Using a Button in Android
You can also use a Button widget in Android to load a web page in the mobile browser when clicked.
To do this you will need to make use of an Intent and use the startActivity(…) method to launch an Intent when the Button is clicked.
See the code sample of the MainActivity.kt Activity class file below showing how to use a Button to launch a web browser on the device at a given URI when clicked.
How to Create a Clickable Link to Another Activity in a TextView
I have written another blog post on this website about how to switch between Activities in Android using an Intent. To learn more about this including an example using a Button to switch between Activities using an Intent check out the article below.
If you want to use a TextView instead of a Button to create a link to another Activity you can take the code samples from that lesson and replace the Button with a TextView. You will need to style the text shown in the TextView to look like a hyperlink by setting the text color to blue and adding an underline. There you will need to add an OnClickListener to create the Intent when the TextView is selected.
See the code excerpt from the IntentNavigationActivity.kt Activity class file below which shows setting the text color of the TextView to blue and adding an on click listener to switch to the MainActivity using an Intent when the TextView is clicked.
See the code sample of the activity_intent_navigation.xml layout resource file below containing a TextView to be shown inside a ConstraintLayout.
See the code sample of the strings.xml resource file below containing String Resource for the activity link which is underlined using HTML markup.
You will ensure need to use you have included references to all of the Activities you will be using and navigating between in your manifest file. This is done using the activity tag inside the application tag of the Android Manifest file.

LinkTextView
Made TextView with ClickableSpan more easy

Gradle
implementation "com.reoobter:linktextview:0.0.4"
Feature
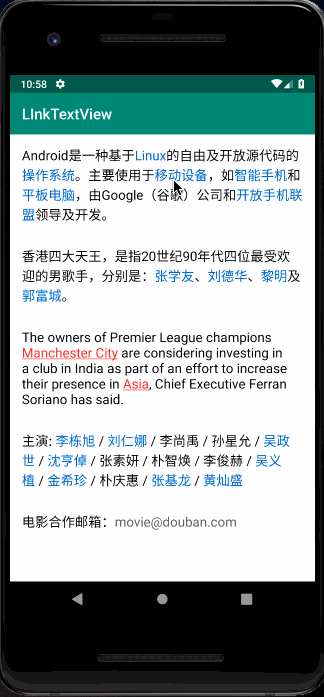
Thanks for VeerHan‘s PR .Now we support match repeat word in some complex scenes. for example
val androidRules = arrayOf("手机", "Linux", "操作系统", "移动设备", "智能手机", "平板电脑", "开放手机联盟")
the word «手机» is repeated in those keyword. when the word «手机» is clicked in ”智能手机“ or ”开发手机联盟“ ,it will be react as «手机” ,while when «智能手机» and ”开发手机联盟“ clicked ,it will react as normal.
Usage
noraml
all clickable word with same color
// the content should be set for TextView
val android = getString(R.string.text_android_baike)
// Array to define all clickable words
val androidRules = arrayOf("Linux","操作系统","移动设备","智能手机","平板电脑","开放手机联盟")

Linker.Builder()
    .content(android)
    .textView(text_view_1)
    .links(androidRules)
    .linkColor(ContextCompat.getColor(this,R.color.link))
    .addOnLinkClickListener(onLinkClickListener)
    .apply()

private val onLinkClickListener = object:OnLinkClickListener{
    override fun onClick(view: View, content: String) {
        Toast.makeText(mContext, "clicked link is : $content", Toast.LENGTH_SHORT).show()
    }
}
advance
clickable word with different color

val actorsRules1 = listOf(
    Pair("刘仁娜", ContextCompat.getColor(this, R.color.red)),
    Pair("李栋旭", ContextCompat.getColor(this, R.color.colorPrimary)),
    Pair("吴政世", ContextCompat.getColor(this, R.color.colorAccent)),
    Pair("沈亨倬", ContextCompat.getColor(this, R.color.colorPrimaryDark)),
    Pair("吴义植", ContextCompat.getColor(this, R.color.green)),
    Pair("张基龙", ContextCompat.getColor(this, R.color.blue)),
    Pair("黄灿盛", ContextCompat.getColor(this, R.color.yellow)),
    Pair("金希珍", ContextCompat.getColor(this, R.color.orange))
)

Linker.Builder()
    .content(actors)
    .textView(text_view_4_1)
    .colorLinks(actorsRules1)
    .shouldShowUnderLine(false)
    .addOnLinkClickListener(onLinkClickListener)
    .apply()
API
| method | function | must invocation | defaultValue |
|---|---|---|---|
| content | content for TextView | yes | none |
| textview | TextView used for set clickable words | yes | none |
| links | String/Array/List to define clickable words | no | none |
| linkColor | Color for clickable word | no | Color.Black |
| colorLinks | supply a List of Pair,define both word and color | no | null |
| shouldShowUnderLine | whether to show underline for clickable word | no | false |
| addOnLinkClickListener | add a listener will callback once click the link word | no | null |
| setLinkMovementMethod | add a custom LinkMovementMethod | no | internal |
| bold | true means textStyle=»bold» | no | false |
| apply | apply the function | yes | none |
TODO
- different color for links
License
Copyright 2019 REBOOTERS

Licensed under the Apache License, Version 2.0 (the "License");
you may not use this file except in compliance with the License.
You may obtain a copy of the License at

   http://www.apache.org/licenses/LICENSE-2.0

Unless required by applicable law or agreed to in writing, software
distributed under the License is distributed on an "AS IS" BASIS,
WITHOUT WARRANTIES OR CONDITIONS OF ANY KIND, either express or implied.
See the License for the specific language governing permissions and
limitations under the License.