
Create_Excel_File_From_Android_Studio_Kotlin
Writing a excel file form list in android studio using kotlin 2022
Easy Steps
—————Step 1: Download jxl latest version and extract your zip file.———
Firstly you can download the latest version of jxl library and extract it. Copy your JXL jar file and Past it into the Project base libe folder.
[ ]
]
—————Step 2: Add your jar file in your module base Gradle file.————
Add library and sync your project after successfully syncing your project. open your java file. and implement a writable workbook for creating Xls file.
———Step 3:Add this Permission Into your Manifest File.———————————
Code
// code

    <uses-permission android:name="android.permission.WRITE_EXTERNAL_STORAGE" />
    <uses-permission android:name="android.permission.READ_EXTERNAL_STORAGE" />
————Step 4 Now Checkout the MainActivity.kt file.——————
*———Checkout the master branch for all fiules ,You can able to Create Your #Excel File Into Your Device Extralnal or Internal Storage
————Step 5 Dont Forget To Use Permission . Without Permission it will not work ——————
Add Permission
// code

   if (ContextCompat.checkSelfPermission(
                this, Manifest.permission.WRITE_EXTERNAL_STORAGE
            ) !=
            PackageManager.PERMISSION_GRANTED && ContextCompat.checkSelfPermission(
                this, Manifest.permission.READ_EXTERNAL_STORAGE
            ) !=
            PackageManager.PERMISSION_GRANTED
        ) {
            ActivityCompat.requestPermissions(
                this,
                arrayOf(
                    Manifest.permission.WRITE_EXTERNAL_STORAGE,
                    Manifest.permission.READ_EXTERNAL_STORAGE
                ), 101
            )
            return
        }
        isPermissionGranted = true
        setUpClickListener()
Authors
- Vishwanath Gugwad — Application Developer
License
This project is licensed under the MIT License — see the LICENSE.md file for details
Acknowledgments
- For any Query Email Me — vishwanath.gugwad@gmail.com
- Thanks
Содержание
- Creating/Reading an Excel in Android.
- Overview:
- However, we will only cover the following in this article:
- Downloading the JAR file
- Exporting jar as a dependency in Android Studio
- Read & Write Excel in Kotlin | Apache POI
- Excel file with Kotlin | Apache POI
- Apache POI :
- vishwanathgugwad/Create_Excel_File_From_Android_Studio_Kotlin
- Sign In Required
- Launching GitHub Desktop
- Launching GitHub Desktop
- Launching Xcode
- Launching Visual Studio Code
- Latest commit
- Git stats
- Files
- README.md
- About
- A Simple way to work with Excel in Android App
- Part 1- Writing Excel Sheet
- Prerequisites
- Write Excel File
- How to Read Data from Google Spreadsheet in Android?
- What we are going to build in this article?
- Step by Step Implementation
Creating/Reading an Excel in Android.
With the exponential increase in mobile devices, the ease of data accessibility has increased tenfold.
We can see all the data relevant to any domain on the mobile devices, for instance, the annual turnover of an organization, the number of employees who joined last month, etc. However, displaying the data on a mobile application is useful, although it becomes quite useless when we need to share the relevant data with the management or others. It is where exporting of data comes in handy and can be seen in most mobile applications today.
Overview:
We want to create a ‘Contact’ application of our own as shown in the video below.
In this application:
- Initially, we will query the Contacts Content Provider in order to retrieve all the contacts present in the Android device.
- Next, we would export all the contacts into an Excel workbook (.xls format)
- Lastly, we will read data from the previously generated xls workbook and display the results in a recycler-view.
- As a bonus feature, we can also share the excel via the supported applications (eg: Nearby Share, Bluetooth etc.)
You can find the code for this application here .
However, we will only cover the following in this article:
- Downloading the jar file.
- Exporting jar as a dependency in Android Studio.
- Creating an Excel workbook.
- Importing data (Reading) from an Excel workbook.
- Exporting data (Writing) into an Excel Workbook.
By the end of this article, you will be able to generate the below excel workbook:
Without wasting any time further, let us dive into it right away!
Downloading the JAR file
We will be making use of Apache’s POI project in order to achieve our goal. It is completely free and can be downloaded from here.
As per the official documentation:
You can read and write MS Excel files using Java. In addition, you can read and write MS Word and MS PowerPoint files using Java. Apache POI is your Java Excel solution (for Excel 97–2008).
So, not only can we use the POI for generating excel, it can be used for creating MS Word and MS Power point as well. However, it is beyond the scope of this article.
Exporting jar as a dependency in Android Studio
Next, we need to export the JAR as a dependency in Android Studio. I’ve depicted the same in a step-wise manner below:
Источник
Read & Write Excel in Kotlin | Apache POI
Excel file with Kotlin | Apache POI
In every Development environment, data is a mandatory part of their development, we put all your data in your program files. But if any change in data results in the editing of the program file, which makes us recompile the code and retest the compiled code.
If data Changes every day, are we going to edit the program file every day?
What happens if the compilation fails ?
Development should happen in such that data do not have any effect on the program files. Placing data outside the program is the only way to do it, like placing the data on excel files, property files, config file, Json Files, Xml files.
Apache POI :
Apache POI helps Kotlin/Java related technologies to read and write Excel files on different platforms, Using apache poi we can do read and write operation of both xls and xlsx file formats. Apache poi is an open-source tool developed by Apache.
Apache POI will be helpful to modify the large content of data. Below is the step by step process to download Apache poi jar files.
Follow below steps to download Apache Poi:
1. Open https://poi.apache.org/download.html
2. Click Downloads section on right side
3. Click on the poi-bin-#####.zip link under binary distribution section
4. Click on the mirror link, apache would be suggesting the nearest location for your mirror link
5. Your poi files will be started to download
6. Extract the downloaded zip file
7. The extracted folder should contain below files.%3C/li%3E%3Cli%3ESelect%20Modules%20at%20the%20left%20panel%3C/li%3E%3Cli%3EDependencies%20tab%3C/li%3E%3Cli%3E%E2%80%98+%E2%80%99%20%E2%86%92%20JARs%20or%20directories%20and%20add%20all%20jar%20files%20to%20IntelliJ%3C/li%3E%3C/ul%3E%3Ch2%3EApache%20POI%20famous%20Terms%3C/h2%3E%3Cp%3EApache%20POI%20excel%20library%20revolves%20around%20four%20key%20interfaces%20which%20actually%20represent%20the%20items%20in%20the%20excel%20file.%20%3C/p%3E%3Cul%3E%3Cli%3EWorkbook:%20A%20workbook%20represents%20the%20excel%20file%3C/li%3E%3Cli%3ESheet:%20A%20workbook%20may%20contain%20many%20sheets.%20We%20can%20access%20the%20sheets%20either%20with%20a%20name%20or%20with%20index.%3C/li%3E%3Cli%3ERow:%20As%20the%20name%20suggests,%20It%20represents%20a%20row%20in%20the%20sheet.%3C/li%3E%3Cli%3ECell:%20A%20cell%20represents%20a%20column%20in%20the%20sheet.%3C/li%3E%3C/ul%3E%3Ch2%3EWrite%20Excel%20in%20Kotlin%3C/h2%3E%3Cp%3EFor%20writing%20excel%20file%20in%20kotlin%20the%20steps%20are%20simple,%20we%20would%20be%20writing%20an%20xlsx%20file%20in%20this%20example.%20%3C/p%3E%3Cul%3E%3Cli%3ECreate%20an%20Object%20for%20XSSFWorkbook()%20,%20which%20will%20create%20excel%20file%20in%20JVM%3C/li%3E%3Cli%3ECreate%20Sheet%20object%20from%20workbook%20object(xlWb)%20using%20createSheet()%20function%3C/li%3E%3Cli%3ECreate%20a%20row%20from%20the%20Workbook%20sheet%20object(xlWb)%20using%20createRow(rowNumber)%20,%20pass%20the%20which%20row%20number%20you%20want%20to%20create%3C/li%3E%3Cli%3ECreate%20a%20Cell%20inside%20the%20row%20using%20createCell()%20function,%20pass%20the%20cell%20number%20as%20a%20parameter%3C/li%3E%3Cli%3ESet%20the%20value%20of%20the%20cell%20that%20you%20have%20created%20using%20the%20setCellValue(%C2%ABvalue%20to%20set%C2%BB)%20function%3C/li%3E%3Cli%3ENow%20we%20have%20to%20move%20the%20Excel%20file%20created%20inside%20JVM%20into%20local%20file%20system%20using%20FileOutputStream%3C/li%3E%3C/ul%3E%3Ch2%3ERead%20Excel%20in%20Kotlin%3C/h2%3E%3Cul%3E%3Cul%3E%3Cli%3ETo%20read%20any%20file%20we%20have%20to%20bring%20the%20file%20from%20Local%20system%20to%20JVM,%20use%3C/li%3E%3C/ul%3E%3C/li%3E%3C/ul%3E%3Cul%3E%3Cul%3Eobject%20to%20bring%20the%20excel%20file%20into%20JVM%3C/li%3E%3Cli%3ERead%20the%20file%20as%20excel%20file%20using%20the%3C/li%3E%3C/ul%3E%3C/li%3E%3C/ul%3E%3Cp%3EWorkbookFactory.create()%20%3C/p%3E%3Cul%3E%3Cul%3E,%20because%20sometimes%20you%20may%20have%20xlsx%20or%20xls,%20so%20to%20avoid%20issues%20we%20would%20be%20using%20the%20Workbookfactory.Create()%3C/li%3E%3Cli%3EGet%20the%20sheet%20we%20want%20to%20read%20using%3C/li%3E%3C/ul%3E%3C/li%3E%3C/ul%3E%3Cp%3EgetSheetAt(%C2%ABindex/name%C2%BB)%20%3C/p%3E%3Cul%3E%3Cul%3Efunction,%20we%20can%20get%20the%20sheet%20either%20using%20the%20name%20or%20by%20index,%20the%20index%20starts%20from%200%3C/li%3E%3Cli%3EGet%20the%20row%20using%3C/li%3E%3C/ul%3E%3C/li%3E%3C/ul%3E%3Cp%3EgetRow(rowNumber)%20%3C/p%3E%3Cul%3E%3Cul%3Efrom%20the%20sheet%20object%20and%20pass%20the%20row%20number%20you%20want%20to%20read%20s%20parameter%3C/li%3E%3Cli%3EGet%20the%20cell%20number%20from%20the%20row%20using%20the%3C/li%3E%3C/ul%3E%3C/li%3E%3C/ul%3E%3Cp%3EgetCell(columnNumber)%20%3C/p%3E%3Cul%3Efunction%20and%20print%20it%3C/ul%3E%3Cdiv%20style=)
Retrieving Cell values by CellType
We can retrieve cell value using stringCellValue method but it only works for String values. In actual, day to day activities, we may store more types of data in excel sheets like Number, boolean, strings.
We have different properties to retrieve different types of data in apache poi
To retrieve different data, you may check each cell’s type and then retrieve its value using various type-specific methods.
You should understand that below properties will not extract a type of data from the cell when you store a particular data type in the cell then the total cell is of that type
So these properties will fetch total value present in the cell
- booleanCellValue — To fetch boolean data from the excel
- stringCellValue — To fetch String data from the excel
- dateCellValue — fetches date values from the cell
- numericCellValue — fetches numeric value
- cellFormula — fetches the data from the formula cell.
Read all values from a specific Column
We can fetch all the data from a specific column in apache poi, here we should not change the column number. The column is specified by the cell in apache POI. We have our column number ready but we have to get the number of rows present in the excel sheet so that we would know how much we have to iterate.
Using While Loop
I hope you know that the last row number would give us the number of rows present in the excel.
We can get number of rows using the lastRowNumber property from Cell object and we can use the while loop to get all the values
vishwanathgugwad/Create_Excel_File_From_Android_Studio_Kotlin
Use Git or checkout with SVN using the web URL.
Work fast with our official CLI. Learn more.
Sign In Required
Please sign in to use Codespaces.
Launching GitHub Desktop
If nothing happens, download GitHub Desktop and try again.
Launching GitHub Desktop
If nothing happens, download GitHub Desktop and try again.
Launching Xcode
If nothing happens, download Xcode and try again.
Launching Visual Studio Code
Your codespace will open once ready.
There was a problem preparing your codespace, please try again.
Latest commit
Git stats
Files
Failed to load latest commit information.
README.md
Writing a excel file form list in android studio using kotlin 2022
—————Step 1: Download jxl latest version and extract your zip file.———
Firstly you can download the latest version of jxl library and extract it. Copy your JXL jar file and Past it into the Project base libe folder.
—————Step 2: Add your jar file in your module base Gradle file.————
Add library and sync your project after successfully syncing your project. open your java file. and implement a writable workbook for creating Xls file.
———Step 3:Add this Permission Into your Manifest File.———————————
————Step 4 Now Checkout the MainActivity.kt file.——————
*———Checkout the master branch for all fiules ,You can able to Create Your #Excel File Into Your Device Extralnal or Internal Storage
————Step 5 Dont Forget To Use Permission . Without Permission it will not work ——————
- Vishwanath Gugwad — Application Developer
This project is licensed under the MIT License — see the LICENSE.md file for details
- For any Query Email Me — vishwanath.gugwad@gmail.com
- Thanks
About
Writing a excel file form list in android studio using kotlin 2022
Источник
A Simple way to work with Excel in Android App
Part 1- Writing Excel Sheet
So, in today’s article you will learn writing of excel sheet in Android app with a very simple and easy way. To do this, we need to add libraries from Apache POI.
In App level gradle file, add below dependencies.
Prerequisites
Have previous knowledge about:
1- Kotlin
2- Save file in Android
Write Excel File
To create excel file, we first need to create Workbook from XSSFWorkbook and then need to create sheet to add data into it.
You can create multiple sheets in a single workbook by using the createSheet method of workbook.
In the first row of excel sheet, usually people create sheet header. So, below code will help you to create and understand header in excel sheet.
The maximum column width for an individual cell is 255 characters and it’s value in integer cannot be greater than 65280.
In the above code snippet, you can assign any color to the cell background or Foreground. For more details, you can see the implementation of setFillPattern method in CellStyle class. You can also customize the font style of the text of a cell including color.
To add data in the excel sheet, you need to create a row and need to add data to each cell of the row.
Create cell with row and column indexes and add value into it.
Now it’s time to create excel file from workbook in Android Directory.
Hurry!! creating and writing excel file in Android App successfully done.
For reading excel sheets please check Part-2. Next parts of updating excel sheet will be published soon. Please follow for more posts and different solutions to the problems in Android App.
Источник
How to Read Data from Google Spreadsheet in Android?
Many apps have to display statistical data inside their applications and they stores all their data in the excel file or a spreadsheet. But it is not every time possible to add the whole data in the database to use inside our app. In this article, we will take a look at reading this data from our Excel sheet in Android App in Android Studio.
What we are going to build in this article?
We will be building a simple application in which we will be displaying data from our excel sheet which we have already created and we will read the entries from that excel sheet and display that list of data in our recycler view. A sample video is given below to get an idea about what we are going to do in this article. Note that we are going to implement this project using the Java language.
Step by Step Implementation
Step 1: Create a New Project
To create a new project in Android Studio please refer to How to Create/Start a New Project in Android Studio. Note that select Java as the programming language.
Step 2: Add the below dependency in your build.gradle file
Below is the dependency for Volley which we will be using to get the data from API. For adding this dependency navigate to the app > Gradle Scripts > build.gradle(app) and add the below dependency in the dependencies section.
// below line is use for image loading library
Источник
Table of content
- Excel file with Kotlin | Apache POI
- Apache POI famous Terms
- Write Excel in Kotlin
- Read Excel in Kotlin
- Retrieving Cell values by CellType
- Read all values from a specific Column
In every Development environment, data is a mandatory part of their development, we put all your data in your program files. But if any change in data results in the editing of the program file, which makes us recompile the code and retest the compiled code.
If data Changes every day, are we going to edit the program file every day?
What happens if the compilation fails ?
Development should happen in such that data do not have any effect on the program files. Placing data outside the program is the only way to do it, like placing the data on excel files, property files, config file, Json Files, Xml files.
Apache POI :
Apache POI helps Kotlin/Java related technologies to read and write Excel files on different platforms, Using apache poi we can do read and write operation of both xls and xlsx file formats. Apache poi is an open-source tool developed by Apache.
Apache POI will be helpful to modify the large content of data. Below is the step by step process to download Apache poi jar files.
Follow below steps to download Apache Poi:
1. Open https://poi.apache.org/download.html
2. Click Downloads section on right side
3. Click on the poi-bin-#####.zip link under binary distribution section
4. Click on the mirror link, apache would be suggesting the nearest location for your mirror link
5. Your poi files will be started to download
6. Extract the downloaded zip file
7. The extracted folder should contain below files.
Steps for adding Apache POI jars in IntelliJ IDEA:
- Click File from the toolbar
- Project Structure (CTRL + SHIFT + ALT + S on Windows/Linux)
- Select Modules at the left panel
- Dependencies tab
- ‘+’ → JARs or directories and add all jar files to IntelliJ
Apache Commons CSV Integration
Apache POI excel library revolves around four key interfaces which actually represent the items in the excel file.
- Workbook: A workbook represents the excel file
- Sheet: A workbook may contain many sheets. We can access the sheets either with a name or with index.
- Row: As the name suggests, It represents a row in the sheet.
- Cell: A cell represents a column in the sheet.
For writing excel file in kotlin the steps are simple, we would be writing an xlsx file in this example.
- Create an Object for XSSFWorkbook(), which will create excel file in JVM
- Create Sheet object from workbook object(xlWb) using createSheet() function
- Create a row from the Workbook sheet object(xlWb) using createRow(rowNumber), pass the which row number you want to create
- Create a Cell inside the row using createCell() function, pass the cell number as a parameter
- Set the value of the cell that you have created using the setCellValue(«value to set») function
- Now we have to move the Excel file created inside JVM into local file system using FileOutputStream
fun main(args: Array<String>) {
    val filepath = "./test_file.xlsx"
    //Instantiate Excel workbook:
    val xlWb = XSSFWorkbook()
    //Instantiate Excel worksheet:
    val xlWs = xlWb.createSheet()
    //Row index specifies the row in the worksheet (starting at 0):
    val rowNumber = 0
    //Cell index specifies the column within the chosen row (starting at 0):
    val columnNumber = 0
    //Write text value to cell located at ROW_NUMBER / COLUMN_NUMBER:
    val xlRow = xlWs.createRow(rowNumber)
    val xlCol = xlRow.createCell(columnNumber)
    xlCol.setCellValue("Chercher Tech")
    //Write file:
    val outputStream = FileOutputStream(filepath)
    xlWb.write(outputStream)
    xlWb.close()
}
Write Properties File
- <li»>To read any file we have to bring the file from Local system to JVM, use
FileInputStream()
- object to bring the excel file into JVM <li»>Read the file as excel file using the
WorkbookFactory.create()
- , because sometimes you may have xlsx or xls, so to avoid issues we would be using the Workbookfactory.Create() <li»>Get the sheet we want to read using
getSheetAt(«index/name»)
- function, we can get the sheet either using the name or by index, the index starts from 0 <li»>Get the row using
getRow(rowNumber)
- from the sheet object and pass the row number you want to read s parameter <li»>Get the cell number from the row using the
getCell(columnNumber)
- function and print it
fun main(args: Array<String>) {
    val filepath = "./test_file.xlsx"
    val inputStream = FileInputStream(filepath)
    //Instantiate Excel workbook using existing file:
    var xlWb = WorkbookFactory.create(inputStream)
    //Row index specifies the row in the worksheet (starting at 0):
    val rowNumber = 0
    //Cell index specifies the column within the chosen row (starting at 0):
    val columnNumber = 0
    //Get reference to first sheet:
    val xlWs = xlWb.getSheetAt(0)
    println(xlWs.getRow(rowNumber).getCell(columnNumber))
}
KProperty in kotlin
We can retrieve cell value using stringCellValue method but it only works for String values. In actual, day to day activities, we may store more types of data in excel sheets like Number, boolean, strings.
We have different properties to retrieve different types of data in apache poi
To retrieve different data, you may check each cell’s type and then retrieve its value using various type-specific methods.
You should understand that below properties will not extract a type of data from the cell when you store a particular data type in the cell then the total cell is of that type
So these properties will fetch total value present in the cell
- booleanCellValue — To fetch boolean data from the excel
- stringCellValue — To fetch String data from the excel
- dateCellValue — fetches date values from the cell
- numericCellValue — fetches numeric value
- cellFormula — fetches the data from the formula cell.
fun main(args: Array<String>) {
    val filepath = "./test_file.xlsx"
    val inputStream = FileInputStream(filepath)
    //Instantiate Excel workbook using existing file:
    var xlWb = WorkbookFactory.create(inputStream)
    //Row index specifies the row in the worksheet (starting at 0):
    val rowNumber = 0
    //Cell index specifies the column within the chosen row (starting at 0):
    val columnNumber = 0
    //Get reference to first sheet:
    val xlWs = xlWb.getSheetAt(0)
    var cell = xlWs.getRow(rowNumber).getCell(columnNumber)
    when (cell.getCellTypeEnum()) {
        CellType.BOOLEAN -> println("Boolean value found : "+cell.booleanCellValue)
        CellType.STRING -> println("String value found : "+cell.stringCellValue)
        CellType.NUMERIC -> if (DateUtil.isCellDateFormatted(cell)) {
            println("Date value found : "+cell.dateCellValue)
            } else {
            println("Numeric value found : "+cell.numericCellValue)
            }
        CellType.FORMULA -> println("Formula value found : "+cell.getCellFormula())
        else -> print("")
    }
}
Append content in kotlin
We can fetch all the data from a specific column in apache poi, here we should not change the column number. The column is specified by the cell in apache POI. We have our column number ready but we have to get the number of rows present in the excel sheet so that we would know how much we have to iterate.
For going through every row in the excel sheet we have to create rowIterator() for the excel sheet
We have all rows now, let’s get the data based on the cell/Column number. In ‘E’ column I have store months, let’s retrieve it. E column would have an index number as 4.
fun main(args: Array) {
    val filepath = "./test_file.xlsx"
    val inputStream = FileInputStream(filepath)
    //Instantiate Excel workbook using existing file:
    var xlWb = WorkbookFactory.create(inputStream)
    //Row index specifies the row in the worksheet (starting at 0):
    val rowNumber = 0
    //Cell index specifies the column within the chosen row (starting at 0):
    val columnNumber = 0
    //Get reference to first sheet:
    val xlWs = xlWb.getSheetAt(0)
    val xlRows = xlWs.rowIterator()
	// go row by row to get the values and print them
    xlRows.forEach { row -> println(row.getCell(4))}
}
Using While Loop
I hope you know that the last row number would give us the number of rows present in the excel.
We can get number of rows using the lastRowNumber property from Cell object and we can use the while loop to get all the values
fun main(args: Array) {
    val filepath = "./test_file.xlsx"
    val inputStream = FileInputStream(filepath)
    //Instantiate Excel workbook using existing file:
    var xlWb = WorkbookFactory.create(inputStream)
    //Row index specifies the row in the worksheet (starting at 0):
    val rowNumber = 0
    //Cell index specifies the column within the chosen row (starting at 0):
    val columnNumber = 0
    //Get reference to first sheet:
    val xlWs = xlWb.getSheetAt(0)
    val xlRows = xlWs.lastRowNum
    var i=0;
    while (i<= xlRows){
        println(xlWs.getRow(i).getCell(4))
        i++
    }
}
0 results
Over the past few years, Kotlin is gaining popularity over Java as an alternative language, being as versatile as it’s predecessor. A statically-typed programming language running on the Java Virtual Machine (JVM), Kotlin combines both object- oriented and functional programming styles, solving some of the flaws in Java, and is proving to be the most preferred language for Android development.
The main reason to use Kotlin is because it is compatible with Java. All libraries/frameworks from Java can be used in Kotlin, including advanced frameworks. No major steps (like converting projects are required), so one does not have to learn a new language.
Last year, we released GrapeCity Documents for Excel — Java Edition (GcExcel). The library is a high-speed, feature-rich Excel document API based on VSTO that helps to generate, convert, calculate, format, and parse spreadsheets in any application. The feature set helps you work with a variety of features like importing spreadsheets, calculate data, query, generate, and export any spreadsheet, add sorting, filtering, formatting, conditional formatting and validate data, add grouping, sparklines, charts, shapes, pictures, slicers, comments, hyperlinks, and themes.
In addition, you can import existing Excel templates, add data and save the spreadsheets back. You can also use GrapeCity Documents for Excel together with Spread.Sheets, another Spread product that is included in GrapeCity SpreadJS.
Being a Java API, GcExcel is fully compatible with Kotlin. See GcExcel sample browser to view samples running with Kotlin.
This guide will help you get started with GcExcel and Kotlin.
Getting started with GcExcel and Kotlin
Step 1:
Open IntelliJ IDE.
Step 2:
Create new project.
Step 3:
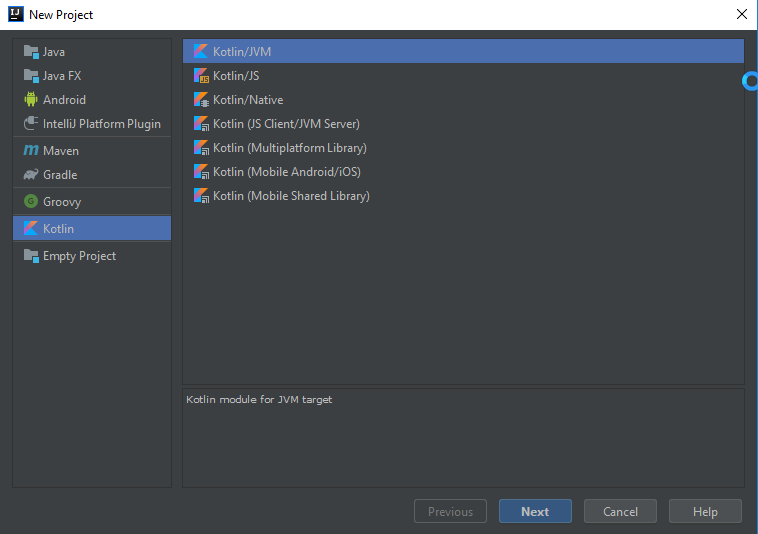
In the left pane, choose ‘Kotlin’ and in the right pane that opens, choose ‘Kotlin/JVM.’
Click Next.
Step 4:
Give title to the project and click ‘Finish.’
Step 5:
In the ‘src’ folder, create ‘libs’ folder and place gcexcel-2.2.0.jar in it.
Step 6:
Right-click ‘libs’ in the IDE and choose ‘Add as library.’
Step 7:
In ‘src’ folder, right-click and add new Kotlin class file, name it ‘Main.kt’.
Step 8:
Type following code in Main.kt:
a. Import necessary packages:
package com.grapecity

import com.grapecity.documents.excel.*
import com.grapecity.documents.excel.drawing.*
import com.grapecity.documents.excel.IWorksheet
import com.grapecity.documents.excel.Workbook
b. Create the main function, add code to generate the workbook and add data to it:
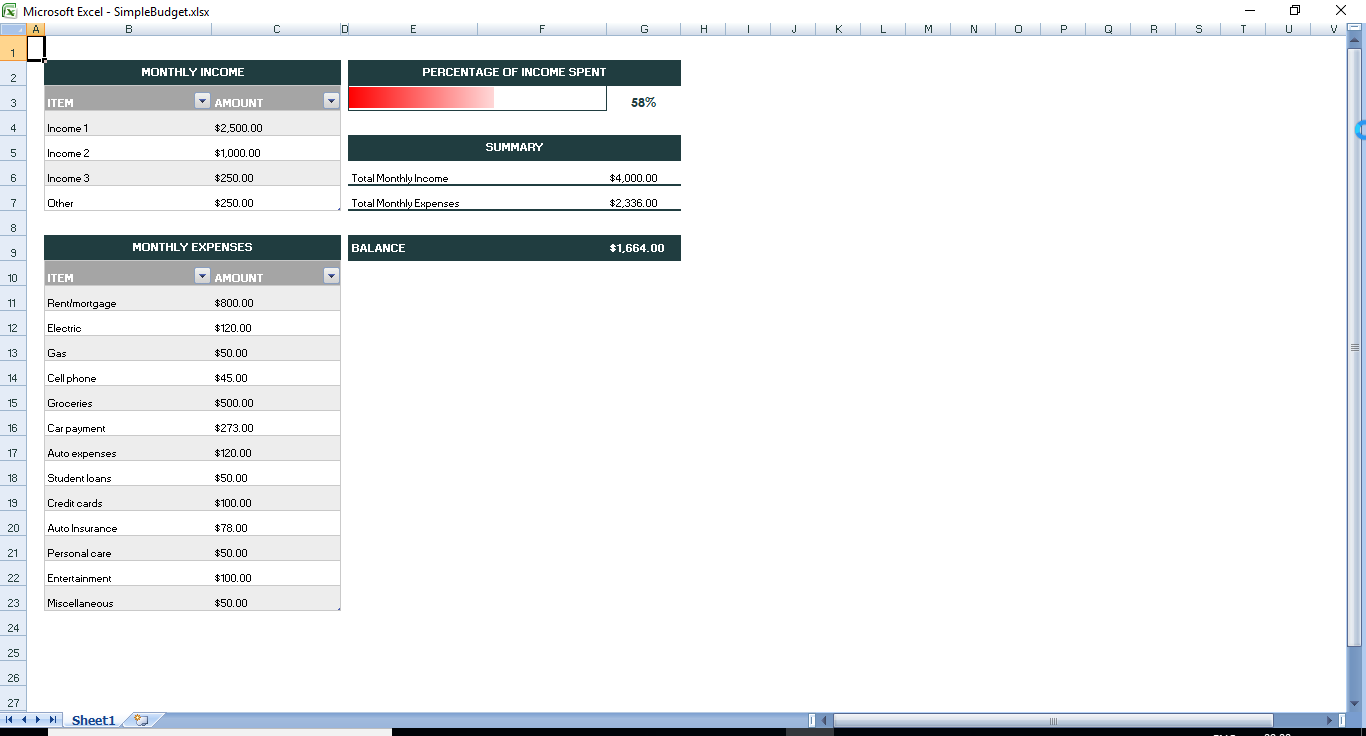
fun main(args: Array<String>?) {
   val workbook = Workbook()
val worksheet = workbook.worksheets.get(0)

worksheet.getRange("B3:C7").value =
    arrayOf(
        arrayOf<Any>("ITEM", "AMOUNT"),
        arrayOf("Income 1", 2500),
        arrayOf("Income 2", 1000),
        arrayOf("Income 3", 250),
        arrayOf("Other", 250)
    )
worksheet.getRange("B10:C23").value =
    arrayOf(
        arrayOf<Any>("ITEM", "AMOUNT"),
        arrayOf("Rent/mortgage", 800),
        arrayOf("Electric", 120),
        arrayOf("Gas", 50),
        arrayOf("Cell phone", 45),
        arrayOf("Groceries", 500),
        arrayOf("Car payment", 273),
        arrayOf("Auto expenses", 120),
        arrayOf("Student loans", 50),
        arrayOf("Credit cards", 100),
        arrayOf("Auto Insurance", 78),
        arrayOf("Personal care", 50),
        arrayOf("Entertainment", 100),
        arrayOf("Miscellaneous", 50)
    )

worksheet.getRange("B2:C2").merge()
worksheet.getRange("B2").value = "MONTHLY INCOME"
worksheet.getRange("B9:C9").merge()
worksheet.getRange("B9").value = "MONTHLY EXPENSES"
worksheet.getRange("E2:G2").merge()
worksheet.getRange("E2").value = "PERCENTAGE OF INCOME SPENT"
worksheet.getRange("E5:G5").merge()
worksheet.getRange("E5").value = "SUMMARY"
worksheet.getRange("E3:F3").merge()
worksheet.getRange("E9").value = "BALANCE"
worksheet.getRange("E6").value = "Total Monthly Income"
worksheet.getRange("E7").value = "Total Monthly Expenses"

val incomeTable = worksheet.getTables().add(worksheet.getRange("B3:C7"), true)
incomeTable.setName("tblIncome")
incomeTable.setTableStyle(workbook.getTableStyles().get("TableStyleMedium4"))
val expensesTable = worksheet.getTables().add(worksheet.getRange("B10:C23"), true)
expensesTable.setName("tblExpenses")
expensesTable.setTableStyle(workbook.getTableStyles().get("TableStyleMedium4"))

worksheet.getNames().add("TotalMonthlyIncome", "=SUM(tblIncome[AMOUNT])")
worksheet.getNames().add("TotalMonthlyExpenses", "=SUM(tblExpenses[AMOUNT])")
worksheet.getRange("E3").setFormula("=TotalMonthlyExpenses")
worksheet.getRange("G3").setFormula("=TotalMonthlyExpenses/TotalMonthlyIncome")
worksheet.getRange("G6").setFormula("=TotalMonthlyIncome")
worksheet.getRange("G7").setFormula("=TotalMonthlyExpenses")
worksheet.getRange("G9").setFormula("=TotalMonthlyIncome-TotalMonthlyExpenses")

worksheet.setStandardHeight(26.25)
worksheet.setStandardWidth(8.43)

worksheet.getRange("2:24").setRowHeight(27.0)
worksheet.getRange("A:A").setColumnWidth(2.855)
worksheet.getRange("B:B").setColumnWidth(33.285)
worksheet.getRange("C:C").setColumnWidth(25.57)
worksheet.getRange("D:D").setColumnWidth(1.0)
worksheet.getRange("E:F").setColumnWidth(25.57)
worksheet.getRange("G:G").setColumnWidth(14.285)

val currencyStyle = workbook.getStyles().get("Currency")
currencyStyle.setIncludeAlignment(true)
currencyStyle.setHorizontalAlignment(HorizontalAlignment.Left)
currencyStyle.setVerticalAlignment(VerticalAlignment.Bottom)
currencyStyle.setNumberFormat("$#,##0.00")
val heading1Style = workbook.getStyles().get("Heading 1")
heading1Style.setIncludeAlignment(true)
heading1Style.setHorizontalAlignment(HorizontalAlignment.Center)
heading1Style.setVerticalAlignment(VerticalAlignment.Center)
heading1Style.getFont().setName("Century Gothic")
heading1Style.getFont().setBold(true)
heading1Style.getFont().setSize(11.0)
heading1Style.getFont().setColor(Color.GetWhite())
heading1Style.setIncludeBorder(false)
heading1Style.setIncludePatterns(true)
heading1Style.getInterior().setColor(Color.FromArgb(32, 61, 64))
val percentStyle = workbook.getStyles().get("Percent")
percentStyle.setIncludeAlignment(true)
percentStyle.setHorizontalAlignment(HorizontalAlignment.Center)
percentStyle.setIncludeFont(true)
percentStyle.getFont().setColor(Color.FromArgb(32, 61, 64))
percentStyle.getFont().setName("Century Gothic")
percentStyle.getFont().setBold(true)
percentStyle.getFont().setSize(14.0)
worksheet.getSheetView().setDisplayGridlines(false)
worksheet.getRange("C4:C7, C11:C23, G6:G7, G9").setStyle(currencyStyle)
worksheet.getRange("B2, B9, E2, E5").setStyle(heading1Style)
worksheet.getRange("G3").setStyle(percentStyle)
worksheet.getRange("E6:G6").getBorders().get(BordersIndex.EdgeBottom).setLineStyle(BorderLineStyle.Medium)
worksheet.getRange("E6:G6").getBorders().get(BordersIndex.EdgeBottom).setColor(Color.FromArgb(32, 61, 64))
worksheet.getRange("E7:G7").getBorders().get(BordersIndex.EdgeBottom).setLineStyle(BorderLineStyle.Medium)
worksheet.getRange("E7:G7").getBorders().get(BordersIndex.EdgeBottom).setColor(Color.FromArgb(32, 61, 64))
worksheet.getRange("E9:G9").getInterior().setColor(Color.FromArgb(32, 61, 64))
worksheet.getRange("E9:G9").setHorizontalAlignment(HorizontalAlignment.Left)
worksheet.getRange("E9:G9").setVerticalAlignment(VerticalAlignment.Center)
worksheet.getRange("E9:G9").getFont().setName("Century Gothic")
worksheet.getRange("E9:G9").getFont().setBold(true)
worksheet.getRange("E9:G9").getFont().setSize(11.0)
worksheet.getRange("E9:G9").getFont().setColor(Color.GetWhite())
worksheet.getRange("E3:F3").getBorders().setColor(Color.FromArgb(32, 61, 64))

workbook.save("SimpleBudget.xlsx")
}
Step 9:
Run the project.
You have generated an Excel file with Kotlin.
More about GcExcel on Kotlin
To view more demos of GcExcel features with Kotlin, refer to the GcExcel Java sample browser.
Download the sample
import android.os.Bundle;
import android.view.View;
import android.widget.ProgressBar;
import android.widget.Toast;
import androidx.appcompat.app.AppCompatActivity;
import androidx.core.widget.NestedScrollView;
import androidx.recyclerview.widget.LinearLayoutManager;
import androidx.recyclerview.widget.RecyclerView;
import com.android.volley.Request;
import com.android.volley.RequestQueue;
import com.android.volley.Response;
import com.android.volley.VolleyError;
import com.android.volley.toolbox.JsonObjectRequest;
import com.android.volley.toolbox.Volley;
import org.json.JSONArray;
import org.json.JSONException;
import org.json.JSONObject;
import java.util.ArrayList;
public class MainActivity extends AppCompatActivity {
private ArrayList<UserModal> userModalArrayList;
private UserRVAdapter userRVAdapter;
private RecyclerView userRV;
private ProgressBar loadingPB;
@Override
protected void onCreate(Bundle savedInstanceState) {
super.onCreate(savedInstanceState);
setContentView(R.layout.activity_main);
userModalArrayList = new ArrayList<>();
userRV = findViewById(R.id.idRVUsers);
loadingPB = findViewById(R.id.idPBLoading);
getDataFromAPI();
}
private void getDataFromAPI() {
RequestQueue queue = Volley.newRequestQueue(MainActivity.this);
JsonObjectRequest jsonObjectRequest = new JsonObjectRequest(Request.Method.GET, url, null, new Response.Listener<JSONObject>() {
@Override
public void onResponse(JSONObject response) {
loadingPB.setVisibility(View.GONE);
try {
JSONObject feedObj = response.getJSONObject("feed");
JSONArray entryArray = feedObj.getJSONArray("entry");
for(int i=0; i<entryArray.length(); i++){
JSONObject entryObj = entryArray.getJSONObject(i);
String firstName = entryObj.getJSONObject("gsx$firstname").getString("$t");
String lastName = entryObj.getJSONObject("gsx$lastname").getString("$t");
String email = entryObj.getJSONObject("gsx$email").getString("$t");
String avatar = entryObj.getJSONObject("gsx$avatar").getString("$t");
userModalArrayList.add(new UserModal(firstName, lastName, email, avatar));
userRVAdapter = new UserRVAdapter(userModalArrayList, MainActivity.this);
userRV.setLayoutManager(new LinearLayoutManager(MainActivity.this));
userRV.setAdapter(userRVAdapter);
}
} catch (JSONException e) {
e.printStackTrace();
}
}
}, new Response.ErrorListener() {
@Override
public void onErrorResponse(VolleyError error) {
Toast.makeText(MainActivity.this, "Fail to get data..", Toast.LENGTH_SHORT).show();
}
});
queue.add(jsonObjectRequest);
}
}