
HTTA is reader supported. When you buy through links on our site, we may earn an affiliate commission at no extra cost to you. Learn more.
In today’s article, you’ll learn how to use some keyboard shortcuts and other methods to type or insert the Logical Or Symbol (text) in MS Word for Windows.
Just before we begin, I’ll like to tell you that you can also use the button below to copy and paste the Logical Or symbol text into your work for free.
However, if you just want to type this symbol on your keyboard, the actionable steps below will show you everything you need to know.
Logical Or Symbol [∨] Quick Guide
To type the Logical Or Symbol on Word for Windows, simply press down the Alt key and type 8744 using the numeric keypad, then let go of the Alt key. This shortcut works only on MS Word.
The below table contains all the information you need to type this Symbol on the keyboard on Word for Windows PC.
| Name | Logical Or Sign |
| Symbol | ∨ |
| Alt Code | 8744 |
| Shortcut (Word) | Alt+8744 |

The quick guide above provides some useful shortcuts and alt codes on how to type the Logical Or symbol in Word on Windows.
For more details, below are some other methods you can also use to insert this symbol into your work such as Word or Excel document.
Microsoft Office provides several methods for typing Logical Or Symbol or inserting symbols that do not have dedicated keys on the keyboard.
In this section, I will make available for you several different methods you can use to type or insert this and any other symbol on your PC, like in MS Word for Windows.
Without any further ado, let’s get started.
See Also: How to type Nabla Symbol in Word
Using the Logical Or Symbol Alt Code (Windows Only)
The Logical Or Symbol alt code is 8744.
Even though this Symbol has no dedicated key on the keyboard, you can still type it on the keyboard with the Alt code method. To do this, press and hold the Alt key whilst pressing the Logical Or Alt code (i.e. 8744) using the numeric keypad.
This method works on Windows only. And your keyboard must also have a numeric keypad.
Below is a break-down of the steps you can take to type the Logical Or Sign on your Windows PC:
- Place your insertion pointer where you need the Logical Or Symbol text.
- Press and hold one of the Alt keys on your keyboard.
- Whilst holding on to the Alt key, press the Logical Or Symbol’s alt code (8744). You must use the numeric keypad to type the alt code. If you are using a laptop without the numeric keypad, this method may not work for you. On some laptops, there’s a hidden numeric keypad which you can enable by pressing Fn+NmLk on the keyboard.
- Release the Alt key after typing the Alt code to insert the Symbol into your document.
This is how you may type this symbol in Word using the Alt Code method.
Copy and Paste Logical Or Sign ∨ (text)
Another easy way to get the Logical Or Symbol on any PC is to use my favorite method: copy and paste.
All you have to do is to copy the symbol from somewhere like a web page, or the character map for windows users, and head over to where you need the symbol (say in Word or Excel), then hit Ctrl+V to paste.
Below is the symbol for you to copy and paste into your Word document. Just select it and press Ctrl+C to copy, switch over to Microsoft Word, place your insertion pointer at the desired location, and press Ctrl+V to paste.
∨
Alternatively, just use the copy button at the beginning of this post.
Using insert Symbol dialog box (Word, Excel, PowerPoint)
The insert symbol dialog box is a library of symbols from where you can insert any symbol into your Word document with just a couple of mouse clicks.
Obey the following steps to insert this symbol (∨) in Word or Excel using the insert symbol dialog box.
- Open your Word/Excel/PowerPoint document.
- Click to place the insertion pointer where you wish to insert the symbol.
- Go to the Insert tab.

- In the Symbols category, click on the Symbol drop-down and select the More Symbols button.

The Symbol dialog box will appear.
- To easily locate the Logical Or symbol, type 2228 in the character code field at the bottom of the window. After typing this character code, the Logical Or symbol will appear selected.
- Now click on the Insert button to insert the symbol into your document.

- Close the dialog.
The symbol will then be inserted exactly where you placed the insertion pointer.
These are the steps you may use to insert this Symbol in Word.
Conclusion
As you can see, there are several different methods you can use to type the Logical Or Sign in Microsoft Word.
Using the alt code shortcut for Word makes the fastest option for this task. Shortcuts are always fast.
Thank you very much for reading this blog.
If you have anything thing to say or questions to ask concerning the Logical Or Symbol, please drop it in the comments.
Логические операторы это специальные символы (или сочетания символов), которые изменяют или комбинируют логические значения типа Boolean — true и false. Их используют чтобы создавать сложные условия, например в циклах.
Логические операторы
Оператор НЕ (!, not)
Выражение вида !true равно false и наоборот. ! — унарный оператор (применяется к одному операнду), он помещается перед операндом.
Оператор И (&&, and)
Выражение вида a && b будет равно true только тогда, когда и а и b равны true.
Оператор ИЛИ (||, or)
Выражение a || b будет равно true, когда или a, или b (или оба) равен true.
Оператор исключающее ИЛИ (^, xor)
Выражение a ^ b будет равно true, когда только один из операндов имеет значение true. Подробно о применении xor рассказывается в статье «Практика применения XOR в программировании»
Оператор эквивалентности ==
Выражение a == b будет равно true, когда a и b имеют одинаковые значения.
Оператор неравенства !=
Выражение a != b будет равно true, когда a и b имеют разные значения.

Приоритет логических операторов
- Оператор эквивалентности — ==, оператор неравенства — !=.
- Оператор отрицания — !.
- Оператор И — &&.
- Оператор исключающее ИЛИ — ^.
- Оператор ИЛИ — ||.
Предлагаем вам пройти тест и узнать, насколько хорошо вы разобрались с логическими операторами:

Published on
May 2, 2022
by
Eoghan Ryan.
Revised on
November 4, 2022.
Boolean operators are words and symbols, such as AND or NOT, that let you expand or narrow your search parameters when using a database or search engine. When you search using these operators, it is known as a Boolean search.
You can use Boolean operators such as AND, OR, and NOT alongside keywords to create a Boolean string that will refine your search to find the most relevant results and sources.

How to use Boolean operators
Knowing how to use Boolean operators effectively can save you a lot of time and help you to find useful sources, determine the relevance of your research topic, and create strong research questions. It’s also very helpful when you’re working on a literature review or systematic review.
| Boolean operator | Function | Example |
|---|---|---|
| AND | Provides results that contain both or all keywords | paradigm AND syntagm |
| OR | Provides results that contain either keyword | meteor OR meteorite |
| NOT or AND NOT | Provides results that contain the first keyword but not the second | football NOT soccer |
| Quotation marks “” | Provides results with the exact phrase | “Newtonian mechanics” |
| Parentheses () | Allows you to group together keywords and control the order in which the terms will be searched | (rural OR urban) AND sociology |
| Asterisk * | Provides results that contain a variation of the keyword | Develop*
This will return results containing words such as “development,” “developer,” and “developing.” |
AND
AND will provide search results containing both or all of your keywords.
Use this when you want results that contain two or more specific keywords.
OR
OR will provide search results containing at least one of your keywords.
Use this when you want results that contain at least one (though not necessarily both) of your chosen keywords.
NOT
NOT will provide search results containing the first of your keywords but not the second. Make sure to put your keywords in the correct order when using NOT, as the search results provided will exclude the latter keyword.
Use this when you want results that contain one specific keyword but not another.
Parentheses: ()
Parentheses allow you to group together keywords and control the order in which the terms will be searched, just like in a mathematical statement. Keywords and Boolean operators within parentheses will be searched first, followed by keywords outside parentheses.
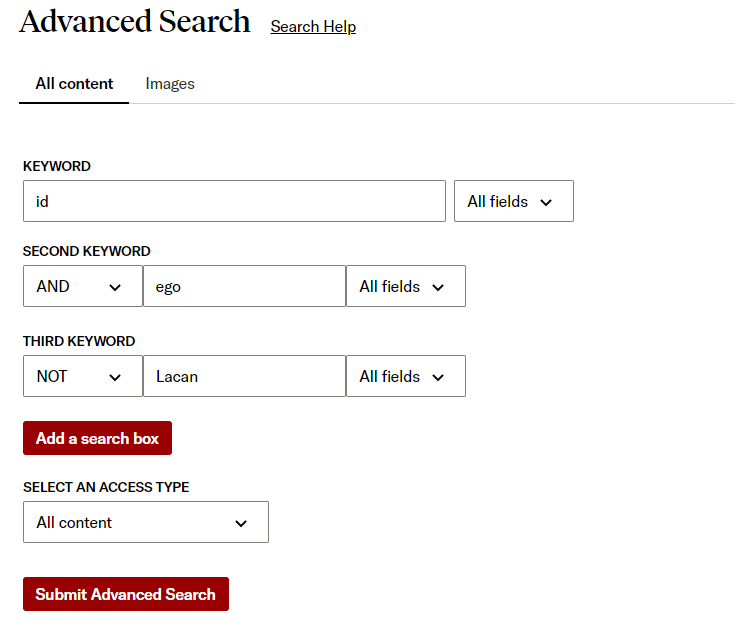
For example, the combination shown below will provide results that are initially filtered to contain at least one of “id” or “ego,” and then further refined to also include “developmental.”
You can also use more than one pair of parentheses. The search will filter results based on the innermost parenthetical keywords first, followed by the keywords in outer parentheses, and finally the keyword(s) outside parentheses.
Quotation marks: “”
Quotation marks will provide search results containing the exact keyword(s) contained within.
Use this when you want results that contain a precise keyword or keywords.
Asterisk: *
An asterisk will provide search results containing variations of a root word.
Use this when you want results that contain the keyword that you entered or other words that begin with those letters.
This will provide results including variations of the chosen word such as “formal” and “formation.”
Each database or search engine may use Boolean operators in slightly different ways. Therefore, it is important to check how Boolean operators work in the particular database or search engine you’re using.
Note: Many databases and search engines also offer an “advanced search” option that lets you choose the most relevant Boolean operators from a drop-down list, like in the example from JSTOR below.
Proximity operators
Proximity operators are similar to Boolean operators. They let you filter results based on the proximity of one keyword to another.
Proximity operators include NEAR (Nx), WITHIN (Wx), and SENTENCE.
| Proximity operator | Function | Example |
|---|---|---|
| NEAR (Nx) | Provides results that contain your chosen keywords within x words of each other, regardless of the order they occur in | Solar N5 energy will provide results in which “energy” appears within five words of the word “solar.” This will include results such as “solar energy,” and “energy produced by solar panels.” |
| WITHIN (Wx) | Provides results that contain your chosen keywords within x words of each other in the order you entered them | Solar W5 energy will provide results in which “energy” appears within five words of the word “solar” but will exclude results in which the order is reversed, such as “energy produced by solar panels.” |
| SENTENCE | Provides results in which two or more keywords occur in the same sentence | Learning SENTENCE environment will provide results in which “learning” and “environment” appear in the same sentence, such as “a supportive environment is essential to the learning process.” |
Note: Not all databases use proximity operators. Be sure to check the search operations of the database you are using.
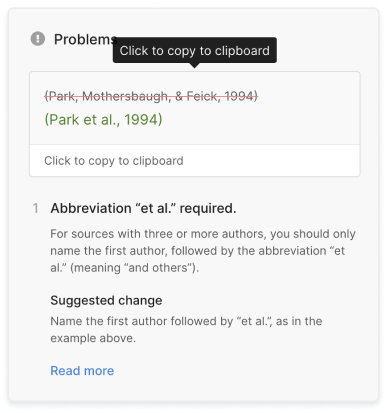
Scribbr Citation CheckerNew
![]()


The AI-powered Citation Checker helps you avoid common mistakes such as:
- Missing commas and periods
- Incorrect usage of “et al.”
- Ampersands (&) in narrative citations
- Missing reference entries
Learn more
Frequently asked questions about Boolean operators
-
What is a Boolean search?
-
A Boolean search uses specific words and symbols known as Boolean operators (e.g., AND, OR) alongside keywords to limit or expand search results. Boolean searches allow you to:
- Prioritize keywords
- Exclude keywords
- Search exact keywords
- Search variations of your keywords
-
What are Boolean operators and how do I use them?
-
Boolean operators are specific words and symbols that you can use to expand or narrow your search parameters when using a database or search engine.
The most common Boolean operators are AND, OR, NOT or AND NOT, quotation marks “”, parentheses (), and asterisks *.
Each Boolean operator has a unique function. For example, the Boolean operator AND will provide search results containing both/all of your keywords.
-
What are proximity operators and how do I use them?
-
Proximity operators are specific words used alongside your chosen keywords that let you specify the proximity of one keyword in relation to another.
The most common proximity operators include NEAR (Nx), WITHIN (Wx), and SENTENCE.
Each proximity operator has a unique function. For example, Nx allows you to find sources that contain the specified keywords within a set number of words (x) of each other.
-
How do I search research databases efficiently?
-
When searching for sources in databases, think of specific keywords that are relevant to your topic, and consider variations on them or synonyms that might be relevant.
Once you have a clear idea of your research parameters and key terms, choose a database that is relevant to your research (e.g., Medline, JSTOR, Project MUSE).
Find out if the database has a “subject search” option. This can help to refine your search. Use Boolean operators to combine your keywords, exclude specific search terms, and search exact phrases to find the most relevant sources.
Cite this Scribbr article
If you want to cite this source, you can copy and paste the citation or click the “Cite this Scribbr article” button to automatically add the citation to our free Citation Generator.
Ryan, E.
(2022, November 04). Boolean Operators | Quick Guide, Examples & Tips. Scribbr.
Retrieved April 12, 2023,
from https://www.scribbr.com/working-with-sources/boolean-operators/
Is this article helpful?
You have already voted. Thanks 
Your vote is saved
Processing your vote…
Is there a way to create a rule that looks for certain words in the message body and only if it finds all these words in the message it will apply a certain action?
Right now, when using the «with specific words» condition it behaves like an OR operatator.
If these words are always next to each other, then you can simply add that single phrase to the “specific words” list.
If these words are not always next to each other, then there is no way in Outlook to do this with a single rule but you can achieve this by creating 2 (or more, depending on the amount of words that you want to check on) rules.
Workaround via Categories
The workaround makes use of assigning a category if the first word is found and have a second rule look for another word and the category assigned by the first rule. The second rule can then perform the action if both words are found or add yet another category if you want to check for a 3rd word.
First rule
This example will look for the words “food” and “evening” and only when it finds both words will the message be moved to the “dinner” folder.
- Open the Rules and Alerts dialog;
- Outlook 2003 and Outlook 2007
Tools-> Rules and Alerts… - Outlook 2010
File-> Manage Rules & Alerts
- Outlook 2003 and Outlook 2007
- Press the New Rule… button.
- Start with a blank rule;
- Outlook 2003
Select the option “Start from a blank rule” and then select “Check messages when they arrive” and press the Next button. - Outlook 2007 and Outlook 2010
Select: “Check messages when they arrive” and press the Next button.
- Outlook 2003
- Select “with specific words in the body”.
- Click the “specific words” link at the bottom to open the “Search Text” dialog.
- Here type; food
- Press the Add button and OK.
- Click Next.
- Select: “assign it to the category category”.
- Click the “category” link at the bottom to open the Categories dialog.
- Here we will create a unique category for the rule to be used. I recommend that you name it something that starts with “Rule” to indicate where you used it for and then add the name of the rule such as “Dinner — search word food” so the entire category would be named;
Rule — Dinner — search word food- Outlook 2007 and Outlook 2010
Click New… to name the category and assign it a different color if you want. - Outlook 2003
Type the category name and press the Add to List button.
- Outlook 2007 and Outlook 2010
- Click OK to close the Categories dialog.
- Click Next and then Next again to go to the dialog where you can name the rule.
- Name the rule “Dinner – search word food” as indicated above and click Finish.
The entire rule will read like this;
Apply this rule after the message arrives
with food in the body
assign it to the Rule — Dinner — search word food category
Second rule
Now we have created the rule that looks for the first word. You can create additional rules if you are looking for more than 3 words. Make sure you add the condition “assigned to the category category” after step 6 as well and set it to look for any previous categories assigned by the rules. In our example that would be;
“Rule — Dinner — search word food”
When you only have 1 search word left, then create the following rule;
- Repeat steps 1 to 6 as indicated above and specify your last search word.
In our example that would be “evening”.
You are now still in the “Select condition(s)” part of the rule creation wizard. - Select the condition “assigned to the category category”.
- Click the “category” link at the bottom to open the Categories dialog.
- Here select all the categories that you have previously assigned by the rules looking for words.
In our example we have them prefixed with “Rule — Dinner” so the selection process should be easy. - Click Next.
- Select: “move it to the specified folder”.
- Click the “specified” link at the bottom to select the “Dinner” folder.
- Click Next and then Next again to go to the dialog where you can name the rule.
- Name the rule “Dinner — search word evening (last)” and click Finish.
The entire rule will read like this;
Apply this rule after the message arrives
with evening in the body
and assigned to the Rule — Dinner — search word food category
move it to the Dinner folder
Note: The “specific words” condition looks for text strings. This means that if your search word is part of another word then it will see it as a match as well. In our example, the word “evenings” would also be seen as a match as it contains the word “evening”.

Use «BH93RF24» to get a discount when ordering!
I wish to create an Outlook rule that matches two non-adjacent words in the subject line. It must match both words (AND), not one or the other. If I add the two words as one entry it treats them as a phrase rather than two distinct words, and if I add them as separate entries, it places an «OR» between them. Creating two rules doesn’t work either, as they behave just like the «OR» case.
Is there any way to say, in effect, «Apply this rule to emails matching ALL of the following words.»?
![]()
Breakthrough
34.1k10 gold badges104 silver badges149 bronze badges
asked Sep 10, 2009 at 1:42
![]()
Marcelo CantosMarcelo Cantos
1,5012 gold badges12 silver badges16 bronze badges
2
I’m afraid the answer is no.
You can’t change the logic from the
Rules Wizard itself. It’s preset for
«usual» requests. I tested a few
different wizard options for you
though.If you key in the whole phrase
(instead of just one word at a time)
as one submission (e.g. «How do you
get there») it will filter any
messages that comes through with all
the words in that order. That helps
(maybe!) but if you get a message that
has, «how do you ALWAYS get there» it
won’t activate the filter so it might
not meet your needs. If you already
know the difference between the AND
and OR controller then you probably
already know that this won’t help you

As you’ve already discovered, if you
drop each word in separately, it will
use the «or» controller and you’ll
filter out a lot more messages than
you want.You CAN import custom scripts for your
Outlook rules but you have to use
VBScript and you have to craft the
rules in VBScript for applications,
not just the editor. It’s proprietary
to Microsoft Corp.There is an expanding knowledge base
article from MicrosoftIt’s got examples of code you can use
but you have to draft it from VBScript
for applications as mentioned above.You might consider a third party
filter.

Source
(This question has been asked many times and the conclusion is always the same.)
![]()
answered Sep 10, 2009 at 2:28
2
I found a way around this. If you use the rule «with specific words in the subject» and then also use the rule «with specific words in the subject or body» then you can link two phrases together that are both in the subject with the «and» operator.
answered Oct 15, 2015 at 20:34
![]()
JayGJayG
3193 silver badges2 bronze badges
5
So, ehm, this is kind of ridiculous but it should work.
- Create a new temporary category
- Create a first rule that filters based on the first phrase and let it assign the temporary category (rule:
assign it to the category category) - Create a second rule that filters on the temporary category (rule:
assigned to the category category) and on the next phrase and does the action you want to do - Create a third rule that removes the temporary category (rule:
clear message's categories) from all mail
Make sure the order is correct though, the first rule should execute first so put in top etc.
If you need more than 2 AND phrase matches you’ll need another temporary category.
answered Jul 26, 2018 at 6:41
![]()
DidiiDidii
1911 silver badge4 bronze badges
1
If you know one of the words won’t be in the body, say the words are A and B and B is not in the body, you can do
with A in the subject
 and with B in the subject or body
do whatever
except if the body contains B
![]()
ZygD
2,43911 gold badges26 silver badges43 bronze badges
answered Oct 19, 2021 at 21:19
![]()
You can use SQL filter. Here example of filtering all tasks which is not done, AND tasks completed in last 7 days:
http://schemas.microsoft.com/mapi/id/{00062003-0000-0000-C000-000000000046}/811c000b" = 0 OR %last7days("http://schemas.microsoft.com/mapi/id/{00062003-0000-0000-C000-000000000046}/810f0040")%
answered May 28, 2019 at 5:38
![]()
If one of the two words belongs to a predefined list of words, you can filter on it by creating an exception condition to exclude the other words of the predefined list.
answered Nov 28, 2019 at 16:32
![]()
I think only server rules have this restriction. If you create a local rule you can add multiple filters for the same field and make the rules be «all» or «any».
answered Dec 7, 2019 at 1:20
![]()
I couldn’t find any other simpler way but found one way you can use two keywords in AND condition from Subject line,
check the image at below link for details,
Two keywords in AND condition from subject line
answered Nov 28, 2020 at 9:41
![]()
1
While doing any data analysis, you often encounter situations wherein you need to make use of Boolean logic. Now, Boolean logic involves operations on Truth values TRUE (1) and FALSE values (0) .

In simple words, you would be interested, at times, in knowing the output when one expression is true and(/or) second expression is also true. You can think of Boolean logic as a simple way of comparing individual inputs and expressions. In order to make those comparisons, it uses what are called as operators aka “Logical Operators”. Note that Boolean logic is a form of logic that reduces all values to either TRUE or FALSE.
In this post, you are going to learn about Logical Operators in MS Access. You will make use of logical operators to combine two expressions and return a value of “TRUE”, “FALSE”, or “NULL” depending on the Boolean value of the expression on which logical operation is being done.
Scenario
You and your manager are busy analysing the company’s sales order data and you want to analyse quite a few scenarios on the data as mentioned below:
From the orders data, you want to extract only those transactions that took place in New York that were paid through check as well as all transactions that took place in Illinois and were paid through all except Credit card.
You want all data from Los Angeles except Cash payments as well as all cash payments transactions except those in Los Angeles. In other words, you want all Los Angeles Cash transactions to be ignored as well as all non-cash transactions from non-Los Angeles city (sic).
As per the business rule set by the company, once the order is closed, it means that there are no payments pending and that the payments have been done either by cash, check or credit cards. You want a report indicating that this rule is being followed.
Concept: AND, OR, EQV, NOR, XOR, IMP Operations
Before we start creating queries, Let us first understand the concept of logical operators and the kind of operations they perform on the inputs.
In all there are total 6 logical operators in MS Access as follows:
- AND OperatorOperation involving AND operator is known as ‘Logical Conjunction’. When you use AND operator between two inputs or operands, the final output will be TRUE (i.e. 1) only if both the inputs/operands are TRUE.
- OR Operator Operation involving OR operator is known as ‘ Logical Disjunction’. When you use OR operator between two inputs or operands, the final output will be TRUE (i.e. 1) only if either or both the inputs/operands are TRUE.
- XOR Operator– eXclusive OROperation involving XOR operator is known as ‘Exclusive Disjunction’. When you use XOR operator between two inputs or operands, the final output will be TRUE (i.e. 1) if and only if either of the inputs/operands are TRUE but not both. i.e. if both inputs are true or both inputs are false, the output will be false.
- Eqv OperatorOperation involving Eqv operator is known as ‘Logical Equality’. As the name suggests, when you use EQv operator between two inputs or operands, the final output will be TRUE (i.e. 1), if and only if both inputs are equal.
- NOT OperatorOperation involving NOT operator is known as ‘Logical Negation’. This operation is performed on only one input or operand. It returns the value of TRUE if the input is FALSE and vice-versa.
- IMP OperatorNow, this is a bit tricky one! Atleast I found it so. Nevertheless, pay attention.Operation involving IMP operator is known as ‘Logical Implication’.Lets take an example : A IMP B.
It means that A implies B but B does not necessarily implies A. In other words, it means if A is true then B has to be true.If B is not true, then the output will be false. It also means if A is false then B may or may not be true. Hence the output will be TRUE in that case.
|
A |
B |
A Implies B |
|
0 |
0 |
1 |
|
0 |
1 |
1 |
|
1 |
0 |
0 |
|
1 |
1 |
1 |
Now, the following table shows the output when all the 6 logical operations are performed on two inputs A and B:
|
A |
B |
AND |
OR |
EQV. |
XOR |
IMP |
|
1 |
1 |
1 |
1 |
1 |
0 |
1 |
|
1 |
0 |
0 |
1 |
0 |
1 |
1 |
|
0 |
1 |
0 |
1 |
0 |
1 |
0 |
|
0 |
0 |
0 |
0 |
1 |
0 |
1 |
NOT (1) = 0 ; NOT (0) = 1
It is worth noting the outputs of the logical operations if any one or both the inputs are NULL.
|
A |
B |
AND |
OR |
EQV. |
XOR |
IMP |
NOT (A) |
|
0 |
NULL |
0 |
NULL |
NULL |
NULL |
1 |
1 |
|
1 |
NULL |
NULL |
1 |
NULL |
NULL |
NULL |
0 |
|
NULL |
0 |
0 |
NULL |
NULL |
NULL |
NULL |
NULL |
|
NULL |
1 |
NULL |
1 |
NULL |
NULL |
1 |
NULL |
|
NULL |
NULL |
NULL |
NULL |
NULL |
NULL |
NULL |
NULL |
Note: In order to understand more about NULL Value, please read the post :What is a NULL Value?
Having learnt the basics of all the 6 logical operators, let us now use these operators to solve the manager’s query mentioned earlier in the scenario:
Using AND, OR, NOT operators
Consider point 1 in the above scenario. It has two parts :
Part 1: You want all the transactions for the sales in New York that were paid in Check.
(City Name = “New York” ANDPayment Type = “Check”)
Part 2: You want all the transactions for the sales in Illinois wherein the payment was made via all payment types except credit cards
(City Name = “Illinois” AND (NOT(Payment Type = “Check”)))
Since you want all the transactions that satisfy either part 1 or part 2, your final criteria statement would look as follows:
Part 1 ORPart 2
Let us see how we can achieve the above result in MS Access:

Based on the screenshot above,
-
First Select the columns that you want to see in the final output. In this case, since you want all the columns form the table, you specify Orders.* in the query grid. It extracts all the columns for you – no need to select individual columns.
-
In the second column, specify the criteria and name the column as “Expr”. What it really means is that you are creating a new calculated column with the expression shown above in the screen shot. As you can see,
-
there is an AND operator between Payment Type= “Check” and Ship State/Province = “NY” . When this part of query is executed, it will return a value of 0 for the transactions that do not satisfy this condition whereas it will return –1 for those that satisfy this condition. It should be noted that a new column named “Expr” is being created and across each row in that column a value of 0 or –1 is being calculated. In MS Access, 0 = False and –1 = True.
-
Similarly, there’s an AND operator between “IL” and NOT (Credit Card). The presence of NOT makes the NOT (credit card)=0, thereby excluding all the transactions with payment type = credit card. Again, based on the calculation, you will get –1 and 0 depending on whether it satisfies the condition.
-
Finally you are adding “OR” operator between the above 2 parts thereby indicating that the transactions satisfying either of the above two conditions, will be returned as TRUE i.e. –1.
-
-
Uncheck the checkbox so that, you wont see the column “Expr”. This columns just holds the Boolean values and has no business value to you.
-
So far, you are getting all the records such that the transactions that satisfy the condition have –1 (TRUE) value across them while others have 0 (FALSE). Since you are interested only in the TRUE values, you’ll specify <> FALSE in the criteria.
Thus, The final output is as follows:

Using XOR (eXclusive OR), Eqv.
On going through the point 2 in the scenario at the beginning, you’ll observe that the result can be achieved using either XOR statement or Eqv statement.
Lets see how,

From the screenshot, you can see that we have selected the columns Order ID, Ship City and Payment Type.
In the next Column, you have XOR operation which would return TRUE (-1), if either the city is Los Angeles or the payment type is cash. It will return FALSE (0) otherwise.
Similarly, in the next column you have a EQV operation. It will return TRUE & FALSE values as discussed in the concept above.
(I have written both the expression side-by-side for you to understand and compare their results. In reality, you’ll actually just use one of them.)
Note – The spelling of ‘Los Angeles’ in the Northwind Database is Los Angelas. This reminds that a wrong spelling in the query will not give any error message. It will simply run the query treating it as FALSE, thereby giving you the wrong output.
On running the query, you get the following output:

But that is not what you are interested in. You want only those transactions that satisfy the condition mentioned in the scenario whereas the above output gives us all the transactions with corresponding Boolean values.
Hence we can make any one of the following two changes.
- In case you want to use XOR operation , you provide the criteria as TRUE under the XOR column in the query grid.

- In case you want to use Eqv operation , you provide the criteria as FALSE under the Eqv column in the query grid.

The expected output is as follows:

This shows that the same result can be obtained by any one of the operator but with a slight difference in the way you write the query.
Using IMP Operator
Referring to the point 3 of the scenario, the report can be generated as follows:

As indicated in the screenshot,
-
First you select the column ‘Status Name’ (from table: Order Status) and column ‘Payment Type’ (from table: Orders). Since you are interested only in the closed orders, specify the criteria “Closed” under the column “Status Name” .
-
In the last column of the query grid, you’ll provide the expression with IMP operator. This expression will return FALSE ‘0” if the payment type is NULL (i.e pending payment) for a closed order.
On running this query, the output will look as:

Summary
In this post, you have learnt the following logical operators and their impact on inputs such as NULL Values.
- AND
- OR
- XOR
- EQV
- NOT
- IMP
With a bit of logic and creativity, you can use these logical operators to create more complex queries.
Next Steps
Having finished reading this article, you might want to check the following:
- 7 Useful Arithmetic Operators in MS Access that you should know [Operator Types 1 of 5]
- 6 Comparison Operators in MS Access that you need to know about [Operator Types 2 of 5]
- 2 Handy Concatenate Operators worth knowing [Operator Types 4 of 5]
- 4 Additional Operators in MS Access that you can use [Operator Types 5 of 5]
Wildcard characters and operators refine the search in Microsoft Word. Simple combinations of the
question mark and asterisk allow you to search various word forms. More advanced options like character
ranges and min/max occurrences make it even more powerful.
The question mark matches any single character; the asterisk matches any group of characters (commonly
called a text string). Word looks past the asterisk to see whether any other characters limit
the search.
For example, searching for wo*d finds text such as word, world, and
worshipped.
Press Ctrl+H to open Find and Replace dialog box:

To use wildcard characters, click the More > > button, and select the
Use wildcards checkbox in the Find and Replace dialog box:

These wildcards are handy for finding words that you don’t know how to spell.
For example, if you are not sure how to spell receive, you can type rec??ve. Word then locates
any word that begins with rec, followed by any two characters followed by ve.
Search Operators
- ? — Any single character.
For example, d?g finds dig, dog, and dug, but not
drug and ridge. - * — Zero or more characters: finds a word with the specified characters and zero or more
characters in place of *.For example, des*t finds descent, desert, destiny,
dessert, and destruct and even excludes the, codes — to. - < — Beginning of the word.
For example, <tel finds telemarketing, telephone, and
television, but not hotel and retell. - > — End of the word.
For example, ion> finds aggravation, inspiration, and
institution, but not ionic and bionomics. - @ — Preceding one or more: finds one or more of the characters immediately preceding the @
sign.For example, ^[email protected]^t finds one or more paragraph break marks followed by a tab mark.
- [] — One of the specified characters.
For example, b[aeiu]t finds bat, bet, bit, and but,
but not debt and boot. - [-] — Any character from the range.
For example, [a-m]end finds bend, fend, lend, and
mend (the first character in this case is a, m, or any letter between
them),
but not rend and end. - [!] — Not: finds the text but excludes the characters inside the brackets.
For example, t[!ae]ll finds till and toll but not tall and
tell. - [!a-z] — Any single character except the ones in the range inside the bracket.
For example, m[!o-z]st finds mast and mist, but not most or
must. - {n} — Exact number of occurrences: finds the specified number of occurrences of the letter
immediately before the {.For example, to{2} finds too and tool but not to.
- {n,} — Minimum number of occurrences: adding a comma after the number tells Word to look for
at least that number of occurrences.For example, a{4,} finds four or more of the letter a in a row.
Note: In this example, commas work as a list separator. If you see the Word message
that an invalid character has been used, your configurations use another symbol as a list
separator, usually, a semi-colon. Consequently, all list-delimiting commas need to be replaced
(e.g., for {n, m} you would need to use {n; m}). See also
how to change the list separator in Windows 10. - {n,n} — Minimum and maximum number of occurrences.
For example, 10{2,3} finds 100 and 1000, but not 10.
- () — Expression: lets you «nest» search expressions within a search term.
For example, <(pre)*(ed)> finds presorted and prevented,
but not repressed and precedent.
See also this tip in French:
Utilisation de caractères génériques pour rechercher.