
Word 2016 предназначен для создания профессионально оформленных документов. Он также помогает эффективно создавать документы и систематизировать их.
При создании документа в Word вы можете выбрать пустой документ или шаблон. В любом случае создание документов и предоставление общего доступа к ним выполняется одинаково. Эффективные средства редактирования и рецензирования Word помогают совместно работать над улучшением документа.
Создание документа
Как правило, документы удобнее создавать на основе шаблона, а не пустой страницы. Шаблоны Word содержат уже настроенные темы и стили и готовы к использованию. Остается только добавить в них содержимое.
При каждом запуске Word вы можете выбрать шаблон из коллекции, посмотреть дополнительные шаблоны в соответствующей категории или поискать их в Интернете.
Чтобы подробнее изучить шаблон, щелкните его для предварительного просмотра в увеличенном масштабе.
Если вы не хотите использовать шаблон, нажмите кнопку » Пустой документ».
Открытие документа
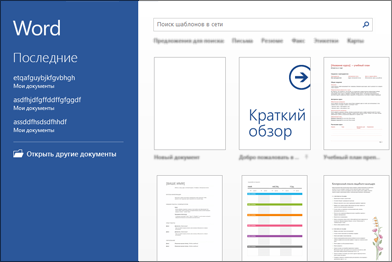
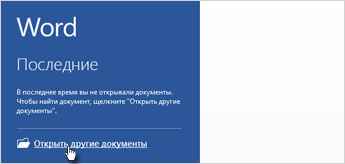
При каждом запуске Word в левом столбце отображается список последних открытых документов. Если в нем нет нужного документа, нажмите кнопку Открыть другие документы.
Если Word уже запущен, на вкладке Файл выберите команду Открыть и выберите расположение файла.
При открытии документа, созданного в более ранней версии Word, в строке заголовка окна документа отображается надпись «Режим ограниченной функциональности». Вы можете работать в этом режиме или обновить документ, чтобы использовать все возможности Word 2016.
Сохранение документа
Чтобы сохранить документ в первый раз, сделайте следующее:
-
На вкладке Файл выберите команду Сохранить как.
-
Выберите нужную папку для сохранения документа.
Примечание: Чтобы сохранить документ на компьютере, выберите папку в разделе Этот компьютер или нажмите кнопку Обзор. Чтобы сохранить документ в Интернете, выберите расположение в Интернете в разделе Сохранить как или щелкните Добавление места. Если файлы размещены в Интернете, вы можете делиться ими, отправлять отзывы о них и совместно работать над ними в режиме реального времени.
-
Нажмите кнопку Сохранить.
Примечание: По умолчанию Word сохраняет файлы в формате DOCX. Чтобы сохранить документ в другом формате, откройте список Тип файла и выберите нужный вариант.
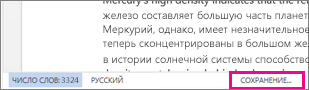
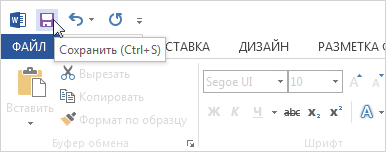
Чтобы сохранить документ в процессе работы, нажмите кнопку Сохранить на панели быстрого доступа.
Чтение документов
Документ можно открыть в режиме чтения, скрыв большинство кнопок и инструментов, которые могут отвлекать от чтения.
-
Откройте нужный документ.
Примечание: Некоторые файлы, например защищенные документы или вложения, автоматически открываются в режиме чтения.
-
На вкладке Вид нажмите кнопку Режим чтения.
-
Перемещаться по страницам документа можно одним из следующих способов:
-
Щелкните стрелку в левой или правой части страницы.
-
Нажимайте клавиши Page Down и Page Up или ПРОБЕЛ и Backspace. Также можно использовать клавиши со стрелками или колесо прокрутки мыши.
-
На устройствах с сенсорными экранами поведите пальцем влево или вправо.
Совет: Нажмите Вид, а затем — Редактировать документ, чтобы снова внести изменения в документ.
-
Регистрация изменений
При совместной работе с документом или самостоятельном редактировании можно включить отслеживание изменений. Word отметит все добавленные, удаленные и перемещенные элементы, а также изменения форматирования.
-
Откройте нужный документ.
-
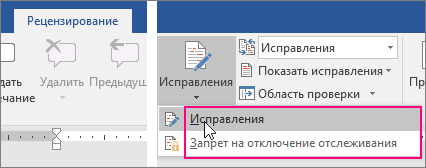
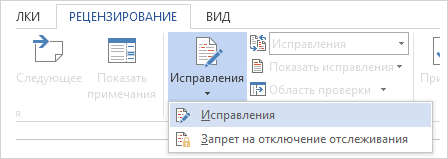
На вкладке Рецензирование нажмите кнопку Исправления и выберите пункт Исправления.

Дополнительные сведения см. в записи отслеживания изменений.
Печать документа
На вкладке «Печать» можно предварительно просмотреть документ, изменить параметры печати и распечатать документ.
-
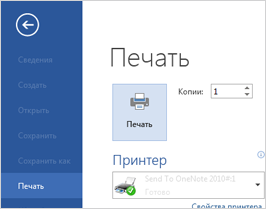
На вкладке Файл нажмите кнопку Печать.
-
Сделайте следующее:
-
В разделе Печать в поле Копии укажите число копий для печати.
-
В разделе Принтер убедитесь, что выбран нужный принтер.
-
В разделе Настройка выбраны параметры, заданные по умолчанию для указанного принтера. Чтобы изменить какой-либо параметр, щелкните его и выберите нужное значение.
-
-
После установки нужных параметров нажмите кнопку Печать.
Дополнительные сведения см. в статье Печать документа.
Более сложные действия
Дополнительные сведения об основах работы в Word см. в статье Новые возможности Word 2016.
К началу страницы
Используя Word в Интернете, вы используете веб-браузер для создания, просмотра и редактирования личных документов, которые хранятся в OneDrive. Если у вашей организации или учебы есть планMicrosoft 365 или SharePoint, начните использовать Word в Интернете, создав или храня документы в библиотеках на сайте. Сохранение изменений
Word автоматически сохраняет изменения. Просмотрите строку состояния в левом нижнем углу Word в Интернете. В ней будет надпись Сохранено или Сохранение.
Совместный доступ к документам через Интернет
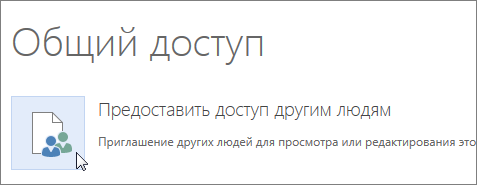
Так как документ находится в Интернете, вы можете предоставить общий доступ к нему, отправив ссылку вместо почтового вложения. Другие пользователи могут просмотреть его в браузере или на мобильном устройстве.
Выберите пункты Файл > Общий доступ > Предоставить доступ другим людям.
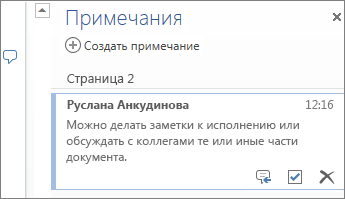
Создание комментариев в браузере
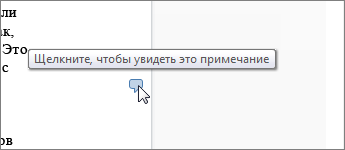
Выноска показывает, куда в документе добавлены комментарии.
Вы можете отвечать на примечания и помечать просмотренные элементы галочкой.
Редактирование в браузере
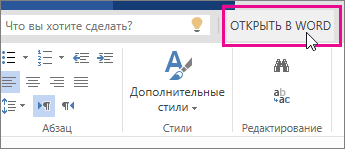
Если при попытке написать что-то в документе ничего не происходит, то, вероятно, выбран режим чтения. Переключитесь в режим правки: нажмите кнопку « Изменить документ> Изменить в Word в Интернете.

После этого можно ввести и отформатировать текст, добавить изображения, настроить макет страницы и т. д. Для доступа к расширенным возможностям редактирования выберите команду Открыть в Word.
Совместная работа над документом
Для совместной работы в Word в Интернете вы редактируем документ, как обычно. Если другие разработчики также редактирует его, Word в Интернете оповещение о присутствии. Вы можете узнать, кто работает над документом, щелкнув ленту.
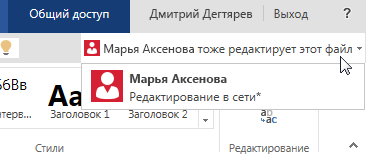
Если щелкнуть имя автора, будет показана часть документа, которую он изменяет. Изменения можно просматривать по мере внесения. Они могут работать в Word в Интернете, Word 2010 или более поздней версии или Word для Mac 2011.
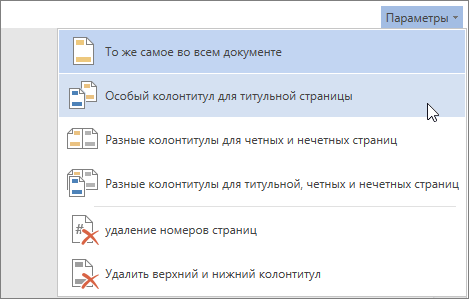
Добавление колонтитулов
Чтобы добавить в документ колонтитулы, щелкните Вставка > Колонтитулы.
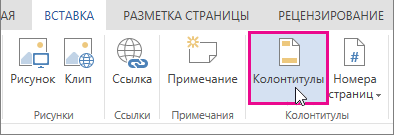
Нажмите кнопку Параметры, чтобы настроить параметры их отображения.
Добавление номеров страниц
Щелкните Вставка > Номера страниц и затем выберите из коллекции вариант отображения номеров страниц.
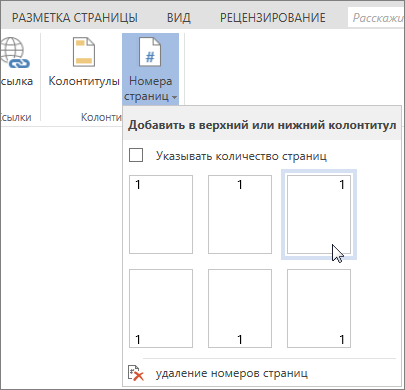
Выберите Включить количество страниц, чтобы отображались как номер текущей страницы, так и общее число страниц (страница X из Y).
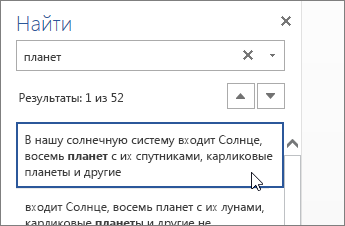
Поиск и замена текста
Чтобы быстро найти все вхождения определенного слова или фразы в документе, щелкните Главная > Найти (или нажмите клавиши CTRL+F). Результаты выводятся рядом с документом, так что вы можете просмотреть их в контексте. Если щелкнуть результат поиска, будет выполнен переход к этому вхождению.
Для поиска и замены текста нажмите кнопку Заменить (или нажмите клавиши CTRL+H).
Печать в Word в Интернете
Щелкните Файл > Печать. Word в Интернете создает предварительный просмотр документа в формате PDF, который сохраняет весь макет и форматирование документа. Отправьте PDF-файл на печать, и он будет распечатан в необходимом виде.
Microsoft Word 2013 — это текстовый редактор, предназначенный для создания профессионально оформленных документов. Он помогает легко и эффективно создавать документы и систематизировать их.
Первым делом при создании документа в Word 2013 нужно выбрать пустой документ или шаблон. Дальнейшие действия по созданию документов и предоставлению общего доступа к ним остались без изменений. Эффективные средства редактирования и рецензирования помогают совместно работать над улучшением документа.
Выбор шаблона
Как правило, документы удобнее создавать на основе шаблона, а не пустой страницы. Шаблоны Word содержат темы и стили и готовы к использованию. Остается только добавить в них содержимое.
При каждом запуске Word 2013 можно выбрать шаблон из коллекции, щелкнув категорию для просмотра ее шаблонов или загрузив шаблоны из Интернета. Если использовать шаблон не требуется, просто выберите пункт Новый документ.
Чтобы подробнее изучить шаблон, щелкните его для предварительного просмотра в увеличенном масштабе.
К началу страницы
Открытие документа
При каждом запуске Word в левом столбце отображается список последних открытых документов. Если в нем нет нужного документа, нажмите кнопку Открыть другие документы.
Если Word уже запущен, на вкладке Файл выберите команду Открыть и выберите расположение файла.
При открытии документа, созданного в более ранней версии Word, в строке заголовка окна документа отображается надпись «Режим ограниченной функциональности». Можно работать в этом режиме или обновить документ для использования новых и улучшенных возможностей Word 2013.
К началу страницы
Сохранение документа
Чтобы сохранить документ в первый раз, сделайте следующее:
-
Откройте вкладку Файл.
-
Нажмите кнопку Сохранить как.
-
Выберите нужную папку для файла.
Примечание: Чтобы сохранить документ на компьютере, выберите папку в группе Компьютер или нажмите кнопку Обзор. Чтобы сохранить документ в Интернете, выберите расположение в группе Окружение или Добавление места. Если файлы размещены в Интернете, ими можно обмениваться, оставлять комментарии и совместно работать с документами в реальном времени.
-
Нажмите кнопку Сохранить.
Примечание: По умолчанию Word сохраняет файлы в формате DOCX. Чтобы сохранить документ в другом формате, откройте список Тип файла и выберите нужный вариант.
Чтобы сохранить документ в процессе работы, нажмите кнопку Сохранить на панели быстрого доступа.
К началу страницы
Чтение документов
Откройте документ в приложении » Чтение Mode«, чтобы скрыть большинство кнопок и инструментов, чтобы не отвлекаясь на чтение.
-
Откройте нужный документ.
Примечание: Некоторые файлы, например защищенные документы или вложения, автоматически открываются в режиме чтения.
-
На вкладке Вид нажмите кнопку Режим чтения.
-
Перемещаться по страницам документа можно одним из следующих способов:
-
Щелкните стрелку в левой или правой части страницы.
-
Нажимайте клавиши Page Down и Page Up или ПРОБЕЛ и Backspace. Также можно использовать клавиши со стрелками или колесо прокрутки мыши.
-
На устройствах с сенсорными экранами поведите пальцем влево или вправо.
Совет: Нажмите Вид, а затем — Редактировать документ, чтобы снова внести изменения в документ.
-
К началу страницы
Регистрация изменений
При совместной работе с документом или самостоятельном редактировании можно включить отслеживание изменений. Word отметит все добавленные, удаленные и перемещенные элементы, а также изменения форматирования.
-
Откройте нужный документ.
-
На вкладке Рецензирование нажмите кнопку Исправления и выберите пункт Исправления.
Дополнительные сведения см. в записи отслеживания изменений.
К началу страницы
Печать документа
На вкладке «Печать» можно предварительно просмотреть документ, изменить параметры печати и распечатать документ.
-
Откройте вкладку Файл и нажмите кнопку Печать.
-
Сделайте следующее:
-
В разделе Печать в поле Копии укажите число копий для печати.
-
В разделе Принтер убедитесь, что выбран нужный принтер.
-
В разделе Настройка выбраны параметры, заданные по умолчанию для указанного принтера. Чтобы изменить какой-либо параметр, щелкните его и выберите нужное значение.
-
-
После установки нужных параметров нажмите кнопку Печать.
Дополнительные сведения см. в статье Печать и предварительный просмотр документов.
Более сложные действия
Выйдите за рамки основных сведений о документах, создав оглавлевую таблицу или сохранив документ в качестве шаблона.
К началу страницы
Важно:
Office 2010 больше не поддерживается. Перейдите на Microsoft 365, чтобы работать удаленно с любого устройства и продолжать получать поддержку.
Обновить
В этой статье
-
Что такое Word?
-
Поиск и применение шаблона
-
Создание нового документа
-
Открытие документа
-
Сохранение документа
-
Чтение документов
-
Отслеживание изменений и вставка примечаний
-
Печать документа
Что такое Word?
Microsoft Word 2010 — это программа word-обработки, предназначенная для создания профессиональных документов. Благодаря средствам форматирования документов Word помогает эффективнее упорядочивать и писать документы. Word также включает мощные средства редактирования и редактирования, чтобы вы могли легко взаимодействовать с другими пользователями.
К началу страницы
Поиск и применение шаблона
Word 2010 позволяет применять встроенные шаблоны, применять собственные настраиваемые шаблоны и выполнять поиск по различным шаблонам, доступным в Интернете.
Чтобы найти и применить шаблон в Word, выполните следующие действия.
-
На вкладке Файл нажмите кнопку Создать.
-
В разделе «Доступные шаблоны» выполните одно из следующих действий:
-
Чтобы использовать один из встроенных шаблонов, щелкните «Примеры шаблонов «, выберите нужный шаблон и нажмите кнопку «Создать».
-
Чтобы повторно использовать шаблон, который вы недавно использовали, щелкните «Последние шаблоны», выберите нужный шаблон и нажмите кнопку «Создать».
-
Чтобы использовать созданный ранее шаблон, щелкните «Мои шаблоны», выберите нужный шаблон и нажмите кнопку «ОК «.
-
Чтобы найти шаблон на сайте Office.com, в разделе Office.com Templates щелкните требуемую категорию шаблона, выберите нужный шаблон и нажмите кнопку «Скачать», чтобы скачать шаблон с сайта Office.com на компьютер.
-
Примечание: Вы также можете искать шаблоны на сайте Office.com в Word. В поле поиска Office.com введите один или несколько условий поиска, а затем нажмите кнопку со стрелкой для поиска.
К началу страницы
Создание нового документа
-
Откройте вкладку « Файл» и нажмите кнопку » Создать».
-
В разделе «Доступные шаблоны» щелкните «Пустой документ».
-
Щелкните Создать.
Дополнительные сведения о создании документа см. в разделе «Создание документа».
К началу страницы
Открытие документа
-
Откройте вкладку Файл и нажмите кнопку Открыть.
-
В левой области диалогового окна « Открыть» щелкните диск или папку, содержащую документ.
-
В правой области диалогового окна « Открыть» откройте папку, содержащую нужный документ.
-
Щелкните документ и нажмите кнопку » Открыть».
К началу страницы
Сохранение документа
Чтобы сохранить документ в формате, используемом Word 2010 и Word 2007, сделайте следующее:
-
Откройте вкладку Файл.
-
Выберите команду Сохранить как.
-
В поле «Имя файла » введите имя документа.
-
Нажмите кнопку Сохранить.
Чтобы сохранить документ, чтобы он был совместим с Word 2003 или более ранней версии, выполните следующие действия.
-
Откройте документ, который вы хотите использовать в Word 2003 или более ранней версии.
-
Откройте вкладку Файл.
-
Нажмите кнопку Сохранить как.
-
В списке Тип файла выберите значение Документ Word 97–2003. Формат файла будет изменен на DOC.
-
В поле Имя файла введите имя документа.
-
Нажмите кнопку Сохранить.
Дополнительные сведения о создании документа, совместимого с Word 2003 или более ранними версиями, см. в статье «Создание документа для использования в предыдущих версиях Word».
К началу страницы
Чтение документов
-
Откройте документ, который вы хотите прочитать.
-
На вкладке « Вид» в группе » Представления документов» щелкните «Полноэкранный режим чтения»
-
Перемещаться по страницам документа можно одним из следующих способов:
-
Щелкните стрелки в нижних углах страниц.
-
На клавиатуре нажмите клавиши PAGE DOWN, PAGE UP или SPACEBAR и BACKSPACE.
-
Щелкните стрелки навигации в верхней части экрана.
Совет:
Щелкните «Параметры просмотра», а затем выберите команду «Показать » для просмотра двух страниц или экранов за раз.
-
 » для просмотра двух страниц или экранов за раз.
Дополнительные сведения о просмотре документов см. в статье » Чтение документов в Word».
К началу страницы
Отслеживание изменений и вставка примечаний
-
Чтобы включить отслеживание изменений, на вкладке «Рецензию» в группе «Отслеживание » нажмите кнопку «Отслеживать изменения».
-
Чтобы вставить комментарий, на вкладке «Рецензию» в группе » Примечания » нажмите кнопку «Создать примечание».
Дополнительные сведения о том, как отслеживать изменения, внесенные при изменении, см. в разделе «Отслеживание изменений и вставка примечаний».
К началу страницы
Печать документа
-
Откройте вкладку Файл и нажмите кнопку Печать.
-
Сделайте следующее:
-
В разделе «Печать» в поле « Копии» введите количество копий, которые нужно распечатать.
-
В разделе «Принтер» убедитесь, что выбран нужный принтер.
-
В разделе Настройка выбраны параметры, заданные по умолчанию для указанного принтера. Если вы хотите изменить параметр, щелкните нужный параметр, а затем выберите нужный параметр.
-
-
Когда параметры будут удовлетворены, нажмите кнопку » Печать».
Дополнительные сведения о том, как распечатать файл, см. в разделе «Предварительный просмотр и печать файла».
К началу страницы
One of the most widely used programs of Microsoft Office suite, MS Word is a word processor developed by Microsoft.
An introduction to MS Word, its features and its uses, have all been discussed in detail, in this article. Also, a few sample questions based on this MS Office program have been given further below for the reference of candidates preparing for competitive exams.
To know further about the MS Office suite and the various programs included in it, visit the linked article.
Since MS Word is one of the most used programs of the Office Suite, some basic information regarding its creation and development has been given below:
- Charles Simonyi, a developer and Richard Brodie, a software engineer, were the two creators of MS Word
- This program was initially named “Multi-Tool Word” but later, was renamed as MS Word
- It was introduced in 1983
- Word for Windows is available standalone or as a part of MS Office suite
- MS Word for Mac was introduced by Microsoft as Word 1.0 in 1985
- The extension for any word file is “.doc or .docx.”
Moving forward, details about the features and applications of Word have been discussed. To read more about the other Computer Knowledge topics, check the links given below:

Let us first understand some basic aspects of Microsoft Word.
What is MS Word?
Used to make professional-quality documents, letters, reports, etc., MS Word is a word processor developed by Microsoft. It has advanced features which allow you to format and edit your files and documents in the best possible way.
Where to find MS Word on your personal computer?
Follow these simple steps to open MS Word on your personal computer:
Start → All Programs → MS Office → MS Word.
What are the uses of MS Word?
MS Word enables users to do write-ups, create documents, resumes, contracts, etc. This is one of the most commonly used programs under the Office suite.
How to create an MS Word document?
To create an MS Word doc, follow the steps mentioned above to open Microsoft Word. Then once the program is open, click on “File” followed by “New”. This opens a new doc where something new can be created.
Since it is used by people of all age groups, in schools, in colleges and for official purposes, having proper knowledge of Microsoft Word is a must. The preview of the MS Doc file once it is opened is given below:
Also, from a competitive exam perspective, one must be well aware of this topic. To get the list of all major Government exams conducted in the country, aspirants can visit the linked article.
For a better understanding of how MS Word works and the features that are included in it, you can refer to the video given below and analyse its functioning easily.
Features of MS Word
Now let us read more about the features and components of an MS Word doc file in detail.
The image given below shows the different elements and categories which are available in MS Word doc:

- Home
This has options like font colour, font size, font style, alignment, bullets, line spacing, etc. All the basic elements which one may need to edit their document is available under the Home option.
- Insert
Tables, shapes, images, charts, graphs, header, footer, page number, etc. can all be entered in the document. They are included in the “Insert” category.
- Design
The template or the design in which you want your document to be created can be selected under the Design tab. Choosing an appropriate tab will enhance the appearance of your document.
- Page Layout
Under the Page Layout tab comes options like margins, orientation, columns, lines, indentation, spacing, etc.
- References
This tab is the most useful for those who are creating a thesis or writing books or lengthy documents. Options like citation, footnote, table of contents, caption, bibliography, etc. can be found under this tab.
- Review
Spell check, grammar, Thesaurus, word count, language, translation, comments, etc. can all be tracked under the review tab. This acts as an advantage for those who get their documents reviewed on MS Word.
Apart from all the above-mentioned features, the page can be set in different views and layouts, which can be added and optimised using the View tab on the Word document. Margins and scales are also available for the benefit of the users.
When compared with MS PowerPoint, MS Word is more of reading while PPT is more of visual and graphical representation of data.
To know more about Microsoft Windows, visit the linked article.
For Govt exam aspirants, given below are links to the other subjects which are a part of the competitive exam syllabus:
Uses of MS Word
Given below are the different fields in which MS Word is used and simplifies the work of an individual:
- In Education: It is considered as one of the simplest tools which can be used by both teachers and students. Creating notes is easier using MS Word as they can be made more interactive by adding shapes and images. It is also convenient to make assignments on MS Word and submitting them online
- In Workplace: Submitting letters, bills, creating reports, letterheads, sample documents, can all easily be done using MS Word
- Creating & Updating Resume: One of the best tools to create your resumes and is easy to edit and make changes in it as per your experience
- For Authors: Since separate options are available for bibliography, table of contents, etc., it is the best tool which can be used by authors for writing books and adjusting it as per the layout and alignment of your choice
Also, creating a Doc file and converting it into PDF is a more suitable option, so it is highly recommended.
For competitive exam aspirants, given below are links which may help you prepare yourself for the upcoming exams:
Sample MS Word Question and Answers
Some sample questions and answers with the competitive exam perspective have been given below. Refer to these for assistance.
Q 1. How can you open the column dialogue box?
- Alt+O+C
- Alt+A+C
- Alt+R+C
- Alt+C
- Alt+ctrl+C
Answer: (1) Alt+O+C
Q 2. Which is the default alignment in MS Word?
- Right
- Centre
- Left
- Justify
- None of the Above
Answer: (3) Left
Q 3. “Ctrl + =” is used for _________
- Change Alignment
- Subscript
- Superscript
- Change font to Bold
- None of the above
Answer: (2) Subscript
Q 4. A combination of which shortcut keys to use to split a table?
- Ctrl+shift+enter
- Ctrl+enter
- Shift+enter
- ctrl+alt+S
- alt+S
Answer: (1) Ctrl+shift+enter
Furthermore, to get the best tips to ace the upcoming Government exams, candidates can check the Preparation Strategy for Competitive Exams at the linked article.
Get the best study material and the latest exam information at BYJU’S.

Frequently Asked Questions on Microsoft Word
Q 1. Which formatting features can be added to the MS Word document?
Ans. The common formatting features which are available on MS Word include:
-
- Font Style, Size and Colour</li
- Header and Footer
- Insert Images
- Add tables and bulleted lists
- Set a page layout
- Add Word Art
The basic feature of why people choose MS Word over any other text editor is that it makes the document more visually interactive and appealing.
Q 2. What is Microsoft Word used for??
Ans. MS Word can also help you organize and write documents more efficiently. When the document is created in Word, the user can choose to start from a blank document or let a template do much of the work for the user. From then on, the basic steps in creating and sharing documents are the same.
Q 3. What are the basic functions of MS Word?
Ans. Given below are the basic functions of Microsoft Word:
- Creating text documents
- Editing and Formatting the existing documents
- Making a text document interactive with different features and tools
- Graphical documents, comprising images
- Used by Authors and Researchers
- Detect grammatical errors in a text document
Q 4. What is the extension of an MS Word file?
Ans. An MS Word file is always saved with the extension of .doc or .docx.
.
Q 5. What are the five basic fields of application for MS Word?
Ans. Using Microsoft Word, one can create resumes, reports, and write letters. Authors can use it to write their books and researchers for writing a thesis. Apart from this, it can be used as a simple text editor.
Зачем знать все функции MS Word
Все возможности текстового редактора Microsoft знать и использовать необязательно. Вы можете успешно решать рабочие задачи, изредка переключаясь между вкладками «Главная» и «Вставка». Но вы будете работать еще эффективнее, если вооружитесь даже несколькими трюками из этого обзора.
Вот простой пример, знакомый вебмастерам. Некоторые специалисты перед переносом текста из документа Word в редактор CMS копируют контент в «Блокнот». Это очищает текст от форматирования Word, которое может конфликтовать с шаблонными форматами «движка». Так вот, «Блокнот» вам не нужен. Чтобы решить проблему, достаточно выделить текст в Word и нажать кнопку «Удалить все форматирование».

Форматирование можно удалить без «Блокнота»
Обратите внимание, обзор написан для версии Word’а 2013 года. Актуальной стабильной версией программы является MS Word 2016, выпущенная в сентябре 2015 года. Однако эта версия программы пока не стала основной.

Без претензии на репрезентативность: версия 2013 года самая популярная
Как создать и сохранить документ MS Word
Чтобы создать документ, откройте рабочую папку. Нажмите правую кнопку мыши и выберите опцию «Создать — Microsoft Word Document».

Создаем документ MS Word в папке
Чтобы легко находить документ, назовите его.

Называем документ сразу после создания
Также вы можете запустить MS Word через меню «Пуск». Обратите внимание на иллюстрацию.

Запускаем Word через меню «Пуск»
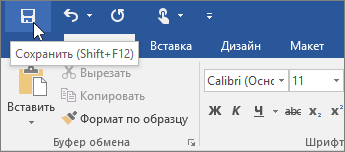
При запуске через меню пуск вы создали новый документ с названием по умолчанию. Назовите его и сохраните в выбранную папку, чтобы не потерять. Для этого нажмите на значок «Сохранить» или воспользуйтесь комбинацией клавиш Shift+F12.

Сохраняем документ в рабочую папку
Нажмите кнопку «Компьютер», чтобы сохранить документ на компьютере. Также вы можете поместить его на облачный диск OneDrive.

Выбираем место сохранения документа
Назовите документ и сохраните его в выбранную папку.

Называем и сохраняем документ. Теперь он не потеряется
Вы создали и сохранили документ. Приступайте к работе.
Как использовать возможности вкладки «Главная»
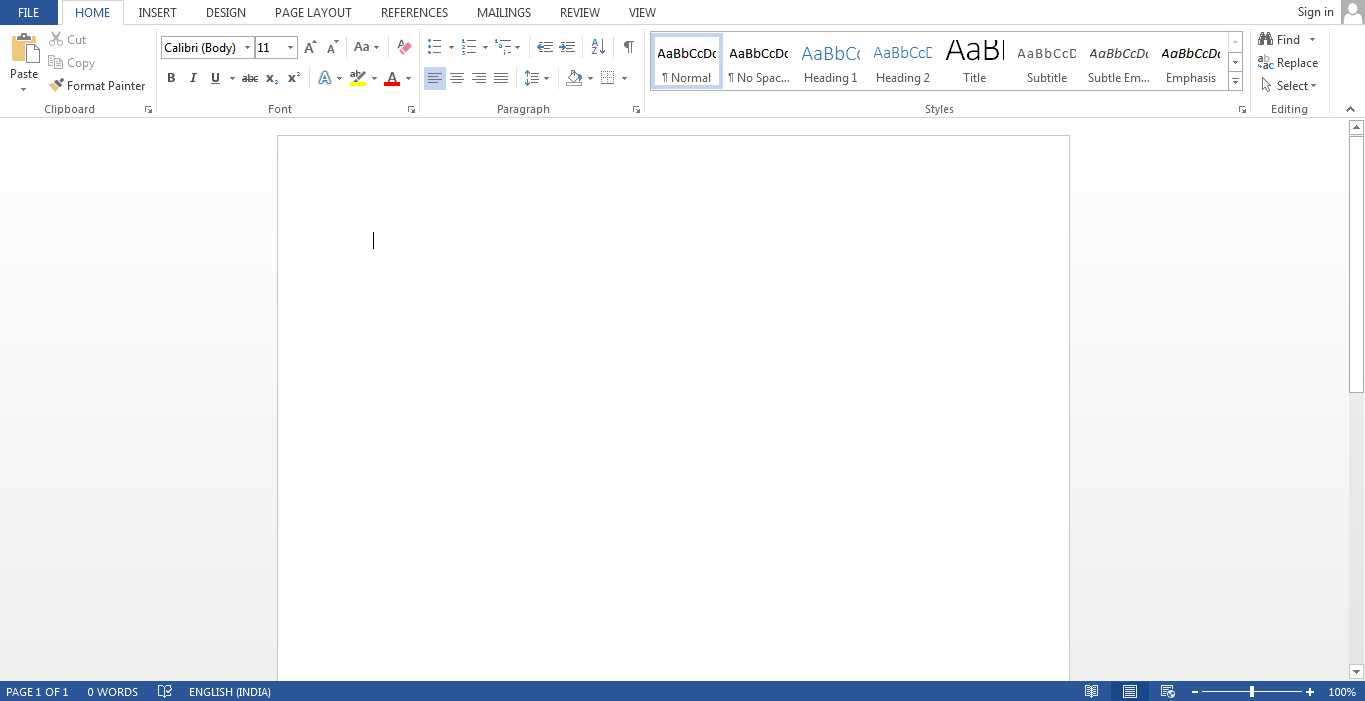
Инструменты на панели управления MS Word объединяются с помощью тематических вкладок. Такой тип интерфейса называется лентой. По умолчанию открывается основной набор инструментов, выделенный на вкладке «Главная».

Вкладка «Главная» на панели инструментов MS Word
Ниже описаны задачи, которые можно решать с помощью инструментов вкладки «Главная».
Блок инструментов «Буфер обмена»
Вы можете копировать, вырезать и вставлять контент. Чтобы воспользоваться опциями «Вырезать» и «Копировать», выделите нужный фрагмент текста.

Вырезаем, копируем и вставляем текст
Обратите внимание на варианты вставки. Вы можете сохранить исходное форматирование, объединить форматы или сохранить текст без форматирования. Также вы можете воспользоваться специальными режимами вставки.

Выбираем режим вставки
Зачем нужна специальная вставка? Например, представьте, что вам необходимо работать с текстом, скопированным из другого документа или с сайта. Исходное форматирование может не совпадать с форматированием вашего документа.

Форматирование не совпадает
Эта проблема решается с помощью специальной вставки. Воспользуйтесь соответствующим меню. В открывшемся окне выберите вариант «Неформатированный текст».

Выбираем опцию «Неформатированный текст»
Теперь вам будет удобнее форматировать скопированный контент.

Скопированный контент удобно форматировать
С помощью меню «Буфер обмена» вы можете выбрать скопированный ранее контент и вставить его в документ. Чтобы открыть буфер обмена, нажмите на отмеченную на иллюстрации стрелку. Выберите нужный элемент. С помощью выпадающего меню выберите опцию «Вставить». Также вы можете удалить скопированный элемент из буфера.

Пользуемся буфером обмена
Вы можете настраивать параметры вставки по умолчанию. Для этого воспользуйтесь меню «Вставить – Вставка по умолчанию».

Настраиваем параметры вставки по умолчанию
Укажите подходящие настройки и сохраните изменения. Обратите внимание на параметры вставки в другой документ. Большинство пользователей может заменить дефолтное значение «Сохранять исходное форматирование» на «Сохранить только текст».

Настраиваем параметры вставки по умолчанию
Блок инструментов «Шрифт»
Чтобы изменить шрифт по умолчанию, воспользуйтесь отмеченным на иллюстрации выпадающим меню. Обратите внимание, чтобы изменить существующий текст, фрагмент необходимо выделить перед выбором шрифта.

Меняем шрифт
С помощью соответствующего меню вы можете выбрать подходящий размер шрифта. Обратите внимание на возможность увеличить или уменьшить шрифт выделенного фрагмента. Отметьте текст и воспользуйтесь кнопками, отмеченными на иллюстрации.

Меняем размер шрифта
Выбрать подходящий регистр можно с помощью соответствующего меню. Выделите нужный фрагмент текста, воспользуйтесь отмеченной на иллюстрации кнопкой и выберите нужный вариант.

Меняем регистр
Вы можете выделить фрагмент текста полужирным, курсивом или подчеркиванием. Для этого выделите контент и воспользуйтесь отмеченными кнопками. С помощью выпадающего меню вы можете выбрать способ подчеркивания текста.

Выделяем текст полужирным, курсивом или подчеркиванием
Чтобы зачеркнуть фрагмент текста, выделите его и воспользуйтесь соответствующей кнопкой.

Зачеркиваем фрагмент текста
С помощью кнопок X2 и X2 можно добавить подстрочный и надстрочный текст.

Добавляем подстрочный и надстрочный текст
С помощью отмеченных кнопок можно изменить цвет, выделить текст маркером или применить к нему эффекты.

Выделяем текст с помощью цвета, маркера или эффектов
Обратите внимание на возможность настройки расширенных параметров шрифта. Чтобы войти в меню, нажмите отмеченную на иллюстрации кнопку.

Входим в меню настроек расширенных параметров шрифта
На вкладке «Шрифт» укажите подходящие параметры основного текста и заголовков. С помощью кнопки «По умолчанию» вы можете вернуть дефолтные настройки, а с помощью кнопки «Текстовые эффекты» выбрать дополнительные эффекты.
Блок инструментов «Абзац»
Чтобы создать маркированный, нумерованный или многоуровневый список, воспользуйтесь показанными на иллюстрации выпадающими меню.

Создаем списки
Чтобы создать маркированный или нумерованный список, установите курсор на новую строку и нажмите на соответствующую кнопку. С помощью выпадающего меню выберите подходящий знак маркера.

Выбираем знак маркера
С помощью меню «Определить новый маркер» вы можете использовать дополнительные знаки.

Маркер может выглядеть по-разному
Чтобы создать многоуровневый список, в соответствующем выпадающем меню выберите опцию «Изменить уровень списка».

Выбираем нужный уровень списка
Выбрать подходящий стиль списка можно в библиотеке. А меню «Определить новый многоуровневый список» и «Определить новый стиль списка» помогут вам создать собственный шаблон списка.

Выбираем готовый или создаем новый шаблон
Вы можете выбрать подходящий способ выравнивания текста с помощью соответствующего меню. Чтобы обеспечить читабельность текста, используйте выравнивание по левому краю.

Выравниваем текст
При необходимости измените междустрочный интервал. В большинстве случаев вам подойдет стандартный интервал 1,15. Если вы готовите документ для детей или пожилых людей, увеличьте интервал до 1,5 или 2,0. Дальнейшее увеличение интервала снизит читабельность текста.

В большинстве случаев используйте стандартный интервал. Для детей его можно увеличить
С помощью заливки можно выделить фрагмент текста цветом. Например, вы можете выделить абзац или ячейку таблицы. Чтобы добавить фон, выделите фрагмент текста и выберите с помощью выпадающего меню «Заливка» подходящий цвет.

Выбираем цвет фона
С помощью меню «Границы» можно управлять границами ячеек в таблицах. Выделите интересующие вас ячейки. С помощью выпадающего меню выберите подходящее действие.

Управляем границами ячеек в таблице
Блок инструментов «Стили»
С помощью меню «Стили» выберите подходящий стиль оформления текста. Если хотите применить его к существующему контенту, выделите соответствующий фрагмент и определите стиль. Чтобы использовать стиль для создаваемого контента, установите курсор на чистую строку и выберите подходящий вариант оформления. Например, вы можете использовать соответствующий стиль для заголовков.

Используем стиль «Заголовок 1»
Блок инструментов «Редактирование»
С помощью меню «Найти» вы можете быстро искать интересующий вас контент. Обратите внимание на доступ с помощью выпадающего меню к расширенным настройкам поиска.

Ищем потерявшийся контент
Функцию «Заменить» удобно использовать во время редактирования текста. Например, можно автоматически заменить в тексте слово «копирайт» на «копирайтинг». Для этого воспользуйтесь меню «Заменить», укажите нужные слова в полях «Найти» и «Заменить на».

Указываем нужные значения
Нажмите кнопку «Заменить все». После обработки запроса программа сообщит число выполненных замен.

Автоматически заменили четыре слова
Используйте функцию «Выделить» для быстрого выделения контента. Например, вы можете в два клика выделить весь текст, выбрать произвольные объекты или выделить фрагменты с одинаковым форматированием.

Быстро выделяем весь текст
С помощью функции «Свернуть ленту» вы можете спрятать инструменты управления программой. На панели останутся только вкладки.

Сворачиваем ленту
Чтобы вернуть инструменты на панель, раскройте любую вкладку и воспользуйтесь опцией «Закрепить ленту».

Закрепляем ленту
Как использовать возможности вкладки «Вставка»
На вкладке «Вставка» находятся инструменты, с помощью которых можно вставлять различные объекты в документ MS Word.
Блок инструментов «Страницы»
В меню «Титульная страница» можно выбрать шаблон титульной страницы для документа.

При необходимости добавляем к документу титульную страницу
С помощью функций «Пустая страница» и «Разрыв страницы» можно создать пустую страницу или перейти к новой странице. Например, если вам необходимо вставить пустую страницу между абзацами, установите между ними курсор и воспользуйтесь функцией «Пустая страница».

Создаем пустую страницу
Блок инструментов «Таблицы»
С помощью выпадающего меню «Таблица» вы можете вставить или нарисовать в документе таблицу. Это можно сделать несколькими способами.
Чтобы быстро добавить таблицу, воспользуйтесь графическим инструментом. Выделите с помощью курсора мыши необходимое количество ячеек в таблице. После этого установите курсор на выделенную область и нажмите левую кнопку мыши.

Создаем таблицу с помощью графического меню
Функция «Вставить таблицу» позволяет указать вручную число строк и столбцов. Также вы можете выбрать способ определения ширины столбцов.

Указываем количество столбцов и строк вручную
Функция «Нарисовать таблицу» позволяет выполнить соответствующее действие. Используйте ее для создания нестандартные таблиц. Например, вы можете нарисовать таблицу с разным числом ячеек в строках.

Рисуем таблицу
Чтобы определить свойства нарисованной таблицы, воспользуйтесь соответствующим меню.

Определяем свойства таблицы
С помощью меню «Таблицы Excel» можно вставить в документ MS Word таблицы из MS Excel. В меню «Экспресс-таблицы» вы найдете шаблоны таблиц.

Пользуемся шаблонами таблиц
Блок инструментов «Иллюстрации»
С помощью функции «Рисунки» вы можете вставить в документ изображение с жесткого диска компьютера. Меню «Изображения из интернета» позволяет найти подходящие фото в Сети.

Ищем фотографии в интернете
В результатах поиска приоритет отдается фото, распространяемым по лицензии Creative Commons.
Функция «Фигуры» поможет добавить в документ шаблонную фигуру, например, сердечко, звездочку или стрелку. Чтобы воспользоваться инструментом, с помощью выпадающего меню откройте каталог и выберите подходящую фигуру.

Выбираем подходящую фигуру
С помощью курсора мыши определите размер и расположение фигуры в документе.

Выбираем расположение и размер фигуры
Оформите фигуру с помощью функций «Заливка», «Контур», «Эффекты».

Выбираем цвет заливки
Функция SmartArt позволяет вставить в документ графические объекты. С помощью выпадающего меню выберите тип и подходящий рисунок.

Выбираем тип объекта SmartArt
Установите курсор на элементы рисунка и добавьте текст.

Добавляем текст
Обратите внимание на возможность менять цвет объектов SmartArt.

Меняем цвет объектов
С помощью меню «Диаграмма» в документ можно добавить диаграммы. Обратите внимание на возможность выбора типа графика.

Выбираем тип диаграммы
Вставьте необходимые значения в таблицу данных.

Редактируем таблицу данных
С помощью меню «Снимок» вы можете сделать снимок области экрана и вставить его в документ. Для этого с помощью выпадающего меню выберите опцию «Вырезка экрана», а с помощью курсора мыши выберите область, которую хотите снять.

Быстро вставляем в документ снимок экрана
Блок инструментов «Надстройки»
В надстройках вы найдете магазин приложений Office. В нем есть платные и бесплатные инструменты для решения специальных задач. Чтобы выбрать подходящее приложение, нажмите на кнопку «Магазин» и воспользуйтесь поиском. Также вы можете просматривать инструменты по категориям.

Ищем приложения в магазине
Например, с помощью приложения MailChimp for MS Word вы можете создавать Email-кампании прямо в документе. Чтобы воспользоваться приложением, нажмите кнопку «Доверять». Возможности инструмента станут доступными после авторизации.

Авторизуемся в приложении MailChimp for MS Word
В меню «Мои приложения» отображается список установленных приложений. Вы можете удалить неиспользуемые и добавить новые инструменты.

Просматриваем установленные приложения
Функция «Википедия» позволяет искать информацию на соответствующем ресурсе непосредственно из документа MS Word. Также вы можете быстро вставить изображения из «Википедии» в документ.
Чтобы воспользоваться инструментом, нажмите отмеченную на иллюстрации кнопку и выделите слово или термин, значение которого хотите найти. Для работы инструмента необходим доступ к интернету.

Ищем определение в «Википедии»
Чтобы вставить изображение, нажмите на знак «плюс», отмеченный на иллюстрации.

Вставляем в документ изображение
Также можно вставить в документ текстовую цитату из «Википедии». Для этого выделите нужный фрагмент и нажмите знак «плюс».

Выделяем текст и вставляем в документ Word
Инструменты мультимедиа
С помощью инструмента «Видео из интернета» вы можете вставить в документ соответствующие объекты. Чтобы воспользоваться функцией, нажмите кнопку «Видео из интернета», найдите видео с помощью поиска на YouTube или в Bing, выделите и вставьте объект.

Вставляем видео в документ
Теперь видео можно просмотреть в документе MS Word. Для этого понадобится доступ к интернету.

В Word’е можно смотреть видео
Функция «Ссылки»
С помощью выпадающего меню «Ссылки» можно вставлять в документ гиперссылки, закладки и перекрестные ссылки. Чтобы вставить гиперссылку, скопируйте URL веб-страницы в буфер обмена. Затем выделите фрагмент текста, который станет анкором ссылки.

Копируем URL и выделяем анкор
В выпадающем меню «Ссылки» выберите опцию «Гиперссылка». Вставьте скопированный URL и нажмите кнопку «ОК».

Вставляем URL и сохраняем ссылку
Функция «Закладка» позволяет быстро переходить к отмеченным разделам текста. Чтобы добавить закладку, выделите нужный фрагмент текста, а в выпадающем меню «Ссылки» выберите опцию «Закладки». Назовите закладку и нажмите «Добавить».

Добавляем закладку
Чтобы быстро перейти к заложенному контенту, выберите меню «Закладка», выберите нужную закладку и нажмите «Перейти».

Переходим к закладке
Функция «Примечание»
Функцию «Примечания» удобно использовать при групповой работе с документом. Чтобы добавить к тексту примечание, выделите фрагмент текста и нажмите отмеченную кнопку.

Добавляем примечание
Чтобы изменить, удалить или пометить примечание готовым, установите на него курсор и откройте контекстное меню с помощью правой кнопки мыши. Выберите необходимую опцию.

Помечаем, изменяем или удаляем примечание
Блок инструментов «Колонтитулы»
С помощью инструментов группы «Колонтитулы» можно добавить на страницы верхние и нижние колонтитулы, а также пронумеровать страницы документа.
Чтобы добавить верхний колонтитул, воспользуйтесь соответствующим меню. Выберите шаблон колонтитула.

Выбираем шаблон колонтитула
Введите текст. Для сохранения изменений закройте окно колонтитулов.

Вводим текст и сохраняем изменения
Чтобы удалить или изменить колонтитул, воспользуйтесь соответствующими опциями в меню «Верхний колонтитул».

Изменяем или удаляем колонтитул
Аналогичным способом можно работать с нижним колонтитулом.
С помощью функции «Номер страницы» можно пронумеровать страницы документа. Для этого с помощью выпадающего меню выберите расположение и шаблон нумерации.

Нумеруем страницы
Блок инструментов «Текст»
С помощью функции «Текстовое поле» можно выделить фрагмент текста в документе. Используйте его, если нужно оформить врезку, цитату, определение. Чтобы воспользоваться инструментом, с помощью выпадающего меню выберите шаблон текстового поля.

Выбираем шаблон текстового поля
Добавьте текст и сохраните изменения.

Добавляем текст
Функция «Просмотреть экспресс-блоки» позволяет вставить автотекст, свойства документа или поле. Например, вы можете вставить дату публикации, название, адрес и телефон организации и другие данные.

Вставляем в документ дату публикации
С помощью меню «Добавить объект WordArt» можно добавить в документ визуально привлекательную надпись. Для этого воспользуйтесь отмеченным на иллюстрации меню. Выберите подходящий объект и добавьте текст.

Используем объект WordArt
Функция «Добавить буквицу» позволяет оформить абзацы с помощью выделяющейся заглавной буквы. Установите курсор в начале абзаца. С помощью соответствующего меню выберите расположение заглавной буквы. Обратите внимание на возможность изменять параметры буквицы. Вы можете выбрать шрифт, высоту и расстояние от текста.

Выделяем заглавную букву
Добавьте в документ строку для цифровой подписи. Для этого воспользуйтесь отмеченным на иллюстрации меню. В открывшемся окне укажите необходимую информацию и сохраните изменения.

Вставляем поле для цифровой подписи
Функция «Дата и время» поможет добавить в документ актуальную дату и время. Нажмите на соответствующую кнопку, выберите формат отображения даты и нажмите кнопку «ОК».
Функция «Объект» позволяет вставить в документ объекты или текст из файла. Чтобы вставить текст из файла, выберите соответствующую опцию в выпадающем меню. Найдите на жестком диске файл, текст которого хотите вставить в документ, и нажмите «Вставить».

Вставляем в документ объект или текст из файла
Блок инструментов «Символы»
Функция «Уравнение» поможет вставить в документ математическую формулу. С помощью выпадающего меню выберите стандартную формулу или перейдите к конструктору. Добавьте необходимые значения и сохраните изменения.

Используем конструктор формул
С помощью меню «Символ» в документ можно вставить отсутствующие на клавиатуре символы. Обратите внимание на возможность вставить дополнительные символы из диалогового окна.

Вставляем в документ специальные символы
Как использовать возможности вкладки «Дизайн»
С помощью инструментов вкладки «Дизайн» вы можете изменить оформление документа. Если хотите изменить стандартные настройки, начните с выбора темы.

Выбираем тему документа
Чтобы отменить изменения, воспользуйтесь опцией «Восстановить тему шаблона» или выберите тему «Стандартная».
В меню стили выберите подходящий по вашему мнению стиль.

Меняем стиль документа
Функция «Цвета» позволяет вручную настроить цвет шрифта основного текста, заголовков и гиперссылок. Вы можете выбрать стандартный набор цветов или указать цвета для разных элементов стиля самостоятельно.

Настраиваем цвета
С помощью меню шрифты можно быстро настроить шрифт для заголовков и основного текста. Вы можете выбрать стандартные пары или указать шрифт вручную.

Настраиваем шрифты
Меню «Интервал между абзацами» можно использовать для изменения соответствующих настроек. Есть возможность удалить интервал, выбрать стандартные или задать собственные значения.

Настраиваем интервал между абзацами
С помощью меню «Эффекты» можно выбрать дополнительные эффекты оформления. Функция «По умолчанию» будет полезна, если вы хотите применять настройки дизайна к новым документам.
Блок инструментов «Фон страницы»
Функция «Подложка» позволяет выбрать стандартную или настроить пользовательскую подложку. Чтобы задать параметры вручную, воспользуйтесь опцией «Настраиваемая подложка».

Настраиваем подложку
С помощью функции «Цвет страницы» можно изменить соответствующую настройку. Обратите внимание на опцию «Способы заливки». С ее помощью вы можете добавить на страницы текстуру, узор и рисунок.

Меняем цвет страницы
Функция «Границы страницы» позволяет добавлять на страницы границы. Используйте шаблонные или собственные настройки.
Как пользоваться возможностями вкладки «Разметка страницы»
Инструменты вкладки позволяют менять разметку страниц документа.
Блок инструментов «Параметры страницы»
Функция «Поля» позволяет выбрать стандартные или указать собственные параметры полей. Чтобы задать пользовательские значения, воспользуйтесь опцией «Настраиваемые поля».

Настраиваем поля
Функция «Ориентация» дает возможность выбрать книжную или альбомную ориентацию листов документа. С помощью меню «Размер» можно менять размеры листов. По умолчанию используется размер A4.

Меняем размер документа
В меню «Колонки» вы можете указать число колонок на листе. Функции «Разрывы» и «Номера строк» позволяют настроить разрывы страниц и добавить нумерацию строк соответственно. Меню «Расстановка переносов» дает возможность включить перенос слов со строки на строку по слогам. По умолчанию эта функция выключена. Не меняйте эту настройку без необходимости.

При необходимости включаем переносы
Блок инструментов «Абзац»
С помощью функции «Отступ» вы можете регулировать отступ от левого или правого края до абзаца. Чтобы воспользоваться функцией, установите курсор в начале выбранного абзаца и задайте значение отступа.

Уменьшаем отступ от левого края
С помощью функции «Интервал» можно изменить интервал между выбранными абзацами. Для этого установите курсор перед выбранным абзацем и установите значения.

Меняем интервал между выбранными абзацами
Блок инструментов «Упорядочение»
Функция «Положение» позволяет задать расположение объекта в тексте. Чтобы воспользоваться инструментом, выделите выбранный рисунок и воспользуйтесь выпадающим меню.

Выбираем расположение объекта
Функция «Обтекание текстом» дает возможность выбрать способ обтекания объекта текстом. Чтобы протестировать инструмент, выделите рисунок и воспользуйтесь выпадающим меню.

Выбираем способ обтекания рисунка текстом
С помощью кнопки «Область выделения» вы можете вывести в область задач список объектов. С помощью функций «Выровнять», «Группировать» и «Повернуть» можно выполнить соответствующие действия с выделенными объектами.
Как использовать возможности вкладки «Ссылки»
С помощью инструментов на вкладке «Ссылки» вы можете управлять сносками, ссылками, добавлять оглавление, предметный указатель и таблицу ссылок.
Блок инструментов «Оглавление»
Функция «Оглавление» позволяет создать в документе оглавление. Чтобы воспользоваться инструментом, с помощью выпадающего меню выберите опцию «Автособираемое оглавление». Программа включит в оглавление заголовки всех уровней. Если выбрать опцию «Ручное оглавление», придется указывать названия разделов самостоятельно.

Добавляем в документ оглавление
Функция «Добавить текст» позволяет добавить или удалить из таблицы текущий заголовок. Функция «Обновить таблицу» дает возможность включить в оглавление новые разделы.
Блок инструментов «Сноски»
С помощью меню «Вставить сноску» вы можете добавить соответствующий элемент. Выделите фрагмент текста, к которому относится сноска, и нажмите отмеченную на иллюстрации кнопку.

Вставляем сноску
С помощью функции «Вставить концевую сноску» можно добавить сноску в конец документа. Используйте выпадающее меню «Следующая сноска» и функция «Показать сноски» для быстрого перехода между сносками.
Блок инструментов «Ссылки и списки литературы»
С помощью меню «Вставить ссылку» вы можете сослаться на источник информации, например, на книгу. Установите курсор рядом с фрагментов текста, к которому относится ссылка. Нажмите соответствующую кнопку, в открывшемся окне укажите необходимую информацию и сохраните изменения.

Ссылаемся на источник
С помощью функции «Управление источниками» можно редактировать список, сортировать и удалять источники.

Редактируем список источников
Выпадающее меню «Стиль» позволяет выбрать стиль ссылок. С помощью функции «Список литературы» в документ можно вставить соответствующую информацию.

Вставляем в документ список литературы
Блок инструментов «Названия»
Функция «Вставить название» позволяет добавить название или подпись к изображениям, таблицам и формулам в документе. Чтобы воспользоваться инструментом, выделите нужный объект и нажмите отмеченную на иллюстрации кнопку. Добавьте информацию и сохраните изменения.

Добавляем подпись к изображению
С помощью функции «Список иллюстраций» вы можете добавить в документ соответствующую информацию.

Добавляем в документ список иллюстраций
С помощью меню «Перекрестная ссылка» добавьте в текст перекрестные ссылки на абзацы, рисунки и другие объекты.
Блок инструментов «Предметный указатель»
Функция «Пометить элемент» позволяет добавлять объекты в предметный указатель. Чтобы использовать инструмент, выделите объект, например, фрагмент текста или рисунок, воспользуйтесь соответствующим меню и заполните информацию.

Добавляем элемент в предметный указатель
С помощью меню «Предметный указатель» настройте отображение предметного указателя в документе.
Блок инструментов «Таблица ссылок»
С помощью функции «Пометить ссылку» можно включить соответствующий элемент в таблицу. А функция «Таблица ссылок» позволяет вставить в документ список ссылок.

Помечаем ссылки и строим таблицу
Как использовать возможности вкладки «Рассылки»
Инструменты вкладки помогут организовать физическую и электронную рассылки.
Блок инструментов «Создать»
Функция «Конверты» позволяет корректно добавить информацию на бумажные конверты. Чтобы воспользоваться инструментом, нажмите отмеченную кнопку и добавьте необходимую информацию. Теперь можете напечатать данные на конверте. Обратите внимание на поле «Подача». Здесь указан способ подачи конверта в принтер.

Печатаем информацию на конверте
Функция «Наклейки» поможет корректно напечатать информацию на наклейках для посылок, конвертов, CD.
Блоки инструментов «Начало слияния», «Составление документа и списка полей», «Просмотр результатов» и «Завершение»
Функция «Начать слияние» позволяет отправить сообщение нескольким получателям. Например, можете отправить письмо или электронное сообщение. Для этого нажмите кнопку «Начать слияние» и выберите опцию «Пошаговый мастер слияния». Следуйте подсказкам в области задач.
«Пошаговый мастер слияния» объединяет инструменты групп «Начало слияния», «Составление документа и списка полей», «Просмотр результатов» и «Завершение».

Используем «Пошаговый мастер слияния» с помощью подсказок в области задач
Выберите тип документа и нажмите «Далее».

Выбираем тип документа
Выберите основу для создания письма: текущий документ, шаблон или существующий документ. Создайте список получателей. Для этого выберите опции «Создание списка – создать» и введите данные.

Создаем список получателей
Напишите сообщение, просмотрите его и завершите работу с мастером. Теперь можете напечатать объединенный документ или отправить его в виде электронного сообщения.

Завершаем слияние
Как использовать возможности вкладки «Рецензирование»
Используйте вкладку «Рецензирование» для правок и оценки документа.
Блок инструментов «Правописание»
С помощью отмеченной на иллюстрации кнопки можете запустить штатное средство MS Word для поиска ошибок и опечаток. Обратите внимание, программа «видит» не все ошибки, а также иногда предлагает исправления там, где ошибок нет.

Проверяем правописание с помощью штатного инструмента MS Word
Функция «Определить» поможет определять значение неизвестных слов. Обратите внимание, для использования инструмента необходимо выбрать в магазине приложений словарь и установить его. Меню «Тезаурус» позволяет подобрать синонимы к выделенным словам. Функция «Статистика» показывает число слов, знаков, абзацев и строк в документе или его фрагменте.

С помощью тезауруса ищем синонимы
Блок инструментов «Язык»
Меню «Перевод» позволяет автоматически перевести выделенное слово или фразу. Выделите интересующий вас контент и воспользуйтесь отмеченной на иллюстрации кнопкой.

Автоматически переводим слово на английский язык
Функция «Язык» позволяет выбрать язык проверки правописания, а также настроить языковые параметры.
Блок инструментов «Примечание»
С помощью инструментов блока можно добавлять, просматривать, редактировать и удалять примечания. Обратите внимание, примечания можно создавать также с вкладки «Вставка».

Работаем с примечаниями
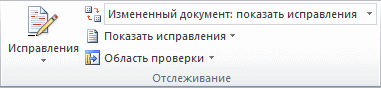
Блоки инструментов «Запись исправлений» и «Изменения»
С помощью функции «Исправления» можно отслеживать внесенные в документ изменения. Обратите внимание на меню «Область проверки». Оно позволяет выбрать способ отображения списка изменений: внизу или сбоку от документа.

Отслеживаем внесенные изменения
Инструменты блока «Изменения» позволяют принимать или отклонять изменения, а также переходить к предыдущему или следующему исправлению.
Функция «Сравнить» дает возможность сравнивать версии документов и объединять исправления нескольких пользователей. Функции «Блокировать авторов» и «Ограничить редактирование» защищают документ от нежелательных для вас действий других пользователей.
Как использовать возможности вкладки «Вид»
Инструменты вкладки «Вид» позволяют настроить отображение документа.
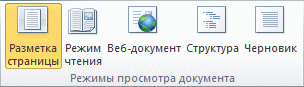
Блок инструментов «Режимы просмотра»
С помощью инструментов блока можно выбрать режим просмотра страницы. Например, вы можете просмотреть структуру документа.

Просматриваем структуру документа
Блок инструментов «Показ»
С помощью инструментов группы можно включить отображение линейки, сетки и области навигации. Последняя функция позволяет быстро переходить к нужному разделу документа.

Включаем отображение линейки, сетки и области навигации
Блок инструментов «Масштаб»
Функция «Масштаб» помогает выбрать произвольный масштаб отображения документа. Функция «100 %» позволяет вернуться к стандартному масштабу в один клик.

Меняем масштаб и возвращаемся к стандартному режиму
Функции «Одна страница» и «Несколько страниц» настраивают отображение на экране одной или нескольких страниц соответственно. Меню «По ширине странице» увеличивает ширину страницы до ширины окна.

Увеличиваем ширину страницы
Функция «Новое окно» открывает текущий документ в новом окне. Это удобно, если вы редактируете контент и хотите сверяться с оригиналом. Функция «Упорядочить все» объединяет несколько документов в одном окне. Функция «Разделить» необходима, чтобы в одном окне работать с разными частями документа.
С помощью функции «Рядом» вы можете расположить два документа в одном окне рядом друг с другом. Это удобно при необходимости сравнить содержание.

Сравниваем содержание документов
С помощью функции «Перейти в другое окно» можно быстро переходить в другие открытые документы.
Функция «Макросы» автоматизирует часто выполняемые задачи. Чтобы воспользоваться инструментом, необходимо создать макрос. Например, представьте, что вам часто приходится выделять фрагменты текста полужирным курсивом. Чтобы выполнять это действие автоматически, создайте макрос. Действуйте так:
- Выделите произвольный фрагмент текста. В выпадающем меню «Макросы» выберите опцию «Запись макроса».

Создаем макрос
- Выберите способ запуска макроса: с помощью кнопки на панели инструментов или сочетания клавиш на клавиатуре.
- Задайте сочетание клавиш для активации макроса.

Задаем сочетание клавиш
- Нажмите кнопку «Назначить» и выполните команды, которые необходимо включить в макрос. Для этого перейдите на вкладку «Главная», выберите выделение полужирным и курсивом.
- Вернитесь в меню «Макросы» и остановите запись.
- Проверьте работу макроса. Для этого выделите фрагмент текста и нажмите заданное сочетание клавиш.

Проверяем работу макроса
Дополнительные трюки для повышения эффективности работы с MS Word
Ниже вы найдете список лайфхаков, с помощью которых можно быстро решать стандартные задачи при работе с MS Word:
- Используйте контекстное меню. Оно вызывается щелчком правой кнопки мыши.

Вызываем контекстное меню
Чтобы выделить абзац, трижды щелкните левой кнопкой мыши по любому слову.
Чтобы вставить на страницу текст-заполнитель, напишите следующие символы: =lorem(2,2). С помощью цифр в скобках определите количество абзацев и строк заполнителя. Если заменить «lorem» на «rand», в качестве заполнителя будет использован случайный текст.

Вставляем текст-заполнитель
- Чтобы быстро создать надстрочную или подстрочную надпись, выделите нужное слово и нажмите сочетание клавиш «Ctrl +» или «Ctrl Shift +» соответственно.
- Чтобы выделить предложение, нажмите Ctrl и установите курсор на любом слове.
- Выбирайте тип сохраняемого файла. Например, вы можете сохранить данные в формате PDF. Для этого выберите опцию «Сохранить как» и выберите нужный тип файла.

Выбираем тип файла при сохранении
- Чтобы создать горизонтальную линию, введите три дефиса подряд и нажмите клавишу Enter.
- Чтобы напечатать тире, воспользуйтесь сочетанием клавиш Alt + 0151.
- Чтобы быстро переместить фрагмент текста, выделите его, нажмите F2, установите курсор на место вставки и нажмите Enter.
Источник: Texterra
Learn more advanced basic features of Microsoft Word. Full explanations of Microsoft Word use and features.
In this article, I am writing about detailed features and uses of the Microsoft word application. These features help you to learn the basics of MS Word 2007, 2013, and 2016 versions.
Microsoft Word is the most important word-processing office application used by students, teachers, IT professionals, and companies, etc. around the world. Microsoft Word is used to create and edit professional-looking documents such as resumes, books, admission forms, letters, papers, reports and booklets, cover pages, notes, assignments, brochures, and even web pages.
Features and uses of Microsoft Word 2007,2010 … and Microsoft 365
1. Microsoft Word Templates Features and uses
- Templates: – In MS Word are a pre-defined professional design for users. In which all the page layout, fonts, colors, graphics, outline, text boxes, etc. word processor user gets by default. To insert the template you need to go to File Menu -> New then you can see available templates and the office.com template. MS word application contains so many templates such as business cards, educational layouts and graphics, event planner documents and event management templates, flyers, invoice templates, invitations templates, many types of forms, resume templates, etc. This is the most beneficial feature of the Microsoft Word Application. Because of even less Microsoft word, literate users can use Microsoft word without the knowledge of other menus and functions.
The benefit of Templates in MS word technically is that any student or professional only needs to replace the existing text and their document is ready to print.
If anyone wants to create a resume but don’t how to do it then they have to go into the file menu->new->template they only need to search for a resume under the office.com template option. But to access these all features of MS word templates it is required users that they’re already connected to the Internet.
If the user wants to send an invitation card but doesn’t know how to create it in MS word then again they need to search for the invitation card template in MS Word, select the design and edit the pre-defined text.
This is the easiest way to use Microsoft Word and it saves lots of time for the users. This is how Microsoft Word use can be productive if anyone uses it smartly.
Related: Importance of MS Word in Education
2. Microsoft Word Home Menu Features and its Uses
Microsoft word home menu contains all the basic standard formatting options such as font settings, paragraphs, styles, and editing. The home menu is very important to practice for MS Word processor students.
- Clipboard: – In Microsoft Word Home Menu Clipboard is the first category menu that is used to store copied material temporarily. Such as text and pictures or any object in Microsoft Word. The uses of the clipboard function are that users can copy, replace, and place the text from one section to another section of the page. Also, the uses can be extended to this function such as copied texts remaining saved temporarily until not deleted. You can see your copied text and image in Clipboard when you click on the bottom right corner (little arrow sign-in box). And if you want to Copy then use CTRL+C and for paste use CTRL+V’
- Font: – In which the user can set the font style according to the nature of the document. For example, if someone is writing an application or resume then the font can be Calibri or any professional font. If anyone is writing a fancy paragraph or poem then the font can be Freestyle Script. You can also type in Hindi, and Punjabi in Microsoft Word by downloading Hindi or Punjabi fonts and then installing those fonts. Such as AGRA, Kruti Deve, Kundli, etc. Hindi fonts are common in use. MS word provides more advantages for users other than any word processor. In MS word, home menu users can set and change font sizes easily. They can fill the color background behind the text, and users can set text transformation to uppercase, lowercase and in Title case, etc. any line can be underlined and italic based on the document style. If you want to use all font options from one place then press Ctrl+Shift+F on the keyboard. This is a shortcut key to open Font options.
- Paragraph: – The paragraph sub-menu is another great feature in MS-word that can be used to align paragraphs, and highlight features and important points by using bullets and numbers. MS Word users can also set the line spacing to improve the readability of the document.
- Style: – If users don’t know anything about the font, or paragraph formatting then they can use the style category menu under the home menu. In which any text can be highlighted according to the predefined style. E.g. heading size, subheading size, etc. confusion can be easily solved in the styles category. Such as if you’re using various headings in your essay or document but don’t know how to set the font size, then you don’t need to worry, just select the text you want to make a heading and then click on Heading 1. In the styles category, there are 6 types of heading such as Heading1, Heading 2, Heading 3, Heading 4, Heading 5, and Heading 6. Such options are very useful in education or educational material. Books and study materials can be designed professionally by using these options in Microsoft Word.
- Change styles: – Users can set any style for their document in Microsoft Word. This is another very useful option in which document style can be edited or created according to the reader of the document. In the change style menu, you can set your document style to distinctive, elegant, fancy, formal, modern, newsprint, perspective, modern, simple and traditional, etc. Also, you can set paragraph spacing to tight, compact, relaxed, etc. based on the user’s demand or according to the reader’s point of view.
- Editing: – Another use of the home menu in Microsoft word by using the Editing Category Menu. The user can find any word or line in between documents. They only need to press F5 or Ctrl+F and then they can find and replace any text in the document. They can select, and replace any object in the document. They can visit any page or section in the document by pressing Ctrl+G from the keyboard then they can put the page number and click on Go To. These wonderful features are not available in one place in such an easy style in other word-processing applications.
Such technical users of the Microsoft word Home menu are very beneficial for all kinds of users such as students to create assignments and notes. Teachers can use these options to highlight the main topic of the document. A business professional can use these options to create professional-looking letters. E-book writers can design their books according to this. Bloggers can write their posts amazingly with the use of these options.
3. Insert Menu Features in Microsoft Word and Uses
- Insert means in MS Word to insert something from outside into the page. Such as pages (cover pages, blank pages, and page breaks), Tables, pictures, clip art, shapes, smart art, hyperlink, header and footer, and text boxes symbols) All are great features of the Insert menu in Microsoft Word. These functions provide exceptional uses for the word user. Let’s understand these features and uses below:
- Pages (Cover Page, Blank Page, and Page Break): – In MS Word, the Page sub-menu contains three main features.
- The cover page feature can be utilized at the start of the document or it will be used on the first page of the document. Such as students, teachers, professionals, and writers can insert cover pages in stories, assignments, notes, articles, etc. to highlight the title of the written story, notes, description, and author name. There are so many pre-defined cover page templates that can be used to get the attention of readers while they will receive your printed or pdf copy. Also if you’re not satisfied with these templates then there is another option called more cover pages from office.com. According to Google translator cover is a thing that lies on, around something, and conceals. The magazine’s front page is also a cover page it can be edited photographs or designed text. Books front page, and greeting cards’ first page are examples of the cover page. I think you got this.
- The blank page option provides the user for inserting any blank page after the cursor. For example, if you want a blank page after writing the first paragraph on one page then you can click on this option. You can also use Ctrl + Enter to insert a blank page after the cursor. The use of the blank page function is mostly found outs in book publishing or eBook designing. People also can use their notes and documents. The benefits of using this function are that it will consume less memory of a computer or it will help to create fewer .docx (extension of MS word file) file word or .pdf(Portable document file extension) files.
- Page break is similar to the blank page option (You can use the same key: Ctrl+Enter) but it will start a new page after the click. But the difference between a blank page and a page feature is that you can insert the blank page at the cursor position, where the page break starts the next page at the current position. No big difference.
- Tables Menu uses in Microsoft Word: – The use of the table menu is that you can insert or draw a table in the document. You can insert a table, draw the table, convert text into a table, and insert a quick table (pre-designed tables). This is the most important function in the Insert menu that is mostly used to design or draw calendars, reports, and invoices and is used while creating forms, labels, and newsletters.
- illustrations: – Illustrations menu is used to insert the picture, clip art, shapes, smart art, chart, and screenshots. The use of the illustrations menu in Microsoft word will help users to visualize the document’s view to readers. Such as by inserting an image, adding clips, smart art, etc. The purpose of using these visually appealing options is to explore the creativity in readers’ minds while reading printed word files or pdf documents.
- The picture menu is used to insert a picture from your computer hard drives or from the desktop to the current position of your cursor. You can also insert pictures anywhere in the text box, word art and smart art, etc. Whenever you have to insert the image inside any object in Microsoft word then click on Picture Option under Illustration Menu.
- Clip Art uses MS word to insert Art clips such as drawings, movie clips, and sounds that illustrate the concept written in the document. These features help students to understand the concept by seeing clips. Also good to use in all kinds of educational and study materials.
- The shapes feature is used to insert rectangular, circles, arrows, charts, lines, and symbols based on the demand of the document. For example, while giving examples of something such as water consumption or electricity consummation in a document then we can use these shapes in MS word. We can also highlight, colorize, decorate or insert text and images inside the shapes. This is also a great feature of presenting reports in meaningful and professional methods.
- Smart Art is one of my favorite options in MS word. The uses of this option are great especially while educating. You can visually communicate information by using process diagrams, hierarchy diagrams, list diagrams, and relationship diagrams such diagrams is very important and we can use them to display organizational structure, and processes such as (Input->Processor->Output). SmartArt is easy to understand and teaches any complex problem. The option is also available in Microsoft PowerPoint.
- Charts are used to illustrate and compare data in MS word by using Bar, Pie, Line, Area, and surface mostly used charts in MS word. We can insert an excel chart into MS word. When you click on the chart it will open a Microsoft Excel spreadsheet that we can use to write figures. The uses of a chart are very beneficial to display data comparison and data analytics. You can find such options mostly in math or economics books and newspaper economics pages. Publishers are using such kinds of charts to display facts and figures.
Related: Top 5 Microsoft Word Courses Online to become master in document writing and editing
- A screenshot is a great option in MS word and it is used to take a screenshots of opened programs or applications on the computer and on the internet. You can insert the same captured clip in an MS word document in real time. It’s like a web camera in MS word. The use of illustration options for teachers and students in Microsoft word is great. Students and teachers can use these options to explain data organization, story maps, cause and effect, topic building, and clocks to teach about time. Also, entrepreneurs or managers can use these options to highlight decision trees, pros, and cons, and brainstorming exercises. English tutors can use these options to enhance students’ English vocabulary etc. There are so many uses but tough to share them in one post. But I hope you got the ideas about the uses of Illustrations in Microsoft Word.
- Links: –Insert menu category contains a hyperlink, bookmark, and cross-reference function. What users use to link any internal or external file, picture, the web page from the document. Also, the bookmark can be inserted anywhere on the page, and then we can create the hyperlink to visit that position on the same document without scrolling.
- The hyperlink is used to create the link from text to any file, picture, video, or website. For example, if you want your reader to find more information about certain causes or solutions then you can link that source using the hyperlink option. Such as when you search on Google for something then all the list of search results is also hyperlinked.
- Cross-reference is similar to the Hyperlink option that is used to refer the user to headings, and tables. You can find such an option in E-books in which the table of content of the eBook is connected to the pages and figures. To insert a hyperlink on the selected document text from the keyword press Ctrl+K on the keyboard.
Here you can read the complete tutorial about hyperlinks: Hyperlink Example within Microsoft Word Document
- Header & Footer: – Microsoft Word users can use the header and footer option to insert text, image, and symbol that is important to appear at the top and bottom of each printed page. After adding content such as graphics, page number, author of the book, title of book, date, and time. Microsoft Word automatically inserts the same text with the correct page number and other graphics on the next pages or on each printed page. Such as if you want to highlight or want to print page numbers on each page you’re writing you can insert and align page numbers on the right or left or center of the document and after adding the page numbers, it will automatically appear on the next pages with number 2, 3,4. Word process users can also use a pre-designed header and footer and can edit too. If you want to insert only a page number then just click on the page number and select the desired position.
- Text: – Text category in Microsoft word under the home menu is used to insert TextBoxes, Quick Parts, Word Art, Drop Cap, Date &Time, and any kind of object. Uses of Text are very great for book writers, students and for teachers to insert preformatted text boxes anywhere in the document to highlight important words, sayings or main points of written paragraphs. The user can also draw text boxes from their own anywhere in the document such as forms, books, invitation cards, and invoices. Also if they don’t know how to format text boxes, then they can download more pre-formatted text boxes from office.com.
- Quick parts are used to insert a reusable piece of content including fields, document properties such as author name, the title of a document, comments, company name, etc. such options are mostly used by news editors, books, and magazine editors.
- WordArt is a good option to create and decorate a slogan, and quotes in documents in Microsoft Word. To use this you only need to select the piece of text and then select the appropriate color style or decorative text. WordArt is also useful to insert decorative text in invitation cards, happy birthday greetings and other kinds of funny or less professional documents.
- Drop Cap is used in books, letters, notes and new stories or newsletters to display the first letter larger at the beginning of the paragraph.
- Signature line: – The signature link is used mostly in the legalities of the document. Such as in government notification PDF files and legal notices signed with a stamp at the end of the page. This is similar to Microsoft Word in that government notification letters can use a signature line or they can add a digital signature on the spot. Also, any word user can insert a signature line at the end of the document or paragraph which specifies the individual who must sign or sign. Also, a digital signature is used in mostly Income tax returns, company audits, and company registration numbers and can be used in related legal documents.
- Date & Time: The date and time are easy-to-use features that can be inserted anywhere in the document. In Microsoft Word, there are so many dates and time formats (such as Saturday, December 31, 2016, or 31-Dec-16) that are two different formats that can be used according to the nature of the document.
Related: Top 5 Microsoft Word Courses Online to become master in document writing and editing
- Object: – Object is an advanced feature of Microsoft Word that is used to insert any object into the document and also by creating in real-time. Such as you can insert paint program functionality by creating a bitmap image in real-time, excel spreadsheets, videos, and PowerPoint presentations mean you can insert the embedded object.
- Symbols: – In this option, you can insert mathematical equations and can do plus, minus by using a table. Also, there is a symbol option that is used to insert a special character or symbol that is not commonly available on the keyboard. For example, you can insert a trademark symbol (™), copyright (©) and Unicode characters to display the ownership or authentication of the document that other people cannot use without permission.
This option in Microsoft word is mostly used in legal, marketing, and promotional documents. Also, you can find such symbols in the company’s logo, website footer, and Wikipedia contents footer.
4. Features and uses of Page Layout Menu in Microsoft Word
- Page layout menu in Microsoft word gives various uses for the user to set themes, page setup, page background, paragraph and arrangement in the document. Page layout features in Microsoft word is very useful for eBook publisher and document printing business and also for common word users.
- Themes: – In Microsoft Word, a theme is a set of pre-designed document designs fonts, headings, and effects. By the use of the theme option in Microsoft word, the user can change the overall design of the page such as fonts, effects, and colors.
- Page Setup: – Page setup is the most important option and the users start after creating a new document. I always recommend to all my students that before writing, creating, designing or doing anything in Microsoft you should first do the page setup. Why because all the page margins, page orientation and size create problems later when you print the document or do the arrangement of objects.
- The margins option is used to set blank spaces from edges toward the inside from outside. Margins are page edges that are outside the main content of the document. The margin will help us to define the paragraph’s starting point and ending point. By doing click on the margin option there are various pre-defined margins such as narrow in which margins are 0.5 from the top, bottom, left and right. Where normal is 1” from all four sides. If the physical paper is the A4 size it means its width is 8.27” and height is 11.69” then you can set 0.5” margin from all corners recommended. Because the fewer margins on the edges will use less paper for your document. Else if you set 1” then it will use more printouts for the same document.
- The orientation used is to set the page layout from Vertical to Horizontal or Portrait to Horizontal. A simple way to understand the uses of orientation in Microsoft Word is that it will allow the users to switch the page layout according to the text writing flow. Portrait means layout style from left to right and landscape means the right to left. This will be a best-used example, if you’re printing your document on the A4 size and your text in the document goes outside the page from the right and uses less space towards the bottom then you can set landscape. For example Exam Date Sheets, Marriage cards, and Diploma certificates. are printed in the Landscape layout. Where mark sheets and admission forms are printed in portrait. The best way to switch to one option then sees the document samples that you want to print or check if the page sizes or margins are not meeting your design criteria. Most 90% of the time we use a portrait layout in page setup. So, if you find your document text is not getting proper arrangement on the printed page then you can do the experiment to switch the portrait layout to the landscape in the Page setup option in Microsoft Word.
- Page size as I discussed above that it depends on the kind of document you’re printing. If you’re printing your document on the A4 paper size that you purchased in the market then set A4. Because you can’t set A5 in this condition because then some text will not be printed in the document. You can vary the page sizes according to the section. In Microsoft word, there are Letter sizes for letter documents, Tabloid, executive sizes and envelope sizes available. But if you want to become an expert in Microsoft Word or want to be proficient in printing documents then I will suggest you print the same text in various page sizes on A4 paper. It will give you practical knowledge about page setup settings and other things too.
- The columns option in Page Setup is used to split the text into two or more columns. Generally, this option is a classical text formatting style that is very beneficial in news printing, newsletter, and nobles. For example, see the newspaper in which they adjusted the text in small line width and paragraph and at the same time they converted the long paragraph into columns. So it will increase readership interest in particular news. Else you can see English and Hindi in which one page is divided into columns.
Breaks, lines, numbers, and hyphenation options are similar as we discussed in the Insert Menu options.
- Page Background: – The use of page background in Microsoft Word is to give extra effects or protection effects to the document such as the watermark, page color, and page borders.
- Watermark is used to insert ghosted text behind the text in the middle of the document. This is a very beneficial option that indicates that the document is confidential, and urgent and needs to be treated carefully. Watermarks are used in text documents, images, and PDF files. You can see the example in Google images or stock image which is protected by the website or company watermark so that no one can reuse the images. Also, you find watermarks in legal documents, letterheads, and bank passbooks or in checks. There is a pre-defined watermark in Microsoft Word such as Confidential, and urgent. You can change these into your company name, personal name or related to the document, you can also insert your company logo, school logo, or any other image that will indicate to the reader or finder that this document is important.
Related: Top 10 Basic and Advanced Microsoft Word skills
- The page Color option is used in Microsoft Word to set the color background of the page. Microsoft word document default color is white with black text color. So, official documents with page background colors you can’t see often. But it is used mostly in eBook or PDF files. Also, it depends on the document’s goal. You can also use the fill effects option in which you can set gradient colors, textures, patterns and picture backgrounds to your page. Setting page color will not print a document in colors it’s just for visual appeal.
Related: Top 5 Microsoft Word Courses Online to become master in document writing and editing
- The page Borders feature is very beneficial to add border styles with colors and art around the page. Also, it is used to add text color background by using shading options that will come in printout too.
- The paragraph option in the page layout is used to set left, and right text indents. This is used to set paragraph beginning and ending points. Similar to what I discussed above in Home Menu. This option is also in the home menu but the difference is that you can set the left indent by using figures.
For example, if you want to give more space to a paragraph from left in the current cursor positions then type 1.22” in the box and hit enter. This will move your paragraph toward the right. The use of this feature is to design the document style in which the reader will find it interesting or information is easy to read.
Also, there is the spacing option used for spaces between paragraphs. You can also use the TAB key on the keyboard to use Indent or paragraph margin functionality in Microsoft Word to set indents and spacing.
- Arrange: – The use of an arrange feature in Microsoft Word is to arrange document text professionally and efficiently. The most important option is the Wrap Text. I saw many students learning computers find it difficult to arrange the image or text objects correctly.
- Wrap text is used to align inserted images, and word Art correctly with text. For that, if you want to insert text around the inserted image then you can select a square option in Wrap Text. Also, you can set your image in Front of the Text or Behind the Text. You can also drag and adjust the object over text to align it.
But by default when you insert an image it will not move because it is “In Line with Text” by default then right-click or double-click on the image and choose Wrap Text and select the square or in front of text option then you can adjust the image according to your style by the use of the mouse.
You can find such text arrangement skills in newspapers, magazines, and book-style layouts. There are other options too which can work similarly to arrange the document such as position, bring forward, and send backward. But you can also use the option by right-clicking on the object. You can also use the drag-and-drop style to arrange different kinds of objects in the document.
The best way to learn Microsoft word is to use these options or click on these features after the selected text and you will find a result practically that is learnable.
5. Features of Reference Menu in Microsoft Word and Its Uses
Reference menu and options mean mentioning, or referring to the source of information. In this I will define the Footnotes feature:
- Footnote: – Footnote in Microsoft Word is used to add the special text or written text reference in the document at the end of the page. This is not the footer, this will come before the footer. For example, if you’re writing in a document, book page any figure or fact that is published in the newspaper then you can mention in the footnote the source of information that it is published in abcd newspaper.
- But the endnote is different and the output is similar. The endnote will come at the end of the paragraph. The endnote is used after the paragraph but the footnote is used at the end of the document. The font size of the endnote and footnote is small than other written text.
You can see footnote and EndNote examples in the dictionary’s bottom page, old English literate books, and in English nobles and magazines.
6. Microsoft Word Mailings Menu Features and Its Uses
In Microsoft Word Mailings Menu Mail Merge is the most powerful feature that is used to send bulk emails and printouts letters, and documents for thousands of people or print out thousands of copies with different names, addresses, and email fields but with same subject or company name.
This option is very beneficial to send a newsletter, reports, notifications, and updates. to team members by the Manager, to customers from banks to readers, from bloggers and to students from Teachers. Also, the mail merge is used by the printing press to print envelopes with the same subject line but with a different name on each printed page.
7. Microsoft Word Review Menu Features and Uses
Review functions and features used are to examine, test, and proofing of the written document in Microsoft Word. You can compare the two documents and also you can add a comment to certain lines or words.
- Proofing: – Use of the proofing feature is to check the spelling and grammatical mistakes in the document. You can also research any word and its meaning word thesaurus. For example, you can check spelling mistakes, and count the total written words, and paragraphs in the document. If you want to check your spelling mistakes then you can press the short key F7 then it will automatically highlight spacing mistakes with green color and spelling errors with Red color.
Related: Top 5 Microsoft Word Courses Online to become master in document writing and editing
- Comments: – Comments option output is similar to ToolTip. For example when you move your mouse to the “Window Button” it notifies the user with the text “Start Button” this is similar to comments. If you want to add more expression or more thoughts behind any used word in the document you can use the comment option.
8. View Menu Features and Uses MS Word
View menu uses are related to document views such as full screen, web layout, print layout, zoom, windows arrangement, and macros.
- Document view: – Document view menu features are used to view the documents in various styles. The printout is by default view to see the document while you’re writing the text. Also if you’re printing or creating something for printing purposes then use a print layout view.
- Full-screen reading view: used for reader and document designer to view the document in reading view in which all the pages are looking like you’re reading a book. Also, the full-screen reading view is helpful to design and see the page’s settings and visibility of text clearly.
Related: Top 11 Most important Computer Skills to learn for career development
- Web layout is used to see the document as a web page. The uses are for students and designers to view the text in a web layout. Also selecting a web layout view and then saving the document as a web page will save the file in HTML format and when you open the saved file, it will use the internet browser to view the document text instead of Microsoft Word.
- Outline: is used to see the document heading, and body text in levels. You can use this menu to edit the heading, body text, and document structure. You can also add control for sub-headings. Such as if you’re using H1 for the main heading and h2, h3, h4 for other headings then you place such subheadings under the H1 heading. Mostly this option is used in tutorials, support pages, and application or software documentation.
- Draft: is used to edit the text quickly.
Related: Top 5 Microsoft Word Courses Online to become master in document writing and editing
- The show feature is used to show gridlines to see the document text spacing and word spacing.
- Navigation is useful for eBooks and you can see such an option by default in Google Docs. The navigation option is used to view the document by heading when you checkmark on the navigation pane it will highlight the heading in the left sidebar in Microsoft word after that you can navigate the document by heading instead of scrolling down.
- The ruler or Ruler Bar is most useful and very important for document margins. Indents are important to align correctly with the use of the ruler bar. The ruler option in ms word is similar to the scale that we used for drawing in schools etc. You can see the first-line indent, hanging indent or left indent in the ruler bar. You can also use the rule bar to set the left, and center tab positions by a click on the ruler bar in Microsoft Word. This is beneficial to view the document correctly and align paragraph spacing correctly.
- Window: – The window feature used is to create a new document in New Window. For example, if you’re current file name is Microsoft Word Tutorials then the new windows file name will be Microsoft Word Tutorials 2.
- The split feature is used to split the page with a ruler bar in between the text. Not that common to use. Just feature users are while you’re creating the document in which spacing or margin detail is important.
- Arrange all will arrange multiple application windows in the current view. Such as we can shrink the window size towards the left and then we can arrange another application window on the right side.
- A switch window is used to switch between two application windows. But you can also use the Alt + Tab to switch between more than 2-3 applications without using the switch window option.
- Macros are used in Microsoft Word to automate repeated tasks such as font size, color size or series of commands and instructions in a group. You can run macros that will automate the formatting of other text in the document.
9. Format Menu Features and Uses MS Word
The format menu is used to edit font size, and color and to present object appearance with extra effects. Such as when you insert an image on the document format option will be highlighted on the Menu Bar. This indicates to the user that they can adjust color, brightness, border style, and other image effects such as picture shadow, cropping, and wrapping in Microsoft Word.
This option is very important for Microsoft Word students, and word operators to learn this practice as much as possible because it will be used in assignments, newsletters, and notes.
The format feature is also visible when you insert shapes or text boxes in the document. You can edit shape outlines, background colors, and text styles from the format menu.
After getting the basic knowledge of or Microsoft Word uses written in this article now it is really important that you can do as many as possible practical exercises. Such the above-discussed features of Microsoft Word are very important for every word processor user. School students should learn such features so they can create professional-looking notes. Professionals or people working in a government office and documenting related works in their daily life can learn such features.
If you study all the above features in the best possible way then you can understand if we all can are educated enough about Microsoft Word then we can get various benefits.
As you can see today there are various government and private documents you receive from offices that are not that professional technically. Even school question papers and books are printed with low-quality text formatting such things are not good even when someone is paying for the services.
If students learn these Microsoft word features in schools I will be sure that they will be great professionals in the future especially in documenting writing and editing related works.
Jobseeker also learns Microsoft Word features that help them in their job and also creates resumes professionally in Microsoft Word.
Because of the robust uses of Microsoft word, it is essential to learn Microsoft Word. There are various tutorials that you can use to learn Microsoft Word for free on the Internet. The best way to learn Microsoft word is that you can practice your skills by creating different kinds of admission forms, reports, tables, and advertisements in Microsoft Word.
You can also use Google Docs for Word Processing. Google Docs is available on Google Drive. You can also use MS word online by creating a Microsoft account on live.com or with an outlook account in OneDrive. A little advance but very beneficial if want to upgrade your MS office skills.
So, friends, I hope this article about the features and uses of Microsoft Word helps you to learn and understand the various uses of Microsoft word. And its features are important in our daily official life and career.
It is important to know all parts of Word, so that in this way we can write a more orderly and precise document. In this article you will learn everything related to this topic. You can also read our post about the work packages of What is Microsoft-office, where you will know its meaning and much more.
Table of Contents
- 1 Parts of Word 2020 and their functions
- 1.1 Microsoft Word
- 2 Work area
- 3 Title bar
- 4 Quick Access Toolbar
- 5 Standard bar
- 5.1 New
- 5.2 Open
- 5.3 Save
- 5.4 Print
- 5.5 Close
- 5.6 Exit Word
- 5.7 Save as
- 6 Office button
- 7 Format bar
- 8 Status Bar
- 8.1 See print layout
- 8.2 View full screen
- 8.3 Web Design View
- 8.4 Outline view
- 8.5 See Project
- 8.5.1 Zoom slider
- 9 Menu bars
- 10 Size buttons
- 11 Views
- 12 Rules
- 13 Scrollbars
- 14 Other icons that are parts of the Word program
- 14.1 The Tabs
- 15 The mousse or mouse
- 16 What is the most important part of Word?
- 16.1 Task pane
- 17 What are the parts of the Word screen?
- 18 Recommendations for using Word and its parts
Parts of Word 2020 and their functions
In this section we will make references to the parts of Word 2020. This implies that we must refer to the parts of Word and their functions. This program is included in the Office package developed by the Microsoft company for some years. Along with other programs, it represents one of those used by various users around the world. It contains a number of appearances that can make the works a real gem. Here we will tell you all parts of Word.
Documents written in Word can be presented in order and with an interesting organization when all the parts of Word. We will then see how these commands are carried out and also how the program is structured.
The first view of Word presents the Word desktop parts. A way where a very large space that covers 80% of the screen can be seen between several elements. This is where the document will be written. There are also various menus and bars where various processes are activated. These allow giving breadth and versatility to the document, let’s see its parts then.
If you want to learn How to make an index in Word you can access the link that left you here.
Microsoft Word
Now, What is Microsoft Word and its parts? This program is a software for writing texts, by means of which different types of documents can be easily developed in a practical way.
In other words, it is a word processor that allows you to create and edit text, as long as you know each other. what are the parts of Word and what are they for. With this software, the user will be able to write and design texts where they can use different fonts, colors, sizes, thanks to the Word functions. Next, we will describe you all parts of Word.
Area work
The work area is one of the parts of the Word and it is the largest that can be seen when we open the Word file. It is generally white and it is the place where the writing of any type of document, letter, memo, or simply a communication will be developed. Next we will say what are the parts of Microsoft Word.

Bar of title
The title bar is one of the parts of a Word document. It is located at the top of the document, it shows the name of the program or document. There are also buttons to expand, reduce and close the document or file. The bar allows you to place some tools that the user will use according to their needs.
There, when we open a Word document we can read the phrase Document1 — Microsoft Word. Refers to a general name displayed by the program software. When we save our document we can replace that name with a personalized one related to our theme.
Bar tool quick access
This bar is one of the most important parts of Word. It is also located at the top of our screen, on the left side. When you press the little arrow, some commands such as “New” are displayed, which refers to opening a new document, «Open» which implies displaying a document that we have filed on our computer, «Undo» o «Redo», it even allows us «Save» The document.
To «Save» we just have to press the command that has the shape of a floppy disk. To «Undo» we press the arrow that goes to the left and «Redo» the one that goes to the right.
To this Word components, It is called the Quick Access Toolbar because they are the commands we use the most.
In this same bar we can visualize on the upper right side, what is known as window controls. They are simply three commands that allow us to perform three functions. The «X» is to close the window of the Word document we are working with, but not the program.
Others of the Word and its components is the script » — “It is to minimize the document that we are working on. On the other hand, the button that contains a double box that is located in the center of the previous ones is to maximize or enlarge the document.
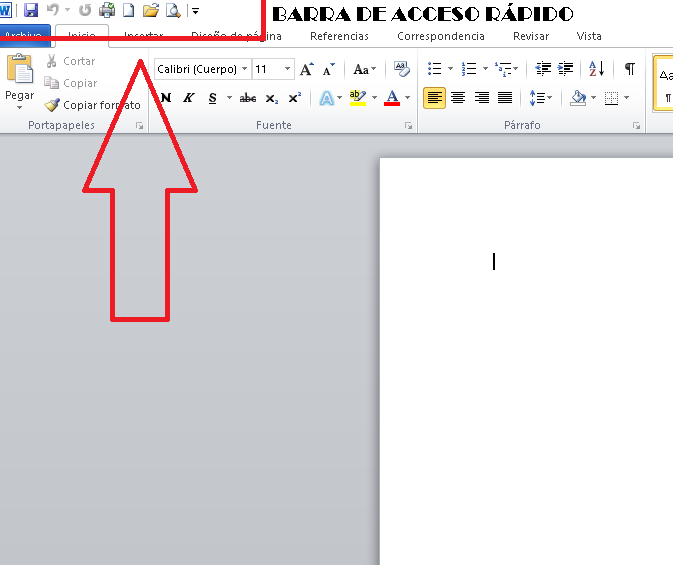
Standard bar
One of the parts of Microsoft office Word is the Word Menu bar is made up of eight horizontally organized tabs. Each one has different but easy to use functions. To be able to see the functions that integrate them, we simply click or select each one of them.
Among these tabs we have «File», «Home» or as some call it Word startup and its parts, «Insert», «Page Layout», «References», «Correspondence», «Review» and «View». Each of them has Microsoft Word functions specific.
In each of these tabs we can see dialog launchers that are downward arrows that display some functions. When we click on those arrows, windows are displayed according to each tab and group.
Selecting any function will display other options and you will be able to select the one you require to work on your document.
For example, when we press the «File» tab, some commands or functions such as «New», «Open» «Save», «Save as» are displayed, among others.
New
This command allows you to select a new document in the different programs offered by the Word Program package. You simply select the document you should work with and that’s it. Described one of the microsft word parts, We proceed to explain another of the components of this program.
Open
Open gives us the option to select in the document folders any material, work, file or document that we have saved.
Save
By pressing «Save» we are backing up the information we are working on. In the event that the document has not been saved on our computer, the «Save as» option will open so that we can back up the entire document.
When we have finished our work and we need to print it, we simply press the «Print» button and we can have our document in physical or printed form in word sheet.
Close
The «X» that we find in the «File» tab allows us to close the document we are working on. When pressed, a window is displayed that asks us for our choice to save the document.
Exit Word
As its name indicates, clicking on this option allows us to exit the word program. Also, all documents that are open will be closed.
Save as
This function allows us to save and identify our document with a category, a specific name that may be related to its content.
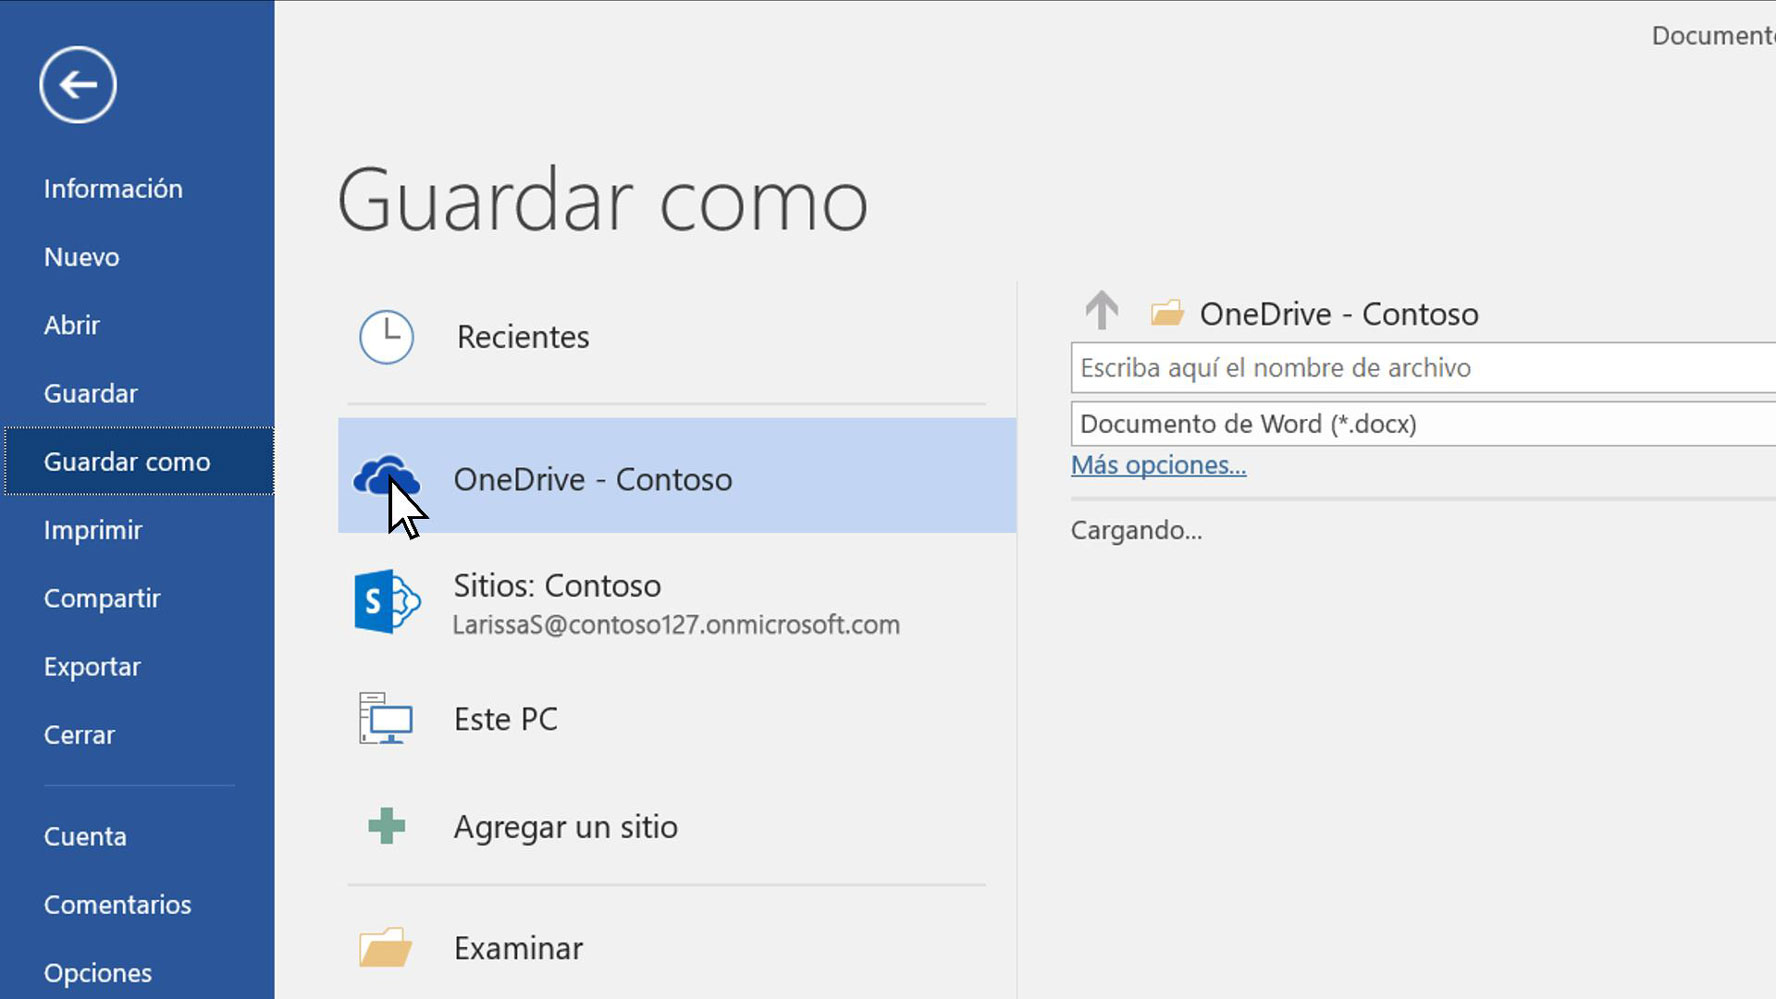
Office button
Another main parts of Microsoft Word it’s the office button. It is the circular button that is located in some operating systems at the bottom and in others at the top, on the left side.
When you press it, a window is displayed where you can select some functions of interest to which the program operates. This command takes us to other programs Microsoft Word parts, as well as other functions as you can see in the following word drawing and its parts.
Next we are going to describe the different Word bars and their functions so you can easily identify them. Among the word bars and their functions we have the format. Let’s see.
Format bar
Another parts of the word program is the format bar. This bar allows us to observe a series of buttons where a series of elements can be changed. They help to give a different and original style to the document. It also contains elements such as font type and color, highlighting, font size, style, among others.
This bar offers us different options to choose the font or type of letter with which we are going to write and the choice of color. In addition, it gives us the options to select the styles of the characters (bold, italic, normal, among others.), As well as the size of the font.
On the other hand, the format bar contains functions that help add to our underlined text and specific functions such as crossing out a phrase or word, double strikethrough, superscript, subscript, shadow, outline, relief, engraving, small capitals, uppercase, lowercase, sentence type , among others,.
Finally, it is in this bar where we choose the spaces between characters, lines and paragraphs, and other effects. We continue to offer you to word with all its parts.
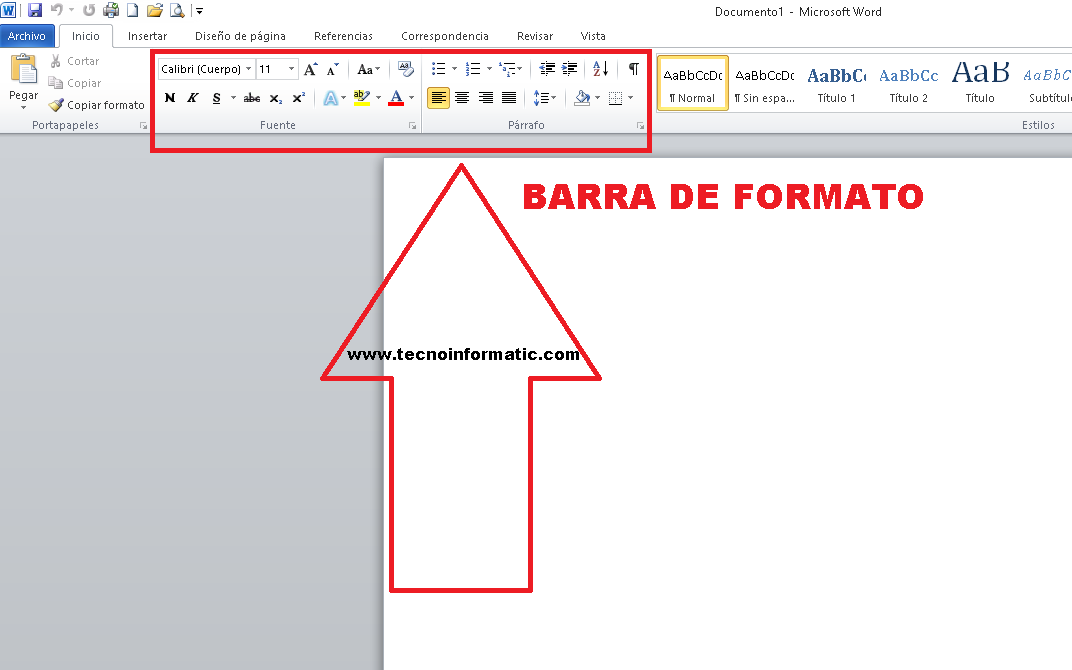
Word Format Bar
Status Bar
It is located at the bottom of the document and specifies the information related to the total number of pages, language, translator, error notifications, the word count, sections among other information. According to our image below, it is number 9.
The menu, as one of the parts of a Word, it is characterized by being manipulable and the information presented is assigned directly by the program, that is, actions cannot be included.
In this bar we can visualize the document we are working on in five ways.
See print layout
This option will allow the user to view the document as it will look when printed.
View full screen
This option is very useful, as it allows you to view the entire document and we can read the content of the document appropriately and comfortably.
Web Design View
In the event that the document is disseminated in search engines such as Explores or Firefox, this web design view will allow us to see how our document would look.
Outline view
As its name indicates, the document can be viewed in schematic form.
See Project
It is the tool that users use the most when they want to read or edit it. Refers to Zoom tools.
Zoom slider
This tool allows you to resize the document to view it according to the user’s requirements. Allows you to zoom in or out. It offers a wide range of sizes from 0% to 500%.
A part of word is the menu bar. Just by clicking on one of the actions found in it. We access various functions and various menus that serve as support when the document is being drafted or edited. That is, between the parts of word menu and Word functions in the menu bar we can:
- Create a new document.
- Locate previously saved Word documents.
- Close the current document.
- Archive the document you are working on on a disk drive.
- Save document changes with different characteristics, for example: different name.
- Set margins, paper size, orientation of the Word page and its parts throughout the document or part of it.
- Present on screen the final appearance that the document will have if it is printed.
- Send the document to print on the previously assigned device. You can also specify the number of copies, the range of sheets to print and print quality, among others.
- Quickly access recently used documents in Word.
- Exit the Microsoft Word application.
After having referred about the parts of the Word page, now let’s talk about the sizing buttons.
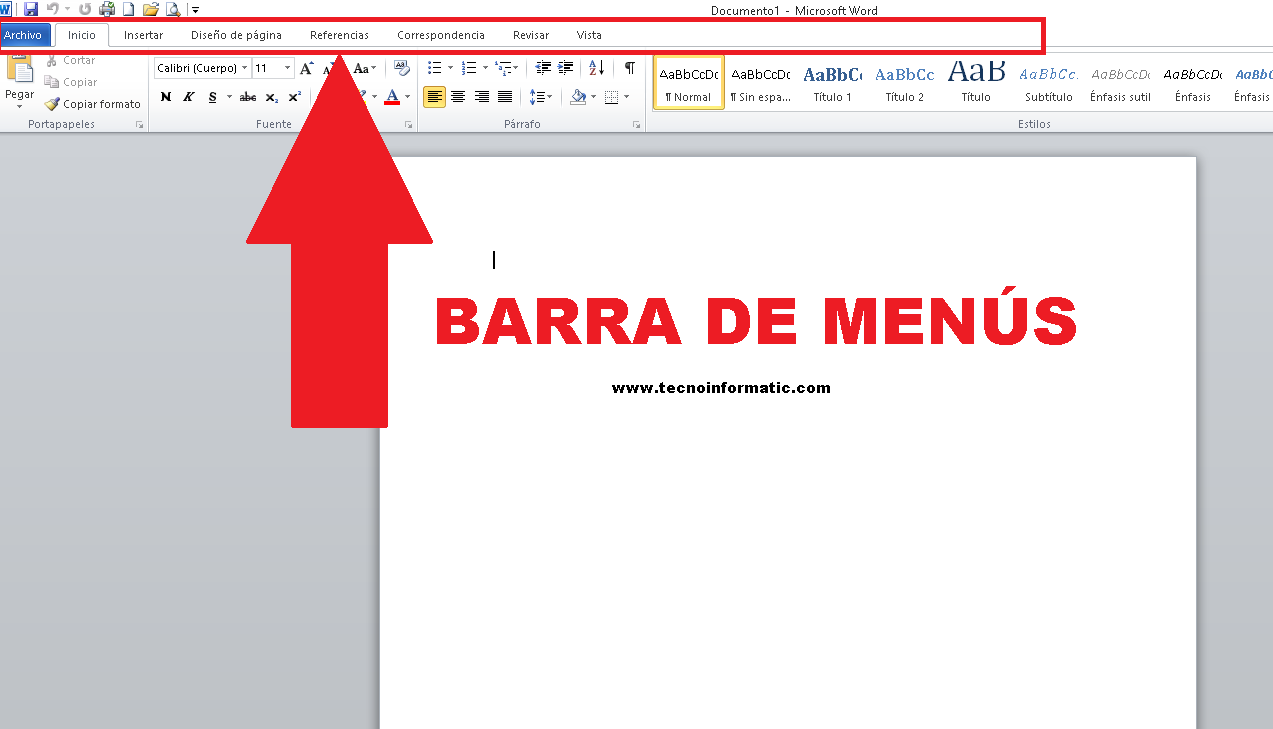
Size buttons
Between the parts of Word with their names we have to size buttons. It is located in the upper right part of the document in number three. They can also be seen in the rest of the Office programs.
There are three buttons as an integral part of the Word components, which allow the document to be minimized first when a small horizontal line is clicked. As you can see in the following image are the buttons that are located in the upper left part (Number 11 of the image)
Then we have the decrease bar, other of the parts of Microsoft Word, where by clicking on it we can reduce the size of the document. The X represents the closing of the document, it is always important to save it so as not to lose the changes.
Views
One of the parts of the Microsoft Word program that acquires relevance in the views. It is a very practical button, it serves to appreciate everything related to the various views that can be had of the document. As well as the modifications according to our taste, it refers to the ways in which a document can be viewed.
The menu shows the so-called normal view, print design, outline and web design among others. It is for these reasons that we consider this command to be one of the important parts of Word.
Rules
Described the Word parts functions, now we will talk about the Rules. It is a condition of the parts of the word which helps to manipulate the document. This is to select the size of the margins and set the distance for the entire document. Therefore, it is considered one of the basic parts of Word.
I leave you this video so that you can visually understand much more about the word elements and their functions.
Scrollbars
Is one of the parts that make up Word, characterized by being a long bar that is generally located towards the right side of the document. It consists of an open bar containing an arrow which allows the user to scroll up and down more quickly.
Other icons that are parts of the Word program
This feature is generally hidden and out of the user’s view. To access it, you must click to display a menu where the rest of the icons that represent other actions can be found. These are allowed to activate the icons of the different bars. Each of them can be added to the toolbar depending on the user’s own needs.
The Tabs
Definitely, tabs is one of the main parts of word. It consists of a user tool that helps to organize the content of the document in order to make it visible. This action can be done from the keyboard, but according to needs. Also, you can use the icon located at the top.
It is activated by clicking on the respective icon. Where a small menu opens that offers the various types of tabs, center the margin, or place it to the right or left.
The mousse or mouse
One of the Word components it’s the mousse. During the tour of the article we have told you about word and its parts and functions, however we lack the mouse. To select the various functions we must use the mousse or mouse. To select the different commands, we move the mouse pointer to the command that we need to use. It is important that you know that with the left button of the mousse you can select the options.
Now, with the button on the right side, other functions such as undo, paste, select all, among others, are displayed.
What is the most important part of Word?
The most important part of Word is the task pane, which we will define next.
Task pane
Other parts of Microsoft Word you can locate the right part of the window, in some versions. Allows the user to access functions related to changing text, formatting, modifying the paragraph. You can also create new documents, perform searches and insert some Word images and their parts.
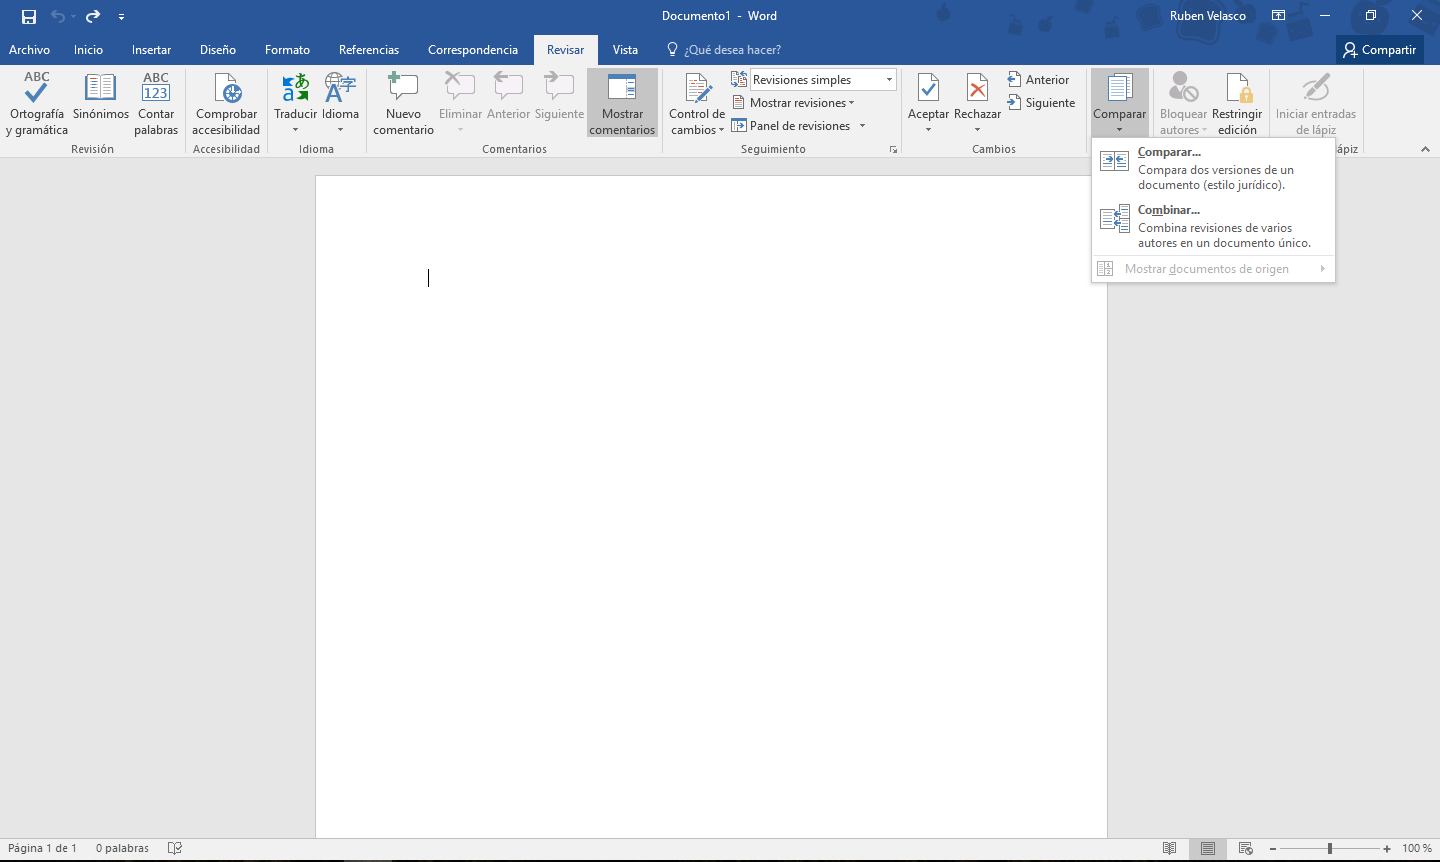
Word has undergone a major change in design and appearance compared to the previous version 2003. It now makes document preparation tasks easier as it uses a more intuitive and manageable interface that simplifies the use of the different tool menus.
What are the parts of the Word screen?
Once addressed Word its parts and functions, we will give you a list of Word and its parts that has the screen and among one of the first we find the Microsoft office 2007 Button (1), then we will see several of the bars one of them is the Tools whose function is to have Quick Access to the different functions (2), we also have the Title bar (3), another is the tab bar (5), the tool bar (6), the Status Bar (8) and Document View Bar (Print, Web, full screen reading (9)) , we will also see the Ribbon (Contains Tab Bar and Toolbar (4)), the Work Area (7) and the Zoom Control (10).
Once the questions about which are the parts of the Microsoft Word, we can appreciate the parts of the Word screen captured in the following image, we propose to give you a series of recommendations.
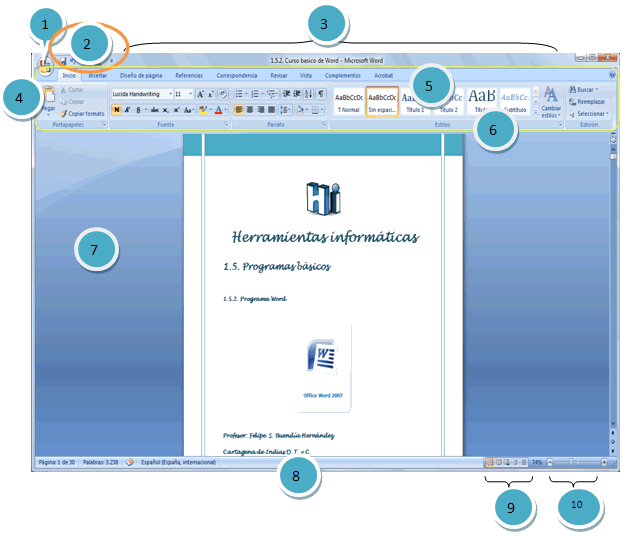
Recommendations for using Word and its parts
When you are working on a document, take a few minutes to learn the Word parts. Also always use the save icon to avoid losing the work you have done. It happens that sometimes there may be power outages or simply by mistake we close the document.
It is important to become familiar with the save icon. It is easily identifiable because it is a small blue floppy disk that is usually in the upper left part of the screen and the M toolbar.icrosoft Word and its parts.
After developing this articles on word and all its parts, We hope that if you liked this article with the parts of microsoft word and what are they for You want to know more about this topic. I invite you to visit our portal by clicking on the following links about The 5 most dangerous viruses in history and Computer security recommendations.
The content of the article adheres to our principles of editorial ethics. To report an error click here!.