
Office 2021 Office 2021 for Mac Office 2019 Office 2019 for Mac Office 2016 Office 2016 for Mac Office 2013 Office 2010 Word 2007 PowerPoint 2007 More…Less
Most applications (such as Microsoft Word, Excel, and PowerPoint) include fonts that are automatically installed when you install the software. For example, applications that are created especially for document design projects, such as Microsoft Publisher, often come with quite a few extra fonts that you can use with any other program on your computer.
However, sometimes you may want to install custom fonts that you’ve created, purchased or downloaded from somewhere else. In this article we’ll talk about how to install those fonts so you can use them in Microsoft Office.
Locate custom fonts on the Web
In addition to acquiring and using fonts installed with other applications, you can download fonts from the Internet. Some fonts on the Internet are sold commercially, some are distributed as shareware, and some are free. The Microsoft Typography site site provides links to other font foundries (the companies or individuals outside of Microsoft who create and distribute fonts) where you can find additional fonts.
After you find a font that you would like to use with an Office application, you can download it and install it through the operating system that you are currently using on your computer. Because fonts work with the operating system, they are not downloaded to Office directly. You should go through the system’s Fonts folder in Windows Control Panel and the font will work with Office automatically. On the Mac you use the Font Book to add the font and then copy it to the Windows Office Compatible folder.
Many third parties outside of Microsoft package their fonts in .zip files to reduce file size and to make downloading faster. If you have downloaded a font that is saved in .zip format double-click the zip file to open it.
Install a custom font you have downloaded
Once you’ve downloaded the font you want to install you need to install it in the operating system. Once the font is properly installed in the operating system Microsoft Office will be able to see and use it. For detailed instructions select the operating system you’re using from the drop-down box below.
-
Find the font file that you downloaded, keeping in mind that it may be contained within a .zip file. It’s probably located in your downloads folder.
-
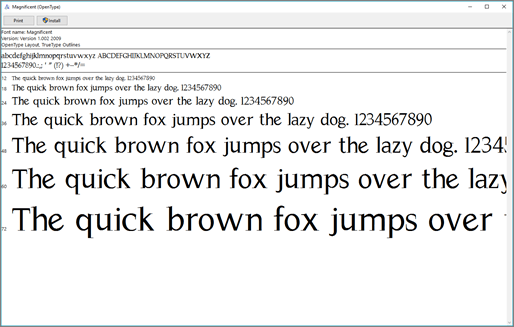
Double-click the font file to open it in the Font Previewer

-
If you’re satisfied that this is the font you want, click Install at the top left.
-
Close the Font Previewer, and open your Office program. You should now see your new font included on the font list.

-
Find the font file you downloaded — it likely has a .ttf or .otf extension and it’s probably in your downloads folder. Double-click on it.
Note: If the font file has a .zip extension you need to open that .zip file and open the font file from there.
-
It will open in the font previewer. Click Install Font. It will open in the Font Book.
-
Close the Font Book. Your font should now be available to Microsoft Office.
Note: If you’re using Office 2011 for Mac, you may need to drag and drop the font to the Windows Office Compatible collection in the Font Book to make it available to Microsoft Office.
Sharing files that contain non-standard fonts
When you install a custom font, each font will work only with the computer you’ve installed it on. Custom fonts that you’ve installed on your computer might not display the same way on a different computer. Text that is formatted in a font that is not installed on a computer will display in Times New Roman or the default font.
Therefore, if you plan to share Microsoft Office Word, PowerPoint, or Excel files with other people, you’ll want to know which fonts are native to the version of Office that the recipient is using. If it isn’t native, you may have to embed or distribute the font along with the Word file, PowerPoint presentation, or Excel spreadsheet. For more information about this see Fonts that are installed with Microsoft Office.
See also
-
Microsoft Typography
-
Change or set the default Font in Microsoft Office
-
Language Accessory Pack for Office
Do you have ideas for how we can improve Microsoft Office?
See How do I give feedback on Microsoft Office?
Need more help?
Want more options?
Explore subscription benefits, browse training courses, learn how to secure your device, and more.
Communities help you ask and answer questions, give feedback, and hear from experts with rich knowledge.
Набор шрифтов для microsoft office поможет вам в оформлении нестандартными шрифтами всевозможные документы, возможно открытки. В коллекцию входят, как Английские, так и Русские шрифты. Установка, довольно простая, с ней справится надеемся любой. Если у вас возникли вопросы в процессе установки и использования, оставьте ваш комментарий, мы постараемся вам помочь.
В сборке, почти 250 шрифтов. (337) Декоративные и рукописные (кир, лат). (403) из фильмов, книг, игр, известных брендов, известных групп, марок авто. Кириллические шрифты в количестве 1585 штук.
Как установить шрифты ?
Для того чтобы использовать (применить) новый шрифт на своем компьютере или программе, необходимо:
- Открываем «Панель управления» и находим папку «Шрифты»
- Вставляем файлы с расширением «.Ttf» в папку «Шрифты»
- Открываем программу (например, Microsoft Word) и выбираем понравившийся шрифт. Для того, что бы быстрее найти нужный шрифт можно его переименовать. Главное, что бы расширение «.Ttf» осталось неизменным.
Размер файла: 10 MB.

Добавить комментарий
Обновлено 08.01.2019 17:44
You can split fonts into two main styles. There are serif fonts (with lines flicking out of each letter) and sans-serif fonts (without the lines). Serif fonts tend to be easier to read, but they look more formal. This article will show you some of the best ones in Word.
The best serif fonts in Microsoft Word are Times New Roman, Garamond, and Palatino Linotype. They all work well to show a more formal look in your writing. They’re also very easy to read, making them solid choices if you’re looking to write an essay or academic paper.
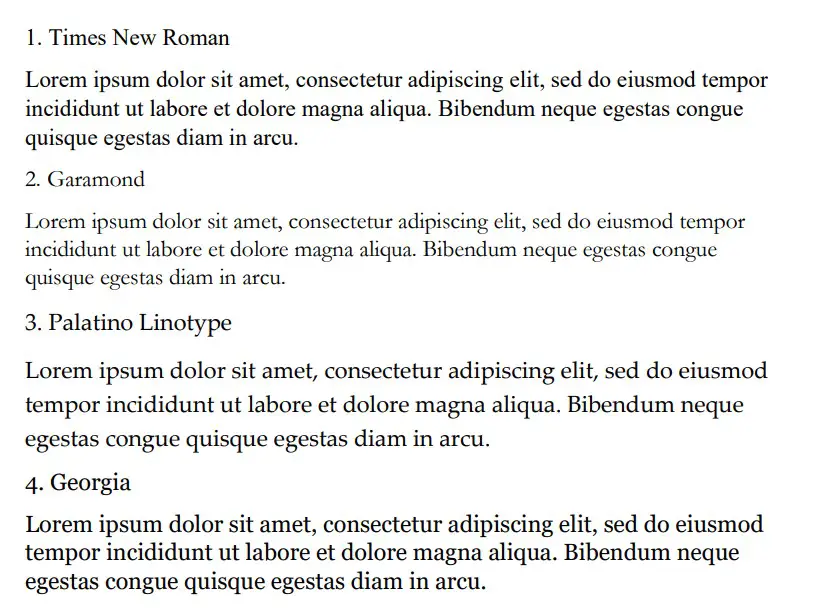
Times New Roman
Times New Roman is the default Microsoft Word font. You really can’t go wrong with it. Everyone knows what it looks like, and everyone uses it as the default serif font in Word. If you don’t actively change your font, it’s likely that you’re writing in Times New Roman.
It is a very professional font that has been proven to be one of the easiest to read on paper. It also makes your writing look more trustworthy, which works wonders when you use it for something like an academic or scientific paper.
You will find that Times New Roman is one of the most popular fonts in the world. It’s such a good choice because of how popular it is, and it can fit in just about anywhere in your writing. It works well for titles and in the main body of the text.
Garamond
Garamond is another great serif font that works really well. It comes in at a close second to Times New Roman, which is saying a lot considering how popular Times New Roman is. Garamond is fairly easy to read, and it even comes in slightly smaller in size.
Garamond is a great font that makes your writing much more concise. The smaller size of this font allows you to fit more words onto your page without feeling like you’re writing an essay full of gibberish and waffle.
If people decided to choose a different serif font in place of Times New Roman, it’s likely that Garamond would rank quite highly as their next favorite pick.
Palatino Linotype
Palatino Linotype is a great font choice that a lot of people enjoy using. It feels a bit fresher than some of the other serif fonts, and the size of the letters makes it a little more appealing when you are writing it for more informal purposes.
You will find that Palatino Linotype looks good wherever you put it. It can be both in a heading or in the main text body. As long as you like the look of the font, you’ll find a great place to put it to make sure it fits in.
The letters on Palatino Linotype feel a little more “open” than those of Times New Roman and Garamond. That’s what makes it a better choice if you’re looking for something that’s a little bit easier to read or comes across with more informal energy.
Georgia
Georgia is a very popular choice that a lot of essay writers are recommended to use. Many academics also vouch for Georgia, making it a really good choice if you’re looking to capture a more formal and trustworthy look.
People say that Georgia works really well as a heading. While this is definitely true, there is nothing wrong with using it as part of the main body of your text either. It can work in just about any situation, which makes it a great serif font choice.
While it’s not as popular as Times New Roman, it’s definitely up there in terms of how many people use it. It’s a fairly generic serif font, so there aren’t any specific style choices that stand it out from some of the rest.
Cambria
Cambria is another great serif font that is a default choice in Microsoft Word. While it isn’t automatically set as a font choice, it is automatic if you use the specific Word style that allows you to write headings and sub-headings.
Cambria is one of the best choices to introduce new ideas with headings and sub-headings. Of course, you don’t have to be limited to including it as a heading. If you want it as the text body, too, that’s fine.
You’ll find that this ranks highly in popularity compared to many of the other fonts. It looks really good on the page because of the more “square” feel that the letters have.
Bodoni MT
Bodoni MT is a classical serif font that works well. People like to use this font for novels, which shows that it must be an easy-to-read choice. The purpose of novels is to have thousands of words page after page, so having an easy-to-read font is always going to be ideal.
Bodoni MT is one of the thicker fonts on this list. It almost looks like it is written in bold, which really helps it to stand out from some of the other options. It works really well when it’s used to write multiple words at the same time.
The serif style looks very similar to some of the best fonts on this list, too. While this doesn’t allow Bodoni MT to be unique, it does allow it to have a familiar look and feel to it.
Bookman Old Style
Bookman Old Style is another great font that is common for novels. Again, if it works well in novels, you can bet that it works well in any situation when you might need someone to read through what you’re writing carefully.
Bookman Old Style is a large font. It allows the letters to appear more free and open compared to many of the other choices. This makes it a great font that’s worth trying out.
Lucida Bright
Lucida Bright is a good font choice. It’s part of the famous Lucida font family, and it works really well to show a large serif style. Lucida Bright is one of the larger fonts on this list, making it a great choice if you’re trying to make your writing really easy to read.
Some people would argue that Lucida Bright is too large for most formal documents. It does mean that you’ll take up a few extra pages because of your larger font choice, but this isn’t always a problem. Sometimes, it’s refreshing to include a larger font.
Modern No. 20
Modern No. 20 is an interesting serif font that doesn’t often get used. It’s a great choice nonetheless, and it applies to situations where some of the other serif fonts might feel a bit too pretentious or samey.
Modern No. 20 has very sharp serifs on its letters. While all of the fonts discussed so far have decent serif accents, Modern No. 20 seems to have some of the largest serifs that really help it to bring a unique style to your writing.
It’s much smaller than most of the other options too. It makes for a great choice if you’re trying to include a lot of information in one area without feeling like you have to fill up a lot of pages to get it to work.
Rockwell
Rockwell is a great option that many people like to use. It comes from the Rockwell family, which has made its name with more obvious and impactful fonts like ExtraBold and Condensed. Rockwell on its own is a great option for your serif-font needs.
It fits a similar style to most of the other serif fonts. There is nothing particularly unique that makes it stand out, which is usually a good thing. People don’t like their serif fonts to look out of place in their writing, and Rockwell will fit in no matter where you put it.
Poor Richard
Poor Richard is a great font in Microsoft Word that deserves more attention. It’s a very attractive font that comes with small lower-case letters. The capital letters tend to dwarf the lower-case ones, making it an interesting font style that the other serif fonts don’t have.
This font style is both a blessing and a curse, depending on how you look at it. It’s a blessing because it means that Poor Richard has a unique personality that allows it to stand out from the rest of the serif crowd.
It’s a curse because the uniqueness and size of the font in its style mean it doesn’t work very well formally. You’ll find that Poor Richard is a much better serif font for your informal writing.
Perpetua
Perpetua follows the same general idea as Poor Richard. It’s not all that popular, but it deserves to be. It’s a great font with an interesting style (most of which comes from the way some of the letters go below the written line, like the “p’s” and “q’s”).
Perpetua works really well in formal and informal contexts. It’s worth trying to use it yourself to see whether you can get along with it. A lot of people think it’s an attractive font, but it doesn’t often get used because it’s not a very well-known name.
You may also like:
12 Smallest Fonts In Microsoft Word
12 Best Cursive Fonts in Microsoft Word
12 Most Scary Fonts for Halooween in Microsoft Word

Martin holds a Master’s degree in Finance and International Business. He has six years of experience in professional communication with clients, executives, and colleagues. Furthermore, he has teaching experience from Aarhus University. Martin has been featured as an expert in communication and teaching on Forbes and Shopify. Read more about Martin here.
Inject some personality into your words
What to Know
- Easiest option for Windows: Right-click the .ttf or .otf file and select Install.
- Next easiest: Go to Start > Control Panel > Fonts. In another window, drag the .ttf or .otf file into the font folder you just opened.
- For Word for Mac, double-click the font file to open a preview > Install Font.
This article explains how to install fonts in Windows, Word for macOS, Microsoft Word Online, Word for Android, and Word for iOS. Instructions in this article apply to all versions of Word going back to 2011 as well for Windows 10, 8, and 7, macOS, Android, and iOS.
How to Install a Font on Windows
Let’s learn how to install a font on Windows so we can then add it to Word. Installing a font on Windows is the same from Windows 10 all the way back to Windows 7. There are 2 ways to install.
Method 1
-
If you don’t see a .ttf or .otf file, you may have to extract it from a zip file.
-
Once you have a .ttf or .otf file, right-click the file and select Install.
-
You will briefly see an installation progress window as it installs.
Method 2
-
Select Start > Control Panel > Fonts to open your system’s font folder.
-
In another window, find the font you want to install. If you downloaded the font from a website, then the file is probably in your Downloads folder. The font file will likely have a .ttf or .otf extension.
-
Drag the desired font into your system’s font folder. You can drop it into any white space between the other font icons in the font control panel.
Font sets are often contained within .zip files, so you must extract them before dragging the actual font files into your system’s Fonts folder. For guidance on how to extract, or unzip, a .zip file, see Zip Files: Unzip Them With the Right Software. If a .zip file contains multiple variations of a font, you must install each one individually.
-
Once the font is in the correct folder, it should install automatically. If it doesn’t, double-click the font file to open the Font Previewer, and click the Install button in the upper-left corner. The next time you open Word, the new font should appear as an option in the font list.
How to Add Fonts to Word for Mac
Before you can use new Microsoft Word fonts on Mac, you must add them to the app for managing fonts on macOS, the Font Book:
-
Locate your font file and double-click it to open the font preview window. You may need to unzip the file first.
-
Click Install Font near the bottom of the font preview window, which should open the Font Book.
-
If you’re using the 2011 version of Office for Mac, then you must also drag and drop the font file into the Windows Office Compatible collection, which can be found in the left sidebar of the Font Book.
-
After restarting your Mac, the font should be available in Word and most other apps including PowerPoint and Excel.
Fonts will only display properly in Word if they are installed on the user’s device. Text formatted with unsupported fonts will usually appear in a default font such as Times New Roman. If you plan on sharing your Word files with others, you may need to embed some fonts. You can only embed fonts in the Windows versions of Word, and the specific font must allow embedding. Check the list of Microsoft fonts supported by each version of MS Office to determine which fonts you might need to embed.
How to Add Fonts to Word Online
If you’re using the Microsoft Word Online app as part of Microsoft 365, you can make use of any font installed on your system. Just type the name of the font file minus the extension into the Font Options box.
When you save the document, the font name will appear in the font options box and display properly for any user who has that font installed on their device. Unfortunately, Word Online doesn’t let you embed fonts.
If I Add Fonts in Word, Do They Transfer Over to Excel or PowerPoint?
Yes. Once you add a font to your operating system and ensure that it’s compatible with Word, then you should be able to use it in any MS Office application including Microsoft Excel and PowerPoint.
How to Add Fonts to Microsoft Word for Android
Unfortunately, adding fonts to the newest version of MS Word for Android is much more difficult than it used to be. Before you begin, you’ll need root access to your device. Lifewire has an in-depth guide explaining how to root any Android device.
Rooting your device could void the warranty and cause hardware malfunctions. Before you attempt rooting, back up your important data using an app like Helium.
-
With your rooted Android device, download FX File Explorer and install the root add-on.
-
Open FX File Explorer and locate your font file.
-
Select the font file by holding your finger on it for a few seconds, and then tap Copy in the upper right corner of the screen. If successful, you’ll see a new icon in the upper right corner that says «1 copied.»
Use the FX File Explorer app to locate your font and copy it.
-
Now, close out FX File Explorer, locate the MS Word app and hold your finger on the file icon to make a menu pop up. If your device has been rooted, you should see an Explore data option in addition to Open and Uninstall.
-
Tap Explore data and find the font directory by navigating to Files > Data > Fonts.
-
Paste the font file inside the font directory by tapping the «1 copied» icon in the upper right of your screen and selecting Paste from the menu that appears.
-
The font will now appear as an option in MS Word.
How to Add Fonts to Microsoft Word for iOS
To add a font to an iPhone or iPad, you’ll need a font installer app such as AnyFont, which you can download from the App Store.
-
Move the desired font file into your iCloud.
-
From iCloud, tap the font file, and then tap Share > More (ellipsis) in the upper right corner of your screen.
-
From the Apps menu, tap AnyFont.
-
Once AnyFont opens, you should see your font file. Tap > next to the font on the right side.
-
Tap Install on the next screen that appears.
-
Tap Allow if prompted to allow a configuration profile download.
-
Go to Settings > General > Profiles,
-
Under Downloaded Profile, select the font.
-
Select Install on the top right corner.
-
Select Next.
-
Select Install on the Unsigned Profile window.
-
When asked for confirmation, select Install.
-
Select Done.
-
Open Word and select font under iOS Fonts.
Download Fonts for Microsoft Word
You can install any font file on any OS. You can find fonts online at Creative Market, Dafont, FontSpace, MyFonts, FontShop, and Awwwards. Some fonts are free while others must be purchased. When you download a font, it typically goes to your system’s Downloads folder unless you specify otherwise.
FAQ
-
How do I embed my Word fonts into a PDF?
On a Mac, select File > Print > PDF > Save as PDF > Save to convert the document to a PDF and embed all fonts. Windows machines should also automatically embed fonts when you convert a Word document to a PDF. To check, open the PDF in Acrobat Reader then select File > Properties > Fonts tab and make sure your fonts are embedded.
-
Why aren’t the correct fonts appearing in my PDF?
You might need to adjust your Acrobat conversion settings. In Word, select Acrobat > Preferences > Advanced Settings. Select the Fonts section and check Embed all fonts.
-
How do I remove fonts from Word?
In Windows, open the Control Panel and enter fonts into the search, then choose the font you don’t want and select Delete. On a Mac, open Font Book and pick the font you want to get rid of, then select File > Remove.
Thanks for letting us know!
Get the Latest Tech News Delivered Every Day
Subscribe
11 free fonts
Related Styles
Cool
Script
Bold
Modern
Retro
Vintage
Logo
Ligatures
Techno
Black
Tech
Wordmark
Blog
Capital
Clean
Digital
Mark
Technology
Business
All Caps
Future
Futuristic
Game
Hand
Hard
Head
Illustration
Massive
Music
Professional
Sign
Simple
Title
Banana
Coma
Samutojj
Adobe
Commercial-use
Sort by
- Popular
- Trending
- Newest
- Name
Aftetir
by
AmruID
Personal Use Free

Regular
6865 downloads
Autobus Bold
by
NimaType
Personal Use Free

99814 downloads
Dispence
by
Chequered Ink
Personal Use Free

51447 downloads
Love Nature
by
Chequered Ink
Personal Use Free

36779 downloads
b Break Password
by
wepfont
Personal Use Free

1363 downloads
Aisy Khadijah
by
Syukur Setiyadi
Personal Use Free

Regular
23604 downloads
Miamagon
by
Chequered Ink
Personal Use Free

16733 downloads
Moonwalk Miss
by
Chequered Ink
Personal Use Free

6819 downloads
Tibet
by
Rémi Godefroid
100% Free

15682 downloads
Gameshow
by
Darrell Flood
Personal Use Free

Regular
2294 downloads
SAMUTOJJ handwrite massive skul
by
SAMUTOJJ
100% Free

3480 downloads