
.docx file might not show Word icons if the Docx file associations are misconfigured or corrupt. Moreover, outdated or corrupt Office installation may also cause the error under discussion.
The issue arises when the icons of the .docx files change to blank/shield icons (not the default MS Word icons). The files can be normally opened & edited, but Word icons are not displayed (which work perfectly for the .doc files).
![]()
Before moving on to fix the Docx icon, check if uninstalling any other outdated document application (like Adobe Acrobat Reader) sorts out the icons’ problem.
Solution 1: Update the Windows and MS Office of Your PC to Their Latest Builds
The MS Word icons issue may arise if the Windows or MS Office installation are outdated as it may create incompatibility between the both. In this case, updating the Windows & MS Office to the latest builds may solve the problem.
- Manually update Windows to the latest release & check if the file icons issue is resolved.
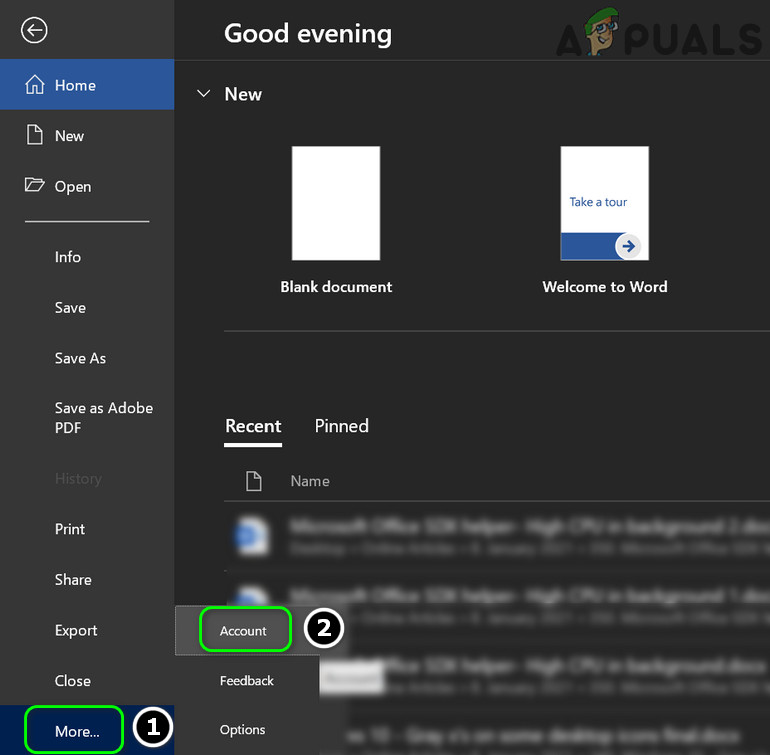
- If not, launch an Office application (e.g., MS Word) & steer to its File menu.
- Now expand More & select Account.

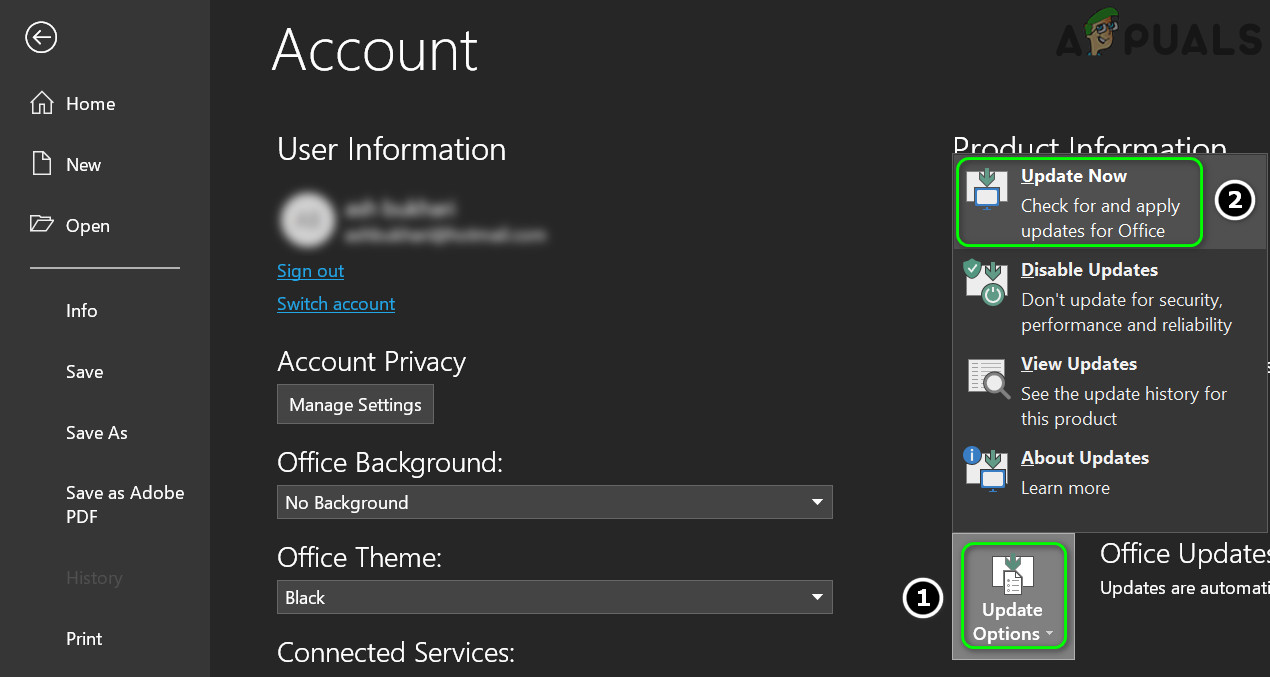
Open Account in the File Menu of MS Word - Then click on Update Options & in the menu shown, click Update Now.

Update Office Application - Now let the Office update process complete & check if the Word file icons issue is resolved.
Solution 2: Revert the File Association to MS Word and Reset the Defaults
The icon issue may arise if the .docx file association is not set to MS Word or corrupt. In this scenario, reverting the .docx file association to MS Word & resetting the default apps to MS defaults may solve the problem.
Set the MS Word as the Default Application for the .docx File Type
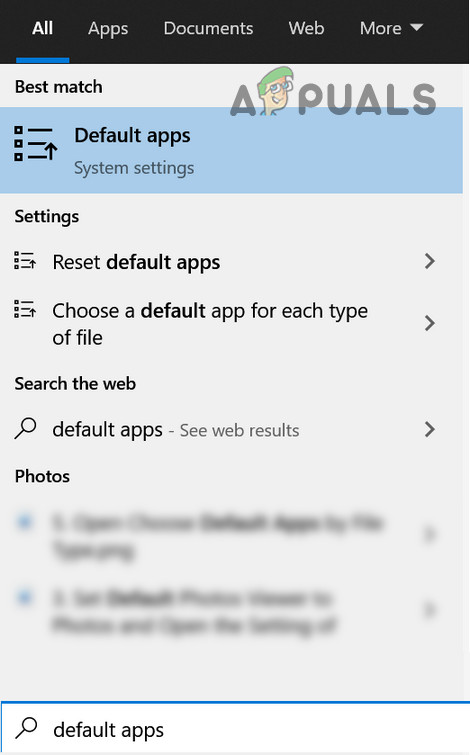
- Press the Windows key & in the search, type: Default Apps. Then open Default Apps.

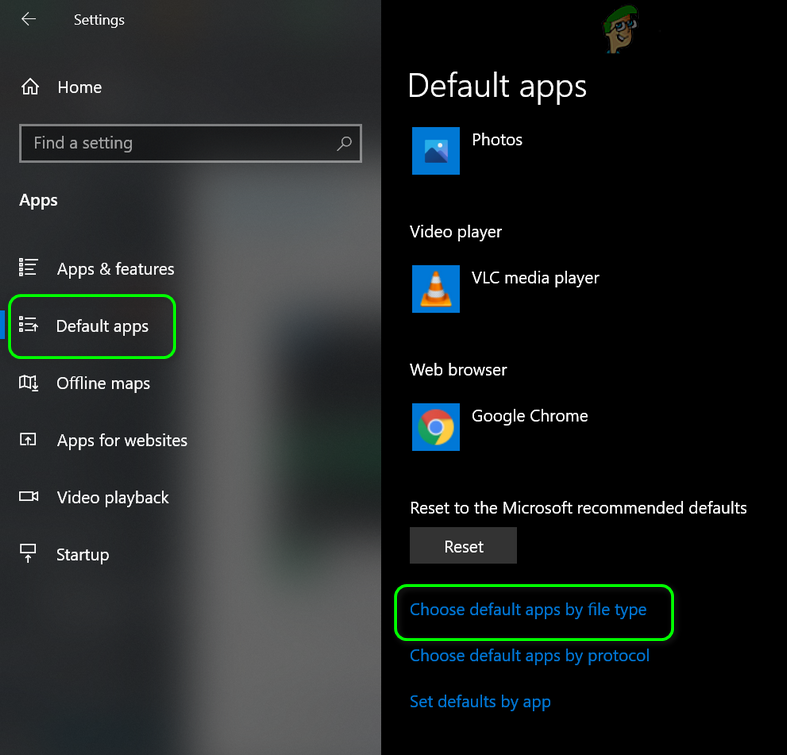
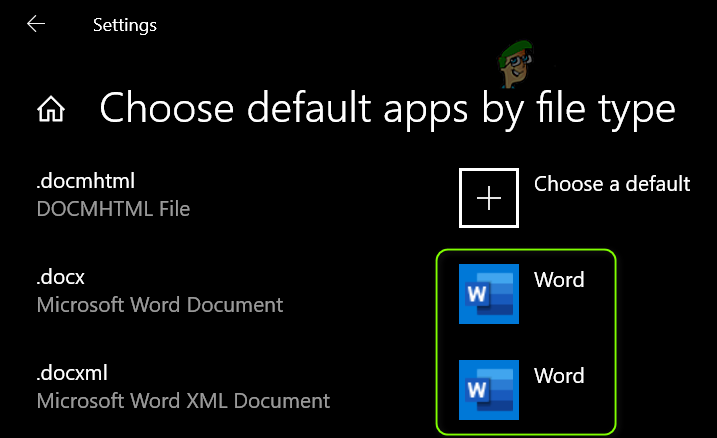
Open Default Apps - Now open Choose Default Apps by File Types & expand the option in front of the .docx.

Open Choose Default Apps by File Type - Then choose Word & repeat the same to .docxml. If the option is also set to Word, select another app as the default app for .docx & revert the setting to MS Word.

Set MS Word as the Default App for Docx File Type - Now reboot your PC & check if the icon issue is resolved.
Use the Right-Click Context Menu
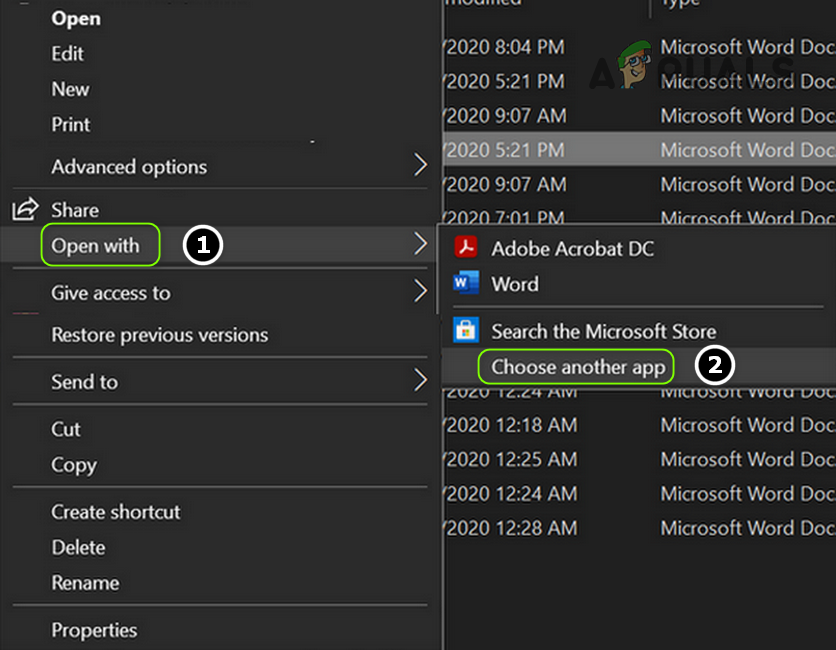
- Right-click on an MS Word file & select Open With > Choose Another App.

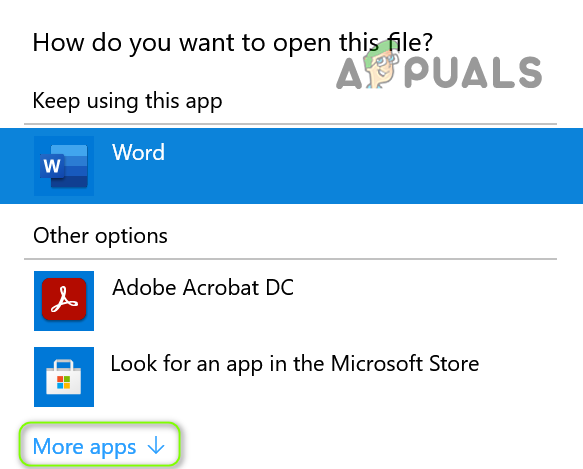
Open Choose Another App - Now click on More Apps and choose Wordpad.

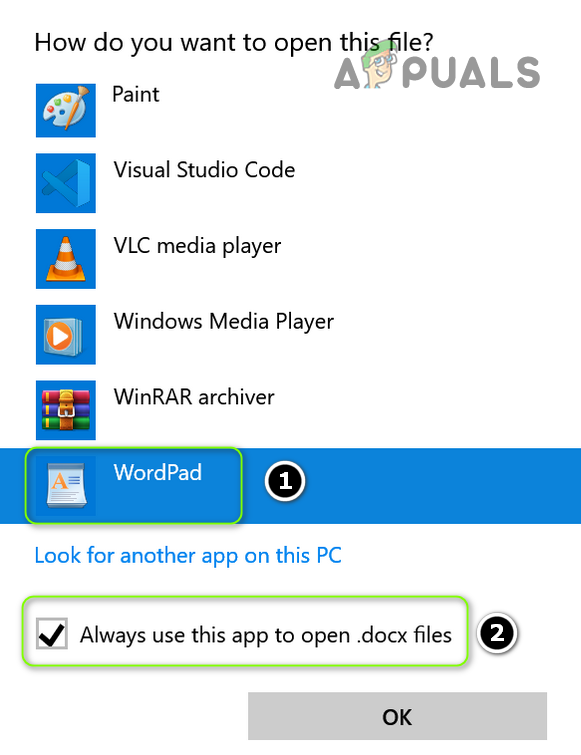
Open More Apps - Then checkmark Always Use This to Open .docx Files and click on the OK button.

Set Wordpad as the Default App for Docx Files - Then repeat the above steps but set MS Word as the default app and check if the icons have reverted to the Word defaults.
- If the issue persists, revert the default Docx app to Wordpad (by following steps 1 to 3) and right-click on a Word File.
- Now hover your mouse over Open With and open Choose Another App.
- Then expand More Apps and click on Look for Another App on This PC.

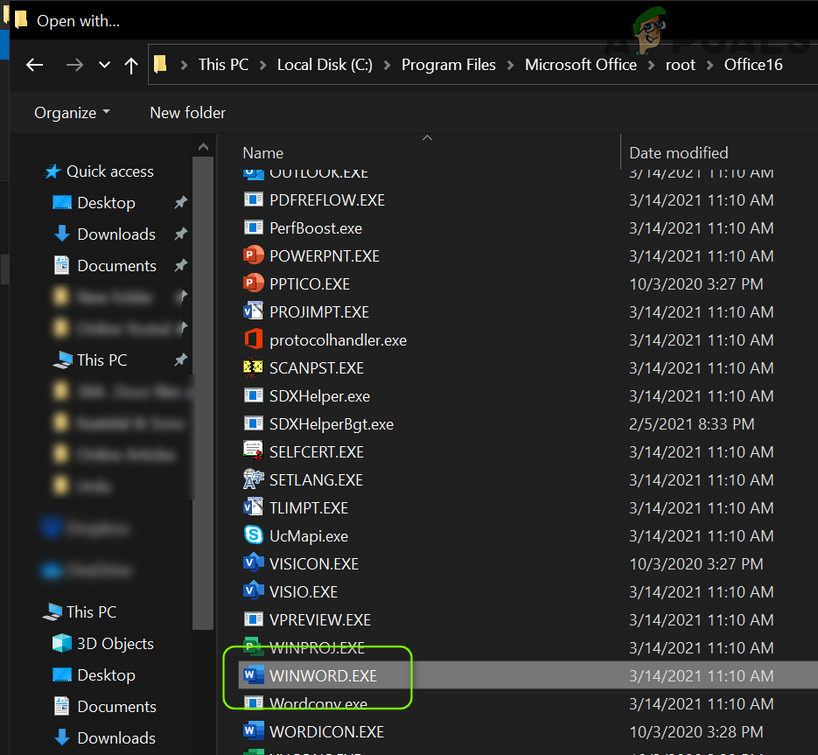
Look for Another App on This PC - Now steer to the MS Word installation directory (you can use the method discussed in solution 5).
- Then double-click on WINWORD.exe (make sure to checkmark the Always Use This option) and check if the icons’ issue is resolved.

Select WinWord.exe
Reset the Default Apps to the Microsoft Recommended
- Open Default Apps (discussed above) and scroll down till the end.
- Now, under Reset to the Microsoft Recommended Defaults, click on the Reset button and check if the MS Word icons issue is resolved.

Reset to the Microsoft Recommended Defaults

Solution 3: Rebuild the Icon Cache Database
The Docx icon issue could be a result of a corrupt Icon Cache Database. In this case, rebuilding the Icon Cache Database may solve the problem.
- Close all the applications/folders on the system and right-click on the Windows button.
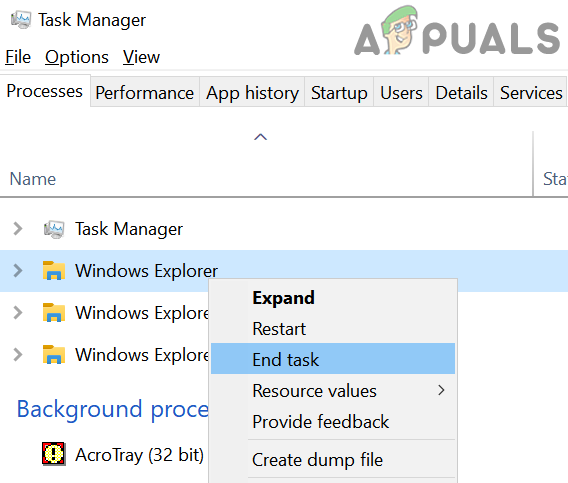
- Then choose Task Manager and right-click on the process of Explorer.exe (or Windows Explorer).
- Now select End Task and confirm to end the process.

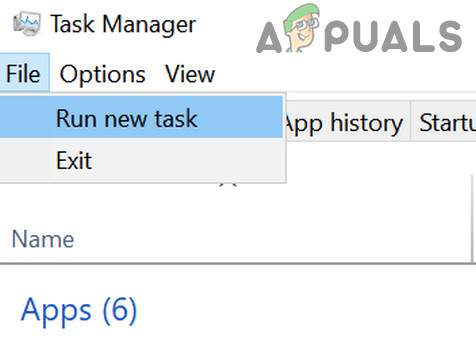
End Task of Windows Explorer - Then expand the File menu and choose Run New Task.

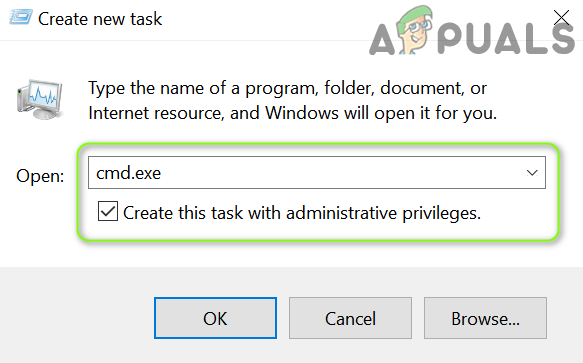
Run a New Task in the Task Manager - Now checkmark the option of Create This Task with Administrator Privileges and in the Open box, type: CMD.exe.

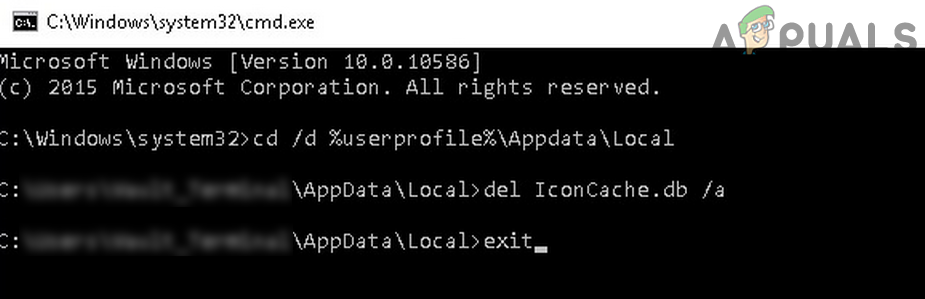
Run CMD.exe Task - Then click the OK button and in the Command Prompt window, execute the following one by one:
CD /d %userprofile%AppDataLocal

DEL IconCache.db /a

EXIT

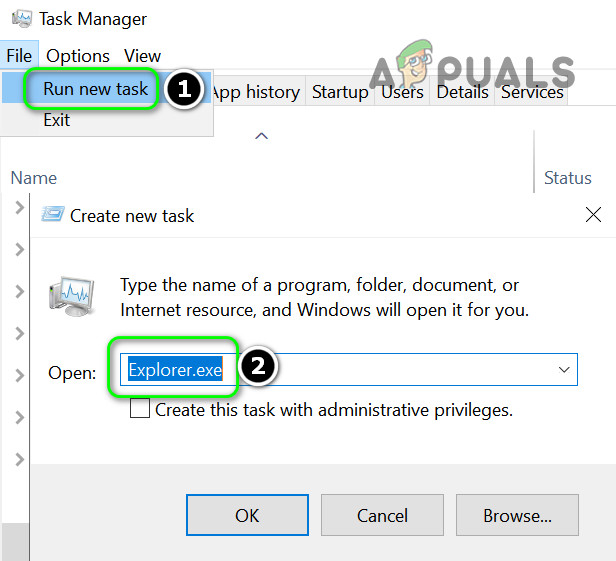
Delete Iconcache Database - Now, in the Task Manager, open the File menu and choose Run New Task.
- Then type Explorer.exe and click on the OK button.

Run a New Task of Explorer.exe in the Task Manager - Now check if the Word icon issue is resolved. If not, reboot your system and check if the icons are restored.
Solution 4: Repair the MS Office Installation
The corrupt MS Office installation may cause the missing Word icon issue. In this context, repairing the MS Office installation may solve the problem.
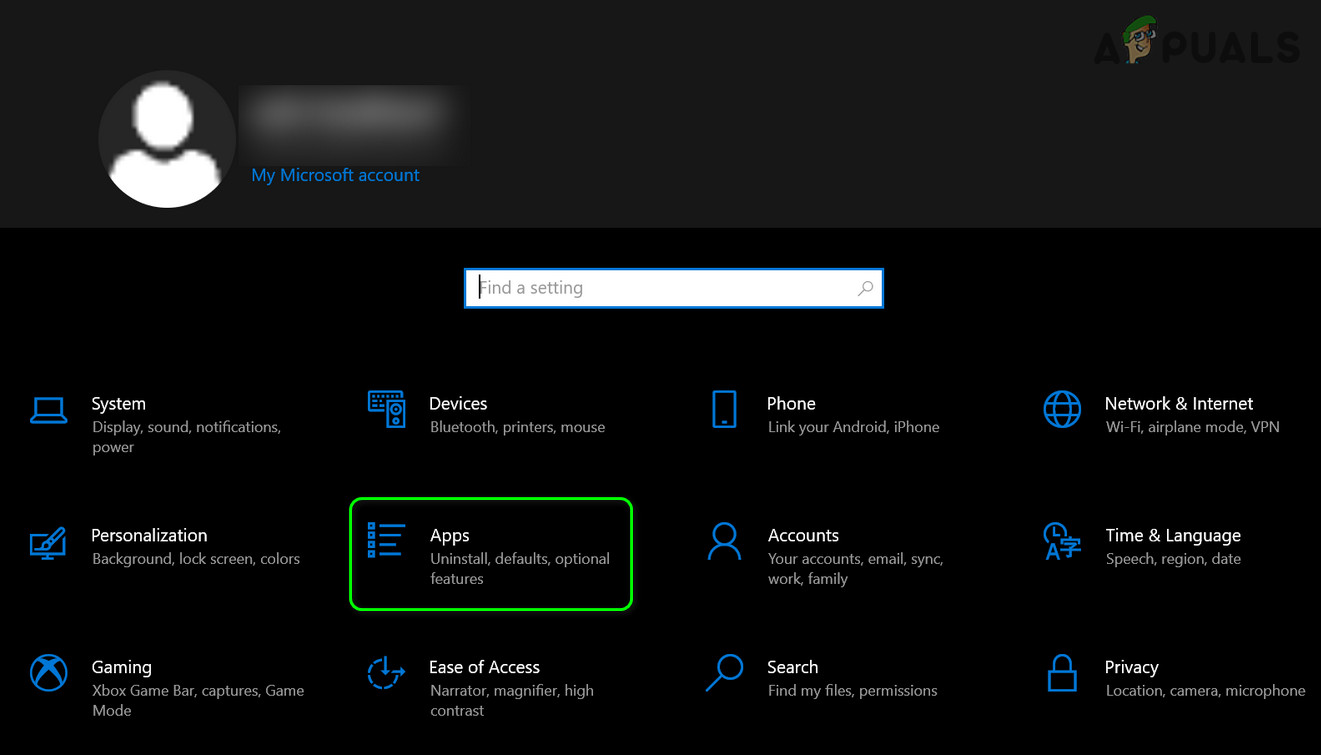
- Press the Windows key and open Settings.
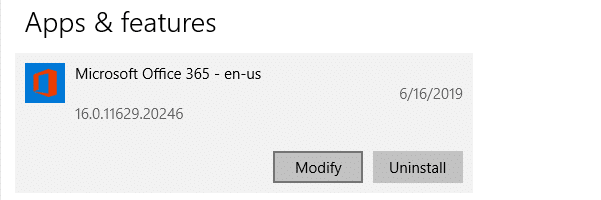
- Now select Apps and expand the MS Office installation.

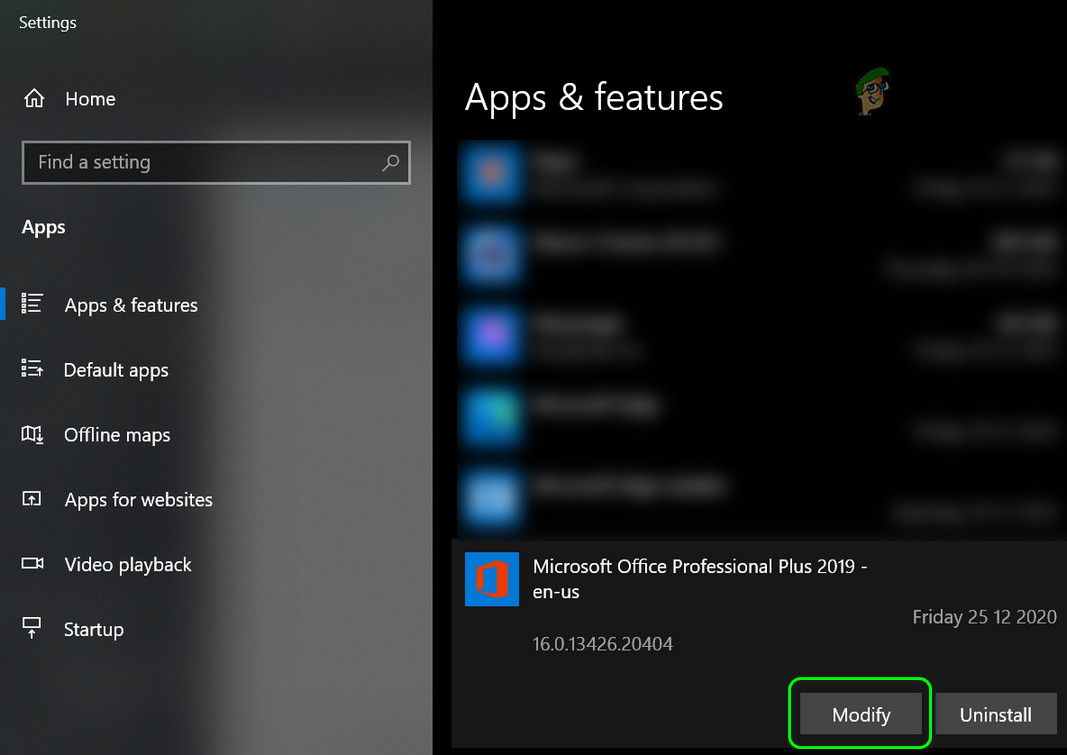
Open Apps in the Windows Settings - Then click on the Modify button and click Yes (if UAC prompt received).

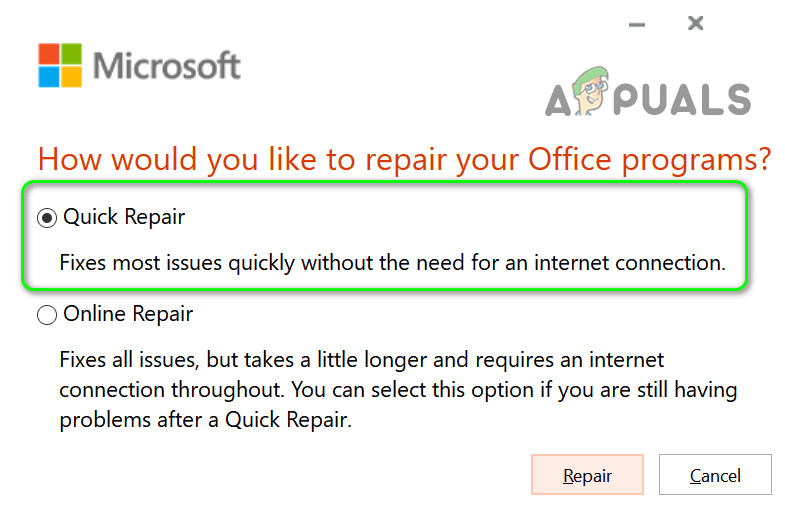
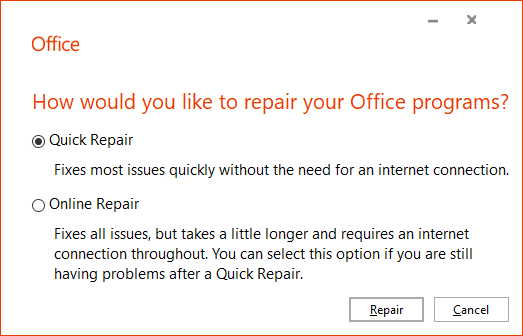
Modify the Office Installation - Now choose the Quick Repair option and click on the Repair button.

Quick Repair Office - Then let the process complete and reboot your PC to check if the Word icon has restored to normal.
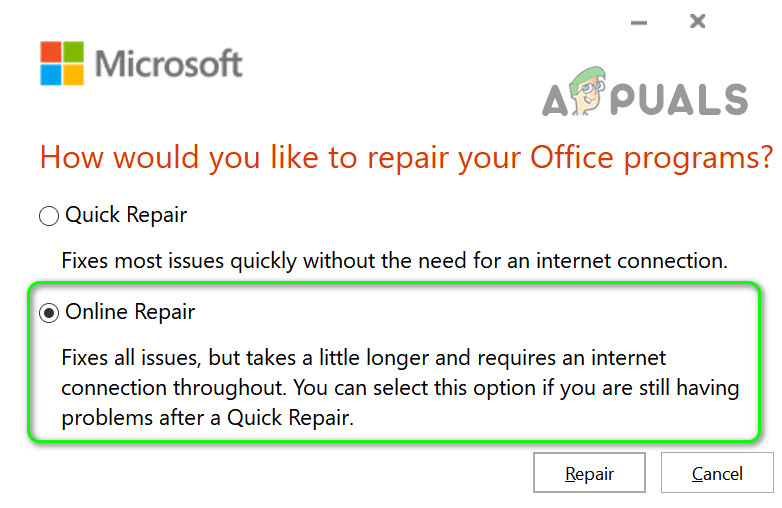
- If not, repeat the above steps but at step 4, choose Online Repair.

Online Repair Office - Once the Online repair is complete, check if the icon’s issue is resolved.
Solution 5: Reregister the MS Word
The icons’ issue may arise if the MS Word application fails to claim the .docx file association (despite the user set it to be) in Windows. In this case, reregistering the MS Word application (which may reclaim the association) may solve the problem. Before proceeding, make sure to close any running processes related to MS Office in the Task Manager.
Re-Register the MS Word Application
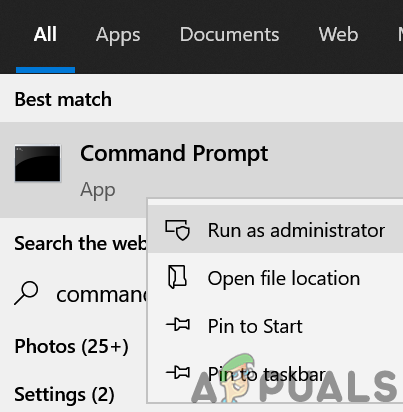
- Press the Windows key and in the search box, type: CMD. Now, in the results list, right-click on the Command Prompt, and in the mini-menu, choose Run as Administrator.

Open Command Prompt as Administrator - Then, execute the following (copy-paste the command):
winword /r

Execute Winword /r in the Command Prompt - Keep in mind that nothing will be shown in the Command Prompt window but the Word application will register itself in Windows. Once the cursor is shown in the Command Prompt, check if the icons issue is resolved.
- If not, launch the MS Word and right-click on the Taskbar. Now open Task Manager.

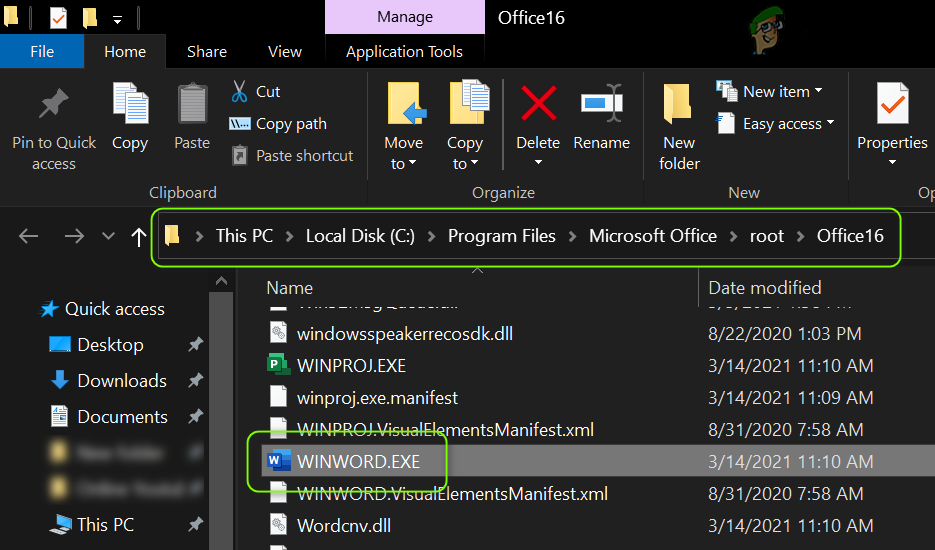
Open the Task Manager of Your System from the Taskbar - Now, right-click on the process of MS Word and choose Open File Location.

Open File Location of MS Word - Then copy the address from the address bar, e.g.,
C:Program FilesMicrosoft OfficerootOffice16)

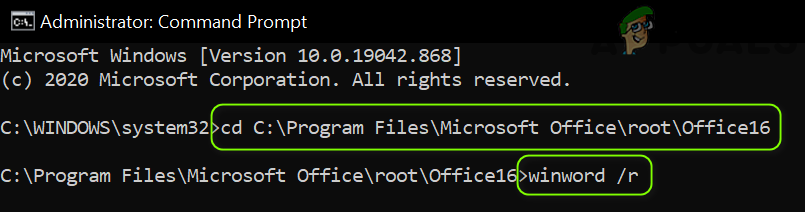
Find the Installation Directory of the MS Word - Then launch an elevated Command Prompt (step 1) and execute the following to steer to the installation directory of MS Word.
cd C:Program FilesMicrosoft OfficerootOffice16
(you may paste the path noted at step 6)
- Now, execute the following and check if the icons are restored:
winword /r

Run the Winword /r from the MS Word Installation Directory - If the issue persists, and you have more than one Office suite installed, check if repeating step 8 from the installation directory of the other Office suite resolves the issue.

Re-Register the MS Word Application
- Launch an elevated Command Prompt (as discussed above in step 1) and execute the following (with inverted commas):
"C:Program FilesMicrosoft OfficerootOffice16winword.exe" /unregserver
The path in inverted commas is the same path noted in step 6 (discussed above).

Unregister Winword - Once the execution is complete, execute the following in the Command Prompt window:
"C:Program FilesMicrosoft OfficerootOffice16winword.exe" /regserver
- Once the execution is complete, check if the Word files icons have reverted to defaults.

Solution 6: Edit the System’s Registry and Reinstall the Office Suite
The icons’ issue may arise if the MS Word application’s registry keys are not properly configured or corrupt. In this case, editing the registry keys relevant to MS Word may solve the problem.
Warning: Advance at your own risk and with extreme care as editing the system’s registry is a proficient task and if not done properly, you may cause everlasting damage to your OS/data/system.
Before proceeding, make sure to perform a backup of your system’s registry. Press the Windows key and search for: Registry Editor. Now, in the list of results, right-click on the Registry Editor, and in the mini-menu, choose Run as Administrator.
You may try the following edits to check if resolves the icons issue (keep in mind some of these keys may not be available to some users).
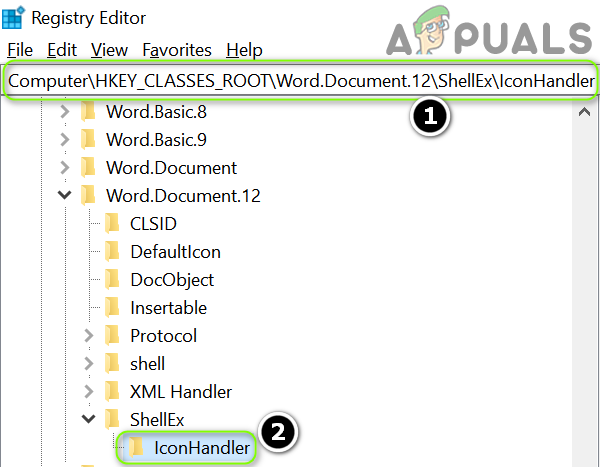
Delete the IconHandler Key
- Navigate to the following path:
ComputerHKEY_CLASSES_ROOTWord.Document.12ShellEx
- Now, in the right pane, delete the IconHandler key and reboot your PC.

Delete the IconHandler Key - Upon reboot, set the Word as the default application for .docx files (as discussed in solution 2) and check if the word icons issue is resolved.
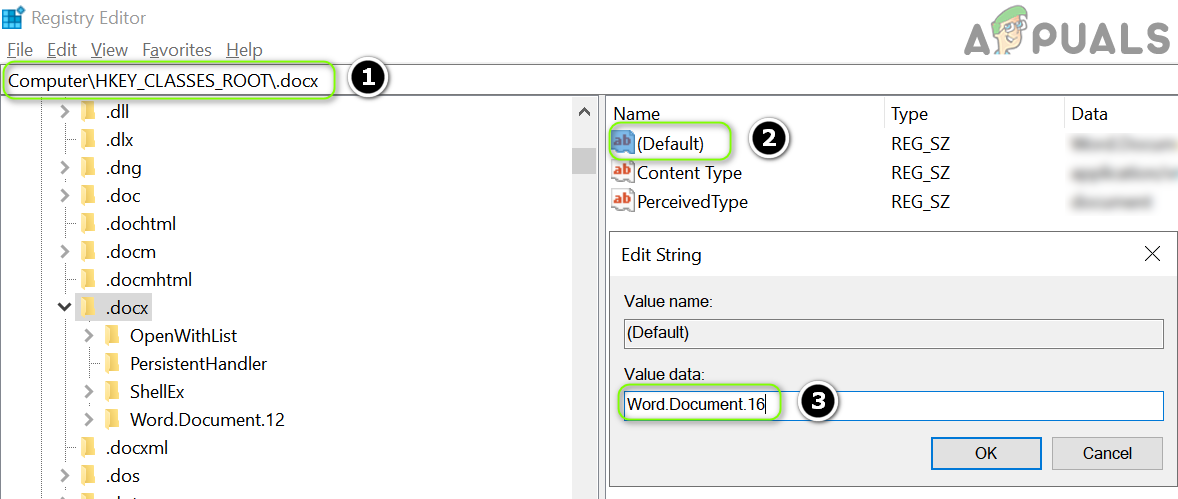
Change the Default Key Path
- Navigate to the following path:
ComputerHKEY_CLASSES_ROOT.docx
- Now, in the right pane, double-click on Default and set its value to Word.Document.16.

Set the Default Value to Word.Document.16 - Then repeat solution 2 to set MS Word as the default app and check if the proper icons are shown.
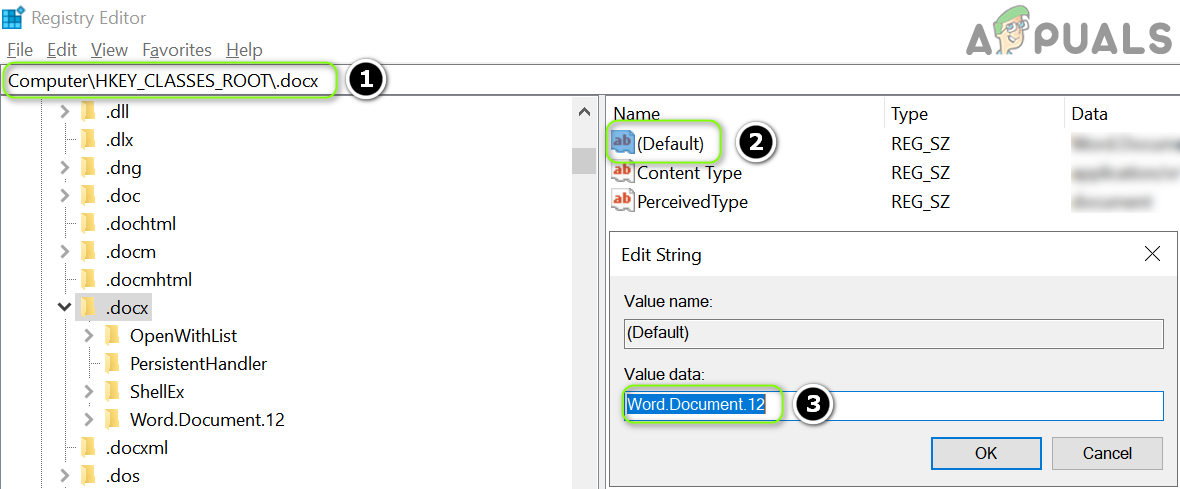
- If not, repeat the above solution but at step 2, set the value of Default to Word.Document.12 and check if it resolves the icons issue.

Set the Default Value to Word.Document.12
Import the .docx Registry Key
- On a working and trusted computer, navigate to the following path:
ComputerHKEY_CLASSES_ROOT.docx
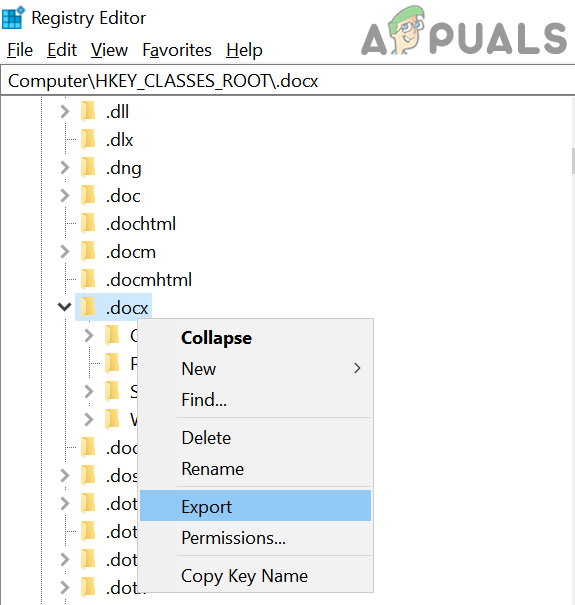
- Now, in the left pane, right-click on the .docx key and select Export.

Export the .Docx Registry Key - Then save the file to someplace (e.g., the desktop) and transfer it to the affected computer.
- Now, on the affected computer, launch the Registry Editor and navigate to the following path:
ComputerHKEY_CLASSES_ROOT.docx
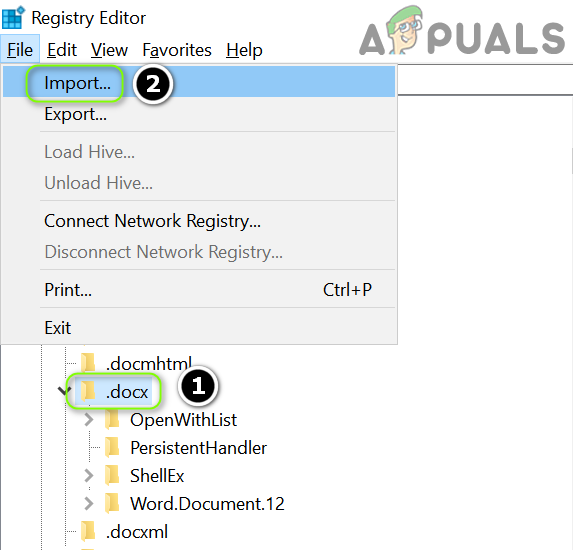
- Then, in the left pane, select the .docx key and expand the File menu.
- Now select Import and after completion of the import process, reboot your PC.

Import the .Docx Registry Key - Then repeat solution 2 to check if the icons issue is resolved.
Delete the Docx File
- Navigate to the following path:
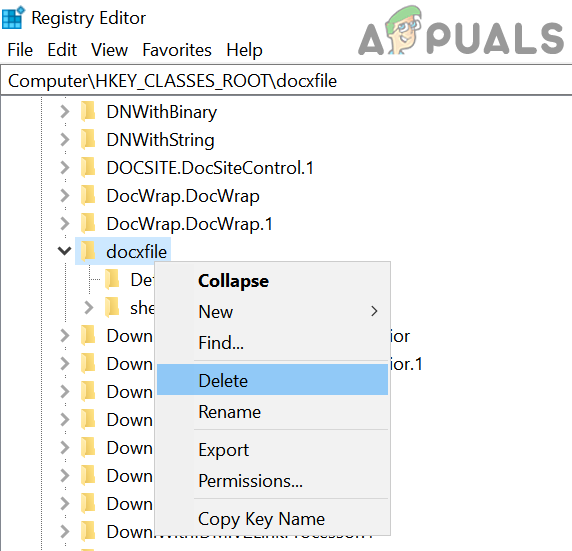
ComputerHKEY_CLASSES_ROOTdocxfile
(for some users, the key will be Docx file auto)
- Then, in the left pane, right-click on the docxfile key and select Delete.

Delete the docxfile Registry Key - Now confirm to delete the docxfile key and exit the editor.
- Then, reboot your PC and launch a word file (if asked to, choose MS Word as the default application) to check if the icons’ issue is resolved.
Delete the .docx Keys and Reinstall the Office Suite
- Uninstall the Office suite and in the Registry Editor, navigate to the following path:
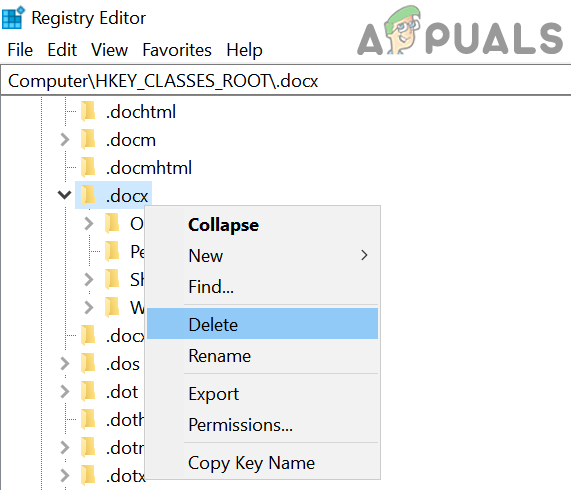
ComputerHKEY_CLASSES_ROOT.docx
- Now, in the left pane, right-click on the .docx key and choose Delete. Then confirm to delete the .docx key

Delete the .Docx Registry Key - Now repeat the same to delete the .docx key from the following path and exit the editor:
ComputerHKey_Classes_RootSystemFileAssociations.docx

Delete the .Docx Registry Key - Now reboot your PC and reinstall the Office suite to check if the icons issue is resolved.

Solution 7: Create a New Windows User Account
If none of the solutions has done the trick of you, the issue may be caused by a corrupt user profile. In this context, creating a new Windows user account may solve the problem.
- Create a new Windows user account (it will be better to create a local administrator account) and log out of your current user.
- Then log-in using the newly created Windows account and check if the Word file icons have reverted to defaults. If so, you may transfer all the old account data (a tedious task).
If the issue persists, you may use 3rd party utilities (like IconsExtract & FileTypesMan) to sort out the issue. If the issue is still there, you may edit the security permissions (it may have its repercussions) of the Local folder to allow Everyone (in the Advanced and Group/User names) in the following location:
%userprofile%AppData

Kevin Arrows
Kevin Arrows is a highly experienced and knowledgeable technology specialist with over a decade of industry experience. He holds a Microsoft Certified Technology Specialist (MCTS) certification and has a deep passion for staying up-to-date on the latest tech developments. Kevin has written extensively on a wide range of tech-related topics, showcasing his expertise and knowledge in areas such as software development, cybersecurity, and cloud computing. His contributions to the tech field have been widely recognized and respected by his peers, and he is highly regarded for his ability to explain complex technical concepts in a clear and concise manner.
On a Windows 7 computer, with Office 2013 installed, suddenly all DOCX files were not displayed with the default Word icon in Explorer, even though the DOCX file association was set up correctly and all docx files opened without problems with Word 2013 application.

In this tutorial you ‘ll find detailed instructions to fix the following problem in Word 2016, 2013 & 2010: «The docx files displayed with a generic icon in Windows Explorer instead of the default Word icon». (Applied to Word 2010, 2013 or 2016)
How to fix: DOCX files are displayed with a generic icon in Windows Explorer.
Step 1. Scan your computer for viruses.
Viruses or malicious programs can cause your PC to work abnormally. So, before you continue to troubleshoot your problems, use this Malware Scan and Removal Guide to check and remove viruses or/and malicious programs that may be running on your computer.
Step 2. Temporally set DOCX files to open with WordPad and then revert back to Word.
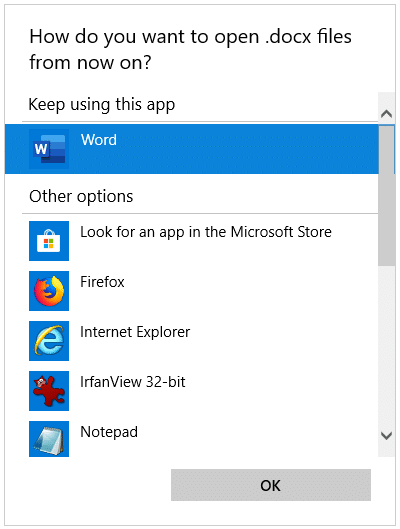
1. Right click on a DOCX file and select Open with…

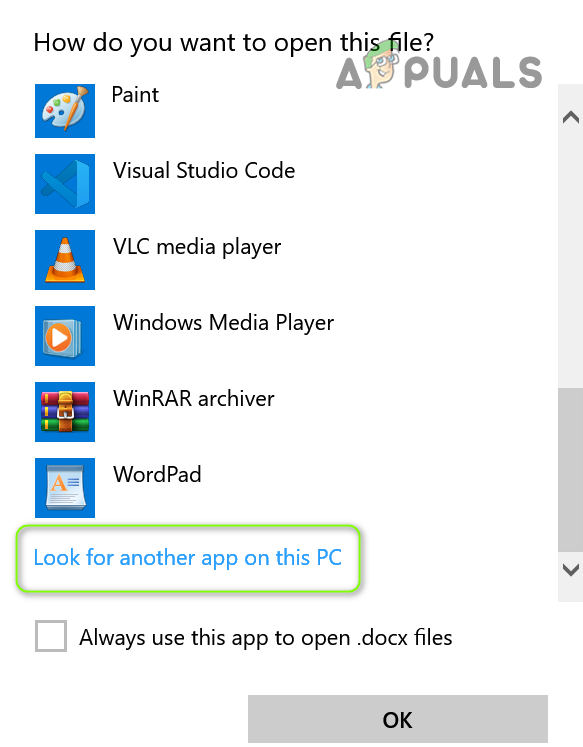
2. At «How do you want to open this file» options, click More apps.

3. Scroll down and select WordPad and then check the «Always use this app to open .docx files» checkbox. Click OK when done.

4. Close WordPad.
5. Now right click again to a DOCX document and select Open with…
6. Select the Word program from the list and then check the «Always use this app to open .docx files«.
7. Click OK.
8. Close Word application and then check if the DOCX files displayed with the right Word icon in Explorer. If the problem persists continue to the next step.
Step 3. Set DOCX files to open with «winword.exe» application.
1. Right click on a DOCX file and select Open with…
2. At «How do you want to open this file» options, click More apps.
3. First, scroll down and check the «Always use this app to open .docx files» checkbox.
4. Then click above at Look for another app to open .docx files option.

5. Select the WINWORD.exe application, from one of the following paths, according to the installed Office version and click Open:
- Word 2016 (64-bit): C:Program FilesMicrosoft OfficerootOffice16
- Word 2016 (32-bit): C:Program Files (x86)Microsoft OfficerootOffice16
- Word 2013 (64-bit): C:Program FilesMicrosoft OfficeOffice 15
- Word 2013 (32-bit): C:Program Files (x86)Microsoft OfficeOffice 15
- Word 2010 (64-bit): C:Program FilesMicrosoft OfficeOffice 14
- Word 2010 (32-bit): C:Program Files (x86)Microsoft OfficeOffice 14

8. Close Word application and then check if the DOCX files are displayed with the Word icon in Explorer. If the issue persists, then continue to the next step.
Step 4. Modify Default Word icon in Registry.
1. Simultaneously press the Win ![]() + R keys to open the run command box.
+ R keys to open the run command box.
2. Type regedit and press Enter to open Registry Editor.

3. Navigate to this key from the left pane:
- HKEY_CLASSES_ROOTWord.Document.12DefaultIcon

4. Double click at Default value at the right pane and according your Word version and architecture (32 or 64 bit), copy/paste the corresponding value in the value data box:
- Word 2016 (64-bit):
- C:Program FilesMicrosoft OfficerootOffice16wordicon.exe,13
- Word 2016 (32-bit):
- C:Program Files (x86)Microsoft OfficerootOffice16wordicon.exe,13
- Word 2013 (64-bit):
- C:Program FilesMicrosoft OfficeOffice 15wordicon.exe,13
- Word 2013 (32-bit):
- C:Program Files (x86)Microsoft OfficeOffice 15wordicon.exe,13
- Word 2010 (64-bit):
- C:Program FilesMicrosoft OfficeOffice 14wordicon.exe,13
- Word 2010 (32-bit):
- C:Program Files (x86)Microsoft OfficeOffice 14wordicon.exe,13

5. Close Registry Editor and restart your computer.
6. If after restart, the Word icon is not displayed in docx files, then the final step is to repair your Office installation.
That it! Let me know if this guide has helped you by leaving your comment about your experience. Please like and share this guide to help others.
If this article was useful for you, please consider supporting us by making a donation. Even $1 can a make a huge difference for us in our effort to continue to help others while keeping this site free:

If you want to stay constantly protected from malware threats, existing and future ones, we recommend that you install Malwarebytes Anti-Malware PRO by clicking below (we
do earn a commision from sales generated from this link, but at no additional cost to you. We have experience with this software and we recommend it because it is helpful and useful):
Full household PC Protection — Protect up to 3 PCs with NEW Malwarebytes Anti-Malware Premium!
You may import following registry hives from «good» computer (where links are working OK):
[HKEY_CLASSES_ROOT.lnk]
[HKEY_CLASSES_ROOTlnkfile]
OR
In case you have not machine with Win 7 where it works nearby, you may save text below into a file with .reg extension and import it into registry via duble-click on this file.
Windows Registry Editor Version 5.00

[HKEY_CLASSES_ROOT.lnk]
@="lnkfile"

[HKEY_CLASSES_ROOT.lnkShellEx]

[HKEY_CLASSES_ROOT.lnkShellEx{000214EE-0000-0000-C000-000000000046}]
@="{00021401-0000-0000-C000-000000000046}"

[HKEY_CLASSES_ROOT.lnkShellEx{000214F9-0000-0000-C000-000000000046}]
@="{00021401-0000-0000-C000-000000000046}"

[HKEY_CLASSES_ROOT.lnkShellEx{00021500-0000-0000-C000-000000000046}]
@="{00021401-0000-0000-C000-000000000046}"

[HKEY_CLASSES_ROOT.lnkShellEx{BB2E617C-0920-11d1-9A0B-00C04FC2D6C1}]
@="{00021401-0000-0000-C000-000000000046}"

[HKEY_CLASSES_ROOT.lnkShellNew]
"Handler"="{ceefea1b-3e29-4ef1-b34c-fec79c4f70af}"
"IconPath"=hex(2):25,00,53,00,79,00,73,00,74,00,65,00,6d,00,52,00,6f,00,6f,00,
74,00,25,00,5c,00,73,00,79,00,73,00,74,00,65,00,6d,00,33,00,32,00,5c,00,73,
00,68,00,65,00,6c,00,6c,00,33,00,32,00,2e,00,64,00,6c,00,6c,00,2c,00,2d,00,
31,00,36,00,37,00,36,00,39,00,00,00
"ItemName"="@shell32.dll,-30397"
"MenuText"="@shell32.dll,-30318"
"NullFile"=""
"Command"=-

[HKEY_CLASSES_ROOT.lnkShellNewConfig]
"DontRename"=""

[HKEY_CLASSES_ROOTlnkfile]
@="Shortcut"
"EditFlags"=dword:00000001
"FriendlyTypeName"="@shell32.dll,-4153"
"NeverShowExt"=""
"IsShortcut"=""

[HKEY_CLASSES_ROOTlnkfileCLSID]
@="{00021401-0000-0000-C000-000000000046}"

[HKEY_CLASSES_ROOTlnkfileshellex]

[HKEY_CLASSES_ROOTlnkfileshellexContextMenuHandlers]

[HKEY_CLASSES_ROOTlnkfileshellexContextMenuHandlersOpenContainingFolderMenu]
@="{37ea3a21-7493-4208-a011-7f9ea79ce9f5}"

[HKEY_CLASSES_ROOTlnkfileshellexContextMenuHandlers{00021401-0000-0000-C000-000000000046}]
@=""

[HKEY_CLASSES_ROOTlnkfileshellexDropHandler]
@="{00021401-0000-0000-C000-000000000046}"

[HKEY_CLASSES_ROOTlnkfileshellexIconHandler]
@="{00021401-0000-0000-C000-000000000046}"

[-HKEY_CURRENT_USERSoftwareMicrosoftWindowsCurrentVersionExplorerFileExts.lnkUserChoice]
Many users have reported that the Word icons are not showing up for .docx and .doc files on their systems. Instead, they show up with a generic (unknown) or plain white icon even though the files open in Word when double-clicked (i.e., the file association settings are intact.)
![]()
Cause
Blank or missing Word icons on .doc and .docx files may occur due to multiple reasons, such as deleting the Office installer folder (which contains the Office icons) or installing multiple versions of Office on a computer. This may have been caused if you install and later uninstall a Microsoft Office alternative software (e.g., Open Office, WPS Office, etc.)
An incorrect Programmatic Identifier (e.g., docx_auto_file) or wrong file association settings in the Windows registry for Word documents can also cause this issue. Last but not least, a corrupt icon cache can also trigger the problem.
This article tells you how to fix the icons for Word document file types .docx and .doc using different ways.
Fix: Word .docx and .doc files show Up with White Icon
Follow these steps to fix the icons for Word document file types .docx and .doc:
Step 1: Re-associate .docx and .doc files with Word
- Open admin command Prompt and then run the following commands one by one:
assoc  .docx=Word.Document.12

assoc  .doc=Word.Document.8
- Exit the Command Prompt window.
- Right-click on a
.docxfile and click Properties - Click the Change button
- Select Word from the list and click OK.

- Repeat the same for
.docfiles if the.docicons are showing as a plain white rectangle. - Log off and log back in if the icons are not refreshed.
Step 2: Fix the Word documents icon in the registry
- Start the Registry Editor (
regedit.exe) - Go to the following key:
HKEY_CLASSES_ROOTWord.Document.12DefaultIcon
- Double-click (default) and its value data to the following:
For Word 2016 regular (.msi) installations:
C:Program FilesMicrosoft OfficerootOffice16wordicon.exe,13

For Word 2016 CTR Setup (Office 365)
C:Program FilesMicrosoft OfficeRootVFSWindowsInstaller{90160000-000F-0000-1000-0000000FF1CE}wordicon.exe,13
- Repeat the same for the .doc file type branch here:
HKEY_CLASSES_ROOTWord.Document.8DefaultIcon
The icon path for .doc files is below:
For Word 2016 regular (.msi) installations:
C:Program FilesMicrosoft OfficerootOffice16wordicon.exe,1

For Word 2016 CTR Setup (Office 365)
C:Program FilesMicrosoft OfficeRootVFSWindowsInstaller{90160000-000F-0000-1000-0000000FF1CE}wordicon.exe,1
For Excel, use the following registry paths and icons for .xlsx and .xls file types, respectively, for Office 365 installations:
File type: .xlsx
Registry Key: HKEY_CLASSES_ROOTExcel.Sheet.12DefaultIcon
Icon Path (MSI): C:Program FilesMicrosoft OfficerootOffice16XLICONS.EXE,1
Icon Path (O365): C:Program FilesMicrosoft OfficeRootVFSWindowsInstaller{90160000-000F-0000-1000-0000000FF1CE}xlicons.exe,1

File type: .xls
Registry Key: HKEY_CLASSES_ROOTExcel.Sheet.8DefaultIcon
Icon Path (MSI): C:Program FilesMicrosoft OfficerootOffice16XLICONS.EXE,28
Icon Path (O365): C:Program FilesMicrosoft OfficeRootVFSWindowsInstaller{90160000-000F-0000-1000-0000000FF1CE}xlicons.exe,28
For PowerPoint, use the following registry paths and icons for .pptx and .ppt file types, respectively:
File type: .pptx
Registry key: HKEY_CLASSES_ROOTPowerPoint.Show.12DefaultIcon
Icon Path (MSI): C:Program FilesMicrosoft OfficerootOffice16pptico.exe,10
Icon Path (O365): C:Program FilesMicrosoft OfficeRootVFSWindowsInstaller{90160000-000F-0000-1000-0000000FF1CE}pptico.exe,10

File type: .ppt
Registry key: HKEY_CLASSES_ROOTPowerPoint.Show.8DefaultIcon
Icon Path (MSI): C:Program FilesMicrosoft OfficerootOffice16pptico.exe,17
Icon Path (O365): C:Program FilesMicrosoft OfficeRootVFSWindowsInstaller{90160000-000F-0000-1000-0000000FF1CE}pptico.exe,17
If you’ve installed Office 2016 (32-bit) on a computer running 64-bit windows, replace the path
C:Program FileswithC:Program Files (x86) - Exit the Registry Editor.
- Refresh the icons manually using the procedure listed in this article.
Note that the icon paths used for Office .msi installation are also valid for Office 365.
Registry file for the above
Here is the .reg implementation for the above:
;Fix Word document icons showing incorrect or as blank rectangle
;The icon paths are valid for both .msi and CTR installations (Office 365)

Windows Registry Editor Version 5.00

[HKEY_CLASSES_ROOT.docx]
@="Word.Document.12"

[HKEY_CLASSES_ROOTWord.Document.12DefaultIcon]
@="C:\Program Files\Microsoft Office\Root\Office16\wordicon.exe,13"

[HKEY_CLASSES_ROOT.doc]
@="Word.Document.8"

[HKEY_CLASSES_ROOTWord.Document.8DefaultIcon]
@="C:\Program Files\Microsoft Office\Root\Office16\wordicon.exe,1"
See how to create and apply the .reg file on your system.
Step 3: Repair Office via Apps & Features
- Right-click Start, and click Apps & Features
- Select Microsoft Office entry from the list, and click Modify

- For Office .msi installations, select Repair. For Office Click-to-run installations, select Quick Repair and then click Repair. Quick Repair is faster, and it takes approximately 3-5 minutes to repair the Office settings, corrupt files, and other registry settings automatically.
 For more information, see the Microsoft Office article Repair an Office application
 For more information, see the Microsoft Office article Repair an Office application
That should fix the Office/Word icons for standalone Office installations and Office 365 installations.
![]()
One small request: If you liked this post, please share this?
One «tiny» share from you would seriously help a lot with the growth of this blog.
Some great suggestions:
- Pin it!
- Share it to your favorite blog + Facebook, Reddit
- Tweet it!
So thank you so much for your support. It won’t take more than 10 seconds of your time. The share buttons are right below. 

Recently, a number of users reported seeing plain white icons on their “.docx” files instead of the Word icon. This kind of issue is mostly caused by a conflict with the default program settings in Windows which is why you may not see any Microsoft Word icon on your .docx files. So if you suddenly find that the Microsoft Word icon is either blank or missing and does not show properly on .doc and .docx document files of Office on your Windows 10 computer, then you can check out the potential solutions outlined below.
Before you proceed, you can try to restart your computer as there are instances when a simple system restart can resolve some issues like this one. However, if it does not help, create a System Restore point first. This is to ensure that you can always undo the changes you are about to make in case something goes wrong. Once you have that covered, proceed to the following options.
Option 1 – Try to configure .docx files to open with “winword.exe”
You can try configuring the .docx files to open with the winword.exe in order to fix the problem.
- Right-click on a .docx file and select the “Open with…” option.
- After that, if a prompt appears with a message saying, “How do you want to open this file”, select the “More apps” option to proceed.
- Next, scroll down and check the checkbox that says, “Always use this app to open .docx files” option.
- Then click on the “Look for another app on this PC” link and choose the WINWORD.exe application from one of the following paths based on the installed Office version in your computer and click Open:
- Word 2016 (64-bit): C:/Program Files/Microsoft Office/root/Office16
- Word 2016 (32-bit): C:/Program Files (x86)/Microsoft Office/root/Office16
- Now check if you can now see the Word icon on the .doc or .docx files.
Option 2 – Try changing the default Word icon via Registry Editor
- Tap the Win + R keys to open the Run utility.
- Then type “Regedit” in the field and hit Enter to open the Registry Editor.
- Next, navigate to this path located in the left pane: HKEY_CLASSES_ROOTWord.Document.12DefaultIcon
- From there, double click on the default value at the right pane and based on the Word version you are using as well as the architecture (32 bit or 64 bit) and then copy-paste the corresponding value in the Value data box:
- For Word 2016 (64-bit) keep it as C:/Program Files/Microsoft Office/root/Office16/wordicon.exe,13
- For Word 2016 (32-bit) Keep it as C:/Program Files (x86)/Microsoft Office/root/Office16/wordicon.exe,13
- Once you’re done, tap Enter and then close the Registry Editor.
- Restart your computer and see if the problem’s fixed.
Option 3 – Try to rebuild the Icon cache
You may want to rebuild the Icon cache as it could also help fix the issue.
- Tap Win + E to open File Explorer and then click Folder Options and click Views to show Hidden System Files.
- After that, go to C:Users%username%AppDataLocal folder and look for a file named Iconcache.db and delete it.
- Next, go to C:Users%username%AppDataLocalMicrosoftWindowsExplorer.
- From there, look for the following files and delete them.
- iconcache_32.db
- iconcache_48.db
- iconcache_96.db
- iconcache_256.db
- iconcache_1024.db
- iconcache_1280.db
- iconcache_1600.db
- iconcache_1920.db
- iconcache_2560.db
- iconcache_exif.db
- iconcache_idx.db
- iconcache_sr.db
- iconcache_wide.dd
- iconcache_wide_alternate.db
- Restart your computer. This will purge and rebuild the icon cache.
Option 4 – Try fixing Office apps
Fixing the Office apps can help you resolve the Word icon issue. All you have to do is open Settings > Apps. From the app list, look for the Microsoft Office Desktop apps and select it and then click on the Advanced options and click Fix. After that, wait until the process is completed and restart your PC. However, if the problem still persists, repeat the steps again but this time, click on Reset instead of Fix.
Option 5 – Try to repair Office Installation
If the options given above didn’t work, you can try to repair the Office installation and see if it can fix the problem.
- Open Control Panel and click on Programs and Features.
- Next, right-click on the Office program that you want to repair which in this case is, Word.
- Select Change and click Repair > Continue. After that, Office will start to repair Microsoft Word.
- Wait until the process is done and then reboot your computer.
Do You Need Help with Your Device?
Our Team of Experts May Help

Troubleshoot.Tech Experts are There for You!
GET HELP
Troubleshoot.Tech experts work with all versions of Microsoft Windows including Windows 11, with Android, Mac, and more.
Share this article:
You might also like
Error Code 0xc1900106 – What is it?
One of the most common errors encountered by Microsoft users upgrading from Windows 7 or Windows 8/8.1 to Windows 10 is the Error Code 0xc1900106. Microsoft users experience a failure in the installation process. Either they will be notified that the installation process was ended but failed or that Windows is not able to install the update.
Solution
 Error Causes
 Error Causes
More and more Windows users are having trouble upgrading their operating system to Windows 10. There are a lot of errors being encountered by users and one of them is the Error Code 0xc1900106. This error is normally due to the misconfigured system files. If a Windows user encounters this error, most likely their device has some registry problems.
Further Information and Manual Repair
Fixing error code-related issues could be best resolved to do manual repair methods. Applying repair methods manually can help Windows users address the root causes of the errors they encounter, as well as apply definite solutions to rectify the issue.
Most Windows users can be able to implement manual repair methods themselves but there are some cases where help from a Windows professional is needed. If you’re not a very tech-savvy person and not confident performing the manual repair methods yourself, it would be advisable to seek help from a professional Windows technician who is knowledgeable enough to address the errors or problems you are encountering. However, if you don’t want to resort to seeking help from a professional, you can also consider using a powerful automated tool.
In trying to fix Error Code 0xc1900106, here are the following manual repair methods you can take:
Method One: Custom Installation
- Make a backup of your personal files
- Users of Windows 8/8.1 should Refresh first then proceed to upgrade.
- If the Refresh process does not work, reset your device then try again.
- If resetting your device still does not work, you can proceed with a custom installation.
- When your Windows installation media is ready, you need to choose to boot from CD, DVD, or USB drive to begin setup. (For example purposes, this article will discuss booting from DVD).
- When your device is all set to boot from DVD, you will be prompted to Press any key to boot from CD or DVD…
- Once you’ve pressed any key, the screen will show the Windows logo which might take a while. No need to worry though, as long as you can see the indicator, you’re good.
- Choose your Language, Time, and Keyboard method from the drop-down menu then hit Next.
- Click on the Install Now button then wait until Setup begins.
- Tick on the I accept the license terms check box then select Next.
- Choose Custom: Install Windows only (advanced)
- Choose the Primary partition then select Next. You will be prompted by the following warning: The partition you selected might contain files from a previous Windows Installation. If it does, these files and folders will be moved to a folder named Windows.old. You will be able to access the information in Windows.old, but you will be able to use your previous version of Windows. Just click the OK button then wait as the Windows continue to install. Windows will restart once this phase of the setup completes and will reboot into setup once again.
- At this point, Windows will detect and install your hardware. Once this finishes, Windows will restart again.
Method Two: Reset Windows Update Components
- From your device’s desktop, hit Windows key + X to open the command prompt as admin.
- Once the command prompt window appears, you can type or copy and paste the following commands (all at once):
net stop wuauserv
net stop cryptSvc
net stop bits
net stop msiserver
ren C:WindowsSoftwareDistribution SoftwareDistribution.old
ren C:WindowsSystem32catroot2 catroot2.old
net start wuauserv
net start cryptSvc
net start bits
net start msiserver
pause
- Exit the command prompt.
- After you reset the Windows Update components, see if you receive Windows Updates which includes the firmware updates for your computer.
Method Three: Ensure Windows is Updated
- If you have an antivirus, make sure to disable it during the upgrade process.
- Run Windows Update to check if the system is updated.
- Ensure that the latest firmware and drivers are installed. To be able to do this, go to the computer manufacturer’s website or you can also try contacting company support.
Read More
What is Error Code 31?
Device Manager Error Code 31 pops up when Windows prevents the driver for a particular hardware device from loading. The error code 31 is almost always presented in the following format:
“This device is not working properly because Windows cannot load the drivers required for this device.” Code 31
This error can occur with any hardware device; however, in most cases, it occurs with Ethernet cards. The good news is that it belongs in the easy-to-resolve category. So repairing it should not be difficult.
Solution
Error Causes
 Error Causes
Error code 31 is related to driver problems, and the most common causes include:
- Outdated drivers
- Missing drivers
- Mis-configured drivers
- Corrupt drivers
Further Information and Manual Repair
To resolve error code 31 on your system, try the methods given below. We have listed down some of the most effective and easy-to-perform DIY methods for fixing Device Manager code 31 on your PC.
Method 1 — Rollback the Driver to its Previous State
This simply means to return the driver back to its previous state — to the version last installed. Try this method to resolve error code 31. This is probably the easiest way to return your PC to its previous working state.
However, by doing so, you will not be able to update your drivers and run new driver versions on your system. In other words, this is a temporary method to fix this issue.
You may still want to try other methods given below to ensure you have the latest drivers installed on your system.
You can roll back the driver to its previous version by accessing the Driver Rollback feature located in the driver settings within the Device Manager. Or another way to perform a rollback is to use the Windows System Restore Utility.
It is a recovery tool built-in the new Windows versions. To access it, simply go to the start menu and type System Restore Utility in the search menu.
Access it and pick a point in the past, also referred to as the restore point, to return your PC to its previous state before the error code 31 occurred.
However, to resolve the problem permanently, try method 2.
Method 2 — Update the Driver
Error code 31, as discussed above, may occur due to outdated, misconfigured, or corrupted drivers. Whatever the reason may be, to ensure the proper functioning of your hardware device, it is important to update the drivers on your system frequently.
To start driver updates, first, it is important to find out and identify problematic drivers. You need to identify the drivers that are corrupt, misconfigured, and outdated. For this, go to the Device Manager and then look for devices with yellow exclamation marks.
The yellow exclamation marks next to the devices show that these device drivers are problematic. Once you’ve identified the problematic drivers, simply update them by finding the latest and compatible versions on the manufacturer’s website.
This process is time-consuming and can be frustrating at times, especially when doing it for the first time.
Also, once you’ve updated the drivers, you need to update them from time to time to ensure they don’t get outdated, or else you will have to encounter Device Manager error codes again.
Method 3 — Download DriverFIX to Update Drivers Automatically
To avoid the hassle and stress involved in updating drivers manually, it is advisable to download and install DriverFIX.
DriverFIX is a smart, innovative, and feature-filled software embedded with an intelligent algorithm that quickly detects problematic drivers, matches them with the latest and compatible versions, and updates them immediately and automatically in just a few seconds and a couple of clicks.
It’s as simple as it can be. Furthermore, with this software installed on your PC, you don’t have to stress and worry about when your drivers need to be updated again.
DriverFIX ensures all drivers are continuously and regularly updated before they become outdated.
Click here to download DriverFIX to repair Device Manager error code 31 and update drivers automatically and regularly.
Read More
Installing Windows Updates in your Windows 10 computer does not always go smoothly as there are instances when you could encounter some errors along the way. One of these errors is error code 0x80244022 –WU_E_PT_HTTP_STATUS_SERVICE_UNAVAIL HTTP 503. This kind of error can be encountered when you check, download or install any updates. At the time of writing, it isn’t known yet what the exact cause of this error is. However, there are some potential fixes you can check out to fix it.
When this error occurs, you will see the following error message on your screen:
“There were some problems installing updates, but we’ll try again later. If you keep seeing this and want to search the web or contact support for information, this may help: (0x80244022).”
To fix error code 0x80244022, refer to the potential fixes provided below.
Option 1 – Disable the Proxy server
The first thing you can do is to try disabling the Proxy server as it might be the reason why you’re getting error 0x80244022 for Windows Updates. To disable the proxy server, refer to the steps below.
- Tap the Win + R keys to open the Run dialog box.
- Then type “inetcpl.cpl” in the field and hit Enter to pull up the Internet Properties.
- After that, go to the Connections tab and select the LAN settings.
- From there. Uncheck the “Use a Proxy Server” option for your LAN and then make sure that the “Automatically detect settings” option is checked.
- Now click the OK and the Apply buttons.
- Restart your PC.
Note: If you are using a third-party proxy service, you have to disable it. In addition, if you are also using a VPN, you can try to disable it as well.
Option 2 – Run the DISM tool
You can run the DISM tool as well to help fix the error code 0x80244022 during Windows Update. Using this built-in tool, you have various options such as the “/ScanHealth”, “/CheckHealth”, and “/RestoreHealth”.
- Open the Command Prompt with admin privileges.
- Then type in the following commands and make sure to hit Enter right after you type each one of them:
- Dism /Online /Cleanup-Image /CheckHealth
- Dism /Online /Cleanup-Image /ScanHealth
- exe /Online /Cleanup-image /Restorehealth
- Do not close the window if the process takes a while as it will probably take a few minutes to finish.
Option 3 – Perform a System File Checker scan
The SFC or System File Checker scan could detect and automatically repair damaged system files that could be causing error code 0x80244022 to appear when you try to update your Windows 10 computer. SFC is a built-in command utility that helps in restoring corrupted files as well as missing files. It replaces bad and corrupted system files with good system files. To run the SFC command, follow the steps given below.
- Tap Win + R to launch Run.
- Type in cmd in the field and tap Enter.
- After opening Command Prompt, type in sfc /scannow and hit Enter.
The command will start a system scan which will take a few whiles before it finishes. Once it’s done, you could get the following results:
- Windows Resource Protection did not find any integrity violations.
- Windows Resource Protection found corrupt files and successfully repaired them.
- Windows Resource Protection found corrupt files but was unable to fix some of them.
- Once done, restart your computer.
Option 4 – Try disabling the Firewall or antivirus program
Disabling the antivirus program or Firewall or any other security software installed in your computer is always a good idea you can try when the Windows Update process does not go smoothly. So before you try updating your computer again, make sure to disable the antivirus or security program and once the Windows Update is done, don’t forget to enable the antivirus program back again.
Option 5 – Try resetting the Windows Update components
- Open Command Prompt with admin privileges.
- After that, type each one of the following commands and hit Enter after you key in one after the other.
- net stop wuauserv
- net stop cryptsvc
- net stop bits
- net stop msiserver
Note: The commands you entered will stop the Windows Update components such as Windows Update service, Cryptographic services, BITS, and MSI Installer.
- After disabling WU components, you need to rename both the SoftwareDistribution and Catroot2 folders. To do that, type each one of the following commands below, and don’t forget to hit Enter after you type one command after the other.
- ren C:/Windows/SoftwareDistribution/SoftwareDistribution.old
- ren C:/Windows/System32/catroot2/Catroot2.old
- Next, restart the services you’ve stopped by entering another series of commands. Don’t forget to hit Enter after you key in one command after the other.
- net start wuauserv
- net start cryptsvc
- net start bits
- net start msiserver
- Close Command Prompt and reboot your PC.
Option 6 – Run the Windows Update Troubleshooter
You might also want to run the Windows Update Troubleshooter as it could also help in fixing Windows Update Error. To run it, go to Settings and then select Troubleshoot from the options. From there, click on Windows Update and then click the “Run the troubleshooter” button. After that, follow the next on-screen instructions and you should be good to go.
Read More
Error Code 0xc004f034 – What is it?
Error code 0xc004f034 occurs when Windows 10 users fail to activate their operating system. This activation error code affects not only Windows 10 but those using other versions of the Windows operating system including Windows 8.1. Users experiencing this problem will notice the following common symptoms which occur:
- Inability to activate Windows 10 operating system
- Message box with error code 0xc004f034
Solution
Error Causes
Error code 0xc004f034 usually results from issues related to activation servers. In such cases when servers are busy, users will not be able to complete the activation process which would result in access to their Windows 10 edition of choice. The error code may also result from issues related to your product key. For this reason, be sure to use the correct product key when you attempt to activate Windows 10.
Further Information and Manual Repair
The completion of manual repair methods can be an effective way to correct issues like error codes in Windows 10. To begin, however, ensure you follow the instructions as given as making even a slight mistake will result in unfavorable results. If, for whatever reason, you have trouble completing the steps suggested below, feel free to contact a Windows repair technician. This type of IT professional is usually equipped with knowledge and expertise to access your particular situation. Otherwise, see the manual repair methods listed below and complete at least one method to fix error code 0xc004f034.
Method One: Ensure You Enter a Valid Product Key
If there is a problem with your product key, you will need to ensure you fix it before you can resolve error code 0xc004f034. Follow the instructions below after ensuring you have a valid product key.
- Step one: Click the Start button then select Settings
- Step two: Select Update & security then Activation
- Step three: Click the Change product key
- Step four: Type in your valid product key with its 25 characters in the correct order
Your system will activate Windows 10 if the issue was related to the use of an invalid product key. However, attempt manual method two if error code 0xc004f034 reappears and you are unable to complete the activation process.
Method Two: Reattempt Windows 10 Activation Until Process Completes
In many cases, error code 0xc004f034 occurs simply due to a busy server. This was the case in 2015 in particular when Windows users first received access to editions of Windows 10 like Windows 10 Pro. To complete this process, you will need to follow the instructions below, repeating the last step until the activation occurs.
- Step one: Click the Start button then select Settings
- Step two: After selecting Settings, click Update & Security
- Step three: Select Windows Update then the Check for updates tab
- Step four: Click Activate Windows 10 update
If this method is successful, you will finally be able to update your system to the Windows 10 edition of your choice. This process may take just a few minutes – and several attempts – before you resolve the issue. Remember to be patient. However, contact a Windows repair technician to evaluate your system if the issue persists for more than a few days.
Method Three: Use an Automated Tool
If you wish to always have at your disposal a utility tool to fix these Windows 8 and other related issues when they do arise, download and install a powerful automated tool.
Read More
Error Code 32 — What is it?
Code 32, a Device Manager error, pops up when a device driver and other required services related to the driver are disabled.
The error code 32 is usually displayed in the following format:
“A driver (service) for this device has been disabled. An alternate driver may be providing this functionality. Code 32”
When a driver experiences a problem, it is reported to the Device Manager. Though error Code 32 does not cause detrimental damage to your system, it can cause the loss of functionality of the hardware device whose driver is disabled.
Solution
Error Causes
Error 32 may be generated due to several reasons. However, the most common causes include:
- The device driver is outdated
- The device is not configured as the default
- Some other device is providing default functionality
- The device driver is disabled in the registry
- Corruption of registry values in the CD ROM Drive Class registry key
Further Information and Manual Repair
If you come across error code 32 on your PC, then repair it immediately to ensure optimum PC performance. To resolve this error code, try the methods listed below. If you are not a computer programmer, don’t worry!
The listed solutions are easy to perform, require no technical background or expertise and more importantly, these solutions are very effective.
Simply follow the instructions to repair error code 32 on your system in just a few minutes.
Method 1 — Reboot Your PC
Sometimes Device Manager error codes may appear due to temporary issues, which may be resolved simply by rebooting your system. If you are lucky, this might actually work.
By restarting your PC, you might be able to get rid of error code 32. However, if the error still persists, then try other methods given below.
Method 2 — Uninstall and Reinstall the Driver
To resolve error code 32, uninstall and then reinstall the driver. To uninstall the driver, simply follow these steps:
- Go to the start menu
- Type Device Manager in the search bar and then press enter
- Now in the Device Manager, find and then double-click the category of device that you wish to uninstall, for example, click on the Display Adapter to uninstall the graphics card.
- Once you have located the device and the driver you wish to uninstall, simply right click on it and then click ‘uninstall’
- Windows will prompt you to confirm device removal changes.
- Click OK to confirm and proceed.
- After that, simply restart your system to activate changes
- To reinstall, go to the control panel and choose Add/Remove Hardware and add a new device. Follow all prompts to reinstall the device.
Method 3 — Delete Both the Upper Filters and Lower Filters Registry Values
As discussed above, sometimes error code 32 may be triggered due to corruption of registry values.
If this is the underlying cause, then delete both the upper filters and lower filters registry values from the registry. This will take about 5 to 7 minutes. Here’s what you have to do:
- Go to the start menu
- Type Regedit in the search box and then press enter
- Now locate the HKEY_LOCAL_MACHINE folder under ‘My Computer’
- Click the |> or (+) icon next to the folder name to expand
- Here you will see a long list of subkeys
- Locate the correct class GUID for the problematic device
- Now click the registry subkey that corresponds to the device class GUID
- Locate the Upper Filters and Lower Filter values and delete
- Close the registry editor
- Restart your PC to activate changes
This will hopefully resolve error code 32 on your system if the error was generated due to registry value corruption. However, if the error continues to appear, then resort to method 4.
Method 4 — Update the Problematic Driver
Locate the problematic drivers and update them with the latest versions. This procedure is effective but time-consuming if performed manually.
It takes several minutes to identify problematic drivers and find the latest and compatible versions for each driver on the manufacturers’ website. And besides, you will have to perform updates continuously to ensure the error doesn’t occur again.
Method 5 — Download DriverFIX to Update Drivers Automatically
To avoid the hassle, download DriverFIX.
This is a cutting-edge and user-friendly software program embedded with intelligent system programming and intuitive technology that identifies problematic drivers and updates them with the latest and compatible driver versions in seconds, automatically and on a regular basis.
By installing it on your PC, you can update all the drivers and repair code 32 in no time.
Click here to download DriverFIX to resolve Device Manager error code 32 today!
Read More
As you know, one of the basic apps in the Windows 10 operating system is the calculator and it can even be extended to a scientific calculator which makes it really useful for users. However, there are instances when you might encounter some issues while using this app. One of the issues about the Calculator app that’s been reported recently is that the Calculator app is not working. If you encounter the same problem, then you’ve come to the right place as this post will guide you on what you can do to fix the problem.
Based on the reports, users claimed that the issue with the Calculator app occurred right after they’ve installed a feature update, while other users claimed that the Calculator app never really worked on their computers and there are also cases where the app opens but it either freezes or crashes.
According to researchers, the main causes of the problem include a feature update that could’ve altered the settings. It could also be due to problems with the login account or corrupted and missing files, or the problem could also with the calculate app itself. To resolve this problem, here are some suggestions you can follow.
Option 1 – Run the System File Checker Scan
System File Checker or SFC is a built-in command utility that helps in restoring corrupted files as well as missing files. It replaces bad and corrupted system files to good system files that might be the reason why the calculator app is not working properly. To run the SFC command, follow the steps given below.
- Tap Win + R to launch Run.
- Type in cmd in the field and tap Enter.
- After opening Command Prompt, type in sfc /scannow
The command will start a system scan which will take a few whiles before it finishes. Once it’s done, you could get the following results:
- Windows Resource Protection did not find any integrity violations.
- Windows Resource Protection found corrupt files and successfully repaired them.
- Windows Resource Protection found corrupt files but was unable to fix some of them.
- Reboot your computer.
Option 2 – Run the DISM tool
You can also run the DISM Tool as it helps in repairing the Windows System Image as well as the Windows Component Store in Windows 10. Using this built-in tool, you have various options such as the “/ScanHealth”, “/CheckHealth”, and “/RestoreHealth” that could help in fixing the Calculator app.
- Open the Command Prompt with admin privileges.
- Then type in the following commands and make sure to hit Enter right after you type each one of them:
- Dism /Online /Cleanup-Image /CheckHealth
- Dism /Online /Cleanup-Image /ScanHealth
- Dism (.)exe /Online /Cleanup-image /Restorehealth
- Do not close the window if the process takes a while as it will probably take a few minutes to finish.
Option 3 – Try logging into your computer using a different User Account
You might want to try logging into a different User Account since it is possible that the issue could have something to do with your log-in account. Thus, you can isolate this possibility by logging into a different user account. If you don’t have any other user account, simply create a new one by clicking on the Start icon and then go to Settings > Account > Family & other users. From there, go to the Other user’s section and click on the Add someone else to this PC option, and then inputs all the needed information and restarts your computer. Once your computer has restarted, log into your computer using the newly created user account.
Option 4 – Try to reset or reinstall the Calculator app
If the first three given options didn’t work, you might want to reset or reinstall the Calculator app. To do that, follow these steps:
- Click on the Start button and go to Settings > Apps > Apps and features.
- Next, look for the Calculator app from the app list and click on it to see its other options.
- After that, select the Advanced options and go to the Reset section and then click on the Reset button to reset the Calculator app.
Note: You also have the option to reinstall the Calculator app. All you have the option to visit Microsoft Store and from there, uninstall the Calculator app.
Read More
 REevil is one of the most active and successful hacking groups connected to Russia and operating all over the world. The group recently demanded a huge bitcoin ransom for an attack targeting IT firm Kaseya in the USA.
Since Tuesday blog and payment site run by REvil group cannot be longer reached without any kind of explanation or why.
The reason behind the disappearance is unknown but has sparked speculation that the group may have been targeted deliberately by authorities.
US President Joe Biden said he raised the issue with Vladimir Putin during a phone call on Friday, after discussing the subject during a summit with the Russian president in Geneva last month.
Mr. Biden told reporters that he had «made it very clear to him…we expect them to act» on information and also hinted the US could take direct digital retaliation on servers used for intrusions.
The timing of Tuesday’s outage has sparked speculation that either the US or Russian officials may have taken action against REvil — though officials have so far declined to comment and cyber experts say sudden disappearances of groups are not necessarily uncommon.
The development comes after a series of high-profile ransomware attacks which have hit major US businesses this year.
The FBI accused REvil — also known as Sodinokibi — of being behind a ransomware attack on the world’s largest meat processing company JBS last month.
Read More
Error 577 — What is it?
This is a typical system error code. It stops your ability to run or load programs on your PC. The error message is displayed in the following format:
‘Windows cannot verify the digital signature for this file.
A recent hardware or software change might have installed a file that is signed incorrectly or damaged, or that might be malicious software from an unknown source.’
Solution
Error Causes
Error 577 may be triggered due to several reasons. However, the most common causes of this error include:
- Device Driver Conflicts
- Hardware Malfunction
- Viral Infection
- Windows Registry Corruption or Damage
- Software File Corruption or Damage
Error 577 can prove to be fatal if the underlying causes are related to viral infection or registry corruption.
Further Information and Manual Repair
To resolve error 577 on your PC, you don’t have to hire a professional and spend hundreds of dollars on repair. The process for fixing this error is simple and easy.
Here are some of the best and efficient methods to repair error 577 — no technical expertise is required.
Method 1 — Check and Update Device Drivers
If the problem is triggered by the outdated or corrupted driver for the device reporting the error then it is advisable to update the driver.
To do this, first, uninstall the corrupted driver and then reinstall the latest version.
For this simply click the start menu, go to the control panel and then click Performance and Maintenance, and then System. In the new window, you will then see a tab called Hardware and the Device Manager.
Double click on the device whose driver you need to uninstall. Click on the properties window with a tab marked driver. Then click on the driver you want to uninstall. To activate changes reboot your PC.
Now reinstall the latest and updated version of the driver uninstalled using the Plug and Play feature.
Method 2 — Scan For Viruses
System error codes like 577 can also pop up if your PC is infected by viruses. Viruses enter through phishing emails and downloadable files from unreliable websites.
If the reason for error 577 is a viral infection, then simply install a powerful antivirus, run it to scan your entire PC. Remove all the viruses and malicious programs immediately to resolve.
If the issue still persists, then try method 3.
Method 3 — Repair the Registry
Sometimes registry corruption can be the underlying cause for error 577. The registry is the part that saves all activities performed on the system.
It stores both important and unnecessary files like junk files, cookies, and bad registry entries. If these files are not removed from the registry frequently, they accumulate and corrupt the registry which then generates system error codes.
To resolve and repair the registry in seconds, simply download Restoro. This is a user-friendly PC Repair Tool embedded with a registry cleaner. It wipes away all unnecessary files corrupting the registry and repairs it.
Click here to download Restoro.
Read More
Error 1753 — What is it?
Error 1753 is an RPC endpoint mapper error code. This code is typically displayed as «EPT_S_NOT_REGISTERED» or sometimes as the hexadecimal value 0x6D9. Error 1735 indicates that there are no more endpoints available from the endpoint mapper.
To understand this better, basically, RPC is an inter-process communication (IPC) method.
This is used by clients and servers for communication purposes. RPC is used by programs to execute programs on a server computer. The perfect example of this is Microsoft Outlook. You communicate with Microsoft Exchange Server using RPC.
This enables you to send and receive emails. When you use Microsoft Outlook to send emails, your computer sends a message to the server computer in an obscure coding.
The server responds to your computer with another message that contains the results of the executed program. This is all being carried at the backend of the running program.
Integral to this is the endpoint. The endpoint includes the name, port, or a group of ports on a computer that is monitored by the server for incoming client requests. This is a network-specific address to be precise.
The endpoint mapper is the part of the RPC subsystem that is responsible for dynamically assigning endpoints to the server. When this function fails it leads to error 1753 message display. It shows that RPC service is not available.
Solution
Error Causes
The error code 1753 indicating RPC endpoint mapper service failure is triggered due to multiple reasons. These include:
- Windows registry damage and corruption
- Malfunctioning of the hardware
- Spyware intrusion or viral infections
- Device driver conflicts
Further Information and Manual Repair
This error code may cause a great deal of inconvenience to execute programs that are dependent on the server. It can lower your productivity and performance. To avoid the hassle, it is advisable to repair the error 1753 immediately.
The best way to resolve this error 1753 in seconds is to download Restoro. By using this repair tool, you can fix the error right away for free without paying hundreds of dollars to a professional expert.
Restoro is a new and innovative PC fixer integrated with an automated algorithm and intuitive technology that enables users to sit back and relax while Restoro runs on the system and detects all PC-related issues in the shortest time.
In just a few clicks you can resolve even the mightiest PC issues like the error code 1753 RPC endpoint mapper problem and resume back to the program in no time.
Why Restoro
It is efficient and user-friendly. Restoro can be used by users of all levels so even if this is your first experience using a repair tool, you don’t have to worry. To operate it, you don’t have to be a computer programmer or have sound technical expertise.
It is simple and very easy to use. The layout is simple and neat complimented nicely with easy navigation and a sophisticated user interface.
Restoro is a high and multi-functional error tool embedded with powerful, performance-driven, and value-adding utilities, all in one.
So, whether the error code 1753 is triggered due to a viral infection on your system or registry corruption, you don’t have to look for different tools to resolve the error, simply run Restoro to fix the issue right away.
Restoro includes a dynamic registry cleaner that detects all registry issues and wipes out the clutter from the hard disk like junk files, internet history, and invalid entries which is by the way the number cause for registry corruption leading to error 1753.
It clears up disk space and RAM and repairs the misconfigured system files and corrupt registry in seconds thus resolving error 1753.
Restoro also functions as a system optimizer thus boosting the speed and performance of your PC massively and reducing boot time.
In addition to this, it also has a backup feature. This tool is embedded for safety purposes. This feature enables you to create backup files on your PC before you start system repair. This helps you recover data in the event of data loss during system repair.
To get started:
- Click here to download and install Restoro on your system
- After installation, run it to scan for errors like 1753
- Now press the repair tab to resolve
Read More
Driver Verifier is a built-in tool in Windows 10 that monitors device drivers on your computer, if it detects issues with drivers, it will attempt to fix the issue. If you are encountering Blue Screen for a Driver and after running Driver Verifier you get another with message DRIVER_VERIFIER_DETECTED_VIOLATION ten follow this article step by step in order to solve it.
There is a chance that you will maybe even have to do this in safe mode, if that is your case, login into safe mode and proceed, otherwise proceed normally.
-
Update Device Drivers
the most common issue with the blue screen is old Drivers, in most cases, graphical drivers, update all Drivers with the latest versions and see if this will resolve the issue.
-
Stop or uninstall Virtualization software
Virtua machine software is a great way to have a safe environment and to experiment while preserving your Windows installation intact, however sometimes due to the nature of these applications they can be a case for blue screen errors. Stop virtualization software to see if it will remove the issue. If that is the case, try another virtualization application
-
Disable Driver Verifier
Press ⊞ WINDOWS + X to open the secret menu
Click on Command Prompt (admin)
Inside command prompt type: verifier and press ENTER
Select the Delete existing settings radio button
Click Finish
Reboot your computer -
Reset Driver Verifier
Press ⊞ WINDOWS + X to open the secret menu
Click on Command Prompt (admin)
Inside command prompt type: verifier /reset and press ENTER
Reboot your computer -
Use system restore
Rollback Windows to the previous state where everything was working fine.
Read More
![]()
Copyright © 2022, ErrorTools. All Rights Reserved
Trademarks: Microsoft Windows logos are registered trademarks of Microsoft. Disclaimer: ErrorTools.com is not affiliated with Microsoft, nor claim direct affiliation.
The information on this page is provided for information purposes only.
![]()
Repair your PC with one click
Please be aware that our software needs to be installed on a PC system with Windows on it, Open this website on a desktop PC and download the software for easy and quick elimination of your issues.