
Excel for Microsoft 365 Excel for Microsoft 365 for Mac Excel 2021 Excel 2021 for Mac Excel 2019 Excel 2019 for Mac Excel 2016 Excel 2016 for Mac Excel 2013 Excel 2010 Excel 2007 More…Less
You are trying to open an Excel file and you get a message about the file being locked. Sometimes the file is locked by another user, and other times the «another user» is actually you. If you have locked the file yourself, it might be because the file is open on a different device, or the previous instance of the file didn’t close properly.
Tip: Sometimes a file may get locked if everyone editing isn’t using a version that supports co-authoring. To co-author together, make sure everyone is using the Microsoft 365 subscription version of Excel or Excel for the web.
Make sure the file is closed on all your devices. If the error still occurs, wait a few minutes for the server to release the lock on the file. (Sometimes the server thinks you have the file open, and just needs to catch up with what’s really going on.)
If the other user is not you, you can wait until the other person is done and has closed the file. You can also choose to view it as read-only. Or, you can ask the person to close the file, check it in, or give you edit permissions.
If you want to work on the file at the same time as other people, then make sure everyone uses a version of Excel that supports co-authoring. When you co-author, more than one person can open the file, and you can see each other’s changes quickly — in a matter of seconds.
Note: * Co-authoring in Excel for Microsoft 365 and Excel for Microsoft 365 for Mac requires you to be signed in with your Microsoft 365 subscription. If you have a work or school account, you might be able to co-author if your administrator hasn’t provided the latest version to install.
Versions of Excel that support co-authoring:
-
Excel for Microsoft 365*
-
Excel for Microsoft 365 for Mac*
-
Excel for the web
-
Excel for Android
-
Excel for iOS
-
Excel Mobile
Note: Excel 2019 does not support co-authoring.
If just one person uses a version of Excel that doesn’t support co-authoring, then everyone else will get the «locked» error — even if everyone else is using a version of Excel that does support co-authoring.
If people aren’t sure which version of the app they have, then encourage everyone to use Excel Online to co-author in a web browser.
If you want to avoid the error by co-authoring with others, put the file on OneDrive, OneDrive for Business, or SharePoint in Microsoft 365. If the file is saved to another location that doesn’t support co-authoring, people will get the “locked” error.
The following locations do not support co-authoring:
-
Server paths like \serverfolder and smb://server/folder
-
Cloud locations like DropBox, Box, and Google Drive
-
Local folders on your Windows or Mac computer
-
Libraries on SharePoint On-Premises sites. If you have an on-premises site and Excel for Microsoft 365, try using Excel Online to co-author instead.
For Windows: If you are trying to co-author, check the file name of the file and make sure it is in either .xlsx, .xlsm, or .xlsb format. If the file is in another format, go to File > Save As > Browse > Save as type and choose the .xlsx, .xlsm, or .xlsb format.
For Mac: If you are trying to co-author, check the file name of the file and make sure it is in either .xlsx, .xlsm, or .xlsb format. If the file is in another format, go to File > Save As… and choose the .xlsx, .xlsm, or .xlsb format.
Note: Co-authoring does not support the Strict Open XML Spreadsheet format.
If you are using the OneDrive sync app for Windows, make sure you are using the latest version. Also, make sure the sync app is not paused.
If you are trying to co-author, the “locked” error can occur if the file uses a feature that is not supported by co-authoring. Ask the person who has the file open to do one or more of the following. The first thing to try is to turn off the Shared Workbook feature. Also, if you are opening a snapshot from SharePoint, open the workbook itself instead. If those two solutions don’t work, try one or more of the following.
Windows:
-
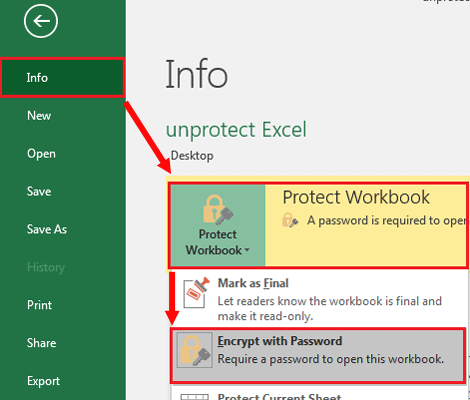
If possible, remove password encryption or restricted access from the file. Go to File > Info > Protect Workbook and remove any passwords or restricted access settings.
-
Turn off the Refresh data when opening file setting on all tables and PivotTables in the file. Select the table or PivotTable, then go to Table Tools Design > Refresh > Connection Properties. Then uncheck Refresh data when opening file.
-
Inactivate an add-in that’s causing the lock. Select File > Options > Add-Ins > Excel Add-ins > Go and then clear the check box for the add-in.
Mac:
-
If possible, remove password encryption from the file. To do that, go to the Review tab. If Protect Workbook is highlighted, click it to turn off protection. Enter the password if prompted.
-
If possible, remove restricted access. Go to File > Restrict Permissions > No Restrictions.
-
Turn off the Refresh data when opening file setting on all tables and PivotTables in the file. Select the table or PivotTable, then go to the Table tab > Refresh > Connection Properties. Then uncheck Refresh data when opening file.
-
Inactivate an add-in that’s causing the lock. Select Tools > Excel Add-ins and then clear the check box for the add-in.
Need more help?
Want more options?
Explore subscription benefits, browse training courses, learn how to secure your device, and more.
Communities help you ask and answer questions, give feedback, and hear from experts with rich knowledge.
Are you unable to edit your Excel workbook due to an error message “The document is locked for editing by another user”?
If you also want to solve this Excel file locked by another user how to unlock mystery then you are on the right page. As today through this post, I am gonna share some easy fixes to resolve this Excel file is locked for editing by another user error.
Before that let’s find out why “The document is locked for editing by another user” error is appearing while trying to edit the Excel spreadsheet.
How Word And Excel Files Become Non-Editable?
This error is not limited to the Excel file, MS Word users are also facing File is locked for editing by another user error message.
There are lots of causes that can trigger this type of error and prevent the user from editing Excel or word file.
If you haven’t quit the Excel file properly then the Excel application becomes unable to delete the owner file and hence when the user tries to open/edit the Excel file then they get “The document is locked for editing by another user” error message.
If the Excel file a Word file saved on the server then it is possible that the same file is getting used by another person at the same time.
Microsoft’s office creates a temporary ownership file for their Excel and Word, this file is present in the location of the document, having “~$” followed by the name of the file. For Example: The filename of “myfile.doc” will have an ownership file name “~$myfile.doc”, both the files are created on newmisserverpublic.
The file also contains the name of the owner who is currently editing the document. You can see the file on newmisserverpublic from a computer, but on a Mac, you can’t see this file.
To extract data from corrupt Excel file, we recommend this tool:
This software will prevent Excel workbook data such as BI data, financial reports & other analytical information from corruption and data loss. With this software you can rebuild corrupt Excel files and restore every single visual representation & dataset to its original, intact state in 3 easy steps:
- Download Excel File Repair Tool rated Excellent by Softpedia, Softonic & CNET.
- Select the corrupt Excel file (XLS, XLSX) & click Repair to initiate the repair process.
- Preview the repaired files and click Save File to save the files at desired location.
There are various causes that can trigger this type of Excel File Locked For Editing issues. Some of the common reasons for “The document is locked for editing by another user” error are as follows:
- Microsoft Excel isn’t closed properly and, therefore, didn’t erase the owner file.
- The second request of the Excel file is active in the background with the doc already open.
- The Excel doc is shared over a network, and used by any other user.
Sometimes you may also get the error message saying that:
File in Use – {filename] is locked for editing by {username}. Open Read-Only” or click “Notify to receive a notification when the document is no longer in use.
Screenshot of the error:

How To Fix Microsoft Excel File Locked For Editing?
In order to solve Excel file in use issue, we will disconnect the user from the file, and allow another user to get the complete accessibility. So follow all the below-given solutions.
Method 1# Disconnect User From The Opened Excel File And Unlock It
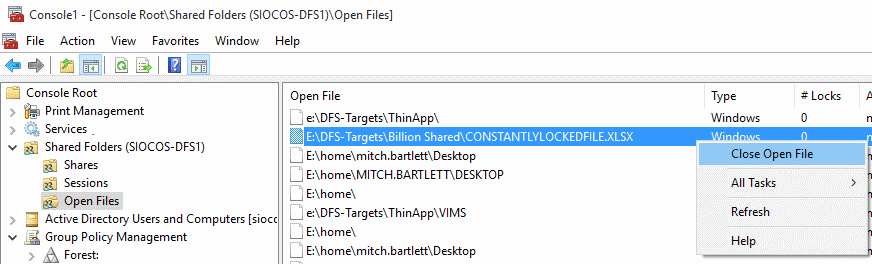
1: First you have to note down the path to the file, and the file name.
2: Open the run dialogue box, press the Windows Key + R from your keyboard to open up the Run dialog box.
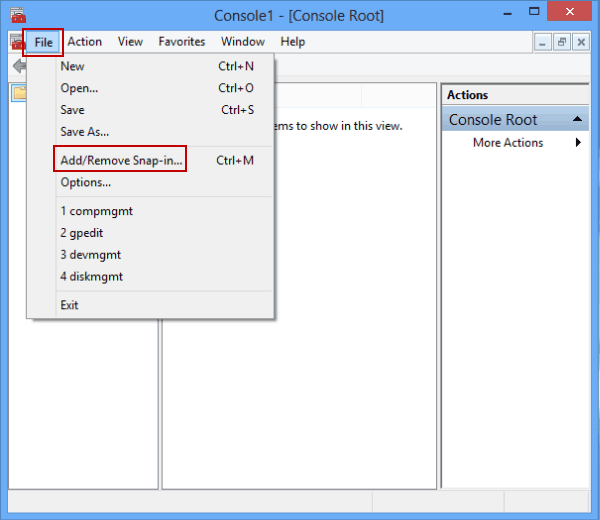
3: In the run dialogue box, type “mmc” and then hit the Enter key to open up the “Microsoft Management Console“.
4: Choose the “File” > “Add/Remove Snap-in“.
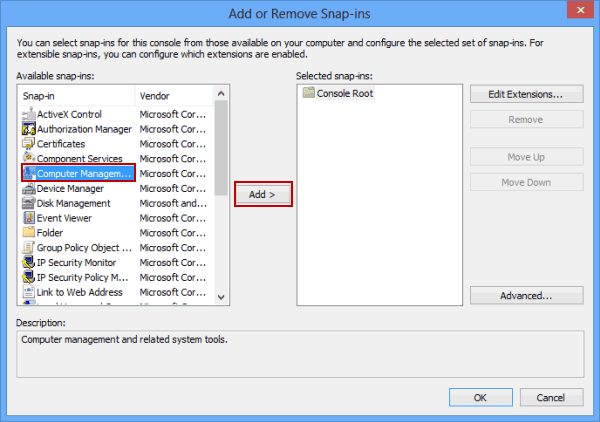
5: From the list of “Available snap-ins”, choose the “Shared Folders” and then choose “Add” to add it to the “Selected snap-ins” list.
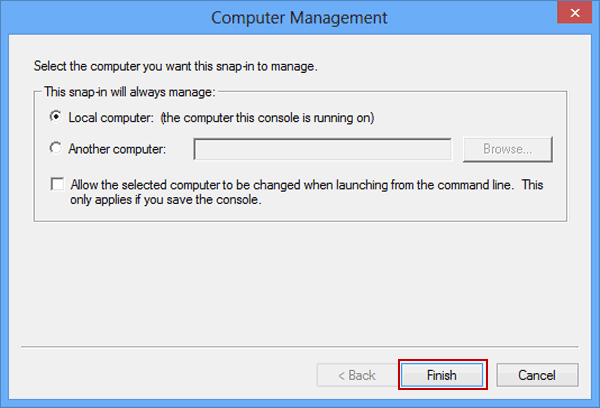
6: Another box will appear asking you to “Select the computer you want the snap-in to manage“. In case you are logged in on the server where the contaminated Excel file is present, then select “Local computer”. But if you are using a different system, then select the “Another computer”, then type the server where the Excel file stored.
7: Now, in the view section, choose the “Open Files“.
8: Choose the “OK“

9: Click on the “Open Files” to expand it.
10: You can sort the entire list according to your need and then search the file in the list. After it, right-click the file and, select “Close Open File”
Method 2# Quit All The Instances Of Excel
Follow the below-mentioned steps to terminate your PC from all the opened instances of Excel. This ultimately works in resolving Excel file in use error.
- Try to save your ongoing work, after that exit from all programs.
- Press the CTRL+ALT+DELETE button from your keyboard. This will open up the dialog box of Windows Security.
- Hit the Task Manager and then go to the Processes tab.
- Click Excel.exe, and then click End Process.

- In the Task Manager Warning dialog box, click Yes.
- If you are receiving locked for editing by another user or your program is not responding then click End Now.

- On the File menu, tap to the Exit Task Manager.
Method 3# Same File Is Editing By Another User
If any other user is also working on the same excel file at the same time then you have the two options to perform. The first one is, either you can wait till that person releases the file. And the second one is to make a copy of your Excel file and make all the changes in this copied document.
Or you can also switch to such an app that allows multiple authors to work on the file concurrently.
Note: If you are working on the same Excel file with multiple users, then ensure that all the users must be using the same version of Excel which has well support for co-authoring.
Method 4# Office App Already Executing In Background
If you are very much sure that your excel file is not shared on the network nor it is been edited by any other user. In that case, chances are high that instances of the Office app along with the opened file are already executing in the background.
Method 5# Check Your Excel Version Support Co-Authoring Or Not
To work on the Excel file which is used by multiple users at the same time, make sure all the users are using Excel version which supports co-authoring.
If your excel version support co-authoring than more than one person can easily open and work on the file at the same time. Apart from this, they can also view other user’s changes in just a few seconds.
Following Excel application Versions well support this co-authoring feature:
- Excel Mobile
- Excel for the web
- Excel for Android
- Excel for Microsoft 365 for Mac*
- Excel for iOS
- Excel for Microsoft 365*
Note: Excel 2019 version doesn’t support this co-authoring feature.
This locked for editing by another user error also encounters also when a single user from the multiple users’ group is using the Excel version which doesn’t support this co-authoring.
If you are not sure about which Excel version they are using then encourage all to use Excel Online. This will facilities you with this co-authoring feature in the web browser only.
Method 6# Stick With These Excel File Formats
For Windows:
In spite of using the co-authoring feature in your Excel application if still you are getting the same locked for editing by another user error. At that time, keenly check the file format in which this specific Excel file is been saved.
Make sure that your excel file must be in the following .xlsx, .xlsm, or .xlsb format.
If it’s not then, go to the File > Save As > Browse > Save as type option. After that select any one of the .xlsx, .xlsm, or .xlsb formats.

For Mac user:
Go to the File > Save As… Option and then choose any one of the .xlsx, .xlsm, or .xlsb format.
Method 7# Remove Unsupported Features From The File
If still, you are getting this Excel file in use error then the reason can be the unsupported Excel feature that doesn’t work with co-authoring.
So for this, you just need to ask one of your Excel file users to perform the following task.
The first option is to turn off the shared Excel workbook feature. If a snapshot is opened from SharePoint then it will open your workbook automatically.
If these two solutions fail to work then try the following solutions.
Windows:
- If it’s possible then remove the password or restricted file access settings. For this just follow this path: File > Info > Protect Workbook option. After that, you have to remove restricted access settings and passwords if it is applied.
- Disable Refresh data when opening file setting present within the pivot table and tables of the file. Choose the PivotTable or table, after that follow this path: Table Tools Design > Refresh > Connection Properties. Now uncheck the Refresh data when opening file option.

- Inactivate the excel add-in which causes this lock file issue. Choose the File > Options > Add-Ins > Excel Add-ins > Go option. Uncheck the add-in checkbox.

Conclusion
Now you must have got the perfect answer to your query Excel file locked by another user how to unlock.
If you successfully fixed this issue with the help of the above-given steps then it’s good. But if you are still unable to fix this issue or unable to follow the below-given steps due to lack of knowledge then you can go with the automatic solution to repair MS Excel errors.
Download and install the Excel Repair Tool, and fix Excel editing issues with ease. This tool is very simple to use as you don’t need any professional skills to perform Excel recovery. It is recommended to apply this tool once and make your Excel file error-free without doing anything manually.
We’ve already discussed several errors and tried to fix them, if you are new to our website and want to read our latest blogs then kindly visit: https://www.repairmsexcel.com/blog
If you have any queries related to the Excel file then kindly contact us in our social accounts like Facebook and Twitter.
* Free version of the product only previews recoverable data.

Priyanka is an entrepreneur & content marketing expert. She writes tech blogs and has expertise in MS Office, Excel, and other tech subjects. Her distinctive art of presenting tech information in the easy-to-understand language is very impressive. When not writing, she loves unplanned travels.
You can also press Ctrl+Shift+F or Ctrl+1. In the Format Cells popup, in the Protection tab, uncheck the Locked box and then click OK. This unlocks all the cells on the worksheet when you protect the worksheet.
Contents
- 1 How do I unlock an Excel file that is locked for editing?
- 2 How do you unlock an Excel spreadsheet without the password?
- 3 How do I unlock a locked XLSX file?
- 4 How do I unlock a locked document for editing?
- 5 How do you unlock cells in Excel?
- 6 How do I unlock Excel Online?
- 7 How do I unlock data validation in Excel?
- 8 How do I unlock cells in Excel 2010?
- 9 How do I unlock cells in Excel 2019?
- 10 Why is Data Validation greyed out Excel?
- 11 How do you unfreeze a drop down in Excel?
- 12 What is Pivot in Excel?
- 13 How do you lock or unlock cells based on values in another cell in Excel?
- 14 What is F4 in Excel?
- 15 What are locked cells in Excel?
- 16 How do I enable data validation tab in Excel?
- 17 How do I fix data validation in Excel?
- 18 How do I unprotect an Excel worksheet?
How do I unlock an Excel file that is locked for editing?
How to Unlock Excel File Locked for Editing – 5 Ways
- Quit All Instance of Excel.
- Use Windows Management Console.
- File Is Editing by Another User.
- Remove Unsupported Features.
- Check Your File Format.
How do you unlock an Excel spreadsheet without the password?
Just follow any of these steps: Open the protected spreadsheet, and switch to the ‘Review’ tab and click the ‘Unprotect Sheet’ icon in the Changes group. You can access the same above option by right-clicking the protected spreadsheet tab, then select the ‘Unprotect Sheet’ option from the context menu.
How do I unlock a locked XLSX file?
How to unprotect a password protected .XLSX file
- Change the file extension from . XLSX to .
- Extract the file to a folder with your favorite unzipper (7-Zip is what I used)
- Go to the xlworksheet sub-folder that you just extracted.
- There should be one or more files named like: sheet1.
- Re-zip the files back up.
- Rename from .
How do I unlock a locked document for editing?
Unlock a protected document
- On the Review tab, in the Protect group, click Restrict Editing.
- In the Restrict Formatting and Editing task pane, click Stop Protection.
- If you are prompted to provide a password, type the password.
How do you unlock cells in Excel?
Here’s how to lock or unlock cells in Microsoft Excel 2016 and 2013.
- Select the cells you wish to modify.
- Choose the “Home” tab.
- In the “Cells” area, select “Format” > “Format Cells“.
- Select the “Protection” tab.
- Uncheck the box for “Locked” to unlock the cells. Check the box to lock them. Select “OK“.
How do I unlock Excel Online?
Unprotect Excel from any device: Windows, Mac, Linux, Android and iOS.
- Upload your Excel files to unlock.
- Enter the protection password.
- Press the “UNLOCK” button.
- Download the unlocked files instantly or send a download link to email.
How do I unlock data validation in Excel?
Select the cell(s) with data validation. On the Data tab, click the Data Validation button. On the Settings tab, click the Clear All button, and then click OK.
How do I unlock cells in Excel 2010?
Select the cells you want to unlock. These are the cells you want to allow users to edit when the worksheet is protected. Press Ctrl+1 to open the Format Cells dialog box and click the Protection tab. Use the Protection tab in the Format Cells dialog box to unlock cells.
How do I unlock cells in Excel 2019?
Once you’ve selected the cells that you want to unlock, navigate to ‘Format’ on the ‘Home’ tab and click. Your drop-down menu should appear and you should click ‘Format Cells. ‘ Make sure you’re on the ‘Protection’ tab and click the little box next to ‘Locked’ to unlock the highlighted cells.
Why is Data Validation greyed out Excel?
The reason Data Validation is Greyed Out is due to the characteristics of your spreadsheet. If you spreadsheet is “Protected” or being “Shared” with another file, the Data validation tool is turned off in Excel.The other option is to copy the data set into a new worksheet that is not shared.
How do you unfreeze a drop down in Excel?
Right click on them and select Format Cells in the right-clicking menu. See screenshot: 3. In the Format Cells dialog box, go to the Protection tab, uncheck Locked box, and then click the OK button.
What is Pivot in Excel?
A pivot table in Excel is an extraction or resumé of your original table with source data. A pivot table can provide quick answers to questions about your table that can otherwise only be answered by complicated formulas.
How do you lock or unlock cells based on values in another cell in Excel?
Method: Lock and Unlock Cells Based on Another Cell Value Via VBA Code
- Private Sub Worksheet_Change(ByVal Target As Range)
- If Range(“A1”) = “Pass” Then.
- Range(“B2:B6”). Locked = False.
- ElseIf Range(“A1”) = “Fail” Then.
- Range(“B2:B6”). Locked = True.
- End If.
- End Sub.
What is F4 in Excel?
When you are typing your formula, after you type a cell reference – press the F4 key. Excel automatically makes the cell reference absolute! By continuing to press F4, Excel will cycle through all of the absolute reference possibilities.
What are locked cells in Excel?
By default, when you protect cells in a sheet or workbook, all of the cells will be locked. This means they can’t be reformatted or deleted, and the content in them can’t be edited. By default, the locked cells can be selected, but you can change that in the protection options. 1.
How do I enable data validation tab in Excel?
Add data validation to a cell or a range
- Select one or more cells to validate.
- On the Data tab, in the Data Tools group, click Data Validation.
- On the Settings tab, in the Allow box, select List.
- In the Source box, type your list values, separated by commas.
- Make sure that the In-cell dropdown check box is selected.
How do I fix data validation in Excel?
Fix: Change Data Validation Source
- Select the data validation cells.
- On the Excel Ribbon’s Data tab, click Data Validation.
- On the Settings tab, change the range address* in the Source box, to include the new items.
- Click OK, to complete the change.
How do I unprotect an Excel worksheet?
Just do any of the following:
- Right-click the sheet tab, and select Unprotect Sheet… from the context menu.
- On the Review tab, in the Changes group, click Unprotect Sheet.
- On the Home tab, in the Cells group, click Format, and select Unprotect Sheet from the drop-down menu.
I’ve been using Excel since 2010 and like everyone else, I faced frustrating and annoying problem of not being able to edit my.doc or.xlsx files while working. At times, it keeps on showing the error message saying “The document is locked for editing by another user”. Several questions arise in mind like “How do I unlock an excel file for editing” or “Is there any solution to unlock an excel file for editing without a password”?
This is the question we often see from Excel Community, after many years, there’s still many friends ask the same question. Well, nothing to worry about at all. Passwiper for Excel got your back! Here lists several useful and easy solutions that can help you unlock shared excel file locked for editing. Let’s get started!
- 1. Unlock Excel File for Editing without Password
- 2. Disconnect User from the Opened Excel File and Unlock It
- 3. Quit All the Instances of Excel
- 4. Same File Is Editing by Another Users
- 5. Office App Already Executing in Background
- 6. Check Your Excel Version Support Co-Authoring or Not
- 7. Stick with these Excel File Formats
- 8. Remove Unsupported Features from the File
Way 1. Unlock Excel File for Editing without Password
Passwiper for Excel is an effective and professional Excel password remover that helps you unprotect Excel workbook and worksheet protection in just a few clicks. The following are the functionalities of Passwiper for Excel:
- Support the removal of worksheet protection permissions.
- Support the removal of permission to change the workbook structure and window.
- Supports the removal of documents with read-only permissions.
- All permissions are supported to be removed at the same time.
Document suffix format: xlsx, xls, xlsm, xlsb, csv, xltx, xltm, xlt, xml, xlam, xps, xla, ods. No risk of data damage, 100% success rate.
Passwiper for Excel ensures a 100% success rate to crack Excel VBA project password. You can recover VBA project passwords using this tool in the following way.
Step 1. Download and install PassWiper for Excel on your system.
Step 2. Run the program and select Remove Excel Password.

Step 3. Insert your VBA-encrypted document and click the Remove to continue.
That’s it. You’re done! Then you can share it with your friends without editing restrictions.
It supports removing excel restrictions under Windows system: Win7 and above (32 & 64bit), the latest Win 11 system. You can remove excel file in Microsoft Office 2003, 2007, 2009, 2012, 2015, 2019, 2021, 365 (local), and it can be removed without depending on office environment. You can remove the restrictions without Office software.
Way 2. Disconnect User from the Opened Excel File and Unlock It
Disconnecting other users from the opened Excel file can prevent the file locked for editing. You disconnect the user from the file and allow another user to get access to the file by using Microsoft Management Console.

Way 3. Quit All the Instances of Excel
To resolve errors in editing Excel files, you need to quit all the open instances of Excel. You can do this by right-clicking the Excel icon in the Windows Taskbar. You can find it at the bottom of your screen.
Click the Close All Windows command to close all Excel files on your PC. You can also use Task Manager to end all the running processes.
Way 4. Same File Is Editing by Another Users
The easiest way to solve this issue is to copy all the data to another Excel file to edit it. You can make all the changes in the copied file accordingly.
Way 5. Office App Already Executing in Background
If none of the above is your problem, the reason that might be restricting you from editing the Excel file is the automatically running Office app in the background.
- To stop that, open Settings.
- Go to Privacy.
- Select Background apps.
- You will see the section”Choose which apps can run in the background.
- Try turning off the background running apps.
Way 6. Check Your Excel Version Support Co-Authoring or Not
If the Excel file is shared on a network and several users are working on it simultaneously then make sure that everyone accessing the file is using the Excel version which supports co-authoring. It allows multiple users to work and edit Excel files at the same time.
Way 7. Stick with these Excel File Formats
File formats are important in saving and accessing Excel files for editing. You need to save your Excel file in formats that include .xlsx, .xlsm, or .xlsb.
Way 8. Remove Unsupported Features from the File
There’s a high chance that any unsupported feature or functionality is preventing the file from being opened for editing. Turning off such features can open Excel files for editing.
Bonus Tip: Why Can’t You Edit the File in Excel?
There are several reasons why the Excel file you’re working on could be locked. It’s quite common for frequent Excel users to face problems like this. Some of the most common reasons why you can’t edit the file in Excel are:
- When the file is running in the background and is already open, it becomes uneditable. If the Excel file is set for Read-Only then you can’t edit it as well. Also, restricted access to the file can prevent it from editing.
- You will be unable to edit an Excel file if excel file locked for editing by another user at the same time. Moreover, when the file has been marked as final already and no changes can be made. Excel files that are password protected are uneditable and you won’t be able to make changes to it unless you enter the password to unprotect it.
- An excel file can be made non-editable by adding a digital signature to a protected it. If the file is workbook structure protected, then you cannot make changes to it. The coded VBA project in Excel can also make the file unable to edit.
The above-mentioned reasons may stop you from editing files in Excel. However, there are several ways as well to unlock it easily.
This comprehensive guide can help you in unlocking excel file for editing.
Summary
Hope, now you get the answer to your question about how to unlock a file locked for editing in excel after going through several ways shared in this guide.
Use Passwiper for Excel to unlock Excel files with ease. So, PassWiper for Excel is an ultimate solution when the excel file locked out of editing, no matter it’s a mistake or by other user, this situation may happens and you can’t deal it and let the tool cut off your manual work while resolving all your Excel-related errors.
“What can you do if an Excel file locked for editing? Is there a way to unlock it? It is a very important Excel file that contains very sensitive information. The entire message says that the respective file is locked for editing (followed by a username). Does anyone know why did this error take place out of nowhere? I searched for various solutions online, but none of them seem to be reliable. I hope someone will help me out.”

Most probably, you are reading this guide as you have faced a similar type of issue. Well, the first thing we should say is that you don’t have to panic or get frustrated. This sort of error is very common than you think.
As per our research, plenty of individuals who use Excel experience this error due to some reason or another. In fact, this issue can be fixed without much trouble. So, don’t worry as we explain the reasons behind this error and, more importantly, the solutions to it.
On top of that, we explain how to avoid experiencing this issue in the future. In a nutshell, this is a must-read article if you are an MS Excel user.
Part 1: Why is an Excel File Locked for Editing?
In the real world, solving any problem becomes easier if you know the exact cause of it. This is applicable to the “Excel file locked for editing” issue as well.
So, in this section of our guide, we explain the possible reasons behind this issue. Our studies suggest that there are plenty of causes behind these types of errors.
To give you a better idea about the nature of this problem, we will list the reasons below.
- Excel file locked for editing error can appear if you did not close the respective Excel file properly. When you don’t close it properly, the data in the file may fail to be saved.
- This error can trigger if the respective file is being used by another user (in a shared network). Because of this, it can become a Read-only file. As you know, you always get a message when you try to open a read-only file and edit it. The same theory is applicable to Excel files as well. That is exactly why shared Excel files often become locked for editing.
- In certain cases, Microsoft Office can create a temporary MS Excel file as well. Such temporary files can be identified easily because they have a “~$” character with the file name. This character is placed before the original name of the MS Excel file you have created. When you try to open that temporary Excel file, you will see the “Excel file locked for editing” message.
Part 2: The Fixes to Try if Excel File Locked for Editing
Although the “Excel file locked for editing” looks pretty frustrating at once, it can be solved easily. You don’t have to worry much about it because we will explain how to solve it without complexity. There is no rocket science behind these fixes. Before trying the fixes, you should do the basics right, and for many, the issue will go away easily.
What you should do is close the respective Excel file on your computer. If it is shared on your local network, just close it on the other computers as well. Then, open the file on the computer where it is originally located to see if the problem persists.
As we mentioned, this error goes away with this simple approach for many individuals. If not, you can even ask for edit permissions for the respective file from the original user. Or, you can ask the other users to close the file on networked computers and reopen it.
However, if You Were Not Able to Resolve the Issue Through That, Follow the Instructions Below.
01. Be sure that you note the name of the file and its path before proceeding. In order to start, launch the “Run” utility. To do that, you should hold both the “Windows” and “R” keys simultaneously.
02. Now, on the search bar, you should search for the tool called “Microsoft Management Console.” To do that, just enter the text “MCC” on the search bar. When the MMC window is open, you can choose the option called “File” and then select “Add/Remove Snap-in“.

03. You can then select the “Shared Folders” option located under the “Available Snap-ins” menu. Then, click on the option called “Add,” so you can add it to the list labeled “Selected Snap-ins.”

04. Then, you will see the prompt called “Select the computer you want the snap-in to manage.” After that, just choose the “Local computer” option if you use it through a server.
If you are using a different computer to log in, choose the option called “Another computer.” Now, you should search for the file location using the existing window.

05. You can now proceed to select the option called “Open Files“. Then, choose “OK.”
06. As the final step, you should expand the “Open Files” list. Then, sort the list according to the author/user name, and you can locate the file. Once you have done that, be sure to right-click on the same and choose the option “Close Open file.”

You will be able to edit the Excel file now. That is because it is disconnected from the user who was using it. You should just exit Excel and launch it once again to see if it works.
Part 3: Prevention of “Excel File Locked for Editing” Issue
Now that you know how to fix the “Excel file locked for editing” error. Let’s learn about preventive measures. In fact, if you know how to prevent this issue from occurring, you have almost nothing to worry about.
Mentioned below are some of those important tips you should consider to prevent the “Excel file locked for editing” issue. If you use these tips, you will face no trouble in working on your files even through multiple computers at the same time.
If you are using a Microsoft Excel version that is compatible with co-authoring compatibility, that’s a very smart approach. Mentioned below are examples of such options.
- Excel for the Web
- Excel for iOS
- Excel for Office 365 for Mac
- Excel for Office 365
- Excel for Android
Nevertheless, both Excel for Office 365 and its Mac version require you to create an office account. You should go for an Office 365 subscription. In order to get the best co-authoring experience, using Excel Online versions is the perfect solution.
Tip 02: Upload Your Excel File to Cloud Storage
The next tip is to have your file uploaded to Cloud storage through a dedicated tool. In fact, you can use tools like SharePoint or OneDrive to save your documents in the Cloud. Both of the tools we mentioned above offer co-authoring as well as easy accessibility.
Therefore, you will not get your files locked. Nevertheless, you should remember that co-authoring isn’t supported for cloud locations, local folders, SharePoint On-Premises sites, and server paths.
Tip 03: Check Your File Format
It is important to consider the file formats when it comes to co-authoring an Excel file. Some of the versions may not support some users. So, be sure to choose a format that is compatible with all the users.
We highly recommend formats such as .xlsx, .xlsm, or .xlsb for those who use Windows and Mac users.
If you want to set the file formats, however, we recommend you follow the instructions below.
- Click on the option called File and then go to Save As. After that, choose Browse and select Save as type. Then, you will be able to select any of the file formats, and we recommend the ones mentioned earlier.
- If you are a Mac user, just click on File and choose Save As options. Then, choose one from the .xlsx, .xlsm, and .xlsb formats.
Tip 04: Check the Once Drive Sync App
If you use the One Drive sync app, you should be sure to update it to the latest version. Also, it shouldn’t be paused at any time.
Tip 05: Remove the Incompatible Features
Last but not least, if you see a feature that is incompatible with co-authoring, that will cause issues. In this case, you should turn that feature off and launch the workbook without opening the snapshot on SharePoint.
Important: What Can You Do if the Excel File is Locked for Editing Purposely with a Password?
The above solutions are practical only if the Excel file is locked due to some technical error. However, if the respective file is locked purposely with a password, none of the above options work. In that case, you will have to use a professional tool to decrypt the respective Excel file.
The best tool we suggest is PassFab for Excel if you’re trying to open a password-protected Excel file. This special tool has the ability to get rid of the password from your worksheets or workbooks with ease. Also, it doesn’t create any data loss at all. This tool is highly recommended by many review sites.
Features of PassFab for Excel
- Remove all the editing and formatting restrictions from Excel worksheets or workbooks if you forgot the Excel password.
- Unprotect the Excel workbook and Removes passwords.
- 100% success rate guaranteed.
- Simple and easy-to-use program.
- Supports many versions (.xls, .xlsx, .xlsm, .xltm, .xlsb, etc.)
How to Use PassFab for Excel if Your Excel File is Locked for Editing
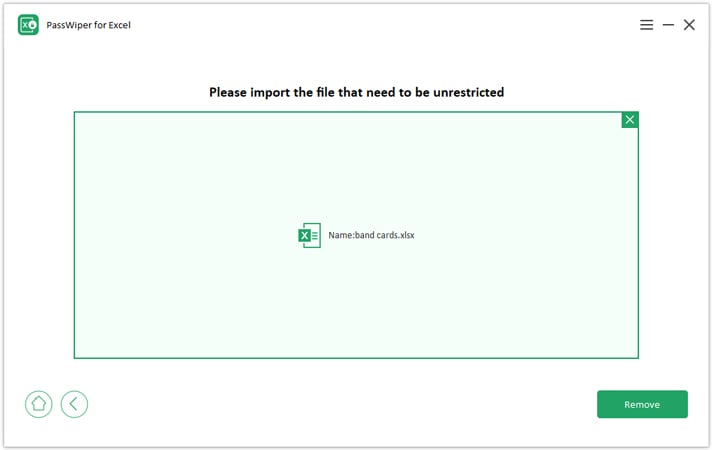
- Download the PassFab for Excel application on your computer and launch it to proceed.
- Click on “Remove Excel Restriction Password.”

- Click on “Please import Excel file” and upload the password-protected file to the interface.

- Then click on “Remove” so the restrictions will be removed in a couple of seconds.


That’s how to fix an Excel file locked for editing with PassFab for Excel.