
Word for Microsoft 365 Word 2021 Word 2019 Word 2016 Word 2013 Word 2010 Word 2007 More…Less
A cross-reference allows you to link to other parts of the same document. For example, you might use a cross-reference to link to a chart or graphic that appears elsewhere in the document. The cross-reference appears as a link that takes the reader to the referenced item.
If you want to link to a separate document you can create a hyperlink.
Create the item you’re cross-referencing first
You can’t cross-reference something that doesn’t exist, so be sure to create the chart, heading, page number, etc., before you try to link to it. When you insert the cross-reference, you’ll see a dialog box that lists everything that’s available to link to. Here’s an example.
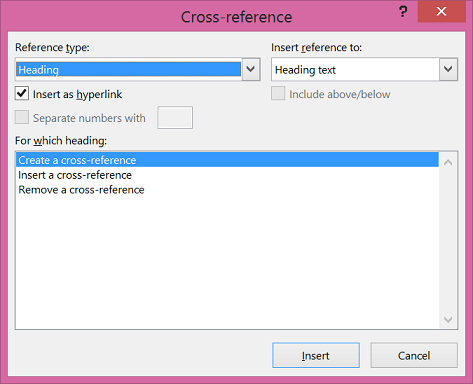
Insert the cross-reference
-
In the document, type the text that begins the cross-reference. For example, «See Figure 2 for an explanation of the upward trend.»
-
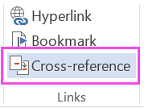
On the Insert tab, click Cross-reference.

-
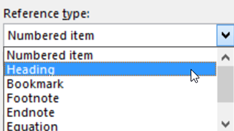
In the Reference type box, click the drop-down list to pick what you want to link to. The list of what’s available depends on the type of item (heading, page number, etc.) you’re linking to.
-
In the Insert reference to box, click the information you want inserted in the document. Choices depend on what you chose in step 3.
-
In the For which box, click the specific item you want to refer to, such as «Insert the cross-reference.»
-
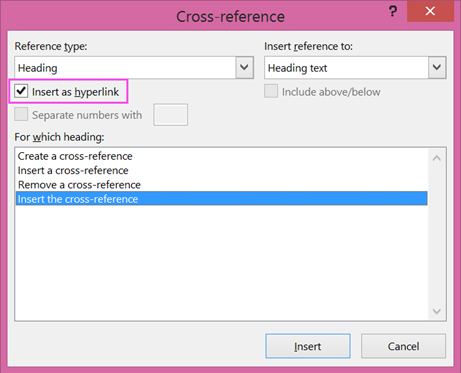
To allow users to jump to the referenced item, select the Insert as hyperlink check box.
-
If the Include above/below check box is available, check it to include specify the relative position of the referenced item.
-
Click Insert.

Cross-references are inserted as fields
Cross-references are inserted into your document as fields. A field is a set of information that instructs Word to insert text, graphics, page numbers, and other material into a document automatically. For example, the DATE field inserts the current date. The advantage of using fields is that the content being inserted—date, page number, graphics, etc.—gets updated for you whenever there’s a change. For example, if you’re writing a document over a period of days, the date will change each day when you open and save the document. Similarly, if you update a graphic that’s stored elsewhere but referenced in the field, the update will get picked up automatically without you having to re-insert the graphic.
If you’ve inserted a cross-reference and it looks similar to {REF _Ref249586 * MERGEFORMAT}, then Word is displaying field codes instead of field results. When you print the document or hide field codes, the field results replace the field codes. To see the field results instead of field codes, press ALT+F9, or right-click the field code, and then click Toggle Field Codes on the shortcut menu.
Use a master document
If you want to cross-reference items that reside in a separate document but don’t want to use hyperlinks, you’ll have to first combine the documents into one master document and then insert the cross-references. A master document is a container for a set of separate files (or subdocuments). You can use a master document to set up and manage a multi-part document, such as a book with several chapters.
Need more help?
Want more options?
Explore subscription benefits, browse training courses, learn how to secure your device, and more.
Communities help you ask and answer questions, give feedback, and hear from experts with rich knowledge.
Insert and Manage Dynamic Cross-Reference Fields in Microsoft Word
by Avantix Learning Team | Updated October 9, 2021
Applies to: Microsoft® Word® 2010, 2013, 2016, 2019 or 365 (Windows)
In Microsoft Word, you can insert a cross-reference to content in another part of your Word document and then update it if the target of the cross-reference changes. A cross-reference can refer to a heading, bookmark, the caption of a table or figure as well as other target items. Since a cross-reference is a field, it can be updated and formatted manually, using styles or using switches in the field.
Recommended article: How to Keep Text Together in Microsoft Word (Paragraphs, Lines or Words)
The information inserted by a cross-reference field can be text, a page number, a section number, a paragraph number, a caption number, a caption label or a combination of items. The cross-reference field is a code so it can also include special information in the code (called a switch) that make the field act or appear in a specific way. For example, a cross-reference field may act as a hyperlink so you can jump directly to the target of the cross-reference by Ctrl-clicking the field.
It’s easiest to create cross-references to built-in heading styles but they can also be used with bookmarks, footnotes or endnotes.
For example, you could insert a cross-reference to a built-in heading style as follows:
See Section 4: About Our Services on page 5.
In this case, the cross-reference refers to a style’s paragraph number, paragraph text and a page number so you would need to insert three separate cross-references and type some of the text (like the word See) as well as appropriate spacing.
Inserting a cross-reference to a built-in heading
It’s common to create a cross-reference to a built-in heading in Microsoft Word.
To insert a cross-reference to a built-in heading in the current document:
- Position the cursor where you want to insert your cross-reference.
- Type text that you want to precede the cross-reference (such as See) and any necessary spacing.
- Click the References tab in the Ribbon.
- In the Captions group, click Cross-reference. A dialog box appears.
- In the Reference type drop-down menu, select Heading.
- In the Reference to drop-down menu, select Heading text, Page number, Heading number, Heading number (no content) or Heading number (full content).
- In the For which heading list, click the item you want to reference.
- Ensure Insert as hyperlink is selected If you want to be able to Ctrl-click the cross-reference to jump to the referenced item.
- Click Insert. Word inserts an invisible bookmark to the target.
- Repeat for other items you want to include in the cross-reference. The dialog box can remain open.
- Click Close.
In the following example, note that Heading has been selected as the Reference type in the Cross-reference dialog box:

In the Cross-reference dialog box, the Separate numbers with and Include above/below check boxes are enabled under some conditions.
All paragraphs that are formatted with one of the built-in heading styles (Heading 1-9) are automatically shown in the dialog box. Although you can use outline levels, it’s best to use the built-in heading styles (these appear in the Home tab in the Ribbon in the Styles group and in other areas in Word).
Inserting a cross-reference to a bookmark
You can also insert a bookmark and then insert a cross-reference to the bookmark.
To insert a cross-reference to a bookmark in the current document:
- Position the cursor where you want to insert a bookmark.
- Click the Insert tab in the Ribbon.
- Click Bookmark in the Links group. A dialog box appears.
- Type a name for the bookmark without spaces.
- Click Add.
- Click where you want to insert the cross-reference to the bookmark.
- Type text that you want to precede the cross-reference (such as See) and any necessary spacing.
- Click the References tab in the Ribbon.
- In the Captions group, click Cross-reference. A dialog box appears.
- In the Reference type drop-down menu, select Bookmark.
- In the Reference to drop-down menu, select Bookmark text, Page number or one of the other options as required.
- In the For which heading list, click the item you want to reference.
- Ensure Insert as hyperlink is selected If you want to be able to Ctrl-click the cross-reference to jump to the referenced item.
- Click Insert.
- Repeat for other items you want to include in the cross-reference. The dialog box can remain open.
- Click Close.
The following is an example of a bookmark created in the Bookmark dialog box:

Inserting a cross-reference to a table or figure
You can cross-reference tables and figures in Word if you have inserted captions using Insert Caption on the References tab in the Ribbon.
To insert a cross-reference to a table or figure in the current document:
- Click where you want to insert the cross-reference to the table or figure (which has already been captioned).
- Type text that you want to precede the cross-reference (such as See) and any necessary spacing.
- Click the References tab in the Ribbon.
- In the Captions group, click Cross-reference. A dialog box appears.
- In the Reference type drop-down menu, select Table or Figure.
- In the Reference to drop-down menu, select the required option – Entire caption (which includes the figure caption or table title with the label and number), Only label and number (such as Table 10), Only caption text (which includes the figure caption or table title without the label and number), Page number or Above/below (which inserts the word above or below with no additional text related to the table or figure).
- In the For which heading list, click the table or figure you want to reference.
- Ensure Insert as hyperlink is selected If you want to be able to Ctrl-click the cross-reference to jump to the referenced item.
- Click Insert.
- Repeat for other items you want to include in the cross-reference. The dialog box can remain open.
- Click Close.
In the following example, note that Table has been selected as the Reference type in the Cross-reference dialog box:

Showing or hiding field codes
Cross-references are fields. Normally, the result of a field is displayed but you can also view the field codes.
To show or hide all field codes in your document, press Alt + F9.
The following is an example of a field code:
{ REF _Ref46507086 h }
Understanding cross-reference field codes
When you insert a cross-reference, a field code will be inserted based on what the reference refers to.
There are three types of cross-reference fields in Word – PAGEREF, NOTEREF and REF. The first part of the field code of a cross-reference field indicates which type of field it is.
A cross-reference field that refers to the page on which the target is found is a PAGEREF type. When you select Page number as the Reference to insert in the Cross-reference dialog box, the inserted cross-reference field will be PAGEREF.
A cross-reference field with a footnote or an endnote as the target will be the NOTEREF type.
All other cross-reference fields will be the REF type.
Part of the field code inside a cross-reference field refers to a bookmark that points to the target. A bookmark in Word is a named location or a named block of text or other content in a document.
If you refer to a built-in heading style in a cross-reference, Word automatically adds a bookmark around the heading text at the beginning and the end (excluding the paragraph mark) if a bookmark is not already found. The name of the bookmark is included in the field code of the cross-reference field. Bookmarks that are automatically added are named _Ref followed by eight or nine digits.
If you are inserting a cross-reference to a caption, a bookmark will also be added to enclose the part of the caption content to be displayed by the cross-reference field. The bookmark will include different parts of the caption depending on the kind of caption reference you select (such as the entire caption or only the label and number).
The following is an example of a cross-reference for a REF field:
{ REF _Ref449977221 p h d».»* CHARFORMAT }
The syntax for REF fields is:
{ REF Bookmark [* Format Switch ] [Switches ] }
Switches are optional.
The underscore at the start of the bookmark name means that the bookmark is being treated as a hidden bookmark in Word. You cannot add hidden bookmarks manually.
Hidden bookmarks are invisible in the document even if you turn on display of bookmarks. You can view invisible bookmarks in the Bookmarks dialog box, but you must turn on Hidden bookmarks to display them.
Formatting cross-references
Cross-references can be formatted manually, using styles or using switches in the field code. A switch holds special information that causes the field to act or appear in a specific way.
One easy way to format a cross-reference is by using a character style such as Emphasis or Intense Emphasis.
To apply the Emphasis, Intense Emphasis or Intense Reference character style to a cross-reference:
- Select the cross-reference as well as any surrounding text that refers to it.
- Click the Home tab in the Ribbon.
- Click the More down arrow in the Style gallery in the Styles group.
- Click Emphasis, Intense Emphasis or Intense Reference.
The benefit of this method is that you can later modify the style or find and replace the style with a different style.
In a future article, we’ll take a look at more advanced formatting techniques for cross-references.
Updating cross-references
If a document has been edited, you will likely need to update the cross-references since cross-references do not update automatically.
It is important that the markers that are added at the beginning and end of the target of a cross-reference are not deleted or moved during editing. If they are, you will need to reinsert the cross-reference because you will receive an error when you update.
You can update cross-references manually by pressing Ctrl + A to select all and then pressing F9.
Cross-references will also be updated when you switch to Print Preview or when you print (if the Word option Update fields before printing is turned on).
To ensure that fields are updated before printing:
- Click the File tab in the Ribbon.
- Click Options.
- Select Display in the categories on the left.
- In Printing options, select Update fields before printing.
- Click OK.
Be sure to check after update to see if there are any errors in your cross-references.
Subscribe to get more articles like this one
Did you find this article helpful? If you would like to receive new articles, join our email list.
More resources
14 Timesaving Microsoft Word Selection Shortcuts
How to Update All Figure Numbers in Microsoft Word
How to Insert the Not Equal Sign in Word (5 Ways to Type or Insert ≠)
How to Keep Text Together in Microsoft Word (Paragraphs, Lines or Words)
How to Create a Table of Contents in Word (Insert, Format and Update a TOC)
Related courses
Microsoft Word: Intermediate / Advanced
Microsoft Excel: Intermediate / Advanced
Microsoft PowerPoint: Intermediate / Advanced
Microsoft Word: Long Documents Master Class
Microsoft Word: Styles, Templates and Tables of Contents
Microsoft Word: Designing Dynamic Word Documents Using Fields
VIEW MORE COURSES >
Our instructor-led courses are delivered in virtual classroom format or at our downtown Toronto location at 18 King Street East, Suite 1400, Toronto, Ontario, Canada (some in-person classroom courses may also be delivered at an alternate downtown Toronto location). Contact us at info@avantixlearning.ca if you’d like to arrange custom instructor-led virtual classroom or onsite training on a date that’s convenient for you.
Copyright 2023 Avantix® Learning
Microsoft, the Microsoft logo, Microsoft Office and related Microsoft applications and logos are registered trademarks of Microsoft Corporation in Canada, US and other countries. All other trademarks are the property of the registered owners.
Avantix Learning |18 King Street East, Suite 1400, Toronto, Ontario, Canada M5C 1C4 | Contact us at info@avantixlearning.ca
In a recent tutorial, we looked at how to insert table titles and figure captions in Microsoft Word. Today, we’re going to use those titles and captions to cross-reference tables and figures in Microsoft Word.
One benefit of using cross-references in Word is that they can be hyperlinked to the connected table or figure.
In addition, Word’s cross-references can be easily updated if you add or delete a table or figure, as shown in the second section below.
This tutorial is also available as a YouTube video showing all the steps in real time.
Watch more than 200 videos about Microsoft Word and Adobe Acrobat on my YouTube channel.
The images shown here are from Word for Microsoft 365. These steps will also work for Word 2021, Word 2019, Word 2016, Word 2013, and Word 2010. However, your interface may look slightly different in those older versions of the software.
Important Note: These steps only work with existing tables and figures that have titles or captions created with Word’s caption tool.
- Place your cursor where you want to insert the cross-reference.

- Select the References tab in the ribbon.

- Select Cross-reference in the Captions group.

Pro Tip: The Cross-reference option is also available in the Insert tab.
- Select Figure or Table from the Reference type menu in the Cross-reference dialog box.

- Select an option from the Insert reference to menu:
-
- Entire caption (This option includes the figure caption or table title with the label and number.)
- Only label and number (e.g., Table 10)
- Only caption text (This option includes the figure caption or table title without the label and number.)
- Page number
- Above/below (This option inserts the word “above” or “below” with no additional text related to your table or figure.)

- Select Insert as hyperlink if you want to give your readers the ability to select the cross-reference and move to the table or figure.

- Select the table or figure you want to cross-reference from the For which caption menu.

- Select the Insert button.

Pro Tip: You can move your cursor and insert additional cross-references while the Cross-reference dialog box is open.
Your cross-reference will be inserted into your text immediately.

- Select the Close button to close the Cross-reference dialog box.

Cross-references don’t update automatically as you add or delete tables or figures. So, in the next section, we’ll look at how to update them simultaneously in just five steps.
How to Update Cross-References to Tables and Figures
If you need help updating table or figure numbers, please see “How to Update Table and Figure Numbers in Microsoft Word.”
- Select one of the cross-references in your text.

- Select the Home tab in the ribbon.

- Select Select in the Editing group.

- Select Select Text with Similar Formatting from the menu.

All your cross-references should now be selected.
- Right-click one of the cross-references and select Update Field from the shortcut menu.

Your cross-references should update immediately.
Pro Tip: If you don’t want to update all your cross-references, you can select an individual one, right-click, and then select Update Field from the shortcut menu, as shown in figure 15.
Related Resources
How to Insert and Modify Images in Microsoft Word
How to Reference Tables and Figures in Text
How to Write Table Titles
How to Write Figure Captions for Graphs, Charts, Photos, Drawings, and Maps
How to Create and Update a List of Tables or Figures in Microsoft Word
How to Add Heading Numbers to Table Titles and Figure Captions in Microsoft Word (PC & Mac)
Updated March 13, 2023
If you are wanting a list of everything for which a cross-reference has been made in a document, there is no such thing.
You can search the document for Ref fields, though.
Every time a cross-reference is created to something like a heading, a hidden bookmark is created. You can look at those in the GoTo dialog but I doubt it will help you.
Here is a screenshot using the Find feature to find REF fields to hidden bookmarks.

Here is the Insert bookmark dialog that lets you see hidden bookmarks in the list by checking the box.

Here is the GoTo dialog that lets you go to the bookmarks. (Ctrl+G)

This is in no way as simple as getting a list. As you can see, the names attached to the bookmarks are semi-random. In this case, the cross-references to the headings were made first and to the tables, second. No distinction is made between types of cross-reference or target in the name of the bookmark.
Of course, if the only cross-references are to tables, it simplifies things.
The Find feature, with field codes displayed, finds REF fields and gives you a count.
By going to each bookmark using the GoTo dialog, you could track which tables have been cross-referenced. (This will not, though, tell you that the cross-reference is still in the text, has not been deleted. To do that, you would need to check the REF fields for the bookmark.)
Workaround:
Manually add bookmarks to each Table Caption (i.e. naming the bookmarks Table01, Table02, etc.) and cross-reference to your bookmarks rather than to Tables. The bookmark is on the Caption, not the table. That way, you can see in the REF field that you have cross-referenced to a particular table, rather than a random number.
Find looking for «REF Table» with manually inserted bookmarks

Here is the Insert Bookmark dialog with manually inserted bookmarks and hidden unchecked.

Cross-Reference dialog with manually inserted bookmark

This is after hidden was unchecked in the bookmarks dialog. This does give you a non-printable list of all cross-references to the manually added Table bookmarks. If a cross-reference had been accidentally deleted, it would not show up in this list.
To add bookmarks to Table Captions
You can use Advanced Find to look for all captions that have the word Table in them.

Remember, you will want to select the entire caption (without the paragraph mark) to include in your bookmark. Insert bookmarks can be found under the Insert tab in the Links group.

Cross-references refer readers to other parts of your document. In Microsoft Word, you can also use them to link to headings, bookmarks, tables, figures, and footnotes. This can help readers to find important details in your writing. Here, then, is a quick guide on how to cross-reference in Microsoft Word.
Getting Started with Cross-References in Word
The first step in cross-referencing parts of a document in Microsoft Word is making sure you have something to cross-reference (e.g., headings, figures, tables). As you are drafting your document, then, think about what you might need to link.
Once you have created the items you want to cross-reference, though, you can:
- Select where you want to add a cross-reference and, if necessary, add introductory text (i.e., a sentence or additional text that you want to precede the page number, heading text, or other item that you’ll be using as a cross-reference).
- Open the cross-reference tool by going to the Insert or References tab at the top of your screen and clicking on Cross-reference.
This will open a menu where you can select a reference type (i.e., the document element you want to cross-reference, such as a heading, figure, or chart) and the type of text you want to use as a cross-reference (e.g., a page or paragraph number).
We’ll look at the options available here for creating cross-references below.
Cross-Referencing Options
First, select the latter via the Reference type dropdown menu, where the options are:
- Numbered item – Create a cross-reference to text formatted as a numbered list (either an item from a list or a numbered heading).
- Heading – Create a cross-reference to text that uses a Heading style.
- Bookmark – Cross-reference text that has been bookmarked.
- Footnote/Endnote – Select a footnote or endnote to cross-reference.
- Equation/Figure/Table – Select an equation, figure, or table from the document (based on the label applied to the accompanying caption).
The Insert reference to dropdown menu on the right-hand side of the dialogue box, meanwhile, lets you decide what kind of reference you will add.
For example, in the image below, we have selected Page number. This would add the page number of the selected heading in the place selected. If we selected Above/below, on the other hand, it would add the word above or below depending on where the reference is in relation to the item being referenced.
The options in this menu will depend on the cross-reference type (e.g., if you cross-reference a footnote or endnote, you will be able to select the note number here, whereas this isn’t available for other types of cross-references). But all you need to do is select the option most relevant to where you are adding it (e.g., if your cross-reference starts with See page…, you’ll want to add a page number).
Find this useful?
Subscribe to our newsletter and get writing tips from our editors straight to your inbox.
You can also select whether to make the cross-reference a hyperlink here (this is often selected by default). Doing this means that readers can click the cross-reference text to navigate to the part of the document being referenced, which can be very useful in online copy or electronic documents.
How to Insert a Cross-Reference in Microsoft Word
Let’s look at how to create a cross-reference for a heading in practice:
- Place the cursor where you want to add a cross-reference (e.g., immediately after any introductory text, or in a header for running chapter headers).
- Open the cross-referencing tool as described above.
- Select Heading from the Reference type dropdown menu.
- Under Insert reference to, select what to add as a cross-reference. For our example, we have selected Page number, which will add the page number for the heading we select.
- Decide whether to check the Insert as hyperlink box to make the cross-reference a link to the referenced part of the document.
- Click Insert to add the cross-reference to the document.
We have now added the page number for the heading in the place selected. And clicking the hyperlinked text here would take us straight to the heading.
The other cross-reference types (numbered item, bookmark, footnote, etc.) follow the same basic format as the heading reference type, as shown above. All you need to do is adapt the process to match the reference type you want to use.
Updating Cross-References in Microsoft Word
One major advantage of using the cross-reference tool in Microsoft Word, as opposed to typing out cross-references manually, is that you can update them at the click of a button. To do this:
- Right click the text that you added with the cross-reference tool.
- Select Update Field from the contextual menu (see below).
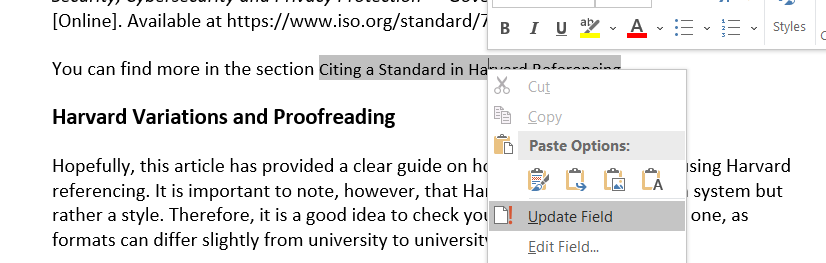
Doing this will automatically update the cross-reference text to match any changes made to the source text. For instance, if you added a cross-reference based on the text of a heading somewhere in the document, but then changed the heading after adding the cross-reference, right-clicking and selecting “Update Field” would update the cross-reference to use the revised heading text. Or if the page numbering changed after adding a cross-reference based on a page number, updating it would change the cross-reference to reflect the new pagination.
You can also update multiple cross-references at the same time by selecting all the relevant text. However, this will also update any other fields selected (e.g., a table of contents or list of figures). As such, make sure you only select the fields you want to update if you are updating multiple cross-references in one go.
Professional Proofreading Services
Using cross-references in Microsoft Word can help readers to get the most out of your document. If you would like any extra help to ensure your writing is clear and error-free, though, why not try our proofreading services today?