
Word for Microsoft 365 Word 2021 Word 2019 Word 2016 Word 2013 Word 2010 Word 2007 More…Less
Alignment determines the appearance and orientation of the edges of the paragraph: left-aligned text, right-aligned text, centered text, or justified text, which is aligned evenly along the left and right margins. For example, in a paragraph that is left-aligned (the most common alignment), the left edge of the paragraph is flush with the left margin.
Vertical alignment determines the position of the text within a section of a document relative to the top and bottom margins, and is often used to create a cover page.
-
Select the text that you want to align.
-
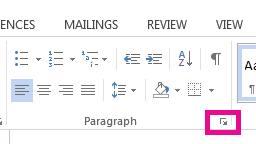
On the Home tab, in the Paragraph group, click Align Left
 or Align Right .
 or Align Right
  .
.-
Select the text that you want to center.
-
On the Home tab, in the Paragraph group, click Center
.
 .
.-
Select the text that you want to center.
-
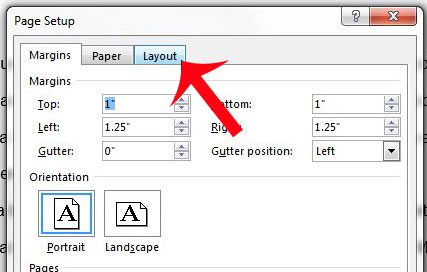
On the Layout or Page Layout tab, click the Dialog Box Launcher
in the Page Setup group, and then click the Layout tab. -
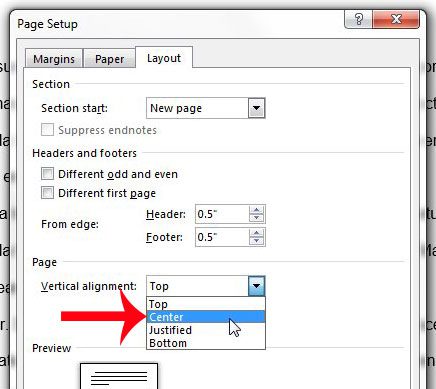
In the Vertical alignment box, click Center.
-
In the Apply to box, click Selected text, and then click OK.
 in the Page Setup group, and then click the Layout tab.
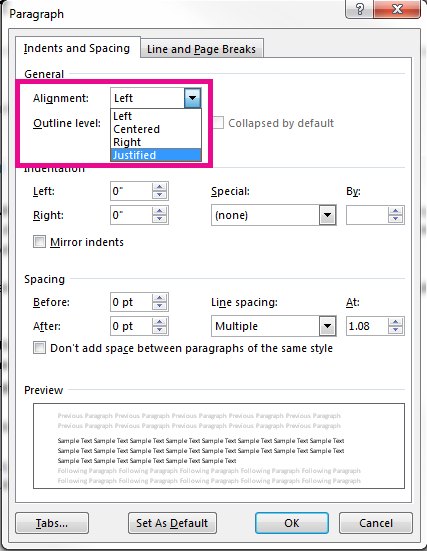
When you justify text in Word, you give your text straight edges on both sides of the paragraph. Justifying extends each line of your text to the left and right margins. Justifying text might make the last line of text in a paragraph considerably shorter than the other lines.
-
Select the text you want to justify.
-
On the Home tab, in the Paragraph group, click Justify
.
 .
.Tips:
-
In the Paragraph group, click the Dialog Box Launcher
, and select the Alignment drop-down menu to set your justified text. -
You can also use the keyboard shortcut, Ctrl + J to justify your text.
In Office Word 2007, you can choose from a selection of predesigned cover pages to create a professional-looking document quickly and easily.
-
On the Insert tab, in the Pages group, click Cover Page.
-
Click the cover page that you want.
A cover page is always added to the beginning of the open document.

See also
Adjust indents and spacing
Need more help?
Want more options?
Explore subscription benefits, browse training courses, learn how to secure your device, and more.
Communities help you ask and answer questions, give feedback, and hear from experts with rich knowledge.

Microsoft Word comes equipped with a tool that allows users to align text both vertically and horizontally, giving you complete freedom for determining the position of text in a Word document. Here’s how it all works.
Horizontal alignment, also known as centered alignment, positions the text evenly between the margins on either side of the page. This tool also allows you to be selective with the text you align horizontally, giving you more control over what you can do to your document.
RELATED: How to Change the Alignment of the Numbers in a Numbered List in Microsoft Word
To align text horizontally on a page, highlight the text you want to center. Next, click the “Center Alignment” icon in the “Paragraph” group of the “Home” tab. Alternatively, you can use the Ctrl+E keyboard shortcut.

Your text will now be horizontally aligned. If you don’t already have text typed, it’s also an option to select the center alignment option before entering the text. It’s all up to you.
Aligning Text Vertically in Word
As you’ve probably guessed, vertical alignment positions the text evenly between the upper and lower margins of the page. You won’t notice a difference in the text alignment if you use it on a page that’s already full of text.
To see any real difference, try enabling the horizontal text option before inputting the text in your document.
RELATED: How to Align Text After a Bullet in PowerPoint
To align text vertically on a page, head over to the “Layout” tab and select the small icon in the bottom-right corner of the “Page Setup” group.
This opens the “Page Setup” dialog box. Select the “Layout” tab and then click the arrow next to “Vertical Alignment” in the “Page” section. A selection of vertical alignment options will appear. Go ahead and click “Center” (or choose another option that better suits your requirements).
Your text will now reflect the selected vertical alignment option.
What if you only want to align specific text in the document vertically? There’s also an easy way to make this happen.
First, highlight the text you want to align vertically. Once selected, head back to the “Layout” tab of the “Page Setup” dialog box. Next, choose the desired vertical alignment type, open the drop-down menu next to “Apply To,” select “Selected text,” and then click the “OK” button.
The selected text will now reflect the selected vertical alignment option.
READ NEXT
- › How to Center Text in a Microsoft Word Table
- › How to Perfectly Align Objects and Images in Microsoft Word
- › Why the Right-Click Menu in Windows 11 Is Actually Good
- › The Best DNS Servers for Secure Browsing
- › Universal Audio Volt 2 Review: A Workhorse Audio Interface With Vintage Charm
- › Google+ Will Come to a Final End on July 5, 2023
- › Why One Ultrawide Is Better Than Two Monitors
- › Get to Your Windows 11 Desktop: 7 Fastest Methods
How-To Geek is where you turn when you want experts to explain technology. Since we launched in 2006, our articles have been read billions of times. Want to know more?
To align text vertically on a page, head over to the “Layout” tab and select the small icon in the bottom-right corner of the “Page Setup” group. This opens the “Page Setup” dialog box. Select the “Layout” tab and then click the arrow next to “Vertical Alignment” in the “Page” section.
Contents
- 1 How do you vertically align text in Word?
- 2 How do I fix vertical alignment in Word?
- 3 How do you vertically align content?
- 4 How do I vertically align text in a row?
- 5 What is center alignment?
- 6 Why can’t I Align Center in Word?
- 7 Where can u change the vertical alignment?
- 8 What is vertical alignment?
- 9 How do I center vertically and horizontally in CSS?
- 10 How do I vertically align text in a div?
- 11 How do I align text vertically in a button?
- 12 How do I center align vertically in CSS?
- 13 How do I center a div vertically and horizontally?
- 14 What are the 4 alignment options?
- 15 How do you center vertically in Word on a Mac?
- 16 How do you align some text left and some right?
- 17 What is justify alignment in MS Word?
- 18 How do I center text vertically in Word?
- 19 How do you align in the middle of a word document?
- 20 How do I center a table vertically in Word 2016?
How do you vertically align text in Word?
For Microsoft Word 2019, 2016, 2013, 2010, and 2007
In the Page Setup dialog box, choose the Layout tab. In the Page section, select the Vertical alignment drop-down arrow and choose either Top, Center, Justified, or Bottom. If you choose Justified, the text is spread out evenly from top to bottom. Select OK.
How do I fix vertical alignment in Word?
Instead, you can access the vertical alignment options in Word as follows:
- Go to Layout > Page Setup on the main ribbon.
- Click the arrow in the bottom right to open the full layout options.
- Click the Layout tab and go down to the Page section.
- Select the alignment you need from the Vertical alignment menu.
How do you vertically align content?
The CSS just sizes the div, vertically center aligns the span by setting the div’s line-height equal to its height, and makes the span an inline-block with vertical-align: middle. Then it sets the line-height back to normal for the span, so its contents will flow naturally inside the block.
How do I vertically align text in a row?
How to Vertically Center Text with CSS
- Use the CSS vertical-align property.
- Use CSS Flexbox.
- Use the CSS display property.
- Use the CSS line-height property.
- Set equal top and bottom padding.
- Set absolute positioning and negative margin.
- Set absolute positioning and stretching.
- Set the CSS transform property.
What is center alignment?
Centre Alignment means that the text in the page is exactly in the centre….. also the distance from the left and right margin is equal to the text of the paragraph.
Why can’t I Align Center in Word?
Select the text that you want to center, and then click Paragraph on the Format menu. On the Indents and Spacing tab, change the setting in the Alignment box to Centered, and then click OK.On the Indents and Spacing tab, change the setting in the Alignment box to Centered, and then click OK.
Where can u change the vertical alignment?
Where can you change the vertical alignment?
- A. Formatting toolbar.
- Paragraph dialog box.
- Page Setup dialog box.
- Standard toolbar.
What is vertical alignment?
Vertical alignment is the state or act of lining items up, one above each other. The exact meaning of this concept varies depending on the context. Verical alignment has applications in a wide range of fields and subjects and can take on greatly differing meanings from place to place.
How do I center vertically and horizontally in CSS?
To center both vertically and horizontally, use padding and text-align: center : I am vertically and horizontally centered.
How do I vertically align text in a div?
Answer: Use the CSS line-height property
Suppose you have a div element with the height of 50px and you have placed some link inside the div that you want to align vertically center. The simplest way to do it is — just apply the line-height property with value equal to the height of div which is 50px .
How do I align text vertically in a button?
Use line-height to center it vertically. I usually use the same value as its height. No need to use padding-top or margin-top for vertical align. Just use display: table-cell; and vertical-align: middle; .
How do I center align vertically in CSS?
Use line-height for simple vertical centering
To vertically center a single line of text or an icon within its container, we can use the line-height property. This property controls the height of a line in a run of text and adds an equal amount of space above and below the line-box of inline elements.
How do I center a div vertically and horizontally?
So we can add a middle div between the father div and the child div. First, set writing-mode and text-align in the parent to center the middle vertically, and then set writing-mode and text-align in the middle to center the child horizontally.
What are the 4 alignment options?
There are four main alignments: left, right, center, and justified. Left-aligned text is text that is aligned with a left edge. Right-aligned text is text that is aligned with a right edge.
How do you center vertically in Word on a Mac?
Select the text you want to center between the top and bottom margins. 2 On the Page Layout tab, click the Page Setup Dialog Box Launcher. 3 Select the Layout tab. 4 In the Vertical alignment box, click Center 5 In the Apply to box, click Selected text, and then click OK.
How do you align some text left and some right?
Use the tab to right-align text on the same line as left-aligned text.
Figure B
- On the Home tab, click the Paragraph group’s dialog launcher and then click Tabs in the bottom-left corner.
- Enter 6.5 in the Tab stop position.
- Click Right in the Alignment section (Figure C).
- Click Set.
- Click OK.
What is justify alignment in MS Word?
When you justify text, space is added between words so that both edges of each line are aligned with both margins. The last line in the paragraph is aligned left. Click anywhere in the paragraph that you want to justify.
How do I center text vertically in Word?
Centering text vertically is almost as easy:
- Right-click on the cell containing the information you want to vertically center. This displays a Context menu for the cell.
- Choose the Alignment (Word 97) or Cell Alignment (Word 2000 or later) option from the Context menu.
- Choose the Center Vertically option.
How do you align in the middle of a word document?
Select the text that you want to center. in the Page Setup group, and then click the Layout tab. In the Vertical alignment box, click Center. In the Apply to box, click Selected text, and then click OK.
How do I center a table vertically in Word 2016?
Use Word’s Vertical Alignment settings to center a page
- From anywhere on the page, choose Page Setup from the File menu.
- Click the Layout tab.
- In the Page section, click the Vertical Alignment dropdown and choose Center.
- Click OK. No guesswork, just a centered page!
Change Word’s default vertical alignment for special design effects
Updated on October 21, 2022
What to Know
- To center text in Word, use the Vertical alignment menu.
- The Vertical Alignment menu also controls Top, Justified, and Bottom text alignment.
- To center text in Word for only part of the document, highlight what you want to center before choosing Vertical Alignment.
This article explains how to center text in Word. Instructions apply to Word for Microsoft 365, Word 2019, Word 2016, Word 2013, Word 2010, Word 2007, and Word 2003.
How to Vertically Align Text in Word
When you want to position text in a section of a document relative to the top and bottom margins, use vertical alignment.
To reflect a change in the vertical alignment, the document page or pages must be only partially full of text.
For Microsoft Word 2019, 2016, 2013, 2010, and 2007
-
Open the Word document in which you want to vertically align the text.
-
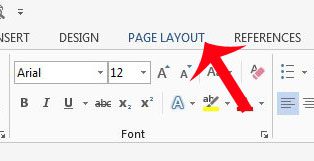
Go to the Layout tab (or Page Layout, depending on the version of Word).
-
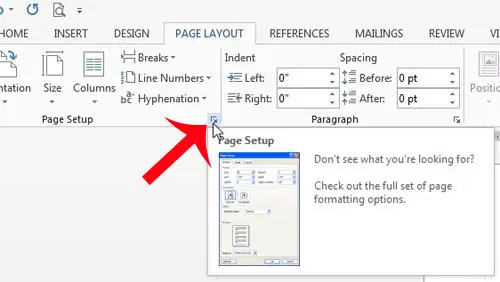
In the Page Setup group, select the Page Setup dialog launcher (which is located in the lower-right corner of the group).
-
In the Page Setup dialog box, choose the Layout tab.
-
In the Page section, select the Vertical alignment drop-down arrow and choose either Top, Center, Justified, or Bottom.
If you choose Justified, the text is spread out evenly from top to bottom.
-
Select OK.
-
Your text will now be aligned the way you selected.
For Word 2003
To vertically align text in Microsoft Word 2003:
-
Select File.
-
Choose Page Setup.
-
In the Page Setup dialog box, select Layout.
-
Select the Vertical alignment drop-down arrow and choose either Top, Center, Justified, or Bottom.
-
Select OK.
Vertically Align Part of a Word Document
When you use the steps above, the default condition is to change the vertical alignment of the entire Microsoft Word document. If you want to change the alignment of only part of the document, select the text you want to vertically align.
Here’s how to vertically align part of a document:
-
Select the text you want to vertically align.
-
Go to the Layout tab (or Page Layout, depending on the version of Word).
-
In the Page Setup group, select the Page Setup dialog launcher (it’s located in the lower-right corner of the group).
-
In the Page Setup dialog box, choose the Layout tab.
-
In the Page section, select the Vertical alignment drop-down arrow and choose an alignment.
-
In the Preview section, select the Apply to drop-down arrow and choose Selected text.
-
Select OK to apply the alignment to the selected text.
-
Any text before or after the selection retains the existing alignment choices.
If you don’t select text prior to performing the alignment selection, the Selected text preference can only be applied from the cursor’s current location to the end of the document.
To make this work, position the cursor, then:
-
Go to the Layout tab (or Page Layout, depending on the version of Word).
-
In the Page Setup group, select the Page Setup dialog launcher (which is located in the lower-right corner of the group).
-
In the Page Setup dialog box, choose the Layout tab.
-
In the Page section, select the Vertical alignment drop-down arrow and choose an alignment.
-
In the Preview section, select the Apply to drop-down arrow and choose This point forward.
-
Select OK to apply the alignment to the text.
FAQ
-
What is the default text alignment in Microsoft Word?
The standard text alignment default in Word (and most other word processing programs) is left-justified.
-
How do I create vertical text in Microsoft Word?
Create a text box and type what you want into it, then right-click on the edge of the box and select Format Shape from the drop-down menu. Select Size/Layout & Properties > Text Box, then open the drop-down menu next to Text Direction. From there, choose the options that best suit your needs.
Thanks for letting us know!
Get the Latest Tech News Delivered Every Day
Subscribe
Do you need to put some of the text in your document in the middle of the page?
While you may have found the button that lets you center your text horizontally, it can be a little more difficult to find that option that will center your text vertically.
Our tutorial below will show you the steps to take so that you can find the menu where you will be able to vertically center text in your Microsoft Word document.
- Click the Page Layout tab.
- Click the Page Setup button.
- Click the Layout tab on the Page Setup window.
- Click the Vertical alignment drop-down menu, then click the Center option.
- Click the Apply to drop-down menu, then click the Whole document option.
- Click the OK button.
Our guide continues below with additional information on vertically centering text in a Word document, including pictures of these steps.
If you have been formatting the content in a document that you are creating for work or school then you may have needed to change some of the alignment.
If so, then you most likely found the Left, Center, and Right Alignment options in the Paragraph group on the Home tab.
But you probably noticed that there weren’t the corresponding alignment or centering options that affected the vertical layout of the document.
You can use center vertical alignment in a Microsoft Word document by going to Page Layout > Page Setup > selecting the Layout tab > then choosing Center on the Vertical Alignment dropdown menu.
Microsoft Word 2013 has a lot of formatting options, although some of the less commonly used ones can be difficult to locate.
One of the settings that can be difficult to find is the selector for vertical alignment. But this is an option that is adjustable, which means that you are able to vertically center text in Microsoft Word 2013.
When you are adjusting your document’s vertical alignment, you will have the option to set it as Top, Center, Justified, or Bottom.
For the purposes of this tutorial, we will be selecting the Center option, but you can experiment with each of the different options if you are not sure which one is best for your situation.
You can also read our article on how to center text in Word for other ways to align your content in the middle of the page.
How to Center Text in the Middle of the Page in Word 2013 (Guide with Pictures)
The default vertical-alignment setting in Microsoft Word 2013 is “Top.” This means that if you create a new document and enter one line of text, it will appear at the top of the page.
The steps below will change that setting so that the single line of text would appear at the center of the page instead. This is ideal if you need to vertically center a title in your Word document.
Our guide below will give you a document where every page is centered vertically. This is because we will be selecting the Whole Document option when applying our vertical alignment.
However, you can also choose the option to apply your vertical alignment From this point forward, which will cause everything after your current location to be centered vertically instead.
These steps will show you how to vertically center text in Word documents.
Step 1: Open your document in Word 2013.
Open your Word document.
Step 2: Click the Page Layout tab at the top of the window.
Select the Page Layout option.
Step 3: Click the Page Setup button at the bottom-right corner of the Page Setup section of the navigational ribbon.
Click the small Page Setup button.
As shown in the image above, the Page Setup dialog launcher in the Page Setup group of the ribbon is quite small. It’s very easy to miss it.
Step 4: Click the Layout tab at the top of the window.
Choose Layout at the top of the Page Setup dialog box.
Step 5: Click the drop-down menu to the right of Vertical alignment, then select the Center option.
Select the Vertical alignment dropdown, then choose Center.
Step 6: Confirm that Whole document is selected in the drop-down menu to the right of Apply to, then click the OK button.
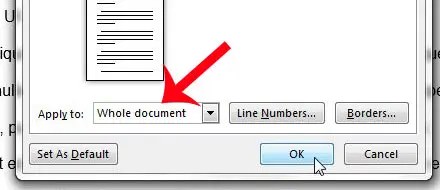
Make sure that Whole document is selected next to Apply to, then click OK.
Now that you know how to vertically center text in Word you will be able to use this option whenever you need to put text in the middle of the page on a title page or other part of your document.
You can continue reading below for additional discussion about vertical centering in documents with Microsoft Word.
More Information on How to Vertically Align the Text in the Center of the Current Page
As we mentioned above, you have the option of choosing which part of your document you would like to center. If it’s everything that you have already written, then the “Whole document” option is probably what you want.
If you would like to center everything from the point where you currently are until the end of the document, then you can choose the “From this point forward” option.
But if you only want to center text on a single page, such as if you are centering text vertically on a title page, then you are going to want to place your cursor after the text on the title page, go to Page Layout > Breaks > then select the “Next Page” section break.
Now when you go back to the Page Setup dialog box menu and the Vertical alignment menu, you will be able to apply the centering formatting to “This section.” if you choose that after turning your title page into its own section then you only center that one page.
Taking advantage of sections when you are dealing with alignments that only affect one part or one page of your document is a great way to simplify tasks that can become difficult or annoying in Microsoft Word.
Does your document contain a lot of sensitive information that you only want certain people to be able to read? Learn how to password protect a document in Word 2013 so that anyone that wants to read the document will need to know the password that you create.
Frequently Asked Questions About the Word Center Text Vertically Option
How do I change the top and bottom margins in a Word document?
If you are trying to adjust the amount of space at the top and bottom of your document, then you may want to make the margins larger or smaller.
You can find this setting by choosing the Layout tab at the top of the window, clicking the Margins button, then choosing one of the options there.
You can choose the Custom Margins option if you need different margin sizes than the default options.
What other options are there in the vertical alignment box in Microsoft Word?
When you need to align text vertically in your document, but when you click Center it doesn’t offer the desired result, then there are a few other options in the vertical alignment list that you can try instead.
These options include:
– Top
– Center
– Justified
– Bottom
What is a dialog box launcher in Microsoft Word?
We make reference to something called a dialog box launcher in this article.
This is a very small button that looks like a square with a diagonal arrow inside of it.
It is found at the bottom-right corner of the Page Setup group in the ribbon on the Layout tab.
There is another dialog box launcher on that tab as well, in the Paragraph group.
Where is the new page Word button?
If you are trying to add a new page to the middle of your document, then you might be looking for a button called “New Page” or something similar.
Word doesn’t actually have something like this, so you will need to insert a page break if you want to position text at the start of a new page.
You will find this by first clicking at the desired insertion point for the new page, then going to Layout > Breaks > Page Break.
Additional Sources

Matthew Burleigh has been writing tech tutorials since 2008. His writing has appeared on dozens of different websites and been read over 50 million times.
After receiving his Bachelor’s and Master’s degrees in Computer Science he spent several years working in IT management for small businesses. However, he now works full time writing content online and creating websites.
His main writing topics include iPhones, Microsoft Office, Google Apps, Android, and Photoshop, but he has also written about many other tech topics as well.
Read his full bio here.