
Align text horizontally
-
In the text box, select the text that you want to change the horizontal alignment for.
-
On the Home tab, click the alignment option that you want
 .
.
 .
.Align text vertically
You can align all the text in a text box with the top, middle, or bottom of the text box.
-
Click the outer edge of the text box to select it.
-
On the Shape Format tab, click Format Pane.
-
Click the Shape Options tab if it isn’t already selected.
-
Click the text box icon
, and then click Text Box. -
Choose Top, Middle, or Bottom from the Vertical alignment drop-down list.
 , and then click Text Box.
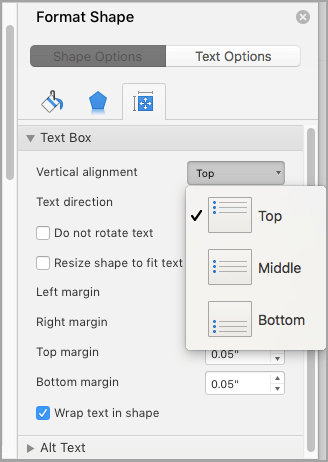
Adjust the text box margins
-
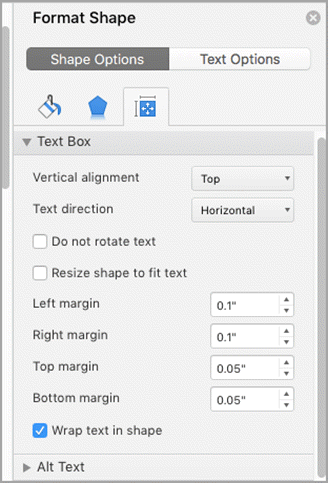
Click the outer edge of the text box to select it.
-
On the Shape Format tab, click Format Pane.
-
Click the Shape Options tab if it isn’t already selected.
-
Click the text box icon
, and then click Text Box. -
You can adjust the left, right, top, and bottom margins.
Important:
Office for Mac 2011 is no longer supported. Upgrade to Microsoft 365 to work anywhere from any device and continue to receive support.
Upgrade now
Align text horizontally
-
In the text box, select the text that you want to change the horizontal alignment for.
-
On the Home tab, under Paragraph, click the alignment option that you want
.
Align text vertically
You can align all the text in a text box with the top, middle, or bottom of the text box.
-
Click the outer edge of the text box to select it.
-
Click the Format tab (the purple contextual tab that appears next to the Home tab), and then under Text Box, click Change text alignment within the text box
. -
Click the alignment option that you want.
 .
.Adjust the text box margins
-
Click the outer edge of the text box to select it.
-
On the Format menu, click Shape.
-
In the left pane of the Format Shape dialog box, click Text Box.
-
Under Internal Margin, adjust the measurements to increase or decrease the distance between the text and the outer border of the text box.
In LaTeX, one could use vfill before a paragraph to align it to the bottom of the page. Is there a similar function in Microsoft Word 2007? I am trying to avoid multiple new lines or text boxes since the contents of the page will change
asked Dec 12, 2014 at 14:15
![]()
6
Just like in the old days of HTML, creating a table that has the size of the entire page with two rows will do the trick. You can anchor the table to the page. Inside each table cell, you can select horizontal and vertical alignment.
As an alternative, you can create one table cell, make sure the document text goes around or above & below it and anchor the table to the bottom of the page. Set the row height to fit. This way, you don’t have the disadvantages of the table (eg different behavior of tab) in the regular body text.
Actually, I’ve seen official internal document templates of a company that used this trick to layout its text for project templates etc.
answered Dec 13, 2014 at 1:44
![]()
agtoeveragtoever
6,2141 gold badge23 silver badges37 bronze badges
2
This is an old question but it is possible with frames, an old feature of Word that Microsoft, for some reason, no longer exposes by default in the Word user interface. Frames are similar to text boxes but the text in them remains part of the main document. Note that this means that if you add text before the framed paragraph, it can move off the page you set it up on and onto the next one!
- Select the paragraph you want to align
- In the Ribbon, choose View, Macros, View Macros or hold down ALT and type T M, M. The Macros dialog box will open.
- Type
InsertFrameand click Run (this is a poorly-documented feature of Word; if you know the name of a command, typing its name into the Macro dialog will run it). Word will convert the paragraph into a frame. - Double-click the Frame border, or right-click and choose Format Frame. The Frame dialog will open.
- Change the Vertical Position drop-down to «Bottom» (the Relative To drop-down should update automatically to «Margin) and click OK.
- By default, Word puts a border around frames. Right-click and choose Borders & Shading to get rid of it.
If you find yourself using frames a lot, you can put it back on the user interface by using the Customize dialog.
answered Jul 16, 2019 at 15:32
![]()
Ken KeenanKen Keenan
3353 silver badges7 bronze badges
1
The cleanest way to do this is to use page setup dialogue (under Layout in the ribbon)
Make sure to add section break before and after the text you wish to be on the bottom of the page. Always start new section on a new page.

![]()
answered May 3, 2020 at 20:37
![]()
1
I came across slightly different way to do this.
- Create a single cell table (it can be border-less)
- Put your text in the single cell
- Go to the table properties
- On the Table tab, set the «Text Wrapping» to «Around»
- Click on the «Positioning» button
- Leave the Horizontal Position and Relative fields as is (Left/Column)
- Set the Vertical Relative field to «Page»
- Set the Vertical Position field to a reasonable values (e.g., a single line worked well at 9.5″ on letter sized pages — you can override the defaults in the pull down).
- Click OK to leave the
Table Positioningwindow. - Click OK to leave the
Table Propertieswindow
Your table (and contained text) will now float at the bottom of the page. You’ll have to update the position if you change the page size of course, but you don’t have to pad the bottom of the table with white space so the text doesn’t sit in the footer.
answered Nov 3, 2017 at 20:03
![]()
BIBDBIBD
1,5466 gold badges22 silver badges32 bronze badges
Increase the bottom margin and adjust the footer to accommodate the text. Place the text in the footer and add a page number under the text, if needed. (You can use page field code if you want.) Place a section break at the bottom of the page so that the bottom margin and footer for the subsequent pages can be restored to their desired settings.
answered Oct 25, 2019 at 23:33
![]()
Simply create a textbox and under format>arrange>align select align bottom
answered Feb 6, 2016 at 14:04
![]()
1
In this course, we will talk about how to align text in Microsoft Word. Meanwhile, this is the continuation of the previous tutorial on how to change font style, size and font case in Microsoft Word which still part of formatting text in your documents.
Furthermore, we’ll learn how to change text so that it looks like what we want it to look like.
Table of contents
- Text Alignment
- What is text alignment in MS Word?
- Default text alignment in MS Word
- How Many Alignment in MS Word
- Left Aligned Text
- Right Align Text
- Center Aligned Text
- Justified Text
- How to Align Text in Microsoft Word
- Which shortcut key to align the text?
- Summary
What is text alignment in MS Word?
Text alignment is a way to change the look of all the text in a paragraph. It is an attribute of paragraph formatting. For instance, when a paragraph is align to the left, which is the most common way to align it. The text lines up with the left margin. On the other hand, when a paragraph is justified, the text lines up with both sides of the page.
Default text alignment in MS Word
The default alignment for text or paragraphs is left-align with straight margins on the left and uneven ones on the right. However, there are many other ways to format a document’s alignment.
Also, the alignment buttons in the Paragraph group on the Home tab let us justify or align not just text but also other objects.
How Many Alignment in MS Word
There are four types of text alignment available in Microsoft Word — left-align, center-align, right-align, and justify.
Left Aligned Text
A paragraph or a text is left-align when that paragraph or text is aligned evenly along the left margin of the page in MS-Word. It is also known as “left-justified,”.
Right Align Text
Right-alignment means that the text of a paragraph is line up evenly along the right edge of the page in MS-Word. Moreover, right alignment works well for columns with numbers, tables, and other types of ordered lists.
Center Aligned Text
Center aligned means that the text of a paragraph is in the middle of the left and right margins.
Justified Text
Justified Text in MS-Word is a paragraph’s text when it lines up evenly along both the left and right edges of the page.
How to Align Text in Microsoft Word
Here are the ways How to Align Text in Microsoft Word.
- Align text left or right in Microsoft Word
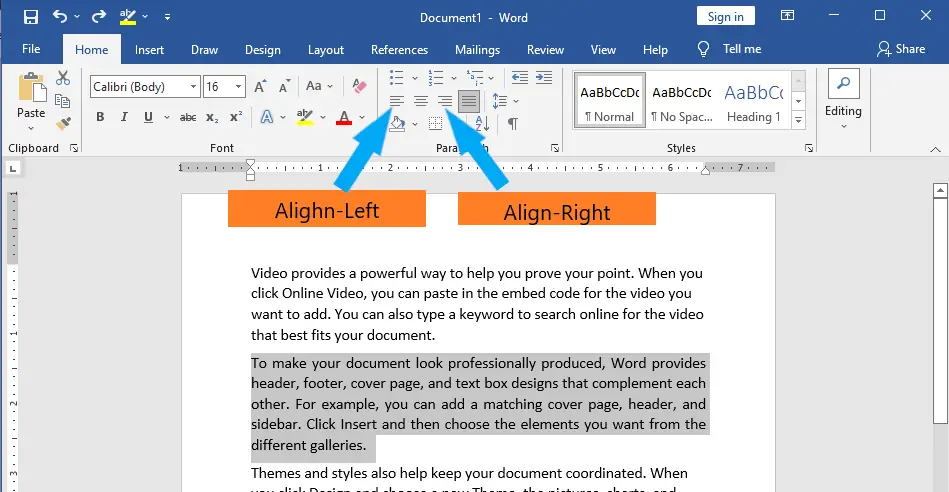
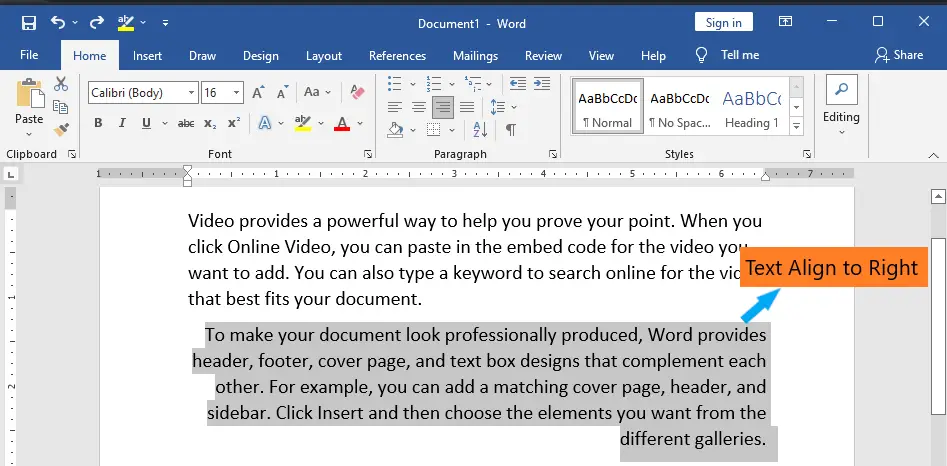
First select text in Word you want to align. Then, at the top of the window, click or tap on the Home tab.

Click or tap Align Left or Align Right in the Paragraph section, depending on what you want to do.

Here’s what right-aligned text looks like:
TIP: You can also align text to the left or right quickly by selecting the text and then pressing the CTRL + L or CTRL + R keys on your keyboard.
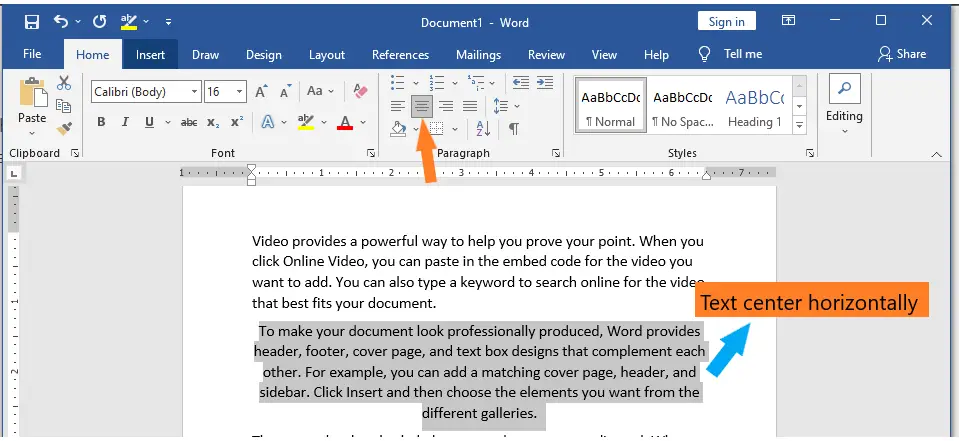
- Center text horizontally in Microsoft Word
First, choose the text you want to center horizontally. Then, at the top of the window, click or tap on the same Home tab.
When you click or tap on Center in the Paragraph section, the text you chose is moved right away to the middle of the page’s side margins.
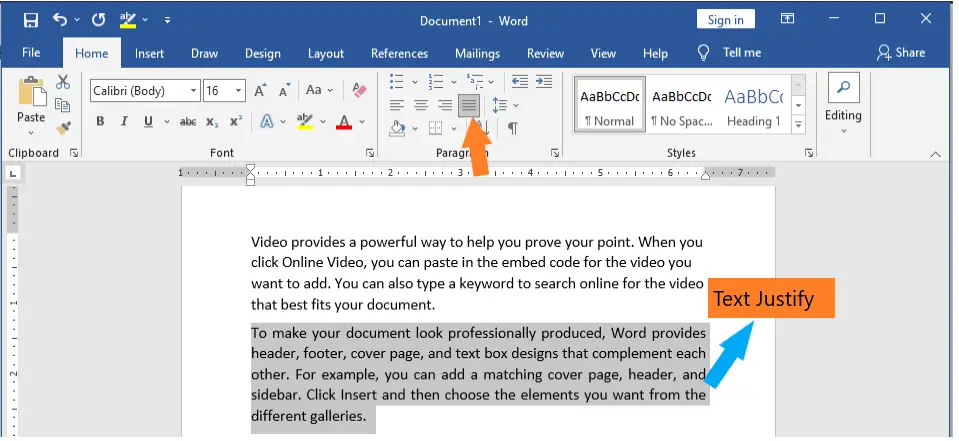
TIP: You can also center text by selecting it and then pressing the CTRL + E keys on your keyboard. - Justify text in Microsoft Word
When text is justified, the edges on both sides of the page are straight. Word can add more or less space between words so that each line is filled from beginning to end. But if the last line of text has too few words, it can be cut down.
To justify text in Word, you must first select the text and then click or tap on the Home tab at the top of the window.
Justify is a button you can click or tap in the Paragraph section. This is how your text should look:
TIP: If you select the text and then press the CTRL and J keys on your keyboard, you can quickly align text. - Align text vertically (top, center, justify, bottom) on the pages of a Microsoft Word document
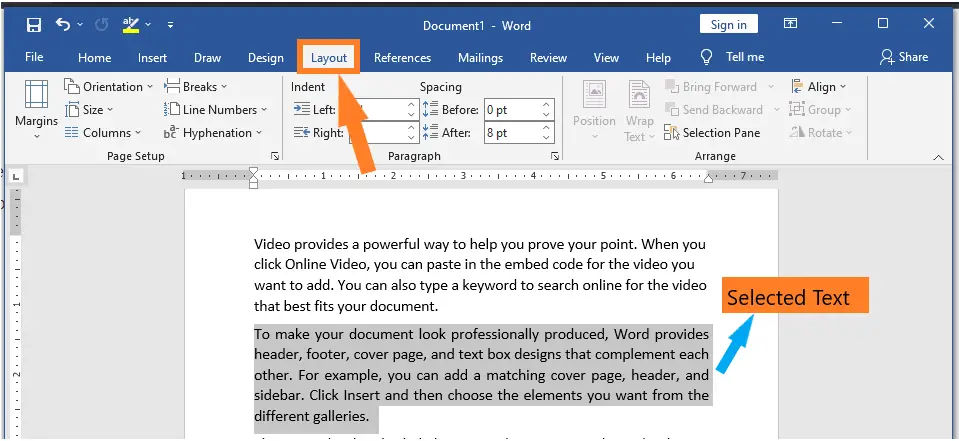
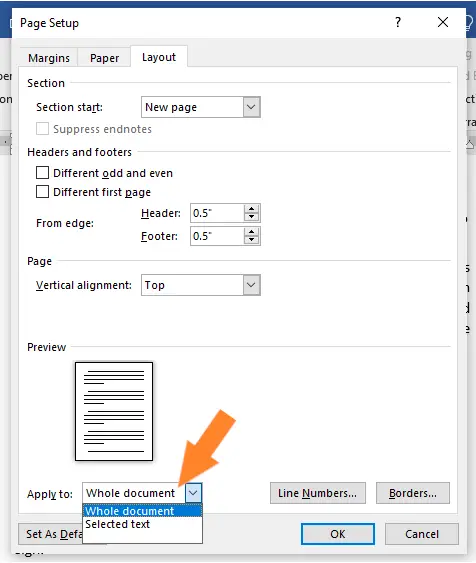
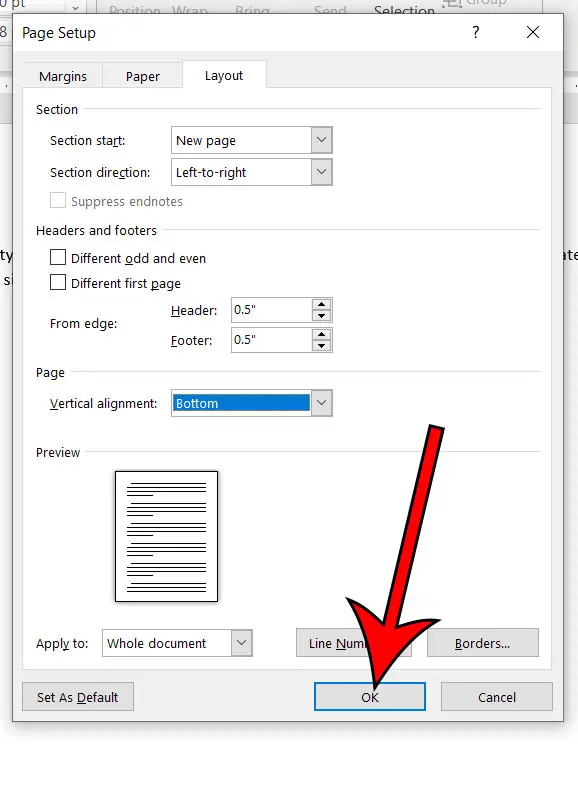
First, select the text, just like you would for any other text-alignment task. Then, at the top of the window, click or tap on the Layout tab.
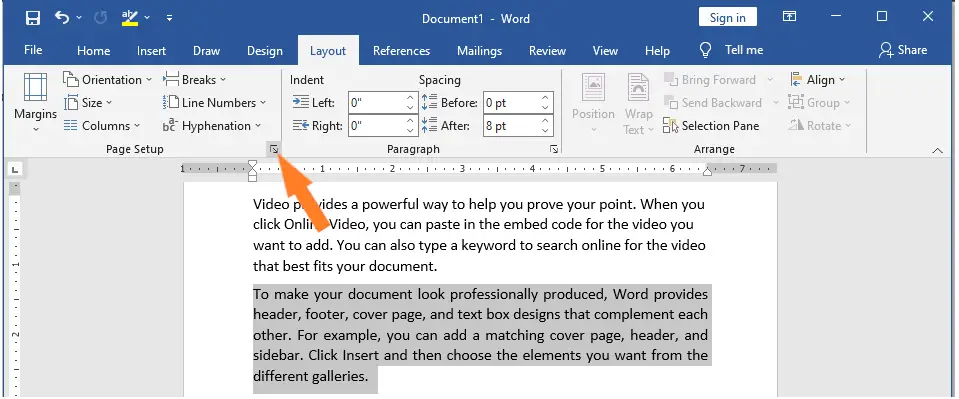
Then, in the Page Setup area, click or tap on the Dialog Box Launcher button. It is a small button in the bottom-right corner of the Page Setup section that looks like an arrow.

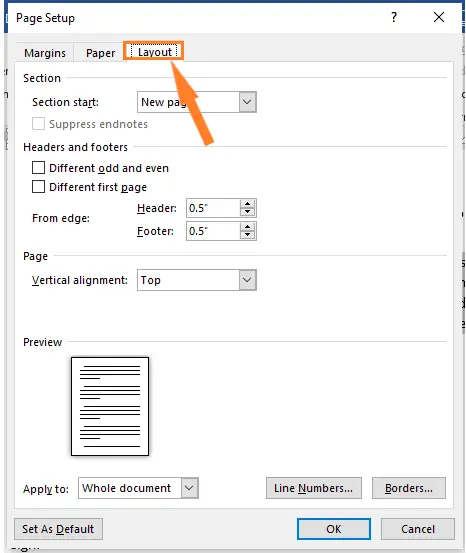
Now, the window for setting up pages opens. Choose the Layout tab at the top of the window.

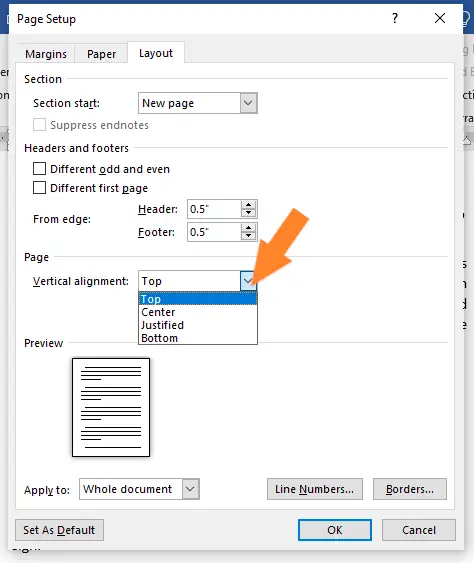
In the Page section, look for a setting called Vertical alignment. It should be set to “top” by default, which means that the text is aligned vertically to the top of the page. But you can set the text to be aligned in the middle, at the bottom, or even to justify. Click or tap on Vertical alignment, and then choose the option you like best.

Then, make sure that Selected text is chosen in the box that says “Apply to” at the bottom of the window. This only changes the alignment of the text you chose. But if you’d rather, you can apply the vertical alignment to all the text in the whole document by leaving the Apply to setting on Whole document.

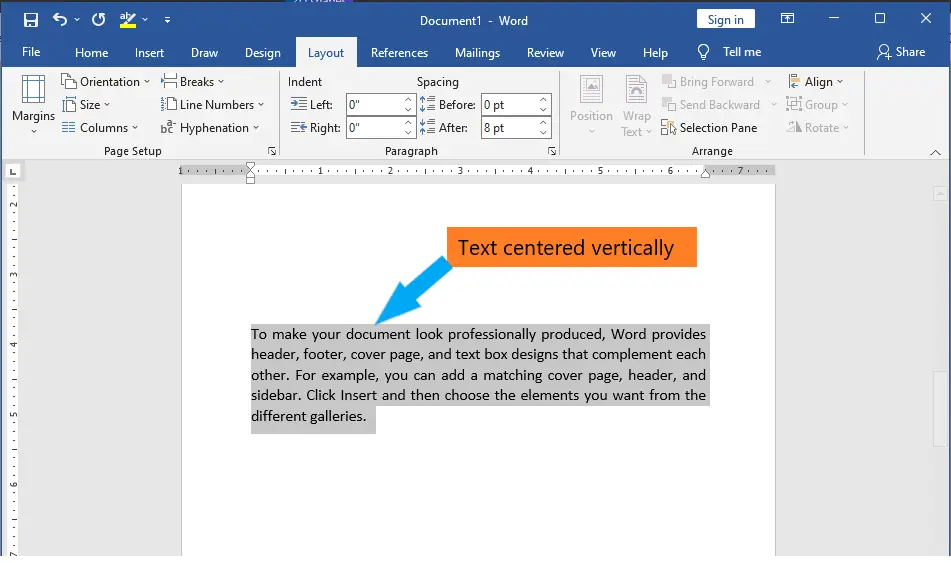
Here’s what a vertically centered piece of text looks like:

Simple, right? Now, all you have to do is try out the different alignment options until your text looks exactly how you want it to. You may also want to change the color of the font or just some of the cases in your Word document. Just visit our previous tutorial.
Which shortcut key to align the text?
Here are frequently used shortcuts to align the text in MS Word.
| Text alignment | Short Cuts |
|---|---|
| Increase the font size by 1 point. | Ctrl+Right bracket (]) |
| Center the text. | Ctrl+E |
| Align the text to the left. | Ctrl+L |
| Align the text to the right. | Ctrl+R |
Summary
In summary, we’ve talked about how to change text alignment in Microsoft Word, as well as how to apply those alignments in a document and what those terms mean. In addition, we know the available alignment in Microsoft Word. We also know how to use shortcuts that will make our formatting documents easy.
We hope this tutorial helps you as you format your documents in MS Word.
PREVIOUS
NEXT
If you’ve ever pressed Enter a bunch of times to move text to the bottom of the page in a Word document, then aren’t alone.
Many Word users will take this approach since there isn’t an obvious way to position text at the bottom of a document.
But this can cause problems later, as each of the line breaks that you add when you press Enter are technically part of the document, which means that your positioning could be affected if you add more content.
Our tutorial below will show you another way to vertically align text to the bottom of the page in Microsoft Word.
How to Put Text at the Bottom in a Word Document
- Open the document.
- Select the text to move.
- Click the Layout tab.
- Click the Page Setup button.
- Choose the Layout tab.
- Select the Vertical alignment dropdown and choose Bottom.
- Click OK.
Our guide continues below with additional information on how ot align some of the text on one of your pages to the bottom of the page, including pictures of these steps.
You can also check out our Word center text vertically guide for more information on putting text in the middle of the page.
New documents that you create in Microsoft Word will align your content to the top of the page by default.
This means that when you start typing, the text will appear on the top-most line in the document. This is a very common requirement for most documents, and many people find this to be the setting that they need.
But you may occasionally encounter a situation where you need your text to align to the bottom of the page. This means that your typing will appear on the bottom-most line in the document, then will move up a line as you add more text.
Our guide below will show you how to switch to bottom align in Microsoft Word by changing the vertical alignment setting found on the Page Setup menu.
If you use Microsoft’s speech-to-text feature, then our change read aloud voice in Word guide can show you how to change the voice that it uses.
How to Align to the Bottom of the Page in Microsoft Word (Guide with Pictures)
The steps in this article were performed in Microsoft Word for Office 365, but will work in most other recent versions of Microsoft Word as well.
Step 1: Open the document in Word.
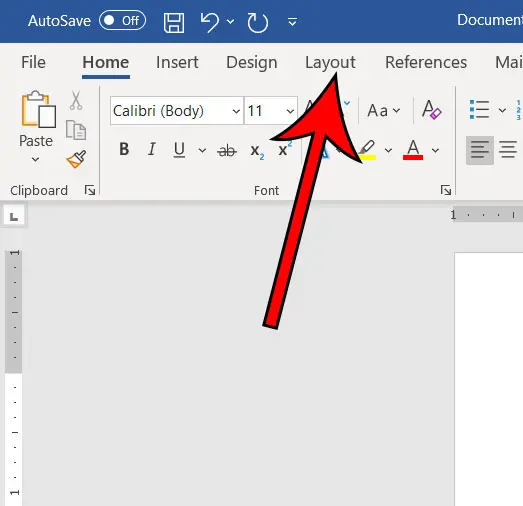
Step 2: Select the Layout tab at the top of the window.
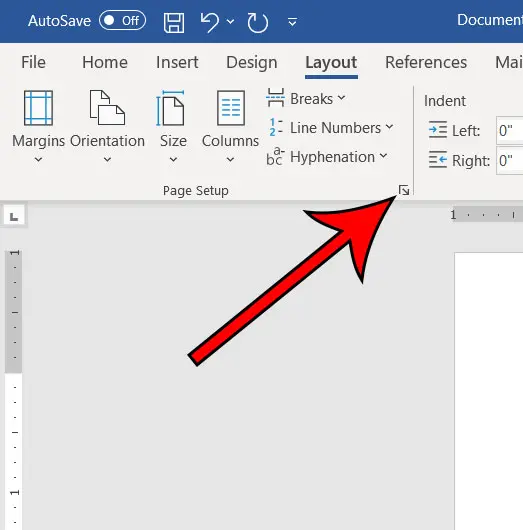
Step 3: Click the small Page Setup button at the bottom-right of the Page Setup section of the ribbon.
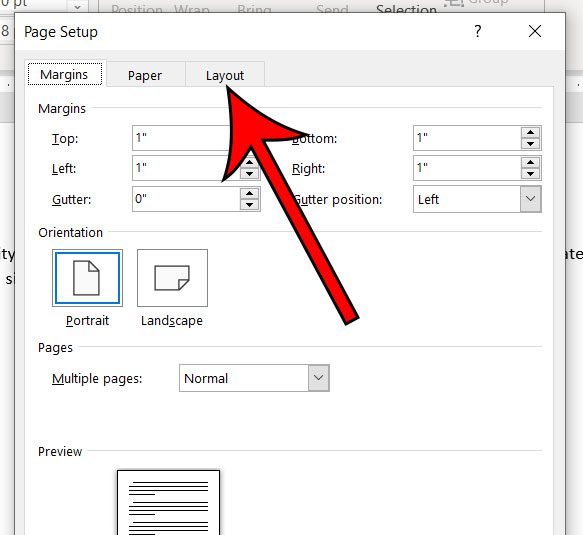
Step 4: Choose the Layout tab at the top of the window.
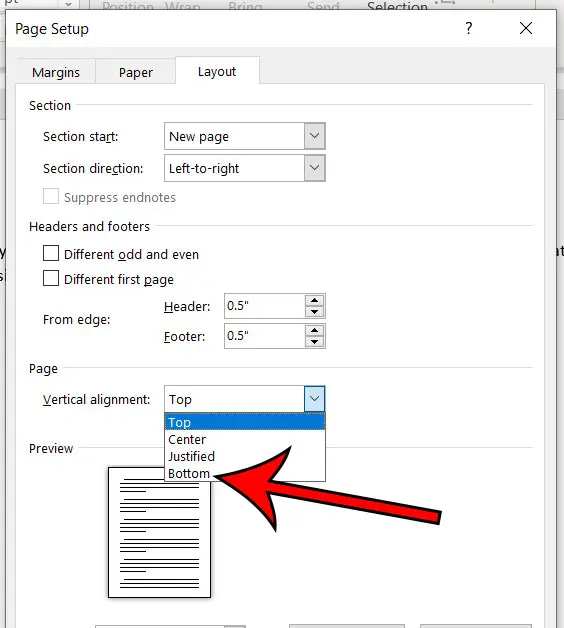
Step 5: Click the Vertical alignment dropdown menu and choose the Bottom option.
Step 6: Click OK to apply the change.
Now you should see that your document content is aligned at the bottom of the page instead of the top.
Now that you know how ot position text on the bottom of the page in Microsoft Word documents you will be able ot quickly adjust the vertical position of some of the text on a page if you need it at the bottom instead of the top.
Additional Sources
- How to insert a check mark in Microsoft Word
- How to do small caps in Microsoft Word
- How to center text in Microsoft Word
- How to merge cells in Microsoft Word tables
- How to insert a square root symbol in Microsoft Word

Matthew Burleigh has been writing tech tutorials since 2008. His writing has appeared on dozens of different websites and been read over 50 million times.
After receiving his Bachelor’s and Master’s degrees in Computer Science he spent several years working in IT management for small businesses. However, he now works full time writing content online and creating websites.
His main writing topics include iPhones, Microsoft Office, Google Apps, Android, and Photoshop, but he has also written about many other tech topics as well.
Read his full bio here.
Apply Left, Center, Right or Justify Alignment to Text in Microsoft Word
by Avantix Learning Team | Updated April 13, 2022
Applies to: Microsoft® Word® 2010, 2013, 2016, 2019, 2021 and 365 (Windows)
You can align or justify text or other content in Word in several ways including using keyboard shortcuts, selecting commands in the Ribbon, using the Paragraph dialog box or modifying a style. It’s important to note that alignment or justification is paragraph formatting so applies to entire paragraphs. You can align text or inline graphics in paragraphs that are followed by a hard return (you pressed Enter or Return).
To see where paragraphs have been created in a Word document, it’s helpful to turn on Show/Hide ¶ on the Home tab in the Ribbon.
In this article, we’ll review 4 different ways to change horizontal alignment or justification in Word documents.
Recommended article: How to Insert a Line in Word (3+ Ways)
Do you want to learn more about Microsoft Word? Check out our virtual classroom or in-person Word courses >
There are 4 types of alignment that can be applied to paragraphs:
- Align left – aligns text or inline graphics with the left margin or indent
- Center – centers text or inline graphics between the left and right margins or indents
- Align right – aligns text or inline graphics with the right margin or indent
- Justify – distributes text evenly between the left and right margins or indents
A paragraph aligns within the indents (indent markers appear on the Ruler). The indents may be different from the margins. Paragraphs are also entered in cells in tables and each paragraph in a cell may have different indents and alignment settings.
1. Align or justify using keyboard shortcuts
To align or justify paragraphs using keyboard shortcuts:
- Align left – select the paragraph(s) and press Ctrl + L to align to the left.
- Align right – select the paragraph(s) and press Ctrl + R to align to the right.
- Align center – select the paragraph(s) and press Ctrl + E to align center.
- Justify – select the paragraph(s) and press Ctrl + J to justify.
2. Align or justify using the Ribbon
To align or justify paragraphs using the Word Ribbon
- Select the paragraph(s) to which you want to apply alignment or justification. If you would like to select all paragraphs, press Ctrl + A.
- Click the Home tab in the Ribbon and then click Align Left, Center, Align Right or Justify in the Paragraph group.
Align and Justify commands appear on the Home tab in the Ribbon in the Paragraph group:
![]()
3. Align or justify using the Paragraph dialog box
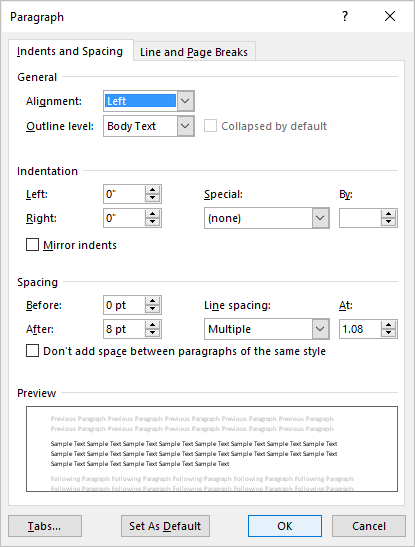
To align or justify paragraphs using the Paragraph dialog box:
- Select the paragraph(s) to which you want to apply alignment or justification. If you would like to select all paragraphs, press Ctrl + A.
- Right-click and select Paragraph. The Paragraph dialog box appears.
- From the Alignment drop-down menu, select Left, Center, Right or Justify.
- Click OK.
You can also display the Paragraph dialog box by clicking the Home tab in the Ribbon and then clicking the dialog box launcher on the bottom right of the Paragraph group.
The Paragraph dialog box includes a drop-down menu to select Alignment:
4. Align or justify by modifying a style
When you create a new blank document, it starts out using the Normal style which contains default paragraph and character formatting.
If you want to apply alignment or justification to multiple paragraphs throughout a document (such as a heading), you can modify a style (such as Heading 1).
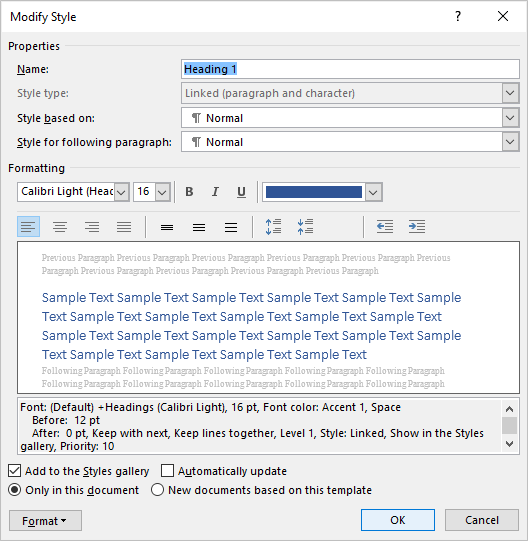
To change the alignment for a heading style (such as Heading 1):
- Click in a paragraph using the heading style (typically applied through the Home tab in the Ribbon).
- Click the Home tab in the Ribbon.
- In the Styles group, right-click the heading style. A dialog box appears.
- Click Format. A drop-down menu appears.
- Click Paragraph. The Paragraph dialog box appears.
- From the Alignment drop-down menu, select Center or your preferred alignment.
- Click OK twice.
Below is the Modify Style dialog box with align and justify commands:
There may be issues if you modify alignment or justification in the Normal style since other styles are based on this style by default. Cells in tables would likely be affected and so would other styles that are based on the Normal style (such as Header, Footer and Heading styles). Paragraphs using these styles would then inherit the alignment or justification (unless alignment or justification has been specifically modified in these styles). If you are comfortable using styles, you could create your own style or modify a different Word style to avoid this issue.
Subscribe to get more articles like this one
Did you find this article helpful? If you would like to receive new articles, join our email list.
More resources
How to Double Space in Word (4 Ways + Shortcut)
How to Hide Comments in Word (or Display Them)
How to Find and Replace in Word (and Use Wildcards)
How to Create a Hanging or First Line Indent in Word (3 Ways)
How to Superscript or Subscript in Microsoft Word (with Shortcuts)
Related courses
Microsoft Word: Intermediate / Advanced
Microsoft Excel: Intermediate / Advanced
Microsoft PowerPoint: Intermediate / Advanced
Microsoft Word: Long Documents Master Class
Microsoft Word: Styles, Templates and Tables of Contents
Microsoft Word: Designing Dynamic Word Documents Using Fields
VIEW MORE COURSES >
Our instructor-led courses are delivered in virtual classroom format or at our downtown Toronto location at 18 King Street East, Suite 1400, Toronto, Ontario, Canada (some in-person classroom courses may also be delivered at an alternate downtown Toronto location). Contact us at info@avantixlearning.ca if you’d like to arrange custom instructor-led virtual classroom or onsite training on a date that’s convenient for you.
Copyright 2023 Avantix® Learning
Microsoft, the Microsoft logo, Microsoft Office and related Microsoft applications and logos are registered trademarks of Microsoft Corporation in Canada, US and other countries. All other trademarks are the property of the registered owners.
Avantix Learning |18 King Street East, Suite 1400, Toronto, Ontario, Canada M5C 1C4 | Contact us at info@avantixlearning.ca