
Word for Microsoft 365 Outlook for Microsoft 365 Word 2021 Outlook 2021 Word 2019 Outlook 2019 Word 2016 Outlook 2016 Word 2013 Outlook 2013 Word 2010 Outlook 2010 Word 2007 Outlook 2007 More…Less
To set or change table options in Word or Outlook, right-click a table and choose Table Properties.
Note: If you want to set properties for a particular row, column, or cell, click in that row, column, or cell before making changes in the Table Properties dialog box.
In this article
-
Table properties
-
Row properties
-
Column properties
-
Cell properties
-
Alt text
Table properties

Click the Table tab to apply settings to your entire table:
-
Under Size, set the table’s overall width by selecting Preferred width and choosing a size. In the Measure in box, choose whether you want to measure the width in inches or a percentage of the page.
-
Under Alignment, choose whether you want to align your table to the left, center, or right of page. If you select Left, you can select an indentation distance in the Indent from Left box.
-
Under Text wrapping, select Around if you want nearby text on your page to wrap around your table; you can make text wrapping more precise by clicking Positioning, and then choosing options in the Table Positioning dialog box. If you don’t want text wrapping, select None.
-
Click Borders and Shading to change the border style, line color, and line width of your table.
-
Click Options to set more table properties, including top and bottom cell margins, cell spacing, and automatic resizing of cell contents.
Top of Page
Row properties
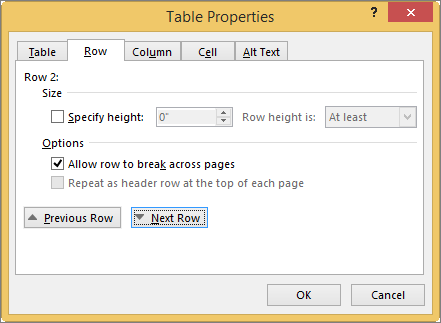
First, click in the row or select the rows you want to change, right-click, choose Table Properties, and then click the Row tab.
-
Under Size, set the row’s height by selecting Preferred height and choosing a size; you can further refine the height by selecting an option in the Row height is box.
-
Under Options, select options for breaking rows across pages or creating header rows.
-
To display the currently selected row at the top of the tab and navigate between rows without leaving the Table Properties dialog box, click Previous Row or Next Row.
Top of Page
Column properties
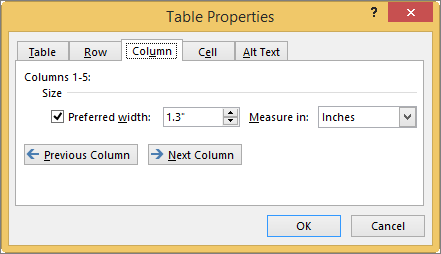
First, click in the column or select the columns you want to change, right-click, choose Table Properties, and then click the Column tab.
-
Under Size, set the column’s width by selecting Preferred width and choosing a size. In the Measure in box, choose whether you want to measure the width in inches or a percentage.
-
To display the currently selected column or columns at the top of the tab and navigate between columns without leaving the Table Properties dialog box, click Previous Column or Next Column.
Top of Page
Cell properties
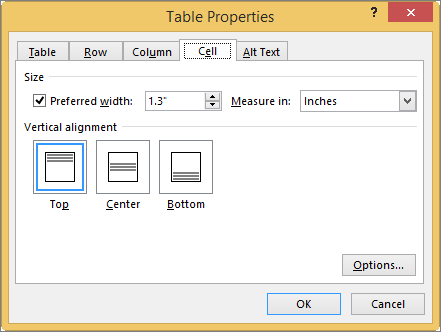
First, click in the cell that you want to change, right-click, choose Table Properties, and then click the Cell tab.
-
Under Size, set the cell’s width by selecting Preferred width and choosing a size. In the Measure in box, choose whether you want to measure the width in inches or a percentage.
-
Under Vertical alignment, choose an alignment option for the cell contents—Top (the default alignment), Center, or Bottom.
-
Click Options to set more cell properties, including top and bottom cell margins and text wrapping and fit options.
Top of Page
Alt text
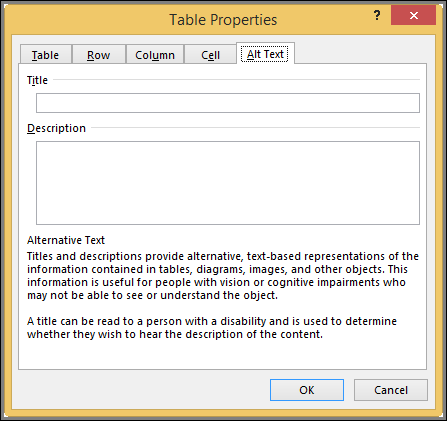
You can create alternative text (alt text) for your table to help people with screen readers understand the content of the table.
-
In the Description box, enter an explanation of the table.
-
In the Title box, enter a brief summary of the table.
Note: Unless you have a complex table, you will usually want to enter text in just the Description box. When you have complex content to describe, filling in the Title field is useful so that reading the full description is not necessary unless desired.
Top of Page
Need more help?
Want more options?
Explore subscription benefits, browse training courses, learn how to secure your device, and more.
Communities help you ask and answer questions, give feedback, and hear from experts with rich knowledge.
Sometimes column edges don’t align. There are a number of ways this can happen. Sometimes fixing it is easy, and occasionally, its the very opposite of easy. To make this task easier, be sure that the cell borders are visible, then try the fixes shown in the demo video at the end of the written instructions.
Drag the edges of the cells
- With no table contents selected, hover over the border between cells until you see the “resize” cursor (shown here).
- Click and drag either until the cell borders line up or until it snaps to a location. Sometimes it’s not possible to make the edges line up exactly on the first try, but now you can select the other misaligned part and snap that border to the same point as the first.
From then on, the edges you’ve aligned should move as one entity.
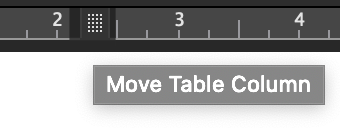
Drag the markers on the ruler
- On the View ribbon, select the Ruler option.
- Click in the cell you want to change.
- On the ruler, click on the gutter marker between columns and drag it to the desired location.
Troubleshooting
If a row is shorter than the others, it will not behave well. Split cells or recreate the row so that the right and left edges align with the table. (Shown in the video demo below.)
Sometimes, it feels impossible to get cell borders to align so that they create a single smooth column. The fastest fix is to insert a new row and drag the contents over, then delete the problematic row. Do watch out, though: deleting problem areas can “move contents up/left” in a way that messes up the rest of the table. On rare occasions, creating a fresh table and transcribing contents (via click and drag) is the fastest method.
demo video: https://youtu.be/ZLqpO3hbrKY

Check out all the other posts in this series about Working with Tables and download your free multimedia ebook of them all!
Got a gnarly Word problem? Submit your problem and we’ll try to answer it in the Q&A thread.

![]()


Learn with us! Join a course today.
© This blog and all materials in it are copyright Adrienne Montgomerie on the date of publication. All rights reserved. No portion may be stored or distributed without express written permission. Asking is easy!
Find a better way through Word
There are many formatting attributes you can apply to tables in Word to make your tables appear just right. Things like alignment, spacing, borders and shading are simple modifications you can make to format your table. The following articles discuss how to format tables to display your information how you want.
Tips, Tricks, and Answers
The following articles are available for the ‘Formatting Tables’ topic. Click the
article»s title (shown in bold) to see the associated article.
Adding Borders to Cell Contents
Word allows you to quickly add borders to cells in a table, but you may not know that you can also add borders to the text within the cells. It all depends on a single setting in the Borders and Shading dialog box, as described here.
Adding Diagonal Borders
Want to add a border diagonally, through the middle of a table cell? It’s easy if you follow the formatting steps presented in this tip.
Adjusting Column Width Using the Ribbon
If you want to resize the width of your table columns, you can do it using a mouse, but you can get more precise widths by using the ribbon controls. This tip explains how to pull up and use the proper controls so you can adjust the width of each column in the table.
Adjusting Table Row Height
When working with tables, you can adjust the height of individual rows. How you go about such adjustments depends on the version of Word you are using.
Aligning Decimal Numbers in Tables
Need to align numbers around their decimal point within a table? It’s easy to do by using the three simple steps provided in this tip.
Aligning Positive and Negative Whole Numbers in a Column
When you use a table to present numeric information, you may want to have Word align the numbers in the table. This can be a challenge in some situations, such as if your negative numbers use parentheses around them. Here’s how to align such numbers properly within the table.
Applying Borders to Tables
Want to change the borders that Word adds to your tables? You have complete control over the way your borders appear, using the tools described in this tip.
Applying Consistent Shading to a Table
Formatting tables can be very time consuming. When you get a document from another person, you can spend a lot of time formatting their tables, as well. Here are a couple of ways you can shorten the table-formatting time you need to spend.
AutoFitting Tables
Need to adjust the width of a bunch of table columns according to what is in the columns? Word provides a tool to do this, called AutoFit. Here’s how to apply it to your tables.
Centering Information in Table Cells
One of the most common ways to format information in a table is to apply some sort of alignment to the contents of table cells. If you need to center your information, you can do it both horizontally and vertically using the information in this tip.
Changing Cell Alignment
Individual cells in a table can be aligned any way you desire. As pointed out here, just select the cell and apply the formatting.
Copying Fill Color in a Table
You may spend some time getting the color in a portion of a table just right, only to be faced with the task of copying that shading to other cells in the table. There are several ways you can accomplish this task, as described in this tip.
Distributing Table Rows Evenly
If you’ve adjusted the height of your table and the rows within the table, you might want to later return all those rows to a uniform height. In Word this is referred to as «distributing» rows, and it is an easy task to do, as discussed in this tip.
Easily Copying Cell Formatting
Copying table cell formatting from one place to another can be a tedious process as Word doesn’t provide a way to do the copying. This tip looks at two techniques that can make the process easier.
Finding an Optimal Table Height
Word can adjust the height of individual rows in a table based on the information you put in each row. This may not result in the optimum table design, however. Here’s a discussion of why this happens and what you can try to do about it.
Fitting Text Into Cells
Need a way to make sure your text fits within the space available in a table cell? Word has a handy setting that will adjust your text’s format, as necessary, to make it fit.
Fitting Your Text In a Table Cell
Got some text you absolutely must fit on a single line in a table cell? Then you’ll appreciate this rather esoteric setting that allows you to force text to fit on that line.
Getting Rid of Background Color in All Tables
When working with tables (particularly those created by others), you can spend a large amount of time getting the formatting the way you want. If you need to routinely remove background shading from tables, here’s a couple of ways you can make your task easier.
Heading Changes for Multi-page Tables
When you have a long table that extends over multiple pages, Word allows you to specify one or more rows to be repeated at the top of the table on each page. Word does not provide a way for you to change the table heading on secondary pages, such as to contain the word «continued.» This tip provides a workaround you can use to get the desired result, however.
Headings On Your Printout
If you’ve got a table that spans multiple printed pages, you probably want to repeat a row or two of that table as a heading on each page. Here’s the easy way to set up those repeating rows.
Hiding Table Gridlines, by Default
The edges to table cells are shown two ways in Word: gridlines and borders. Table gridlines are only seen in Word; they do not print. Borders are visible in Word and on the printed page. Applying borders to table cells overrides the display or hiding of gridlines.
Indenting a Table
Insert a table into your document and it normally appears aligned with the left margin. Word allows you to indent the table by applying the techniques described in this tip.
Keeping Tables on One Page
Need to make sure that your smaller tables stay on a single page? Here’s a handy trick you can use to enforce this rule.
Last-Row Border Formatting
When the last row displayed on a page doesn’t show the borders you want, it can be confusing to figure out how to get them to show up. Here’s an example and a discussion on how to get the borders to appear properly.
Limiting Lines in a Table Cell
When creating tables, Word automatically sets the size of the cells. But what if you want to make sure each cell is a certain height? This tip explains how to format your table so it looks the way you want.
Preventing Overlapping Tables
You can spend considerable time getting the tables in your document to look just right. What happens, though, when you send the document to someone else and the tables are suddenly overlapping each other?
Quick Recall of Table Formats
Got a table that you use over and over again? One way you can make quick work of such repetition is to save the table in a Building Block entry. This tip shows how easy this is.
Quickly Removing Table Borders
Insert a table in your document and Word assumes that you want borders around the table and its cells. Here’s a shortcut that allows you to easily remove those borders.
Right Aligning a Table Column with an Indent
Word allows you to get a bit fancy in formatting the alignment of your tables. In this tip, you discover how to enter very precise right-alignment positioning in your table cells.
Self-Adjusting Column Widths
It is important to understand how column widths relate to the margins you may have set in your document. The reason is because when you change margin settings it can affect column width, but perhaps not as you expect.
Shading Table Rows
Need to format the rows of a table so that your data is showcased better? Here are a few ways you can get the shading you need.
Space after a Table
Those familiar with styles are used to setting vertical spacing before or after paragraphs. You can get just the look you want when it comes to spacing, except in regard to tables. Getting a certain amount of space after a table can take some trial and error, as detailed in this tip.
Spacing Before and After Tables
Tables can be a necessity in many types of documents. However, they can be a bother to get positioned properly relative to the text before and after the table. This tip shows how you can get just the positioning you need.
Spacing Table Rows Vertically
Want to get just the right amount of spacing above and below text in a table cell? A very easy way to do this is to adjust the paragraph spacing, as you do when formatting normal text.
Squaring Table Cells
Inserting a table is fast and easy in Word. You may want to make sure that the cells in the table are as square as possible. Here’s how to do this task.
Stopping Row Breaking for Many Tables
Got a lot of tables you need to format all at once? While you could make your changes manually, a much quicker way is to use a short macro, like the one featured in this tip.
Underlining Cells, Not Space Between Cells
Word provides a couple of ways you can underline information, including underlining table cells and their contents. Getting just the underlining you want can be a challenge, however, as highlighted in this tip.
Right-click anywhere inside the table and then choose the “Table Properties” command from the context menu that appears. In the Table Properties window that opens, you can choose left, center, or right alignment by clicking those options in the “Alignment” section.
Contents
- 1 How do I align table margins in Word?
- 2 How do you center align a table horizontally in Word?
- 3 How do I fix misaligned tables in Word?
- 4 How do I fix the spacing between tables in Word?
- 5 How do you put a table in the center?
- 6 How do I align text in a table in Word 2019?
- 7 Why can’t I type above a table in Word?
- 8 How do you insert a space before a table in Word?
- 9 Why is there a gap in my Word table?
- 10 How do you change the alignment in Word?
- 11 Which command is used to align the table at the center of the document?
- 12 What is the command used to align the table at the center in LaTeX?
- 13 How do I center text in a table in CSS?
- 14 How do I align text in a table?
- 15 How do I center a table in Word 2020?
- 16 How do I reset my table of contents to default?
- 17 How do you sort a table in descending order in Word?
- 18 How do you start typing after a table in Word?
- 19 How do you type above a table in Word on a Mac?
- 20 How do you move a table in Word from the top of the page?
How do I align table margins in Word?
If you want to align the table borders with the outside text margins: – On the Table Tools > Layout tab of the ribbon, click the Cell Margins button. Change the left and right cell margins from the default 0.19 cm to 0.
How do you center align a table horizontally in Word?
Center a Table Horizontally in Word. Once you have selected the entire table, press “Ctrl” and “E” on the keyboard to center the table between the left and right margins.
How do I fix misaligned tables in Word?
Right-click anywhere inside the table and then choose the “Table Properties” command from the context menu that appears. In the Table Properties window that opens, you can choose left, center, or right alignment by clicking those options in the “Alignment” section.
How do I fix the spacing between tables in Word?
Follow these steps:
- Right-click anywhere within the table you want to format.
- Choose the Table Properties option from the Context menu.
- Make sure the Table tab is selected.
- Click on the Options button at the bottom of the dialog box.
- Make sure the Allow Spacing Between Cells check box is selected.
How do you put a table in the center?
One of the most common ways to center a table is to set both the bottom and top margins to 0, and the left and right margins to auto. If you’re after a table that’s an exact width, you may do this as you usually would and the automatic margin will divide the space left over.
How do I align text in a table in Word 2019?
Go to the Layout tab and you will find there’s an Alignment toolbox there. The Alignment toolbox has nine buttons for aligning text in a table in Microsoft Word. From left to right, and top to bottom, the buttons let you align text to the right, and top, center and top, and left and top.
Why can’t I type above a table in Word?
Press “Enter” if the table is at the top of the document; press “Ctrl-Shift-Enter” if the table is at the top of a section. In either case, this creates a blank line directly above the table.
How do you insert a space before a table in Word?
Follow these steps:
- Right-click on the table.
- Select Table Properties from the Context menu.
- Make sure the Table tab is displayed.
- In the Text Wrapping area, click the Around icon.
- Click the Positioning button.
- Adjust the Top and Bottom settings to reflect how much space you want left before and after the table.
Why is there a gap in my Word table?
1 The row height may exceed the space available on the preceding page. (Don’t specify row height.) 2 Text in the row may be set to keep with next. (Turn that off.)
How do you change the alignment in Word?
Press one of the shortcut keys to adjust the alignment of any highlighted text.
- For left alignment, highlight the text and press Ctrl + Shift + L .
- For center alignment, highlight the text and press Ctrl + Shift + E .
- For right alignment, highlight the text and press Ctrl + Shift + R .
Which command is used to align the table at the center of the document?
You can also enclose the tabular environment within a table environment. Not only will it allow you to center it (using the command centering ) but also to add a caption, a label for cross-reference, and to tweak the placement on the page.
What is the command used to align the table at the center in LaTeX?
The text of a figure or table can be centered on the page by putting a centering command at the beginning of the figure or table environment. Unlike the center environment, the centering command does not start a new paragraph; it simply changes how LaTeX formats paragraph units.
How do I center text in a table in CSS?
To center align text in table cells, use the CSS property text-align. The
tag align attribute was used before, but HTML5 deprecated the attribute. Do not use it. So, use CSS to align text in table cells.
How do I align text in a table?
Follow these steps to align text in a table:
- Select the cells, columns, or rows, with text that you want to align (or select your entire table).
- Go to the (Table Tools) Layout tab.
- Click an Align button (you may have to click the Alignment button first, depending on the size of your screen).
How do I center a table in Word 2020?
Centering a Table
- Right-click on the table. Word displays a Context menu.
- Choose Table Properties from the Context menu. Word displays the Table Properties dialog box.
- Make sure the Table tab is selected. (See Figure 1.)
- Click on Center.
- Click on Close.
How do I reset my table of contents to default?
Go to References again and click the Table of Contents button. You’ll now see the default TOC styles. Insert the TOC of your choosing. Done!
How do you sort a table in descending order in Word?
Sort a table in Word
- Select anywhere in the table.
- Select Table Tools Layout > Sort.
- Choose your sort criteria: Select the column you want to Sort by. To sort on a second column, select Then by and select another column. Select Ascending or Descending.
- Select OK.
How do you start typing after a table in Word?
- Add a new row to the table.
- Select the row (by clicking on the left side of the page or drag through the whole row)
- In Table Tools > Layout click on Convert To Text then OK.
How do you type above a table in Word on a Mac?
Press Ctrl+Home to place the insertion point in the leftmost cell of the first row. 2. Click on the Layout tab and then click on the Split Table button. Word will automatically create an empty paragraph above the table.
How do you move a table in Word from the top of the page?
- Click to place your cursor within the table.
- On the ribbon in the Table Tools Layout tab, click Properties in the Table group.
- On the Table tab, click Positioning to open the Table Positioning dialog box.
- In the Vertical section, click the Position drop down and select Top.
Select the table
- Using the mouse: Move the mouse over the table until you see the table selection icons in the upper-left corner of the table and click it:

Note: You can also click on the table selection icon in the bottom-right corner (resizing handle) for the same effect.
- Using the keyboard: To select table elements, on the Table Layout tab, on the Table group, click the Select button, then select the option you prefer:

- Select Cell
- Select Column
- Select Row
- Select Table
Format the table
After positioning the cursor anywhere in a table or selecting a table element, Word shows two tabs: Table Design and Layout. E.g.:

See also Select and format table elements in Word.
Apply a predefined Table style
There are several predefined styles you can use for the table. Styles include a variety of borders, colors, and other attributes that give a table a very professional appearance.
To choose any of the predefined styles, do the following:
1. Select the table.
2. On the Table Design tab, in the Table Styles group, in the Styles Gallery, click the More arrow to see the complete list of styles:

3. Select the table style you want:

The Table Styles gallery includes three categories of styles:
- Plain Tables have minimal formatting.
- Grid Tables include vertical separators between columns.
- List Tables do not include vertical column separators:

Note: The selected style overrides any previously added style changes for the table.
Modify the table style options
To change the table or selected style, on the Table Design tab, in the Table Style group, click Modify Table Style…:

In the Modify Style dialog box, make changes you want:

Note: Click the Format button at the bottom of the dialog box to change other options such as Font or Paragraph. See also how to clear formatting.
Customize the table formatting
After applying a table style, you can turn various options on or off to change their appearance. On the Table Design tab, in the Table Style Options group, there are six options:

- Header Row is the first row of the table that contains Headers that helps identify the contents of a particular column. Usually, the Header Row is formatted differently and should be repeated at the beginning of each new page for tables that extend beyond one page.
Note: According to most requirements, data tables should have a header row to provide a contextual structure that aids navigation.
- Total Row is the last row of the table. If this option is selected, the last row will be formatted differently from the body rows, designed to summarize the rows above it (see how to insert formulas).
- First Column used special formatting to the column. Usually, the First Column contains the row headings.
- Last Column applies special formatting to the column to summarize the earlier columns (see how to insert formulas).
- Banded Rows and Banded Columns alternate the background color of rows and columns (see how to change the background color for the selected cells below).
Note: Certain Table Style Options may have a different effect depending on the Table Style you’ve chosen. You might need to experiment to get the look you want.
Apply the border styles
To apply and remove cell borders, do the following:
1. Select the cells or entire table to which you want to add a border.
2. On the Table Design tab, in the Borders group, choose the desired Border Styles, Line Style, Line Weight, and Pen Color:

- Select the predefined Line Style, Line Weight, and Line Color from the Border Styles dropdown list:

- Select the Line Style:

- Select a border thickness from the Line Weight dropdown list:

- Select the border color from the Pen Color dropdown list:

- Select the borders from the Borders dropdown list:

Note: Select No Borders from the Borders dropdown list to remove borders from the selected cells.
- Draw the border where you want:
- After selecting border style or color, the Border Painter button is automatically checked, or
- If all that you want is selected already, just click the Border Painter button by yourself:

After any of these actions, your cursor changes to the brush. Now, draw the border where you need it:

Note: Use the Eraser button in the Draw group on the Table Layout tab to remove the unnecessary border:


Apply background colors and shading
To change the background color for some table elements, select them, then on the Table Design tab, in the Table Styles group, click the Shading button, then select the background color you prefer:

Note: To use a pattern instead of a solid color, on the Table Design tab, in the Borders group, click the dialog box launcher:

In the Borders and Shading dialog box, on the Shading tab, select a pattern in the Style list:

Layout of the table
The Table Layout tab includes commands for changing the entire table format, as well as commands for changing the appearance of individual table components such as cells, columns, rows:

See Select and format table elements in Word for more details.
Resize a table
- Using the mouse: To resize a table in a Word document, move the mouse over the table until you see the table resizing icons (handle) in the bottom-right corner of the table and click it:

Drag the table to the size you need, and then release the handle.
- Using the keyboard: Select a table (see also how to resize individual cells, specific rows, or columns); the do one of the following:
- On the Layout tab, in the Cell Size group, change the values in the Height and Width fields:

- Open the Table Properties dialog box by doing one of the following:
- On the Table Layout tab, in the Table group, click the Properties button:

- Right-click the table and select Table Properties… in the popup menu:

In the Table Properties dialog box, on the Table tab, in the Size section, select the Preferred width check box, then:
- In the Preferred width field, type or select the value you need,
- In the Measure in dropdown list, select one of the items:
- Percent to specify the percentage of the table width,
- Inches to fix the column width:

- On the Table Layout tab, in the Table group, click the Properties button:
- On the Layout tab, in the Cell Size group, change the values in the Height and Width fields:


See how to resize table elements for more details.
Freeze the table
Some Word tables change the width of their columns according to the data. To stop changing the table size when new data is inserted, do the following:
1. Select the table.
2. Open the Table Properties dialog box.
3. In the Table Properties dialog box, on the Table tab, click the Options… button:

4. In the Table Options dialog box, deselect the Automatically resize to fit contents check box:

See also how to fix the height of table rows.
Move a table
To move a table to a new page or a new document, select it, then use the Cut and Paste commands. You can also use the Copy command to leave a copy of the table in the original location.