
Align text horizontally
-
In the text box, select the text that you want to change the horizontal alignment for.
-
On the Home tab, click the alignment option that you want
 .
.
 .
.Align text vertically
You can align all the text in a text box with the top, middle, or bottom of the text box.
-
Click the outer edge of the text box to select it.
-
On the Shape Format tab, click Format Pane.
-
Click the Shape Options tab if it isn’t already selected.
-
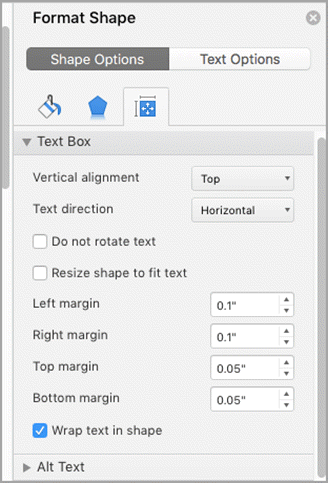
Click the text box icon
, and then click Text Box. -
Choose Top, Middle, or Bottom from the Vertical alignment drop-down list.
 , and then click Text Box.
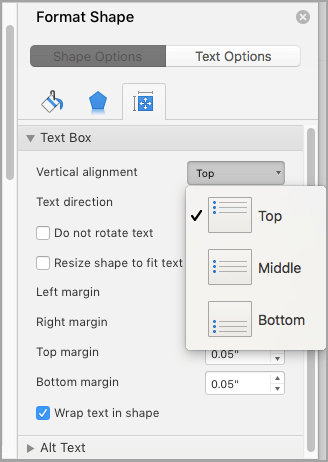
Adjust the text box margins
-
Click the outer edge of the text box to select it.
-
On the Shape Format tab, click Format Pane.
-
Click the Shape Options tab if it isn’t already selected.
-
Click the text box icon
, and then click Text Box. -
You can adjust the left, right, top, and bottom margins.
Important:
Office for Mac 2011 is no longer supported. Upgrade to Microsoft 365 to work anywhere from any device and continue to receive support.
Upgrade now
Align text horizontally
-
In the text box, select the text that you want to change the horizontal alignment for.
-
On the Home tab, under Paragraph, click the alignment option that you want
.
Align text vertically
You can align all the text in a text box with the top, middle, or bottom of the text box.
-
Click the outer edge of the text box to select it.
-
Click the Format tab (the purple contextual tab that appears next to the Home tab), and then under Text Box, click Change text alignment within the text box
. -
Click the alignment option that you want.
 .
.Adjust the text box margins
-
Click the outer edge of the text box to select it.
-
On the Format menu, click Shape.
-
In the left pane of the Format Shape dialog box, click Text Box.
-
Under Internal Margin, adjust the measurements to increase or decrease the distance between the text and the outer border of the text box.
![]()
Download Article
A user-friendly guide to changing a Word document’s margins to wide, narrow, and more
![]()
Download Article
- Applying Preset Margins (Desktop)
- Creating Custom Margins (Desktop)
- Using the Mobile App
- Q&A
- Warnings
|
|
|
|
Are you trying to adjust your margins in Microsoft Word? The margins are the empty space between the edge of the page and the contents of the document. Depending on your needs, you can change the margins to become wider, narrower, or a mix of both. You’ll be able to select from a few preset options or customize your own. This wikiHow will show you how to fix and change the default 1-inch margins in Microsoft Word using your iPhone, Android, or Windows or Mac computer.
Things You Should Know
- On desktop, click «Layout» → «Margins» → select a margin preset.
- For custom margins, click «Custom Margins…» and enter the values for Top, Left, Bottom, and Right.
- On mobile, tap «•••» → «Home» → «Layout» → «Margins» → select a preset or «Custom Margins». Enter a new value and tap «Done».
-
1
-
2
Click Layout. This will be in the top toolbar, between Design and References.
Advertisement
-
3
Click Margins. You can find this in the upper-left corner of the Layout tab. This looks like a rectangle with blue lining the margins.
- A pop-up menu will open.
-
4
Select a margin type. You’ll see a list of preset margins: Normal, Narrow, Moderate, Wide, Mirrored, and Office 2003 Default. Click a preset margin to apply it to your document. It should be applied immediately.
- If you don’t like how it looks, you can select Normal again, or press CTRL + Z (Windows) or CMD + Z (Mac) to undo the change.
Advertisement
-
1
Click Layout. This will be in the top toolbar, between Design and References.
-
2
Click Margins. You can find this in the upper-left corner of the Layout tab. This looks like a rectangle with blue lining the margins.
- A menu will open.
-
3
Click Custom Margins…. This will be at the bottom of the drop-down menu.
- A new window will open.
-
4
Set your new margins. On the desktop application, you’ll be able to edit the margin sizes for: Top, Left, Bottom, Right, Gutter, and Gutter Positions. On the web version, you’ll only be able to edit the margin sizes for: Top, Left, Bottom, and Right. You’ll see a preview of the document layout at the bottom of the window.
- Click the field and enter your new margin size, or use the up/down arrow to adjust the current margins.
- For Gutter Positions, select Left or Top.
- Only adjust the Gutter margin if you intend to use the document in a bound format, like a book or report, and you need space for the binding. In this case, type a number in Gutter that will allow enough room for the binding and use the drop-down to indicate whether the binding will be on the top or on the left.
- Make sure Apply to is set to Whole document, unless you only want to change the margins from This point forward.
-
5
Set new default margins (optional). If you want to use this margin for all new documents in Microsoft Word, click Set as default in the bottom-left corner. Click Yes to confirm.
- When you create a new document, the margins will reflect the change.
-
6
Click OK when finished. The changes will be applied immediately.
Advertisement
-
1
Open the Microsoft Word app. Microsoft Word is available for iOS in the App Store and for Android in the Google Play Store.
- If you aren’t already logged in to your Microsoft account, enter your email address and password to do so now.
-
2
Open a new or existing project. Tap a recent project on your homepage, or tap the + tab to create a new one.
-
3
Tap ••• . This is the «•••» located at the top of your on-screen keyboard. If you don’t see your keyboard, tap the document to open it.
- A new menu will open at the bottom.
-
4
Tap Home. This is located at the top of the new menu.
- A pop-up menu will open.
-
5
Tap Layout. You can find this between Draw and Review.
-
6
Tap Margins. This is the first listing in the Layout tab.
-
7
Select a margin type. You’ll see a list of preset margins: Normal, Narrow, Moderate, Wide, and Mirrored. Tap a preset margin to apply it to your document. It should be applied immediately.
- If you don’t like how it looks, you can select Normal again, or pick a new preset.
- Be sure to save your document when you’re finished.
-
8
Create a custom margin (optional). Tap Custom Margins at the bottom of the Margins menu. You’ll be able to edit the margin sizes for: Top, Left, Bottom, and Right.
- Tap a margin to edit it.
- Tap the backspace button to erase the existing margin.
- Enter a new margin value.
- Tap Done in the top-right corner.
- Tap Margins → Custom Margins to edit another margin.
- The changes will be applied immediately.
Advertisement
Add New Question
-
Question
I want the page ruler. What can I do?

To get the ruler, go into the View tab (Word 2010 and newer) and select the Ruler checkbox.
-
Question
Can I ever allow one more letter on a line to finish a long word rather than wrap to the next line?
No. The only thing you could possibly do would be to make all the margins wider. Making only one word go to the next line is impossible unless you do the same for all words.
Ask a Question
200 characters left
Include your email address to get a message when this question is answered.
Submit
Advertisement
Thanks for submitting a tip for review!
-
Leaving the margin under .25″ may lead to text being cut off when printed.
Advertisement
About This Article
Article SummaryX
1. Open a Microsoft Word document.
2. Click the Layout tab.
3. Click Margins.
4. Click Custom Margins….
5. Set the margins.
6. Click the Apply to drop-down.
7. Select how to apply the margins.
8. Click OK.
Did this summary help you?
Thanks to all authors for creating a page that has been read 493,209 times.
Is this article up to date?

on
September 2, 2022, 8:00 AM PDT
How to align header or footer content to the left and right margins in Microsoft Word
Sometimes alignment tabs aren’t enough if the aligned text stretches to the other margin. When this is possible, use a table to control wrapping.
We may be compensated by vendors who appear on this page through methods such as affiliate links or sponsored partnerships. This may influence how and where their products appear on our site, but vendors cannot pay to influence the content of our reviews. For more info, visit our Terms of Use page.

The article How to align content to the left and right on the same line in a Word document, as the name suggests, shows you how to use a special tab to align content at the margins on the same line. You can do the same thing in a header, but there’s another way to align content to the left and right margin, and it has an advantage over the tab: You can automatically wrap content at the right margin so it doesn’t run into the content at the right margin.
In this tutorial, I’ll show you how to use a table to align content to the left and right margins in the header or footer in Microsoft Word. This technique works in the header, footer and body of the document, but I’ll work in the header. You can download the demo for this Word tutorial.
SEE: Google Workspace vs. Microsoft 365: A side-by-side analysis w/checklist (TechRepublic Premium)
I’m using Microsoft 365 on a Windows 10 64-bit system. Word for the web retains a header and you can even open it and modify it a bit. However, you can’t insert a table.
How to avoid a bad wrap in Word
When using a special tab to align content to the left and ring margins on the same line, you might run into a problem if the content at either margin is longer than one line can manage. Figure A shows a simple example of what you might run into. This happens because users don’t fully understand how to use alignment tabs in the header.
Figure A

By default, the header has two alignment tabs: center and right. We can best illustrate the default setup with a quick example:
- Open the header area by double-clicking the header space.
- Enter your name and then press Tab, which will move the cursor to the center of the header.
- Enter the date and press Tab again. This time, Word sets the cursor at the right margin.
- Enter Page 1. As you enter the content, the right-alignment tab pushes characters to the left of the margin.
As you can see in Figure B, you are able to use the center and right alignment tabs without doing a thing. This default comes with many benefits:
- You don’t have to set the alignment tabs.
- You can change the margins and the alignment tabs will accommodate.
- You can change the page orientation and the alignment tabs will accommodate.
- You can change the paper size and the alignment tabs will accommodate.
My advice is to use the default alignment tabs when possible.
Figure B

If the content at the left margin is so long that it wraps at the right margin, there is no way Word can keep the right aligned content on the first line (Figure A). Fortunately, there’s an alternative: Use a table.
How to use a table to align header content in Word
The problem at hand — text at the left margin that wraps at the right margin displacing right-aligned text on the same line — is rare. However, when it arises, you’ll want a quick and easy solution. In this case, we’ll insert a table that contains two columns, one for the content at the left margin and one for the right-aligned text, all on the same line. You could also add a third column for centered text.
To insert a table into the header, open the header area and do the following:
- Click the Insert tab.
- In the Tables group, click Table.
- In the resulting dropdown, draw a table with two columns and one row (Figure C).
- Drag the center border to the right to accommodate lots of text in the first column. To do so, hover over the border until the cursor turns into the double-arrow cursor. Then click and drag.
Figure C
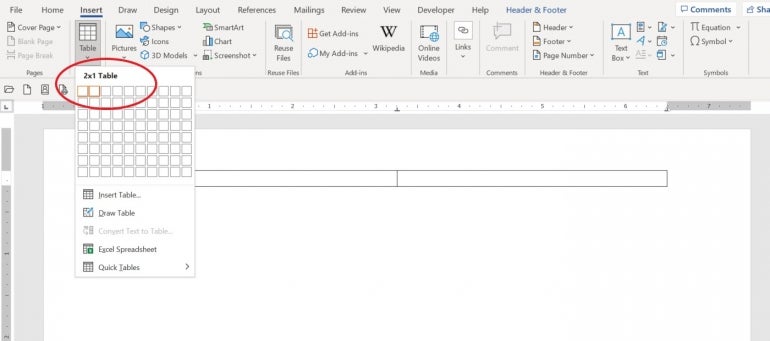
Figure D

With the table in place, you can control when the text on the left wraps to the next line, as you can see Figure D. However, you might not want to display the table borders. To turn off the borders, do the following:
- Select the table by clicking the movement handle in the top-left corner of the table.
- Click the Borders dropdown in the mini menu.
- Choose No Borders from the dropdown (Figure E).
Figure E

Figure F

As you can see in Figure F, the header now has no border lines. If someone were to open the header and start poking around, they’ll find the table, but viewers won’t see it.
If you add a table to a Word footer, you might see additional white space under the table. That’s because Word always includes a hard return after the table. To eliminate this extra white space, use Show/Hide in the Paragraph group on the Home tab to display hard return symbols. Select the symbol after the table in the footer and set a font size of 1. Doing so won’t eliminate the white space, but it will be so small that you won’t notice it.
Also See
-
Windows 11 cheat sheet: Everything you need to know
(TechRepublic) -
Windows PowerToys: A cheat sheet
(TechRepublic) -
Microsoft 365 Services Usage Policy
(TechRepublic Premium) -
Best software for businesses and end users
(TechRepublic on Flipboard)
-
Microsoft
-
Software
What’s the difference between aligning to a page and align margin in Word documents?
Quite often, there’s no practical difference between ‘Align Page’ and ‘Align Margin’ in Word.
These options appear when positioning an object on a page and other places. Centering an object has to be done compared to some defined ‘edge’ of a document. For example, the Layout options for positioning an image, shape or other object.
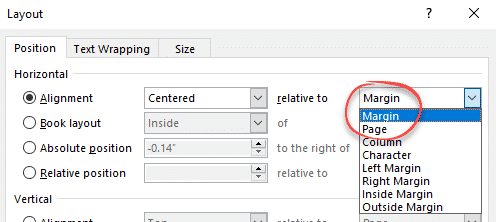
Word understands two document edges:
Physical page edge (like Letter or A4) defined at Layout | Size.
Margins or internal border within the physical page, defined at Layout | Margins. Most printers can’t print to the very edge of a sheet, the margins define where the printing can go.

Most margin settings are equal on both sides (e.g Normal, Narrow, Moderate and Wide). Left/Right distance from edge are the same, as are the Top/Bottom settings.
For all those equal each side margins there’s no practical difference between Align Page and Align Margin. The object will be in the same place either way.
A lot of modern Word documents have equal margins because they are letters, reports or online documents.
When the margins are NOT equal, Align Page is very different from Align Margin.
Mirror or unequal margins
Once you start formatting for a bound publication like a book or magazine, the margins are unequal.
Instead of Left and Right margins, there are ‘Inside’ and ‘Outside’ margins.
Inside margin is wider, to allow space for the binding or spine.

Word calls these ‘mirror margins’ or ‘Book fold’. Odd numbered pages have the Inside margin on the left. Even numbered pages have Inside margin on the right.
Margins for Teachers
Sometimes the extra space margin isn’t for binding. Teachers often insist on a wider margin on one side for their remarks on student essays. Here’s a wide 3” right margin setup as it appears in the Word ruler and Page Setup | Margins.

Gutter Margin
Similar to Mirror Margins is the gutter setting. The gutter is space for the binding, shown here in yellow.
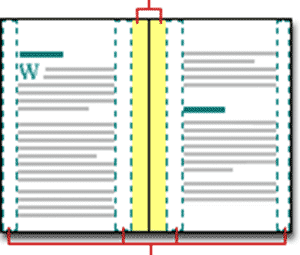
Gutter is separate from the left/right margins. Use Gutter to allow binding space without changing the margins in an existing document.
Gutter is available if you’re not using Mirror margins, Book Fold or ‘2 pages per sheet’.
What to choose: Align Margin or Align Page?
The safer option is ‘Align Margin’ because Word will automatically reposition the image, shape or other object even if the margins are unexpectedly changed.
If you align to page and the document is switched between single sheet to bound formats (equal vs mirror margins) then a lot of the positioning will be wrong.
Change Margins in Word
Simple Drop Caps in Word
Table Cell Margins and Spacing Options in Word
Easy way to change page size and margins in OneNote
Select Layout > Margins. Select Custom Margins. In Margins, use the Up and Down arrows to enter the values you want. Select OK when done.
Change default margins
- Select Layout > Margins > Custom Margins.
- Set your margins.
- Select Set As Default.
- Confirm your selection.
Contents
- 1 How do you create margins in Word?
- 2 How do you do 2.54 Margins in Word?
- 3 How do I make 1.0 Margins in Word?
- 4 How do I drag margins in Word?
- 5 How do you scale a Word document?
- 6 What is computer line spacing?
- 7 How do I set 25mm Margins in Word?
- 8 What does 2.54 cm Margins mean?
- 9 What are 2.54 cm Margins?
- 10 What is 1.5 spacing word?
- 11 How do you make a 0.5 inch border in Word?
- 12 What should margins be set at?
- 13 How do you align paragraphs in Word?
- 14 How do I set margins in Word 2010?
- 15 Where do I find page layout in Word?
- 16 How do you change page width in Word?
- 17 How do you scale a document to size?
- 18 How do I make no space between lines in Word?
- 19 What is Page margin?
- 20 What is the command for adjusting paper size?
How do you create margins in Word?
Creating a 4 inch margin in Word
- Place the cursor at the top of the first page (Ctrl+Home)
- Click Page Layout > Margins > Custom Margins.
- In the Page Setup Window, type “4” into the Top Margin input box.
- Click OK.
Change inches to centimeters and vice versa
- On the File tab, click Options:
- In the Word Options dialog box, on the Advanced tab, under Display, in the Show measurements in units of drop-down list, choose the measurement units you need:
- Click OK.
- Note: Be careful, 1 cm = 0.3937 inch and 1 inch = 2.54 cm.
How do I make 1.0 Margins in Word?
Click the Page Layout tab. Click Margins, then click Custom Margins. Enter your desired default margins into the Top, Left, Bottom, and Right fields, then click Set as Default. Click Yes to confirm the new default margins.
How do I drag margins in Word?
Move the mouse pointer over the Left Indent icon on the Ruler (the top icon), hold down the left mouse button, and drag (move) the mouse to the right to adjust the left paragraph margin. Word displays a dotted vertical line to show you where the paragraph’s new left margin will be.
How do you scale a Word document?
Here’s how:
- Open the document containing the announcement.
- Press [Ctrl]P.
- In the Zoom section, click the Scale To Paper Size drop-down arrow.
- Scroll to and select the desired sheet size.
- Enter how many copies you want and then click OK.
What is computer line spacing?
Line spacing determines the amount of vertical space between lines of text in a paragraph. By default, lines are single-spaced, meaning that the spacing accommodates the largest font in that line, plus a small amount of extra space.
How do I set 25mm Margins in Word?
To set margins in Word, first click the “Layout” tab in the Ribbon. Then click the “Margins” drop-down button in the “Page Setup” button group. In this drop-down is a “Last Custom Setting” option, six preset margin choices, and a “Custom Margins” command.
What does 2.54 cm Margins mean?
Page Margins are the space between the edge of the paper and where your text is printed. They allow you to control where your text is printed on a page.When your document is set to A4 paper, Microsoft Word sets the TOP and BOTTOM margins to 2.54 cm (1 inch) and the LEFT and RIGHT margins to 3.17 cm (1.25 inches).
What are 2.54 cm Margins?
1 inch = 2.54 centimeters. . 75 inches = 1.905 centimeters.
What is 1.5 spacing word?
Press Ctrl+1 for single-spacing, Ctrl+5 for 1.5 spacing, or Ctrl+2 for double-spacing. Click to view larger image.
How do you make a 0.5 inch border in Word?
Add a border
Click the Page Layout tab. In Word 2013 and 2016, click the Design tab instead. In the Page Background group, click the Page Borders option. In the Borders and Shading window (shown below), if not already selected, click the Page Border tab.
What should margins be set at?
The top, bottom, and right margins are required to be 1 inch, but the left margin can either be 1 inch or 1.25 inches. All body text, tables, figures, appendices content, and any copies of published chapters must fit within the required 1-inch margins on all sides.
How do you align paragraphs in Word?
Change text alignment
- Place the insertion point anywhere in the paragraph, document, or table that you want to align.
- Do one of the following: To align the text left, press Ctrl+L. To align the text right, press Ctrl+R. To center the text, press Ctrl+E.
How do I set margins in Word 2010?
How to Change Page Margins in Microsoft Word 2010
- Open your document in Word 2010.
- Select the Page Layout tab.
- Click the Margins button.
- Choose the desired page margin setting.
Where do I find page layout in Word?
Click Page Layout tab
- Click Page Layout tab.
- Move to Page Setup group.
- Click the little square with an arrow in the right bottom of the group.
- The Page Setup window pops up.
How do you change page width in Word?
Change the paper size for all pages
- On the Format menu, click Document.
- Click Page Setup.
- On the Paper Size pop-up menu, select a paper size.
- Click OK.
- On the Apply to pop-up menu, click Whole document, and then click OK.
How do you scale a document to size?
Scaling Your Output
- Load the document you want to print.
- Press Ctrl+P. Word displays the Print dialog box.
- Use the Scale to Paper Size drop-down list (lower-right corner) to specify the paper on which your document will be printed.
- Specify any other printing options, as desired.
- Click on OK to print your document.
How do I make no space between lines in Word?
Change the line spacing in Word
- Select Design > Paragraph Spacing.
- Hover the cursor over each option to see a preview, and then select the option you want. For single spacing, select No Paragraph Space.
What is Page margin?
In typography, a margin is the area between the main content of a page and the page edges. The margin helps to define where a line of text begins and ends.(Any space between columns of text is a gutter.) The top and bottom margins of a page are also called “head” and “foot”, respectively.
What is the command for adjusting paper size?
To do this, go to Layout > Size > More Paper Sizes. In the “Page Setup” dialog box, click “Paper,” and then click the drop-down arrow next to “Paper Size.” Select the paper size you want to make the default for all future documents.