
Align text horizontally
-
In the text box, select the text that you want to change the horizontal alignment for.
-
On the Home tab, click the alignment option that you want
 .
.
 .
.Align text vertically
You can align all the text in a text box with the top, middle, or bottom of the text box.
-
Click the outer edge of the text box to select it.
-
On the Shape Format tab, click Format Pane.
-
Click the Shape Options tab if it isn’t already selected.
-
Click the text box icon
, and then click Text Box. -
Choose Top, Middle, or Bottom from the Vertical alignment drop-down list.
 , and then click Text Box.
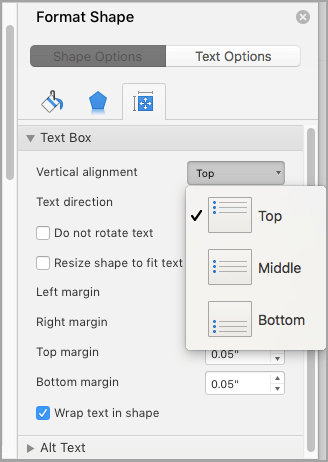
Adjust the text box margins
-
Click the outer edge of the text box to select it.
-
On the Shape Format tab, click Format Pane.
-
Click the Shape Options tab if it isn’t already selected.
-
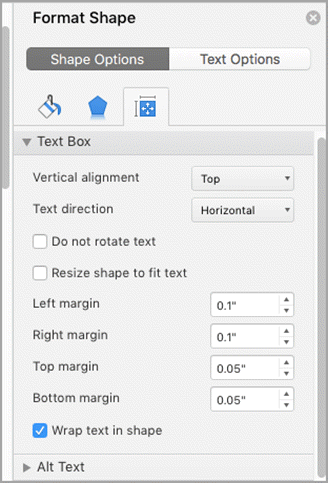
Click the text box icon
, and then click Text Box. -
You can adjust the left, right, top, and bottom margins.
Important:
Office for Mac 2011 is no longer supported. Upgrade to Microsoft 365 to work anywhere from any device and continue to receive support.
Upgrade now
Align text horizontally
-
In the text box, select the text that you want to change the horizontal alignment for.
-
On the Home tab, under Paragraph, click the alignment option that you want
.
Align text vertically
You can align all the text in a text box with the top, middle, or bottom of the text box.
-
Click the outer edge of the text box to select it.
-
Click the Format tab (the purple contextual tab that appears next to the Home tab), and then under Text Box, click Change text alignment within the text box
. -
Click the alignment option that you want.
 .
.Adjust the text box margins
-
Click the outer edge of the text box to select it.
-
On the Format menu, click Shape.
-
In the left pane of the Format Shape dialog box, click Text Box.
-
Under Internal Margin, adjust the measurements to increase or decrease the distance between the text and the outer border of the text box.
To align left, press Ctrl + L. To align right, press Ctrl + R. To align center, press Ctrl + C. To justify, Ctrl + J.
Contents
- 1 How do I align left margin in Word?
- 2 What is the shortcut key for Align text Left?
- 3 How do you type left to right in Word?
- 4 How do you align left and right text in Word?
- 5 What does left justified look like?
- 6 What is flush left in Word?
- 7 How do I turn on alignment guides in Word?
- 8 How do you write left to right?
- 9 How do you move a column to the left and right in Word?
- 10 How do you type left to right in Word on a Mac?
- 11 What are the 4 alignment options?
- 12 What is left aligned text?
- 13 What is left adjust?
- 14 Should be left justified?
- 15 How do you flush left?
- 16 How do you align both left and right?
- 17 Is APA justified or left aligned?
- 18 How do I show alignment lines in Word?
- 19 How do you use the word alignment?
- 20 What are alignment guides in Word?
How do I align left margin in Word?
For example, in a paragraph that is left-aligned (the most common alignment), text is aligned with the left margin. In a paragraph that is justified, text is aligned with both margins.
Align text left, center, or right.
| To | Click |
|---|---|
| Align text left | Align Text Left |
| Center text | Center Text |
| Align text right | Align Text Right |
What is the shortcut key for Align text Left?
Ctrl+L
Frequently used shortcuts
| To do this | Press |
|---|---|
| Center the text. | Ctrl+E |
| Align the text to the left. | Ctrl+L |
| Align the text to the right. | Ctrl+R |
| Cancel a command. | Esc |
How do you type left to right in Word?
You can change the text direction from within a Microsoft Office program by choosing the Right-to-left paragraph button in the Paragraph group on the Home tab (this only appears if you have a right-to-left language enabled).
How do you align left and right text in Word?
Align the text left or right
- Select the text that you want to align.
- On the Home tab, in the Paragraph group, click Align Left or Align Right .
What does left justified look like?
If printed text is left-justified, each line begins at the same distance from the left-hand edge of the page or column.
What is flush left in Word?
In English and most European languages where words are read left-to-right, text is usually aligned ‘flush left’, meaning that the text of a paragraph is aligned on the left-hand side while the right-hand side is ragged.
How do I turn on alignment guides in Word?
Turn on the snap-to options
- Select a chart, picture, or object in the document.
- On the right end of the ribbon, select Format > Align > Grid Settings. The Grid and Guides dialog box appears.
- Turn on one or both of these options: Option. Description. Snap objects to grid when the gridlines are not displayed.
How do you write left to right?
In a right-to-left, top-to-bottom script (commonly shortened to right to left or abbreviated RTL), writing starts from the right of the page and continues to the left, proceeding from top to bottom for new lines.
How do you move a column to the left and right in Word?
To move a row or column using the mouse, follow these steps:
- Select the entire row or column that you want to move.
- Click on the highlighted row or column and hold down the mouse button.
- Drag the row or column to the place where you want it to be.
- Release the mouse button.
How do you type left to right in Word on a Mac?
Use bidirectional keyboard shortcuts
- Change selected text to left to right: Press Command-Option-Control-Right Arrow.
- Change selected text to right to left: Press Command-Option-Control-Left Arrow.
- Change selected text to the default direction: Press Command-Option-Control-Down Arrow.
What are the 4 alignment options?
There are four main alignments: left, right, center, and justified. Left-aligned text is text that is aligned with a left edge. Right-aligned text is text that is aligned with a right edge.
What is left aligned text?
Left-aligned text is text that is aligned with a left edge. Right-aligned text is text that is aligned with a right edge. Centered text is text that is centered between two edges.
What is left adjust?
Updated: 08/02/2020 by Computer Hope. Left align, left alignment, or left justify is text, pictures, graphics, or page formatting that aligns text along the left side of a page or containing element. This text has a ragged right edge because it is left-aligned instead of being right aligned.
Should be left justified?
Margins: All page margins (top, bottom, left, and right) should be 1 inch. All text should be left-justified. Indentation: The first line of every paragraph should be indented 0.5 inches.
How do you flush left?
Flush Left (FL) – Text Alignment
Your entire document should be aligned with the left margin (flush left). Your text should appear with a straight and even edge on the left side and ill be uneven on the right side.
How do you align both left and right?
Figure B
- On the Home tab, click the Paragraph group’s dialog launcher and then click Tabs in the bottom-left corner.
- Enter 6.5 in the Tab stop position.
- Click Right in the Alignment section (Figure C).
- Click Set.
- Click OK.
Is APA justified or left aligned?
Align the text of an APA Style paper to the left margin. Leave the right margin uneven, or “ragged.” Do not use full justification for student papers or manuscripts being submitted for publication.
How do I show alignment lines in Word?
Click the shape or object in the document. Under Drawing Tools on the Format tab, in the Arrange group, click Align, and then click View Gridlines.
How do you use the word alignment?
Examples of alignment in a Sentence
The school has to bring its programs into alignment with state requirements. New alignments have been created within the political party. These example sentences are selected automatically from various online news sources to reflect current usage of the word ‘alignment.
What are alignment guides in Word?
Microsoft Word is equipped with live layout and alignment guides to help you align, resize, and move objects. The example below draws a shape and lines it up using the alignment tool. 1. In the “Insert” tab, click “Shape” and select a shape to draw.

on
September 2, 2022, 8:00 AM PDT
How to align header or footer content to the left and right margins in Microsoft Word
Sometimes alignment tabs aren’t enough if the aligned text stretches to the other margin. When this is possible, use a table to control wrapping.
We may be compensated by vendors who appear on this page through methods such as affiliate links or sponsored partnerships. This may influence how and where their products appear on our site, but vendors cannot pay to influence the content of our reviews. For more info, visit our Terms of Use page.

The article How to align content to the left and right on the same line in a Word document, as the name suggests, shows you how to use a special tab to align content at the margins on the same line. You can do the same thing in a header, but there’s another way to align content to the left and right margin, and it has an advantage over the tab: You can automatically wrap content at the right margin so it doesn’t run into the content at the right margin.
In this tutorial, I’ll show you how to use a table to align content to the left and right margins in the header or footer in Microsoft Word. This technique works in the header, footer and body of the document, but I’ll work in the header. You can download the demo for this Word tutorial.
SEE: Google Workspace vs. Microsoft 365: A side-by-side analysis w/checklist (TechRepublic Premium)
I’m using Microsoft 365 on a Windows 10 64-bit system. Word for the web retains a header and you can even open it and modify it a bit. However, you can’t insert a table.
How to avoid a bad wrap in Word
When using a special tab to align content to the left and ring margins on the same line, you might run into a problem if the content at either margin is longer than one line can manage. Figure A shows a simple example of what you might run into. This happens because users don’t fully understand how to use alignment tabs in the header.
Figure A

By default, the header has two alignment tabs: center and right. We can best illustrate the default setup with a quick example:
- Open the header area by double-clicking the header space.
- Enter your name and then press Tab, which will move the cursor to the center of the header.
- Enter the date and press Tab again. This time, Word sets the cursor at the right margin.
- Enter Page 1. As you enter the content, the right-alignment tab pushes characters to the left of the margin.
As you can see in Figure B, you are able to use the center and right alignment tabs without doing a thing. This default comes with many benefits:
- You don’t have to set the alignment tabs.
- You can change the margins and the alignment tabs will accommodate.
- You can change the page orientation and the alignment tabs will accommodate.
- You can change the paper size and the alignment tabs will accommodate.
My advice is to use the default alignment tabs when possible.
Figure B

If the content at the left margin is so long that it wraps at the right margin, there is no way Word can keep the right aligned content on the first line (Figure A). Fortunately, there’s an alternative: Use a table.
How to use a table to align header content in Word
The problem at hand — text at the left margin that wraps at the right margin displacing right-aligned text on the same line — is rare. However, when it arises, you’ll want a quick and easy solution. In this case, we’ll insert a table that contains two columns, one for the content at the left margin and one for the right-aligned text, all on the same line. You could also add a third column for centered text.
To insert a table into the header, open the header area and do the following:
- Click the Insert tab.
- In the Tables group, click Table.
- In the resulting dropdown, draw a table with two columns and one row (Figure C).
- Drag the center border to the right to accommodate lots of text in the first column. To do so, hover over the border until the cursor turns into the double-arrow cursor. Then click and drag.
Figure C
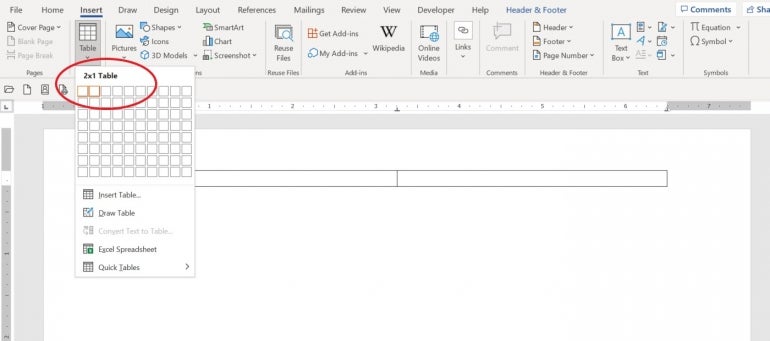
Figure D

With the table in place, you can control when the text on the left wraps to the next line, as you can see Figure D. However, you might not want to display the table borders. To turn off the borders, do the following:
- Select the table by clicking the movement handle in the top-left corner of the table.
- Click the Borders dropdown in the mini menu.
- Choose No Borders from the dropdown (Figure E).
Figure E

Figure F

As you can see in Figure F, the header now has no border lines. If someone were to open the header and start poking around, they’ll find the table, but viewers won’t see it.
If you add a table to a Word footer, you might see additional white space under the table. That’s because Word always includes a hard return after the table. To eliminate this extra white space, use Show/Hide in the Paragraph group on the Home tab to display hard return symbols. Select the symbol after the table in the footer and set a font size of 1. Doing so won’t eliminate the white space, but it will be so small that you won’t notice it.
Also See
-
Windows 11 cheat sheet: Everything you need to know
(TechRepublic) -
Windows PowerToys: A cheat sheet
(TechRepublic) -
Microsoft 365 Services Usage Policy
(TechRepublic Premium) -
Best software for businesses and end users
(TechRepublic on Flipboard)
-
Microsoft
-
Software
Apply Left, Center, Right or Justify Alignment to Text in Microsoft Word
by Avantix Learning Team | Updated April 13, 2022
Applies to: Microsoft® Word® 2010, 2013, 2016, 2019, 2021 and 365 (Windows)
You can align or justify text or other content in Word in several ways including using keyboard shortcuts, selecting commands in the Ribbon, using the Paragraph dialog box or modifying a style. It’s important to note that alignment or justification is paragraph formatting so applies to entire paragraphs. You can align text or inline graphics in paragraphs that are followed by a hard return (you pressed Enter or Return).
To see where paragraphs have been created in a Word document, it’s helpful to turn on Show/Hide ¶ on the Home tab in the Ribbon.
In this article, we’ll review 4 different ways to change horizontal alignment or justification in Word documents.
Recommended article: How to Insert a Line in Word (3+ Ways)
Do you want to learn more about Microsoft Word? Check out our virtual classroom or in-person Word courses >
There are 4 types of alignment that can be applied to paragraphs:
- Align left – aligns text or inline graphics with the left margin or indent
- Center – centers text or inline graphics between the left and right margins or indents
- Align right – aligns text or inline graphics with the right margin or indent
- Justify – distributes text evenly between the left and right margins or indents
A paragraph aligns within the indents (indent markers appear on the Ruler). The indents may be different from the margins. Paragraphs are also entered in cells in tables and each paragraph in a cell may have different indents and alignment settings.
1. Align or justify using keyboard shortcuts
To align or justify paragraphs using keyboard shortcuts:
- Align left – select the paragraph(s) and press Ctrl + L to align to the left.
- Align right – select the paragraph(s) and press Ctrl + R to align to the right.
- Align center – select the paragraph(s) and press Ctrl + E to align center.
- Justify – select the paragraph(s) and press Ctrl + J to justify.
2. Align or justify using the Ribbon
To align or justify paragraphs using the Word Ribbon
- Select the paragraph(s) to which you want to apply alignment or justification. If you would like to select all paragraphs, press Ctrl + A.
- Click the Home tab in the Ribbon and then click Align Left, Center, Align Right or Justify in the Paragraph group.
Align and Justify commands appear on the Home tab in the Ribbon in the Paragraph group:
![]()
3. Align or justify using the Paragraph dialog box
To align or justify paragraphs using the Paragraph dialog box:
- Select the paragraph(s) to which you want to apply alignment or justification. If you would like to select all paragraphs, press Ctrl + A.
- Right-click and select Paragraph. The Paragraph dialog box appears.
- From the Alignment drop-down menu, select Left, Center, Right or Justify.
- Click OK.
You can also display the Paragraph dialog box by clicking the Home tab in the Ribbon and then clicking the dialog box launcher on the bottom right of the Paragraph group.
The Paragraph dialog box includes a drop-down menu to select Alignment:
4. Align or justify by modifying a style
When you create a new blank document, it starts out using the Normal style which contains default paragraph and character formatting.
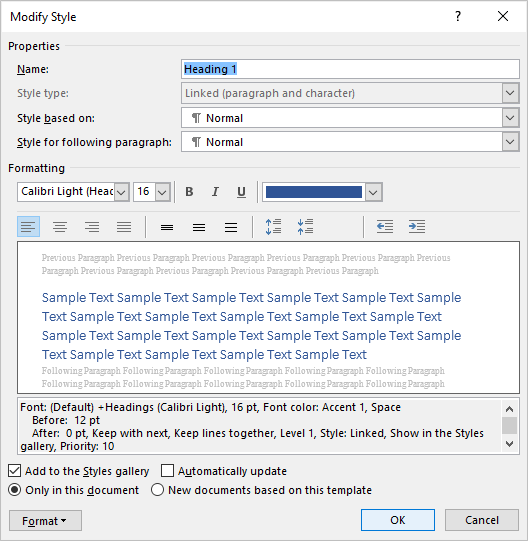
If you want to apply alignment or justification to multiple paragraphs throughout a document (such as a heading), you can modify a style (such as Heading 1).
To change the alignment for a heading style (such as Heading 1):
- Click in a paragraph using the heading style (typically applied through the Home tab in the Ribbon).
- Click the Home tab in the Ribbon.
- In the Styles group, right-click the heading style. A dialog box appears.
- Click Format. A drop-down menu appears.
- Click Paragraph. The Paragraph dialog box appears.
- From the Alignment drop-down menu, select Center or your preferred alignment.
- Click OK twice.
Below is the Modify Style dialog box with align and justify commands:
There may be issues if you modify alignment or justification in the Normal style since other styles are based on this style by default. Cells in tables would likely be affected and so would other styles that are based on the Normal style (such as Header, Footer and Heading styles). Paragraphs using these styles would then inherit the alignment or justification (unless alignment or justification has been specifically modified in these styles). If you are comfortable using styles, you could create your own style or modify a different Word style to avoid this issue.
Subscribe to get more articles like this one
Did you find this article helpful? If you would like to receive new articles, join our email list.
More resources
How to Double Space in Word (4 Ways + Shortcut)
How to Hide Comments in Word (or Display Them)
How to Find and Replace in Word (and Use Wildcards)
How to Create a Hanging or First Line Indent in Word (3 Ways)
How to Superscript or Subscript in Microsoft Word (with Shortcuts)
Related courses
Microsoft Word: Intermediate / Advanced
Microsoft Excel: Intermediate / Advanced
Microsoft PowerPoint: Intermediate / Advanced
Microsoft Word: Long Documents Master Class
Microsoft Word: Styles, Templates and Tables of Contents
Microsoft Word: Designing Dynamic Word Documents Using Fields
VIEW MORE COURSES >
Our instructor-led courses are delivered in virtual classroom format or at our downtown Toronto location at 18 King Street East, Suite 1400, Toronto, Ontario, Canada (some in-person classroom courses may also be delivered at an alternate downtown Toronto location). Contact us at info@avantixlearning.ca if you’d like to arrange custom instructor-led virtual classroom or onsite training on a date that’s convenient for you.
Copyright 2023 Avantix® Learning
Microsoft, the Microsoft logo, Microsoft Office and related Microsoft applications and logos are registered trademarks of Microsoft Corporation in Canada, US and other countries. All other trademarks are the property of the registered owners.
Avantix Learning |18 King Street East, Suite 1400, Toronto, Ontario, Canada M5C 1C4 | Contact us at info@avantixlearning.ca
No matter what you are writing, a fictional book, a story for kids, a user manual, or
a technical report, jumping between the text and ribbon buttons for formatting distracts
from the work. Shortcut Keys or Hotkeys for changing the paragraph alignment,
style, etc. without mouse movements come to rescue.
Aligning Paragraphs
To align paragraphs, follow these steps:
1. Position the insertion point into the paragraph or
select the paragraphs that you want to align.
2. Do one of the following:
- Click the alignment button on the Home tab, in the Paragraph group
to align left/right, center, or justify the paragraph text or press one of the
shortcut keys:
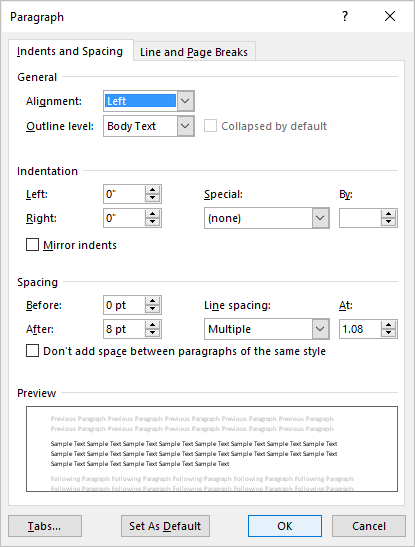
- Choose Paragraph… from the shortcut menu (right-click or press Shift+F10), to
display the Paragraph dialog box:
On the Indents and Spacing tab, choose the alignment option from the Alignment
list and then click OK:


Adjusting line spacing
To adjust spacing between lines, follow these steps:
1. Position the insertion point in the paragraph or
select the paragraphs that you want to adjust.
2. Do one of the following:
- On the Home tab, in the Paragraph group, click Line Spacing Options…:

- Choose Paragraph… from the shortcut menu to open the Paragraph dialog box. On the
Indentation and Spacing tab, in the Line Spacing list box, choose one of the options:- Single — Single-line spacing. (Line height automatically adjusts to accommodate the
size of the font and any graphics or formulas in a line.) - 1.5 Lines — Line-and-one-half spacing (an extra half-line of space between lines).
- Double — Double-spacing (an extra full line of space between lines).
- At Least — At least the spacing that you specify in the At
box-the line won’t be smaller than you specify, but it may be higher because
Word will add extra spacing for
tall characters, big graphics, and superscript or subscript text. - Exactly — The exact spacing that you specify in the At box. All lines
have the exact same height, regardless of the size of the characters in the line; Word
doesn’t add extra spacing. Note that some text may be cut off if not enough space is
available. - Multiple — Multiples of single-line spacing, such as triple (3) or quadruple (4), as
specified in the At box.
To specify a custom line spacing, type the spacing amount that you want in the At box. For
example, enter 1.25 for an extra quarter line of space between lines, or click the up or
down arrow to increase or decrease the amount in half-line increments. When you finish, click
OK. - Single — Single-line spacing. (Line height automatically adjusts to accommodate the
- Press one of the shortcut key combinations:
- Ctrl+l — Single-spacing
- Ctrl+5 — 1.5-line spacing
- Ctrl+2 — Double-spacing
- Ctrl+0 (zero) — Add or remove 12 points of space before a paragraph.

Apply paragraph styles
To change paragraph styles, follow these steps:
1. Position the insertion point into the paragraph or select the
paragraphs that you want to change.
2. Do one of the following:
- Choose the style in the in the Styles group, on the Home tab:

- Press one of the shortcut key combinations:
- Alt+Ctrl+1 — Apply the Heading 1 style
- Alt+Ctrl+2 — Apply the Heading 2 style
- Alt+Ctrl+3 — Apply the Heading 3 style
- Ctrl+Shift+N — Apply the Normal style
- Ctrl+Shift+L — Apply the List style

Remove paragraph formatting by pressing Ctrl+Q to revert the text format to the current style’s
default settings or Ctrl+Shift+N to apply the Normal style to the paragraph.
See also this tip in French:
Comment changer le format de paragraphe avec les raccourcis claviers.