
Resolution
What are Styles?
Built-in styles are combinations of formatting characteristics that you can apply to text to quickly change its appearance. For example, applying the Heading 1 style might make text bold, Arial, and 16 point, and applying the Heading 2 style makes text bold, italic, Arial, and 14 point. (Those are examples; exact formatting characteristics depend on Word’s default settings and those you might have chosen for yourself.)
Here are the top 5 reasons to use Word Styles:
1. Styles application means easy Table of Contents generation
The easiest way to create a table of contents is to use the built-in heading styles. You can also create a table of contents that is based on the custom styles that you have applied. Or you can assign the table of contents levels to individual text entries.
Mark entries by using built-in heading styles
-
Select the text that you want to appear in the table of contents.
-
On the Home tab, in the Styles group, click the style that you want.
For example, if you selected text that you want to style as a main heading, click the style called Heading 1 in the Quick Style gallery.
-
If you don’t see the style that you want, click the arrow to expand the Quick Style gallery.
-
If the style that you want does not appear in the Quick Style gallery, press CTRL+SHIFT+S to open the Apply Styles task pane. Under Style Name, click the style that you want.
2. Styles cascade and so when you make one change to a document you have made them all
Instead of using direct formatting, use styles to format your document so you can quickly and easily apply a set of formatting choices consistently throughout your document.
For more information see Style basics in Word
3. Styles allow you to use Outline View
When you enter your first top-level outline entry, Word automatically formats it with a built-in style, Heading 1. As you continue to build your outline by adding subordinate and body levels, Word in turn continues to apply the appropriate built-in style to each heading and body text entry. In this way, your outline levels (Level 1, Level 2, Body Text, and so on) are directly tied to built-in heading styles (Heading 1, Heading 2, Normal, and so on).
While you can manually change the formatting of text in your outline, veering away from the built-in styles that Word offers can result in some outline entries not being displayed correctly. So if you want to change formatting across your document, you might want to do so in another view, such as print layout view, once your outline is complete.
On the opposite end of the spectrum, if you find extra formatting distracting, you can display your entire outline as plain text by clicking Show Formatting on the Outlining toolbar.
4. Restrict formatting changes
5. Templates are much more efficient and kinder to others if they’re based on styles
A template is a Microsoft Office document that’s been designed with pre-existing themes, styles, and layouts, which has placeholder information instead of real content.
Templates are a great way to save time and create consistent Office 2010 documents. They are especially valuable for types of documents that you use frequently, such as weekly presentations, application forms, and expense reports. If possible, you want to use a file that already has the look and feel that you want, with placeholders that you can change to tailor it for your current needs. That’s what a template is—a file where the hard work has been done for you, saving you from having to start with a blank page.
In addition to the templates that come with the program, you have free access to all the templates on Office.com
Need more help?
The Styles advantage in Word
- Styles application means easy Table of Contents generation.
- Styles cascade and so when you make one change to a document you have made them all.
- Styles allow you to use Outline View.
- Restrict formatting changes.
- Templates are much more efficient and kinder to others if they’re based on styles.
What are advantages of using styles?
Styles allow you to easily apply consistent formatting to documents, as well as to quickly change existing formatting. In addition, the use of styles provides a structure to your document that can be discerned by a screen reader.
What are styles What are the advantages of using styles in open office?
When you apply a style, you apply a whole group of formats at the same time. For example, a style defines the font, type size, indents and spacing, tab stops, and other characteristics of text; and the area fill and line style of a frame or other object. Using styles gives you more control over the entire presentation.
What are styles used for in Word?
A style is a predefined combination of font style, color, and size that can be applied to any text in your document. Styles can help your documents achieve a more professional look and feel. You can also use styles to quickly change several things in your document at the same time.
How do I link two headings in Word?
Add the link
- Select the text or object you want to use as a hyperlink.
- Right-click and then click Hyperlink .
- Under Link to, click Place in This Document.
- In the list, select the heading or bookmark that you want to link to.
How do I add another bullet on the same line?
How to insert multiple bullets in a single line in Word document?
- Click Insert > Table.
- Fill the cells with words and select the whole table with clicking the button.
- Click Home > Bullets, and choose a bullet from the drop-down menu.
- Keep the table selected, click Home > Borders > No Border to hide the table borders.
How do you use multilevel list in Word 2007?
To change the look of a list with many levels, follow these steps.
- Locate the Multilevel List button.
- Click the Multilevel List button.
- Click the Define New Multilevel List link at the bottom of the Multilevel List gallery.
- Select the level you want to work with.
- Select a numbering format to use for that level.
Why is numbering in Word so difficult?
Doing it by the numbers If you have ever wrestled with numbering in Microsoft Word, you are not alone! Numbering can be difficult to understand because, ironically, Word attempts to make it simple by ‘hiding’ the way it works. Unfortunately, this means that, when it goes wrong, you do not know how to fix it.
How do you fix Bullets and Numbering in Word?
Turn on or off automatic bullets or numbering
- Go to File > Options > Proofing.
- Select AutoCorrect Options, and then select the AutoFormat As You Type tab.
- Select or clear Automatic bulleted lists or Automatic numbered lists.
- Select OK.
Is Microsoft Word user friendly?
Microsoft Word is user-friendlier than Google Docs, in my opinion. It has always been easier for me to use Word than Google Docs, and some features you’ll find in Word cannot be found on Google Docs. However, Word is not for free, which is probably also the reason why it got additional features.
How do you do numbering?
Practice: Use the Numbering Toolbar Button
- Click the Numbering button on the Formatting toolbar.
- Type some text and press ENTER.
- Type several additional items pressing ENTER after each item.
- Press ENTER twice to turn off numbering.
- Click the Numbering button to continue with the next sequential number in the list.
How do I create a multi level numbering in Word 2016?
Define a new list style
- Select the text or numbered list you want to change.
- On the Home tab, in the Paragraph group, click the arrow next to Multilevel List.
- Specify a name for your new list style.
- Choose the number to start the list at.
- Choose a level in the list to apply your formatting.
What is the difference between Heading 1 and Heading 2 in Word?
Usually, the topic heading at the top of your page will be Heading 1. The headings of sections within the document will have Heading 2 styles. Headings within a level 2 section will have Heading 3 styles.
What is a subheading used for?
A subheading, or subhead, are mini-headlines and play a huge role in capturing and holding the scanners attention. It also keeps them moving down the page from one subhead to the next. Subheadings are smaller in size than the main headline but larger than the text of your article. They’re meant to stand out.
Did the title and subheading help you read faster?
Use your brand name in titles. Using heading and subheading tags makes it easier for search engines to read and understand your content. Using headings and subheadings helps users navigate your text, which makes it easier to digest.
What is the difference between a subtitle and a subheading?
As nouns the difference between subtitle and subheading is that subtitle is a heading below or after a title while subheading is any of the headings under which each of the main divisions of a subject may be subdivided.
How do I get more styles in Word?
Create a new style based on document formatting
- Right-click the text on which you want to base a new style.
- In the mini toolbar that appears, click Styles, and then click Create a Style.
- In the Create New Style from Formatting dialog box, give your style a name and click OK.
What is the title style in Word?
In Word, a style is a collection of formatting instructions. You use styles to format the paragraphs in your document. So you would use the “Title” style for your title, “Body Text” style for body text, “Caption” style for the picture captions, and “Heading 1” for the major headings. Q.
Can Up Text Effect word?
Add an effect to text
- Select the text that you want to add an effect to.
- On the Home tab, in the Font group, click Text Effect.
- Click the effect that you want. For more choices, point to Outline, Shadow, Reflection, or Glow, and then click the effect that you want to add.
How do I make a good title in Word?
Create a title style in Word to save time and mouse clicks
- Open a blank document and type Title.
- Select Title and click the Bold and Center buttons on the Formatting toolbar or Home tab.
- Change the font to 22 points.
- Click anywhere in your title text.
- Go to View | Task Pane, click the arrow in the New Document box, and select Styles And Formatting.
How do you use titles in Word?
The simplest way to add headings is to use heading styles.
- Select the text you want to use as a heading.
- On the Home tab, click the heading style you want to use. If you don’t see the style you want, click a left, right, or down arrow to see more available styles.
What is Title Bar in MS Word?
It lies next to the Quick Access Toolbar. It displays the title of the currently open document or application. It is present on almost all windows displayed on your computer.
What are the bars in MS Word?
Although window elements are fully explained in our Windows course, here is a brief explanation of the Word window.
- Title bar. This displays the document name, followed by a program name.
- Menu bar.
- Standard toolbar.
- Formatting toolbar.
- Ruler.
- Insertion point.
- End-of-document marker.
- Help.
What is the normal appearance of a document in MS Word?
With word, you can display your document in one of five views: Normal, Outline, Page Layout, or Online Layout. Normal view is the most often used and shows such formatting as line spacing, font, point size, and italics.
What are the types of views in MS Word?
Microsoft Word gives you five different views of a document, and each has its own advantages over the others. They are Print Layout, Full Screen Reading, Web Layout, Outline and Draft and you can guess what purpose some of them serve just by their names. There are two ways of changing the view you have of a document.
What is layout in MS Word?
Page layout is the term used to describe how each page of your document will appear when it is printed. In Word, page layout includes elements such as the margins, the number of columns, how headers and footers appear, and a host of other considerations.
What is changing the appearance of a document called?
Changing the appearance of a document is called Formatting. Depending on the purpose of our document, altering certain formatting elements like backgrounds, lines, margins, or highlighting may be crucial.
What is useful in changing the appearance of a document in writer program?
Paragraph formatting lets you control the appearance if individual paragraphs. For example, you can change the alignment of text from left to center or the spacing between lines form single to double.
What is gutter margin in MS Word?
A gutter margin adds extra space to the side margin, top margin, or inside margins of a document that you plan to bind. A gutter margin helps ensure that text isn’t obscured by the binding. Go to Layout > Margins. In the Gutter position box, click Left or Top.
What is the difference between gutter and mirror margins?
In a facing pages layout (Word refers to this type of layout as “mirror margins”), the gutter margin is on the very inside of both pages. Answer: Gutter Margins is the extra space that is added to your document’s existing margins to allow for the document’s binding.
Which area in MS Word is used to enter the text?
Go to the start menu and look for Microsoft Word icon. Click the icon to open the Microsoft Word. You will see a blinking cursor or insertion point in the text area below the ribbon. Now, as you start typing, the words will appear on the screen in the text area.
What is text in MS Word?
Formatting text in Microsoft Word refers to controlling how text appears in your document. This includes the size, color, and font of the text. It also covers text alignment, spacing, and letter case. Microsoft Word styles make it easy to change and apply styles throughout a document.
How do you add text?
Add a text box Go to Insert > Text Box, and then select Draw Text Box. Click or tap in the document, and drag to draw the text box the size that you want. To add text to a text box, select inside the text box, and then type or paste text.
How do I insert text without box in Word?
Removing the Box from a Text Box
- Either click on the border of the text box or position the insertion point within the text box.
- Select the Text Box option from the Format menu.
- Click on the Colors and Lines tab, if necessary.
- In the Color drop-down list, select No Line.
- Click on OK.
How do I put a border around a text box in Word?
Add a border to selected text
- Select a word, line, or paragraph.
- On the Home tab, click the arrow next to the Borders button.
- In the Borders gallery, click the border style that you want to apply.
How do I remove a text box but keep the text in Word?
Remove all text boxes border and texts
- Please apply the utility by clicking Kutools > More > Remove All Text Boxes.
- In the Remove All Text Boxes dialog window, please uncheck Just remove text box, and keep the text option.
- After clicking OK, it will appear a dialog box to tell you how many text boxes have been removed.
Although there are several free alternatives to Word, Microsoft’s word processing program continues to be the most widely used in the world. One of the most important features of Word is the styles feature. By using styles, you can set text formatting uniformly across a document, ensuring a document’s fonts, font colour, and line spacing are all the same.
Many styles are already preset in Microsoft Word. But how can they be optimally used and adapted when necessary? And how to create new styles? These questions will be answered in the following sections.
Contents
- The various types of Word styles
- Paragraph styles
- Character styles
- Table styles
- List styles
- What are the advantages of Word styles when formatting a text?
- Where can I find preset Word styles?
- How can I create new Word styles?
- Creating a table of contents through a style in Word
- Adapting the layout for a table of contents
- Customise text in a table of contents
- Creating a table of contents through a style in Word
- How can I customise existing Word styles?
- Matching the current formatting
- Manually customising existing styles
The various types of Word styles
To ensure that a document looks uniform and professional, Microsoft offers four types of styles in Word:
- Paragraph styles
- Character styles
- Table styles
- List styles
Paragraph styles
These styles determine the appearance of a text in terms of whole paragraph sections, and allow you to format large sections of text. A paragraph style may contain format settings for character style, however it also determines the overall design of a paragraph. In a new Word document, the paragraph style Standard is usually preset for the entire text. Paragraph styles format the following attributes:
- Indents and spacings
- Line and page breaks
- Borders and shading
- Lists
- Tabs
- All character attributes
In Word, paragraph styles are marked by the ¶ sign in the styles menu (This can be found by clicking the lower most right arrow in the styles gallery on the start tab.)
Character styles
Character styles determine the appearance of text in terms of individual characters, and are mainly used to format smaller sections of text, e. g. highlighting words. Character styles do not format the features of the entire paragraph, but rather format the following attributes:
- Font
- Font size
- Font colour
- Bold, italic, or underlined markings
Character styles are marked by the a-sign in the styles menu.
Table styles
Table styles in Word format the following attributes for tables:
- Header row
- Grid lines
- Accent colour
List styles
List styles in Word format the following attributes for lists:
- The format of bulleted lists
- The format of numbered lists
- Indents
What are the advantages of Word styles when formatting a text?
Preset as well as custom styles make it easier to work on a text document. This is particularly noticeable when editing complex documents, such as final papers or manuscripts. Initially, manual formatting may seem to be easier and quicker, but for longer texts it’s more efficient to use Word styles instead of repeatedly formatting sections of text separately. The following six reasons outline the advantages of using styles in Word:
- Continuity: Format results in a consistent document layout.
- Efficiency: Once the style has been created, it can be applied to any section of the document without having to be changed.
- Adaptability: If only one style is used consistently within a document, then only this style needs to be adjusted when necessary to edit the whole document.
- Navigation: The navigation function makes it possible to switch quickly between sections of the document. To use this function, go to the view tab and select navigation pane. The section of the document which you are looking at will be highlighted here.
- Automatic table of contents: When using Word styles for headings consistently within one document, it’s possible to automatically create a table of contents which you can customise in just a few clicks.
- Outline: It’s possible to gain an overview of the document using the outline view function in Microsoft Word, which can be found in the view tab. In the outline view it’s possible to move individual sections of a document clearly and with full control. In this view, the headings are arranged hierarchically – if there’s a plus sign on the left side of a heading, it means that it has another text level below it, while a minus sign is followed by continuous text only.
The default outline view displays all levels of the document. For a better overview, it’s possible to display only two levels, for example. This view is also suitable for making corrections to the structure of a text and moving text sections around within the document swiftly and with ease. If the corresponding levels are marked with a style, they can be quickly and conveniently moved to the desired position using the outline view tools.
Note
In the outline view, text selection is important. If only the heading is selected, but the entire body text is displayed, Word assumes that only the heading is to be moved. If the text is hidden, however, the entire section will be moved.
Where can I find preset Word styles?
Preset styles in Word can be found under the style gallery, on the start tab. To apply a style to a section of text from the style gallery, highlight the relevant text and then click on the style you wish to select. The style in use will be marked by a light blue border.

To display additional Word styles, use the down arrow on the right side of the style gallery, or open the style gallery by clicking on the menu arrow.

Alternatively, you can also assign the styles for headings using a shortcut. To do this, use the key combination «alt» and the respective level of the heading, for example:
Heading 1:»Alt» + «1».
Heading 2:»Alt» + «2».
Note
When assigning paragraph styles, the cursor must either be in the paragraph with no characters highlighted, or you must highlight the entire paragraph. If you highlight one section, only that section will be formatted, and not the entire paragraph. This is different when assigning character styles: you must select all relevant characters, as just hovering the cursor over a relevant word will not be enough.
How can I create new Word styles?
If you want formatting options that are not available in the preset Word styles, you can easily create them yourself and add them to the style gallery:
- Under the start tab, click on the arrow in the lower right corner of the styles gallery.
- Select the create a style icon in the style side menu – at the bottom on the left.

- Name the style
- Specify the style type: either paragraph, character, linked (paragraph and character), table and list. If you want the style to be based on an existing one, you can specify this under style based on.
- Should you want to set a style for the following paragraph, you can specify an appropriate one for it.
- Set the font, font size, and other possible formatting options.
- As soon as you confirm the style by clicking “OK”, you’ll be able to find your new creation in the style gallery.
Alternatively, it’s possible to create a style by highlighting text:
- Right click on the highlighted text
- Select styles on the right-hand side in the mini-menu
- Select create a style from the style menu that appears
- Select modify.
Creating a table of contents through a style in Word
A key advantage in using styles in Word is that it allows you to automatically create a table of contents. To create a table of contents using a style, go to the references tab, and select a style for the table in the table of contents menu. If you change the text structure later, you can update the table of contents by clicking the update table of contents option.
Adapting the layout for a table of contents
You can also customise the layout and text formatting of a Word style for tables of contents:
- On the references tab, open the table of contents menu and click the custom table of contents option.
- In the table of contents dialog box, make any changes you want to the display of page numbers and fillers.

- To adjust the overall appearance, select format under general and click on the desired format
- If you want to change the number of levels displayed in the table of contents, click on show levels
- Check the result in the print preview and web preview panes
- Confirm with «OK»
Customise text in a table of contents
The presentation of the text in the table of contents can also be adapted using a Word template:
- Open the table of contents dialog box as described above
- Click on modify and change the formats to from template

- In the styles list, select the level you want to customize and click modify.

- Make the formatting changes as described above
- If you select add to quick styles gallery, you’ll find the created style in the gallery
- Confirm with «OK»
How can I customise existing Word styles?
In Word, you can also change existing styles from the quick style gallery. The adjustment is possible in two ways:
- Update a style by customising it to match the current formatting in a document
- Manual customisation in the dialog box
Matching the current formatting
If a Word style has already been applied to the text, you can customise it and include it in the quick Styles gallery:
- Select the text, e. g. with «heading 2», to which you have applied the Word style. You can see which style was used in the quick styles gallery – the corresponding style will be marked with a light blue border.
- Format the text and adjust features such as font, font size, and colour.

- In the styles gallery, right-click the style that you want to customise and confirm with update [style name].

Note
Adapting the styles automatically adapts all text parts which are assigned to this style.
Manually customising existing styles
A Word style from the styles gallery can also be changed manually. This process is possible regardless of the text in the document:
- Right-click on a Word style in the styles gallery and select modify
- Make the desired adjustments, such as font size or colour, in the modify style menu

- Select add to styles gallery at the bottom of the menu to access the style later.
HiDrive Cloud Storage with IONOS!
Based in Germany, HiDrive secures your data in the cloud so you can easily access it from any device!
![]() Highly secure
Highly secure
![]() Shared access
Shared access
![]() Available anywhere
Available anywhere

Word documents: how to save as a PDF file
If you want to send a Word document or prepare it for printing, it’s recommended you know how to save it as a PDF file. This way, you can be sure that the formatting of your document won’t change and that others will not be able to edit it without permission. For simple conversion tasks, the save function in Word is often sufficient. However, there are some dedicated tools which offer a wider…
Word documents: how to save as a PDF file

How to recover unsaved Word documents
If either Word or your PC crashes while working on a Word document, don’t panic! Recovering unsaved Word documents is easy to do; even damaged or deleted files are not always lost. Microsoft has numerous tools built into its popular text program which allow you to retrieve the edited or in-progress file. And if these tools don’t work, Windows and special repair and recovery tools offer plenty of…
How to recover unsaved Word documents

How to create a table of contents in Word
Microsoft Word makes it easy to create smart text documents with its diverse template styles. This includes pre-formatted table of contents templates. With our illustrated, step-by-step guide, we’ll show you how to find the templates and how to customise the design.
How to create a table of contents in Word

How to insert a watermark in Word
Sometimes you need to clearly label your document with words like “Sample,” “Draft,” “Example” or “Confidential”. In Microsoft Word, you can use watermarks to do this. This practical design tool allows you to display barely visible but impressive text or graphics that sit behind the actual text. In this tutorial, we will teach you how to insert a watermark in Word.
How to insert a watermark in Word
How to remove a watermark in Word
Watermarks are a handy way to label documents in Microsoft Word. You can insert a watermark so that your text or your company logo sits discreetly in the background of the page. However, sometimes you might not be happy with how the watermark looks, or you don’t need the watermark at all anymore. We’ll show you two ways to remove a watermark in Word.
How to remove a watermark in Word
A style is a group of formatting settings stored under a single name. Using styles and style sets rather than formatting ad hoc has several advantages:
- The document looks professional and is easy to read.
- Styles provide consistency and can apply several formatting properties at one time.
- Heading styles can be used to create tables of contents and outlines.
- If you change the formatting properties of a style, all instances of the style are updated with the formatting changes.
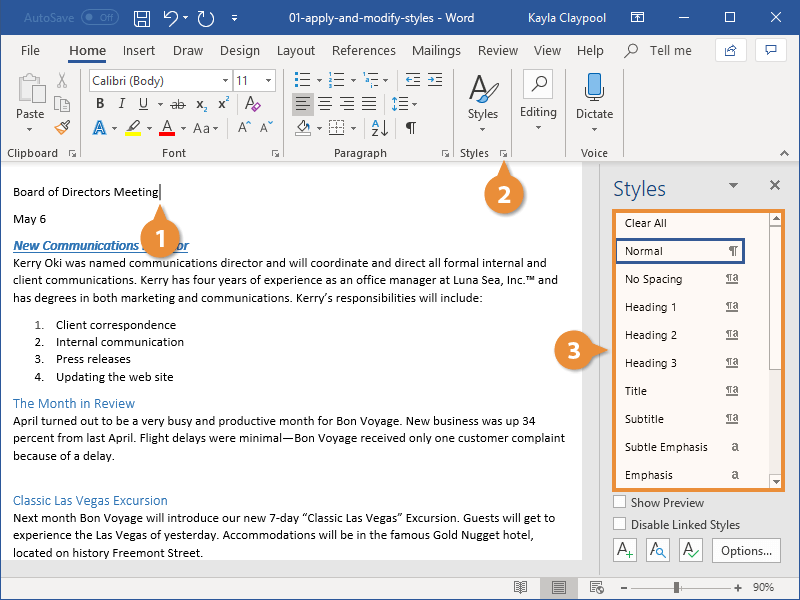
Apply a Style
Word includes several built-in styles that cover most basic formatting needs in a document.
- Click in the paragraph or select the text you want to apply a style to.
- Click the Styles group dialog box launcher on the Home tab.
- Select a style from the Styles pane.

Alternatively, you can browse within the Styles gallery on the ribbon, which will also preview the formatting used in the style, but it’s often easier to choose from all the available styles at once by clicking the dialog box launcher.
The style is applied to the text or paragraph.
Change Style Sets
Another advantage to using styles throughout your document is the ability to quickly change how those styles appear using Style Sets.
Style Sets will update the appearance of the built-in default styles. This way, you can format these elements at once instead of one by one.
- Click the Design tab.
- Open the Style Set gallery by clicking the gallery’s More button.
- Select a Style Set.
Thumbnails previewing the available Style Sets appear.
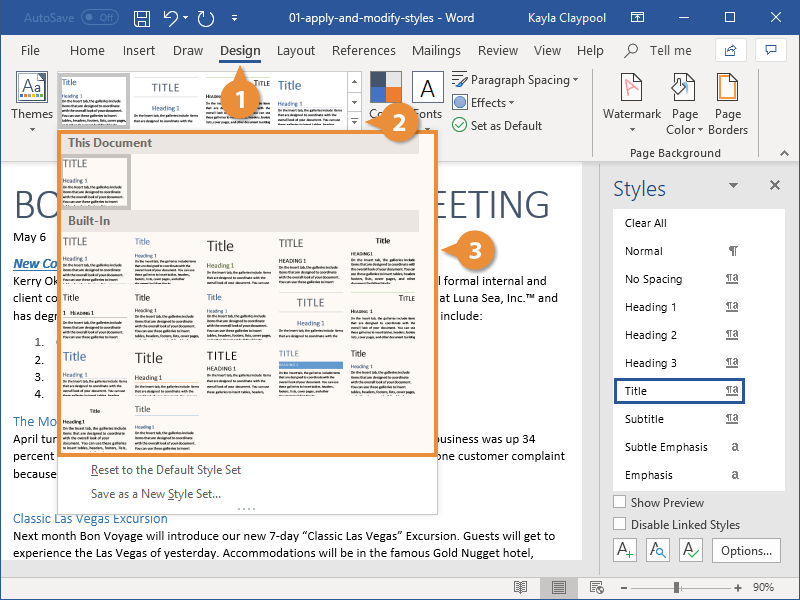
The new Style Set is applied, affecting all the default styles used in the document.
| Default Styles | |
|---|---|
| Normal | The document’s main body text. Any text not using another style is set in Normal. |
| No Spacing | Normal text, with no additional spacing between paragraphs. |
| Heading 1, 2, 3 | Three levels of headings to use in your document, with outline levels automatically applied. |
| Title | A larger heading, useful for the main title of a document. |
| Subtitle, Subtitle Emphasis | Subtitle text, styled to complement the Title style, along with an additional style for emphasis. |
| Emphasis, Intense Emphasis, Strong | These styles are meant to emphasize text in a document. Emphasis usually italicizes, Strong usually bolds, and Intense Emphasis will usually do both. |
| Quote, Intense Quote | These styles will separate blocks of text to display a quote. |
| Subtle Reference, Intense Reference, Book Title | These styles are meant for text used to cite references and book titles. |
| List Paragraph | This style is automatically applied when text is used in a numbered or bulleted list. |
Create a Style
You can also create your own styles, saving a set of formatting to use easily in other places. If the need arises, creating a style is quick and easy. There are five different types of styles:
- Character: Includes any type of character formatting, such as font size, type, color, and effects. These styles can be applied to any selected text.
- Paragraph: Includes any type of paragraph formatting, such as paragraph, tab, border, and bullets and numbering formats. These styles will be applied to entire paragraphs.
- Linked: Uses a combination of character and paragraph formatting properties. These styles will be applied to entire paragraphs as well.
- Table: Provides a consistent style for all borders, shading, alignment and fonts in tables.
- List: Applies similar alignment, numbering or bullet characters and fonts to lists.
You can also base a style on another style. The new style will inherit the formatting of the original style, as well as any changes made to the original style later.
- Format the selected text the way you’d like it to appear in your style.
- Click the New Style button, in the Styles pane.
- Give the new style a name.
- Make any additional adjustments to the style formatting.
- Click OK.
The differences between the selected text that was formatted and the style that it’s based on will be captured. The style that it’s based on will also be listed here.
Basic formatting commands are found right in this dialog box. To customize more advanced formatting, click the Format button and select a category from the menu.
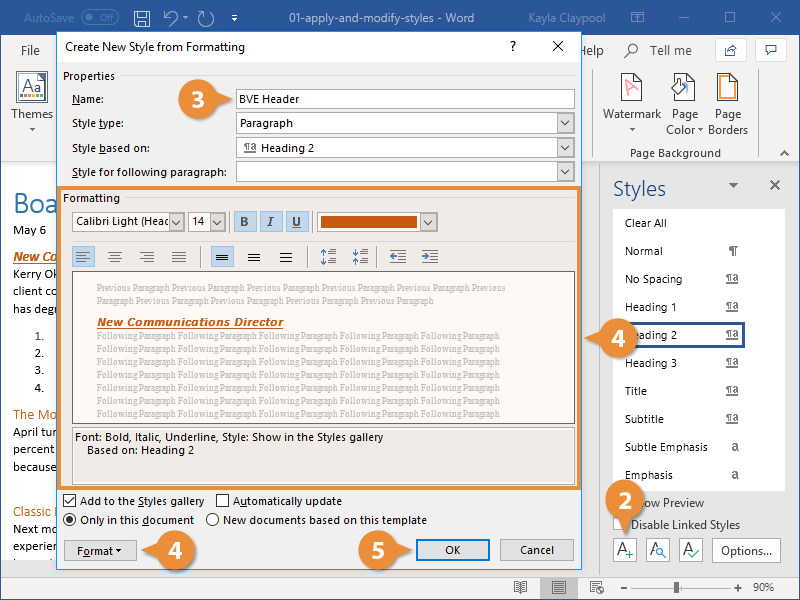
The new style is created and can be applied to other text in the document.
Modify a Style
One of the benefits of using styles is that when you make a change to one, everything that’s using the style is automatically updated.
- Change the formatting of some text using a style.
- Click that Style’s list arrow in the Styles pane.
- Select Update [style name] to Match Selection.
To delete a style, select Delete or Revert to [style name]. If there is no option to delete the style, reverting it back to the style it was based on effectively deletes the style.
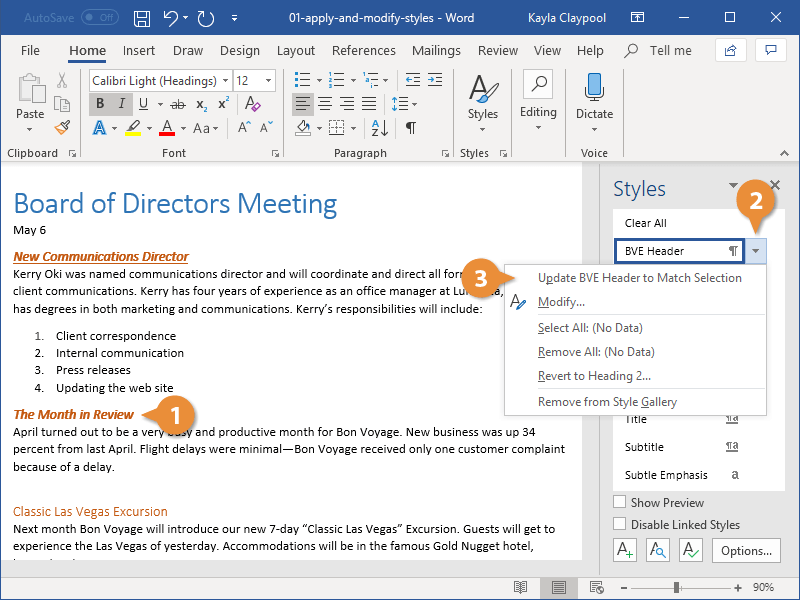
The style is updated, and the changes you made are applied to all text that uses the style.
Only Show Styles in Use
There are a lot of built-in styles that don’t get used and get in the way of the styles you’re working with. You can change the Styles pane settings to show only the styles used in a document.
- Click Options in the Styles pane.
- Click the Select styles to show list arrow.
- Select In use.
- Click OK.
The Style Pane Options dialog box opens.
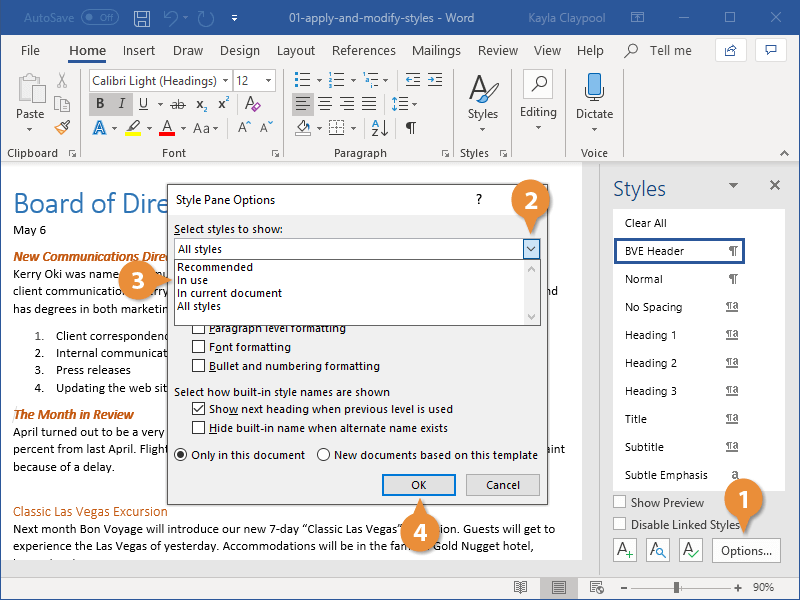
Now only the styles used in the document are shown in the Styles pane.

FREE Quick Reference
Click to Download
Free to distribute with our compliments; we hope you will consider our paid training.
If you haven’t been using Styles in Microsoft Word Listen carefully — start now! Quit wasting time with manual formatting! By using Styles, any document created in Word becomes exponentially easier to manage as the document grows to beyond say . . . 2 pages. Many view the use of Styles in a Word document as a nice “extra” feature, but the truth is if you’re not using Styles chances are you are wasting a lot of time and you haven’t tapped into the real power of Word. Word was built from the very beginning around styles and with the new and improved features in versions 2007 and 2010 there are even more reasons for using them today.
So What are Styles?
Styles are a handy feature of Microsoft Word which provides a quick standard way to control the formatting of a Word document. As you probably know, there are many poweful and rich looking ways to give a Word document the professional look you want. This involves so much more than just making changes to the typesetting (font). You can create bold and colorful headings, consistently spaced paragraphs, bulleted lists, highlights, etc. There are even special tools which allow you to create such things a table of contents, foot notes, and so much more. All of these formatting tools are used to give the document a “style” of its own.
Formally speaking, a Style in Microsoft Word is simply a collection of formatting rules and elements which are used consistently throughout the document to give it the look and feel you want. Once a style is in place, key portions of the document will be automatically formatted according to the rules of the style (e.g. paragraph headings, tables, numbered lists, etc.). Without Styles, a simple change to a font type in a document would have to be made multiple times.
Why Should You Use Them?
There are many reason why you should be using Styles in your Word documents. I’ll give you 4 of the best reasons:
- Consistent Look and Feel
- Ease of Format Management
- Making Intelligent Documents
- Format Portability
1. Consistent Look and Feel
Styles give your document a consistent theme which provides a more polished, professional look by providing a set of rules for formatting which are applied uniformly throughout the document. If you still format your document manually there’s a good chance you may inconsistency in the overall look and feel of the document as a whole.
Take fonts for example. There are 5 basic ways to format your document using fonts:
- Font Face (e.g. Arial, Times Roman, etc.)
- Font Size (e.g. 10pt, 14pt, 24pt, etc.)
- Font Color (e.g. Black, Blue, Orange, etc.)
- Font Style (Bold, Italics, Underline, etc.)
- Font Effect (Strikethough, Superscript, All Caps, etc.)
These are the very basics of font application which go a long way to determine the look and feel of the document. These basic font features are critical to the look and feel of your document (not to mention the many other advanced font features such as character spacing, shadowing, transparency, and so forth). If you apply font formatting manually there is a very good chance you’ll have, for example, subject headers with different styling as you make changes over time. This is especially true as your document grows beyond 1-3 pages to say over 10 pages. Even if you are particularly diligent about remembering what font style you used for what heading type (i.e. major heading, sub heading, sub-sub heading, etc.) you’re bound to miss a few. This effects the consistency of your document over time.
Why bother? Using styles takes all of this burden of remembering what formatting to use and where to use it. Simply decide what formatting you want to use and where you want to use it. Then, apply this formatting to a style and you’re done. Now your document will carry the same look and feel from the start to the finish.
2. Quick Format Management
Managing the Formatting of your document is much easily with the use of styles. You can easliy restyle your document in just seconds. Suppose you decide to use a new font color scheme in a large document which requires changes in the font colors of all headers and sub headers. In a 50 page documents this is a chore if you’re not using styling. With styles in place however, making the changes is a breeze! Suddenly 20 minutes turns into 20 seconds.
Simply head over to the styles menu and find the style you want to change. Right click and select Modify. Then make the change to the header and any other sub headers. These changes apply instantly to the entire document and you’re done in a matter of seconds. This process is so quick and painless that you can even apply sweeping changes to large documents just to see how it will look. If you like the changes you’re ready to move on. If not, just change them back or try something else.
You can also change multiple styles all at once in just a few seconds by applying a Style Set. Style Sets are preconfigured collections of styles which apply to a document all at once. They are useful for instantly changine the look and feel of your document and for overall document format management. You can chose from one of several built-in Styles Sets or create your own to quickly restyle your entire document from top to bottom based on a set of predetermined styles!
3. Making Intelligent Documents
Word 2012 gives you the ability to create amazingly intelligent documents. An intelligent document has the ability to do a great deal of work for you. This is because it has been configured to understand a few important things about the layout and content of your document. For example, keeping track of the page count and reflecting this in a header or footer. Intelligent documents can manage gootnotes and endnotes for you. They can even automatically track changes in your document structure and relect those changes in a dynamic index or table of contents. These are examples of the many powerful features built into Word to give your document the intelligence to save you a ton of work.
Intelligent documents don’t happen automatically. You have to add intelligence by applying the techniques available in Word to build up your document’s IQ. One of those techniques is the use of Styles. By defining your styles for headings for examples you enable Word to automatically format all of your major headings, sub headings, sub-sub headings, etc. Not only does Word know how to “style” those headings, but it knows a little something about the structure of your document. This allows it to provide you ease of movement thoughout the document by simply clicking on the heading you want to move to in the Navigation Pane.
Without styles in place to define which text represent Headings, sub headings, and so forth, the Navigation Pane would not be very useful because only text styled as “heading 1”, “heading 2”, “heading 3”, etc. will show up in the navigation list.
4. Take it With You
Another great thing about styles is their portability. In Word 2010, exporting your style to a template or another Word document is a snap. This is such a powerful feature in Word that you just have to take advantage of it. After you do the hard work of determining what formatting you want to use for your document Title, Sub-Title, Headings, sub-Headings, Quotes, Emphasis Text, etc. you’ll probably want to use this formatting somewhere else — No problem! If you have styled your document properly, you can push that style to another document or even a template in just a matter of seconds. Now you can take your style anywhere and everywhere.
As cool as all these capabilities are you can never take advantage of them if you aren’t actively using styles in your Word documents.
How do you Get Started?
Making the move to Styles is easy. Just follow these steps . . .
- First, decide on your document’s structure and formatting
- Next, format your Styles instead of your text
- Then, give your text a Style instead of manual formatting it
- Last, if you like what you’re created save your Style or create a custom Style List for future use
With the wealth of advantages to using styles and now the ease of applying them, it’s past time to quit manually formatting your documents! Quit reaching for that Font Properties setting and changing text one at a time. Move on to Styles and never look back!
Resources:
1. Style Basics in Word 2010
2. Microsoft Tutorial: Format your Document with Styles
3. The Essentials of Creating Styles in Word
For those of us who work in Microsoft Word* on a regular basis, we know Calibri. Why? Because it is the font of the default style that every new document in Word opens to (unless you’ve set a new default). Wait—there’s a default style? Yep. And since you are still reading this, I’m guessing you haven’t used quick styles or created your own style set yet.
Now, the Calibri font works—for quickly writing and beginning documents. But Word has many more fonts, formatting options, and styles that you should take advantage of to deliver documents that look more professional and presentable. Your documents need to be well-organized and have a consistent look to reflect your expertise. (Plus, you can show off your snazzy Word skills.)
There are many reasons for using styles in Word. Formatting text, or automatically formatting by applying styles, helps readers quickly understand a document visually. Adding formatted headings allows readers to sort through text and focus on the most important content. Proper formatting can also make long documents appear shorter, with smaller footnotes and larger headings to break up large blocks of text. Numbered lists and bullets also help readers assimilate ordered information easily.
Using styles will also save you time. Without styles, you are probably formatting your documents manually. For each chunk of text, you have to select the font type, size, paragraph alignment, color, bold, italics, etc. This can be very time-consuming and tedious to go through all these steps for each section of your document. With styles, though, the repetition is no longer necessary because all these details are predefined.
Meet the “styles”
You can customize every document to the nth degree, but chances are you don’t want to spend that much time on every document. This is where the styles in Word become your best friend.
Here’s a basic overview. Microsoft has built-in styles that provide formatting for the different levels of text in your document. There can be many styles in a document, but the basics are title, subtitle, headings, body (Normal), emphasis, quote, and list paragraph. You can apply styles while you are working on or after you complete a document.
Choose your style set
The default style set is Word 2010 and comes with 18 styles, or text levels. When you open Word, the new blank document will be in this template. Word automatically suggests the formatting for text levels with this default style set. These can be applied and modified as you like.
Let’s walk through how these work.
- Open a simple document that has lots of text.
- Use your cursor to highlight some text that we will apply a style to. For example, highlight the title or a section heading of your document. (By the way, for most styles, you don’t need to select all the text but rather click somewhere within the paragraph to which you’d like to apply a style.)
- From the Quick Styles Gallery in the ribbon, select “Heading 1.”

You will see the text you highlighted changes to match that style. You can use these styles to create different formatting throughout the document.
Change the style set
This is where the true power of styles is shown. Once you have assigned a style to all the text in your document using the steps above, you can change the style set, which will reformat your entire document in one click. Use the “Change Styles” dropdown button in the ribbon. Go to “Style Set” and place your cursor over one of the options.
Here is where you will love Word’s wonderful previewing capabilities! You don’t need to click on a style set to see what it will do to your document. Scroll your mouse through the options to see how the style set will affect your document. Try different ones until you find one that works for your document.
Note: The Style Set you select will determine what options you have in the Quick Style Gallery.
After you pick a style set, you can modify the formatting in the current document, and it will not affect the saved style unless you manually update it, which is not necessary unless you want to preserve the settings.
If you do want to preserve these settings so you can use the same style again, you’ll need to save the style set. Learn how to do this in our next post! Stay tuned for Part 2: How to create your own Quick Style in Microsoft Word.
*These instructions are for the PC version of Microsoft Word 2010.What are Word styles?
A style is a predefined combination of font style, color, and size that can be applied to any text in your document. Styles can help your documents achieve a more professional look and feel. You can also use styles to quickly change several things in your document at the same time.
What are the different types of character formatting?
In Word documents, you can apply three types of character formatting:
- Individual character formats including font, font size, bold, italic, underline, strikethrough, subscript, superscript, font color, and highlight color.
- Artistic text effects that incorporate character outline and fill colors.
What are formatting features?
Document formatting refers to the way a document is laid out on the page—the way it looks and is visually organized—and it addresses things like font selection, font size and presentation (like bold or italics), spacing, margins, alignment, columns, indentation, and lists.
Why do my styles change in Word?
It seems that when there are multiple authors using a single document, the styles sometimes change unexpectedly. This feature of Word causes changes to a style definition when someone applies an explicit formatting change to something in the document.
How do I stop Word from changing formatting?
Select Proofing from the left-hand menu. Click the AutoCorrect options button. Click the AutoFormat As You Type tab. Now you can see all the options available and turn off those that you don’t want.
What are linked styles in Word?
Linked styles are a combination of paragraph styles and character styles. If you select a single word or phrase and apply a linked style it is applied as a character style. These allow you to create “run-in” headings where only the first few words (or characters) of a paragraph are formatted as the heading.
How do you unlink styles in Word?
To open the pane, click the “Styles” pane launcher button in the “Styles” button group of the “Home” tab. Then select the text from which you want to remove the style in the document. Then choose the “Clear All” choice from the list of styles in the “Styles” pane. Any style applied to the selected text will be removed.
How do I change a linked style in Word?
Both the paragraph and words were changed to the same style by selecting them and pressing the ‘Heading 1’ shortcut Ctrl + Alt + 1 . The Style Gallery or styles list could have been used to do the same thing. In the Modify Style dialog you’ll see the style type just under the name.
How do I edit styles in Word?
Modify a style manually in the Modify Style dialog box
- On the Home tab, right-click any style in the Styles gallery and click Modify.
- In the Formatting section, make any formatting changes you want, such as font style, size, or color, alignment, line spacing, or indentation.
Can we modify the predefined styles in Word?
On the Home Ribbon, in the Styles Group, right-click on the style you want to change, and select Modify. If you don’t see the style you want to change, click on the Expand icon to see a more complete list. In the Modify Style dialog box, you can make any change you want to the style.
How do I change my text style?
Changing Built-In Font Settings
- In the “Settings” menu, scroll down and tap the “Display” option.
- The “Display” menu may vary depending on your Android device.
- In the “Font Size and Style” menu, tap the “Font Style” button.
- You’ll have a list of pre-installed font styles available for you to choose from.
Why might you choose to use a style on your title?
Why might you choose to use a Style on your title? To make the title stand out. What feature can you use to easily change the look of the whole document? What can you click to start a new page in a document?
What is the main advantage of using a text box?
There are two main benefits to using text boxes instead of simply typing in your text. You can get greater control over the positioning of specific areas of text. You can take advantage of the text box formatting tools to add additional design elements.
What are advantages of using style?
What is style? what are the advantages of using styles?
- Styles application means easy Table of Contents generation.
- Styles cascade and so when you make one change to a document you have made them all.
- Styles allow you to use Outline View.
- Restrict formatting changes.
- Templates are much more efficient and kinder to others if they’re based on styles.
What are the advantages of styles in open office?
When you apply a style, you apply a whole group of formats at the same time. For example, a style defines the font, type size, indents and spacing, tab stops, and other characteristics of text; and the area fill and line style of a frame or other object. Using styles gives you more control over the entire presentation.
What are styles in open office?
OpenOffice.org Writer has five types of styles:
- Paragraph styles affect an entire paragraph.
- Character styles affect a block of text inside a paragraph.
- Page styles affect page formatting (page size, margin, and the like).
- Frame styles affect frames and graphics.
- List styles affect numbered lists and bulleted lists.
What is the use of styles in a document?
Styles allow you to easily apply consistent formatting to documents, as well as to quickly change existing formatting. In addition, the use of styles provides a structure to your document that can be discerned by a screen reader.
What is difference between paragraph and character style?
A character style is a collection of character formatting attributes that can be applied to text in a single step. A paragraph style includes both character and paragraph formatting attributes, and can be applied to a paragraph or range of paragraphs. Paragraph and characters styles are sometimes called text styles.
What is the paragraph style?
Paragraph styles are a collection of rules that define the way your text behaves and looks. They contain formatting for both the characters (fonts, color, scale, etc..) and for the paragraph (Indents, align, hyphenation, etc.).
Does a character style impact on?
Answer. if a character style only changes text color, applying a different font size to the text does not appear as an override. You can clear character styles and formatting overrides when you apply a style. You can also clear overrides from a paragraph to which a style has been applied.
Is AA a character?
Sometimes abbreviated as char, a character is a single visual object used to represent text, numbers, or symbols. For example, the letter “A” is a single character.
What are the 4 types of characters?
One way to classify characters is by examining how they change (or don’t change) over the course of a story. Grouped in this way by character development, character types include the dynamic character, the round character, the static character, the stock character, and the symbolic character.
What defines a character?
A character is a person, animal, being, creature, or thing in a story. Writers use characters to perform the actions and speak dialogue, moving the story along a plot line. A story can have only one character (protagonist) and still be a complete story.
What are the 6 character types?
The different types of characters include protagonists, antagonists, dynamic, static, round, flat, and stock. They can both fit into more than one category and change from one category to another throughout the course of a story.
What is character and example?
Character is defined as a trait, quality or high moral code. An example of character is someone who is known for being funny. The definition of a character is a unique symbol, letter or mark used in writing. An example of character is an asterisk. An example of character is the at symbol.
What is Character simple words?
1 : a mark, sign, or symbol (as a letter or figure) used in writing or printing. 2 : the group of qualities that make a person, group, or thing different from others The town has special character.
When you want to format text in Microsoft Word, you can do
it manually, by selecting font, size, color, alignment and other attributes,
but you’ll often find it easier to apply formatting with Word document styles.
What is Word document formatting with styles? A style is a
mixture of Word formatting that you can apply over and over, like paint. You can use
and modify Word’s built-in styles, and you can also create your own.
There are several advantages to using styles for document formatting in Word:
-
Consistency — You’ll be sure that all the headers, subheads, paragraphs and tables have the
correct formatting. -
Speed — It’s faster to apply a style than to apply all the formatting separately. And
if you need to change some document formatting–like font size–you only have to
change the definition of the style to change the formatting of all text that’s
tagged with the style. -
Navigation — Styles are automatic bookmarks. When you enable the Navigation Pane, you can
click headers and subheads in the pane to go to that spot in the document. -
Tables of
Contents — With just a few clicks, you can insert a table of contents using
the built-in heading and subheading styles.
See my tutorial in Word Tables of Contents at:
For the most part, Word document styles work the same in the Windows and
Mac editions.
How to Simplify Word Document Formatting With Styles (Video Screencast)
Watch this screencast video tutorial to learn how to format a Word document with styles. Or read through the comprehensive written tutorial that follows.

You can follow along using your own document, or if you prefer,
download the zip file included for this tutorial. It contains a document called
Lunar Laser Ranging.docx, which is a
public domain research paper, and it also contains a test document called Merging Styles.docx. Start this
tutorial with the Lunar document on your screen.
1. How to Apply Built-In Paragraph Styles in Word
Word has two basic types of Word document formatting styles:
-
Paragraph Styles — They apply to a minimum of an
entire paragraph, and contain paragraph formatting (alignment, indents, etc.)
and character formatting (font, color, etc.). -
Character Styles — They can apply to as little as
one letter, and contain only character formatting.
Before applying any Word document styles, go to the View tab in Windows and enable the Navigation Pane. This will display the built-in heading styles for
navigating through the document.
.jpg)
.jpg)
.jpg)
For the same functionality on the Mac, click the drop-down
arrow next to the Sidebar button and select
Document Map Pane.


Go back to the Home
tab, and notice the Style section on the right. (If the window is narrow, the
section will just be an icon.) Click inside the title of the document at the
very top (“Lunar Science and Lunar Laser Ranging”); there’s no need to
highlight anything. Roll the mouse pointer over some of the styles to see a
preview, then click the Title style
to apply it.
.jpg)
.jpg)
.jpg)
The Title style doesn’t show up in the Navigation pane, but
the Heading styles will appear nested under it.
Click inside the first heading just below the title (1
Introduction), then click Heading 1
in the Style area. Not only does the text get formatted, but Introduction shows
up in the Navigation pane. You can also use the keyboard shortcut: Ctrl-Alt-1 (Windows) or Command-Option-1 (Mac).
.jpg)
.jpg)
.jpg)
Scroll down through the document and apply Heading 1 to the
remaining first-level headings:
- 2 Lunar Science
- 3 New Retroreflectors on the Moon
- Summary and Goals
Go back to page 2, then start applying Heading 2 to the subheads (the first one is “Fluid Core Moment of
Inertia”).
Each header that gets formatted appears in the Navigation
pane, nested below a Heading 1 item.
.jpg)
.jpg)
.jpg)
2. Modifying a Built-In Paragraph Style in Word
This is where the convenience of using styles for document formatting in Word comes into
play. To modify the formatting of all the text formatted as Heading 1, there’s
no need to select each line of text and apply the Word formatting individually. The
easiest way is to reformat one of them, then use that to update the style. That
will modify all the other headers tagged as Heading 1.
Select one of them and change the font, size and color. Also
insert a left-justified tab at ¼” (click inside the ruler). The header should
look something like this:
.jpg)
.jpg)
.jpg)
In the Style section, right-click Heading 1, and from the
pop-up menu, select Update Heading 1 to
Match Selection.
.jpg)
.jpg)
.jpg)
Now either scroll down through the document to see the other
Heading 1 items, or just click them in the Navigation pane. They all have the
updated Word formatting.
If you want to practice this again, update the Heading 2
style.
3. How to Create and Apply a Character Style in Word
If you want to format recurring text inside a paragraph, use
a character style. You can do this with the Styles panel.
In this document, there are two images, labeled “Fig. 1” and
“Fig. 2”. We’ll format just those labels. Select “Fig 1 (a)” and make it bold
italic. Leave the text selected, and in Windows, click the Down Arrow in the lower-right corner of the Styles section to
display the Styles panel. In the lower-left corner of the panel, click the New Style button.
.jpg)
.jpg)
.jpg)
On the Mac, there is a separate icon on the ribbon for the
Style Manager, and is immediately to the right of the Styles section. The New Style button will be clearly
labeled at the top of the panel.


In the New Style dialog, give it a name of Figure, set the Style Type to Character,
then click OK.
.jpg)
.jpg)
.jpg)
The style name is now listed in the panel and in the Styles
section in the ribbon bar. Notice it has an “a” icon, indicating that it’s a
character style.
Apply it: select the “(b)” in the caption, then click the Figure style name in either the panel
or ribbon to apply it. Scroll down, then apply the style to “Fig 2”.
4. Using Your Styles in Another Word Document
If you want to use the modified or custom Word Document styles in another
document, you need to bring them in. The easiest way to do this is to copy and
paste Word formatting.
Switch to Merging
Styles.docx. Notice it has plain, unformatted text.
.jpg)
.jpg)
.jpg)
Go back to the original document, click in the title, then
click the Format Painter on the Home tab.
.jpg)
.jpg)
.jpg)
Switch to the other document, then select the Title placeholder. It now matches the
Lunar document. Repeat the process with the Heading 1, Heading 2 and
Figure styles. You can also use the
keyboard shortcuts for the Format Painter: Ctrl-Shift-C (Windows) or Command-Shift-C (Mac) to copy formatting from selected, original text, and Ctrl-Shift-V (Windows) or Command-Shift-V (Mac) to apply formatting to the new text.
Work With Styles for Better Document Formatting in Microsoft Word
Now
you can see why styles are so great: it’s faster to apply a style than it is to
apply multiple document formatting attributes, there is much less chance of human error,
and document navigation is automatic.
Also, when you change the look of a
style in Microsoft Word, all text formatted with that style will change immediately. And the
easiest way to use modified or custom styles in another document is to paste
the Word formatting from one document to another.
To learn more about working with Microsoft Word, study the following tutorials:
Editorial Note: This post was
originally published in 2014. It has been comprehensively revised to make it
current, accurate, and up to date by our staff—with special assistance from Laura Spencer.
Did you find this post useful?

Bob Flisser has authored many videos and books about Microsoft and Adobe products, and has been a computer trainer since the 1980s. He is also a web and multimedia developer. Bob is a graduate of The George Washington University with a degree in financial economics.