
![]()
Download Article
Quickly open and edit a PDF file in Microsoft Word
![]()
Download Article
- Word 2013 and Later
- Word 2010 and Earlier (Adobe Acrobat Online)
- Word 2010 and Earlier (Adobe Acrobat Desktop App)
- Q&A
- Tips
|
|
|
|
Trying to view a PDF in Microsoft Word? In Word 2013 and later, including Microsoft 365, you can easily open a PDF directly! Once you open the PDF in Word, it will be converted to a document that you can edit. If you’re using an older version of Word, you’ll need to use an online converter or additional software to convert the PDF to a Word document. This wikiHow guide will show you how to open a PDF in Microsoft Word for editing on your PC or Mac.
Things You Should Know
- In the latest versions of Word, including Word 2021, 2019, 2016, and 2013, you can open a PDF and edit the text.
- In Word 2010 and earlier, you’ll need to use a 3rd party PDF to Word converter to create a Word document.
- One of the best PDF to Word converters is Adobe Acrobat’s free online tool.
-

1
Open Microsoft Word on your PC or Mac. This method uses Word to convert the PDF into a Word document.
- If you’re using Windows, you’ll find Microsoft Word in the Start menu. On a Mac, it’ll be in your Applications folder.
- This method will work in any modern version of Word, beginning with Word 2013 through Microsoft Office 365.
-
2
Click Open. This is an option in the left menu. A new page with a list of files will appear.
Advertisement
-
3
Click a file source. If the PDF file is on your computer, click Computer. If the PDF file is on a flash drive or other external drive, click on that drive.
-
4
Select the PDF document. Find and open the PDF file from its location on your computer.
- In later versions of Word, the file navigation is done within the Word app rather than a file dialog window. Clicking the PDF will immediately open it.
-
5
Click OK or Open in the dialog box. After opening a PDF, you will be notified that the process may take a while to complete. Depending on the size of the PDF file and the number of graphics in the File, the process will take longer.
- Be aware that if you have many images in the PDF, there is a chance that Word will not be able to properly format the document. It will still open, but may not look identical.
-
6
Enable editing. If you downloaded the file from the web, you may be notified that editing is not enabled. This is a security measure that Word takes to prevent your computer from being infected by a virus.
- If you trust the source, click File in the upper-left corner of the window, then click Enable Editing in the yellow box.
-
7
Edit the document. You can start editing the document just like you would any other Word document. You’re ready to cross out some words or remove blank pages.
- When you’re done, you can export the document as a PDF:
- Click the File tab.
- Click Export in the left menu.
- Click Create PDF/XPS Document.
- When you’re done, you can export the document as a PDF:


Advertisement
-
1
-
2
Click Convert. It’s in the menu bar at the top of the page.
-
3
Click PDF to Word. It has a blue page icon.
-
4
Upload the file to the converter. To do so:
- Click Add a file from your device.
- Select the PDF and click Open.
-
5
Click Export to DOCX. This will convert the PDF file to a Word document. It will open in the online editor.
- You can click the drop down menu under «Export to» to change the file type to .doc or .rtf.
-
6
Download the converted file. To do so:
- Click the Download file button. It’s the downward arrow icon in the top right of the online editor menu.
- Choose a file location and click Save.
-
7
Double-click the downloaded file to open it. This will open the converted Word document in Microsoft Word. You’re done!


Advertisement
-
1
Download Adobe Acrobat reader. Adobe Acrobat costs money, but you can get around this by downloading a free trial. You can also use Adobe’s free online converter using the above method.
- Get Adobe Acrobat reader at https://www.adobe.com/acrobat.html. Adobe created the PDF so you can get the best PDF tools from it.[1]
- You will need to enter in some information such as your name and email. Be sure to uncheck the option which notifies you through email about new Adobe products and information.
- Alternatively, there may be an extension that you can use within Microsoft Word that would allow you to edit PDF.[2]
- Get Adobe Acrobat reader at https://www.adobe.com/acrobat.html. Adobe created the PDF so you can get the best PDF tools from it.[1]
-
2
Open Acrobat Reader. The process is slightly different depending on if you are Mac or PC user.
- For PC users:Click the ⊞ Win key, type «Acrobat Reader,» then press ↵ Enter.
- For Mac users:Open Finder from your dashboard, search for «Acrobat Reader» in the search box, then open the program.
-
3
Upload a document. To convert a PDF document, you will first need to open a PDF document in Acrobat Reader.
- Click the File tab in Adobe Acrobat.
- Click Open and select the PDF.
-
4
Convert the document. This will create a Word document from your PDF document.
- Click the «Export PDF» button on the right side of the window.
- Choose your version of Word,
- Click the Export button.
- Name the converted file and select DOC or DOCX in the file options.
- Click Save. You’re done!
-
5
Open your new Word document. Find and open the newly created word document from wherever you decided to save it.


Advertisement
Add New Question
-
Question
Can I convert a scanned PDF to a Word document for editing?

This answer was written by one of our trained team of researchers who validated it for accuracy and comprehensiveness.
wikiHow Staff Editor
Staff Answer
In the most recent versions of Word, yes. Simply open the file in Word and click “OK” on the dialogue box stating that the document will be converted to Word format. Keep in mind that there might be some formatting or transcription errors in the new document that you will have to fix manually.
-
Question
How do I convert a PDF to Word without Acrobat?
This answer was written by one of our trained team of researchers who validated it for accuracy and comprehensiveness.
wikiHow Staff Editor
Staff Answer
In the most recent version of Word, you can do this directly from Word itself. Simply open the PDF file in Word and confirm that you’d like to convert it. Otherwise, there are a variety of third-party PDF to Word converters that you can download or use online.
-
Question
Why can’t I open a PDF in Word?
This answer was written by one of our trained team of researchers who validated it for accuracy and comprehensiveness.
wikiHow Staff Editor
Staff Answer
It’s possible you’re using an older version of Word that doesn’t support PDF files. This feature isn’t available in any version of Word before Word 2013.

Ask a Question
200 characters left
Include your email address to get a message when this question is answered.
Submit
Advertisement
-
Make sure you convert to the right Word format for your computer. Older Word files (before 2007) are generally in DOC format, whereas the newer ones are in DOCX.
Advertisement
About This Article
Thanks to all authors for creating a page that has been read 397,094 times.
Is this article up to date?
Learn how to use and access Creative Cloud Libraries from within Microsoft PowerPoint and Word.
Adobe Creative Cloud Add-in for Word and PowerPoint makes the core design assets for your brand or personal projects available to you from within Microsoft Word and PowerPoint. Use the Add-in to integrate your brand designs and assets to your presentations, reports, brochures, and branding and marketing collaterals.
System requirements
The following system requirements apply to the Adobe Creative Cloud Add-in for Word and PowerPoint.
Desktop apps
- Microsoft Windows 10 or later using Microsoft Office 2016 or later
- Mac OS X v10.13 or later using Microsoft Office 2016 or later
Browser
- Microsoft Windows 10 or later using Microsoft Edge, Internet Explorer 11, or a current version of Firefox, or Chrome
- Mac OS X v10.13 or later using Safari 10 or later, or a current version of Firefox, or Chrome
Installation
To get started, ensure that you are signed in with your Adobe account to the Creative Cloud desktop app. To install the Add-in, follow these steps:
-
Open the PowerPoint file or Word document.
-
Click Insert > Get Add-in.
-
Search for «Adobe Creative Cloud for Word and PowerPoint».
-
The Add-in displays inside the Office application.
Get started
After installing the Add-in, you can access Creative Cloud Libraries from within the Add-in panel.
-
Open a Powerpoint file and click Home > Creative Cloud.
PowerPoint displays the Creative Cloud Add-in panel inside the document.
-
Note:
a) Ensure that you sign in with the same account that you use to access the Creative Cloud desktop app.
b) The first time you sign in, you are prompted to install a self-signed certificate to allow Adobe to make a secure connection between Adobe Creative Cloud and Microsoft Office.
-
Creative Cloud Libraries opens inside the PowerPoint file, providing you access to all your library assets in all your Creative Cloud apps.
To add a library asset to your presentation, place your cursor where you want to insert the asset. In the Libraries panel, hover over the asset and click the Place graphic icon that appears.
-
To search for an asset in your current library, type the asset name in the Search bar.
-
To create a new library:
a) Click the three-line menu icon and select Create New Library from the drop-down list.
b) Give a name to your library and click Create.
-
To collaborate and invite users, click Collaborate or Share link from the three-line menu icon.
The Creative Cloud Libraries home page opens in the browser window, allowing you to invite collaborators and give them viewing and editing permissions.
Note:
If you want to check the syncing status of your library files and folders, click the cloud icon
at the bottom of the panel.
-
Open a Word document and click Home > Creative Cloud.
Word displays the Creative Cloud Add-in panel inside the document.
-
Note:
a) Ensure that you sign in with the same account that you use to access Creative Cloud desktop app.
b) The first time you sign in, you are prompted to install a self-signed certificate to allow Adobe to make a secure connection between Adobe Creative Cloud and Microsoft Office.
-
Creative Cloud Libraries opens inside the Word file, providing you access to all your library assets in all your Creative Cloud apps.
To add a library asset to your Word document, place your cursor where you want to insert the asset. In the Libraries panel, hover over the asset and click the Place graphic icon that appears.
-
To add a new font style or font color to your text, select the text and click the library style or font you want to apply. The changes happen in real time.
-
You can also add elements such as character styles, colors, paragraph styles, and even text to a library. To do so, select a text and click the + icon at the bottom of the Add-in panel. Then, click the text element that you want to use later in your document.
These elements become available to you as and when you need them inside Word and other Adobe applications.
-
To search for an asset in your current library, type the asset name in the Search bar.
-
To create a new library:
a) Click the three-line menu icon and select Create New Library from the drop-down list.
b) Give a name to your library and click Create.
-
To collaborate and invite users, click Collaborate or Share link from the three-line menu icon.
The Creative Cloud Libraries home page opens in the browser window, allowing you to invite collaborators and give them viewing and editing permissions.
Note:
If you want to check the syncing status of your library files and folders, click the cloud icon
at the bottom of the panel.
Excel 2016 Word 2016 Office 2016 Excel 2013 Word 2013 Office 2013 More…Less
You might notice that the Adobe Acrobat tab doesn’t appear in your Office 2016 applications, such as Word or Excel, when you know that you have Adobe Acrobat installed.
To get the Adobe Acrobat tab to appear, first make sure that you have the latest version of Office 2016 and that your version of Adobe Acrobat is compatible with it. If this doesn’t work, there are a few other methods you can try, such as making sure that the Adobe Acrobat add-in is enabled, navigating to the .dll file, or updating the registry. All of these are described in detail below.
In this topic:
Things to try first
Make sure the add-in is enabled
Navigate to the .dll file
Update the registry
Things to try first
-
Make sure that you have the latest version of Office 2016. Open any Microsoft 365 application, such as Word, and then click File > Account > Update Options > Update Now.
-
Ensure that your version of Adobe PDF Maker is compatible with your version of Microsoft 365. Go to the Adobe Acrobat compatibility page.

Top of Page
Make sure the add-in is enabled
-
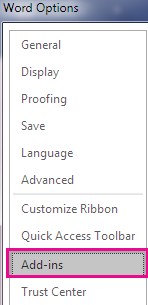
Open an Microsoft 365 application, such as Word. Click File > Options > Add-ins > Manage: COM Add-ins (at the bottom) > Go.
-
Do one of the following:
-
If the check box for Adobe PDF is clear, select it, and click OK.
-
If the check box for Adobe PDF is already selected, clear it, close the program, and then re-open it.
Follow the path in step one, and then select the check box for Adobe PDF. Click OK.
Note: If enabling the Adobe PDF add-in doesn’t work, try uninstalling and then reinstalling Adobe Acrobat, and make sure that the Adobe PDF add-in is enabled in the Microsoft 365 application.
-


Top of Page
Navigate to the .dll file
Once you’ve ensured that you have the latest version of Office 2016, you can activate the Adobe Acrobat add-in by navigating to its .dll file.
-
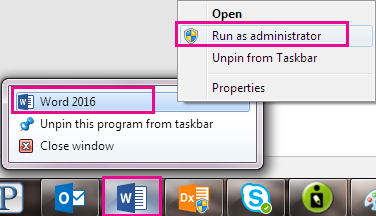
From the Start Menu or the taskbar, right-click Word.
-
From the right-click menu, right-click the Word program, and click Run as administrator.
-
Open a new blank document.
-
Go to File> Options > Add-Ins > Manage: COM Add-Ins, and then click Go.
-
Select the check box for Acrobat PDFMaker Office COM Addin, and then click Remove.
-
Click Add, and navigate to C:Program Files (x86)AdobeAcrobat DCPDFMakerOfficePDFMOfficeAddin.dll.
-
Close Word, and then open it again. The Adobe Acrobat tab should now appear.


Top of Page
Update the registry
Another way to get the Adobe Acrobat tab to appear is by updating the registry. If you’ve successfully added the Adobe Acrobat add-in by navigating to its .dll file, you don’t need to perform this procedure.
-
Go to Start, and type Run.
-
In the Run window, type regedit.
-
Go to this key:
HKEY_LOCAL_MACHINESOFTWAREMicrosoftOfficeExcelAddinsPDFMaker.OfficeAddin. -
Change the LoadBehavior key value to 3. The Adobe Acrobat tab should appear the next time you open Word or another Office 2016 program.
Top of Page
Need more help?
Want more options?
Explore subscription benefits, browse training courses, learn how to secure your device, and more.
Communities help you ask and answer questions, give feedback, and hear from experts with rich knowledge.
PDF (Portable Document Format) files are generally viewed in PDF viewers such as Adobe Reader and edited in PDF editing applications such as Adobe Acrobat. PDF files can consist of both text and graphical elements, but how much easier would things be if you could simply open and edit a PDF file in Microsoft Word? Microsoft Word can also be used to create and edit documents that contain both text and graphics, so it would make sense for Word to be able to open PDF files. Unfortunately that isn’t the case – or at least wasn’t the case, not until Microsoft Word 2013 came into being.
With Word 2013, Microsoft added the ability to open PDF files in Word, edit them and then save them in the PDF file format. To do so, Word converts the PDF file into a file Word can read, open and edit, and then opens it, converting it back to a PDF file when the user saves the changes they make to it. The conversion from PDF to Word is not flawless, which is why a user may find that some lines and pages break at bizarre points or that there are some inconsistencies in the document once it has been converted from PDF to Word and then opened in Word. This functionality is also available in Word 2013’s successor, Word 2016.
However, what of all of the versions of Word that came before Word 2013? And what of instances where converting the PDF file in question from PDF to Word causes the file to lose substance? Well, in these cases, you can make use of an application – say, Adobe Acrobat – to fully convert the PDF file into a Word file and then open the converted Word file in Word.
Without further ado, here’s exactly how you can open a PDF file in Word:
Opening a PDF file in Word 2013 and Word 2016
If you’re using Word 2013 or Word 2016, opening a PDF file in Word is pretty simple – all you need to do is use the Open functionality to locate the PDF file and have Word open it, and the program will automatically convert and then open the file. Here’s exactly what you need to do:
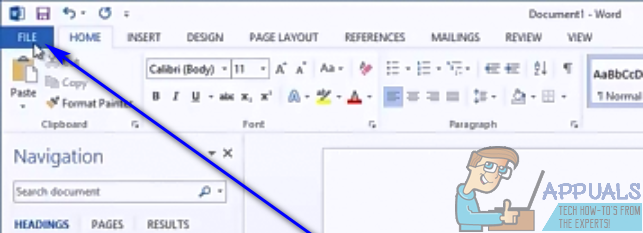
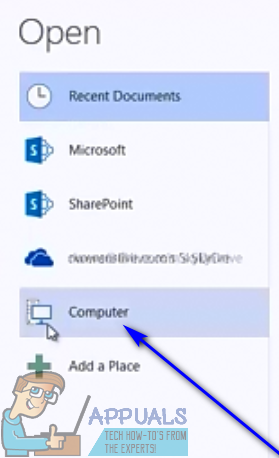
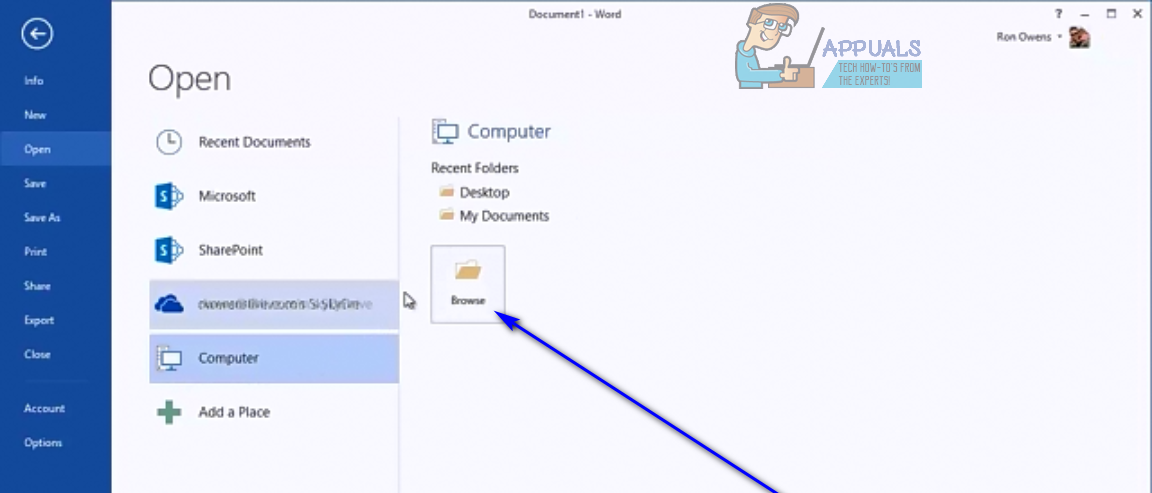
- Click on File > Open.


- Under Open, click on Computer to select it.

- Click on Browse in the right pane.

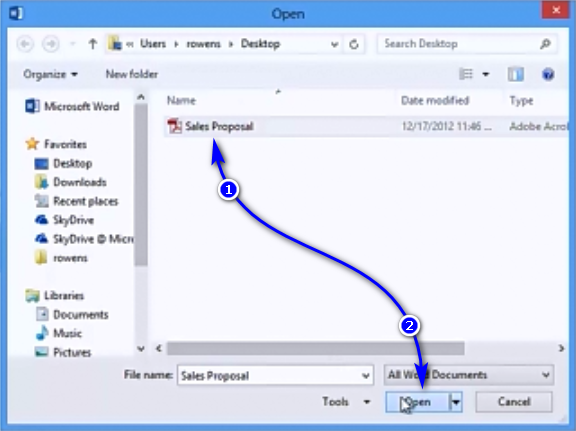
- In the Open window, navigate to the location on your computer the PDF file you want to open in Word is in.
- Locate the PDF file in question and click on it to select it.
- Click on Open.

- Word will display a message stating that it will now convert the selected PDF file into an editable Word document and that you may lose some substance or formatting as a result, especially if the selected PDF file is graphics-heavy. Word will also inform you that the process may take some time. Click on OK.

- Simply wait for Word to convert the selected PDF file into a Word document you can edit.


When Word converts a PDF file into an editable Word document, it prioritizes your ability to edit the text in the file over the overall layout of the file and the formatting of its contents. While the formatting of the content of the resulting document is pretty impeccable compared to the original PDF file in almost all cases, the layout (page breaks, for example) can be a bit messed up, and that’s just something you’ll have to be okay with.
Converting a PDF file into a Word file and then opening it
If you’re using a version of Word that is older than Word 2013 or if converting the PDF file in question into an editable Word document messes it up to the extent that you can’t successfully make the changes you want, you can convert the PDF file into a Word file beforehand and then open it in Word. You’re going to need Adobe Acrobat to do so, however. To convert a PDF file into a Word document using Adobe Acrobat, you need to:
- Open the PDF file in Adobe Acrobat.
- In the right pane of Adobe Acrobat, click on the Export PDF tool.
- For your export format, select Microsoft Word.
- Select Word Document.
- Click on Export. Adobe Acrobat will begin converting the PDF file into a Word document, which may take some time depending on how large the PDF file is and just how graphics-heavy it is. If the PDF file contains any scanned text, Adobe Acrobat will automatically run text recognition on it.
- Name the Word file Adobe Acrobat creates and save it in a desired location on your computer.

Kevin Arrows
Kevin Arrows is a highly experienced and knowledgeable technology specialist with over a decade of industry experience. He holds a Microsoft Certified Technology Specialist (MCTS) certification and has a deep passion for staying up-to-date on the latest tech developments. Kevin has written extensively on a wide range of tech-related topics, showcasing his expertise and knowledge in areas such as software development, cybersecurity, and cloud computing. His contributions to the tech field have been widely recognized and respected by his peers, and he is highly regarded for his ability to explain complex technical concepts in a clear and concise manner.
There are several methods one can use to insert or open pdf in Microsoft Word document. This way, you will be able to edit the pdf right within the Microsoft Word app. Yes, it is possible.
NOTE: Some of these methods involved using online or offline PDF converters. In this tutorial, I’ll show you how to do all of that for free.
Without wasting much time, let’s get started.
Method 1: Open PDF As Word on Windows
This method could be the simplest when it comes to inserting or opening pdf files in Microsoft Word document. It doesn’t involve using any file converter software.
Microsoft Word has a hidden PDF to Word convertor that will easily convert your pdf document to an editable Word document.
This is will save your day if you want to edit your PDF file inside your Word document.
Quick Guide:
To open and edit pdf inside a Word document, simply open the pdf file with Microsoft Word by right-clicking on the pdf file, go to Open With and select the Word app. Or launch Microsoft Word and go to Open, then select the PDF as the file you want to open. A dialog box will appear, click OK.
Obey these detailed instructions below to see how it works:
- Use the Open With the command to open the PDF file in MS Word. To do this, follow the steps below.
- Go to the folder that contains your pdf file. Mine is on Desktop.
- Right-Click on the pdf file. A shortcut menu will appear.
- From the shortcut menu, click on Open With to display the second menu.
- The second shortcut menu will list all the software that can be used to open the pdf file, select Word from this list.
- If Word doesn’t appear on the list, click on Choose another app for more options.

- You’ll see the How do you want to open this file? Dialog. Look for Word on this dialog.
- If you can’t find the Word app on the immediate list, further click on the More apps button. This will reveal more apps that you can use to open the PDF file. We are just trying to open the pdf with Microsoft Word since it is also a supported software for opening pdf files.

- When you click on More Apps, scroll to the button of the list. You should now see Word as part of the options.
- Click to select the Word option and then click on the OK button.

- Alternatively, you can open the PDF file by first opening Word document, then press Ctrl+O to launch the Open dashboard where you get to choose the location of the pdf file.
- After opening the file, you’ll be prompted with a message that says that Word will convert your pdf to an editable Word document. Click on the OK button to accept.

- Now Word will process the pdf file into a format that you can edit. This may take a while depending on the size of the pdf file. The smaller the file size the faster.
- When Word is done with the processing, it’ll then launch with an editable copy of your pdf file.
- Before you can edit the content, you may have to Enable Editing at the top of the window. This is just a warning that some files from the internet may contain a virus. If you are sure of the source of the file, just hit the Enable Editing button.

- After editing your document, Go to File>Save As to save your document as a Word document.
This is how you may easily open and edit any pdf file as a Microsoft Word document.
Method 2: Word’s Insert Object Command (Word 2019, 2016 & 2013)
This method uses technology known as Object Linking and Embedding (OLE) to display the PDF object in its original form withing the Microsoft Word programme.
You should use this approach if you want to only embed and view the pdf inside Word without editing the content.
Thus, with this option, you cannot edit the pdf file. It only allows you to insert the object for viewing only.
And once the pdf is inserted, you can resize and reposition it just as you will do with an image.
Below is a quick guide:
To embed pdf in word, go the Insert tab of the Ribbon and click on the Object drop-down arrow in the Text group, then click Object. The Object dialog box will appear, select Adobe Acrobat Document under the Object Type: and click OK. Then locate and open the PDF file from the Open dialog box to embed the file.
Obey the step by step instructions below:
- Launch your Word document.
- Place your insertion pointer at where you need to insert the pdf Document.
- Go to the Insert tab.
- In the Text group, select the Object drop-down and select Object.

The Object dialog box will appear.
- Under the Create New tab, you’ll need to specify the Object type. The Object type items depend on the programs installed on your Computer. This means your object type items may look different from mine. Select the Adobe Acrobat Document option and click on the Ok button.

- The open dialog box will appear. Navigate to the folder that contains the pdf file you want to insert into Word. Select the file and click Open.

- The pdf file will then be embedded into your Word document.
This is how you may insert or embed a pdf file into a Word document.
To Insert PDF into Word on Mac, just obey the instructions explained in this method and you’ll be able to get the job done.
Method 3: Open PDF in Word by Converting Online
There are a countless number of great PDF to Word converters that will allow you to convert your pdf files into Microsoft Word document for free without losing quality.
As an additional option to the above, you can, first of all, use these online file converters to change the PDF file to a Word document that you can open and edit freely.
Below is a list of some free online PDF to Word converters:
- Small PDF (Link: https://smallpdf.com/pdf-to-word)
- Free PDF Converter (Link: https://www.freepdfconvert.com/pdf-to-word)
- PDF to Doc (Link: https://pdf2doc.com/)
- I Love PDF (Link: https://www.ilovepdf.com/pdf_to_word)
- Simply PDF (Link: https://simplypdf.com/)
To use these online tools (Small PDF), obey the instructions below:
- Go to smallpdf.com
- Select the PDF to Word converter option.
- Alternatively, just click on this link to jump straight to the page.
- Click on the Choose Files button. Navigate to the location of your pdf file and upload it.

- When the File is uploaded, select the Convert to Word option and then click on the Choose Option button.

- The PDF converter will begin the process. It may take a while depending on the pdf file size. The smaller the size the faster the conversion process.
- As soon as the process is done, you should see a screen that says that your pdf file has been converted to an editable Word file. You’ll also be provided with a download button to download the converted file onto your PC Hard drive.

- Download the file and have fun.
Now that the file is converted into Word document file format, you can open the Word version and make any edits you want.
This is how you may open pdf in Word by first converting the file with a free online tool.
Method 4: Insert PDF to Word with Google Docs
Another easy way to open your pdf file in a Word document is to convert the file using Google Drive.
With this option, you first of all need to upload the pdf file into Google Drive, open it in Google Docs, and then Download it as a Microsoft Word document.
You don’t need any special pdf processor to do this. All you need is your web browser, your Gmail accounts and access to the internet.
If this option sounds cool for you, obey the instructions below:
- Login to your Google Drive account.
- To easily reach your Google Drive account, log in to your Gmail and navigate to the top right corner of your windows, click on the Google Apps button for the list of all the google apps and then choose Google drive from the apps. It will open in a new tab.

- Select New>Upload Files.
- Alternatively, click on My Drive drop-down and select Upload files.

- The file will be uploaded to your Google Drive. Now select the file and look at the top right corner of the window, you’ll see this three dotted line, click on it for more options. Select Open with > Google Docs.

- The PDF file will then open in google docs in a new tab.
- On the Google Doc window, go to File > Download > Microsoft Word (.docx).

The file will be downloaded as a Microsoft Word document.
You can then open the downloaded file and enjoy.
Using Google Drive and Google Docs, these are the steps.
Method 5: Use Adobe Acrobat Pro to open pdf as Word
This method didn’t come first because the software involved is not free. However, you can try the free trial version for 7 days.
With Adobe Acrobat Pro, you can do anything with your pdf documents including opening it in other file formats such as Word/Excel/PowerPoint or even editing the pdf file.
If you have the Adobe Acrobat Pro installed on your pc, obey the instructions below to get the job done.
- Open the PDF file you want to insert into Word document.
- Click on the Export PDF tool on the right pane.

- In the Export dialog, choose Microsoft Word as your Export option.

- Then click Export.
- You’ll be asked to select the folder that will contain the exported files, do just that to begin the process.
- After the conversion is done, all the content in the PDF will be inserted into a new Microsoft Word document.
At this point, you can open and edit the content in the pdf right within the Word document.
This is how you may insert or open pdf files in Word.
Method 6: Insert pdf into Word as Images
Another way you could get your pdf pages into Microsoft Word is to insert the pdf as either PNG or JPG file format.
To do so, you need to, first of all, convert the pdf file into images, then using the insert tab, load the images into your Word document.
That is a lot of work though, but it still gets the job done.
Just Obey the following instructions:
- Click here to learn how to convert pdf to jpg.
After converting the pdf files, what is left is to insert the converted files into Microsoft Word.
To do so:
- Open your Word document where you want to insert the pdf.
- Go to the Insert tab, in the Illustrations group, select picture to upload the converted images.

This is how you may insert pdf into a Word document as images.
Method 7: Insert pdf into Word by Copy and Paste
Use this approach if you want to insert only the content of the pdf into Word because you will lose all formatting and images (if any) when you copy and paste content from PDf to Word.
It involves selecting the content on the pdf file and then pasting it into your Microsoft Word document. Very simple.
Follow the steps below if this method sound right for you.
- Open both Microsoft Word and the PDF you want to insert.
- Go to the PDF and select all the content by press Ctrl+A.
- If you only want to insert portion or some pages of the pdf, select only that page or portion.
- After the selection, press Ctrl+C to copy.
- Alternatively, right-click on the selected text and select copy

- Switch over to Microsoft Word where you want to insert the PDF and press Ctrl+V to paste the copied content.
All the content you copy from the PDF document will be inserted into the Word document.
These are the 7 methods you can use to easily insert or open any pdf in Microsoft Word.