
Adobe Acrobat is software used to work with PDFs. PDF is Portable Document Format and was created by Adobe. PDF format is used to present documents. The Adobe Acrobat 10.0 Type Library can be used with VBA to programmatically work with Adobe Acrobat.
Getting Started
To use VBA with Adobe Acrobat, Adobe Acrobat must be purchased and installed on the user’s computer. Installing Adobe Acrobat should give VBA access to the Adobe Acrobat 10.0 Type Library. Set a project reference to: Adobe Acrobat 10.0 Type Library (C:Program Files (x86)AdobeAcrobat 2017Acrobatacrobat.tlb).
Another option instead of developing custom Adobe Acrobat solutions using VBA is to use a commercial plug-in like AutoMailMerge.
Object Model
The Acrobat Object Model consists of two layers: the application or AV layer, and the document or PD layer. The AVApp object is the top-level object representing the Adodbe Acrobat application. The AVDoc object represents a window containing an open PDF. The PDDoc object represents a PDF document. In addition to these layers, there is an object called the JSObject which is used to interop with the PDF JavaScript API.
Application Layer
The AV application layer provides objects for working with the window used to view PDF documents.
| Object | Description |
|---|---|
| AVApp | The top-level object which represents the Adobe Acrobat application. Can control the appearance and size of the application window and can be used to access the menu bar and tool bar of the application. |
| AVDoc | Represents a window containing an open PDF document. |
| AVPageView | Used for scrolling, magnification, changing pages, and accessing history. |
| AVMenu | Represents a menu. |
| AVMenuItem | Represents a single item in a menu. |
| AVConversion | Represents the format to save the document. |
Document Layer
The PD document layer provides objects for working with PDF documents.
| Object | Description |
|---|---|
| PDDoc | Represents a PDF document. |
| PDPage | Represents a single page of a PDF document. |
| PDAnnot | Represents an annotation. |
| PDBookmark | Represents a Bookmark |
| PDTextSelect | Represents selected text. |
JSObject
The native scripting language for PDF format is JavaScript. There is a JavaScript API for developers to work with PDFs. In VBA, the JSObject is used to access the JavaScript API. VBA does not have access to everything in the JavaScript API but most reasonable tasks can be accomplished. For learning the JavaScript API and using VBA with Adobe Acrobat see the JavaScript API Reference and the IAC Developer Guide provided by Adobe with the Adobe Acrobat SDK.
Example
This example should provide a basic template for automating filling out a PDF form.
Option Explicit

Private Function GetAVApp() As Object

    On Error Resume Next
    Set GetAVApp = GetObject("", "AcroExch.App")
    On Error GoTo 0

    If GetAVApp Is Nothing Then
        Set GetAVApp = CreateObject("AcroExch.App")
    End If

End Function

Public Sub AutomateAdobeAcrobatPDF()

    '''Requires a reference to Adobe Acrobat 10.0 Type Library

    Dim aApp    As Acrobat.AcroApp
    Dim aAVDoc  As Acrobat.AcroAVDoc
    Dim aPDDoc  As Acrobat.AcroPDDoc
    Dim JSO     As Object 'There is no explicit class type for the JSObject

    'Set PDF template file path
    Dim TemplatePath As String
    TemplatePath = "C:PDFTemplate.pdf"

    'Get Acrobat Application
    Set aApp = GetAVApp()

    'Use the AV layer document object to control how the document is viewed
    Set aAVDoc = CreateObject("AcroExch.AVDoc")
    If Not aAVDoc.Open(TemplatePath, "") Then
        MsgBox "There was a problem opening template: " & TemplatePath, vbCritical
        Exit Sub
    End If

    'Use the PD layer document object to access info about the document
    Set aPDDoc = aAVDoc.GetPDDoc

    'Use the JSObject object to access PDF JavaScript API
    Set JSO = aPDDoc.GetJSObject

    '''Do something''''''''''''''''''''''''
    '''''''''''''''''''''''''''''''''''''''

        'Check a checkbox
        JSO.getField("Checkbox1").checkThisBox 0, True

        'Add a signature from an image file
        'This is a workaround - add a button and add image to button
        Dim SigRect(3) As Single
        SigRect(0) = 400
        SigRect(1) = 65
        SigRect(2) = 500
        SigRect(3) = 30
        JSO.addField "sigbutton", "button", 0, SigRect
        JSO.getField("sigbutton").buttonPosition = 2
        JSO.getField("sigbutton").buttonImportIcon "Signature.png"
        JSO.getField("sigbutton").buttonFitBounds = True

        'Add Date
        Dim DateRect(3) As Single
        DateRect(0) = 360
        DateRect(1) = 55
        DateRect(2) = 405
        DateRect(3) = 42
        JSO.getField("date").rect = DateRect
        JSO.getField("date").Value = Format$(Date$, "dd/mm/yyyy")
        JSO.getField("date").TextSize = 8

    '''''''''''''''''''''''''''''''''''''''
    '''''''''''''''''''''''''''''''''''''''

    'Close Docs
    aPDDoc.Close
    aAVDoc.Close False

    'Exit Adobe
    aApp.Exit

    'Cleanup
    Set JSO = Nothing
    Set aPDDoc = Nothing
    Set aAVDoc = Nothing
    Set aApp = Nothing

End SubHere is another topic that comes up every now and then: How can I “talk” to Adobe Acrobat from e.g. MS Excel via VBA? I’ll try to give an introduction into that subject in this document. I will only discuss the basics, but I’m open for suggestions about what part to discuss next. So keep the comments coming.
More after the jump…
The Warning Upfront
Before we get too deep into this, let me say this: I am not a VBA expert. I do not program in VBA or VB. All I know about VB is from googling a few things and looking at sample code. It does help that I’ve programmed in many (make that a capital ‘M’ Many) programming languages, and at the end most of them share enough characteristics that once you know one, you know all of them… But still, don’t consider my VB programs to be at an expert level. I only use the samples to demonstrate general methods. It’s up to you to fill in all the missing details (e.g. exception handling).
Resources
All this information is available in one form or another in Adobe’s SDK documentation. Before you read any further, click on this link and take a look at what they have available.
There are (at least) two documents that are required reading if you want to use Acrobat from within your VBA code:
- Developing Applications Using Interapplication Communication (510KB PDF Document)
- Interapplication Communication API Reference (2.3MB PDF Document)
If you want to utilize the VB/JavaScript bridge, you also should read the JavaScript related documents:
- JavaScript for Acrobat API Reference – Version 8 (7.5MB PDF document)
- Developing Acrobat Applications Using JavaScript (2.7MB PDF document)
All of these documents can also be accessed via Adobe’s online documentation system. In order to find the documents I’ve listed above, you need to expand the tree on the left side of the window for the “JavaScript” and “Acrobat Interapplication Communication” nodes.
There is always more than one way…
There are two ways your program can interact with Acrobat. One is more direct than the other, but both require the same mechanism to get things started…
You can either use the “normal” IAC (Inter Application Communication) interface, which is basically a COM object that your program loads and uses to communicate with Acrobat, or you can use the VB/JavaScript bridge, which allows access to Acrobat’s JavaScript DOM. The latter case still requires that your program first establishes a connection to Acrobat via IAC.
Let’s get the party started
As I mentioned before, regardless of how we want to remote control Adobe Acrobat from VB, we need to establish a connection to its COM object (or OLE server). You may have noticed that I always talk about “Adobe Acrobat”, and not the “Adobe Reader”. What I’m presenting here is valid for the Adobe Acrobat, Reader only supports a small subset of features. To learn more about what the differences are, see the IAC Developer Guide. For the purpose of this document, I will use MS Excel 2007 and Adobe Acrobat 9 Pro. As long as you have a version of Acrobat that is compatible with the version of VBA that you are using, you should be able to follow along without any problems.
Preparing MS Excel 2007
When you install Office 2007 or Excel 2007, make sure that you select the Visual Basic Editor component, otherwise you will not be able to write VBA code. This is different than all the versions up to 2007. Once installed, you need to add the “Developer” tab to the ribbon. This is done on the Excel Options dialog, under the Popular category:

Once that is done, you should see the “Developer” tab as part of the ribbon:
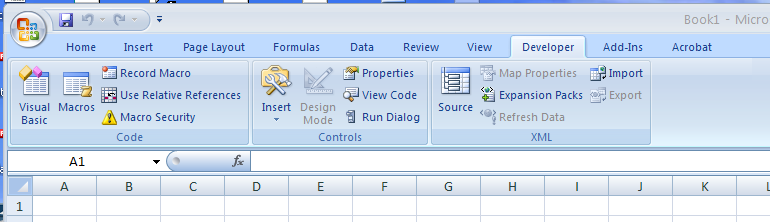
Our First Button
Open a new document and select the Developer tab. Then go to the Insert control and place a button on your document. This will pop up the “Assign Macro” dialog, just click on the “Add” button, which will bring up the VBA editor. Nothing special so far.
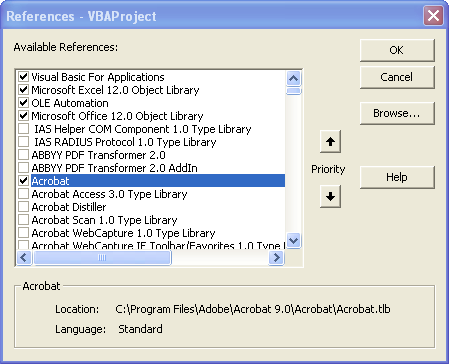
Before we can use any of Acrobat’s functionality, we need to make sure that VBA knows about the Acrobat objects. On the VBA dialog, select the “Tools>References” menu item. On the dialog that pops up, make sure that the TLB for your version of Acrobat is selected. This is what it looks like for my system:
Now we can add code that references the Acrobat objects to our button handler. Of course, before we do that, we need to decide what our button is actually supposed to trigger. Let’s start with something simple – let’s combine two PDF documents and save the result as a new document.
I’ll present the whole program first, and will then explain the different parts.
Sub Button1_Click()

    Dim AcroApp As Acrobat.CAcroApp

    Dim Part1Document As Acrobat.CAcroPDDoc
    Dim Part2Document As Acrobat.CAcroPDDoc

    Dim numPages As Integer

    Set AcroApp = CreateObject("AcroExch.App")

    Set Part1Document = CreateObject("AcroExch.PDDoc")
    Set Part2Document = CreateObject("AcroExch.PDDoc")

    Part1Document.Open ("C:tempPart1.pdf")
    Part2Document.Open ("C:tempPart2.pdf")

    ' Insert the pages of Part2 after the end of Part1
    numPages = Part1Document.GetNumPages()

    If Part1Document.InsertPages(numPages - 1, Part2Document,
		0, Part2Document.GetNumPages(), True) = False Then
        MsgBox "Cannot insert pages"
    End If

    If Part1Document.Save(PDSaveFull, "C:tempMergedFile.pdf") = False Then
        MsgBox "Cannot save the modified document"
    End If

    Part1Document.Close
    Part2Document.Close

    AcroApp.Exit
    Set AcroApp = Nothing
    Set Part1Document = Nothing
    Set Part2Document = Nothing

    MsgBox "Done"

End Sub
Save the document. When prompted for a filename and a filetype, select the type of “Excel Macro-Enabled Workbook” – otherwise the program you just added will get stripped out of the file.
Make sure that there are two files named Part1.pdf and Part2.pdf in the c:temp directory.
Click the button and enjoy…
After the program is done, there will be a new file C:TempMergedFile.pdf on your disk. Open that in Acrobat, and verify that it indeed contains the results of concatenating the two source files.
So, how does it work?
The whole program is in a button handler.
Sub Button1_Click()
...
End Sub
Let’s now look at the different parts of that handler.
At first, we need to setup a bunch of objects that we will use further down the code:
    Dim AcroApp As Acrobat.CAcroApp
    Dim Part1Document As Acrobat.CAcroPDDoc
    Dim Part2Document As Acrobat.CAcroPDDoc
    Dim numPages As Integer
The first statement sets up an object of type Acrobat.CAcroApp – this reflects the whole Acrobat application. If you look through the documentation, you’ll see that there are a number of things that can be done on the application level (e.g. minimizing or maximizing the window, executing menu items, retrieve preference settings, closing the application, …). The next two lines declare two objects of type Acrobat.CAcroPDDoc – these reflect the two documents that we need to open.
There are two different document types available in the OLE part of IAC: The AVDoc and the PDDoc. An AVDoc is one that gets opened in Acrobat’s user interface, the user can navigate through its pages, and do anything that you can do with a PDF document when you double-click on it to open it in Acrobat. A PDDoc on the other hand gets opened in the background. Acrobat still has access to it, and can manipulate it, but the user does not see it. This is useful if a program should quietly do its work without showing the user what’s going on.
Every AVDoc has a PDDoc behind the scenes, and that object can be retrieved via the AVDoc.GetPDDoc method. A PDDoc only has an associated AVDoc if it is actually shown in Acrobat, however, we cannot retrieve that AVDoc object from within the PDDoc. This sounds complicated, but once you get more familiar with how these things are used, it becomes second nature.
We also need an integer object to store the number of pages in the first document.
    Set AcroApp = CreateObject("AcroExch.App")
    Set Part1Document = CreateObject("AcroExch.PDDoc")
    Set Part2Document = CreateObject("AcroExch.PDDoc")
In the next step, we initialize the three Acrobat related objects. Nothing special here.
    Part1Document.Open ("C:tempPart1.pdf")
    Part2Document.Open ("C:tempPart2.pdf")
Now that our objects are initialized, we can use the methods to do something with the objects. In order to merge files, we need access to both the source files, so we have to call the Open() method on both these objects. The key to success is to specify the whole path name, directory and filename.
numPages = Part1Document.GetNumPages()
The method InsertPages requires that we specify after which page to insert the second document. Because we want to insert the pages after the last page of the first document, we need to find out how many pages we have in that document. The GetNumPages() method does return that information.
This is also, where it becomes a bit tricky: Acrobat starts to count the pages in a PDF document at zero. So, if we want to insert the pages after the first page in the document, we need to insert after page number zero. If we want to insert after the second page, we need to insert after page number one… Because we want to insert the pages after the last page of the first document, we need to insert the pages after (lastPage-1). Again, this is a bit confusing, but after a while it gets easier.
    If Part1Document.InsertPages(numPages - 1, Part2Document,
		0, Part2Document.GetNumPages(), True) = False Then
        MsgBox "Cannot insert pages"
    End If
This is where Acrobat does all its work. The parameters of the InsertPages method are described in the Interapplication Communication API Reference document: InsertPages
Now we only have to save the document, do some cleanup and exit our program:
    If Part1Document.Save(PDSaveFull, "C:tempMergedFile.pdf") = False Then
        MsgBox "Cannot save the modified document"
    End If

    Part1Document.Close
    Part2Document.Close

    AcroApp.Exit
    Set AcroApp = Nothing
    Set Part1Document = Nothing
    Set Part2Document = Nothing

    MsgBox "Done"
With these steps, and the information in the API documentation, you should be able to write simple programs.
I’ll document the VB/JavaScript bridge in my next posting.
I have a list of PDF files in MS Excel. I want to open & then close the files in Acrobat Reader.
I do Not want to edit the files, only Open & Close.
I have the VBA Reference: «Adobe Reader File Preview Type Library» selected.
I should be able to use Early Binding.
Could someone fill in the missing code so I can use Acrobat Reader.
Thank you in advance. I’ve spent hours trying to figure this out!
Sub TestFilesPDF()Dim sFile As String
Dim sFile as string
'Early Binding
Dim PDFApp As Acrobat.CAcroApp   'Acrobat Reader HELP
Dim PDFDoc As Acrobat.CAcroAVDoc 'Acrobat Reader HELP

'Note:
'dllFile = "C:Program Files (x86)AdobeAcrobat Reader DCReaderAcroRd32.dll"
'exeFile = "C:Program Files (x86)AdobeAcrobat Reader DCReaderAcroRd32.exe"


    'Uses Early Binding to open Acrobat Reader
    Set PDFApp = "" '<< Help
    Set PDFDoc = "" '<< Help

    With wsFileList
		sFile = .Cells(2, 3).Value

        'Open File
        PDFDoc.Open sFile, vbNormalFocus

        'Close File
        PDFDoc.Close

    End With 'wsFileList

    'Release memory
    AcroApp.Exit
    Set AcroDoc = Nothing
    Set AcroApp = Nothing
End Sub[Some of the links in this Excel Tutorial are affiliate links, which means that if you choose to make a purchase, I will earn a commission. This commission comes at no additional cost to you.]
I’ve written about the topic of PDF and Excel several times throughout Power Spreadsheets. Some of the issues I’ve covered include the following:
- How to convert PDF files to Excel.
- How to save Excel files as PDF using VBA.
 All of these topics are quite important. After all, PDF files are one of the most widely used formats for electronic documents.
If you’re anything like me, you probably encounter PDF files at work virtually every single day. In some of those cases, you may need to extract data from PDF to Excel. I cover the topic of manually converting PDF files to Excel in the first post I link to above. In that particular post I explain 3 different methods you can use:
- Method #1: Copying and pasting directly from the PDF file.
- Method #2: Using Microsoft Word.
- Method #3: Using a PDF Converter, such as Able2Extract.
Those 3 methods (particularly methods #2 and #3) are helpful in many situations you may encounter in your day to day work. You might, however, be wondering whether there’s a way to automate such processes.
If that’s the case, I’ve got good news for you:
It’s possible to use VBA for purposes of extracting data from PDF files to Excel. To be more precise, you can use VBA to automate the 3 methods of converting PDF to Excel that I mention above. I show you how to do this in the VBA tutorial below.
The following table of contents provides a more detailed list of the main topics I cover in this blog post:
All of the methods to extract data from PDF to Excel using VBA that I explain in this tutorial require that you use applications different from Excel (Adobe Reader, Able2Extract or Word). Therefore, let’s start by taking a quick look at the topic of…
Controlling Other Application From Excel With VBA
There are several ways in which you can control other applications from Excel. For example, in Mastering VBA for Microsoft Office 2016, author Richard Mansfield lists the following:
- #1: Automation.
- #2: Data objects.
- #3: Dynamic Data Exchange (DDE).
- #4: SendKeys.
- #5: The Command Line.
For purposes of this VBA tutorial, I only cover the following concepts related to this topic:
- SendKeys (#4 above).
More precisely, I use SendKeys when working with Adobe Reader or Able2Extract to convert a file from PDF to Excel.
- Automation (#1 above).
Automation is relevant for purposes of using Word when converting a PDF file to Excel.
I explain how to use SendKeys for purposes of communicating between applications first. However, for purposes of using SendKeys, you first need to use and understand the Shell Function. The reason for this is that you can only use SendKeys with an application that is currently open and running. SendKeys isn’t capable of opening an application by itself.
However, the Shell Function is able to run an application. Once the application is running, you can use SendKeys. I explain all of this in the following sections, starting with the…
Shell Function
You can use the Shell Function to achieve 2 things:
- #1: Run an executable program.
- #2: If the program runs successfully, obtain a Variant(Double) value that represents the task ID of the relevant program.
If the program doesn’t run successfully, an error occurs.
The task ID is “a unique number that identifies the running program”. You may find this ID useful for other purposes, such as using the TaskKill command to close the program or, as explained in Excel 2016 Power Programming with VBA, “activate the task”.
The basic syntax of Shell is as follows:
Shell(pathname[,windowstyle])
As you can see, the Shell Function uses the following 2 arguments:
- pathname.
pathname is a required Variant (String) argument. You use it to specify the following:
#1: The path and name of the program to be executed.
#2: Any arguments or command-line switches that may be required.
In other words, you generally use pathname to specify (i) the program to be executed and, if required, (ii) the file name and arguments required for purposes of executing the program.
If you’re working on a Mac, you can use the MacID Function for purposes of using the application signature (instead of its name) to specify the pathname argument.
- windowstyle.
windowstyle is an optional Variant (Integer) argument.
You use windowstyle for purposes of determining the style of the window in which the program you specify (using pathname) is executed. You can generally use the windowstyle values that appear in the table below. In all cases, I describe (i) what happens to the window of the newly executed program and (ii) which window has the focus (is active):
Value Constant Description 0 vbHide Program window is hidden. Focus is on hidden window.
1 vbNormalFocus New window is displayed on most recent size and position. Focus is on new window.
2 vbMinimizedFocus New window is displayed as an icon. Focus is on new window (icon).
3 vbMaximizedFocus New window is maximized. Focus is on new window.
4 vbNormalNoFocus New window is displayed in most recent size and position. Focus is on current active window .
6 vbMinimizedNoFocus New window is displayed as an icon. Focus is on current active window.
If you omit windowstyle, the default value is vbMinimizedFocus. In other words, the program starts minimized with focus.
If you’re working on a Mac, the following differences apply (particularly on the more recent iOS versions):
Difference #1: You can only use windowstyle to specify whether or not the relevant application has focus when executed.
Difference #2: The vbHide windowstyle constant (0) I show above isn’t generally applicable.
Therefore, in practice, when working with a Mac you can usually only choose between the following 2 options:
Option #1: Display the newly executed application in the foreground (with focus). For these purposes, you can use any of the 3 windowstyle values with focus (vbNormalFocus, vbMinimizedFocus or vbMaximizedFocus).
Option #2: Open the application in the background (without focus). For these purposes, you can generally use the windowstyle values without focus (vbNormalNoFocus, vbMinimizedNoFocus or vbHide).
The Shell Function has a characteristic that can be tricky to handle:
It runs the relevant program asynchronously. In other words, Visual Basic for Applications continues executing the statements that follow the Shell Function (without pausing) regardless of whether Shell has achieved its purpose (opening another application).
As explained by Richard Mansfield in Mastering VBA for Microsoft Office 2016:
When VBA executes a Shell statement, it registers the statement as an action to be performed— but that action may not necessarily be finished before the next statement in your VBA code executes.
Here’s why this can cause you problems:
- First, as I explain above, whenever you execute a particular program using the Shell Function, is possible that the newly executed program doesn’t execute prior to Visual Basic for Applications executing the statements that follow the Shell Function.
- Despite the above, the statements that follow Shell may rely on the Shell statement having been fully executed. In other words, those statements may need the application launched by Shell to be open before they can do anything.
- If (i) the statements that follow the Shell Function depend on Shell being executed but (ii) Shell hasn’t actually executed the relevant program at that point, an error occurs.
You don’t have to go too far to find situations where this is an issue. In fact, the VBA Sub procedures that I provide below serve as examples.
This, however, doesn’t mean that you can’t do anything to reduce the possibility of errors. As Richard Mansfield goes on to explain in the above-cited Mastering VBA for Microsoft Office 2016:
A crude but often-effective fix is to just allow extra time for the Shell function to execute before taking any dependent action.
There are a few ways in which you can allow for this extra time. For example:
- Mansfield himself suggests calling the Sleep API.
You can use the Sleep API to suspend execution of a thread for a certain amount of time.
- In the code examples below I use the Application.Wait method.
The Wait method allows you to pause a macro for a specified amount of time.
- You can also use a loop.
I don’t cover these topics in detail within this blog post. However, I may write about the topic of pausing or delaying VBA in more detail sometime in the future. If you want to receive an email whenever I publish new content in Power Spreadsheets, please make sure to register for our Newsletter by entering your email address below now:
Before we move on to SendKeys, let’s take a short look at the…
TaskKill Command
The main purpose of the TaskKill command is to end a task or process. You can use the Shell Function for purposes of killing the application once you’re done working with it.
Therefore, in the context of this VBA tutorial, we’re interested in how we can use TaskKill for purposes of closing the application that the Shell Function runs. As a consequence of this, I don’t explain everything there’s to know about the TaskKill command.
The syntax of the TaskKill command can get relatively complicated. However, within the context of this blog post, you just need to understand the following simplified syntax version:
TaskKill /F /Task
Within this simplified syntax version, “F” specifies that the relevant task should be forcefully terminated.
“Task” is where you specify what is the task or process to be terminated. There are 2 basic ways in which you can specify this:
- PID ProcessID.
This makes reference to the Process ID of the task or process you want to terminate.
If you use this alternative within the context of this tutorial, the relevant Process ID is the task ID returned by the Shell Function (as I explain above).
- IM ImageName.
In this alternative, you specify the process to be terminated by using its image (process) name. You generally have to use “.exe” when using this alternative.
This is the way in which I specify the task to be terminated in the code examples below. You can refer to them for purposes of seeing how I implement the TaskKill command to close both Adobe Reader and Able2Extract after using them to convert the data from a PDF file to Excel.
SendKeys Statement And Application.SendKeys Method
Visual Basic for Applications has both a SendKeys statement and a SendKeys method. They both behave in a very similar manner and, therefore, I explain both of them in this section.
Let’s start by taking a general look at the main similarities and differences between the statement and the method:
SendKeys Statement Vs. Application.SendKeys Method
As a general matter, you can use both the SendKeys statement and the Application.SendKeys method to send keystrokes to a particular window or application. This, in practice, has the same result as actually typing those statements on the keyboard.
As a general rule, you can’t use SendKeys to send keystrokes to an application that isn’t designed to be executed on a Windows or Mac platform. This is the case, for example, of DOS applications that run in a virtual machine.
SendKeys is also not able to work with applications that aren’t currently running. As I mention above, you must use the Shell Function for purposes of opening the application. Once the application is running, you can use SendKeys.
On a more specific level, according to the Microsoft Dev Center, you can:
- Use the SendKeys statement for purposes of sending keystrokes to the active window.
- Use the Application.SendKeys method for purposes of sending keystrokes to the active application.
Even though the description is almost identical, notice the difference at the end of the description of both constructs. Even though the active window and the active application may (and usually) make reference to the same, this isn’t always the case.
The active window and active application may be different.
So, what’s the bottom line?
- The SendKeys statement and the Application.SendKeys method are interchangeable and work the same in most cases.
- They’re, however, not redundant.
More precisely, in order to determine which one is appropriate to use, you must be aware whether you’re (i) controlling one application from another, or (ii) working within one application.
Let’s take a look at the …
SendKeys Syntax
The basic syntax of the SendKeys statement is as follows:
SendKeys string [, wait]
The syntax of the Application.SendKeys method mirrors the above:
expression.SendKeys(Keys, Wait)
When working with the Application.SendKeys method, “expression” is a variable representing an Application object. Other than this, SendKeys has 2 arguments:
- Argument #1: string (for the SendKeys statement) or Keys (for the SendKeys method).
This first argument (string or Keys) is required. You use it to specify the keystrokes that should be sent as a string.
- Argument #2: wait.
wait is an optional argument. You use it to determine whether Excel waits for the relevant keystrokes to be processed before control comes back to the macro. More precisely:
If you set wait to True, the keystrokes you specify with argument #1 (string or Keys) are processed. Only after this processing has been completed, control returns to the VBA procedure.
If you omit the wait argument (or set to its default value of False), the keystrokes are sent and control immediately returns to the macro. In this case, the VBA code doesn’t wait for the keystrokes to be processed and the macro execution simply continues.
Argument #2 is relatively straightforward. As I mention above, it’s a Boolean and you can only set it to True or False (or omit it).
However, you have a lot of options when specifying argument #1 (string or Keys). Therefore, let’s take a look at the 6 main rules you should consider when specifying the keystrokes you want the VBA application to send:
- Rule #1: As a general rule, you specify letters, numbers or other characters that are displayed upon you pressing the appropriate key, by including the appropriate character in your code.
For example, you specify the word Excel by including the string “Excel” in your VBA code.
The main exceptions you should be aware of are those I explain in rule #4 below.
- Rule #2: As a general rule, you specify keys that (i) don’t result in a character being displayed when you press the appropriate key or (ii) represent an action (instead of an actual character) by using the appropriate code. The table below includes several of the most relevant. You can also refer to the lists at the Microsoft Dev Center here (for the SendKeys statement) and here (for the SendKeys method).
Key SendKeys Code BACKSPACE {BACKSPACE}, {BS} or {BKSP} BREAK {BREAK} CAPS LOCK {CAPSLOCK} DELETE or DEL {DELETE} or {DEL} DOWN ARROW {DOWN} END {END} ENTER {ENTER} (numeric keypard) or ~ (tilde) ESC {ESCAPE} or {ESC} HELP {HELP} HOME {HOME} INSERT or INS {INSERT} or {INS} LEFT ARROW {LEFT} NUM LOCK {NUMLOCK} PAGE DOWN {PGDN} PAGE UP {PGUP} RETURN {RETURN} RIGHT ARROW {RIGHT} SCROLL LOCK {SCROLLLOCK} TAB {TAB} UP ARROW {UP} Function Keys (F1 through F16) {F#}, where # is the relevant number between 1 (for F1) through 16 (for F16) - Rule #3: When specifying that a particular keystroke must be repeated a certain number of times, you can generally use a shortcut. Instead of repeating the relevant keystroke several times, use the following syntax:
{key number}
Where (i) “key” represents the key you want to enter and (ii) “number” is the number of times the relevant key should be repeated.
- Rule #4: Despite rule #1 above, certain keys that have a special meaning should be surrounded by curly braces ({ }). The most relevant keys falling within this rule #4 are (i) plus (+), (ii) caret (^), (iii) parentheses (( )), (iv) tilde (~), (v) brackets ([ ]), and (vi) curly braces themselves ({ }).
Strictly speaking, square brackets ([ ]) don’t actually have a special meaning for SendKeys itself. The main reason why they’re subject to this rule is that they have a special meaning within other applications. This may be significant if there’s dynamic data exchange (DDE).
- Rule #5: If you want to specify a combination of (i) a particular key and (ii) Shift, Ctrl or Alt, apply the following codes:
Key SendKeys Code Shift + Ctrl ^ Alt % As I show in the examples further below, these codes are helpful for purposes of specifying keyboard shortcuts.
Note that this rule #5 applies only to combinations of a single key with Shift, Ctrl or Alt. In other words, only the keystroke that immediately follows the code above (for Shift, Ctrl or Alt) is considered to be pressed at the same time. The other keystrokes in the string that you specify are considered to be pressed separately.
If you need to hold Shift, Ctrl or Alt while more than 1 key is pressed, take a look at…
- Rule #6: Further to rule #5, you can specify that Shift, Ctrl or Alt should be held down while other keys are pressed. For these purposes, enclose those other keys in parentheses (( )). In other words, use the following syntax:
Code(Keys)
For these purposes, (i) “Code” is the code of the key you want to hold down, as they appear in the table under rule #5 above, and (ii) “Keys” are the other keys to be pressed while the one specified in the preceding (i) is held down.
When To Use SendKeys
SendKeys is a very basic way of controlling other applications from Excel. For example, in Mastering VBA for Microsoft Office 2016, author Richard Mansfield describes SendKeys as…
The oldest and most primitive method of communicating between applications.
In other sections, Mansfield uses adjectives such as “basic” and “limited” to further describe SendKeys.
You may not be surprised by such descriptions.
In fact, as Mansfield himself explains, SendKeys may cause certain issues. He highlights the following 2:
- Problem #1: Similar to what occurs with the Shell Function I explain above, SendKeys can often be the cause of timing issues.
- Problem #2: Testing code is more complicated and less reliable. In particular, you generally face limitations when trying to step through the code using the Visual Basic Editor.
You might then be wondering…
Should you use SendKeys at all? If so, when should you use SendKeys?
SendKeys should probably not be your VBA construct of choice for purposes of controlling other applications from Excel. However, in certain situations, it can be helpful. A useful general rule is provided in Mastering VBA for Microsoft Office 2016:
You may find SendKeys useful if neither Automation nor DDE works with the target application.
In the code examples that I explain below, SendKeys is used for purposes of (i) accessing the menus of other applications and the tools within those menus, or (ii) taking advantage of keyboard shortcuts within those applications.
VBA Code Example #1: PDF To Excel Using Adobe Reader
All of the macro examples within this tutorial extract the data within the Statistical Tables that accompany Christopher Dougherty’s book Introduction to Econometrics. You can get this PDF file here.

Let’s start with the first example…
The following sample macro (pdf_To_Excel_Adobe) uses Adobe Reader for purposes of converting the contents of the PDF file to Excel.
The basic structure of this VBA application is commonly found throughout the Internet whenever you search for examples of how to extract data from PDF to Excel.

This macro proceeds roughly as follows:
- Step #1: Opens the relevant PDF file using Adobe Reader.
- Step #2: Selects and copies the data.
- Step #3: Pastes the data into Excel.
Let’s take a look at each of the lines of code to understand the specifics behind this sample macro:
Line #1: Dim myWorksheet As Worksheet
Uses the Dim statement to declare the myWorksheet object variable as a Worksheet.
The main purpose of this line of code is to create an object variable that represents the Excel worksheet where the contents of the PDF file are pasted.
Lines #2 To #4: Dim adobeReaderPath As String | Dim pathAndFileName As String | Dim shellPathName As String
All of these lines use the Dim statement for purposes of declaring several variables (adobeReaderPath, pathAndFileName and shellPathName) as Strings.
The main purpose of these lines of code is to declare the variables that hold the 3 following strings:
- String #1: The path to the application used to open the PDF file.
In the case of this example #1, this application is Adobe Reader. The variable holding this string is adobeReaderPath.
- String #2: The path to the PDF file you want to convert to Excel.
All of the examples I use throughout this tutorial convert the file named “Statistical Tables”, as I explain above. This string is held by the pathAndFileName variable.
- String #3: The pathname argument used by the Shell Function.
For purposes of the VBA code examples within this tutorial, the general form of the pathname argument is as follows:
adobeReaderPath “pathAndFileName”
The resulting string is held by the shellPathName variable.
Line #5: Set myWorksheet = ActiveWorkbook.Worksheets(“Adobe Reader”)
Uses the Set statement for purposes of assigning the worksheet named “Adobe Reader” within the active workbook to the myWorksheet object variable.
The structure of this statement is as follows:
- Item #1: myWorksheet is originally declared in line #1 above.
- Item #2: The equal sign (=) acts as an assignment operator. It (i) takes the expression to its right side (item #3 below), and (ii) assigns it to the variable on its left side (item #1 above).
- Item #3: The reference to the relevant worksheet (Adobe Reader) is created by using the following VBA constructs:
Property #1: The Application.ActiveWorkbook property returns the active workbook.
Property #2: The Workbook.Worksheets property to return the worksheet named “Adobe Reader”.
Lines #6 And #7: adobeReaderPath = “C:Program FilesAdobeAcrobat Reader DCReaderAcroRd32.exe” | pathAndFileName = “C:…Power Spreadsheets ExamplesStatistical Tables.pdf”
Both lines of code use the assignment operator (=) to (i) assign the string on the right side of the operator to (ii) the variable on the left side.
In practical terms:
- Line #6 assigns the path of the application you use to open the PDF file (Adobe Reader in this case) to the adobeReaderPath variable.
adobeReaderPath is declared in line #2 above.
- Line #7 assigns the path of the PDF file you want to convert to Excel (Statistical Tables) to the pathAndFileName variable.
pathAndFileName is declared in line #3 above.
Line #8: shellPathName = adobeReaderPath & ” “”” & pathAndFileName & “”””
Just as the previous lines #6 and #7, uses the assignment operator to assign a string to a variable.
In this particular case, however:
- The string being assigned is built by using the concatenation operator (&) to concatenate 4 separate items:
Item #1: The string held by the adobeReaderPath variable. This is the path to the application used to open the PDF file.
Items #2 And #4: Double quotes (“).
Item #3: The string held by the pathAndFileName variable. This is the path to the PDF file you convert to Excel.
- The variable to which the string is assigned is shellPathName. This variable is declared in line #4 above.
Lines #9 To #11: Call Shell(pathname:=shellPathName, windowstyle:=vbNormalFocus)
Uses the Shell Function to run the program you use to open the PDF file you’re converting.
In other words, this is the line of code that opens the program you’re using. In this code example #1, this program is Adobe Reader.
The way in which the program is opened is further determined by the following 2 arguments:
- Argument #1: pathname:=shellPathName.
As I explain above, you use the pathname to specify the program to be executed and any relevant arguments or command-line switches. In this code example, pathname is set to be the string held by the shellPathName variable.
The value held by the shellPathName variable is as determined in line #8 above. Therefore, shellPathName holds a string containing the paths and names of (i) the executed program (Adobe Reader in example #1) and (ii) the PDF file to be converted to Excel (Statistical Tables).
- Argument #2: windowstyle:=vbNormalFocus.
You use the windowstyle argument for purposes of specifying the style of the window in which the relevant program is executed. In this case, I use the vbNormalFocus constant.
The consequence of this is that the program (Adobe Reader in this case), opens in a window that has (i) focus and (ii) its original size and position.
Lines #12 And #16: Application.Wait Now + TimeValue(“0:00:03”) | Application.Wait Now + TimeValue(“0:00:30”)
As I explain when introducing the Shell Function and SendKeys, one of the main weaknesses of these constructs is that they can be the source of timing problems.
I also mention how there are several ways in which you can handle these timing problems. Since this VBA tutorial focuses on how to convert files from PDF to Excel (instead of pausing or delaying VBA), I use a relatively simple construct for these purposes: The Application.Wait method.
Both of these lines of code (#12 and #16) use the Application.Wait method for purposes of pausing the execution of the sample macro until a particular time.
Application.Wait has a single required argument: Time. This is the time at which you want execution of the macro to resume.
In the case we’re looking at, Time is specified by using the following VBA constructs:
- Item #1: The Now Function, which returns the current date and time.
- Item #2: The TimeValue Function. TimeValue takes its string argument (time), and returns a Variant (Date) that contains the time.
When used together (as in this case), the Now and TimeValue Functions return a time that is a certain amount of time in the future. In the cases above:
- “Now + TimeValue(“0:00:03″)” returns a time 3 seconds into the future. In other words, execution of the macro is paused for 3 seconds.
- “Now + TimeValue(“0:00:30″)” returns a time 30 seconds from now. The consequence of this is that execution of the macro pauses for 30 seconds.
The times I’m using here are for illustrative purposes only. The computers you work with may be faster or slower than the ones I’ve used while testing the sample macro.
Inaccuracies in the amount of time you use as argument for the Application.Wait method can result in errors. For example, if I reduce TimeValue in line #16 from “0:00:30” (30 seconds) to “0:00:01” (1 second), Visual Basic for Applications displays the following dialog box:

Line #13: SendKeys “%vpc”
Uses SendKeys to enter the keyboard shortcut “Alt + V, P, C”.
If you’re working with Adobe Reader, this keyboard shortcut proceeds as follows:
- Step #1: Press “Alt + V”, which expands the View menu.
- Step #2: Expand the Page Display options.
- Step #3: Select Enable Scrolling.

You might be wondering why should you ensure that scrolling is enabled if the only thing you want to do is select all the text.
Let me explain:
The Select All command of Adobe Reader (which I use in the following line #14) doesn’t always select all the text in the open file. More particularly, if Single Page View is enabled, Select All usually only selects the contents of a single page.
Therefore, in order to ensure that the Select All command given in line #14 selects all the text within the PDF file (vs. a single page), I include this line #13 to guarantee that scrolling is enabled.
Note that the “Alt + V, P, C” keyboard shortcut used by this line #13 means that the Alt and V keys are pressed at the same time. You can alternatively send the keystroke “Alt, V, P, C”, where the keystrokes are sent sequentially. If you prefer using this second version of the keyboard shortcut, simply split apart the keystrokes sent by SendKeys using the following statements instead of line #13:
SendKeys “%”
SendKeys “vpc”
Line #14: SendKeys “^a”
Uses SendKeys for purposes of entering the keyboard shortcut “Ctrl + A”. Within Adobe Reader, this is the keyboard shortcut to select all.

Line #15: SendKeys “^c”
Uses SendKeys to enter the keyboard shortcut “Ctrl + C”. In Adobe Reader, this is the keyboard shortcut to copy.

Lines #17 And #20: With myWorksheet | End With
These are the opening and closing statement of a With… End With block.
The consequence of using the With… End With statement is that the series of statements within the block (lines #18 and #19 below) are executed on the object specified in the opening line of the block.
In the example we’re looking at, this means that both lines #18 and #19 below work with the object represented by myWorksheet. In this case, this object is the worksheet named “Adobe Reader” within the active workbook.
Line #18: .Range(“B4”).Select
Uses the Worksheet.Range property (myWorksheet.Range) and the Range.Select method (Range(“B4”).Select) for purposes of selecting cell B4 of the worksheet represented by the myWorksheet variable.
As a consequence of the assignment made in line #5 above, the worksheet where cell B4 is selected is that named “Adobe Reader”.
The range you select in this line of code (or its equivalent) determines where the contents of the PDF file are pasted in Excel.
Line #19: .PasteSpecial Format:=”Text”
Uses the Worksheet.PasteSpecial method (myWorksheet.PasteSpecial) to paste the contents of the Clipboard on the active worksheet as Text (Format:=”Text”).
You can generally use this method to paste data from other applications. Note that the Worksheet.PasteSpecial method (which we’re using in this example) is different from the Range.PasteSpecial method that I explain here.
The syntax of the Worksheet.PasteSpecial method is as follows:
expression.PasteSpecial(Format, Link, DisplayAsIcon, IconFileName, IconIndex, IconLabel, NoHTMLFormatting)
For purposes of this VBA tutorial, is enough if you’re aware of the following:
- “expression” is a variable representing a Worksheet object. This is myWorksheet in this case.
- Format is an optional parameter that allows you to specify “the Clipboard format of the data”. You specify Format as a string.
In the example we’re looking at, Format is set to “Text”.
This statement, is roughly the equivalent of (i) launching the Paste Special dialog box (by, for example, pressing the “Ctrl + Alt + V” keyboard shortcut), (ii) selecting Text, and (iii) pressing the OK button.

Note that none of the parameters of the Worksheet.PasteSpecial method allows you to select a destination for pasting. Since there’s no such parameter, Worksheet.PasteSpecial pastes the Clipboard contents in the current selection.
As a consequence of this, you must select the destination range prior to calling the PasteSpecial method. In the sample pdf_To_Excel_Adobe macro, this is selection is made by the statement in line #18 above.
Line #21: Call Shell(“TaskKill /F /IM AcroRd32.exe”, vbHide)
Calls the Shell Function to invoke the TaskKill command. The TaskKill command, in turn, kills Adobe Reader.
The windowstyle parameter of the Shell Function is set to vbHide. As a consequence of this, you only see the relevant application (Adobe Reader in this case) closing.
Now that we’ve covered all of the VBA statements used by the sample pdf_To_Excel_Adobe macro, let’s take a look at the practical results obtained when executing the Sub procedure:
PDF To Excel Using Adobe Reader: Example Results
The following image shows the results I obtain when executing the sample pdf_To_Excel_Adobe VBA Sub procedure.

This VBA Convert PDF to Excel Tutorial is accompanied by Excel workbooks containing the data and macros I use. You can get immediate free access to this example workbook by subscribing to the Power Spreadsheets Newsletter.
In most situations, this isn’t the result that you want. However, if you’re relying on Adobe Reader for purposes of converting a PDF file to Excel, you’re unlikely to obtain better results.
The reason for this is that, as a general rule, whenever you copy data from Acrobat Reader and paste it into Excel (which is what this sample macro does), the data ends up in a single column. This is precisely what happens in the image above.
The following sample macro solves this problem by using a PDF Converter: Able2Extract. Let’s take a look at how you can do this:
VBA Code Example #2: PDF To Excel Using Able2Extract
The sample macro (pdf_To_Excel_Able2Extract) that appears further below follows roughly the same as the previous one (pdf_To_Excel_Adobe) with one major difference:
It relies on Able2Extract instead of Adobe Reader for purposes of opening the PDF file and copying the data. In other words, the VBA code that appears below proceeds as follows:
- Step #1: Opens the PDF file you want to convert using Able2Extract.
- Step #2: Selects and copies all the data in the file.
- Step #3: Pastes the data into Excel.
You can try Able2Extract for free here.

The VBA code of this sample pdf_To_Excel_Able2Extract macro is almost the same as that of pdf_To_Excel_Adobe. The following image highlights the differences between both pieces of code:

The differences between both macros can be reduced to the 2 that I explain in the following sections. Other than the clarifications provided in these sections, the explanations I provide for each of the VBA statements in the pdf_To_Excel_Adobe sample macro above generally (also) apply to the statements within the pdf_To_Excel_Able2Extract Sub procedure.
Let’s take a look at the differences between both macros:
Difference #1: References To The Relevant Application
The pdf_To_Excel_Adobe macro uses Adobe Reader for purposes of (i) opening the PDF file you want to convert, and (ii) copying all of its data. The pdf_To_Excel_Able2Extract macro relies on Able2Extract (instead of Adobe Reader) for those same purposes.
As a consequence of the above, the VBA code behind both of these sample macros makes reference to different applications. pdf_To_Excel_Adobe refers to Adobe Reader. pdf_To_Excel_Able2Extract refers to Able2Extract.
This difference is reflected in 3 different places within the VBA code of the sample macros. Only 1 of these changes (#3) has a material effect on the way the macro proceeds.
- #1: The name of the variable that holds the path and name of the relevant application (Adobe Reader or Able2Extract) changes from adobeReaderPath to able2ExtractPath.
This change isn’t really material and I’ve done it for clarity purposes only. In fact, I could’ve used the same variable name for both macros.
Generally speaking, what’s more relevant is that you ensure compliance with the VBA variable naming rules.
- #2: The name of the destination worksheet changes from “Adobe Reader” to “Able2Extract”.
Again, the change isn’t really material. I’ve used different names because the sample workbook that accompanies this tutorial displays the results obtained when executing each macro in separate worksheets. There’s a worksheet named “Adobe Reader”, where the results obtained with the pdf_To_Excel_Adobe macro appear. And there’s a worksheet named “Able2Extract”, where I show the results obtained when running this pdf_To_Excel_Able2Extract macro.
In any case, the object you assign to the myWorksheet variable will, in the end, depend on the particular context you’re in and how you want to design your VBA Sub procedure. Therefore, you’re likely to modify this part of the code anyway.
- #3: The path and name of the application you’re using to open the PDF file and copy its contents changes. The pdf_To_Excel_Adobe macro makes reference to the path and name of Acrobat Reader. The code of the current example (pdf_To_Excel_Able2Extract) refers to the path and name of Able2Extract.
As I anticipate previously, this is the only of the 3 differences we’re looking at here that has a material effect.
In other words, you have flexibility when naming your variables and selecting the destination where you paste the data. However, you must ensure that you’re making reference to the correct application when determining and structuring the pathname parameter of the Shell Function and the process name killed by the TaskKill command (if required).

Before we move on to the second difference between the code of the macro examples, note the following:
As I explain when introducing TaskKill, you have 2 ways of specifying the task to be terminated:
- #1: Using the Task ID returned by the Shell Function.
- #2: Using the name of the process to be terminated.
The code examples in this blog post use alternative #2 (process name). If the sample VBA code relied on the Task ID to identify the task to be terminated (alternative #1), the last line of code would be the same in both sample macros (pdf_To_Excel_Adobe and pdf_To_Excel_Able2Extract).
Difference #2: Keyboard Shortcuts Used
The second group of differences between the sample VBA code for the macros pdf_To_Excel_Adobe and pdf_To_Excel_Able2Extract is related to the use of SendKeys.
More precisely, the keyboard shortcuts you need to use when working with Adobe Reader differ slightly from those you need to use when using Able2Extract. Therefore, the VBA code must reflect these differences when using SendKeys.
As I explain above, the sample pdf_To_Excel_Adobe macro uses 3 keyboard shortcuts:
- Shortcut #1: “Alt + V, P, C” (SendKeys “%vpc”).
This keyboard shortcut enables scrolling.
- Shortcut #2: “Ctrl + A” (SendKeys “^a”).
This shortcut selects all.
- Shortcut #3: “Ctrl + C” (SendKeys “^c”).
This is the keyboard shortcut for the Copy command.
When working with Able2Extract, you don’t need to enable scrolling (shortcut #1 above). The reason for this is that, within Able2Extract, the “Ctrl + A” keyboard shortcut selects all pages.

Within Able2Extract, “Ctrl + C” is the keyboard shortcut for copying.

As a consequence of the above considerations, when using Able2Extract, you only need to include statements that use SendKeys to transmit the keystrokes corresponding to the “Ctrl + A” (#1 in the image below) and “Ctrl + C” (#2 below) keyboard shortcuts.

The differences between the VBA code of the sample macros (pdf_To_Excel_Adobe and pdf_To_Excel_Able2Extract) are relatively minor. However, as I show in the following section, the results obtained when using Able2Extract are significantly better to those obtained when relying on Adobe Reader.
Let’s take a look at them:
PDF To Excel Using Able2Extract: Example Results
The following screenshot shows the results I obtained when executing the example pdf_To_Excel_Able2Extract macro:

Compare this with those I obtained previously (with the pdf_To_Excel_Adobe macro example) and notice the improvement.
A particularly significant improvement is the fact that the macro that relies on Able2Extract is able to replicate the structure of the table in the original PDF document. The macro that uses Adobe Reader for these purposes generally pastes all the values in a single column.

Furthermore, the macro that relies in Able2Extract is usually able to extract all the values from the source PDF document. This aspect is particularly relevant when comparing the performance of this macro example #2 (pdf_To_Excel_Adobe) and macro example #3 (which I explain below and relies on Microsoft Word instead of Able2Extract).
Granted, there are situations where you may still need to do some data cleansing after converting the data from PDF to Excel using VBA and Able2Extract. However, in my experience, the results obtained when relying on Able2Extract (macro example #2) are usually more accurate and easier to fix/clean than those obtained when relying on Adobe Reader (macro example #1) or Microsoft Word (macro example #3).
A final advantage of Able2Extract is that you can use its variety of keyboard shortcuts when working with SendKeys. This gives you more flexibility for purposes of determining which is the exact portion of data you want to extract. Notice, for example, how you can use keyboard shortcuts to execute virtually all of the commands within the Edit and Document menus of Able2Extract:


Now that we’ve covered the topic of converting PDF to Excel using SendKeys alongside Adobe Reader or Able2Extract, let’s move on to the next way of convert PDF files to Excel: with a recent version of Microsoft Word. For these purposes, let’s start by taking a look at…
The Microsoft Word Object Model: A Quick Introduction
Before you start reading the sections on how to use Word for PDF conversion purposes, please note that you need to have at least Word 2013 installed in your computer. The previous versions of Microsoft Word don’t have the PDF Reflow feature that converts PDF files to editable Word documents.
I cover object models in several posts within Power Spreadsheets. Some of the object models I’ve written about are the following:
- The Excel object model.
- The Outlook object model.
- The Ribbon Commander object model.
As I explain in any of those posts, is important to have a good understanding of the object model of the application(s) you’re working with. The main reason for this is that, whenever you’re working with VBA, you’re basically manipulating the objects of that application.
Word isn’t an exception to this general rule.
Just as Excel, Outlook or the Ribbon Commander, Word has its own object model. Therefore, in this section, I provide a short introduction to this particular model.
What Is The Word Object Model
As a general rule, you can picture a VBA object model as being a hierarchy. This hierarchy contains all of the objects you can use.

Object model hierarchies have an object at the top. That object contains other objects. Those objects may, in turn, contain other objects.
This process goes on until. Therefore, any object within the object model hierarchy has the potential of containing other objects. In any case, you eventually reach a point where a particular object doesn’t hold any other objects.
This basic idea is pretty much the same regardless of which particular VBA object model you’re looking at. In other words, even though the exact components of the Word object model differ from those of the Excel object model, their structure follows the general rule I explain above.
The object at the top of a VBA object model is usually known as Application. The Application object represents the relevant application. More precisely:
- Word’s Application object represents (and returns) Word.
- Excel’s Application object represents (and returns) Excel.
Since Word’s Application object contains other objects, you can think of it as the root from which you access all the other objects of Word’s object model. You generally obtain access to Word’s top-level objects by appropriately using the properties of the Application object.
For purposes of this VBA tutorial, 2 particular properties (and their associated objects) are very relevant:
- Property #1: The Application.Documents property.
- Property #2: The Application.ActiveDocument property.
Let’s take a closer look at each of these:
The Application.Documents Property, The Documents Collection And The Document Object
The main purpose of the Application.Documents property is to return a Documents collection.
The basic syntax of Application.Documents is as follows:
expression.Documents
“expression” is a placeholder for the Application object.
The Documents object returned by the Application.Documents property is a collection representing all the Document objects currently open. Each of those Document objects represents an individual document.
For example, the following image shows 5 open Word documents. In this case, the Documents collection represents all of these documents (Document1 through Document5). Each of the individual documents (Document1, Document2, Document3, Document4 and Document5) is represented by an individual Document object.

Application.ActiveDocument Property
The main purpose of the Application.ActiveDocument property is to return the Document object that represents the current active Word document.
The basic syntax of Application.ActiveDocument follows that of the Application.Documents property above:
expression.ActiveDocument
“expression” stands for an Application object.
Automation, Early And Late Binding: An Introduction
Automation is probably the most commonly used (and the preferred) tool for purposes for purposes of controlling one Windows application from another.
When using Automation for purposes of manipulating one application from another one, you refer to the relevant applications as follows:
- The Server or Object Application is the one that provides a particular set of features you want to use.
Within the context of this blog post, the Server Application is Word.
- The Client or Controlling Application is the one that uses the features of the Server or Object Application.
For purposes of this tutorial, the Client Application is Excel.
Using Automation has several advantages over relying on the Shell Function and SendKeys. In this context, a particularly important advantage of Automation is that it allows you to programmatically access the Component Object Model (COM) objects offered by the Server Application.
In the words of author Richard Mansfield (in Mastering VBA for Microsoft Office 2016):
Automation lets the client application harness the built-in capabilities of the server application.
In the case we’re looking at, you use Excel to harness the built-in capabilities of Word. The purpose of doing this, in this case, is to convert the contents of a PDF file to Excel.
For purposes of using Automation, the main thing you need to is create a connection between the relevant applications. In this particular case, those applications are Word and Excel.
You create such connection by using either of the following types of binding:
- Early binding: In early binding you set up a reference to the relevant (Word’s in this case) object library. Once you’ve created the reference, the objects, properties and methods within that library are available while you’re coding the relevant VBA application.
- Late binding: When using late binding, you don’t need to create a reference to the relevant object library while creating your macro. Instead of this, you create an object that references that object library upon execution.
In the sections below, I provide samples of VBA code that use both early and late binding. In the section containing the code sample that uses early binding, I also show how you can create a reference to Word’s object library.
VBA Code Example #3: PDF To Excel Using Microsoft Word With Early Binding
The following sample macro (pdf_To_Excel_Word_Early_Binding) converts a PDF file to Excel by relying on a recent version of Microsoft Word for conversion purposes.
The macro basically proceeds as follows:
- Step #1: Opens the PDF file as an editable Word document.
- Step #2: Copies the contents of the Word document.
- Step #3: Pastes the Clipboard contents to Excel.
The basic steps of this process (open file, copy and paste) are roughly the same as the steps followed by the previous macro examples #1 (using Adobe Reader) and #2 (with Able2Extract). Therefore, you may notice that some lines of code are substantially the same as those used by the previous samples.

I explain each of the lines of code below. When appropriate, I refer to the equivalent lines of code in previous sections.
However, since this particular macro uses early binding, you must start by setting up a reference to the relevant object libraries. Let’s start by taking a look at this:
How To Set Up A Reference To The Microsoft Word Object Library And The Windows Script Host Object Model
Since the sample pdf_To_Excel_Word_Early_Binding macro relies on Word for purposes of carrying out the PDF to Excel conversion, you must set up a reference to the Microsoft Word Object Library.
However, that’s not the only reference you need:
Due to a quirk I explain below, you also need to set up a reference to the Windows Script Host Object Model if you want to implement this VBA code example #3 and/or the following sample #4.
In order to create these references, go to the Visual Basic Editor and follow these 4 easy steps:
- Step #1: Go to the Tools menu and select “References…”.

- Step #2: Search for the appropriate Microsoft Word Object Library (the label includes the version) within the Available References box. Once you’ve found it, select it (click on the check box on the left side).
The following screenshot is how the dialog box I’m working with looks like.
I’m using Office 2016. Therefore, the label of the Microsoft Word Object Library refers to Microsoft Word 16.0. If you’re using a different version, the version number changes.

- Step #3: Search for the Windows Script Host Object Model and select it.

- Step #4: Click on the OK button on the upper right corner of the References dialog box to confirm your selections.


Once you’ve set the object reference, you can access the Word object model and use the objects, methods and properties it contains. Therefore, let’s take a look at each of the lines of code within the sample pdf_To_Excel_Word_Early_Binding macro.
Line #1: Dim myWorksheet As Worksheet
Uses the Dim statement for purposes of declaring the myWorksheet object variable as a Worksheet.
The purpose of the myWorksheet object variable is to represent the Excel worksheet where the data within the PDF file is pasted.
This line of code is substantially the same as line #1 of the previous macro examples.
Line #2: Dim wordApp As Word.Application
Declares the wordApp object variable as of the type Word.Application.
The main purpose of this line of code is to create a variable representing the Word application in order to expose the Word object model.
Line #3: Dim myWshShell As wshShell
Declares the myWshShell object variable as of the type WshShell.
The purpose of this line of code is similar to that of the previous line #2. More precisely, this line #3 creates the variable that provides access to the native Windows shell. I explain why myWshShell is required when explaining line #13 below.
Lines #4 To #6: Dim pathAndFileName As String | Dim registryKey As String | Dim wordVersion As String
These lines use the Dim statement to declare several variables (pathAndFileName, registryKey and shellPathName) as Strings.
Line #4 (Dim pathAndFileName As String) is exactly the same as line #3 of the previous macro examples. Its purpose is to declare a variable that holds the path to the PDF file you want to convert to Excel.
The purpose of the remaining lines #5 and #6 is as follows:
- Line #5: Declares the registryKey variable.
This variable holds a relatively long string (see line #12 below). This variable appears in lines #13 and #17 below. In those lines, the RegWrite method is used to ensure that Word opens the PDF file you want to convert without displaying a dialog box warning you of the conversion.
- Line #6: Declares wordVersion.
The purpose of wordVersion is to hold the version number of the Word version that you’ll use when executing the macro. This value is assigned in line #11 below.
Line #7: Set myWorksheet = ActiveWorkbook.Worksheets(“Word Early Binding”)
This line of code is substantially the same as line #5 from the previous macro examples.
It uses the Set statement to assign a particular worksheet (Word Early Binding) of the active workbook to the myWorksheet object variable.
Lines #8 And #9: Set wordApp = New Word.Application | Set myWshShell = New wshShell
Both of these lines of code use the Set statement for purposes of assigning a new (New) instance of the relevant object to the applicable object variable. More precisely:
- Line #8 assigns a new instance of the Word application (Word.Application) to the wordApp variable.
- Line #9 assigns a new instance of wshShell to the myWshShell object variable.
This assignment is achieved as follows:
- Step #1: The statements create a new instance of Word.Application or wshShell by using the New keyword.
- Step #2: The assignment operator (=) (i) assigns the expression to its right side (New Word.Application or New myWshShell) to (ii) the variable to its left side (wordApp or myWshShell).
Line #10: pathAndFileName = “C:…Power Spreadsheets ExamplesStatistical Tables.pdf”
This line is exactly the same as line #7 in the previous macro examples.
It uses the assignment operator (=) to (i) assign the path of the PDF file you want to convert to Excel (Statistical Tables.pdf) to (ii) the pathAndFileName variable. pathAndFileName is declared in line #4 above.
Line #11: wordVersion = wordApp.Version
This line of code uses Word’s Application.Version property (wordApp.Version). This property returns the version number of the relevant Word version.
That version number returned by the Version property is assigned to the wordVersion variable.
The version number is relevant for purposes of the next…
Line #12: registryKey = “HKCUSOFTWAREMicrosoftOffice” & wordVersion & “WordOptions”
Uses the assignment operator (=) for purposes of (i) assigning the expression to the right of the operator to (ii) the registryKey variable.
The expression on the right side of the assignment operator is created by concatenating the following 3 items:
- Item #1: The string “HKCUSOFTWAREMicrosoftOffice”.
- Item #2: The version number held by the wordVersion variable (see line #11 above).
- Item #3: The string “WordOptions”.
For example, if you’re using Office 2016, the string assigned to registryKey is as follows:
“HKCUSOFTWAREMicrosoftOffice16.0WordOptions”
This string is, in turn, used by…
Line #13: myWshShell.RegWrite registryKey & “DisableConvertPdfWarning”, 1, “REG_DWORD”
In order to understand why this statement is necessary, let’s take a look at what happens when you manually open a PDF file using Word:
In such cases, a dialog box is (usually) displayed. This box informs you about 2 things:
- #1: That Word is converting the PDF file to an editable Word document.
- #2: That (i) the conversion may take a while, and (ii) the Word document may not look exactly like the original file.

In order for Word to proceed with the PDF to Word conversion, you must press the OK button within the displayed dialog box.
Additionally, you have the option of specifying that the message shouldn’t be displayed again. To do this, you just need to check the relevant box that appears on the left side of the dialog box.

Clicking the OK button manually is quite easy. At first glance, this is something that would also be easy to handle using VBA.
However, here’s the deal:
The key that corresponds to the value written to the registry doesn’t initially exist. In order to proceed with the PDF to Word conversion, you must solve this.
And this line #13 is the one that helps you solve this issue. Let’s see how:
The statement uses the RegWrite method of the WshShell object. You can use the RegWrite method for 3 main purposes:
- Purpose #1: Create a new key.
- Purpose #2: Add another value-name to an existing key, and assign it a value.
- Purpose #3: Change the value of an existing value-name.
The basic syntax of RegWrite is as follows:
object.RegWrite(strName, anyValue [,strType])
For these purposes:
- object is a WshShell object.
In this line #13, this object is myWshShell.
- strName is the string value that you use to indicate the key-name, value-name or value you want to work with.
Within the sample code, this string is created by concatenating (i) the string held within the registryKey variable, and (ii) “DisableConvertPDFWarning”. The string assignment for registryKey was made in the previous line #12. As explained by MVP Graham Mayor, the string assigned to strName is the value written to the registry.
In order to specify a key-name, add a backlash () at the end of strName. To specify a value-name (as in the case we’re analyzing), specify strName without a backlash at the end.
- anyValue is either (i) the name of the key you’re creating, (ii) the name of the value you’re adding to an existing key, or (iii) the new value you’re assigning to an existing value-name.
Within line #13, this corresponds to 1.
- strType is an optional parameter that you can use to indicate the data type of the value.
The data type of the value within the statement we’re looking at is REG_DWORD. This strType corresponds to Integer. It allows you to specify a number in the form of an integer.
The practical effect of this line of code #13 is that the warning in the dialog box that I explain above (regarding the PDF to Word conversion) is turned off. Therefore, Visual Basic for Applications is able to proceed with…
Lines #14 To #16: wordApp.Documents.Open Filename:=pathAndFileName, ConfirmConversions:=False
Lines #14 to #16 are a single statement. The statement calls the Documents.Open method. This method allows you to:
- #1: Open a document; and
- #2: Add the newly opened document to the Documents collection.
The basic syntax of Documents.Open is as follows:
expression.Open(FileName, ConfirmConversions, ReadOnly, AddToRecentFiles, PasswordDocument, PasswordTemplate, Revert,WritePasswordDocument, WritePasswordTemplate, Format, Encoding, Visible, OpenConflictDocument, OpenAndRepair,DocumentDirection, NoEncodingDialog)
Notice that the statement we’re analyzing only makes reference to 2 of the parameters of Documents.Open:
- Filename.
Filename is the only required parameter of the Documents.Open method. You use it to specify the name of the document you want to open and add to the Documents collection.
In the sample pdf_To_Excel_Word_Early_Binding macro, the value of this parameter is that contained within the pathAndFileName. The value assigned to pathAndFileName in line #4 above corresponds to the path and file name of the PDF document you’re converting to Excel.
- ConfirmConversions.
ConfirmConversions is an optional parameter. It allows you to determine whether the Convert File dialog box is displayed or not.

This parameter can be set to True (display) or False (don’t display). In this code example, it’s set to False.

As a consequence of the above, the practical effect of lines #14 to #16 is that Word opens the PDF file you want to convert to Excel.
Line #17: myWshShell.RegWrite registryKey & “DisableConvertPdfWarning”, 0, “REG_DWORD”
This line of code is substantially the same as line #15 above.
The only difference between lines #15 and #17 is the value assigned to the anyValue parameter of the RegWrite method.
- In line #15 above, it’s 1.
- In this line #17, it’s 0.

In practice, line #17 reverses what line #15 does. In other words, it turns the warning regarding the PDF to Word conversion back on.
Other than the above, the general aspects within the explanation I provide in line #15 above are applicable.
Line #18: wordApp.ActiveDocument.Content.Copy
Uses Word’s Range.Copy method for purposes of copying the content of the file you want to convert.
The basic syntax of the Range.Copy method is as follows:
expression.Copy
For these purposes, “expression” represents a Word Range object. Within this line #18, this Range object is that returned by the Document.Content property.
When you use Document.Content, it returns a Range object “representing the main document story”. The Document object to which the Content property makes reference to is the active word document (returned by Word’s Application.ActiveDocument property).
Lines #19 And #22: With myWorksheet | End With
These 2 lines of code are the opening and closing statements of a With… End With block.
The practical effect of With… End With is that the series of statements within the block are executed on the same object. In the case of the sample macro we’re looking at:
- The statements within the With… End With block are the following lines #20 and #21.
- The object they’re executed on is that represented by myWorksheet (specified in line #19).
The whole With… End With block composed by lines #19 to #22 of this sample macro has substantially the same effect as lines #17 to #20 of the previous macro examples.
Line #20: .Range(“B4”).Select
This line of code is the same as line #18 of prior code examples. It uses the Range.Select method to select cell B4 of myWorksheet.
This line sets the location where the data from the PDF file you’re converting is pasted. This statement is needed because it’s required by the Worksheet.PasteSpecial method used by…
Line #21: .PasteSpecial Format:=”Text”
This line of code is exactly the same as line #19 of the previous sample macros.
More precisely, it uses the Worksheet.PasteSpecial method for purposes of pasting the contents of within the Clipboard on the selected range (see line #20 above) using a particular format. In the example we’re looking at, Format is set to “Text”.
Line #23: wordApp.Quit SaveChanges:=wdDoNotSaveChanges
Uses Word’s Application.Quit method to close Word without saving the file changes.
The syntax of the Quit method is as follows:
expression.Quit(SaveChanges, Format, RouteDocument)
For purposes of this tutorial, you only need to be aware of the following 2 items:
- “expression”, which is a variable that represents the Word Application object. In this case, expression is wordApp.
- The SaveChanges parameter, which allows you to specify whether Word saves the changes to the document before quitting. You can set the SaveChanges parameter to any of the following 3 values from the WdSaveOptions Enumeration:
Name Value Description wdDoNotSaveChanges 0 Don’t save changes. wdPromptToSaveChanges -2 Ask the user whether the changes should be saved. wdSaveChanges -1 Save changes. In this case, I set SaveChanges to wdDoNotSaveChanges. Therefore, Word doesn’t save the changes (the conversion) of the PDF file.
Lines #24 And #25: Set wordApp = Nothing | Set myWshShell = Nothing
Both lines of code use the Set statement to set the wordApp and myWshShell object variables to Nothing. The reason these statements are included is to release the memory.
VBA Code Example #4: PDF To Excel Using Microsoft Word With Late Binding
The following sample macro (pdf_To_Excel_Word_Late_Binding) is the equivalent to that in the previous example #3. The only difference is that, instead of using early binding, this sample #4 uses late binding.
The macro, therefore, follows exactly the same 3-step process to convert the PDF file to Excel:
- Step #1: Open the PDF file as an editable Word document.
- Step #2: Copy the data within the Word document.
- Step #3: Paste the contents of the Clipboard to Excel.

There are only a few differences between the 2 macro examples that rely on Word to convert a PDF file. I highlight them in the following image:

I explain these differences in the following sections. Other than these clarifications, the comments I provide above when explaining macro example #3 (with early binding) are roughly applicable to this macro.
When using late binding, you don’t need to set up a reference to the Word Object Library or the Windows Script Host Object model.
Let’s take a look at the code changes:
Lines #2 And #3: Dim wordApp As Object | Dim myWshShell As Object
Both of these lines of code use the Dim statement to declare an object variable. Furthermore, in both cases, the object variable is declared as an Object. This declaration (as Object) forces late binding.
These lines of code are the equivalent of lines #2 and #3 of the previous macro example #3 that uses early binding. In that case, however:
- WordApp is declared As Word.Application.
- myWshShell is declared As wshShell.
Line #7: Set myWorksheet = ActiveWorkbook.Worksheets(“Word Late Binding”)
The line #7 of this example #4 makes reference to the worksheet named “Word Late Binding”. Line #7 of the previous example makes reference to “Word Early Binding”.
The consequence of this difference is that both macros paste the data from the PDF file in different Excel worksheets.
This difference, however, isn’t strictly related to the topic of early binding vs. late binding. It’s simply a consequence of the way in which I create and organize the sample workbooks that accompany this tutorial.
Lines #8 And #9: Set wordApp = CreateObject(“Word.Application”) | Set myWshShell = CreateObject(“WScript.Shell”)
Both lines of code achieve the following:
- Step #1: Create and return a reference to the relevant ActiveX object you need to work with. For purposes of this example, these objects are the Word Application (Word.Application) and the Windows Shell (WshShell).
In both cases, this is achieved by using the CreateObject Function.
- Step #2: Assign the object references created in step #1 to the wordApp and myWshShell object variables.
In the previous macro example #3 (with early binding), the object references are created in the same lines #8 and #9. However, in those cases, the object reference is created by using the New keyword instead of the CreateObject Function. Therefore:
- wordApp is set to New Word.Application.
- myWshShell is set to New wshShell.
Line #23: wordApp.Quit SaveChanges:=0
This line of code achieves exactly the same purpose as line #23 of the previous macro example #3. The consequence of this line is, therefore, that Word closes without saving the file changes.
The only difference between the syntax used in the macro that uses early binding and here is the way in which the value of the SaveChanges parameter is specified. In the previous example, this was specified as wdDoNotSaveChanges. Here, it’s assigned the value of 0.
Since the value 0 corresponds to wdDoNotSaveChanges, they’re both equivalent.
Now that we’ve covered how you can use Word to extract data from PDF to Excel using VBA, let’s take a look at the results I obtain when executing the sample macros #3 and #4:
PDF To Excel Using Microsoft Word: Example Results
The VBA code examples #3 and #4 are materially the same. The only difference between them is the fact that #3 uses early binding, whereas #4 uses late binding.
As a consequence of the above, the results I obtain when executing both macros are substantially the same. Therefore, in the images below, I only show the results I obtain when executing the early binding macro version.
The following screenshot shows the first section of the results I obtain when executing the sample pdf_To_Excel_Word_Early_Binding macro.

At first glance these results seem to be very good. In particular, (i) the values seem to be appropriately extracted and (ii) the structure of the original file (including its tables) seems to be well replicated.
However, upon scrolling down the file, some issues become evident. Check out, for example, the following screenshot and notice how the 2 rows I highlight.

The following screenshot shows how this data looks in the original PDF file.

As evidenced by the above screenshots and previous conversion results within this blog post (here and here), the macro example that relies on Word for purposes of converting a PDF file to Excel is generally:
- Less accurate than the macro example that relies on Able2Extract.
- More accurate than the sample macro that uses Adobe Reader.
Microsoft explains the reasons why Word may not accurately convert a particular PDF file here. In very general terms, the conversion feature that Word uses (known as PDF Reflow) “works best with files that are mostly text”.
The following are some of the items where a conversion that relies in Microsoft Word is more prone to inaccuracies:
- Tables with cell spacing.
- Footnotes that span more than 1 page.
- Endnotes.
- PDF comments.
- Pages or sections that are mostly charts or other graphs. In such cases, the page or section may be transferred to Excel as an image.
Despite the above weakness, relying on Microsoft Word for purposes of creating a macro that converts PDF to Excel has some advantages (vs. macros that use SendKeys):
For example, by using Microsoft Word to convert a PDF file to Excel, you gain access to all the features and tools contained within the Microsoft Word Object Model. Furthermore, by avoiding the Shell Function and SendKeys, you prevent the timing issues that are sometimes associated to their use.
By now, you probably have a very good idea of the pros and cons of each of the different approaches I cover in this VBA tutorial. Therefore, is a good time to check out…
PDF To Excel Using VBA: Which Approach To Use
After learning about the different applications you can rely on for purposes of converting a PDF file to Excel (Adobe Reader, Able2Extract and Word), you may (rightly) be wondering whether one is better than the others.
In my opinion, each of the 3 approaches I explain in this tutorial has different advantages and disadvantages.
Despite the above, in my experience, the results you obtain when relying on Adobe Reader are likely to be of lower quality and require more data cleansing than those obtained with Able2Extract or Word.
In order to choose between Word and Able2Extract, I generally suggest that you consider the particular characteristics of the situation you’re in. Some of the criteria you may consider are the following:
- Criterion #1: Whether you have access to both applications (Able2Extract or a recent version of Microsoft Word).
This question may seem relatively obvious, but the computer where your VBA application will be running needs to have installed the application you’ll be using (Able2Extract or a recent version of Microsoft Word) for the macro examples I propose above to work.
- Criterion #2: Length and complexity of the PDF data you want to bring into Excel.
If the PDF files you’re converting are particularly lengthy and complex, Able2Extract may provide better conversion results. As I explain above, Word is prone to inaccuracies when the PDF file has items such as (i) tables with cell spacing, (ii) footnotes that span more than 1 page, (iii) endnote, (iv) PDF comments, or (v) pages or sections that are mostly charts or other graphs.
- Criterion #3: How many PDF to Excel conversions do you need to carry out.
If you’re constantly converting PDF files to Excel, you may find that the investment in a PDF converter such as Able2Extract is worth it.
- Criterion #4: Whether you’d like to use the items within the Microsoft Word Object Model.
As I explain above, one of the advantages of relying on Microsoft Word, is that you can access its object model. In certain scenarios, this may give you a good amount of flexibility and control over how you handle the PDF to Excel conversion.
Conclusion
After reading this VBA tutorial, you know at least 3 ways in which you can convert PDF to Excel using VBA. More precisely, you know how to leverage the following applications for purposes of extracting data from a PDF file to Excel:
- Adobe Reader.
- Able2Extract.
- Microsoft Word.
This VBA Convert PDF to Excel Tutorial is accompanied by Excel workbooks containing the data and macros I use above. You can get immediate free access to this example workbook by subscribing to the Power Spreadsheets Newsletter.
In addition to the above, you’ve also read about the following topics:
- The Shell Function and TaskKill Command.
- SendKeys.
- The Microsoft Word Object Model.
- Automation, Early and Late Binding.
For purposes of this VBA tutorial, I’ve excluded approaches that require relying on an API (application programming interface). If you want (and have the possibility), you can use an API for purposes of converting PDF files to Excel. Using an API certainly has advantages over some of the methods that I describe above. For example:
- An API allows you to better handle potential timing issues, such as those that arise when relying on the Shell Function and SendKeys.
- Depending on which API you’re using, you may able to get more accurate conversions (particularly) than those made through Microsoft Word.
As I show above, Word’s PDF Reflow feature works well in several scenarios. However, there are some situations where a more specialized PDF converter (such as Able2Extract) provides better and more accurate results.
I may write about the topic of PDF to Excel conversion using APIs in future posts. If you want to receive an email whenever I publish new material in Power Spreadsheets, please make sure to enter your email address below now:
Books And Resources Referenced In This Excel VBA Tutorial
- Alexander, Michael and Kusleika, Dick (2016). Excel 2016 Power Programming with VBA. Indianapolis, IN: John Wiley & Sons Inc.
- Dougherty, Christopher (2011). Introduction to Econometrics. New York City, NY: Oxford University Press.
- Mansfield, Richard (2016). Mastering VBA for Microsoft Office 2016. Indianapolis, IN: John Wiley & Sons Inc.
The following link is an affiliate link, which means that if you choose to make a purchase, I will earn a commission. This commission comes at no additional cost to you.
- Able2Extract.
|
1300 / 402 / 22 Регистрация: 21.10.2011 Сообщений: 1,285 |
|
|
1 |
|
|
26.07.2012, 17:35. Показов 34062. Ответов 18
Взятие данных из PDF-файла с помощью VBA. Если возможно, то, наверное, понадобится какая-нибудь библиотека классов и соответственно справка по этой библиотеке нужна, чтобы воспользоваться классами этой библиотеки.
0 |

|
1508 / 478 / 56 Регистрация: 10.04.2009 Сообщений: 8,008 |
|
|
26.07.2012, 17:38 |
2 |
|
а через прогонку в виртуальном принтере и т. д. и т. п. не прокатит?
0 |
|
1300 / 402 / 22 Регистрация: 21.10.2011 Сообщений: 1,285 |
|
|
26.07.2012, 17:40 [ТС] |
3 |
|
Ципихович Эндрю, напишите код, чтобы взять текст первой строки из pdf-файла.
0 |
|
1508 / 478 / 56 Регистрация: 10.04.2009 Сообщений: 8,008 |
|
|
26.07.2012, 17:42 |
4 |
|
сорри, я ответа не знаю, это так начало разговора, мысли вслух
0 |
|
1300 / 402 / 22 Регистрация: 21.10.2011 Сообщений: 1,285 |
|
|
26.07.2012, 17:44 [ТС] |
5 |
|
Ципихович Эндрю, а как с помощью виртуального принтера взять данные?
0 |
|
Busine2012 1300 / 402 / 22 Регистрация: 21.10.2011 Сообщений: 1,285 |
||||
|
20.08.2012, 19:06 [ТС] |
6 |
|||
|
РешениеВзятие данных из PDF-файла с помощью объектов программы Adobe Acrobat. Чтобы использовать объекты программы Adobe Acrobat, нужно чтобы на компьютере была установлена программа Adobe Acrobat. Название библиотеки в Tools — References… Библиотеки могут иметь 2 названия:
Код, который берёт текст из PDF-файла «Файл1.pdf» с первой страницы
Примечания
10 |
 Сообщение было отмечено как решение
|
Заблокирован |
|
|
20.08.2012, 19:56 |
7 |
|
Что я делаю не так? Перебрал не один десяток PDF-файлов — результат один Миниатюры
0 |


|
1300 / 402 / 22 Регистрация: 21.10.2011 Сообщений: 1,285 |
|
|
20.08.2012, 19:57 [ТС] |
8 |
|
Апострофф, на компьютере должна быть программа Adobe Acrobat.
0 |
|
|
|
20.08.2012, 20:27
|
|
Не по теме: Во как! Библиотека есть, а программы нет?
0 |
|
1300 / 402 / 22 Регистрация: 21.10.2011 Сообщений: 1,285 |
|
|
20.08.2012, 20:32 [ТС] |
10 |
|
Апострофф, я тоже посмотрел на компьютере, где нет Adobe Acrobat, что библиотека есть — думал будет через Adobe Reader работать.
0 |
|
Модератор 6792 / 2814 / 527 Регистрация: 24.04.2011 Сообщений: 5,308 Записей в блоге: 10 |
|
|
20.08.2012, 20:33 |
11 |
|
Взятие данных из PDF-файла Медаль за взятие данных из PDF!!!
Возможно ли это? А если применить рабоче-крестьянский метод, который работает со всеми документами без библиотек?
0 |

")
|
1300 / 402 / 22 Регистрация: 21.10.2011 Сообщений: 1,285 |
|
|
20.08.2012, 20:35 [ТС] |
12 |
|
А если применить рабоче-крестьянский метод просто я хочу быть точно уверенным, что сочетание клавиш Ctrl+A даст нужный результат. Интересно, можно ли получить данные из PDF-файла прямо с жёсткого диска компьютера без программы для работы с PDF-файлами.
0 |
|
Модератор 6792 / 2814 / 527 Регистрация: 24.04.2011 Сообщений: 5,308 Записей в блоге: 10 |
|
|
20.08.2012, 20:47 |
13 |
|
просто я хочу быть точно уверенным, что сочетание клавиш Ctrl+A даст нужный результат. Если PDF поддерживает выделение-копирование, то ни чего не исказиться, проверено. А ели это не разрешено, или это не текст, а изображение, то конечно ни чего не выйдет. Хотя в этом случае ни как не выйдет.
1 |
|
1300 / 402 / 22 Регистрация: 21.10.2011 Сообщений: 1,285 |
|
|
20.08.2012, 20:51 [ТС] |
14 |
|
Pro_grammer, да, в VBA можно использовать нажатие клавиш.
0 |
|
0 / 0 / 0 Регистрация: 14.04.2015 Сообщений: 6 |
|
|
14.04.2015, 10:36 |
15 |
|
Вопрос на засыпку. У меня Acrobat Reader установлен через Citrix.
Const sPath As String = «C:Documents and SettingsПользовательРабочий столФайл1.pdf»
0 |
|
Ушел с CyberForum совсем! 873 / 182 / 25 Регистрация: 04.05.2011 Сообщений: 1,020 Записей в блоге: 110 |
|
|
14.04.2015, 11:53 |
16 |
|
У меня Acrobat Reader установлен в данном случае речь идет не о ридере, а о
0 |
|
0 / 0 / 0 Регистрация: 14.04.2015 Сообщений: 6 |
|
|
14.04.2015, 13:18 |
17 |
|
Я это понял. В этом то и проблема. На компе у меня стоит Adobe Reader, а в Citrix есть установленный Acrobat X Pro.
в данном случае речь идет не о ридере, а о
0 |
|
Ушел с CyberForum совсем! 873 / 182 / 25 Регистрация: 04.05.2011 Сообщений: 1,020 Записей в блоге: 110 |
|
|
16.04.2015, 11:57 |
18 |
|
Можно ли как-нибудь провести операции изъятия данных их PDF через Citrix с помощью Acrobat X Pro? попробуй в shell запустить Citrix. не уверен правда, что сможешь передавать параметры Acrobat X Pro на виртуалку… Kuznetsovka, а зачем так сложно ?
0 |
|
0 / 0 / 0 Регистрация: 14.04.2015 Сообщений: 6 |
|
|
16.04.2015, 12:25 |
19 |
|
попробуй в shell запустить Citrix. не уверен правда, что сможешь передавать параметры Acrobat X Pro на виртуалку… Я тоже в этом не уверен. Но уже решил задачу SendKeys. Не так уж и криво получилось, учитывая что местонахождение всех слов шаблонное.
0 |