
Create an address list using the Mail Merge feature in Microsoft Word when you need to print labels for a mass mailing. Mail Merge enables you to input your address list in a spreadsheet format, and then import the list into the correct label template. Word natively supports hundreds of generic and vendor-specific label templates. If you know the vendor and the product number for the labels you will use for printing, you can select the exact template to automatically format your labels for the product. In most cases, you will not need to install template software that accompanies your labels.
Create Address List
-
Open a blank document in Microsoft Word.
-
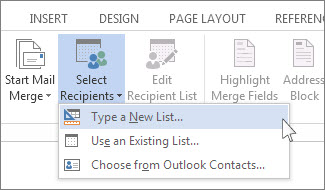
Click the “Mailings” tab on the top navigation bar to open the Mailings options in the ribbon.
-
Click the “Start Mail Merge» button, and then click the “Label” option to open the Label Options dialog box.
-
Click the radio button next to your printer type. Options are “Continuous Feed Printers” and “Page Printers.”
-
Click the “Label Vendors” drop-down box, and then click the vendor of the labels you will use to print the addresses.
-
Click the product number of your labels in the Product Number box, and then click “OK.” You will see the blank label template, but gridlines are hidden.
-
Click the “Layout” tab in the top navigation menu, and then click “View Gridlines” to display the label gridlines and show each individual label.
-
Click the “Mailings” tab in the top navigation menu, and then click “Select Recipients.”
-
Click “Type a New List” to open the New Address List dialog box.
-
Click inside a cell under one of the headers in the top row, and type the data for the column. For example, click the cell under “First Name,” and then type the first name of the first recipient to add to your address list.
-
Click the next available cell and type the required value. Continue typing data in each cell for the first address in your list. When finished with data for the first label, click “New Recipient” to add a new row to the New Address List form.
-
Type the address information for the next label in the second row, and then click “New Recipient” to add yet another record. Keep adding recipients until all addresses are entered.
-
Click “OK” to open the File Save dialog box.
-
Type a name for the new address list in the File Name field, and then click “OK” to save the address list in the Microsoft Address List file format for future use.
Print Preparation
-
Click the “Mailings” tab, and then click “Address Block” to open the Insert Address Block dialog box.
-
Click the format for displaying the name in the Insert Recipient’s Name in This Format field. You will see the address in the Preview window on the right side of the dialog box. Click the arrows above the Preview window to scroll through the list entries.
-
Click the desired radio button in the Insert Postal Address section to select how to display the country or region.
-
Check other options as desired and then click the leftmost arrow above the Preview window to return the preview to the first entry. Click “OK” to add the configured block to the first label.
-
Click “Update Labels” in the navigation ribbon to update the labels with your address list.
-
Click “Preview Results” in the navigation ribbon to see all addresses in the label template.
One of the advantages to using Microsoft Exchange or Microsoft Outlook is the ability to use information from the Address Book in Microsoft Word documents. Exactly how to do it, though, isn’t obvious. The key is an AutoText entry called AddressLayout in English (see Non-English Word for the correct name in other languages). This article shows you how to change this entry and how to add an Insert Address button to the Word toolbar. See More Information at the end of this article for alternative methods of putting addresses into Word documents.
Adding an Insert Address button | Changing the Address Layout
Non-English Word | Notes | More Information
Adding an Insert Address button
Word 7.0 includes an Insert Address button on its Standard toolbar, but newer versions of Word don’t add the button to the Toolbar or ribbon. If you’re going to add address information to documents frequently, having a button available will make it easier. Here’s how to add it to a toolbar:
- In Word, choose View | Toolbars | Customize, then switch to the Commands tab..
- Under Categories, choose Insert.
- Near the bottom of the Commands list, you’ll find Address Book. Drag that command to any toolbar currently displayed in Word.
The Insert Address button makes it easy to add an address to any document.
Changing the Address Layout
Word includes a default AddressLayout entry that you can’t see or edit directly. Test it by using the Insert Address button to insert an address from your Address Book.
To add, remove or rearrange fields, create a new layout in a Word document, then save it as a new AutoText entry named AddressLayout. (If you have a non-English version of Word, see Non-English Word below.)
The following table lists each field you can use, indicates whether it applies to addresses from the Personal Address Book (PAB) or Outlook Contacts (OAB) and lists the corresponding field name in the OAB and PAB.
Fields marked with an asterisk (*) may work only in Word 2000.
| AddressLayout Field | Contacts (OAB) or Personal Address Book (PAB) Field Name |
OAB | PAB |
|---|---|---|---|
| Name Fields | |||
| <PR_DISPLAY_NAME> | Subject (by default, First Last Middle Suffix) (OAB) First Last or Last, First (PAB, depending on setting) |
X | X |
| <PR_GIVEN_NAME> | First | X | X |
| <PR_SURNAME> | Last | X | X |
| <PR_TITLE> | Job Title (OAB) Title (PAB) |
X | X |
| <PR_DISPLAY_NAME_PREFIX>* | Title (OAB) | X | ? |
| Company Fields | |||
| <PR_COMPANY_NAME> | Company | X | X |
| <PR_DEPARTMENT_NAME> | Department | X | X |
| <PR_OFFICE_LOCATION> | Office Location (OAB) Office (PAB) |
X | X |
| <PR_ASSISTANT> | Assistant | X | X |
| Address Fields | |||
| <PR_STREET_ADDRESS> | Street | X | X |
| <PR_LOCALITY> | City | X | X |
| <PR_STATE_OR_PROVINCE> | State/Province | X | X |
| <PR_POSTAL_CODE> | ZIP/Postal code | X | X |
| <PR_COUNTRY> | Country | X | X |
| <PR_POSTAL_ADDRESS> | Full address, including country only if it’s not your own | ||
| Phone Fields | |||
| <PR_OFFICE_TELEPHONE_NUMBER> | Business | X | X |
| <PR_OFFICE2_TELEPHONE_NUMBER> | Business 2 | X | X |
| <PR_PRIMARY_TELEPHONE_NUMBER> | Phone number (on Business tab) | X | |
| <PR_BUSINESS_FAX_NUMBER> | Business Fax | X | |
| <PR_PRIMARY_FAX_NUMBER> | Fax | X | |
| <PR_ASSISTANT_TELEPHONE_NUMBER> | Assistant (on Phone pick list) (OAB) Assistant (on Phone Numbers tab) (PAB) |
X | X |
| <PR_BEEPER_TELEPHONE_NUMBER> | Pager | X | X |
| <PR_CAR_TELEPHONE_NUMBER> | Car | X | |
| <PR_CELLULAR_TELEPHONE_NUMBER> | Mobile | X | X |
| <PR_RADIO_TELEPHONE_NUMBER> | Radio | X | |
| <PR_HOME_TELEPHONE_NUMBER> | Home | X | X |
| <PR_HOME2_TELEPHONE_NUMBER> | Home 2 | X | X |
| <PR_HOME_FAX_NUMBER> | Home Fax | X | |
| <PR_OTHER_TELEPHONE_NUMBER> | Other | X | |
| Other Fields | |||
| <PR_EMAIL_ADDRESS> | E-mail Address | X | X |
| <PR_ADDRTYPE> | E-mail Type | X | X |
| <PR_COMMENT> | Notes | X |
An example is the easiest way to show how to create a new layout. If you want to add the job title and company name to the layout and remove the country name, type (or copy and paste) this into Word, with a carriage return after each line:
<PR_GIVEN_NAME> <PR_SURNAME> <PR_TITLE> <PR_COMPANY_NAME> <PR_STREET_ADDRESS> <PR_LOCALITY>, <PR_STATE_OR_PROVINCE> <PR_POSTAL_CODE>
Make sure you include spaces and punctuation where you want them to appear in the address. Now, select the entire layout, and save it as an AutoText entry with the name «AddressLayout,» taking care to use exactly that spelling and capitalization.
To save an AutoText entry in Word 7.0, choose Edit | AutoText, enter the Name as «AddressLayout,» then click Add.
To save an AutoText entry in Word 97 or Word 2000/2002/2003, choose Insert | AutoText | New, enter «AddressLayout» as the name, then click OK.
You can now use the Insert Address button to test your new AddressLayout. The above example should give you an address that looks like this:
Bill GatesCEOMicrosoft CorporationOne Microsoft WayRedmond, WA 98052
You might notice, though, that if a person has no title, you get a blank line. To suppress blank lines and make use of different fields that display the same data, depending on whether the source is a PAB or OAB entry, try this variation from the Office 97 Resource Kit, omitting the carriage returns:
{{<PR_GIVEN_NAME> <PR_SURNAME> | <PR_DISPLAY_NAME>}r} {{<PR_STREET_ADDRESS>r}{{<PR_LOCALITY>} {, <PR_STATE_OR_PROVINCE> <PR_POSTAL_CODE>}r} {<PR_COUNTRY>r}| <PR_POSTAL_ADDRESS>r}
The curly braces ( {} ) are used to ensure that a particular line does not print if it is empty, for example, if the person does not have a title. The vertical bar ( | ) means OR. And the r switch substitutes for the carriage return. (Omit the r in Word 2000 and just put a carriage return or soft return after each line; the r switch doesn’t work in Word 2000.) You are limited to a total of 12 fields, according to WD2000: How to Modify the Layout of an Address Book Entry.
For Office XP, this turns out to be a pretty good AddressLayout entry to include both company and country. I suspect it might also work well in Office 2000. You should put a carriage return or soft return at the end of each line shown here:
{{<PR_GIVEN_NAME> <PR_SURNAME> | <PR_DISPLAY_NAME>} }{<PR_COMPANY_NAME>} {{<PR_STREET_ADDRESS> }{{<PR_LOCALITY>}{, <PR_STATE_OR_PROVINCE> <PR_POSTAL_CODE>}} {<PR_COUNTRY> }| <PR_POSTAL_ADDRESS>}
If the address doesn’t work the way you think it should, check the field names for spelling mistakes and make sure that you actually have information entered in the corresponding Contacts or PAB fields. Also, if the addresses were imported, you may need to follow the instructions in MSKB article Address Displays Incorrectly on Imported Contacts.
Another approach is to simply make sure that the Address field contains whatever you want printed after the name, repeating the company name or other information as needed.
Non-English Word
If you are using a non-English version of Word, AddressLayout may not be the correct name for the AutoText entry that you need to modify. If you discover what the correct name is for a particular language, please let us know and we’ll add it to this list:
- Dutch — AdresIndeling
- French — MiseEnPageAdresse
- German — Adreßlayout or Adresslayout
- Italian — IndirizzoLayout
- Nordic languages — AdresseLayout
- Spanish — AddressLayout
- Turkish – AdresD’zeni
Notes
If you want to write a Word macro to insert addresses, use the GetAddress method. This also gives you the option of specifying an address layout, rather than using the AddressLayout entry from AutoText. There’s a good example in the VBA help file in Word.
Additional notes on the fields:
- In an Outlook contact, if you edit the Subject field, subsequent changes to any name field will cause the Subject field also to change. If you are using the Reorder Contacts form to change the way addresses are displayed in the Outlook Address Book, you should use the <PR_GIVEN_NAME> and <PR_SURNAME> fields in the AddressLayout entry, rather than <PR_DISPLAY_NAME>. Also, <PR_DISPLAY_NAME> may show the (E-mail) suffix for contacts from the Outlook Address Book.
- For Outlook Contacts, the <PR_EMAIL_ADDRESS> and <PR_ADDRTYPE> fields work with the E-mail field only. There are no corresponding fields for the E-mail 2 and E-mail 3 addresses.
- In Outlook, the Country field is often filled in by default with a value determined by your regional settings (Control Panel | Regional Settings). Click Address on the Contacts record to check the value placed in Country field.
Word for Microsoft 365 Word for Microsoft 365 for Mac Word 2021 Word 2021 for Mac Word 2019 Word 2019 for Mac Word 2016 Word 2016 for Mac Word 2013 Word 2010 Word Starter 2010 More…Less
If you don’t have a mailing list as a source for names and addresses in a mail merge, you can create one in Word.
Create a new mail merge list
-
Go to File > New > Blank Document.
-
Choose Select Recipients > Type a New List.

-
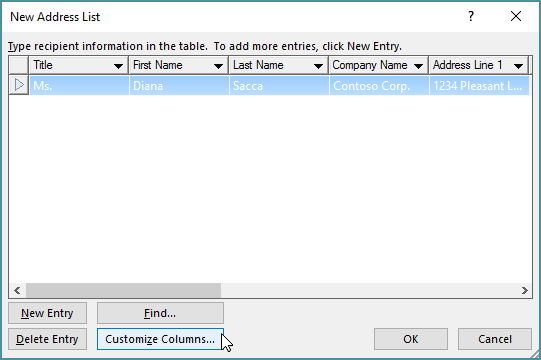
In the New Address List dialog box type recipient information in each column as appropriate. For more info on using the dialog box, see Edit Data Source.
-
For each new record, select Add New.
-
If you need more columns, such as for an order number, follow these steps:
-
In the New Address List dialog box choose Customize Columns.
-
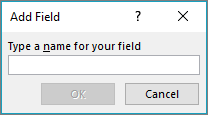
Choose Add.
-
Type a field name and then select OK.
-
Repeat steps b and c for each column or field to add.
-
-
When you’re done adding all the people you want to your list, choose OK.
-
In the Save Address List dialog box, give your new file a name, and then choose Save.

You can now insert mail merge fields in your document. For more information, see Insert mail merge fields.
Create a mailing list in Word
A mailing list can be created within Word for sending bulk mail during mail merge process.
-
Go to File > New > New Document.
-
Go to Mailings > Select Recipients > Create a New List.
-
In the Edit List Fields, you’ll see a set of automatic fields that Word supplies. If you want a new field, type a name into New Field name to add it to the list.
-
Use the Up
and Down buttons to reposition fields -
Select Create.
-
In the Save dialog, give the list a name and save it.
-
In Edit List Entries, type the data in each column for the mailing list.
-
For each new record, select the + button. To remove a record, go to the record and press the — button
-
When you’re done adding all the people you want to your list, choose OK.
 and Down
  buttons to reposition fields
To later modify the list, follow these steps:
-
Go to Mailings > Select Recipients.
-
Select Use an existing list, choose the list you previously created and select Open.
-
Add or edit records in the Edit List Entries dialog box.
Create a mailing list in Word
A mailing list can be created within Word for sending bulk mail during mail merge process.
-
On the View menu, choose Print Layout.
-
On the Standard toolbar, choose New
.You use this blank document to create a data source.
-
On the Tools menu, choose Mail Merge Manager.
-
Under 1. Select Document Type, choose Create New, and then select Form Letters.
-
Under 2. Select Recipients List, choose Get List, and then select New Data Source.
-
In the Field names in header row box, click any field names that you don’t want to include in your data source, choose Remove Field Name, and then selectOK.
-
Type a name and choose a location for your data source, and then choose Save.
Remember where you save the data source. You will need to know the location later.
-
In the Data Form dialog box, type the data for one data record (for example, a recipient’s first name in FirstName, last name in LastName, street address in Address1, and so on).
Note: Do not enter spaces in boxes that you want to leave blank.
-
After you finish filling in the boxes for one record, choose Add New.
-
Repeat steps 8 and 9 for each record that you want to enter.
-
After you add all the records that you want, choose OK.
Tip: To return to the Data Form dialog box later, in the Mail Merge Manager, under 2. Select Recipients List, select Edit Data Source
. -
On the File menu, choose Close.
-
To save the data source, choose Save.
-
To discard the blank open document, choose Don’t Save.
 .
. .
.Need more help?
List Templates
Nowadays, address lists are used in a variety of ways. They are used by business establishments in documenting their client and customer details. Also, party organizers use them in planning events especially if you’re catering a large number of guests or participants. The address list, in this case, becomes an indispensable part of your to-do list.

In line with this, there are address list templates that you may use and download. The templates provided range from guest list template to a new grocery list. Furthermore, address lists are considered as great tools in the field of management and documentation.
Wedding Address List
 enigmaphoto.net
Details
File Format
Size: 141 KB
Download
Free Address List
 k12.wa.us
Camp Address
 bsatroop439.com
Details
File Format
Size: 62 KB
Download
Email Address List
 liberty.edu
Details
File Format
Size: 28 KB
Download
Guest List Template
 cdn.shopify.com
Details
File Format
Size: 747 KB
Download
What Is a Global Address List?
A global address list is considered as an electronic shared address book contain school records, employment records and the like. It is also considered as directory service. In line with this, your global address list may contain client lists as showcased by client list templates.
This type of system is secured because only designated administrators of the system can edit them. If you want to create a global address list, Microsoft Exchange is a great tool to look into. Email list template are also good references.
What to Prepare before Creating a Global Address List?
In a free list template, the database is divided into different sections depending on the usage of the address list. If you’re planning to create a global address list, consider the following:
- Choose administrators within your team. The address list will be managed by your selected administrators. For the other users, it would only be a read-only access.
- Make a list or outline of the contacts or records that you wish to be added. A list template in PDF contain various methods in terms of sorting relevant information in an address list. The said templates can help you.
Reference List
 opwdd.ny.gov
Details
File Format
Size: 87 KB
Download
Medical Staff Address List
 rvh.on.ca
Details
File Format
Size: 248 KB
Download
Client Address Template
 maaden.com.sa
Details
File Format
Size: 17 KB
Download
A list template in Word is a mere tool and guide that you may access to build your own address list. In the end of the day, you have to come up with solid a sound management procedures and protocols in maintaining the security and reliability of the data and records. If you’re using Microsoft Exchange, refer to the following tips:
- After launching and signing in to your MS Exchange account, you need to click on Contacts. Do this in order for you to access your list of contacts.
- If you’re planning to add a new contact, you need to click on the (+) button. After that, a drop-down menu will appear. In this case, you need to choose the mail contact option.
- Fill in the needed contact details. After that, you need to provide the necessary information in the fields provided. Once you’re done, click on the Save button. This is basically the same process you would have to follow when creating vendor list templates.
After adding the contact, you can still make necessary edits and modifications especially when you’re about to update old contacts. To edit them, you may click on the pencil toolbar and search for the designated contact.
More in List Templates
| Email List Template – 10+ Free Sample, Example, Format Download … | List Template – 270+ Free Word, Excel, PDF Format Download … |
| 21+ Sign In Sheet Templates – Free Word, Excel, PDF Documents … | Wedding Guest List Template — 6+ Free Sample, Example, Format … |
| List Templates – 105+ Free Word, Excel, PDF, PSD, Indesign Format … | 28+ Sign Up Sheets — Free Word, Excel, PDF Documents Download … |
| List Template – 180+ Free Sample, Example, Format Download … | Client List Template — 9+ Free Word, PDF Format Download Free … |
Insert contact information into a document
What to Know
- Customize Quick Access Toolbar > More Commands > Choose commands from > Not in the Ribbon > Address Book > Add > OK.
- The Address Book icon now appears in the Quick Access Toolbar. In a Word document, place the cursor where you want the contact info.
- Then, select Insert Address, select the Address Book drop-down arrow, and choose the address book and contact name.
This article explains how to insert contact information into a document from your address book in Microsoft Word. Instructions cover Word 2019-2010 and Word for Microsoft 365.
Add an Address Book Button to Quick Access Toolbar
Adding the Insert Address button to the Quick Access Toolbar (QAT) on the ribbon provides quick access to your Outlook contact information.
-
Go to the Quick Access Toolbar and select the Customize Quick Access Toolbar drop-down arrow.
-
Select More Commands.
-
In the Word Options dialog box, select the Choose commands from the drop-down arrow and choose Commands Not in the Ribbon.
-
In the list of commands, select Address Book.
-
Select Add to move the Address Book command to the Quick Access Toolbar list.
-
Select OK to add the Address Book button to the Quick Access Toolbar.
Insert a Contact From Your Address Book
The Address Book icon now appears in the Quick Access Toolbar. Use it to access your Microsoft Outlook address book.
The button is called Insert Address in its tooltip.
-
Place the cursor in the location where you want to insert the contact information.
-
Select Insert Address.
-
In the Select Name dialog box, select the Address Book drop-down arrow, then select the address book you want to use. Contact names from that book appear in the list.
-
Choose a contact name.
-
Select OK to insert the contact information in the document.
Thanks for letting us know!
Get the Latest Tech News Delivered Every Day
Subscribe