
Create and print labels

Create and print a page of identical labels
-
Go to Mailings > Labels.
-
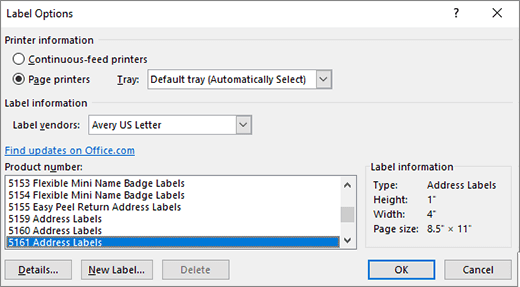
Select Options and choose a label vendor and product to use. Select OK.
If you don’t see your product number, select New Label and configure a custom label.

-
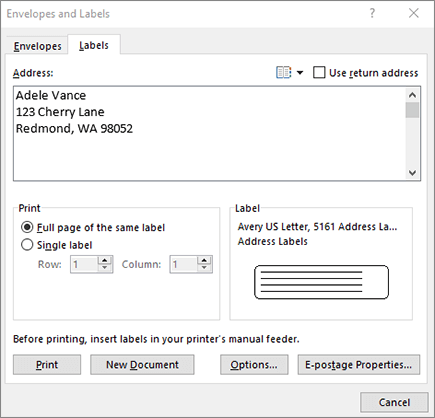
Type an address or other information in the Address box (text only).
To use an address from your contacts list select Insert Address
. -
To change the formatting, select the text, right-click, and make changes with Font or Paragraph.
-
Select OK.
-
Select Full page of the same label.
-
Select Print, or New Document to edit, save and print later.
 .
.If you need just one label, select Single label from the Mailings > Labels menu and the position on the label sheet where you want it to appear. Select OK, the destination, and Save.
Create and print a page of the same label
-
Go to Mailings > Labels.
-
In the Address box, type the text that you want.
To use an address from your contacts list select Insert Address
. -
To change the formatting, select the text, right-click, and make changes with Home > Font or Paragraph.
-
In the Label Options dialog box, make your choices, and then select OK.
If you don’t see your product number, select New Label and configure a custom label.
-
Select OK.
-
Select Full page of the same label.
-
Select Print, or New Document to edit, save and print later.
 .
.Set up and print a page of the same label
-
Go to Mailings > Labels.
-
Select Options.
-
Choose Printer type, Label products, and Product number.
If you don’t see your product number, select New Label and configure a custom label.
-
Select OK.
-
Type an address or other information in the Delivery Address box.
To use an address from your contacts list select Insert Address
. -
To change the formatting, select the text and then select Font to make changes.
-
Select Full page of the same label.
-
Select OK.
-
Select Print, or New Document to edit, save and print later.
 .
.For info about merging data with labels, see Create mailing labels in Word by using mail merge or Mail merge in Word for Mac.
If you want to make return address labels, see Create return address labels.
Word for the web doesn’t support directly creating labels. However you can create labels from a template.
-
Open Word for the web.
-
Select a label template when you create a new document. Select More templates if you don’t see what you want.
You can also go to templates.office.com, and search for label.
-
For a sheet of identical labels, fill out one label, and then copy/paste for the rest.
Tip: Print your labels to a sheet of paper before loading labels into the printer to make sure the text aligns with the labels.
See also
To create a page of different labels, see Create a sheet of nametags or address labels
To create a page of labels with graphics, see Add graphics to labels
To print one label on a partially used sheet, see Print one label on a partially used sheet
To create labels with a mailing list, see Print labels for your mailing list
To create labels using a template, see Microsoft label templates
Need more help?
Even if your office does the majority of its communication by email, blog post, tweet and blast, you still may find that hard-copy correspondence can be of benefit. To speed up handling mail, use Microsoft Word to design and print address labels. Choose from one of Word’s included templates to get yourself started, and then customize everything from the text to the colors. Once you’ve crafted labels in Word, you can reuse them again and again, even after you’ve moved offices or changed names.
Step 1
Launch Word, click the “File” tab and then click “New.” Click “Labels” from the “Suggested search” section.
Step 2
Scroll through the types of labels in the “Category” column and double-click one that fits your needs, such as “Address.” Double-click a template and, after a few moments, Word opens the template in a new window.
Step 3
Click on any label on the sheet. Highlight the placeholder lines, which may show “Recipient Name” and “Recipient City” for example, and type your own, such as your business return address.
Step 4
Highlight the new label text and right-click the highlight. Use the pop-up menu to format the label data, such as changing the font and color and resizing the text to be large and clearly readable.
Step 5
Click the “Same Address” button on the ribbon to extend the text you just changed on one label to all of labels in the template, which can save time and data entry error. This is optional. For a sheet with different addresses, simply type over the placeholder lines with your own label data.
Step 6
Click the “Design” tab, then the “Page Color” button. If you will be printing in color, you can choose a background color for the labels, such as your company’s main logo color. This step works well if you are printing on plain white label sticker paper – skip it, however, if you have colored sticker paper.
Step 7
Position the cursor to the left or right of the first line on the label. Click the “Insert” tab, then “Pictures.” Browse to a copy of your logo and double-click to add it to the label. Press and hold down the “Shift” key, click a corner of the logo and drag in toward the middle to shrink it. Drag the logo graphic into place on the label. Right-click the logo, select “Copy,” click into the next label on the template and select “Paste.” Repeat until the logo is on each label.
Step 8
Click the “File” tab and click “Print.” You’ll see a preview of the label sheet. Click the “Print” button, or adjust the printer settings to choose your printer, number of copies, color or grayscale and other settings.
References
Tips
- You can also format existing labels by clicking the “File” tab, clicking “Open,” browsing to them, double-clicking the file name and then following the rest of the instructions here.
- Word comes with functionality to help you with one of the most used label brands in the world — Avery. Once you have the template open, you’ll see the «Avery Template» tab available. On its ribbon, you can search out additional Avery label templates, get help with making labels, set up alignment and more. If you’re starting from scratch, you can also choose specific label templates from Word’s start screen, «Available Templates» screen in Word 2010 and the search box on either. You can find your Avery label template number on the box/envelope of labels and sometimes on the back of the label paper.
Warnings
- These instructions apply only to Word 2013. Earlier or later versions may present several differences. In Word 2010, double-click the “Labels” button on the Available Templates screen after clicking “New.”
Writer Bio
Fionia LeChat is a technical writer whose major skill sets include the MS Office Suite (Word, PowerPoint, Excel, Publisher), Photoshop, Paint, desktop publishing, design and graphics. LeChat has a Master of Science in technical writing, a Master of Arts in public relations and communications and a Bachelor of Arts in writing/English.
Image Credit
PhotoObjects.net/PhotoObjects.net/Getty Images
 Please Note:
This article is written for users of the following Microsoft Word versions: 2007, 2010, 2013, 2016, 2019, Word in Microsoft 365, and 2021. If you are using an earlier version (Word 2003 or earlier), this tip may not work for you. For a version of this tip written specifically for earlier versions of Word, click here: Controlling URL Formatting.
![]()
Written by Allen Wyatt (last updated January 8, 2022)
This tip applies to Word 2007, 2010, 2013, 2016, 2019, Word in Microsoft 365, and 2021
It is no surprise that Word provides support for the Internet. One aspect of this support is the ability for Word to recognize URL addresses in your document and make them active. For instance, if you type a URL, Word automatically converts it to a field code. When you later click on the address, your Web browser is started, and you can visit the Web page represented by the URL.
This feature is turned on by default in Word, but some people find it just plain annoying. This is especially true if you are working with a document that has many, many URLs in it. If you want to turn off this feature, there are two routes you can follow. The first involves these steps:
- Display the Word Options dialog box. (In Word 2007 click the Office button and then click Word Options. In Word 2010 or a later version, display the File tab of the ribbon and then click Options.)
- Click Proofing at the left side of the dialog box.
- Click the AutoCorrect Options button. Word displays the AutoCorrect dialog box.
- Make sure the AutoFormat As You Type tab is displayed. (See Figure 1.)
- At the bottom of the Replace As You Type section, make sure the Internet and Network Paths With Hyperlinks checkbox is cleared.
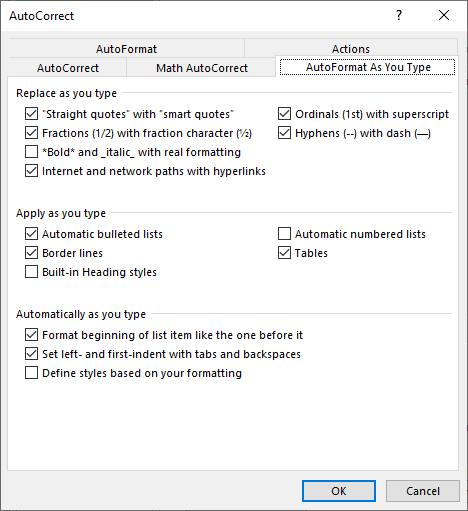
Figure 1. The AutoFormat As You Type tab of the AutoCorrect dialog box.
Don’t close the dialog box quite yet. While you’ve instructed Word to not convert the URLs as you type, you may want to follow the second route, which changes how Word autoformats an entire document at a single pass. This feature of Word (AutoFormatting) is available by adding the command to the Quick Access Toolbar. Normally you would add and use the AutoFormat command if you routinely import a document either from another word processor or if you import a regular ASCII text file and you need to format it. To make sure that Word does not activate links when you use the AutoFormat command, continue with these steps:
- Click on the AutoFormat tab. (See Figure 2.)
- Near the middle of the dialog box, at the bottom of the Replace section, make sure the Internet and Network Paths With Hyperlinks checkbox is cleared.
- Click on OK.
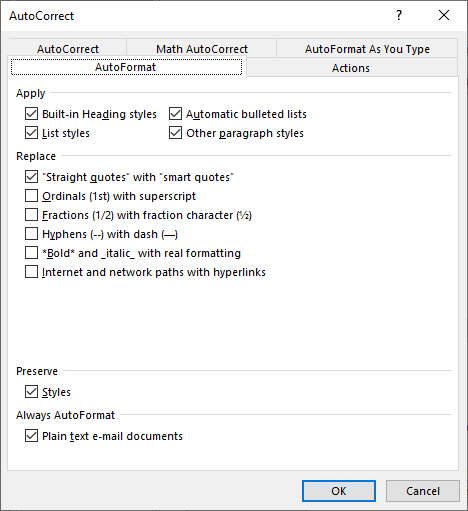
Figure 2. The AutoFormat tab of the AutoCorrect dialog box.
WordTips is your source for cost-effective Microsoft Word training.
(Microsoft Word is the most popular word processing software in the world.)
This tip (8875) applies to Microsoft Word 2007, 2010, 2013, 2016, 2019, Word in Microsoft 365, and 2021. You can find a version of this tip for the older menu interface of Word here: Controlling URL Formatting.
Author Bio
With more than 50 non-fiction books and numerous magazine articles to his credit, Allen Wyatt is an internationally recognized author. He is president of Sharon Parq Associates, a computer and publishing services company. Learn more about Allen…
MORE FROM ALLEN
Removing Confusion When Using AutoCorrect
AutoCorrect is a great help when writing, as it can allow you to create regular blocks of text easily. This can cause …
Discover More
Page Numbers in VBA
When you print a larger worksheet, Excel breaks the printout across several pages. You may want to know, before you …
Discover More
Converting Coded Dates into Real Dates
Sometimes the format in which you receive data is not the same format that would be optimal for Excel. For instance, you …
Discover More
More WordTips (ribbon)
Removing Automatic Lines
Type a few dashes, underscores, or equal signs, and you could end up with a full-width line in your document. This is …
Discover More
Controlling Automatic Indenting
Type a tab character and you might just find that Word adjusts the indentation of the entire paragraph. If you don’t like …
Discover More
Smart Quotes in AutoCorrect Entries
Smart quotes can add a finishing touch to your text. You might expect that when AutoCorrect is used to add text, it would …
Discover More
One of the advantages to using Microsoft Exchange or Microsoft Outlook is the ability to use information from the Address Book in Microsoft Word documents. Exactly how to do it, though, isn’t obvious. The key is an AutoText entry called AddressLayout in English (see Non-English Word for the correct name in other languages). This article shows you how to change this entry and how to add an Insert Address button to the Word toolbar. See More Information at the end of this article for alternative methods of putting addresses into Word documents.
Adding an Insert Address button | Changing the Address Layout
Non-English Word | Notes | More Information
Adding an Insert Address button
Word 7.0 includes an Insert Address button on its Standard toolbar, but newer versions of Word don’t add the button to the Toolbar or ribbon. If you’re going to add address information to documents frequently, having a button available will make it easier. Here’s how to add it to a toolbar:
- In Word, choose View | Toolbars | Customize, then switch to the Commands tab..
- Under Categories, choose Insert.
- Near the bottom of the Commands list, you’ll find Address Book. Drag that command to any toolbar currently displayed in Word.
The Insert Address button makes it easy to add an address to any document.
Changing the Address Layout
Word includes a default AddressLayout entry that you can’t see or edit directly. Test it by using the Insert Address button to insert an address from your Address Book.
To add, remove or rearrange fields, create a new layout in a Word document, then save it as a new AutoText entry named AddressLayout. (If you have a non-English version of Word, see Non-English Word below.)
The following table lists each field you can use, indicates whether it applies to addresses from the Personal Address Book (PAB) or Outlook Contacts (OAB) and lists the corresponding field name in the OAB and PAB.
Fields marked with an asterisk (*) may work only in Word 2000.
| AddressLayout Field | Contacts (OAB) or Personal Address Book (PAB) Field Name |
OAB | PAB |
|---|---|---|---|
| Name Fields | |||
| <PR_DISPLAY_NAME> | Subject (by default, First Last Middle Suffix) (OAB) First Last or Last, First (PAB, depending on setting) |
X | X |
| <PR_GIVEN_NAME> | First | X | X |
| <PR_SURNAME> | Last | X | X |
| <PR_TITLE> | Job Title (OAB) Title (PAB) |
X | X |
| <PR_DISPLAY_NAME_PREFIX>* | Title (OAB) | X | ? |
| Company Fields | |||
| <PR_COMPANY_NAME> | Company | X | X |
| <PR_DEPARTMENT_NAME> | Department | X | X |
| <PR_OFFICE_LOCATION> | Office Location (OAB) Office (PAB) |
X | X |
| <PR_ASSISTANT> | Assistant | X | X |
| Address Fields | |||
| <PR_STREET_ADDRESS> | Street | X | X |
| <PR_LOCALITY> | City | X | X |
| <PR_STATE_OR_PROVINCE> | State/Province | X | X |
| <PR_POSTAL_CODE> | ZIP/Postal code | X | X |
| <PR_COUNTRY> | Country | X | X |
| <PR_POSTAL_ADDRESS> | Full address, including country only if it’s not your own | ||
| Phone Fields | |||
| <PR_OFFICE_TELEPHONE_NUMBER> | Business | X | X |
| <PR_OFFICE2_TELEPHONE_NUMBER> | Business 2 | X | X |
| <PR_PRIMARY_TELEPHONE_NUMBER> | Phone number (on Business tab) | X | |
| <PR_BUSINESS_FAX_NUMBER> | Business Fax | X | |
| <PR_PRIMARY_FAX_NUMBER> | Fax | X | |
| <PR_ASSISTANT_TELEPHONE_NUMBER> | Assistant (on Phone pick list) (OAB) Assistant (on Phone Numbers tab) (PAB) |
X | X |
| <PR_BEEPER_TELEPHONE_NUMBER> | Pager | X | X |
| <PR_CAR_TELEPHONE_NUMBER> | Car | X | |
| <PR_CELLULAR_TELEPHONE_NUMBER> | Mobile | X | X |
| <PR_RADIO_TELEPHONE_NUMBER> | Radio | X | |
| <PR_HOME_TELEPHONE_NUMBER> | Home | X | X |
| <PR_HOME2_TELEPHONE_NUMBER> | Home 2 | X | X |
| <PR_HOME_FAX_NUMBER> | Home Fax | X | |
| <PR_OTHER_TELEPHONE_NUMBER> | Other | X | |
| Other Fields | |||
| <PR_EMAIL_ADDRESS> | E-mail Address | X | X |
| <PR_ADDRTYPE> | E-mail Type | X | X |
| <PR_COMMENT> | Notes | X |
An example is the easiest way to show how to create a new layout. If you want to add the job title and company name to the layout and remove the country name, type (or copy and paste) this into Word, with a carriage return after each line:
<PR_GIVEN_NAME> <PR_SURNAME> <PR_TITLE> <PR_COMPANY_NAME> <PR_STREET_ADDRESS> <PR_LOCALITY>, <PR_STATE_OR_PROVINCE> <PR_POSTAL_CODE>
Make sure you include spaces and punctuation where you want them to appear in the address. Now, select the entire layout, and save it as an AutoText entry with the name «AddressLayout,» taking care to use exactly that spelling and capitalization.
To save an AutoText entry in Word 7.0, choose Edit | AutoText, enter the Name as «AddressLayout,» then click Add.
To save an AutoText entry in Word 97 or Word 2000/2002/2003, choose Insert | AutoText | New, enter «AddressLayout» as the name, then click OK.
You can now use the Insert Address button to test your new AddressLayout. The above example should give you an address that looks like this:
Bill GatesCEOMicrosoft CorporationOne Microsoft WayRedmond, WA 98052
You might notice, though, that if a person has no title, you get a blank line. To suppress blank lines and make use of different fields that display the same data, depending on whether the source is a PAB or OAB entry, try this variation from the Office 97 Resource Kit, omitting the carriage returns:
{{<PR_GIVEN_NAME> <PR_SURNAME> | <PR_DISPLAY_NAME>}r} {{<PR_STREET_ADDRESS>r}{{<PR_LOCALITY>} {, <PR_STATE_OR_PROVINCE> <PR_POSTAL_CODE>}r} {<PR_COUNTRY>r}| <PR_POSTAL_ADDRESS>r}
The curly braces ( {} ) are used to ensure that a particular line does not print if it is empty, for example, if the person does not have a title. The vertical bar ( | ) means OR. And the r switch substitutes for the carriage return. (Omit the r in Word 2000 and just put a carriage return or soft return after each line; the r switch doesn’t work in Word 2000.) You are limited to a total of 12 fields, according to WD2000: How to Modify the Layout of an Address Book Entry.
For Office XP, this turns out to be a pretty good AddressLayout entry to include both company and country. I suspect it might also work well in Office 2000. You should put a carriage return or soft return at the end of each line shown here:
{{<PR_GIVEN_NAME> <PR_SURNAME> | <PR_DISPLAY_NAME>} }{<PR_COMPANY_NAME>} {{<PR_STREET_ADDRESS> }{{<PR_LOCALITY>}{, <PR_STATE_OR_PROVINCE> <PR_POSTAL_CODE>}} {<PR_COUNTRY> }| <PR_POSTAL_ADDRESS>}
If the address doesn’t work the way you think it should, check the field names for spelling mistakes and make sure that you actually have information entered in the corresponding Contacts or PAB fields. Also, if the addresses were imported, you may need to follow the instructions in MSKB article Address Displays Incorrectly on Imported Contacts.
Another approach is to simply make sure that the Address field contains whatever you want printed after the name, repeating the company name or other information as needed.
Non-English Word
If you are using a non-English version of Word, AddressLayout may not be the correct name for the AutoText entry that you need to modify. If you discover what the correct name is for a particular language, please let us know and we’ll add it to this list:
- Dutch — AdresIndeling
- French — MiseEnPageAdresse
- German — Adreßlayout or Adresslayout
- Italian — IndirizzoLayout
- Nordic languages — AdresseLayout
- Spanish — AddressLayout
- Turkish – AdresD’zeni
Notes
If you want to write a Word macro to insert addresses, use the GetAddress method. This also gives you the option of specifying an address layout, rather than using the AddressLayout entry from AutoText. There’s a good example in the VBA help file in Word.
Additional notes on the fields:
- In an Outlook contact, if you edit the Subject field, subsequent changes to any name field will cause the Subject field also to change. If you are using the Reorder Contacts form to change the way addresses are displayed in the Outlook Address Book, you should use the <PR_GIVEN_NAME> and <PR_SURNAME> fields in the AddressLayout entry, rather than <PR_DISPLAY_NAME>. Also, <PR_DISPLAY_NAME> may show the (E-mail) suffix for contacts from the Outlook Address Book.
- For Outlook Contacts, the <PR_EMAIL_ADDRESS> and <PR_ADDRTYPE> fields work with the E-mail field only. There are no corresponding fields for the E-mail 2 and E-mail 3 addresses.
- In Outlook, the Country field is often filled in by default with a value determined by your regional settings (Control Panel | Regional Settings). Click Address on the Contacts record to check the value placed in Country field.
Whenever you mail a letter, you need to write the address correctly. If you format the address incorrectly, your mail might get delivered to the wrong destination.
That’s just one situation in which you’ll need to know how to write an address. You may also need to write your address in the header of a resume, to fill out legal forms, and countless other situations.
If you’re trying to write an address, you’ve come to the right place. This article will give you a complete guide to formatting an address and provide examples of common address formats.
What Is an Address?
An address consists of all the information that a mail carrier needs to identify a location.
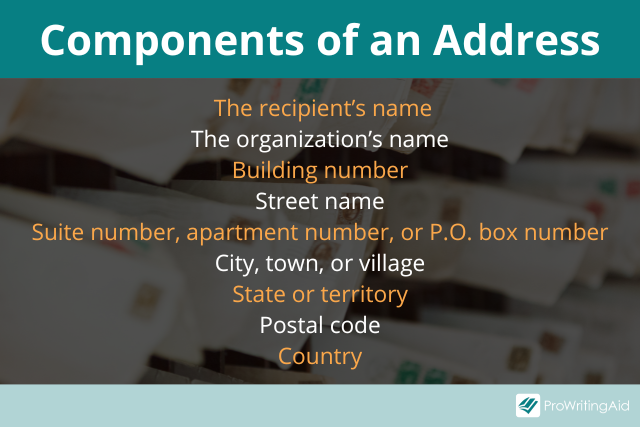
Addresses contain some or all of the following pieces of information:
- The recipient’s name
- The organization’s name, if necessary
- Building number
- Street name
- Suite number, apartment number, or P.O. box number, if necessary
- City, town, or village
- State or territory
- Postal code
- Country
It’s important to include all the information that the post office needs to identify the correct location, without including any extraneous information. If you add any extraneous lines or words, it will be harder for others to figure out what the actual address is.
What Are the Address Formats for Mailing a Letter?
When you mail a letter in the US, you’ll need to include both the recipient’s address and the sender’s address. Let’s look at how to format each one.
Mailing Address Format
Whenever you mail a letter, you need to put the recipient’s address at the center of the envelope. This is where the postal courier will look to figure out where to deliver the letter to.
If you’re writing to a recipient in the US, you should include the following pieces of information, in this order:
- The recipient’s name on the first line. You can choose whether or not to include a title, such as Ms. or Dr.
- The recipient’s building number and street name. Also include a suite number, apartment number, or P.O. box number on the second line, if necessary
- The recipient’s city, state, and postal code on the final line
The address should consist of three lines of text, one for each of the bullet points above.
You only need to include a suite or apartment number if you live in a building where multiple individuals or families share the same building number. That way, couriers can figure out which specific apartment to deliver the mail to.
When you write the postal code, you can write out either the five-digit ZIP code (e.g. 98052), or the five-digit ZIP code with the area-specific four-digit suffix (e.g. 98052-1134). Including your full postal code will help couriers deliver your package more quickly.
Return Address Format
The term “return address” refers to the address of the person sending a letter or package. The reason you need to include your own address on any letter or package you send is so the postal service knows where to return the mail if they’re unable to deliver it. You should place your return address on the upper left corner of the envelope.
If you live in the US, you should include the following pieces of information, in this order:
- Your name on the first line. You can choose whether or not to include a title, such as Ms. or Dr.
- Your building number and street name. Also include a suite number, apartment number, or P.O. box number on the second line, if necessary
- Your city, state, and postal code on the final line
Just like with the mailing address, the return address should be three lines of text, one for each of the bullet points above.
What Are the Address Formats for Specific Types of Addresses?
The guidelines to follow when writing an address often depends on the specific type of letter you’re writing. For example, if you’re sending an international letter to a country outside of the US, you may need to format your address differently.
Let’s look at some of these specific guidelines.
Business Address Format
When you’re sending mail to a business address, you may need to include some additional information that you wouldn’t include for a personal letter.
That’s because the courier may need to know the company name, as well as the name of the specific person within the company you’re writing to.
Here’s the information you need to include in a business address:
- The recipient’s name. You can precede this name with the word Attention or ATTN, followed by a colon. You can choose whether you want to include any relevant professional titles, such as Ph.D. or Esq.
- The name of the recipient’s company or organization
- The company’s building number and street name
- The company’s floor or suite number, if necessary
- The company’s city, state, and postal code
International Address Format
If you’re mailing a letter outside of the US, you’ll need to adhere to the format of the country you’re sending the letter to. That way, the postal service within that country will know where to go.
In general, these are the pieces of information you should include in an international address:
- The recipient’s name
- The name of the recipient’s house, if their home has a specific name
- The recipient’s building number and street name, if their house does not have a specific name
- The recipient’s city, town, or village
- The recipient’s county
- The recipient’s postal code
- The recipient’s district, if necessary
- The recipient’s country
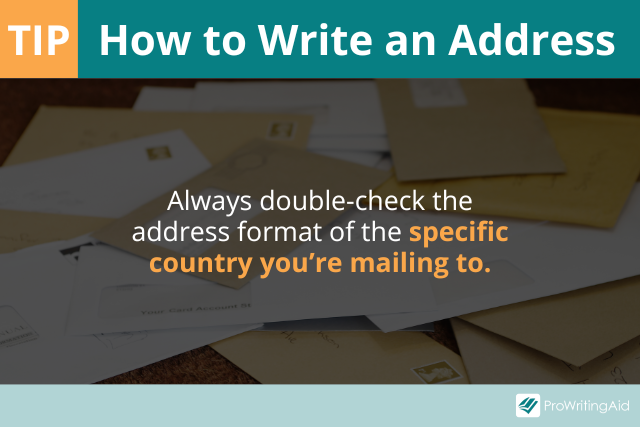
To be safe, you should always double-check the address format of the specific country you’re mailing to.
When you write your return address on international mail, you should format it the same way you usually would. In addition, you should include your own country at the bottom of the return address.
Resume Address Format
When you write a professional resume, you should include your address at the top of your resume. You can either include it in your header or add it in the top left corner.
The good news is that you should use the same format for writing an address in a resume that you would use for writing a letter. Include all the same information you would use for a return address.
One-Line Address Format
Sometimes, you may need to write an entire address in a single line of text.
In this case, you should include all the same information that you would include in a multi-line address. The only difference is that you’ll need to replace each line break with a comma when you write an address on one line.
Make sure to include a comma after each of these elements:
- The person’s name
- The street address
- The apartment number or suite
- The city

Should You Use Abbreviations in an Address?
It’s perfectly acceptable to use abbreviations when writing an address—in fact, it’s often expected.
Here are some common abbreviations you should know:
- Apartment: Apt
- Boulevard: Blvd
- Drive: Dr
- Lane: Ln
- Parkway: Pkwy
- Road: Rd
- Street: St
- Suite: Ste
- North: N
- South: S
- East: E
- West: W
You should also abbreviate all the US states with a two-letter code. For example, you would write CA for California or DE for Delaware.
Address Examples
To help you understand what a correctly formatted address should look like, we’ve included some examples you can refer to.
US Address Examples
Here’s an example of a domestic residential address in the US:
John Smith
5480 7th Ave
San Francisco, CA 94112
Here’s an example of a US address with an apartment number:
Ms. Mary Green
2211 Edgewood St, Apt 2
Boston, MA 02124-1331
One-Line Address Examples
Here’s how you would write each of the above addresses on a single line:
John Smith, 5480 7th Ave, San Francisco, CA 94112
Ms. Mary Green, 2211 Edgewood St, Apt 2, Boston, MA, 02124-1331
Professional Address Examples
If you’re writing a business letter, don’t forget to include the organization’s name. Here’s an example:
Attn: Rachel Long, CEO
The Greatest Writers’ Organization
780 English Avenue, Floor 8
Seattle, WA 90199
International Address Examples
Here’s an example of an address in Canada:
Jacob White
423 Second Street NE
Montreal, QC H3Z 2Y7
Canada
(In this case, Montreal is the city, QC is the province, and H3Z 2Y7 is the postal code.)
Here’s an example of an address in Great Britain:
Harry Brown
87 Blackstone Street
London
EC1Y 8SY
England
(In this case, London is the city, and EC17 8SY is the postal code.)
Conclusion on How to Write an Address
There you have it—a complete guide to writing an address correctly! Here’s a quick recap:
- An address should include everything a mail carrier needs to identify the recipient’s location
- It’s expected that you’ll use standard abbreviations, such as St for Street
- The guidelines may be different for international addresses, so always double-check each country’s guidelines
Lastly, make sure you write your address in clear and legible handwriting, so your mail can be delivered efficiently.
![]() Have you tried ProWritingAid yet? What are you waiting for? It’s the best tool for making sure your copy is strong, clear, and error-free!
Have you tried ProWritingAid yet? What are you waiting for? It’s the best tool for making sure your copy is strong, clear, and error-free!