
Insert contact information into a document
What to Know
- Customize Quick Access Toolbar > More Commands > Choose commands from > Not in the Ribbon > Address Book > Add > OK.
- The Address Book icon now appears in the Quick Access Toolbar. In a Word document, place the cursor where you want the contact info.
- Then, select Insert Address, select the Address Book drop-down arrow, and choose the address book and contact name.
This article explains how to insert contact information into a document from your address book in Microsoft Word. Instructions cover Word 2019-2010 and Word for Microsoft 365.
Add an Address Book Button to Quick Access Toolbar
Adding the Insert Address button to the Quick Access Toolbar (QAT) on the ribbon provides quick access to your Outlook contact information.
-
Go to the Quick Access Toolbar and select the Customize Quick Access Toolbar drop-down arrow.
-
Select More Commands.
-
In the Word Options dialog box, select the Choose commands from the drop-down arrow and choose Commands Not in the Ribbon.
-
In the list of commands, select Address Book.
-
Select Add to move the Address Book command to the Quick Access Toolbar list.
-
Select OK to add the Address Book button to the Quick Access Toolbar.
Insert a Contact From Your Address Book
The Address Book icon now appears in the Quick Access Toolbar. Use it to access your Microsoft Outlook address book.
The button is called Insert Address in its tooltip.
-
Place the cursor in the location where you want to insert the contact information.
-
Select Insert Address.
-
In the Select Name dialog box, select the Address Book drop-down arrow, then select the address book you want to use. Contact names from that book appear in the list.
-
Choose a contact name.
-
Select OK to insert the contact information in the document.
Thanks for letting us know!
Get the Latest Tech News Delivered Every Day
Subscribe
This tutorial shows how to create printable address labels with images in Microsoft Word.
This process is best for sheets of labels with the same address, such as holiday labels for your home or business labels with a company logo.
We will look at how to use Mail Merge to create labels with multiple addresses in an upcoming tutorial.
Watch all the steps shown here in real time!
Explore more than 200 writing-related software tutorials on my YouTube channel.
The images below are from Word for Microsoft 365. These steps also apply to Word 2021, Word 2019, Word 2016, and Word 2013. These steps don’t apply to Word for the web.
We will cover this topic in Word for Mac in a separate tutorial.
- Select the Mailings tab in the ribbon.

- Select the Labels button.

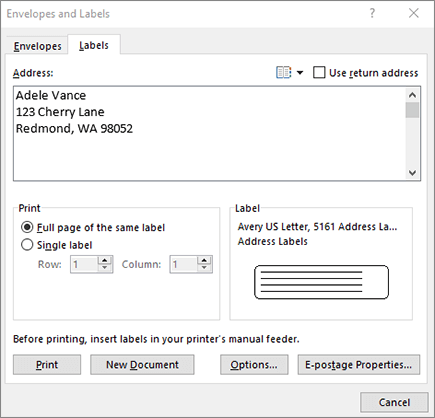
- Type the address into the Address text box in the Label tab of the Envelopes and Labels dialog box.

- Ensure that Full page of the same label is selected.

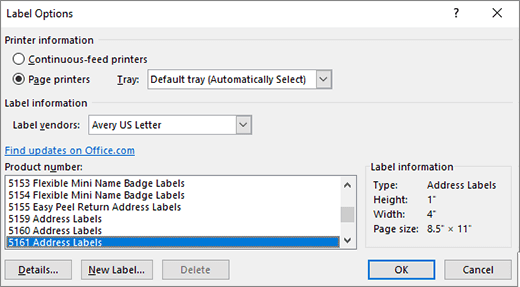
- Select the Options button.

- Review your printer settings in the Label Options dialog box. (These setting will normally be correct because Word should use the settings used to print your regular files.)

- Select the company that makes your labels from the Label vendors menu.

- Select the product number from the menu. (This number should appear on your label’s packaging.)

- Select the OK button.

- Select the New Document button.

How to Insert Images into Labels
- Place your cursor at the start of the first label in the new label document.

- Select the Insert tab.

- Select the Pictures button.

- Select the location of your image from the drop-down menu: This Device, Stock Images, or Online Pictures. (For this tutorial, we will choose This Device.)
Pro Tip: Microsoft 365 subscribers also have the option to use an icon instead of an image.

- Locate and select the image, and then select the Insert button.

Pro Tip: If you are going to print on a colored or clear label, use a PNG image rather than a JPEG image because PNGs have transparent backgrounds.
- Select the Layout Options button.

- Select Square in the Layout Options menu.

- Select the X to close the Layout Options menu.

- Use the resizing handles to adjust the image’s size as necessary.

How to Customize the Label Font
- Select all the text in the first label.

You should automatically move to the Home tab after selecting the text.
- Use the Font group options to customize the font, size, and color.

Important Note: The line spacing options in the Paragraph group won’t work for this process. If you need to change the line spacing, see the Pro Tip below.
How to Duplicate the Image and Custom Font across All Labels
- Reselect the Mailings tab (see figure 1).
- Reselect the Labels button (see figure 2).
- Reselect the New Document button in the Envelopes and Labels dialog box (see figure 10).
All the labels should now feature the image and custom font.

Pro Tip: You can manually retype different names and addresses in each individual label.
How to Print Labels
- Select the File tab.

- Select Print in the Backstage view.

- Enter the number of copies you want to print in the text box.

- Select the Print button.

- Save your file as you normally would so you can reprint the labels as necessary.
Related Resources
How to Create Newspaper-Style Columns in Microsoft Word
How to Insert and Modify Images in Microsoft Word
One of the advantages to using Microsoft Exchange or Microsoft Outlook is the ability to use information from the Address Book in Microsoft Word documents. Exactly how to do it, though, isn’t obvious. The key is an AutoText entry called AddressLayout in English (see Non-English Word for the correct name in other languages). This article shows you how to change this entry and how to add an Insert Address button to the Word toolbar. See More Information at the end of this article for alternative methods of putting addresses into Word documents.
Adding an Insert Address button | Changing the Address Layout
Non-English Word | Notes | More Information
Adding an Insert Address button
Word 7.0 includes an Insert Address button on its Standard toolbar, but newer versions of Word don’t add the button to the Toolbar or ribbon. If you’re going to add address information to documents frequently, having a button available will make it easier. Here’s how to add it to a toolbar:
- In Word, choose View | Toolbars | Customize, then switch to the Commands tab..
- Under Categories, choose Insert.
- Near the bottom of the Commands list, you’ll find Address Book. Drag that command to any toolbar currently displayed in Word.
The Insert Address button makes it easy to add an address to any document.
Changing the Address Layout
Word includes a default AddressLayout entry that you can’t see or edit directly. Test it by using the Insert Address button to insert an address from your Address Book.
To add, remove or rearrange fields, create a new layout in a Word document, then save it as a new AutoText entry named AddressLayout. (If you have a non-English version of Word, see Non-English Word below.)
The following table lists each field you can use, indicates whether it applies to addresses from the Personal Address Book (PAB) or Outlook Contacts (OAB) and lists the corresponding field name in the OAB and PAB.
Fields marked with an asterisk (*) may work only in Word 2000.
| AddressLayout Field | Contacts (OAB) or Personal Address Book (PAB) Field Name |
OAB | PAB |
|---|---|---|---|
| Name Fields | |||
| <PR_DISPLAY_NAME> | Subject (by default, First Last Middle Suffix) (OAB) First Last or Last, First (PAB, depending on setting) |
X | X |
| <PR_GIVEN_NAME> | First | X | X |
| <PR_SURNAME> | Last | X | X |
| <PR_TITLE> | Job Title (OAB) Title (PAB) |
X | X |
| <PR_DISPLAY_NAME_PREFIX>* | Title (OAB) | X | ? |
| Company Fields | |||
| <PR_COMPANY_NAME> | Company | X | X |
| <PR_DEPARTMENT_NAME> | Department | X | X |
| <PR_OFFICE_LOCATION> | Office Location (OAB) Office (PAB) |
X | X |
| <PR_ASSISTANT> | Assistant | X | X |
| Address Fields | |||
| <PR_STREET_ADDRESS> | Street | X | X |
| <PR_LOCALITY> | City | X | X |
| <PR_STATE_OR_PROVINCE> | State/Province | X | X |
| <PR_POSTAL_CODE> | ZIP/Postal code | X | X |
| <PR_COUNTRY> | Country | X | X |
| <PR_POSTAL_ADDRESS> | Full address, including country only if it’s not your own | ||
| Phone Fields | |||
| <PR_OFFICE_TELEPHONE_NUMBER> | Business | X | X |
| <PR_OFFICE2_TELEPHONE_NUMBER> | Business 2 | X | X |
| <PR_PRIMARY_TELEPHONE_NUMBER> | Phone number (on Business tab) | X | |
| <PR_BUSINESS_FAX_NUMBER> | Business Fax | X | |
| <PR_PRIMARY_FAX_NUMBER> | Fax | X | |
| <PR_ASSISTANT_TELEPHONE_NUMBER> | Assistant (on Phone pick list) (OAB) Assistant (on Phone Numbers tab) (PAB) |
X | X |
| <PR_BEEPER_TELEPHONE_NUMBER> | Pager | X | X |
| <PR_CAR_TELEPHONE_NUMBER> | Car | X | |
| <PR_CELLULAR_TELEPHONE_NUMBER> | Mobile | X | X |
| <PR_RADIO_TELEPHONE_NUMBER> | Radio | X | |
| <PR_HOME_TELEPHONE_NUMBER> | Home | X | X |
| <PR_HOME2_TELEPHONE_NUMBER> | Home 2 | X | X |
| <PR_HOME_FAX_NUMBER> | Home Fax | X | |
| <PR_OTHER_TELEPHONE_NUMBER> | Other | X | |
| Other Fields | |||
| <PR_EMAIL_ADDRESS> | E-mail Address | X | X |
| <PR_ADDRTYPE> | E-mail Type | X | X |
| <PR_COMMENT> | Notes | X |
An example is the easiest way to show how to create a new layout. If you want to add the job title and company name to the layout and remove the country name, type (or copy and paste) this into Word, with a carriage return after each line:
<PR_GIVEN_NAME> <PR_SURNAME> <PR_TITLE> <PR_COMPANY_NAME> <PR_STREET_ADDRESS> <PR_LOCALITY>, <PR_STATE_OR_PROVINCE> <PR_POSTAL_CODE>
Make sure you include spaces and punctuation where you want them to appear in the address. Now, select the entire layout, and save it as an AutoText entry with the name «AddressLayout,» taking care to use exactly that spelling and capitalization.
To save an AutoText entry in Word 7.0, choose Edit | AutoText, enter the Name as «AddressLayout,» then click Add.
To save an AutoText entry in Word 97 or Word 2000/2002/2003, choose Insert | AutoText | New, enter «AddressLayout» as the name, then click OK.
You can now use the Insert Address button to test your new AddressLayout. The above example should give you an address that looks like this:
Bill GatesCEOMicrosoft CorporationOne Microsoft WayRedmond, WA 98052
You might notice, though, that if a person has no title, you get a blank line. To suppress blank lines and make use of different fields that display the same data, depending on whether the source is a PAB or OAB entry, try this variation from the Office 97 Resource Kit, omitting the carriage returns:
{{<PR_GIVEN_NAME> <PR_SURNAME> | <PR_DISPLAY_NAME>}r} {{<PR_STREET_ADDRESS>r}{{<PR_LOCALITY>} {, <PR_STATE_OR_PROVINCE> <PR_POSTAL_CODE>}r} {<PR_COUNTRY>r}| <PR_POSTAL_ADDRESS>r}
The curly braces ( {} ) are used to ensure that a particular line does not print if it is empty, for example, if the person does not have a title. The vertical bar ( | ) means OR. And the r switch substitutes for the carriage return. (Omit the r in Word 2000 and just put a carriage return or soft return after each line; the r switch doesn’t work in Word 2000.) You are limited to a total of 12 fields, according to WD2000: How to Modify the Layout of an Address Book Entry.
For Office XP, this turns out to be a pretty good AddressLayout entry to include both company and country. I suspect it might also work well in Office 2000. You should put a carriage return or soft return at the end of each line shown here:
{{<PR_GIVEN_NAME> <PR_SURNAME> | <PR_DISPLAY_NAME>} }{<PR_COMPANY_NAME>} {{<PR_STREET_ADDRESS> }{{<PR_LOCALITY>}{, <PR_STATE_OR_PROVINCE> <PR_POSTAL_CODE>}} {<PR_COUNTRY> }| <PR_POSTAL_ADDRESS>}
If the address doesn’t work the way you think it should, check the field names for spelling mistakes and make sure that you actually have information entered in the corresponding Contacts or PAB fields. Also, if the addresses were imported, you may need to follow the instructions in MSKB article Address Displays Incorrectly on Imported Contacts.
Another approach is to simply make sure that the Address field contains whatever you want printed after the name, repeating the company name or other information as needed.
Non-English Word
If you are using a non-English version of Word, AddressLayout may not be the correct name for the AutoText entry that you need to modify. If you discover what the correct name is for a particular language, please let us know and we’ll add it to this list:
- Dutch — AdresIndeling
- French — MiseEnPageAdresse
- German — Adreßlayout or Adresslayout
- Italian — IndirizzoLayout
- Nordic languages — AdresseLayout
- Spanish — AddressLayout
- Turkish – AdresD’zeni
Notes
If you want to write a Word macro to insert addresses, use the GetAddress method. This also gives you the option of specifying an address layout, rather than using the AddressLayout entry from AutoText. There’s a good example in the VBA help file in Word.
Additional notes on the fields:
- In an Outlook contact, if you edit the Subject field, subsequent changes to any name field will cause the Subject field also to change. If you are using the Reorder Contacts form to change the way addresses are displayed in the Outlook Address Book, you should use the <PR_GIVEN_NAME> and <PR_SURNAME> fields in the AddressLayout entry, rather than <PR_DISPLAY_NAME>. Also, <PR_DISPLAY_NAME> may show the (E-mail) suffix for contacts from the Outlook Address Book.
- For Outlook Contacts, the <PR_EMAIL_ADDRESS> and <PR_ADDRTYPE> fields work with the E-mail field only. There are no corresponding fields for the E-mail 2 and E-mail 3 addresses.
- In Outlook, the Country field is often filled in by default with a value determined by your regional settings (Control Panel | Regional Settings). Click Address on the Contacts record to check the value placed in Country field.
Create and print labels

Create and print a page of identical labels
-
Go to Mailings > Labels.
-
Select Options and choose a label vendor and product to use. Select OK.
If you don’t see your product number, select New Label and configure a custom label.

-
Type an address or other information in the Address box (text only).
To use an address from your contacts list select Insert Address
. -
To change the formatting, select the text, right-click, and make changes with Font or Paragraph.
-
Select OK.
-
Select Full page of the same label.
-
Select Print, or New Document to edit, save and print later.
 .
.If you need just one label, select Single label from the Mailings > Labels menu and the position on the label sheet where you want it to appear. Select OK, the destination, and Save.
Create and print a page of the same label
-
Go to Mailings > Labels.
-
In the Address box, type the text that you want.
To use an address from your contacts list select Insert Address
. -
To change the formatting, select the text, right-click, and make changes with Home > Font or Paragraph.
-
In the Label Options dialog box, make your choices, and then select OK.
If you don’t see your product number, select New Label and configure a custom label.
-
Select OK.
-
Select Full page of the same label.
-
Select Print, or New Document to edit, save and print later.
 .
.Set up and print a page of the same label
-
Go to Mailings > Labels.
-
Select Options.
-
Choose Printer type, Label products, and Product number.
If you don’t see your product number, select New Label and configure a custom label.
-
Select OK.
-
Type an address or other information in the Delivery Address box.
To use an address from your contacts list select Insert Address
. -
To change the formatting, select the text and then select Font to make changes.
-
Select Full page of the same label.
-
Select OK.
-
Select Print, or New Document to edit, save and print later.
 .
.For info about merging data with labels, see Create mailing labels in Word by using mail merge or Mail merge in Word for Mac.
If you want to make return address labels, see Create return address labels.
Word for the web doesn’t support directly creating labels. However you can create labels from a template.
-
Open Word for the web.
-
Select a label template when you create a new document. Select More templates if you don’t see what you want.
You can also go to templates.office.com, and search for label.
-
For a sheet of identical labels, fill out one label, and then copy/paste for the rest.
Tip: Print your labels to a sheet of paper before loading labels into the printer to make sure the text aligns with the labels.
See also
To create a page of different labels, see Create a sheet of nametags or address labels
To create a page of labels with graphics, see Add graphics to labels
To print one label on a partially used sheet, see Print one label on a partially used sheet
To create labels with a mailing list, see Print labels for your mailing list
To create labels using a template, see Microsoft label templates
Need more help?
Want more options?
Explore subscription benefits, browse training courses, learn how to secure your device, and more.
Communities help you ask and answer questions, give feedback, and hear from experts with rich knowledge.
 Please Note:
This article is written for users of the following Microsoft Word versions: 2007, 2010, 2013, 2016, 2019, Word in Microsoft 365, and 2021. If you are using an earlier version (Word 2003 or earlier), this tip may not work for you. For a version of this tip written specifically for earlier versions of Word, click here: Inserting the User’s Address.
![]()
Written by Allen Wyatt (last updated April 2, 2022)
This tip applies to Word 2007, 2010, 2013, 2016, 2019, Word in Microsoft 365, and 2021
Word automatically maintains several items of information about you, as a user. One such item is your address, which is changed by going to File | Options | Advanced. Scroll down to the General section and fill in your address in the Mailing Address box. You can find more information about setting the address in this tip:
https://tips.net/T9539
If you want to automatically insert the user address in your documents, you can follow these steps:
- Position the insertion point where you want the address inserted.
- Make sure the Insert tab of the ribbon is selected.
- In the Text group, click Quick Parts. You’ll see a drop-down menu.
- Choose Field. Word displays the Field dialog box.
- In the Categories drop-down list, choose User Information. (See Figure 1.)
- In the Field Names list choose UserAddress.
- Click on OK to close the dialog box and insert your field.
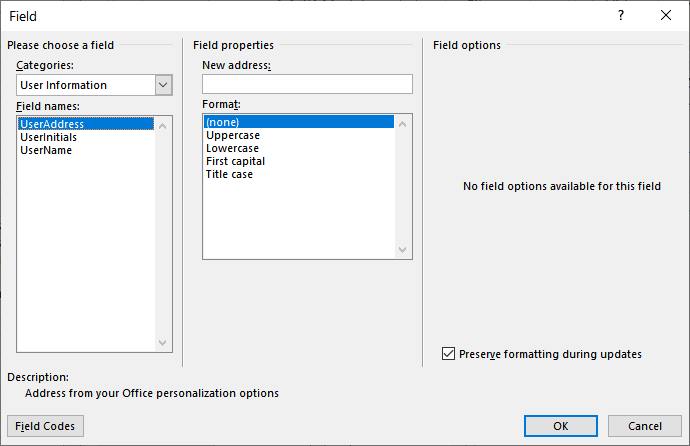
Figure 1. The Field dialog box.
WordTips is your source for cost-effective Microsoft Word training.
(Microsoft Word is the most popular word processing software in the world.)
This tip (5982) applies to Microsoft Word 2007, 2010, 2013, 2016, 2019, Word in Microsoft 365, and 2021. You can find a version of this tip for the older menu interface of Word here: Inserting the User’s Address.
Author Bio
With more than 50 non-fiction books and numerous magazine articles to his credit, Allen Wyatt is an internationally recognized author. He is president of Sharon Parq Associates, a computer and publishing services company. Learn more about Allen…
MORE FROM ALLEN
Quickly Formatting Footers in Documents with Many Sections
Need to adjust all the footers or headers in a document that uses lots of them? It’s easy to do if you understand how the …
Discover More
Using Continued Lines
You can create a special header and footer page numbering scheme by using nested fields. This tip shows an example of how …
Discover More
Calculating Week-Ending Dates
When working with dates, you may need to figure out all the dates on which weeks end in a given year. There are several …
Discover More

Do More in Less Time! Are you ready to harness the full power of Word 2013 to create professional documents? In this comprehensive guide you’ll learn the skills and techniques for efficiently building the documents you need for your professional and your personal life. Check out Word 2013 In Depth today!
More WordTips (ribbon)
Inserting the Total Number of Pages in Your Document
Word keeps track of many statistics for each of your documents. One statistic is the total number of pages in the printed …
Discover More
Inserting the Author Name
Did you know that Word tries to keep track of who the author of a document is? This information can be easily added to …
Discover More
Inserting the User’s Initials
One of the pieces of information tracked by Word are your name and initials. You can insert your initials by using the …
Discover More
Subscribe
FREE SERVICE: Get tips like this every week in WordTips, a free productivity newsletter. Enter your address and click «Subscribe.»
View most recent newsletter.