
You can use either a text box or WordArt to add text on top of a photo in Word, Outlook, PowerPoint, or Excel.
Text box over a photo

If your text is longer or doesn’t need fancy styling, a text box may be suitable. You can format the text any way you like.
WordArt over a photo

If the text is brief and you want a stylized look—similar to what you might see on a postcard—then WordArt might be your best option.
Which app are you using?
Word or Outlook | PowerPoint or Excel
Word or Outlook
Use a text box to add text on top of a photo
-
In your document, click to select an insertion point.
-
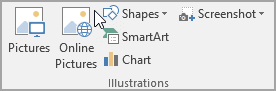
On the Insert tab, in the Illustrations group, click Shapes, and then click New Drawing Canvas.

-
Click the drawing canvas, and then, on the Insert tab, in the Illustrations group, click Pictures.
-
Browse to and double-click the photo that you want to use, and then click outside the drawing canvas.
-
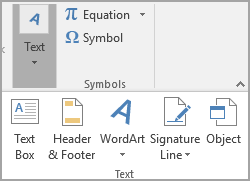
On the Insert tab, in the Text group, click Text Box, and then at the bottom of the menu, click Draw Text Box.
-
Type the text that you want to appear in the text box, and then drag the text box to the location that you want on top of the picture.
-
To change the font or style of the text, highlight the text and then select the text formatting you want on the shortcut menu.
-
Click the outside edge of the text box, and then drag the text box to position it over your photo.
-
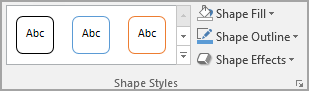
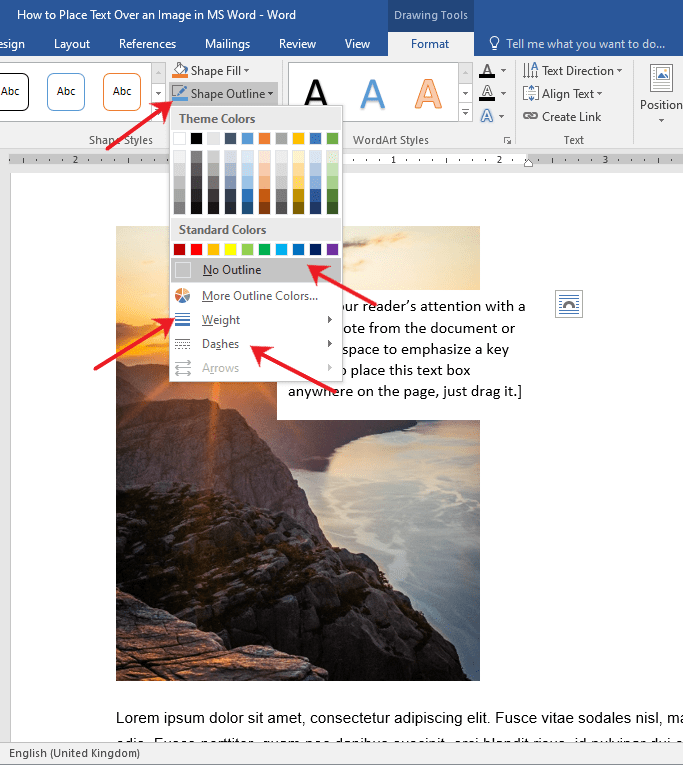
Make sure that the text box is still selected, and then, on the Shape Format tab, in the Shape Styles group, do the following:
-
Click Shape Fill, and then click No Fill.
-
Click Shape Outline, and then click No Outline.
-
-
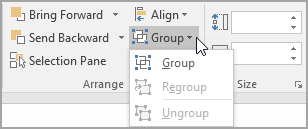
Click the outside edge of the photo, press and hold Ctrl, and then click the edge of the WordArt so that both items are selected.
-
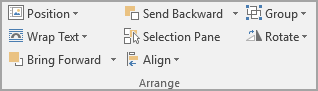
On the Shape Format tab, in the Arrange group, select Group > Group.


Use WordArt to add text on top of a photo
-
In your document, click to select an insertion point.
-
On the Insert tab, in the Illustrations group, click Shapes, and then click New Drawing Canvas.
-
Click the drawing canvas, and then, on the Insert tab, in the Illustrations group, click Pictures.
-
Browse to and double-click the photo that you want to use.
-
On the Insert tab, in the Text group, click WordArt, click the style of text you want, and then type your text.
-
Click the outside edge of the WordArt to select it, drag the text over your photo and then, if you want, rotate the text to the angle that works best for your photo.
-
Click the outside edge of the photo, press and hold Ctrl, and then click the edge of the WordArt so that both items are selected.
-
On the Picture Format tab, in the Arrange group, select Group > Group.
PowerPoint or Excel
Use a text box to add text on top of a photo
-
In your file, make sure that you’ve inserted a photo.
-
On the Insert tab, in the Text group, click Text Box, drag to draw a text box anywhere near the picture, and then type your text.
-
To change the font or style of the text, highlight the text, right-click it, and then select the text formatting you want on the shortcut menu.
-
Click the outside edge of the text box, drag the text over your photo and then, if you want, rotate the text to the angle that works best for your photo.
-
Make sure that the text box is still selected, and then, on the Shape Format tab, in the Shape Styles group, do the following:
-
Click Shape Fill, and then click No Fill.
-
Click Shape Outline, and then click No Outline.
-
-
Click the outside edge of the photo, press Ctrl, and then click the edge of the text box so that both items are selected.
-
On the Shape Format tab, in the Arrange group, select Group > Group.
Use WordArt to add text on top of a photo
-
In your file, make sure that you’ve inserted a photo.
-
On the Insert tab, in the Text group, click WordArt, click the style of text you want, and then type your text.
-
Click the outside edge of the WordArt to select it, drag the text over your photo and then, if you want to, rotate the text to the angle that works best for your photo.
-
Click the outside edge of the photo, press and hold Ctrl, and then click the edge of the WordArt so that both items are selected.
-
On the Shape Format tab, in the Arrange group, select Group > Group.
Which app are you using?
Word or Outlook | PowerPoint or Excel
Word or Outlook
Use a text box to add text on top of a photo
-
In your document, click to select an insertion point.
-
On the Insert tab, in the Illustrations group, click Shapes, and then click New Drawing Canvas.
-
Click the drawing canvas, and then, on the Insert tab, in the Illustrations group, click Pictures.
-
Browse to and double-click the photo that you want to use, and then click outside the drawing canvas.
-
On the Insert tab, in the Text group, click Text Box, and then at the bottom of the menu, click Draw Text Box.
-
Type the text that you want to appear in the text box, and then drag the text box to the location that you want on top of the picture.
-
To change the font or style of the text, highlight the text and then select the text formatting you want on the shortcut menu.
-
Click the outside edge of the text box, and then drag the text box to position it over your photo.
-
Make sure that the text box is still selected, and then, under Drawing Tools, on the Format tab, in the Shape Styles group, do the following:
-
Click Shape Fill, and then click No Fill.
-
Click Shape Outline, and then click No Outline.
-
-
Click the outside edge of the photo, press and hold Ctrl, and then click the edge of the WordArt so that both items are selected.
-
Under Drawing Tools, on the Format tab, in the Arrange group, select Group > Group.
Use WordArt to add text on top of a photo
-
In your document, click to select an insertion point.
-
On the Insert tab, in the Illustrations group, click Shapes, and then click New Drawing Canvas.
-
Click the drawing canvas, and then, on the Insert tab, in the Illustrations group, click Pictures.
-
Browse to and double-click the photo that you want to use.
-
On the Insert tab, in the Text group, click WordArt, click the style of text you want, and then type your text.
-
Click the outside edge of the WordArt to select it, drag the text over your photo and then, if you want, rotate the text to the angle that works best for your photo.
-
Click the outside edge of the photo, press and hold Ctrl, and then click the edge of the WordArt so that both items are selected.
-
Under Picture Tools, on the Format tab, in the Arrange group, select Group > Group.
PowerPoint or Excel
Use a text box to add text on top of a photo
-
In your file, make sure that you’ve inserted a photo.
-
On the Insert tab, in the Text group, click Text Box, drag to draw a text box anywhere near the picture, and then type your text.
-
To change the font or style of the text, highlight the text, right-click it, and then select the text formatting you want on the shortcut menu.
-
Click the outside edge of the text box, drag the text over your photo and then, if you want, rotate the text to the angle that works best for your photo.
-
Make sure that the text box is still selected, and then, under Drawing Tools, on the Format tab, in the Shape Styles group, do the following:
-
Click Shape Fill, and then click No Fill.
-
Click Shape Outline, and then click No Outline.
-
-
Click the outside edge of the photo, press Ctrl, and then click the edge of the text box so that both items are selected.
-
Under Drawing Tools, on the Format tab, in the Arrange group, select Group > Group.
Use WordArt to add text on top of a photo
-
In your file, make sure that you’ve inserted a photo.
-
On the Insert tab, in the Text group, click WordArt, click the style of text you want, and then type your text.
-
Click the outside edge of the WordArt to select it, drag the text over your photo and then, if you want to, rotate the text to the angle that works best for your photo.
-
Click the outside edge of the photo, press and hold Ctrl, and then click the edge of the WordArt so that both items are selected.
-
Under Drawing Tools, on the Format tab, in the Arrange group, select Group > Group.
Содержание
- Добавление поверх рисунка надписи в стиле WordArt
- Добавление поверх рисунка обычного текста
- Добавление подписи к рисунку
- Вопросы и ответы

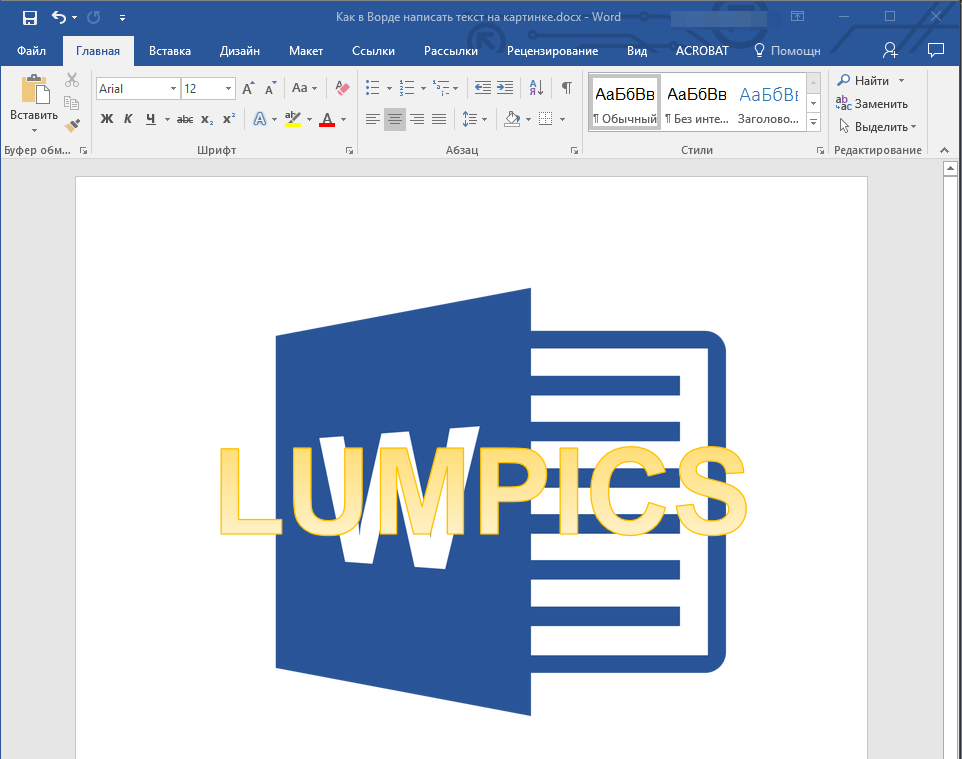
Помимо работы с текстом, программа MS Word также позволяет работать и с графическими файлами, которые в ней можно изменять (хоть и по минимуму). Так, нередко добавленную в документ картинку требуется как-нибудь подписать или дополнить, причем, сделать это необходимо так, чтобы сам текст находился поверх изображения. Именно о том, как наложить текст на картинку в Ворде, мы и расскажем ниже.
Существует два метода, с помощью которых можно наложить текст поверх картинки — это использование стилей WordArt и добавление текстового поля. В первом случае надпись будет красивая, но шаблонная, во втором — вы имеете свободу выбора шрифтов, типа написания и форматирования.
Microsoft Word заслужено считается одним из лучших текстовых редакторов, но для работы с графическими элементами, даже элементарной, он подходит с большой натяжкой. Поэтому для наложения надписи на картинку целесообразнее будет воспользоваться не этой программой, а более специализированным средством – онлайн-сервисом Canva, где данная задача решается буквально в несколько кликов, а доступные во встроенном редакторе шаблоны помогут качественно улучшить подобный проект.
Урок: Как в Word изменить шрифт
Добавление поверх рисунка надписи в стиле WordArt
1. Откройте вкладку “Вставка” и в группе “Текст” нажмите на пункт “WordArt”.
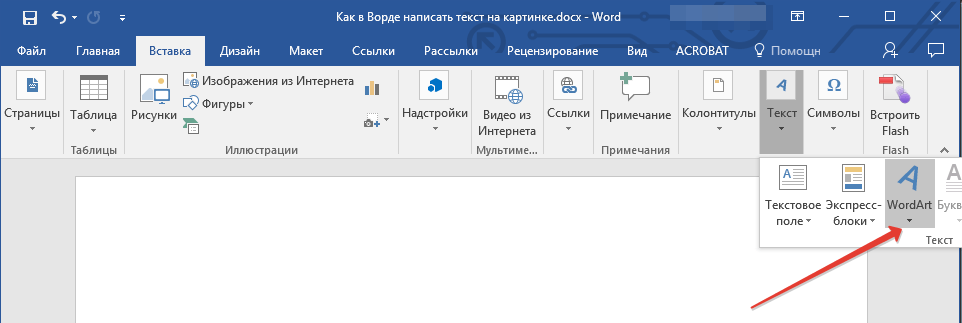
2. Из развернувшегося меню выберите подходящий стиль для надписи.
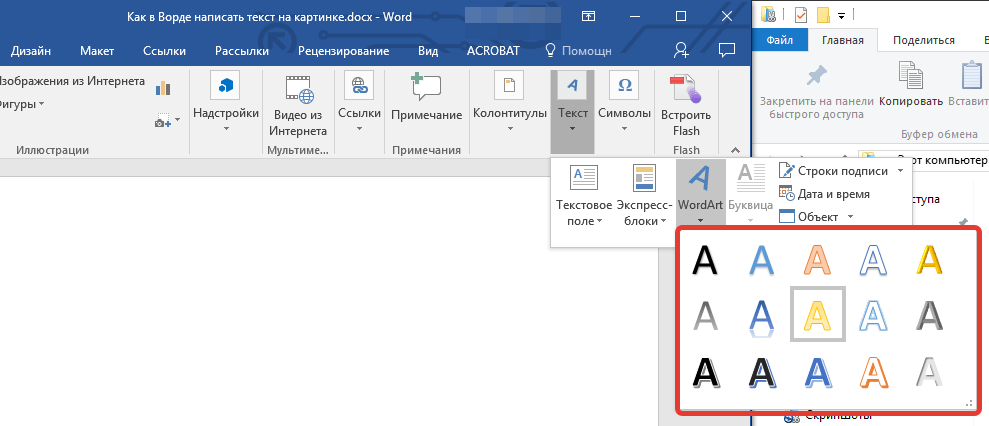
3. После того, как вы кликните по выбранному стилю, он будет добавлен на страницу документа. Введите необходимую надпись.
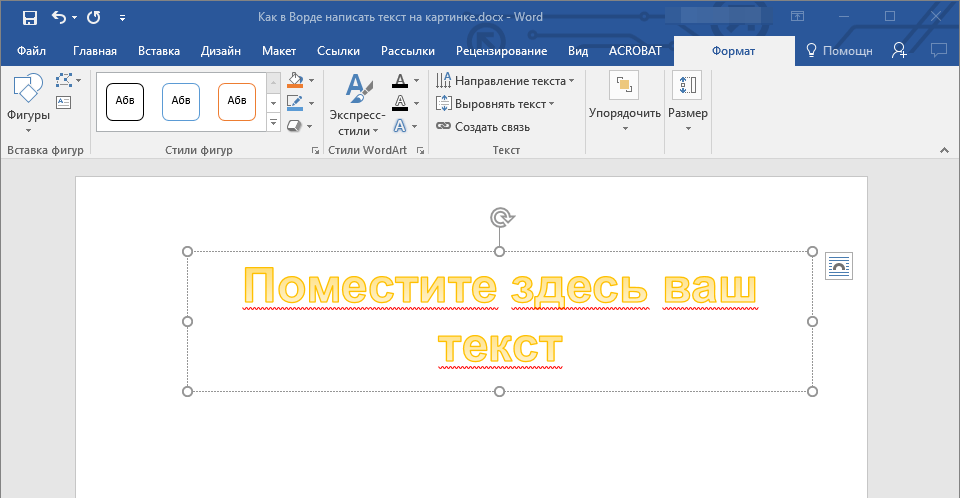
Примечание: После добавления надписи WordArt появится вкладка “Формат”, в которой можно выполнить дополнительные настройки. Кроме того, вы можете изменить размер надписи, потянув за границы поля, в котором она находится.

4. Добавьте в документ изображение, воспользовавшись инструкцией по ссылке ниже.


Урок: Как в Word вставить картинку
5. Переместите надпись WordArt, расположив ее поверх изображения так, как вам это необходимо. Кроме того, вы можете выровнять положение текста, воспользовавшись нашей инструкцией.
Урок: Как в Ворде выровнять текст
6. Готово, вы наложили надпись в стиле WordArt поверх изображения.
Добавление поверх рисунка обычного текста
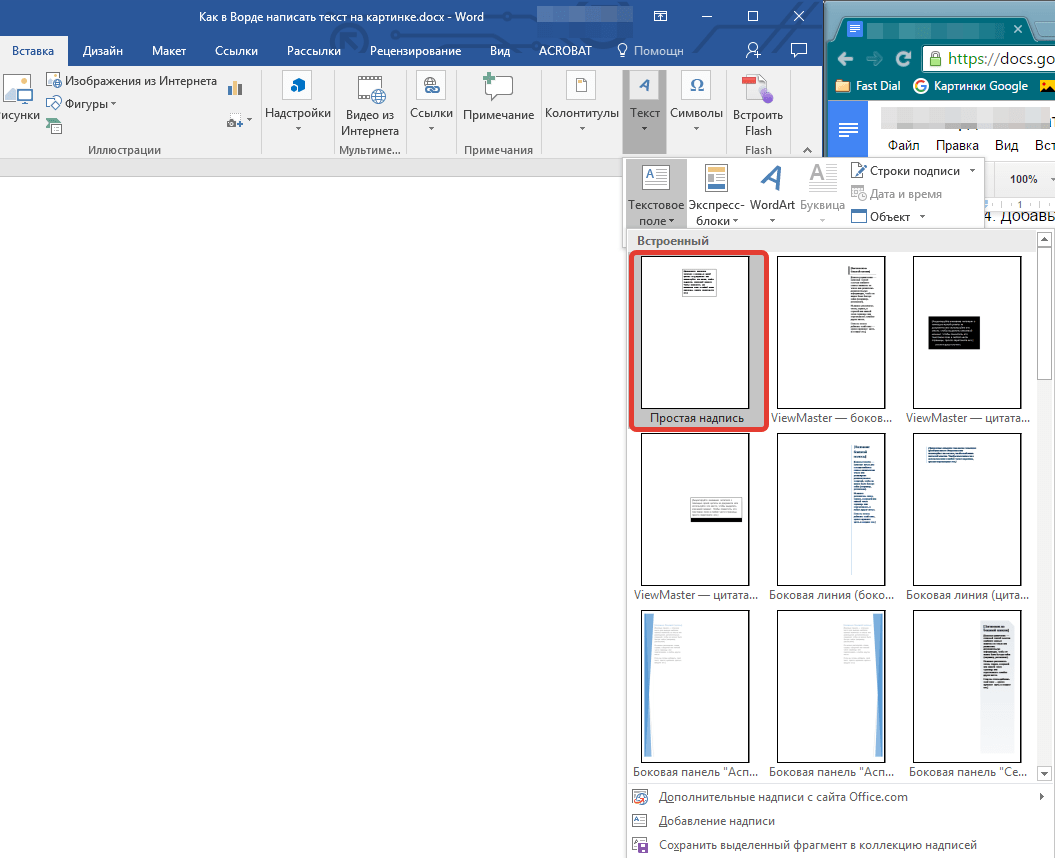
1. Откройте вкладку “Вставка” и в разделе “Текстовое поле” выберите пункт “Простая надпись”.

2. Введите необходимый текст в появившееся текстовое поле. Выровняйте размеры поля, если это необходимо.

3. Во вкладке “Формат”, которая появляется после добавления текстового поля, выполните необходимые настройки. Также, вы можете изменить внешний вид текста в поле стандартным способом (вкладка “Главная”, группа “Шрифт”).

Урок: Как в Word повернуть текст
4. Добавьте изображение в документ.

5. Переместите текстовое поле на картинку, если это необходимо, выровняйте положение объектов, воспользовавшись инструментами в группе “Абзац” (вкладка “Главная”).

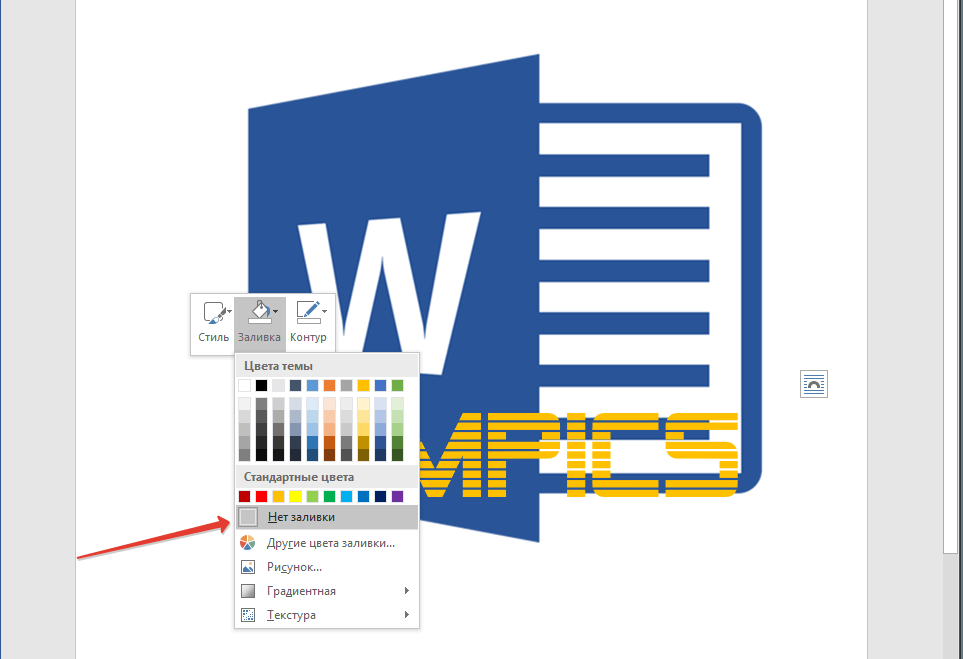
- Совет: Если текстовое поле отображается в виде надписи на белом фоне, перекрывая таким образом изображение, кликните по его краю правой кнопкой мышки и в разделе “Заливка” выберите пункт “Нет заливки”.
Добавление подписи к рисунку
Кроме наложения надписи поверх изображения, вы также можете добавить к нему подпись (название).
1. Добавьте изображение в документ Word и кликните по нему правой кнопкой мышки.

2. Выберите пункт “Вставить название”.
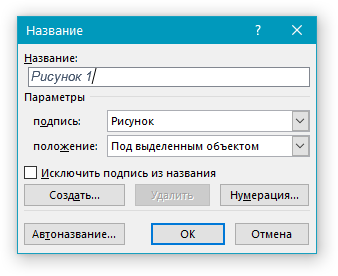
3. В открывшемся окне введите необходимый текст после слова “Рисунок 1” (остается неизменным в этом окне). Если это необходимо, выберите положение подписи (над или под изображением), развернув меню соответствующего раздела. Нажмите кнопку “ОК”.
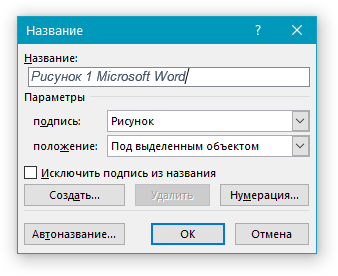
4. Подпись будет добавлена к графическому файлу, надпись “Рисунок 1” можно будет удалить, оставив только введенный вами текст.

На этом все, теперь вы знаете, как сделать надпись на картинке в Ворде, а также о том, как подписывать рисунки в этой программе. Желаем вам успехов в дальнейшем освоении этого офисного продукта.
Use a text box to add text on top of a photo On the Insert tab, in the Text group, click Text Box, drag to draw a text box anywhere near the picture, and then type your text. To change the font or style of the text, highlight the text, right-click it, and then select the text formatting you want on the shortcut menu.
Contents
- 1 How do I edit text in a picture in Word?
- 2 How do I write text over a picture?
- 3 How do you write text on a picture?
- 4 Can I edit text in a picture?
- 5 How do I add text to a JPEG image?
- 6 How do I insert text into text in Word?
- 7 How can I add text to a picture for free?
- 8 How do I select an image behind text in Word?
- 9 How can I add text to a JPEG image online?
- 10 How do I edit text in a picture in paint?
- 11 How do I add an image to a photo?
- 12 How do you add a description to a photo?
- 13 Can you layer text in Word?
- 14 How do I put text over a line in Word?
- 15 How do I put text under a line in Word?
- 16 How do I edit text in a picture in Word Online?
- 17 How do I put text on top of an image in CSS?
- 18 How do you send an image to the back in Word?
- 19 How do I send a picture to the background in Word?
- 20 How do I select part of an image in Word?
How do I edit text in a picture in Word?
Click the picture to reveal the “Format” tab. Press the “Corrections” option to reveal the dropdown. This will reveal to you how to edit image text in word. Apply the required correction to complete the process in full.
How do I write text over a picture?
To allow text to wrap over a picture, select the picture. The “Layout Options” menu will be displayed near the picture. Click on the menu and choose “Behind Text.” This option will cause the picture to be treated as background and text will flow over the picture as you type.
How do you write text on a picture?
In Windows 10:
- Open the Photos app and select an image.
- In the upper-right portion of the screen, select Edit & Create > Edit with Paint 3D.
- At the top of the screen, select Text.
- Click and drag to draw a text box.
- Enter your desired text.
- In the upper-left corner, select Menu.
- Select Save or Save as.
Can I edit text in a picture?
Click into the image, where the text should begin.Once you are done typing, select the text (Ctrl+A, or press the mouse at the beginning of the text, move to the end and release the mouse). You can change the text style in the top bar. The main parameters are the Font, Size and the Color of the text.
How do I add text to a JPEG image?
Open the photo, select “Edit” and tap the “More” (…) icon. Select “Markup,” tap the “+” icon and select “Text.” When the text box appears on the photo, double-tap it to raise the keyboard. Type the caption and use the options at the bottom of the screen to change the font, color and size.
How do I insert text into text in Word?
Word Options
- Click “File,” “Options” and then the “Advanced” tab.
- Check “Use Overtype Mode” in the Editing Options section.
- Click “OK” to enable Overtype and close the Word Options window.
- Click anywhere in the document and start typing to overwrite text to the right of the cursor.
How can I add text to a picture for free?
How it works
- Upload a single photo from your computer, Google Drive or Dropbox. Add a text or a logo.
- Edit your text or logo using the editing toolkit. Drag your text or logo to any place within the picture.
- Click on “Save image” and download a copy of your image with the text or logo.
How do I select an image behind text in Word?
Selecting a Graphic that is Behind Text
- Make sure the Home tab of the ribbon is displayed.
- Click the Select tool (in the Editing group) and then choose Select Objects.
- Click on the graphic you want to select, without regard to any text that may be covering it.
How can I add text to a JPEG image online?
How to Add Custom Text to Images with Kapwing
- Upload your Image. Upload the photo that you want to add text to or paste a link from Instagram, Twitter, etc to import the photo directly.
- Add and Style Text. Use the Text tool to put the font where you want it on the photo.
- Export and Share.
How do I edit text in a picture in paint?
Select the “Text” tool and click to place a text box. As long as the text box is open, you’re free to edit the text. If you’re wondering how to change the color of text in paint, in addition to typing or deleting text, use the settings on the menu bar to edit the text’s formatting, such as font, size and color.
How do I add an image to a photo?
Here’s how to add an image to a photo in PicCollage for Android.
- Get the app from the Play Store, open it and select Grids.
- Tap the images you want to use.
- The app will now display your chosen images in a grid.
- Tap Done when you’re ready to save or share your masterpiece.
How do you add a description to a photo?
When the picture expands, tap the Info button at the bottom; the icon looks like an “i” in a small circle. When you are on the picture’s Info screen, you should see an “Add a description” line at the top. Tap it to type in your caption information. Tap the Back button when you’re done.
Can you layer text in Word?
To layer items in any Word document, including label templates, you need to use the “Arrange” tools. The key tools that you need are “Bring Forward”, “Send Backward”, and (if you are using pictures or shapes) “Wrap Text”. To find the Arrange tools, left click on an image to select it.
How do I put text over a line in Word?
Click the Insert tab, then click the “Text Box” button. On the menu, choose “Simple Text Box.” Drag to form a text box directly above the line on the page.
How do I put text under a line in Word?
Add Bottom Borders
This technique works best on Headings. Click in the paragraph of text you want a line under. Click on the HOME Tab > BORDERS button — Bottom Border is usually the default. This places a line across the page, underlining not just the text but the rest of the row, too.
How do I edit text in a picture in Word Online?
How to convert Image to Text, Word, or Excel free online:
- Upload your image to our free online OCR tool.
- Choose an option to convert your Image to Text, Word, or Excel.
- Click on the “Convert Image” button in order to start the conversion.
- Wait for the conversion to finish & then download your file.
How do I put text on top of an image in CSS?
CSS position property is used to set the position of text over an image. This can be done by enclosing the image and text in an HTML “div”. Then make the position of div “relative” and that of text “absolute”. The absolute elements are positioned relative to their parent (div).
How do you send an image to the back in Word?
To bring an object to the front or back:
- Select an object. The Format tab will appear.
- From the Format tab, click the Bring Forward or Send Backward drop-down box.
- From the drop-down menu, select Bring to Front or Send to Back. Sending an object to the back.
- The objects will reorder. The reordered objects.
How do I send a picture to the background in Word?
Insert a background Picture or image in Word
- On the Design tab, select Watermark > Custom Watermark.
- Choose Picture Watermark and select a picture.
- Select or clear Washout.
- Select OK.
How do I select part of an image in Word?
Using the Selection Pane
- Select one of the objects you want to manage.
- Go to Shape Format or Picture Format> Arrange. > Selection Pane.
- The Selection Pane opens with all your objects listed, and you can do any of the following: Drag an item up or down in the list to change the order.

- Using a Text Wrapping Style
- Inserting a Text Box
- Inserting a WordArt
Method 1: Place Text Over Image Using Text Wrapping Style
If you have a long chunk of text and you just want to put a background image or a watermark on a document, then this method is best for you.
Step 1: Open up a Word document.

Step 2: Set the image as background.
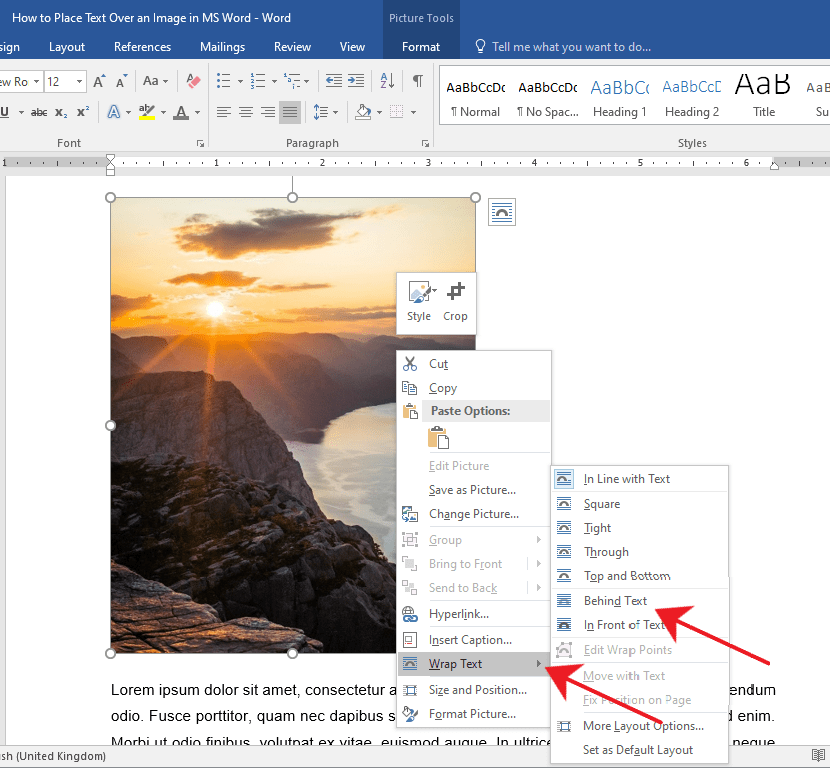
Right-click on the image and select the Wrap Text option.
This will display a horizontal drop-down menu on the right. Once you see the drop-down menu, select Behind Text.
You’ll notice the images and text will rearrange automatically as you hover over the text wrapping options.
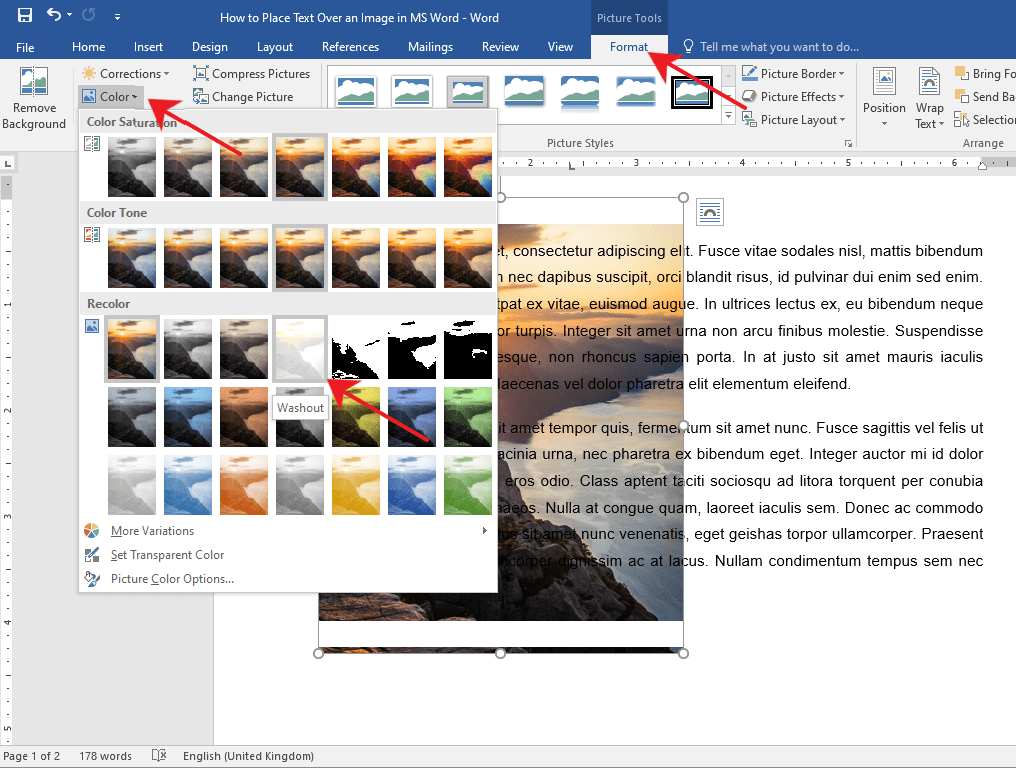
If after you’ve inserted a background image and the text becomes unreadable, you can change the image’s opacity or color.
Simply double-click on the image to activate the Format tab in the Ribbon.
After that, click on the Color drop-down menu and select Washout under the Recolor group.
You can also get creative and explore other options to suit your needs.
Method 2: Place Text Over Image Using a Text Box
Step 1: Open up a Word document.
Step 2: Insert a text box.
Go to the Insert tab on the Ribbon.
Now, navigate to the right side of the Ribbon and click on the Text Box drop-down menu.
Then, select a text box style of your preference. For this example, we’ll use the Simple Text Box.
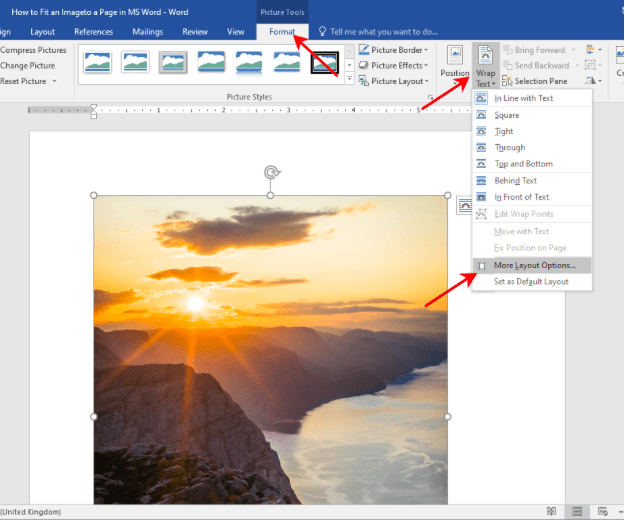
Step 3: Type in the text.
Type in the text that you want to put on top of your image.

Step 4: Set the text wrapping style of the text box.
Select the text box and click the Layout button found at the upper right-hand corner of the text box.
Then, select the In Front of Text option.
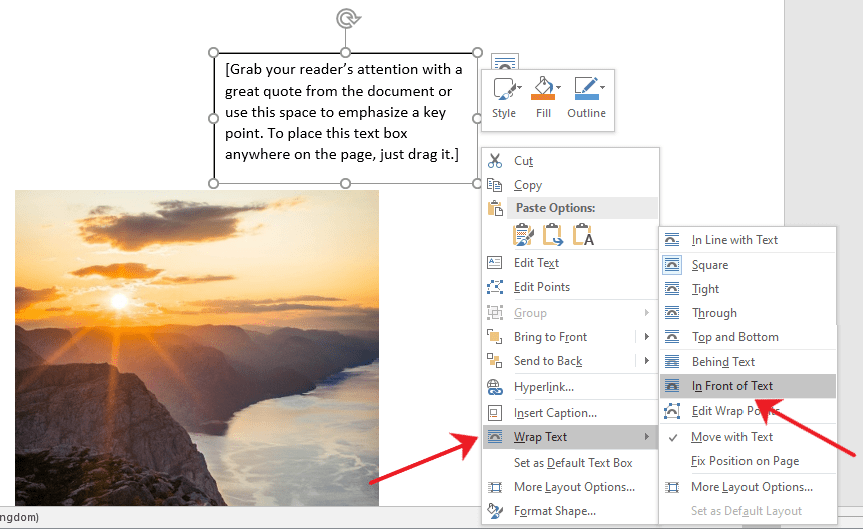
Step 5: Place the text box over the image.
Click and drag the text box to place it over your image. You’ll notice that your text box has a background color by default and is covering a part of the image.

You can change your text box’s background and border color by accessing the Format tab.
This way, only the text will be visible on top of your image. Now, Double-click the text box and go to the Format tab.
From there, click on the Shape Fill drop-down menu and choose No Fill.
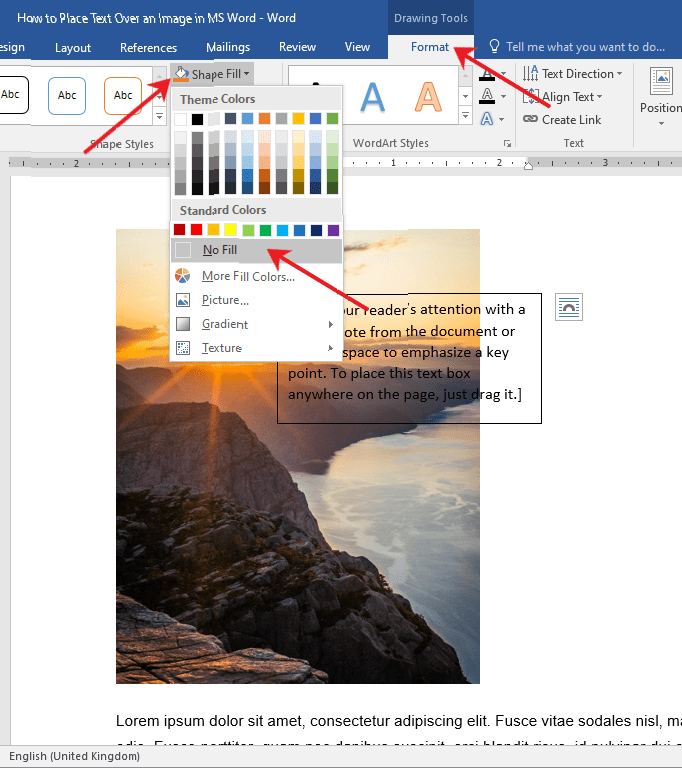
To change the border color, select the Shape Outline drop-down menu and choose No Outline.
You can also change the border’s weight and design by exploring the Dashes and Weight options.
Method 3: Place Text Over Image Using Word Art
If you find yourself needing to put a title, a name, or a couple of words over an image, then this method has got you covered.
Step 1: Open up a Word file.

Step 2: Insert the WordArt
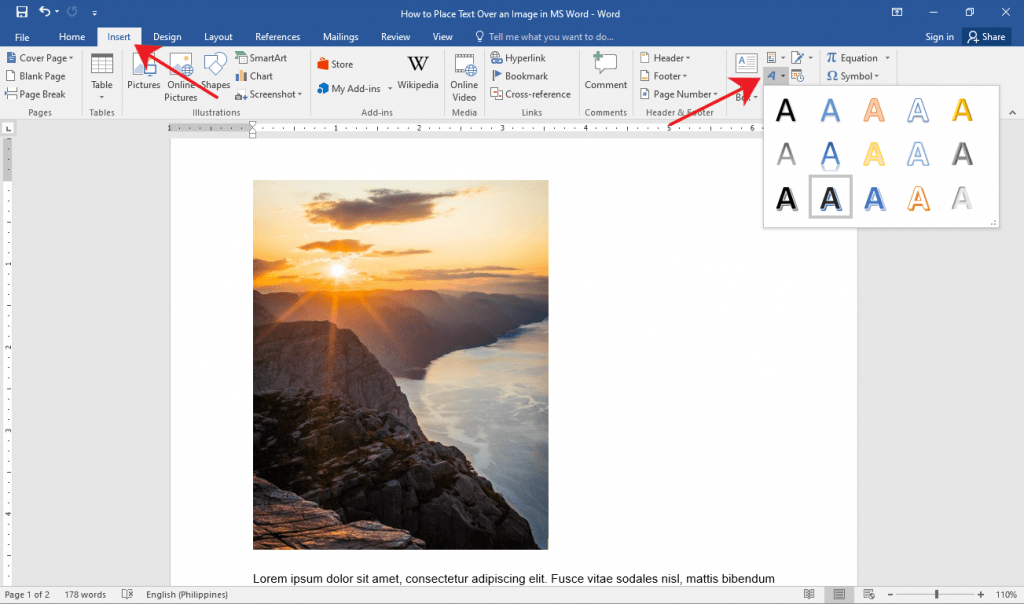
Click the Insert tab on the Ribbon.
Now, click the WordArt button found at the right side of your screen.
It’s the slanted letter A icon under the Text group. After that, choose a WordArt that suits the style of your document.
Step 3: Place the WordArt over the image.
Click on the WordArt and type in the text you want.
From there, select and drag the WordArt to easily move it around to the perfect location on your document.
You can also resize the WordArt like any other text box by grabbing either one of its corners.

Tip: If you’re using a pen or touch-enabled computer, you can directly write text over an image using the Draw option.
Editing and Deleting Text Over an Image
If you used Method 1, simply select the erroneous text and edit or delete it just as you would with any other text.
For Methods 2 and 3, click on the inside of the text box or the WordArt and start editing.
If you want to delete the entire text box or WordArt, click on any of the borders of the text box or WordArt and hit the Delete button on your keyboard.
Conclusion
That’s the rest of it. We hope you’ve found this article helpful!
При оформлении текстовых документов в редакторе Word не редко возникает необходимость вставить картинку и наложить на нее текст. Со вставкой картинки у большинства пользователей не возникает проблем, для этого достаточно скопировать нужное изображение и вставить его в документ, а вот с наложением текста бывают сложности. В этом статье мы попробуем решить эту проблему рассмотрев сразу два способа, как наложить текст на картинку в Word. Статья будет актуальной для Word 2007, 2010, 2013, 2016 и 2019.
Наложение текста на картинку с помощью элемента «Надпись»
Пожалуй, самый простой способ наложить текст на картинку в Word это воспользоваться элементом «Надпись». Такой элемент можно вставить документ и потом разместить его в любом удобном месте, вне зависимости от форматирования текста или размещения картинок.
Для того чтобы воспользоваться данным способом вставьте на страницу нужную картинку и перейдите на вкладку «Вставка». Здесь нужно нажать на кнопку «Надпись» и выбрать вариант «Простая надпись».

Нужно отметить, что в последних версиях Word кнопка «Надпись» была переименована в «Текстовое поле», но она выполняет ту же функцию.

После вставки элемента «Простая надпись» на странице появится рамка с текстом. Такую рамку можно свободно перемещать по документу, что позволяет наложить текст на картинку или другой элемент документа Word.

Естественно, текст, который расположен в элементе «Надпись» можно отредактировать. Для этого просто кликаем внутрь рамки и вводим собственный текст.

В принципе на этом можно закончить, мы наложили текст на картинку. Но, если нужно добиться более красивого результата, то можно поиграться с настройками элемента. Например, можно убрать белый фон под текстом и рамку. Для этого выделите данный элемент и перейдите на вкладку «Формат». Здесь нужно воспользоваться функцией «Заливка фигуры» и выбрать вариант «Нет заливки».

Дальше используем функцию «Контур фигуры» и убираем рамку вокруг текста.

В результате у вас должно получиться примерно вот такое наложение текста на картинку.

Если есть желание сделать текст более красочным, то на вкладке «Формат» есть несколько стандартных стилей текста.

Выбрав один из этих стилей, мы получим результат схожий с тем, что можно получить в профессиональном графическом редакторе.

Также есть возможность ручной настройки стиля текста. Для этого нужно воспользоваться функциями «Заливка текста», «Контур текста» и «Текстовые эффекты».
Наложение текста на картинку с помощью обтекания
Альтернативным способом наложения текста на картинку является использование функции «Обтекание текстом». Для того чтобы воспользоваться данным способом кликните правой кнопкой мышки по картинке и включите опцию «Обтекание текстом – За текстом».

После включения данной опции вы сможете перемещать картинку по документу Word и при этом она не будет влиять на форматирование документа, она как-бы будет располагаться на нижнем слое, под текстом. Это позволит наложить нужный текст на картинку.

Этот способ будет особенно удобен если вам нужно наложить текст на большую картинку, которая занимает всю страницу документа Word.
Посмотрите также:
- Как картинку сделать фоном в Word
- Как наложить картинку на картинку в Word
- Как вставить картинку в Word
- Как свободно перемещать картинку в Word
- Как уменьшить размер файла Word с картинками
Автор
Александр Степушин
Создатель сайта comp-security.net, автор более 2000 статей о ремонте компьютеров, работе с программами, настройке операционных систем.
Остались вопросы?
Задайте вопрос в комментариях под статьей или на странице
«Задать вопрос»
и вы обязательно получите ответ.