
Lesson 21: Working with Tables
/en/word2010/reviewing-documents/content/
Introduction
A table is a grid of cells arranged in rows and columns. Tables can be customized and are useful for various tasks such as presenting text information and numerical data.
In this lesson, you will learn how to convert text to a table, apply table styles, format tables, and create blank tables.
Inserting and modifying tables
In Word, tables are useful for organizing and presenting data. You can create a blank table, convert text to a table, and apply a variety of styles and formats to existing tables.
Optional: You can download this example for extra practice.
To insert a blank table:
- Place your insertion point in the document where you want the table to appear.
- Select the Insert tab.
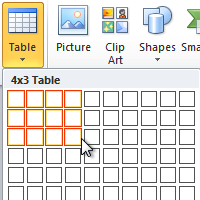
- Click the Table command.
- Hover your mouse over the diagram squares to select the number of columns and rows in the table.
 Inserting a new table
 - Click your mouse, and the table appears in the document.
- You can now place the insertion point anywhere in the table to add text.
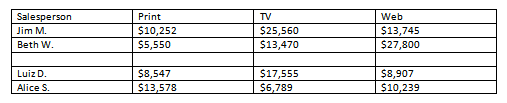
To convert existing text to a table:
- Select the text you want to convert.
- Select the Insert tab.
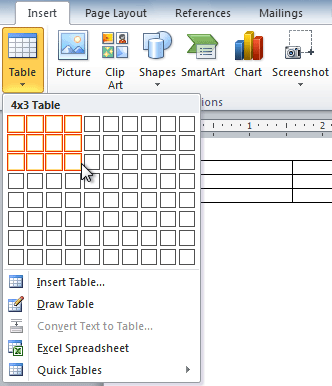
- Click the Table command.
- Select Convert Text to Table from the menu. A dialog box will appear.
Converting text to a table
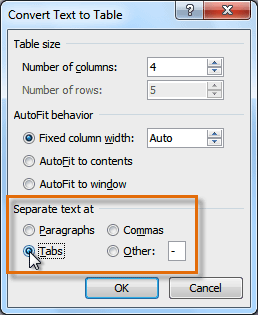
- Choose one of the options in the Separate text at: section. This is how Word knows what text to put in each column.
Separating text at Tabs
- Click OK. The text appears in a table.
The converted table


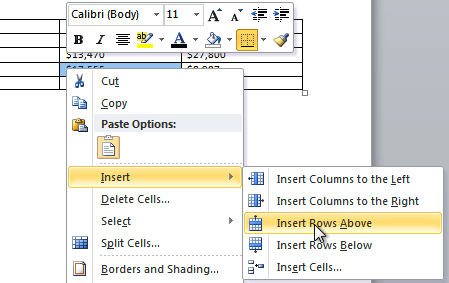
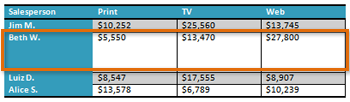
To add a row above an existing row:
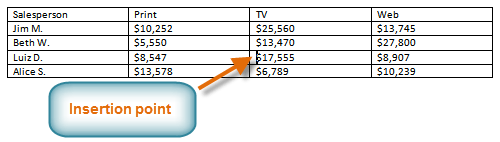
- Place the insertion point in a row below the location where you want to add a row.
Placing the insertion point
- Right-click the mouse. A menu appears.
- Select InsertInsert Rows Above.
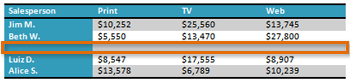
Adding a row
- A new row appears above the insertion point.
The new row
 Insert Rows Above.
You can also add rows below the insertion point. Follow the same steps, but select Insert Rows Below from the menu.
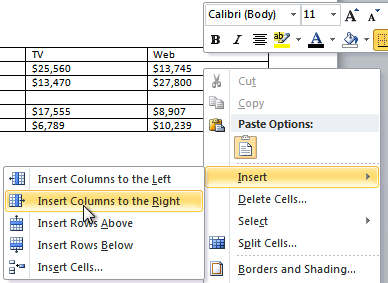
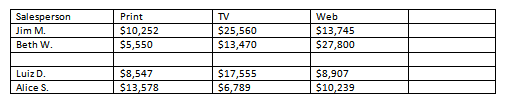
To add a column:
- Place the insertion point in a column adjacent to the location where you want the new column to appear.
- Right-click the mouse. A menu will appear.
Adding a column
- Select InsertInsert Columns to the Left or Insert Columns to the Right. A new column appears.
The new column
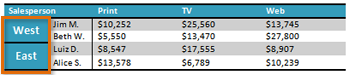
To delete a row or column:
- Select the row or column.
- Right-click your mouse. A menu will appear.
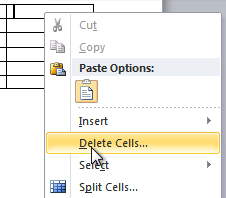
- Select Delete Cells.
Selecting Delete Cells
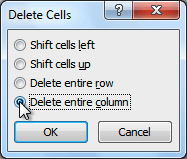
- Select Delete entire row or Delete entire column, then click OK.
Deleting a column
To apply a table style:
- Click anywhere on the table. The Design tab will appear on the Ribbon.
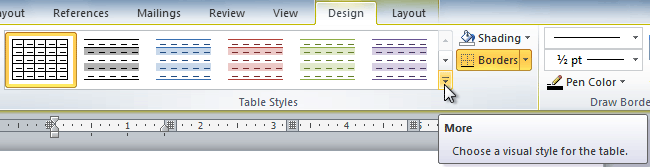
- Select the Design tab and locate the Table Styles.
- Click the More drop-down arrow to see all of the table styles.
Viewing the Table Styles
- Hover the mouse over the various styles to see a live preview.
- Select the desired style. The table style will appear in the document.
After adding a Table Style

To change table style options:
Once you’ve chosen a table style, you can turn various options on or off to change the appearance of the table. There are six options: Header Row, Total Row, Banded Rows, First Column, Last Column, and Banded Columns.
- Click anywhere on the table. The Design tab will appear.
- From the Design tab, check or uncheck the desired options in the Table Style Options group.
Table Style Options

Depending on which table style you’re using, certain table style options may have a somewhat different effect. You may need to experiment to get the exact look you want.
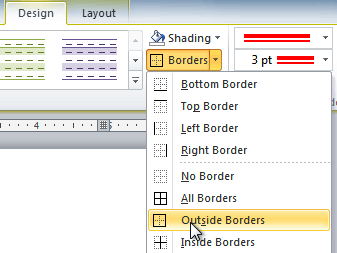
To add borders to a table:
- Select the cells you want to add a border to.
Highlighted cells
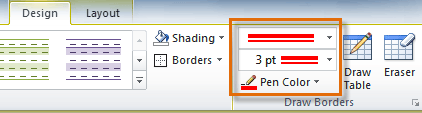
- From the Design tab, select the desired Line Style, Line Weight, and Pen Color.
Line Style, Line Weight, and Pen Color commands
- Click the Borders drop-down arrow.
- From the drop-down menu, select the desired border type.
Selecting a border type
- The border will be added to the selected cells.
The finished border


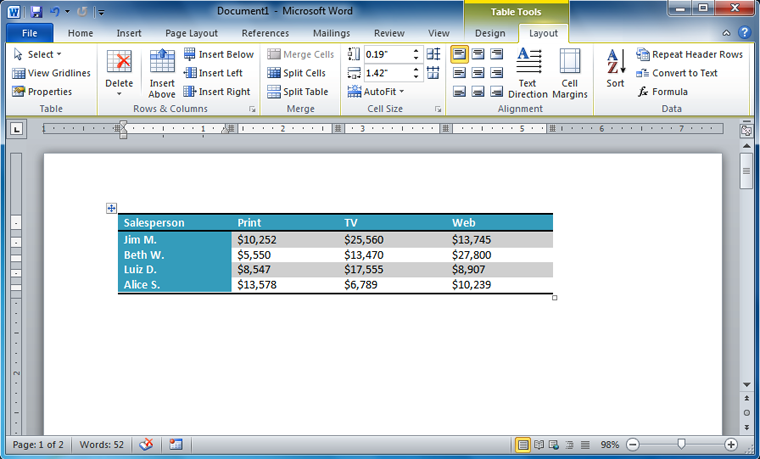
Modifying a table using the Layout tab
When you select a table in Word 2010, Design and Layout tabs appear under Table Tools on the Ribbon. Using commands on the Layout tab, you can make a variety of modifications to the table.
Click the buttons in the interactive below to learn about the different ways you can modify a table with the Layout tab.
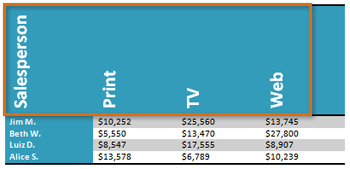
Change Text Direction
Making the text vertical can add style to your table and saves space, allowing you to fit more columns in your table.
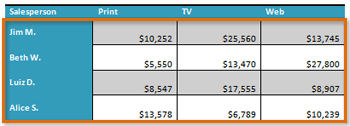
Align Cell Text
By changing the alignment of a cell, you can control exactly where the text is located. In the example below, the cell text is aligned to the bottom-right.
Distribute Rows/Columns
To keep your table looking neat and organized, you may want to distribute the rows or columns equally, which makes them all the same size. You can distribute the rows or columns for the entire table or just a portion of it.
Change Cell Size
You can type a desired row height or column width for your cells. If you prefer, you can click AutoFit, and it will automatically adjust column widths based on the text inside them.
Merge and Split Cells
Some tables require a layout that doesn’t conform to the standard grid. In these cases, you may need to merge or split cells.
Add Rows and Columns
You can insert or delete rows and columns in your table. This can be especially useful if you need to add something to the middle of your table.
Challenge!
- Open an existing Word document. If you want, you can use this example.
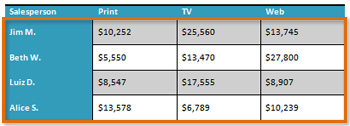
- Convert some text into a table. If you are using the example, convert the text below By Client.
- Apply a table style, and experiment with the table style options. If you are using the example, see if you can make the table match the By Salesperson table above it.
- Delete a row from the table.
- Insert a blank table with five rows and four columns.
- Add borders to the blank table.
/en/word2010/smartart-graphics/content/
If you’ve ever seen a spreadsheet, or used a program such as Excel, then you’re probably pretty familiar with tables. That’s all tables are, after all—simply a grid arranged into columns and rows. You can use them to organize and emphasize certain pieces of information. More than that, you can use tables to do complex page layout operations that almost rival expensive professional publishing programs like Adobe InDesign.
Inserting Tables
Before we identify the different parts of a table, let’s go ahead and insert one into our document. To do this, position the cursor at the point in the document where you want to put the table. Don’t worry if it’s not exactly right—you can always move or manipulate it later.
You’ll find tables under the Insert tab in the Tables group. The Tables button looks like this:

Click the Tables button.
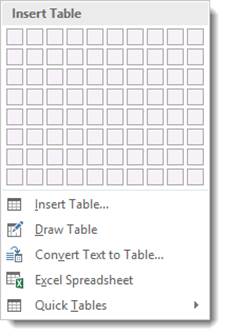
You’ll see a bunch of boxes at the top.
The easiest way to insert a table is to drag your mouse over the rows and columns until you have the amount you want.
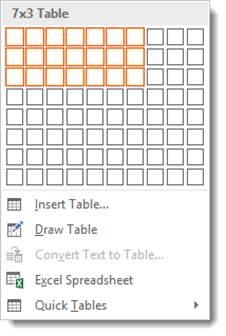
As you can see above, we dragged our mouse to make a table that has seven columns and three rows, or 7×3.
As we drag the table appears on our document:
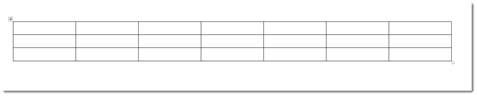
To insert this simple table, click the mouse.
We now have a basic table.
Let’s identify the parts.
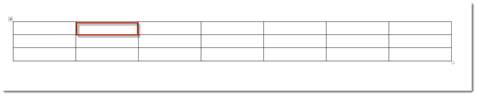
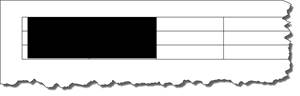
Each box that you see in a table is called a «Cell.» There are 21 cells in the table above. We have highlighted a cell in the snapshot below.
The «Rows» go from top to bottom. There are three rows. Rows go horizontally across the screen.
Columns go from left to right. There are seven columns above. Columns are vertical.
So now that we’ve identified the parts of a table, let’s take a look at the other ways in which we can add them.
Using the Insert Table Dialogue
Once again, we’re going to move the cursor to the point in the document where we want the table to appear. Now go back to the Insert tab, click the Table button, and select «Insert Table» instead of dragging your mouse over the boxes (which really represent cells, as we learned a second ago.)
A dialogue launches in the center of your screen. It looks like this.
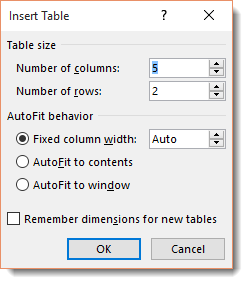
From here you can select the number of rows and columns. In this example, there are going to 5 columns, and 2 rows. Select your preferences in the AutoFit behavior section. You can set a fit column width, make the width of the cells and table fit to the content, or make the table size fit to the window.
Click OK.
Drawing a Table
If you know your table is not going to be uniform (regularly sized columns and rows), you can «draw» a table. This is particularly helpful when using tables to create complex page layouts.
To do this, click the Table button and select Draw Table. Your mouse pointer will transform into a pencil tool and you’ll be able to draw individual cells anywhere in your document. You can even draw cells within cells.
Click and hold the left mouse button, drag the cell into the desired size and shape, and then release. It’s that simple.
Selecting parts of tables
To select part of a table, simply click inside the upper left cell that represents the first cell you want to select. Hold the left mouse button down and drag across the remaining cells you want to select.
Adding Text to a Table
Adding text to a table is as easy as clicking into a cell and then typing. You will be able to change any attributes of that text, too, and even apply a Quick Style.
Position Text within a Cell
Just like in an ordinary document, you can choose whether to center text within a cell, or whether to align it right or left, or toward the top or the bottom. Go to the Alignment group under the Table Layout tab.
To reach the Table Layout tab, click the box above the left top corner of the table. This selects the table.

The Alignment group is pictured below.
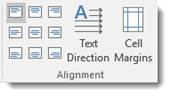
Using the graphics on the left as guides, select how you want text positioned within cell in your table.
NOTE: You can format the text position for just one cell, multiple cells (by selecting the cells), or the entire table (by selecting the table).
Converting Text into a Table
You can convert text into a table. This is especially handy if you’ve already written information that you think would be more effectively conveyed in a table.
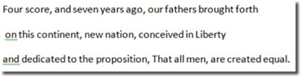
To do this, you’ll have to carve up the text into columns and rows using commas and new paragraphs. That’s how you tell Word to separate the text into individual cells. Simply place a comma between the text you want to put into a column and place a paragraph where you want to begin a new row. An example of the text might look like this:
Now select the text, click the Tables button under the Insert tab. From the dropdown menu, choose «Convert Text To Table.»
You can now specify the number of columns, as well as how to separate text. You can separate text into cells by paragraphs, commas, tabs, etc.
We chose two columns and to separate text at commas.
Look at the example below to see the final result.

Quick Tables
Word 2016 comes with a group of table templates for you to use and quickly customize to fit your needs. You can access them by clicking the Tables tool and choosing Quick Tables. Scroll through the templates and choose the one that best suits your needs. As with other kinds of tables, Word automatically inserts Quick Tables wherever the cursor is positioned in the document.
Once the Quick Table has been created, click the template text and start typing to replace it… You can also create your own Quick Tables by selecting a table that you’ve created and clicking the Save to Quick Table Gallery button at the bottom of the Quick Table menu.
Formatting Tables with the Table Tools
Whenever you create or select a table, the Table Tools will open automatically over the Design and Layout tabs in the tool bar. It allows you to easily apply table styles, borders, and shading attributes and more. Below is an example of the Design and Layout tools available for tables.

The Design tab (shown above) lets you customize the look and appearance of your table.
Let’s look at the Table Style Options group. But first, look at our table below:

In the Table Style Options group, we see that Header Row, First Column, and Banded Rows are checked.
Let’s learn what all these options mean so you can decide what you want checked – and what you don’t.
-
A Header Row is the first row in a table that contains headings (labels) for all the columns, as shown our table above.
-
When First Column is checked, it means the first column is also headers or labels. Same goes for the Last Column.
-
You can also choose to have banded rows or columns. Banded Rows formats even and odd rows differently so they are easier to read. If you choose Banded Columns, it formats even and odd columns differently.
-
Total Row means to create a row for mathematical totals.
In the Table Styles group, you can pick a new table style or apply shading to your table by clicking the Shading button.
In the Borders group, you can use Border Styles add borders to rows and columns to customize the look of your table.
Now, let’s click the Layout tab.

The Layout tab, when associated with the Table Tools, allows you to easily insert rows and columns, and format text and objects within cells.
Selecting Cells, Rows, and Columns
Selecting cells, rows, and columns in Word 2016 is easy.
To select a cell, click within the cell so the mouse cursor is blinking.
Go to the table Format tab, then the Table group. Click Select>Select Cell
To select a row, click in the first cell in a row go to Select>Select Row.
To select a column, click the first cell in a column, then go to Select>Select Column.
The Border Painter Tool
The Border Painter tool was a feature added in Word 2013. It makes applying different widths and borders to your table easier than ever before. To find the tool, select your table and go to the Table Tools Design tab.

To use the border painter, first apply formatting to some borders in your table, then click the Border Painter button. Click on any border to apply the formatting. You can also click and drag the mouse to apply it to a whole line.
Border Sampler
The Border Sampler works with the Border Painter tool. The Border Sampler is located at the bottom of the Border Styles Gallery. To access it, click the Border Styles button in the Borders group under the Table Tools Design tab.
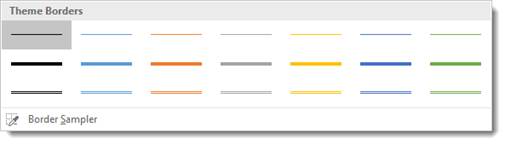
Simply click on Boarder Sampler. An eyedropper will appear. Click on a table border that you want to sample. Word then switches to the Border Sampler. You can apply the same formatting somewhere else in the table.
Adjusting the Width of Individual Columns
There are several ways to adjust the width of individual columns:
1. Position your mouse pointer over the edge of the column and then drag it to the desired width.
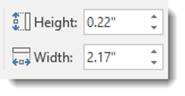
2. Select the column, then go to the Table Tools Layout tab, then the Cell Size group. Enter in a new width (in inches)
Adjusting Width of All Columns
To fix the width of all of the columns at once, select the entire table and use the Width box under the Layout tab to adjust the columns to the desired size.
You can also use the Distribute Columns button to make all of the columns the same size.
Adjust rows in the same way, except use the Height field.
Adding Rows and Columns
There are two ways to add a new row or column to a table.
You can select a cell, row, or column and right click on it, then select Insert from the menu.
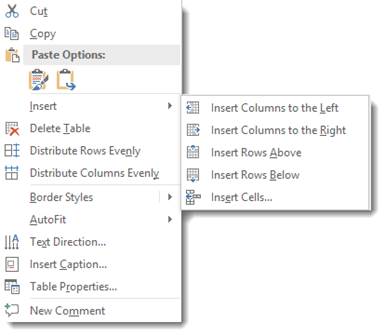
You can then choose to:
-
Insert Columns to the Left
-
Insert Columns to the Right
-
Insert Rows Above
-
Insert Rows Below
-
Insert Cells
In addition, you can also select a cell, row, or column, then go to the Table Tools Layout tab. Choose an option from the Rows & Columns group.
You can also add rows or columns simply by mousing over a row or column.
Look at the snapshot below.

When we moused over the row, look at the little plus sign that appeared.

Click the plus sign to add a row.
For columns, move to the top or bottom of the column and the plus sign will appear.
Deleting Cells, Rows or Columns
To delete a Cell, Row or Column, simply select it, navigate to the Layout tab, go to the Delete group, then select if you want to delete cells, rows, or columns, or the entire table from the dropdown menu.
You will then have the option of deleting a cell, a row, a column, or the entire table. You can also delete cells, rows and columns by right-clicking inside a cell. In the menu select Delete Cells. Click the appropriate command and click Ok.
Merging Cells and Splitting Cells
To merge cells, drag your mouse over the cells while holding the left mouse button to select them. In the Layout tab, select the Merge Cells button from the ribbon. It looks like this:

The Merge Cells button is located in the Merge group on the ribbon. Alternatively, select the cells you’d like to merge and click the right mouse button. Select the Merge Cells from the menu.
To split a cell, select it by clicking on it, then click the Split Cell button on the ribbon.

This button is also found in the Merge group. Choose the number of rows and columns you’d like to split the cell into then click OK.
Split a table by clicking the Split Table button. It looks like this:

The Split Table button is located in the Merge group under the Table Tools Layout tab.
Doing Math in a Table
You can do math in tables in much the same way that you do in spreadsheets and Excel. However, Word’s math commands are simpler, so they’re easier to use.
For this example, let’s do a sum.
To figure out a sum of values in a table, create the table and add the values you want to add. You can put values in rows or columns. You should go ahead and do the layout and design for your table at this time. Just make sure the last cell in the row or column (wherever you’re doing your values) is empty.
Now, click in the cell where you want to place the mathematical formula.
Go to the table Layout tab.
Go to the Data group. Click the Formula button.
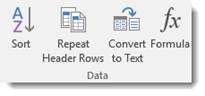
Select Sum from the Paste Function menu, then click OK.

Many documents present some data in the form of figures or tables. Creating tables is often more efficient than describing the data in the paragraph text, especially when the data is numerical or large. The tabular data presentation makes it easier to read and understand.
A table is a collection of information or data, usually represented by horizontal rows and vertical columns. Each column and each row can have a header. Some tables have only column headings or only row headings. The box at the junction of each column and row is a cell that contains data such as text, numeric information, or images. Some cells can be merged or split (see more about formatting tables). E.g.:

Microsoft Word has many features that make working with tables simple and convenient.
Create a table
There are several ways how to insert or create a table:
- Create a blank table of up to 10 columns and 8 rows,
- Create a blank table with more than 10 columns or more than 8 rows,
- Create a blank table manually (Draw a table),
- Create a table using predefined templates (Quick Tables),
- Create a table from the existing data (Convert Text to Table),
- Insert a Microsoft Excel spreadsheet.
To create a blank table in a Word document, do the following:
1. Place your cursor where you want to insert the table.
2. On the Insert tab, in the Tables group, click the Table button:

3. Do one of the following:
Create a blank table of up to 10 columns and 8 rows
- To create a table of up to 10 columns and 8 rows, move the cursor right (to select columns) and down (to select rows) the grid to select as many cells as you need. E.g., the table of 5 columns and 3 rows (selected cells will turn orange):

Click on a cell in the grid with the expected number of rows and columns (or press Enter) to insert an empty table to fit the width of the text (paragraph).
The table has the specified number of single-line text rows in the current paragraph and equal-width columns. E.g., the table of 3 rows and 5 columns:


Create a blank table with more than 10 columns or more than 8 rows
- To create a table with more than 10 columns or more than 8 rows, do one of the following:
- Create a table with exactly 10 columns or 8 rows, then add as many columns or rows as you need (see below how to customize table).
- Click the Insert Table… option:
In the Insert Table dialog box:

- In the Table size group, specify the number of columns and rows,
- In the AutoFit behavior group, specify the width of the table and its columns:
- Select the Fixed column width option to customize width in the appropriate field: select Auto (used by default) or specify width. E.g., 0.75″:

- Select the AutoFit contents option to adjust cell sizes to the document content. E.g.:

- Select the AutoFit to window option to adjust the table’s width to the document content width. E.g.:

- Select the Remember dimension for new tables check box if you want to create tables with the same options later. Word will remember your customization.


Create a blank table manually
- To manually create an empty table, click the Draw Table option:
After clicking that option, the cursor changes to the pencil
 that allows drawing cells directly in the Word document to create a table:
Click anywhere in a document but the table itself by the pencil to stop drawing a table.
Notes:
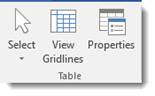
- To draw additional lines, select a table, then on the Table Layout tab, in the Draw group, click the Draw Table button:

- If you draw a line in the wrong position, click the Eraser button in the Draw group of the Table Layout tab:
- We recommend displaying the rulers or gridlines to help you place the lines correctly.
- To draw additional lines, select a table, then on the Table Layout tab, in the Draw group, click the Draw Table button:


Create a table using predefined templates
To create a table using predefined Word templates of tables and calendars, do the following:
1. Place your cursor where you want to insert the table.
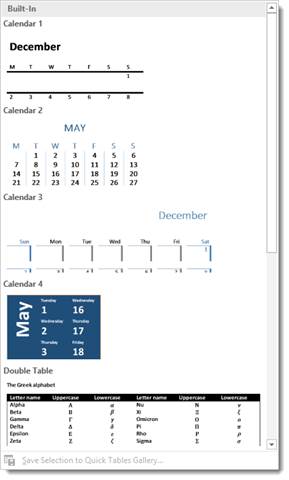
2. On the Insert tab, in the Tables group, click the Table dropdown list, then select Quick Tables list:

3. From the Quick Tables gallery, select the template you prefer.
For example:

Create a table from the existing data
To create a table from the existing data in a document data (either as regular text or as a tabbed list), do the following:
1. Select the document data you want to shape into a new table.
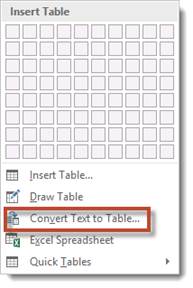
2. On the Insert tab, in the Tables group, click the Table dropdown list, then select Convert Text to Table…:

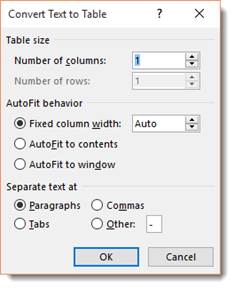
3. In the Convert Text to Table dialog box:

- In the Table size group, specify the number of columns,
- In the AutoFit behavior group, specify whether the width of the columns should be fixed (see details above),
- In the Separate text at group, select the character that separates text into columns in the selected text: paragraph marks, commas, tabs, or some other character.
E.g.:

Insert a Microsoft Excel spreadsheet
Note: It is possible to insert a Microsoft Excel spreadsheet in a document. To do so, on the Insert tab, in the Tables group, click the Table dropdown list, then select Excel Spreadsheet:

Word opens the Excel spreadsheet where you can enter the data. You can use Excel features such as functions and formulas to create or manipulate the data. Note that it is not a Word table.
Add rows and columns
To add a row and a column to a table, do the following:
1. Position the cursor:
- to a cell in a row above or below which you need to insert a row,
- to a cell in a column left or right which you need to insert a column.
2. Do one of the following:
- Click the Insert dropdown list in the Mini toolbar:

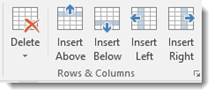
- On the Table Layout tab, in the Rows & Columns group:

- Click the Insert Above button to insert a row above the row with the cursor,
- Click the Insert Below button to insert a row below the row with the cursor,
- Click the Insert Left button to insert a column left to the column with the cursor,
- Click the Insert Right button to insert a column right to the column with the cursor.
- Right-click and select the Insert list:


Notes:
- To insert rows or columns, move the mouse over the table or left of the table until you see the Insertion indicator, then click the icon:
 and
and
- You can choose the option Insert -> Insert Cells… from the popup menu; Word opens the Insert Cells dialog box:

After selecting the option and clicking the OK button, Word adds an entire row or column, not a cell. Word just moves cells according to the selection.
 and
and 

Delete a table element
To delete a table element, do the following:
1. Select the cell, multiple cells, the entire column or multiple columns, the entire row, or multiple rows.
2. Do one of the following:
- Click the Delete dropdown list in the Mini toolbar:

- On the Table Layout tab, in the Rows & Columns group, click the Delete dropdown list, then select one of the options:


3. Select one of the proposed options:
- Delete Cells… opens the Delete Cells dialog box, in which select the option you need:
- Delete Columns
- Delete Rows
- Delete Table

Note: You can select the element you want to delete, right-click on the selection and select the appropriate item in the popup menu. For example, if the entire table is selected or the column is selected:
 and
and

Convert a table into text
To convert a table into text in Word, follow the next steps:
1. Click anywhere in the table.
2. On the Layout tab, in the Format group, click the Convert to Text button:

3. In the Convert Table to Text dialog box, select the charter to separate cells data in the text:

4. Click OK.
Follow these steps to insert captions:
- Click on the figure or table where you want the caption to appear.
- On the References tab, click the Insert Caption button.
- In the Caption window, in the Label menu, select the label Figure or Table.
- In the Position menu, select where you want the caption to appear.
Contents
- 1 How do you add a title to a table?
- 2 How do you caption a table?
- 3 How do you put a title above a table in Word?
- 4 Which tag is used to create a title for a table?
- 5 How do I caption a table in Word?
- 6 How do you keep a table and title together in Word?
- 7 How do you write a description of a table?
- 8 How do you start a new paragraph after a table in Word?
- 9 How do I insert a table in Word without moving the text?
- 10 How do you put a title on a table in HTML?
- 11 How do you add a title to a table in latex?
- 12 How do you label a table?
- 13 How do I create a table of tables in Word?
- 14 How do I move a caption in Word table?
- 15 How do you keep a table title in a table?
- 16 How do I keep a table from breaking across pages in Word?
- 17 How do you keep a table from moving in Word?
- 18 What is an adjective for table?
- 19 How do you reference a table in a report?
- 20 How do you describe a table in thesis?
How do you add a title to a table?
How to Insert Figure Captions and Table Titles
- Right-click on the first figure or table in your document.
- Select Insert Caption from the pop-up menu.
- Select the Label menu arrow in the Caption dialog box.
- Select the option you want from the Label drop-down menu:
- Select the Position menu arrow.
How do you caption a table?
Here are some tips on using captions:
- A figure caption is centered under the figure; a table caption is centered above the table (if a caption is more than one line, make it left justified).
- A Figure and its caption should appear on the same page.
- All captions should start with a capitalized word and end with a period.
How do you put a title above a table in Word?
Inserting Text Above a Table in Word
- Launch Microsoft Word and open the document you want to edit.
- Place the text cursor in the top left cell of the table in question, before any text it contains.
- Press “Enter” if the table is at the top of the document; press “Ctrl-Shift-Enter” if the table is at the top of a section.
Which tag is used to create a title for a table?
Answer: tag is used to create a title for a table..
How do I caption a table in Word?
Select the object (table, equation, figure, or another object) that you want to add a caption to. On the References tab, in the Captions group, click Insert Caption. In the Label list, select the label that best describes the object, such as a figure or equation.
How do you keep a table and title together in Word?
Option 1: Use a Text Box
- Make sure the figure is in-line (not floating).
- Make sure the title or caption is not in a text box. That is, it has to be ordinary text.
- Select both the figure and the title or caption.
- Insert the Text Box.
- Note: The Text Box will stay on the same page as the paragraph to which it is anchored.
How do you write a description of a table?
3 simple statments should do for a table description: one describing what the table holds, one describing the initial state of data in the table (empty or pre-filled), and one describing how data moves in/out of the table. I would also include the table’s cardinality/relationship to other important tables.
How do you start a new paragraph after a table in Word?
The only way I’ve found to add a new paragraph after the table (but before Heading 1b ) is to put the cursor at the start of Heading 1b , and press Enter . This adds a new paragraph with style Heading 1, which I can fix by changing it to Normal – but this messes up the hyperlinks later in the document.
How do I insert a table in Word without moving the text?
Click the Table Layout tab, and then under Settings, click Properties. Under Text Wrapping, click Around. To set the horizontal and vertical position of the table, the distance from surrounding text, and other options, under Text Wrapping, click Positioning, and then choose the options that you want.
How do you put a title on a table in HTML?
To add a title to your table, you would place the title and the attributes of that title between the row commands, and . The heading codes, and , define a heading cell and, by default, these codes center the heading and set it in bold type.
How do you add a title to a table in latex?
A table caption is added through the caption macro, which automatically numbers the table. Usually, a table caption goes above a table. However, some editors require the caption to be placed below the table. Add the caption macro before or after the tabular environment to place the caption above or below the table.
How do you label a table?
Tables should be labeled with a number preceding the table title; tables and figures are labeled independently of one another. Tables should also have lines demarcating different parts of the table (title, column headers, data, and footnotes if present). Gridlines or boxes should not be included in printed versions.
How do I create a table of tables in Word?
To create a combined list of tables and figures
- After the table of contents, click where you want to insert the list.
- In the Insert menu, pull down to Index and Tables.
- Click Table of Figures.
- Check Include label and number, Show page numbers, Right align page numbers.
- Click Options.
- Click OK.
- Click OK.
How do I move a caption in Word table?
Written Instructions:
- Right-click the object you wish to caption and select Insert Caption… from the shortcut menu.
- In the Caption dialog box, select the label that applies to the object you have selected (e.g. “Figure” or “Table”) and select the positioning of the caption (e.g. above or below the object).
How do you keep a table title in a table?
In the table, right-click in the row that you want to repeat, and then click Table Properties. In the Table Properties dialog box, on the Row tab, select the Repeat as header row at the top of each page check box. Select OK.
How do I keep a table from breaking across pages in Word?
How to stop a table from breaking across two pages in Word?
- Select the table which breaks across two pages, and then click Layout (under Table Tools) > Properties.
- In the popping out Table Properties dialog box, (1) enable the Row tab, (2) uncheck the Allow row to break across pages option, and (3) click the OK button.
How do you keep a table from moving in Word?
Go to Table Properties, Table tab, ensure that the Text Wrapping is None. This will anchor the table InLineWithText. Be careful anytime you select and adjust the table with the mouse, this will revert the table back to floating (or the Around wrap).
What is an adjective for table?
tabular. having a flat, plane surface. organized as a table or list.
How do you reference a table in a report?
All figures and tables must be mentioned in the text (a “callout”) by their number. Do not refer to the table/figure using either “the table above” or “the figure below.” Assign table/figure # in the order as it appears, numbered consecutively, in your paper – not the figure # assigned to it in its original resource.
How do you describe a table in thesis?
Tables must be numbered consecutively using Arabic numbers throughout the thesis, as should figures, examples, and illustrations. Each table in a thesis must have a caption that tells concisely what it contains. The caption must be placed above a table.
![]()
Download Article
![]()
Download Article
This how to explains how you can add captions for Microsoft Word tables like you see on tutorial screen shots, text books with diagrams and so forth.
Things You Should Know
- To add a caption, select the table, then right-click the selection and choose Insert Caption.
- You’ll also find the Insert Caption icon on the References tab at the top of Word.
- You can label and number your captions, as well as customize their location in reference to the table.
-
1
Select the table you want to add the caption to.
-
2
Right-click and select Add Caption. The Caption dialog box appears.
Advertisement
-
3
If the Caption dialog box does not appear, click Insert, point to Reference and then select Caption.
-
4
In the Caption dialog box, enter a caption for the table in the Caption box.
-
5
Select an appropriate label you want to use (Table, Figure or Equation) from the Label drop-down box.
-
6
Specify the position where you would like the caption to appear in the Position dialog box (above or below the table).
-
7
If you want the captions to be numbered automatically, click on the Numbering tab in the Caption dialog box.
-
8
Click OK.


Advertisement
Add New Question
-
Question
How do I group a table and its caption so that they can be moved as one object?

Select the caption and go into the Home tab. Select the arrow by paragraph and go over to formatting; select «Keep with Next.» (This is assuming that your caption is above the table.)
Ask a Question
200 characters left
Include your email address to get a message when this question is answered.
Submit
Advertisement
Thanks for submitting a tip for review!
About This Article
Thanks to all authors for creating a page that has been read 261,852 times.