
Hold down SHIFT, and then select the same number of existing sheet tabs of the worksheets that you want to insert in the open workbook. For example, if you want to add three new worksheets, select three sheet tabs of existing worksheets. On the Home tab, in the Cells group, click Insert, and then click Insert Sheet.
Contents
- 1 How do I create multiple tabs in Excel?
- 2 How do you insert a tab?
- 3 Can you group tabs in Excel?
- 4 How do I show tabs in Excel?
- 5 What is Insert tab in Microsoft Excel?
- 6 Where is the Layout tab in Excel?
- 7 Can you put excel tabs in a folder?
- 8 How do I add a tab character in Excel?
- 9 How do I activate the tab key in Excel?
- 10 How do I insert Table Tools tab layout?
- 11 How do I add a page tab in Excel?
- 12 How do you insert a tab in a table cell?
- 13 Why can’t I tab between cells in Excel?
- 14 How do I switch between tabs in Excel using keyboard?
- 15 What is Layout tab?
- 16 What is the difference between Layout tab and Format tab?
How do I create multiple tabs in Excel?
Press and hold the Ctrl key on your keyboard. Select the next worksheet you want in the group. Continue to select worksheets until all of the worksheets you want to group are selected, then release the Ctrl key. The worksheets are now grouped.
How do you insert a tab?
Insert or add tab stops
- Go to Home and select the Paragraph dialog launcher .
- Select Tabs.
- Type a measurement in the Tab stop position field.
- Select an Alignment.
- Select a Leader if you want one.
- Select Set.
- Select OK.
Can you group tabs in Excel?
To group worksheets together, press and hold the Ctrl key and click each worksheet you want to group together at the bottom of the Excel window. Grouped worksheets appear with a white background, while unselected worksheets appear in gray.
How do I show tabs in Excel?
First ensure that the Show sheet tabs is enabled. To do this, For all other Excel versions, click File > Options > Advanced—in under Display options for this workbook—and then ensure that there is a check in the Show sheet tabs box.
What is Insert tab in Microsoft Excel?
The Insert tab contains various items that you may want to insert into a document. These items include such things as tables, word art, hyperlinks, symbols, charts, signature line, date & time, shapes, header, footer, text boxes, links, boxes, equations and so on.
Where is the Layout tab in Excel?
The default location of the Layout tab is second from the left immediately following the Home tab. If your Ribbon isn’t displayed at all go to Excel> Preferences> Ribbon & restore the check for Turn on the Ribbon.
Can you put excel tabs in a folder?
Export the Contents of a Folder
To export a folder: On the left Navigation Bar, click Browse. Right-click the name of the folder that you want to export and select the option that you want to use:The workbook will contain one tab per sheet in the folder.
How do I add a tab character in Excel?
How to Insert a Tab Character In a Cell
- Open your Excel workbook and navigate to the worksheet you are working with.
- Press the “Ctrl,” “Alt,” and “Tab” keys simultaneously and see if a tab character is added to the active cell.
How do I activate the tab key in Excel?
Tab Key Jumps a Screen at a Time
- Display the Excel Options dialog box.
- At the left side of the dialog box click Advanced.
- Scroll through the list of available options until you see the Lotus Compatibility options.
- Clear the Transition Navigation Keys check box.
- Click on OK.
How do I insert Table Tools tab layout?
Design tab
- Click in the table that you want to format.
- Under Table Tools, click the Design tab.
- In the Table Formats group, rest the pointer over each table style until you find a style that you want to use. Note: To see more styles, click the More arrow.
- Click the style to apply it to the table.
How do I add a page tab in Excel?
Method A:
- Click the Page Layout tab in the Ribbon.
- Go to the Page Setup group, and then you will find that some common used setups, such as margins, backgrounds and size are listed in this group.
- Then a “Page Setup” box appears, and you can choose the settings based on your need.
How do you insert a tab in a table cell?
- Place the text cursor in the cell where you want to insert the tab character, using either the mouse or the keyboard.
- Hold down the “Ctrl” key and press “Tab” to insert the tab character.
- Adjust the position of the tab stops using the ruler, if necessary (see Resources).
Why can’t I tab between cells in Excel?
To use the arrow keys to move between cells, you must turn SCROLL LOCK off. To do that, press the Scroll Lock key (labeled as ScrLk) on your keyboard. If your keyboard doesn’t include this key, you can turn off SCROLL LOCK by using the On-Screen Keyboard.
How do I switch between tabs in Excel using keyboard?
You can move worksheets with the keyboard by using Ctrl+PgUp and Ctrl+PgDown. Ctrl+PgUp moves toward the first worksheet in the workbook and Ctrl+PgDown moves toward the last. However, when you reach the first or last worksheet, you have to switch directions: Excel doesn’t wrap to the opposite end of the workbook.
What is Layout tab?
The Layout tab provides access to page display and layout options. These include page orientation and AutoFit, which is a feature that limits the width of columns in a report to be no wider than the largest value in each column. These options allow you to change the size or orientation of your report.
What is the difference between Layout tab and Format tab?
Answer: 1. Layout Tab–The Page Layout Tab holds all the options that allow you to arrange your document pages just the way you want them. You can set margins, apply themes, control of page orientation and size, add sections and line breaks, display line numbers, and set paragraph indentation and lines.
![]()
Download Article
Easy and quick ways to create new tabs in Excel
![]()
Download Article
You can add tabs in Excel, called «Worksheets,» to keep your data separate but easy to access and reference. Excel starts you with one sheet (three if you’re using 2007), but you can add as many additional sheets as you’d like.
-

1
Open your workbook in Excel. Start up Excel from the Start menu (Windows) or the Applications folder (Mac) and open the workbook you want to add tabs to. You’ll be prompted to select a file when you launch Excel.
-
2
Click the «+» button at the end of your sheet tabs. This will create a new blank sheet after your existing sheets.[1]
- You can also press ⇧ Shift+F11 to create a new sheet in front of the selected sheet. For example, if you have Sheet1 selected and then press ⇧ Shift+F11, a new sheet called Sheet2 will be created in front of Sheet1.
- On Mac, press ⌘ Command+T to create a new tab.
Advertisement
-
3
Create a copy of an existing sheet. You can quickly copy a sheet (or sheets) by selecting it, holding Ctrl/⌥ Opt, and then dragging the sheet. This will create a new copy that contains all of the data from the original.[2]
- Press and hold Ctrl/⌥ Opt and click multiple sheets to select them if you want to copy more than one sheet at once.
-
4
Double-click a tab to rename it. The text will become highlighted, and you can type whatever you’d like as the tab name.
-
5
Right-click a tab and select «Tab Color» to color it. You can select from a variety of preset colors, or click «More Colors» to make a custom color.
-
6
Change the number of default sheets for new workbooks. You can adjust Excel’s settings to change the number of sheets that appear by default whenever a new workbook is created.
- Click the File tab or Office button and select «Options.»
- In the «General» or «Popular» tab, find the «When creating new workbooks» section.
- Change the number for «Include this many sheets.»
-
7
Click and drag tabs left and right to reorder them. Once you have multiple tabs, you can click and drag them to change the order that they appear. Drag the tab left or right to put it in a new position in your tab row. This will not affect any of your formulas or references.


Advertisement
-
1
Hold .⇧ Shift and select the number of sheets you want to create. For example, if you want to add three sheets at once, hold ⇧ Shift and select three existing sheets. In other words, you’ll need to already have three sheets to quickly create three new sheets using this command.
-
2
Click the «Insert ▼» button in the Home tab. This will open addition Insert options. Be sure to click the ▼ part of the button so that you open the menu.
-
3
Select «Insert Sheet.» This will create new blank sheets based on the number of sheets you had selected. They will be inserted before the first sheet in your selection.


Advertisement
-
1
Create or download the template you want to use. You can turn any of your worksheets into templates by selecting the «Excel Template (*.xltx)» format when you save the file. This will save the current spreadsheet into your Templates directory. You can also download a variety of templates from Microsoft when creating a new file.
-
2
Right-click the tab you want to insert the template in front of. When you insert a template as a sheet, it will be added in front of the tab you have selected.
-
3
Select «Insert» from the right-click menu. This will open a new window allowing you to select what you want to insert.
-
4
Select the template you want to insert. Your downloaded and saved templates will be listed in the «General» tab. Select the template you want to use and click «OK.»
-
5
Select your new tab. Your new tab (or tabs if the template had more than one sheet) will be inserted in front of the tab you had selected.


Advertisement
Add New Question
-
Question
How do I name a file in Excel?

Go to the file tab on the top left hand side and then click on save as and name the file.
-
Question
How can I change the position of a tab?
Click and drag the tab you want to move to the position you want it moved to.
-
Question
How do I add a row in my Excel spreadsheet?
You need to right click the area on the left side where you want the additional row. Then, you can click «add row.»
See more answers
Ask a Question
200 characters left
Include your email address to get a message when this question is answered.
Submit
Advertisement
-
You can apply changes to several tabs at once by grouping them. Hold the Ctrl key while clicking each tab to create a group. Select a contiguous range of sheets by holding the Shift key while clicking the first and last tabs in the range of sheets. Release the Ctrl and Shift keys and click any other tab to ungroup the sheets.
-
It is easier to manage your tabs by giving them a distinctive name- it could be a month, a number, or something unique so that it describes what exactly is in the tab.
Thanks for submitting a tip for review!
Advertisement
About This Article
Thanks to all authors for creating a page that has been read 331,817 times.
Is this article up to date?
Do you need to add a new sheet tab to your Excel workbook? This post is going to show you all the ways that you can insert a new sheet in Excel!
Excel allows you to add multiple sheets within a workbook. This is a great way to organize your spreadsheet solutions as you can separate your inputs, data, calculations, reports, and visuals into different sheets.
Organizing your workbooks with sheets can also make the spreadsheet easier to navigate for any user.
How can you add new sheets to an Excel workbook? Follow this post to find out all the ways to add sheet tabs in Excel. You’ll even learn how to add multiple sheets based on a list!
Add a New Sheet with the New Sheet Button
The quickest and easiest way to insert a new sheet in Excel is using the New Sheet button located to the right of the current sheet tabs.
Left click on the plus sign icon to the right of the sheet tabs and Excel will create a new blank sheet in your workbook!
Add a New Sheet from the Home Tab
Adding a new sheet can also be done from the Excel ribbon.
You might think this action would be located in the Insert tab, but it will actually be found in the Home tab.
Follow these steps to insert a new sheet from the Home tab.
- Go to the Home tab.
- Click on the lower part of the Insert command found in the Cells section.
- Choose the Insert Sheet option from the menu.
This will create a new sheet in your workbook.
Add a New Sheet with a Keyboard Shortcut
Good news for anyone who prefers to navigate Excel with their keyboard as much as possible! There is a dedicated keyboard shortcut for adding a new sheet.
Press Shift + F11 on your keyboard to insert a new sheet.
Add a New Sheet with Excel Options
When you create a new Excel workbook, the number of sheets it comes with will be determined by your Excel Options settings.
You can change this default so that any time you create a new workbook, it will have your desired number of blank sheets available.
The Excel Options menu allows you to customize your Excel experience with various app and workbook settings.
Follow these steps to adjust the default number of sheets in a workbook.
- Go to the File tab.
- Select Excel Options in the lower left.
- Go to the General section of the Excel Options menu.
- Scroll down to the When creating new workbooks section.
- Change the number in the Including this many sheets input.
- Press the OK button.
The next time you create a new Excel workbook, it will have your desired number of blank sheets.
💡 Tip: You can test out this new setting by pressing Ctrl + N to create a new workbook.
Add Multiple New Sheets with a Pivot Table
Did you know you can create multiple sheets from a list in the grid by using a pivot table?
This is a hidden gem for when you need to quickly create many sheets.
For example, suppose you need to create new sheets for each US state or each product that your company sells. This would be a tedious process with the previous methods.
If you have these sheet names as a list inside the grid, then you can create a pivot table based on this list and use the Show Report Filter Pages feature to generate the sheets for you.
This example shows a list of US states which can then be used to generate sheets with those US state names.
Follow these steps to automatically generate sheets from a list using a pivot table.
- Create a pivot table based on your list.
💡 Tip: Check out this post to see how to insert a pivot table from your list.
- Click and drag the sheet name field to the Filters area in the PivotTable Fields menu.
- Go to the PivotTable Analyze tab.
- Click on the Chevron icon in the Options command.
- Choose the Show Report Filter Page option from the menu.
This will open the Show Report Filter Pages menu.
- Select the field with your sheet names.
- Press the OK button.
You will only see multiple field choices in the menu if you have added multiple fields to the Filters area of your pivot table.
This will create a new sheet for each unique item in your list, and each sheet will be named based on the text in your list.
Each sheet will contain a filtered version of your pivot table in cell A1. The pivot table will be filtered on the same item as the sheet name.
Add Multiple New Sheets with VBA
VBA is a great way to automate any task for Excel in the desktop app. This includes adding sheets!
You can create a VBA macro that will create new sheets based on a selected list.
Go to the Developer tab and select the Visual Basic command or press Alt + F11 to open the visual basic editor.
📝 Note: You might need to enable the Developer tab first as it is disabled by default.
Go to the Insert menu in the visual basic editor and select the Module option from the menu.
Sub AddSheets()
Dim myRange As Range
Dim sheetTest As Boolean
Set myRange = Selection

For Each c In myRange.Cells
sheetTest = False
    For Each ws In ThisWorkbook.Worksheets
        If ws.Name = c.Value Or c.Value = "" Then
            sheetTest = True
        End If
    Next ws
    If Not (sheetTest) Then
          Sheets.Add.Name = c.Value
    End If
Next c
End Sub
Paste the above code into the new module.
This code will loop through the selected range in your workbook and will create a new sheet for each cell. If the sheet name already exists, then this item will be skipped.
Now you will be able to select any range in your workbook and run the VBA code to automatically create multiple sheets.
Add Multiple New Sheets with Office Scripts
Another way you can automate the creation of your sheets is by using Office Scripts.
Office Scripts is the JavaScript language for automating tasks in Excel online. You will need to be using Excel on the web with a business Microsoft 365 account as this feature isn’t available otherwise.
Open Excel online and go to the Automate tab and select the New Script option. This will open the Office Script editor on the right side.
function main(workbook: ExcelScript.Workbook) {

	//Create an array with the values in the selected range
	let selectedRange = workbook.getSelectedRange();
	let selectedValues = selectedRange.getValues();
	//Get dimensions of selected range
	let rowHeight = selectedRange.getRowCount();
	let colWidth = selectedRange.getColumnCount();

	//Loop through each item in the selected range
	for (let i = 0; i < rowHeight; i++) {
		for (let j = 0; j < colWidth; j++) {
			try {
				workbook.addWorksheet(selectedValues[i][j]);
			}
			catch (e) {
				//do nothing
			};
		};
	};
};
Add the above code to the editor and press the Save script button.
This code will loop through the selected range on your sheet and create a new sheet for each item in the range.
Now you select a range in your sheet and press the Run button in the Code Editor. This will run the code and create the required sheets in your workbook!
Add Multiple New Sheets with Power Automate
Microsoft Power Automate is a cloud-based service that makes it easy for end users to create and run automated workflows.
Users can build workflows in a matter of minutes, without any need for coding or complex configuration with the intuitive user interface.
The service can be used to automate a wide range of tasks, including sending emails, copying files, and creating records in databases.
Power Automate is part of the Microsoft Power Platform, which also includes Power BI and Power Apps. Together, these products provide a powerful end-to-end solution for business process automation.
But the best part is it’s available for use as part of any Microsoft 365 subscription!
You can use Power Automate to create sheets from a list inside an Excel Table. In this example, the desired sheet names are in an Excel Table with a column named Names.
📝 Note: This Excel file will need to be saved in either SharePoint or OneDrive in order to work with Power Automate.
Go to the Power Automate Portal and log in with your Microsoft credentials.
Then go to the Create tab and select an Instant cloud flow. This will allow you to run the flow manually with a button in the Power Automate portal.
Give your Flow a name then select the Manually trigger a flow option and then press the Create button.
This will open the flow builder and you can add steps to your workflow.
- Add a List rows present in a table step and then select the relevant file and table location in the various fields.
This action will read all the items in your table of sheet names. This will be used in the next step to create and name new worksheets.
- Add a Create worksheet step and select the same file.
- Select the Names field from the previous List rows present in a table action.
When you add the Names field to the Name input in the Create worksheet step, it will automatically add this step into an Apply to each action. This way a worksheet will be created for each item in your list of sheet names.
Press the Save button to save your flow and it will be ready to run!
Go to the My flows menu, select the Cloud flows tab, and then press the Run button for your flow.
You don’t even have to have the file open, and the sheets will be added to your workbook!
Conclusions
Most of your workbooks will need more than one sheet, so learning how to add sheets in Excel is essential.
There are manual ways to create new sheets such as the New Sheet button, the Home tab, and a keyboard shortcut. There are all great methods when you only need to add a few sheets.
There are also several methods for adding sheets in an automated manner based on a list! VBA, Office Scripts, Power Automate, and even pivot tables can all be used for situations where you need to add a lot of sheets.
Which method do you prefer for adding sheets to your workbooks? Do you have any other tips for this? Let me know in the comments section below!
About the Author
John is a Microsoft MVP and qualified actuary with over 15 years of experience. He has worked in a variety of industries, including insurance, ad tech, and most recently Power Platform consulting. He is a keen problem solver and has a passion for using technology to make businesses more efficient.
In Excel, we usually have the ribbon. In this ribbon, we have many tabs available to work smoothly. To work efficiently in Excel, we need to know the features available with every tab. Almost all the tabs are important to be an expert in Excel. So in this article, we will take you through the “INSERT” tab in Excel. In Excel, the “INSERT” tab plays an important role in analyzing the data. So in this article, we will take a look at the “INSERT” tab in detail.
Table of contents
- Insert Tab in Excel
- What does INSERT Tab have in Excel?
- #1 – Tables
- #2 – Illustrations
- #3 – Add-Ins
- #4 – Charts
- #5 – 3D Map
- #6 – Sparklines
- #7 – Filters
- #8 – Links
- # 9 – Text
- #10 – Symbols
- Things to Remember
- Recommended Articles
- What does INSERT Tab have in Excel?
What does INSERT Tab have in Excel?
Like all the other tabs in the ribbon, the “INSERT” tab has offered its features and tools. Below is the image of the “INSERT” tab in Excel.

We have several other groups under the Excel “INSERT” tab, and below are the group names:
- Tables
- Illustrations
- Add-ins
- Charts
- Power Map
- Sparklines
- Filters
- Links
- Text
- Symbols
Now, we will see what each group offers to us.
#1 – Tables
It is the most important thing under Excel’s “INSERT” tab. Under this group, we have three features called “Pivot Tables in ExcelA Pivot Table is an Excel tool that allows you to extract data in a preferred format (dashboard/reports) from large data sets contained within a worksheet. It can summarize, sort, group, and reorganize data, as well as execute other complex calculations on it.read more, Recommended Pivot Tables, and Table.”

PivotTables are important to quickly analyze and get the story behind large amounts of data. Recommended Pivot Tables best suit pivot table designs for your large amount of data. Finally, the last table lets us convert the normal data range to an “Excel TableIn excel, tables are a range with data in rows and columns, and they expand when new data is inserted in the range in any new row or column in the table. To use a table, click on the table and select the data range.read more” format and allows us to work efficiently and smoothly.
#2 – Illustrations
This option is more to do with graphics like inserting pictures offline and online and inserting different kinds of built-in shapes. Also, we can insert graphics like smart art, and finally, we can add a snapshot of any window to this worksheet.

#3 – Add-Ins
These are external add-ins available for ExcelAn add-in is an extension that adds more features and options to the existing Microsoft Excel.read more. We may find these options from Excel 2013 onwards. If we want to insert external apps from the Microsoft store, we can also insert external apps through “My Apps.” Next, we have “Bing Maps.” We can insert the Bing map to show a graphical representation of numbers and use the People Graph. We can vividly deliver the presentation.

#4 – Charts
If you are a storyteller, you should consider mastering this because all the dashboards contain visual effects, and those are in the form of charts. So in this category, we have plenty of built-in charts to work with.
For example, Column Chart in ExcelColumn chart is used to represent data in vertical columns. The height of the column represents the value for the specific data series in a chart, the column chart represents the comparison in the form of column from left to right.read more, Bar Chart in ExcelBar charts in excel are helpful in the representation of the single data on the horizontal bar, with categories displayed on the Y-axis and values on the X-axis. To create a bar chart, we need at least two independent and dependent variables.read more, Pie Chart in ExcelMaking a pie chart in excel can help you with the pictorial representation of your data and simplifies the analysis process. There are multiple kinds of pie chart options available on excel to serve the varying user needs.read more, Line Chart in ExcelLine Graphs/Charts in Excels are visuals to track trends or show changes over a given period & they are pretty helpful for forecasting data. They may include 1 line for a single data set or multiple lines to compare different data sets. read more, Scattered Chart, and Combo Chart in ExcelExcel Combo Charts combine different chart types to display different or the same set of data that is related to each other. Instead of the typical one Y-Axis, the Excel Combo Chart has two.read more.

#5 – 3D Map
The 3D map is also a part of the extra add-in to visualize the data better and more meaningful to tell the story better.

#6 – Sparklines
Have you heard of in-cell charts in Excel? If yes, then can we create these in-cell charts using the “Sparklines in ExcelSparklines in Excel are similar to a chart within a cell. They are tiny visual representations of the data’s trend, whether it is increasing or decreasingread more” category? Yes. We can insert three kinds of in-cell charts: Line, Column, and Win/Loss.

#7 – Filters
- Excel Filters are not a strange thing for those who work with Excel. If we do not know any other mode for inserting and removing filters for the data, we can use this tool (because most people use the shortcut key Ctrl + Shift + L to insert or remove filters).
- However, we have another tool called “Slicer.” It could be strange because this is available from Excel 2010 onwards versions. The slicer is a visual filter to apply the filter. So we need to click on the visual button to filter what we need to filter.

#8 – Links
We can insert hyperlinks for worksheets in this tool if we wish to create hyperlinks for navigation purposes.

# 9 – Text
Under this category, we can insert a text box to write something. We can also insert header & footer in excel for the worksheet. We can also insert “Word Art,” “Signature Line,” and the external “Object.”

#10 – Symbols
To insert any equations and symbols, we can use this category.

Things to Remember
- The most commonly used feature under the “INSERT” tab is “PivotTables” to analyze large amounts of data.
- Using the “Object” feature, we can insert external objects like PDF, Word, PPT, etc.
Recommended Articles
This article has been a guide to Excel Insert Tab. Here, we learn what insert tab is used to insert objects like the table, illustrations, add-ins, charts, 3D map, sparklines, filters, links, etc., and downloadable Excel templates. You may learn more about Excel from the following articles:-
- Insert Check Mark in Excel
- Pivot Table From Multiple Sheets
- Insert Slicers in Excel
- Insert Line in Excel
Every Microsoft Excel workbook contains at least one worksheet. You can create multiple worksheets to help organize your data, and each sheet is shown as a tab at the bottom of the Excel window. These tabs make it easier to manage your spreadsheets.
You may have a workbook that contains worksheets for each year for company sales, each department for your retail business, or each month for your bills.
To efficiently manage more than one spreadsheet in a single workbook, we have some tips to help you work with tabs in Excel.
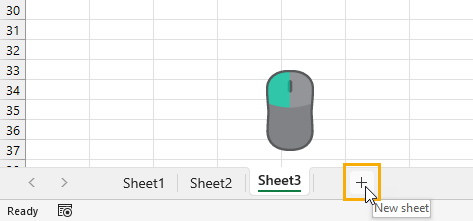
Insert a New Tab
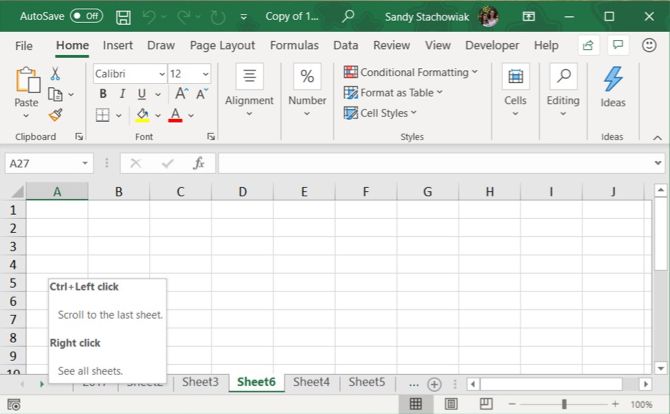
To add another Excel worksheet to your workbook, click the tab after which you want to insert the worksheet. Then, click the plus sign icon on the right of the tab bar.
The new tab is numbered with the next sequential sheet number, even if you’ve inserted the tab in another location. In our example screenshot, our new sheet is inserted after Sheet3, but is numbered Sheet6.
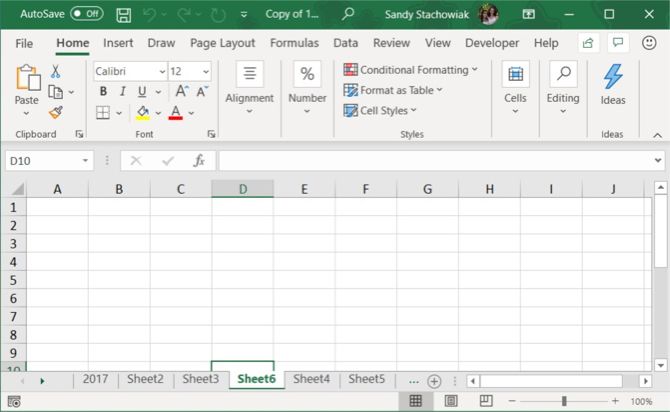
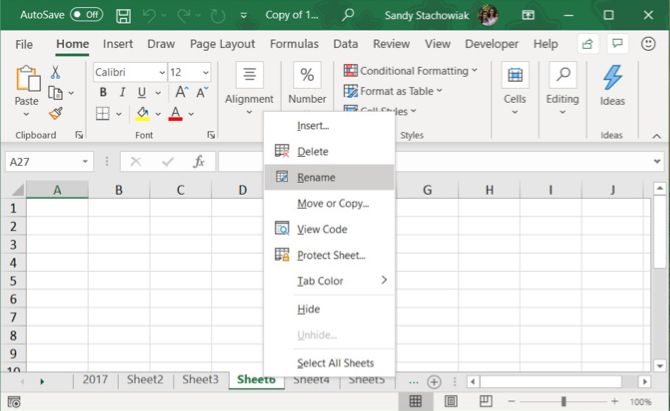
Rename a Tab
New tabs are named Sheet1, Sheet2, etc. in sequential order. If you have multiple worksheets in your workbook, it’s helpful to name each of them to help you organize and find your data.
To rename a tab, either double-click on the tab name or right-click on it and select Rename. Type a new name and press Enter.
Keep in mind that each tab must have a unique name.
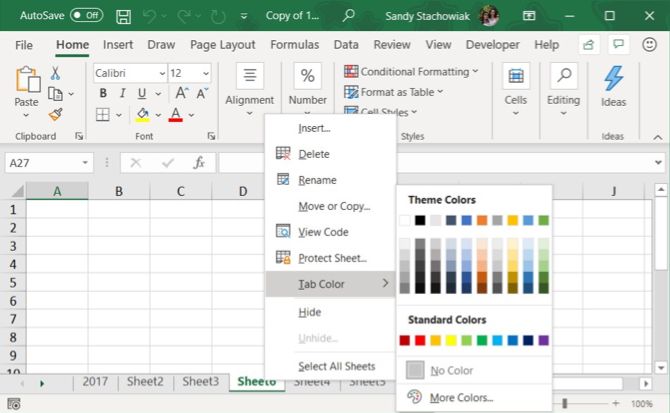
Color a Tab
Along with renaming tabs, you can apply color to them so that they stand out from the rest. Right-click the tab and put your cursor over Tab Color. Select a color from the pop-out window. You’ll notice a nice selection of Theme Colors, Standard Colors, and More Colors if you want to customize the color.
If you have a lot of tabs, they may not all display at once, depending on the size of your Excel window. There are a couple of ways you can scroll through your tabs.
On Windows, you’ll see three horizontal dots on one or both ends of the tab bar. Click the three dots on one end to scroll through the tabs in that direction.
You can also click the right and left arrows on the left side of the tab bar to scroll through the tabs. These arrows also have other uses, as indicated by the popup that displays when you move your cursor over one of them.
On Mac, you’ll only see the arrows on the left side of the tab bar for scrolling.
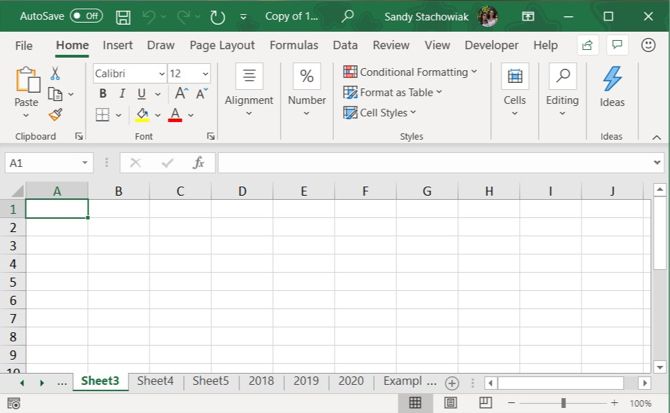
View More Tabs on the Tab Bar
On Windows, the scrollbar at the bottom of the Excel window takes up room that could be used for your worksheet tabs. If you have a lot of tabs, and you want to see more of them at once, you can widen the tab bar.
Hover your cursor over the three vertical dots to the left of the scrollbar, until it turns into two vertical lines with arrows. Click and drag the three dots to the right to make the tab bar wider. You’ll start seeing more of your tabs display.
Need to print your Excel sheet? We show you how to format the document to print your spreadsheet on a single page.
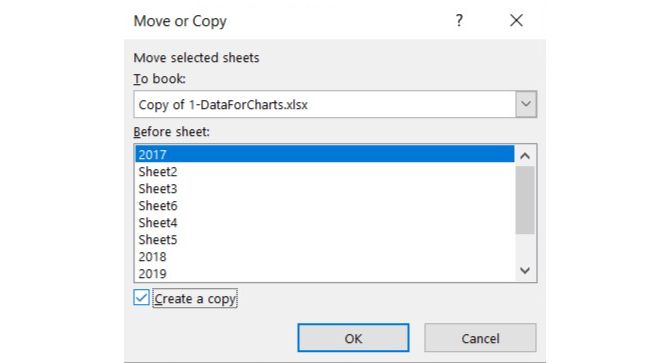
Copy or Move a Tab
You can make an exact copy of a tab in the current workbook or in another open workbook, which is useful if you need to start with the same data. You can also move a tab to another location in the same workbook or a different open workbook.
Right-click on the tab and select Move or Copy.
In the Move or Copy dialog box, the currently active workbook is selected by default in the To book dropdown list. If you want to copy or move the tab to a different workbook, make sure that workbook is open and select it from the list. Remember, you can only copy or move tabs to open workbooks.
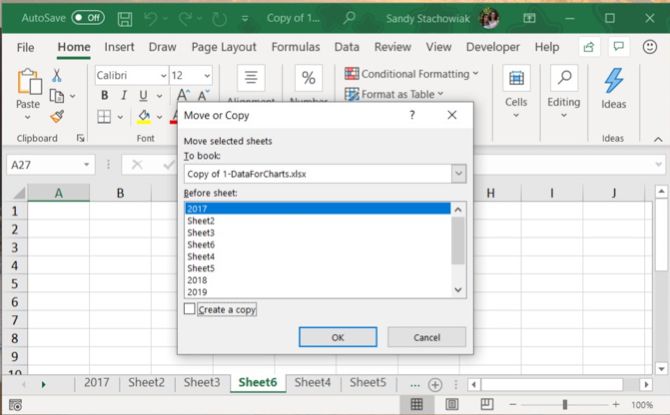
In the Before sheet list box, select the sheet (tab) before which you want to insert the tab. If you’d rather move or copy the tab to the end, pick Move to End.
Copying a Tab
If you’re copying the tab, and not moving it, make sure to check the Create a copy box. If you don’t check the Create a copy box, the tab will be moved to the chosen location instead of copied.
The copied tab will have the same name as the original tab followed by a version number. You can rename the tab as we described in the Rename a Tab section above.
Moving a Tab
If you move the tab, the name will remain the same; a version number is not added.
If you only want to move a tab within the same workbook, you can manually drag it to the new location. Click and hold the tab until you see a triangle on the upper-left corner of the tab. Then, drag the tab until the triangle points to where you want it and then release it.

Delete a Tab
You can delete worksheets (tabs) in your workbook, even those containing data. You will lose the data on a deleted Excel worksheet, and it might cause errors if other worksheets refer to data on the deleted worksheet. So be sure that you actually want to remove the sheet.
Since a workbook must contain at least one spreadsheet, you can’t delete a sheet if it’s the only one in your workbook.
To delete an Excel worksheet, right-click on the tab for the sheet and select Delete.
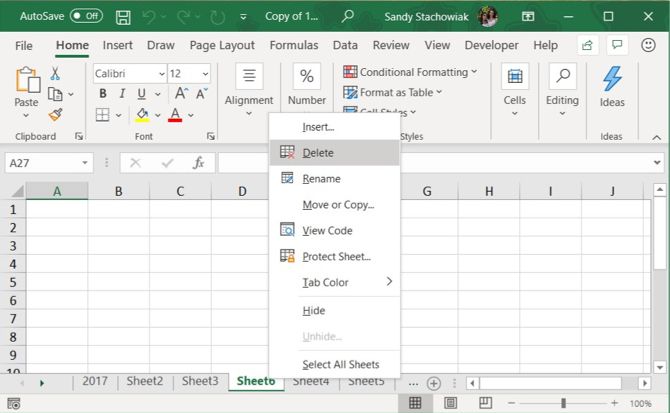
If the worksheet you’re deleting contains data, a dialog box displays. Click Delete, if you’re sure you want to delete the data on the worksheet.
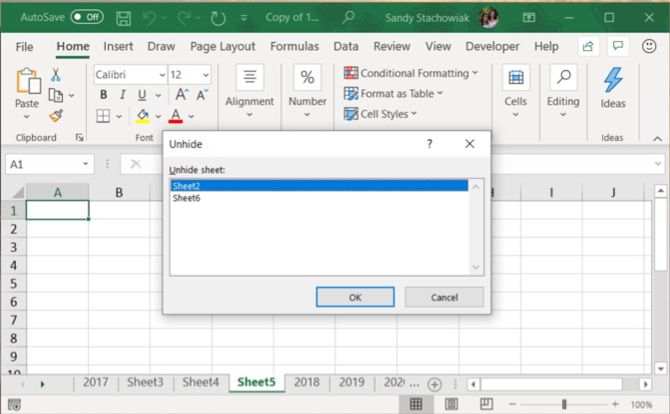
Hide a Tab
You may want to keep a worksheet and its data in your workbook but not see the sheet. You can take care of this easily by hiding a tab instead of deleting it.
Right-click the tab and choose Hide from the shortcut menu. You’ll see the tab and the sheet disappear from the workbook view.
To make a hidden tab reappear, right-click any tab in the workbook and select Unhide. If you have more than one hidden tab, pick the one you want to see and click OK.
Keep Your Excel Data Organized
Tabs are a great way to keep your Excel data organized and make it easy to find. You can customize the tabs to organize your data in the best way that suits your needs.
You can also speed up navigation and data entry on your worksheets using keyboard shortcuts, as well as use these tips to save time in Excel.