Word for Microsoft 365 Word 2021 Word 2019 Word 2016 Word 2013 Word 2010 Word 2007 More…Less
In this article
-
Add a cell
-
Add a row above or below
-
Add a column to the left or right
-
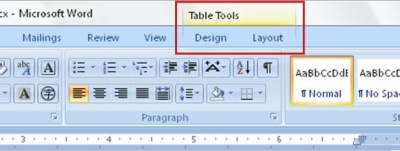
About the Table Tools contextual tabs
Add a cell
-
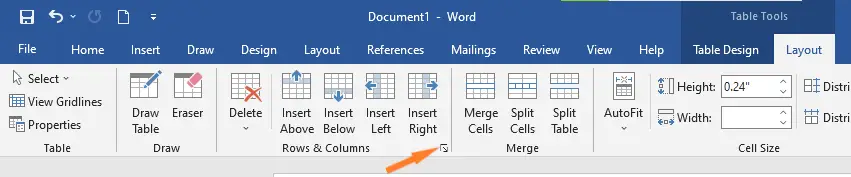
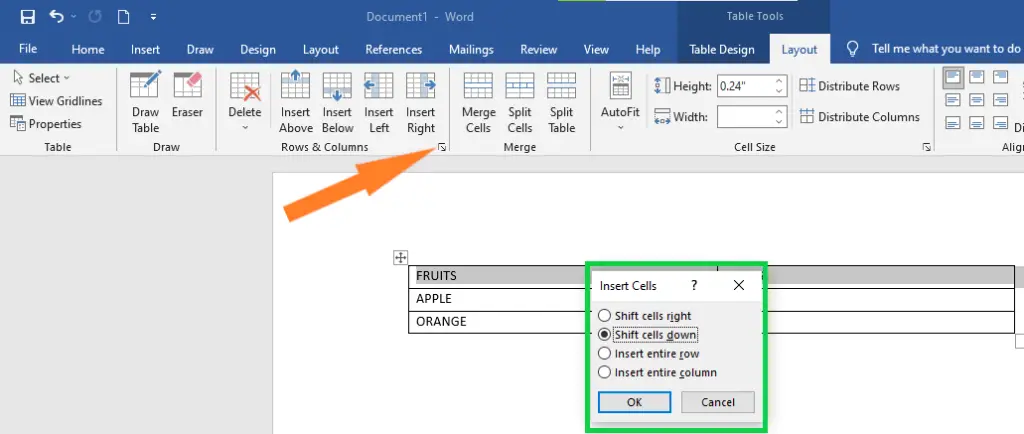
Click in a cell that is to the right of or above where you want to insert a cell.
-
Under Table Tools, click the Layout tab.
-
Click the arrow at the bottom, right-hand corner of the Rows & Columns section.
-
Click one of the following options.
Click
To
Shift cells right
Insert a cell and move all other cells in that row to the right.
Note: Word does not insert a new column. This may result in a row that has more cells than the other rows.
Shift cells down
Insert a cell and move the existing cells down one row. A new row is added at the bottom of the table.
Insert entire row
Insert a row above the cell that you clicked in.
Insert entire column
Insert a column to the left of the cell that you clicked in.
Top of Page
Add a row above or below
-
Click in a cell above or below where you want to add a row.
-
Under Table Tools, on the Layout tab, do one of the following:
-
To add a row above the cell, click Insert Above in the Rows and Columns group.
-
To add a row below the cell, click Insert Below in the Rows and Columns group.
-
Tip: To insert more than one row (or column) at the same time, select as many rows or columns as you want to add before you click the insert control. For example, to insert two rows above a row, first select two rows in your table and then click Insert Above.
Top of Page
Add a column to the left or right
-
Click in a cell to the left or right of where you want to add a column.
-
Under Table Tools, on the Layout tab, do one of the following:
-
To add a column to the left of the cell, click Insert Left in the Rows and Columns group.
-
To add a column to the right of the cell, click Insert Right in the Rows and Columns group.
-
Top of Page
About the Table Tools contextual tabs
You will need to know where the Design and LayoutTable Tools contextual tabs are when working on the design and structural layout of a table. The Design and Layout tabs are only visible after you have clicked inside of a table, and appear at the top of the screen on the ribbon.
Top of Page
See Also
Delete a row, column, or cell from a table
Add columns and rows to a table
Keyboard shortcuts for Microsoft Word on Windows
Need more help?
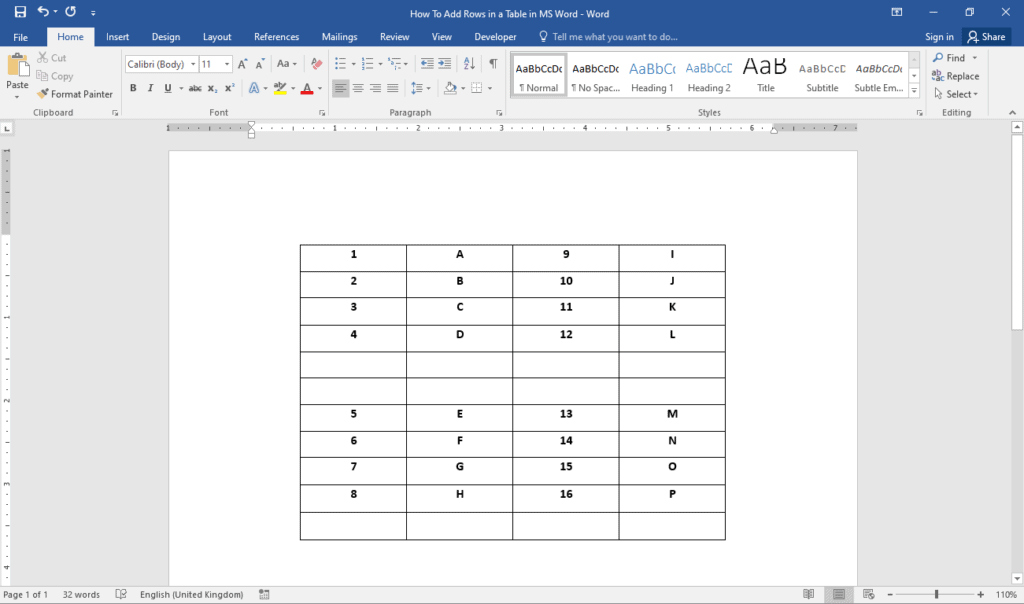
In this article, we would like to introduce you with 4 ways to quickly add multiple rows or columns to an existing Word table.
Every so often, we would find additional rows or columns are needed for an existing table. Certainly, there are a number of methods to realize it. And we here provide you 4 quick ways to do that.
Method 1: Add Multiple Rows with “Tab” Key
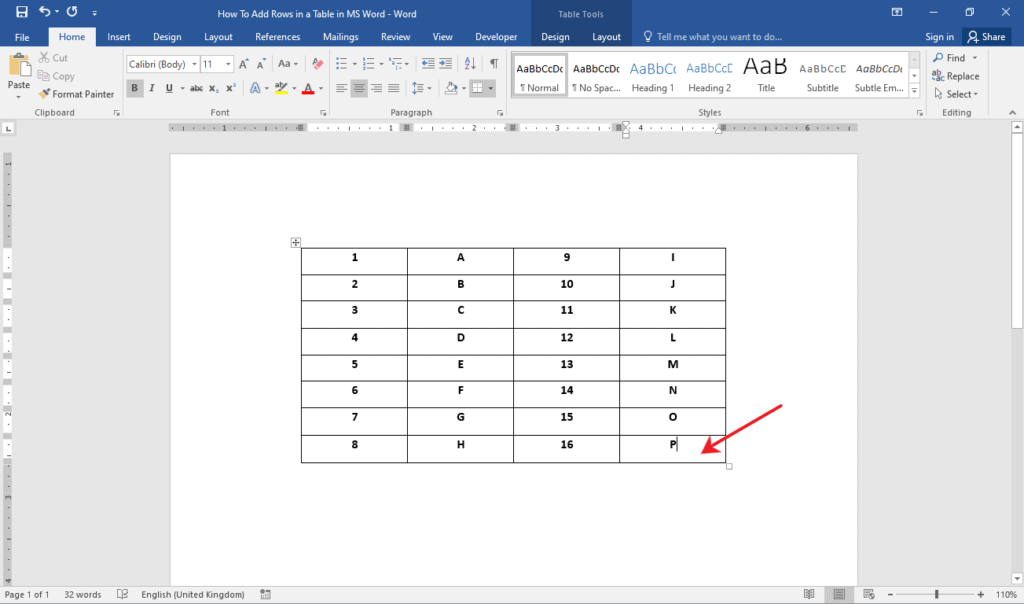
- Firstly, put your cursor outside the end of the last row of a table.
- Then press “Tab” key to get as many rows as you need.
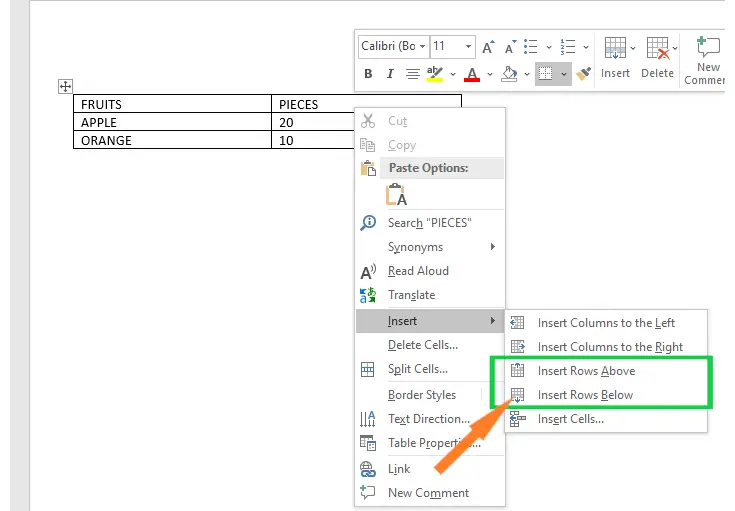
Method 2: Add Multiple Rows or Columns with Contextual Menu
- At first, select a number of rows or columns.
- Next right click and choose “Insert”.
- Then choose the right command as you need. The number of rows or columns is as the same as that of the rows or columns you selected at the very first.


Besides, there are also the shortcuts for inserting columns. Press “Alt”, “J”, “L”, and “L” can insert columns to the left of the selection. And press “Alt”, “J”, “L”, and “R” can insert columns to the right of the selection.
Method 3: Add Multiple Rows with “Insert Table” Option
- To begin with, click “Layout” and check the column width in “Cell Size” group. And put cursor right at the head of the line below the last row of table.

- Secondly, click “Insert” tab.
- Then click “Table” icon.
- Next, choose “Insert Table” option on the drop-down menu.

- In “Insert Table” dialog box, enter the number of columns and rows. Remember the number of columns as the same as the existing table.
- Then input the column width you get in step 1.
- Click “OK”.


You will find 2 tables automatically merge into one.
Method 4: Add Multiple Rows or Columns with Macro
- First off, select a row then press “Alt+ F11” to trigger the VBA editor.
- Click “Normal” then “Insert”.
- Next choose “Module”.

- Double click on the new module to open the editing area.
- Then paste the following codes:

Sub AddRowsAbove()
  Dim nNumber As Long

  If Selection.Information(wdWithInTable) = True Then
    nNumber = InputBox("Input the number of rows you want to add:", "Add Rows to the selection")
    Selection.InsertRowsAbove NumRows:=nNumber
  End If
End Sub
- Hit “Run”.

- In the input box, enter the number of rows you want and click “OK”.


Now there will be 2 blank rows above the first row in the table. And if you want to add rows below a selected one, simply change the “InsertRowsAbove” to “InsertRowsbelow”.
Additionally, here is the macro to add columns:
Sub AddColumnsToLeft()
  Dim nNumber As Long

  If Selection.Information(wdWithInTable) = True Then
    Selection.InsertColumns
  End If
End Sub
You should first select a number of columns then run the macro with the steps above. You can then get new columns. The above macro adds columns to the left of the selection. To add columns to the right selection, you need to replace “InsertColumns” with “InseertColumnsRight”.
Take Care of Word Files
There can be errors or mistakes occurring in Word, result in the collapse of the software. More often than not, it’s not only our time that is wasted but also amounts of priceless data. When it gets that far, you will definitely need a tool to recover docx.
Author Introduction:
Vera Chen is a data recovery expert in DataNumen, Inc., which is the world leader in data recovery technologies, including Excel recovery and pdf repair software products. For more information visit www.datanumen.com
![]()
Download Article
![]()
Download Article
When working with tables in Microsoft Word, you can quickly add and remove rows by using the Table Layout tab. You can insert rows in any part of your table, not just the top and bottom. You can also copy and paste existing rows so that the exact content is duplicated.
If you want to insert a new line in your Word document, press ↵ Enter/⏎ Return.
-

1
Select the row you want to insert a new row above or below. You can insert rows so that they appear above or below the selected row. If you want to add a row at the bottom, select the bottom row. You can select any cell in the row or the entire row.
- To insert multiple rows at once, you’ll need to select as many rows as you want to create by clicking and dragging your mouse. For example, to create three rows at a time, select three existing rows.
-
2
Click the «Table Layout» tab. You’ll find this at the far right end of your Word tabs in Windows, or next to the «Table» tab in Word for Mac. It will only appear if you are currently working in a table.
Advertisement
-
3
Click «Insert Above» (Windows) or «Above» (Mac) to insert a row above the selected row. This will insert blank rows with the same row formatting directly above the row you selected.[1]
- Click «Insert Left» or «Insert Right» to insert a column to the left or right of the selected cell instead.
-
4
Click «Insert Below» (Windows) or «Below» (Mac) to insert a row below the selected row. This will insert blank rows with the same row formatting directly below the row you selected.[2]
-
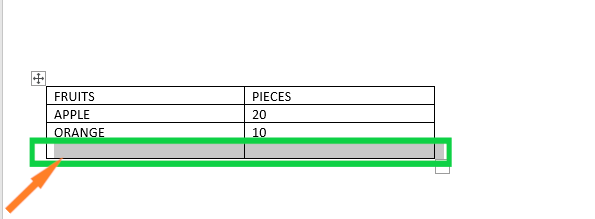
5
Use the .Tab ↹ key to quickly add new rows at the end of a table. You can place your cursor in the last cell of your table and press Tab ↹ to create a new row. This will only insert rows below the last row on your table.


Advertisement
-
1
Highlight the row or rows you want to delete. You can click and drag to highlight multiple rows, or simply select a single cell in the row you want to delete.
-
2
Click the «Table Layout» tab. This appears at the end of your tab list when you are working in a table.
-
3
Click the «Delete» button and select «Delete Rows.» This will delete the row or rows that you have selected. All of the content in each of the deleted row’s cells will be deleted as well.


Advertisement
-
1
Highlight the row or rows that you want to copy. Make sure to highlight the entire row, or the new row will not have all of the cells. You can highlight one or more rows by clicking and dragging your mouse over them.
-
2
Right-click a cell in the row above where you want to insert the copy. When you paste a copied row, it will be inserted directly beneath the row you right-click on.
-
3
Select «Insert as New Rows» from the «Paste» options. This will insert the copied row as a new row in the table, directly beneath the row that you right-clicked.


Advertisement
Ask a Question
200 characters left
Include your email address to get a message when this question is answered.
Submit
Advertisement
Thanks for submitting a tip for review!
About This Article
Thanks to all authors for creating a page that has been read 208,211 times.
Is this article up to date?
- Using the Tab key
- Using the Insert Below or Insert Above buttons
- Using the Context Menu
Method 1: Adding Rows Using the Tab key
This is the easiest method to add rows to a table. On the downside, you can only add rows at the end of your table.
Step 1: Open your Word document.

Step 2: Click the last cell.
Once your document is ready, move your cursor to the bottom right cell of your table.
Then, press the Tab key on your keyboard.
This will create a blank row at the bottom of your table.
If you need to add more rows, you can simply press the Tab key repeatedly until you have the correct number of rows you need.
Method 2: Add Rows Using the Insert Below or Insert Above Options
This technique lets you add rows anywhere in your table.
Step 1: Open your Word document.
Step 2: Access the Insert Above and Insert Below options.
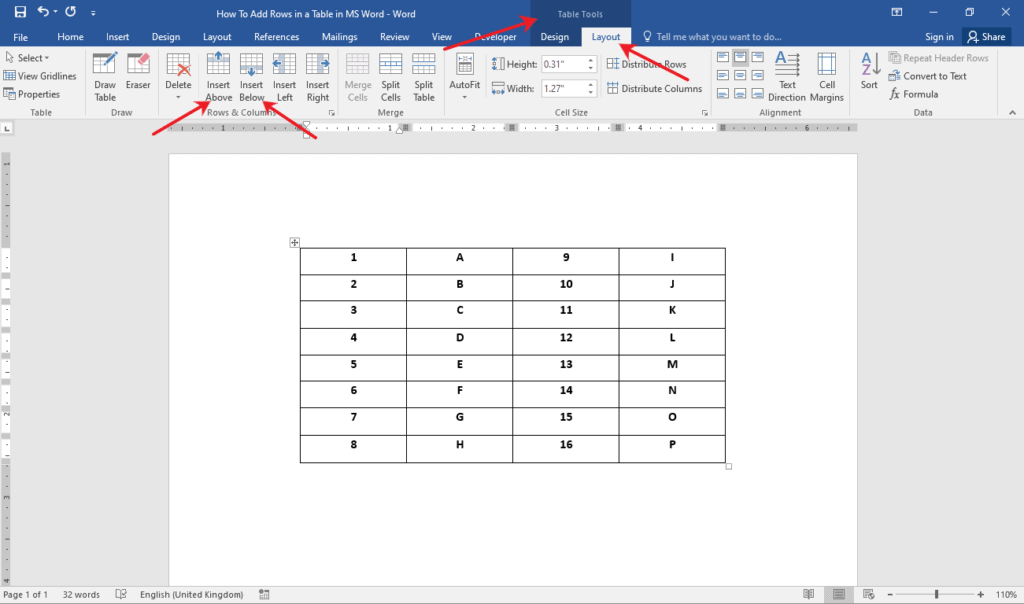
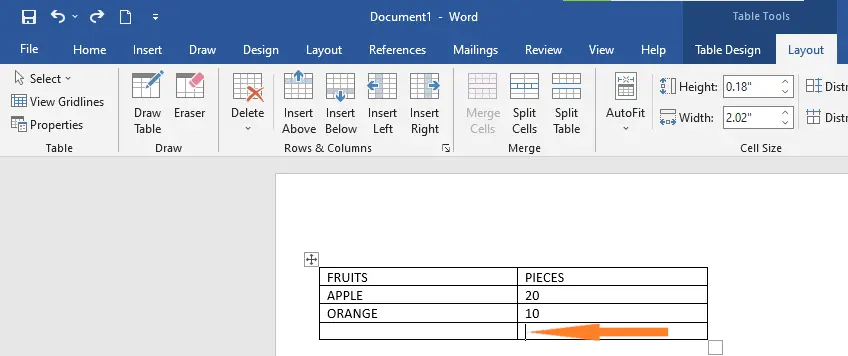
On your table, click the row where you want additional rows inserted. Go to the Table Tools category and click the Layout tab.
Then, under the Rows & Columns group, click either the Insert Above or Insert Below options to add a new row.
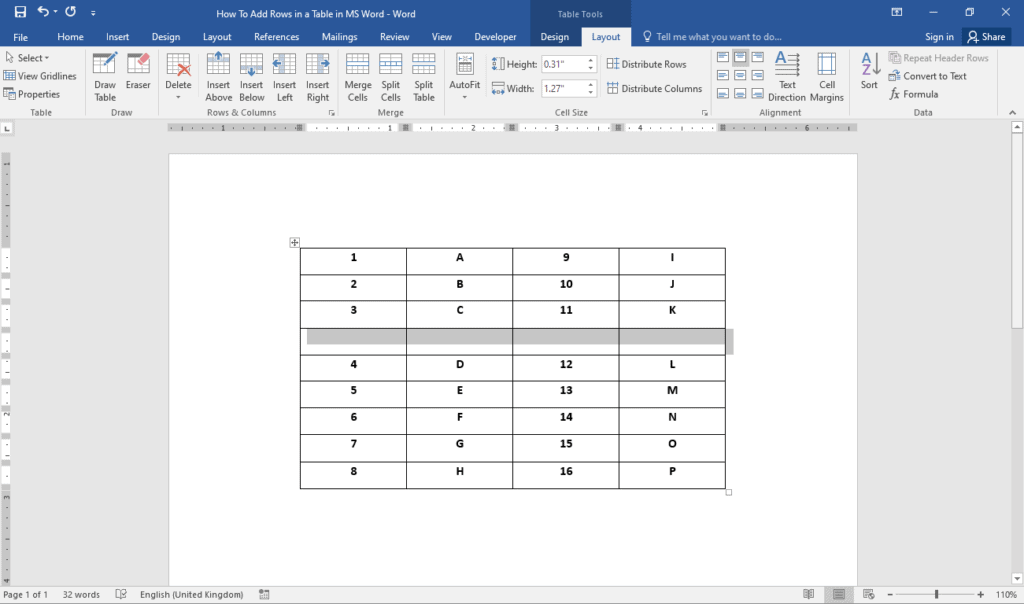
For this example, we’ll add a row above the fourth row.
This is what we got.
Method 3: Add Rows Using the Context Menu
Step 1: Open your MS Word document.

Step 2: Access the Context Menu.
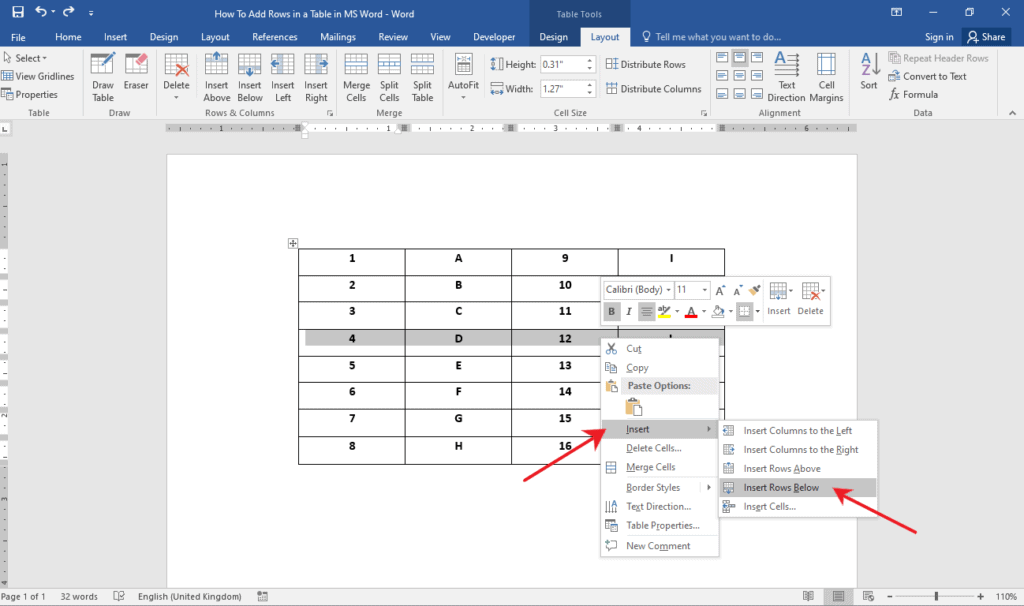
Click the row where you want to add a new row. Right-click on it and click the Insert horizontal drop-down menu.
Then, select either Insert Rows Above or Insert Rows Below depending on your need.
For this example, we’ll add a row below the fourth row.
If you need to add more rows, simply press the F4 key on your keyboard. Note that this only works when the F4 key is pressed right after the addition of rows.
Deleting Rows in a Table in Word
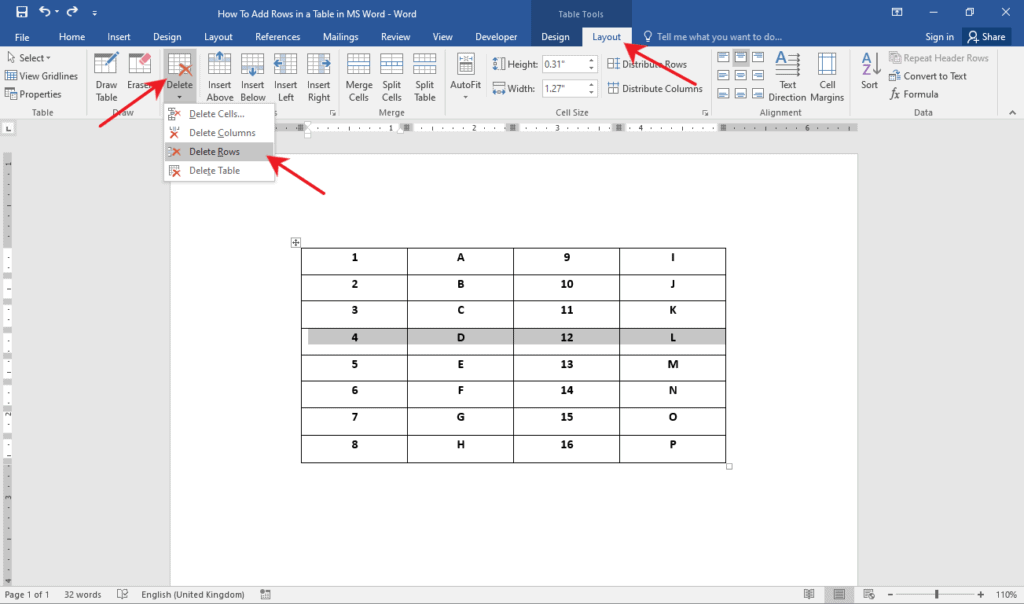
To delete table rows, simply highlight the rows that you want to delete. Then, under the Table Tools category, select the Layout tab.
After that, click the Delete drop-down button and select Delete Rows.
Conclusion
We hope you’ve found this article helpful!
In this chapter, we’ll talk about How to add rows and columns in MS Word. As we talked about in the last chapter, a table is made up of columns on the left and rows on the right, with a cell at each intersection. This chapter will show you how to add and remove rows and columns from a table.
Table of contents
- What is row and column in MS Word?
- How To Add Rows and Columns in MS Word
- Add Table Rows Using Tab
- Add a column to the table
- Use the Ribbon Menu to Add Rows or Columns
- Use Delete Key to Remove Rows and Columns
- Summary
What is row and column in MS Word?
A Word table can have up to 63 columns in a Word document. This is the maximum number of columns that can be in a Word document. In addition, you can have as many rows as you want. Word Document, specifically, allows you to put 32, 767 rows in one table.
The following are the simple steps to add rows to a table in a word document. Once you create a table in a Word document, you will be able to add additional rows to your table based on your requirements.
- Step 1: Place cursor in the table where you want to add a row.
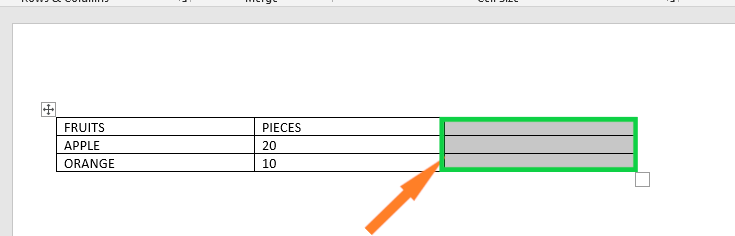
- Step 2: Right-click on the selected area, the following dialog box will appear on the screen. Click on the drop-down menu associated with the Insert button.
Click on the Insert Rows Above option to add a row above the selected row.
Click on the Insert Rows Below option to add a row below the selected row.
- The screenshot below shows that a new row is added to the table.

Add Table Rows Using Tab
Adding rows to your table is easiest if you put your cursor in the cell in the bottom-right corner of your table and then press Tab on your keyboard.
This will add a new row. When you want to add a row, you can choose the cell at the bottom right and press Tab again. If you choose another cell and press Tab, the cursor will move to the next cell. A new row is only automatically added to the last cell.
Add a column to the table
Adding more columns to a Word document is not hard for you to do. To add a column to the table, follow the steps below.
Step 1: Place the cursor where you want to add a column to the table.
Step 2: Right-click on the table, a list of options will show up. Click the drop-down arrow next to the Insert icon.
- Click on the Insert Columns to the Left to add the column left side of the table.
- Click on the Insert Column to the Right to add the column right side of the table.

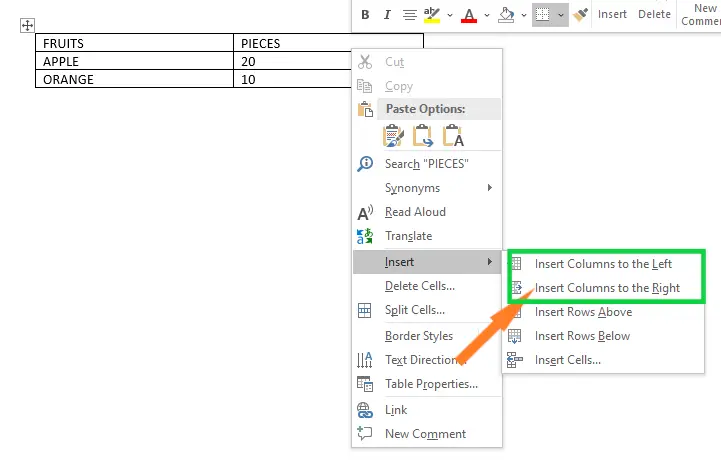
- Step 3: The screenshot below shows that column is added to the table.

Use the Ribbon Menu to Add Rows or Columns
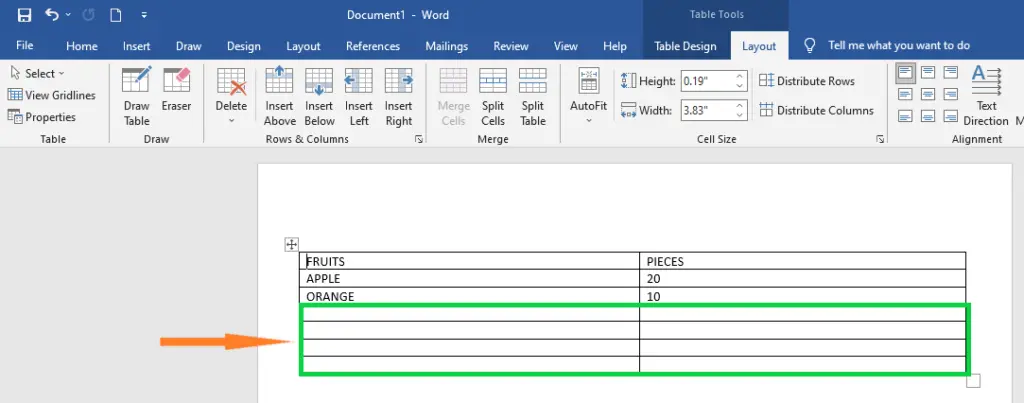
If you have a table in a Word document, you can use the ribbon menu to see more ways to add rows and columns.
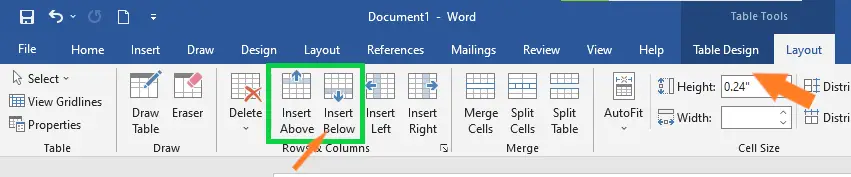
Use the Layout tab in the top ribbon menu to get to these options. The only thing that’s not clear is why there are two tabs called Layout in the menu bar. You need to click the “Layout” tab, which is next to “Table Design” on the right.

When you choose this, you’ll see a list of table-related options here. Since our goal is to add rows and columns, we’ll pay attention to the “Rows & Columns” command group.

If you want to add a row above the cell you’ve chosen in your Microsoft Word table, click “Insert Above.” To add a row below the cell you’ve chosen, click “Insert Below.” Here, we will add a row to the bottom of the cell.
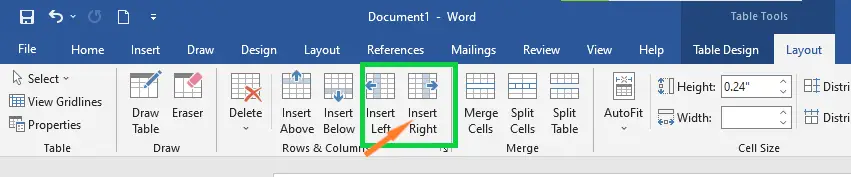
You can also quickly add columns with the buttons here. If you click “Insert Right,” a column will be added to the right of the cell. In the same way, “Insert Left” will add a column to the left of the cell that is currently selected. In our example, we are going to add a column to the right.
You can also click the arrow icon that’s to the right of the “Rows & Columns” command group to reveal a few more options.
Here, you can add rows or columns by clicking “Insert entire row” or “Insert entire column.”
Use Delete Key to Remove Rows and Columns
The following steps are using Delete key to remove rows and columns in word document.
Summary
In the end, we’ve learned how to add rows and columns to a table in MS Word and what those terms mean. We also know that there are different ways to add rows and columns to a table, which we can use in our document to make it look more professional and presentable.
Meanwhile, if you want to learn more about working on tables, see the previous tutorial on how to create tables in Microsoft Word. In our format text and pages tutorial, you’ll also learn how to change page orientation and cover page etc. You can browse those guides if you are having a hard time formatting your documents.
We hope this tutorial helps you as you format your documents in MS Word.
PREVIOUS

NEXT