
Home / VBA / How to Insert a Row using VBA in Excel
In this tutorial, we will look at how to insert a row or a column using a VBA code in Excel. We will also explore what are the different ways to write a macro for this.
To insert a row using a VBA code, you need to use the “Entire Row” property with the “Insert” method. With the entire row property, you can refer to the entire row using a cell and then insert a new row there. By default, it will insert a single row before the cell that you have mentioned.

- First, specify a cell using the range object.
- Now, enter a dot (.) to get the list of properties and methods.
- After that, select the “Entire Row” property or type it.
- In the end, again enter a dot (.) and select the “Insert” method or type it.
Range("A1").EntireRow.InsertYour code is ready here to insert a row. Now when you run this code, it will instantly insert a new row before cell A1.
Insert Multiple Rows
There are two ways to insert multiple rows in a worksheet that I have found. The first is the same insert method that we have used in the above example.
With this, you need to specify a range whose count is equivalent to the count of rows you want to insert. Now let’s say you want to insert 5 rows after, in that case, you can use a code like the following.

To be honest, I haven’t found this method quite useful because you need to change the range if you want to change the count of the rows.
So here’s the second method.
Dim iRow As Long
Dim iCount As Long
Dim i As Long

iCount = InputBox(Prompt:="How many rows you want to add?")
iRow = InputBox _
(Prompt:="After which row you want to add new rows? (Enter the row number")

For i = 1 To iCount
    Rows(iRow).EntireRow.Insert
Next i
When you run this code, it asks you to enter the number of rows that you want to add and then the row number where you want to add all those rows. It uses a FOR LOOP (For Next) to loop that number of times and insert rows one by one.
Insert Rows Based on the Cell Values
If you want to insert rows based on a cell value, then you can use the following code.
Dim iRow As Long
Dim iCount As Long
Dim i As Long

iCount = Range("A1").Value
iRow = Range("B1").Value

For i = 1 To iCount
    Rows(iRow).EntireRow.Insert
Next i
When you run this macro, it takes the count of rows from cell A1 and the row where you want to add rows from cell B1.
Insert a Row without Formatting
When you insert a row where the above row has some specific formatting, in that case, the row will also have that formatting automatically. And the simplest way to deal with this thing is to use clear formats. Consider the following code.
Rows(7).EntireRow.Insert
Rows(7).ClearFormats
When you run the above code, it inserts a new row before the 7th row. Now, what happens, when you insert a row before the 7th row that new row becomes the 7th row, and then the second line of code clears the formats from that row.
Insert Copied Row
You can also use the same method to copy a row and then insert it somewhere else. See the following code.
Application.CutCopyMode = False

With Worksheets("Data")

.Rows(5).Copy
.Rows(9).Insert Shift:=xlShiftDown

End With

Application.CutCopyMode = True
More Tutorials
- Count Rows using VBA in Excel
- Excel VBA Font (Color, Size, Type, and Bold)
- Excel VBA Hide and Unhide a Column or a Row
- Excel VBA Range – Working with Range and Cells in VBA
- Apply Borders on a Cell using VBA in Excel
- Find Last Row, Column, and Cell using VBA in Excel
- Merge Cells in Excel using a VBA Code
- Select a Range/Cell using VBA in Excel
- SELECT ALL the Cells in a Worksheet using a VBA Code
- ActiveCell in VBA in Excel
- Special Cells Method in VBA in Excel
- UsedRange Property in VBA in Excel
- VBA AutoFit (Rows, Column, or the Entire Worksheet)
- VBA ClearContents (from a Cell, Range, or Entire Worksheet)
- VBA Copy Range to Another Sheet + Workbook
- VBA Enter Value in a Cell (Set, Get and Change)
- VBA Insert Column (Single and Multiple)
- VBA Named Range | (Static + from Selection + Dynamic)
- VBA Range Offset
- VBA Sort Range | (Descending, Multiple Columns, Sort Orientation
- VBA Wrap Text (Cell, Range, and Entire Worksheet)
- VBA Check IF a Cell is Empty + Multiple Cells
⇠ Back to What is VBA in Excel
Helpful Links – Developer Tab – Visual Basic Editor – Run a Macro – Personal Macro Workbook – Excel Macro Recorder – VBA Interview Questions – VBA Codes
In this Article
- Insert a Single Row or Column
- Insert New Row
- Insert New Column
- Insert Multiple Rows or Columns
- Insert Multiple Rows
- Insert Multiple Columns
- Insert – Shift & CopyOrigin
- Other Insert Examples
- Insert Copied Rows or Columns
- Insert Rows Based on Cell Value
- Delete Rows or Columns
This tutorial will demonstrate how to use VBA to insert rows and columns in Excel.
To insert rows or columns we will use the Insert Method.
Insert a Single Row or Column
Insert New Row
To insert a single row, you can use the Rows Object:
Rows(4).InsertOr you can use the Range Object along with EntireRow:
Range("b4").EntireRow.InsertInsert New Column
Similar to inserting rows, we can use the Columns Object to insert a column:
Columns(4).InsertOr the Range Object, along with EntireColumn:
Range("b4").EntireColumn.InsertInsert Multiple Rows or Columns
Insert Multiple Rows
When inserting multiple rows with the Rows Object, you must enter the rows in quotations:
Rows("4:6").InsertInserting multiple rows with the Range Object works the same as with a single row:
Range("b4:b6").EntireRow.InsertInsert Multiple Columns
When inserting multiple columns with the Columns Object, enter the column letters in quotations:
Columns("B:D").InsertInserting multiple columns with the Range Object works the same as with a single column:
Range("b4:d4").EntireColumn.InsertVBA Coding Made Easy
Stop searching for VBA code online. Learn more about AutoMacro — A VBA Code Builder that allows beginners to code procedures from scratch with minimal coding knowledge and with many time-saving features for all users!

Learn More
Insert – Shift & CopyOrigin
The Insert Method has two optional arguments:
- Shift – Which direction to shift the cells
- CopyOrigin – Which cell formatting to copy (above, below, left, or right)
The Shift argument is irrelevant when inserting entire rows or columns. It only allows you to indicate to shift down or shift to the right:
- xlShiftDown – Shift cells down
- xlShiftToRight – Shift cells to the right
As you can see, you can’t shift up or to the left.
The CopyOrigin argument has two potential inputs:
- xlFormatFromLeftorAbove – (0) Newly-inserted cells take formatting from cells above or to the left
- xlFormatFromRightorBelow (1) Newly-inserted cells take formatting from cells below or to the right.
Let’s look at some examples of the CopyOrigin argument. Here’s our initial data:
This example will insert a row, taking the formatting from the above row.
Rows(5).Insert , xlFormatFromLeftOrAbove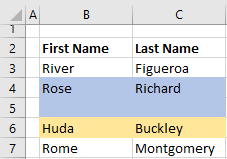
This example will insert a row, taking the formatting from the below row.
Rows(5).Insert , xlFormatFromRightOrBelow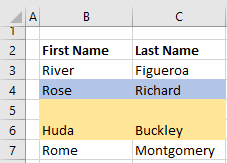
Other Insert Examples
Insert Copied Rows or Columns
If you’d like to insert a copied row, you would use code like this:
Range("1:1").Copy
Range("5:5").Insert
Here we copy Row 1 and Insert it at Row 5.
VBA Programming | Code Generator does work for you!
Insert Rows Based on Cell Value
This will loop through a range, inserting rows based on cell values:
Sub InsertRowswithSpecificValue()

Dim cell As Range

For Each cell In Range("b2:b20")
    If cell.Value = "insert" Then
        cell.Offset(1).EntireRow.Insert
    End If
Next cell

End Sub
Delete Rows or Columns
To delete rows or columns, simply use the Delete method.
Rows(1).Delete

Range("a1").EntireRow.Delete

Columns(1).Delete

Range("a1").EntireColumn.Delete In certain cases, you may need to automate the process of inserting a row (or several rows) in a worksheet. This is useful, for example, when you’re (i) manipulating or adding data entries, or (ii) formatting a worksheet that uses blank rows for organization purposes.
The information and examples in this VBA Tutorial should allow you to insert rows in a variety of circumstances.
This VBA Tutorial is accompanied by Excel workbooks containing the data and macros I use in the examples below. You can get immediate free access to these example workbooks by clicking the button below.

Use the following Table of Contents to navigate to the section you’re interested in.
Insert Rows in Excel
When working manually with Excel, you can insert rows in the following 2 steps:
- Select the row or rows above which to insert the row or rows.
- Do one of the following:
- Right-click and select Insert.
- Go to Home > Insert > Insert Sheet Rows.
- Use the “Ctrl + Shift + +” keyboard shortcut.

You can use the VBA constructs and structures I describe below to automate this process to achieve a variety of results.
Excel VBA Constructs to Insert Rows
Insert Rows with the Range.Insert Method
Purpose of Range.Insert
Use the Range.Insert method to insert a cell range into a worksheet. The 2 main characteristics of the Range.Insert method are the following:
- Range.Insert can insert a single cell or a cell range. For purposes of this VBA Tutorial, you’re interested in inserting entire rows.
- To make space for the newly-inserted cells, Range.Insert shifts other cells away.
Syntax of Range.Insert
expression.Insert(Shift, CopyOrigin)
“expression” is a Range object. Therefore, I simplify as follows:
Range.Insert(Shift, CopyOrigin)
Parameters of Range.Insert
- Parameter: Shift.
- Description: Specifies the direction in which cells are shifted away to make space for the newly-inserted row.
- Optional/Required: Optional.
- Data type: Variant.
- Values: Use a constant from the xlInsertShiftDirection Enumeration:
- xlShiftDown or -4121: Shifts cells down.
- xlShiftToRight or -4161: Shifts cells to the right.
- Default: Excel decides based on the range’s shape.
- Usage notes: When you insert a row: (i) use xlShiftDown or -4121, or (ii) omit parameter and rely on the default behavior.
- Parameter: CopyOrigin.
- Description: Specifies from where (the origin) is the format for the cells in the newly inserted row copied.
- Optional/Required: Optional.
- Data type: Variant.
- Values: A constant from the xlInsertFormatOrigin Enumeration:
- xlFormatFromLeftOrAbove or 0: Newly-inserted cells take formatting from cells above or to the left.
- xlFormatFromRightOrBelow or 1: Newly-inserted cells take formatting from cells below or to the right.
- Default: xlFormatFromLeftOrAbove or 0. Newly-inserted cells take the formatting from cells above or to the left.
How to Use Range.Insert to Insert Rows
Use the Range.Insert method to insert a row into a worksheet. Use a statement with the following structure:
Range.Insert Shift:=xlShiftDown CopyOrigin:=xlInsertFormatOriginConstant
For these purposes:
- Range: Range object representing an entire row. Use the Worksheet.Rows or Range.EntireRow properties to return a Range object that represents the entire row. Please refer to the sections about the Rows and EntireRow properties below.
- xlInsertFormatOriginConstant: xlFormatFromLeftOrAbove or xlFormatFromRightOrBelow. xlFormatFromLeftOrAbove is the default value. Therefore, when inserting rows with formatting from row above, you can usually omit the CopyOrigin parameter.
You can usually omit the Shift parameter. By default, VBA decides how to shift the cells based on the range’s shape. When inserting a row, this usually results in Excel shifting the cells down.
Specify Rows with the Worksheet.Rows Property
Purpose of Worksheet.Rows
Use the Worksheet.Rows property to return a Range object representing all the rows within the worksheet the property works with.
Worksheet.Rows is read-only.
Syntax of Worksheet.Rows
expression.Rows
“expression” is a Worksheet object. Therefore, I simplify as follows:
Worksheet.Rows
How to Use Worksheet.Rows to Insert Rows
Use the Worksheet.Rows property to specify the row or rows above which new rows are inserted.
To insert a row, use a statement with the following structure:
Worksheets.Rows(row#).Insert
“row#” is the number of the row above which the row is inserted.
To insert multiple rows, use a statement with the following structure:
Worksheet.Rows("firstRow#:lastRow#").Insert
“firstRow#” is the row above which the rows are inserted. The number of rows VBA inserts is calculated as follows:
lastRow# - firstRow# + 1
Specify the Active Cell with the Application.ActiveCell Property
Purpose of Application.ActiveCell
Use the Application.ActiveCell property to return a Range object representing the active cell.
Application.ActiveCell is read-only.
Syntax of Application.ActiveCell
expression.ActiveCell
“expression” is the Application object. Therefore, I simplify as follows:
Application.ActiveCell
How to Use Application.ActiveCell To Insert Rows
When you insert a row, use the Application.ActiveCell property to return the active cell. This allows you to use the active cell as reference for the row insertion operation.
Use the Range.Offset property to return a Range object a specific number of rows above or below the active cell. Use the Range.EntireRow property to return a Range object representing the entire row or rows above which to insert the new row. Please refer to the sections about the Offset and EntireRow properties below.
To insert a row above the active cell, use the following statement:
ActiveCell.EntireRow.Insert Shift:=xlShiftDown
To insert a row a specific number of rows above or below the active cell, use a statement with the following structure:
ActiveCell.Offset(RowOffset).EntireRow.Insert Shift:=xlShiftDown
Specify a Cell Range with the Worksheet.Range Property
Purpose of Worksheet.Range
Use the Worksheet.Range property to return a Range object representing a single cell or a cell range.
Syntax of Worksheet.Range
expression.Range(Cell1, Cell2)
“expression” is a Worksheet object. Therefore, I simplify as follows:
Worksheet.Range(Cell1, Cell2)
Parameters of Worksheet.Range
- Parameter: Cell1.
- Description:
- If you use Cell1 alone (omit Cell2), Cell1 specifies the cell range.
- If you use Cell1 and Cell2, Cell1 specifies the cell in the upper-left corner of the cell range.
- Required/Optional: Required.
- Data type: Variant.
- Values:
- If you use Cell1 alone (omit Cell2): (i) range address as an A1-style reference in language of macro, or (ii) range name.
- If you use Cell1 and Cell2: (i) Range object, (ii) range address, or (iii) range name.
- Description:
- Parameter: Cell2.
- Description: Cell in the lower-right corner of the cell range.
- Required/Optional: Optional.
- Data type: Variant.
- Values: (i) Range object, (ii) range address, or (iii) range name.
How to Use Worksheet.Range to Insert Rows
When you insert a row, use the Worksheet.Range property to return a cell or cell range. This allows you to use a specific cell or cell range as reference for the row insertion operation.
Use the Range.Offset property to return a Range object a specific number of rows above or below the cell or cell range. Use the Range.EntireRow property to return a Range object representing the entire row or rows above which to insert the new row or rows. Please refer to the sections about the Offset and EntireRow properties below.
To insert rows above the cell range specified by Worksheet.Range, use a statement with the following structure:
Worksheet.Range(Cell1, Cell2).EntireRow.Insert Shift:=xlShiftDown
To insert rows a specific number of rows above or below the cell range specified by Worksheet.Range use a statement with the following structure:
Worksheet.Range(Cell1, Cell2).Offset(RowOffset).EntireRow.Insert Shift:=xlShiftDown
If the cell range represented by the Worksheet.Range property spans more than 1 row, the Insert method inserts several rows. The number of rows inserted is calculated as follows:
lastRow# - firstRow# + 1
Please refer to the section about the Worksheet.Rows property above for further information about this calculation.
Specify a Cell with the Worksheet.Cells and Range.Item Properties
Purpose of Worksheet.Cells and Range.Item
Use the Worksheet.Cells property to return a Range object representing all the cells within a worksheet.
Once your macro has all the cells within the worksheet, use the Range.Item property to return a Range object representing one of those cells.
Syntax of Worksheet.Cells and Range.Item
Worksheet.Cells
expression.Cells
“expression” is a Worksheet object. Therefore, I simplify as follows:
Worksheet.Cells
Range.Item
expression.Item(RowIndex, ColumnIndex)
“expression” is a Range object. Therefore, I simplify as follows:
Range.Item(RowIndex, ColumnIndex)
Worksheet.Cells and Range.Item Together
Considering the above:
Worksheet.Cells.Item(RowIndex, ColumnIndex)
However, Item is the default property of the Range object. Therefore, you can generally omit the Item keyword before specifying the RowIndex and ColumnIndex arguments. I simplify as follows:
Worksheet.Cells(RowIndex, ColumnIndex)
Parameters of Worksheet.Cells and Range.Item
- Parameter: RowIndex.
- Description:
- If you use RowIndex alone (omit ColumnIndex), RowIndex specifies the index of the cell you work with. Cells are numbered from left-to-right and top-to-bottom.
- If you use RowIndex and ColumnIndex, RowIndex specifies the row number of the cell you work with.
- Required/Optional: Required.
- Data type: Variant.
- Values: You usually specify RowIndex as a value.
- Description:
- Parameter: ColumnIndex.
- Description: Column number or letter of the cell you work with.
- Required/Optional: Optional.
- Data type: Variant.
- Values: You usually specify ColumnIndex as a value (column number) or letter within quotations (“”).
How to use Worksheet.Cells and Range.Item to Insert Rows
When you insert a row, use the Worksheet.Cells and Range.Item properties to return a cell. This allows you to use a specific cell as reference for the row insertion operation.
Use the Range.Offset property to return a Range object a specific number of rows above or below the cell. Use the Range.EntireRow property to return a Range object representing the entire row above which to insert the row. Please refer to the sections about the Offset and EntireRow properties below.
To insert a row above the cell specified by Worksheet.Cells, use a statement with the following structure:
Worksheet.Cells(RowIndex, ColumnIndex).EntireRow.Insert Shift:=xlShiftDown
To insert a row a specific number of rows above or below the cell specified by Worksheet.Cells, use a statement with the following structure:
Worksheet.Cells(RowIndex, ColumnIndex).Offset(RowOffset).EntireRow.Insert Shift:=xlShiftDown
Specify a Cell Range a Specific Number of Rows Below or Above a Cell or Cell Range with the Range.Offset Property
Purpose of Range.Offset
Use the Range.Offset property to return a Range object representing a cell range located a number of rows or columns away from the range the property works with.
Syntax of Range.Offset
expression.Offset(RowOffset, ColumnOffset)
“expression” is a Range object. Therefore, I simplify as follows:
Range.Offset(RowOffset, ColumnOffset)
Parameters of Range.Offset
- Parameter: RowOffset.
- Description: Number of rows by which cell or cell range is offset.
- Required/Optional: Optional.
- Data type: Variant.
- Values:
- Positive number: Moves down the worksheet.
- Negative number: Moves up the worksheet.
- 0: Stays on the same row.
- Default: 0. Stays on the same row.
- Parameter: ColumnOffset.
- Description: Number of columns by which cell or cell range is offset.
- Required/Optional: Optional.
- Data type: Variant.
- Values:
- Positive number: Moves towards the right of the worksheet.
- Negative number: Moves towards the left of the worksheet.
- 0: Stays on the same column.
- Default: 0. Stays on the same column.
- Usage notes: When you insert a row, you can usually omit the ColumnOffset parameter. You’re generally interested in moving a number of rows (not columns) above or below.
How to Use Range.Offset to Insert Rows
When you insert a row, use the Range.Offset property to specify a cell or cell range located a specific number of rows below above another cell or cell range. This allows you to use this new cell or cell range as reference for the row insertion operation.
Use properties such as Application.ActiveCell, Worksheet.Range and Worksheet.Cells to specify the base range the Offset property works with. Please refer to the sections about the ActiveCell, Range and Cells properties above.
Specify Entire Row with the Range.EntireRow Property
Purpose of Range.EntireRow
Use the Range.EntireRow property to return a Range object representing the entire row or rows containing the cell range the property works with.
Range.EntireRow is read-only.
Syntax of Range.EntireRow
expression.EntireRow
“expression” is a Range object. Therefore, I simplify as follows:
Range.EntireRow
How to Use Range.EntireRow to Insert Rows
When you insert a row, use the Range.EntireRow property to return the entire row or rows above which the new row or rows are inserted.
Use properties such as Application.ActiveCell, Worksheet.Range and Worksheet.Cells to specify the range the EntireRow property works with. Please refer to the sections about the ActiveCell, Range and Cells properties above.
Clear Row Formatting with the Range.ClearFormats Method
Purpose of Range.ClearFormats
Use the Range.ClearFormats method to clear the formatting of a cell range.
Syntax of Range.ClearFormats
expression.ClearFormats
“expression” is a Range object. Therefore, I simplify as follows:
Range.ClearFormats
How to Use Range.ClearFormats to Insert Rows
The format of the newly-inserted row is specified by the CopyOrigin parameter of the Range.Insert method. Please refer to the description of Range.Insert and CopyOrigin above.
When you insert a row, use the Range.ClearFormats method to clear the formatting of the newly-inserted rows. Use a statement with the following structure after the statement that inserts the new row (whose formatting you want to clear):
Range.ClearFormats
“Range” is a Range object representing the newly-inserted row.
Use the Worksheet.Rows or Range.EntireRow properties to return a Range object that represents the newly-inserted row. Please refer to the sections about the Rows and EntireRow properties above.
Copy Rows with the Range.Copy Method
Purpose of Range.Copy
Use the Range.Copy method to copy a cell range to another cell range or the Clipboard.
Syntax of Range.Copy
expression.Copy(Destination)
“expression” is a Range object. Therefore, I simplify as follows:
Range.Copy(Destination)
Parameters of Range.Copy
- Parameter: Destination.
- Description: Specifies the destination cell range to which the copied cell range is copied.
- Required/Optional: Optional parameter.
- Data type: Variant.
- Values: You usually specify Destination as a Range object.
- Default: Cell range is copied to the Clipboard.
- Usage notes: When you insert a copied row, omit the Destination parameter to copy the row to the Clipboard.
How to Use Range.Copy to Insert Rows
Use the Range.Copy method to copy a row which you later insert.
Use a statement with the following structure before the statement that inserts the row:
Range.Copy
“Range” is a Range object representing an entire row.
Use the Worksheet.Rows or Range.EntireRow properties to return a Range object that represents a row. Please refer to the sections about the Rows and EntireRow properties above.
Related VBA and Macro Tutorials
- General VBA constructs and structures:
- Introduction to Excel VBA constructs and structures.
- The Excel VBA Object Model.
- How to declare variables in Excel VBA.
- Excel VBA data types.
- Practical VBA applications and macro examples:
- How to copy and paste with Excel VBA.
You can find additional VBA and Macro Tutorials in the Archives.
Example Workbooks
This VBA Tutorial is accompanied by Excel workbooks containing the data and macros I explain below. If you want to follow and practice, you can get immediate free access to these example workbooks by clicking the button below.
Each worksheet within the workbook contains a single data range. Most of the entries simply state “Data”.

Example #1: Excel VBA Insert Row
VBA Code to Insert Row
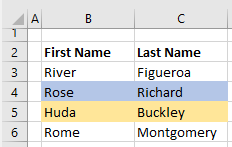
The following macro inserts a row below row 5 of the worksheet named “Insert row”.
Sub insertRow()
    'Source: powerspreadsheets.com/
    'For further information: https://powerspreadsheets.com/excel-vba-insert-row/
    Worksheets("Insert row").Rows(6).Insert Shift:=xlShiftDown
End Sub

Process Followed by Macro

VBA Statement Explanation
Worksheets(“Insert row”).Rows(6).Insert Shift:=xlShiftDown
- Item: Worksheets(“Insert row”).
- VBA construct: Workbook.Worksheets property.
- Description: Returns a Worksheet object representing the “Insert row” worksheet.
- Item: Rows(6).
- VBA construct: Worksheets.Rows property.
- Description: Returns a Range object representing row 6 of the worksheet returned by item #1 above.
- Item: Insert.
- VBA construct: Range.Insert method.
- Description: Inserts a new row above the row returned by item #2 above.
- Item: Shift:=xlShiftDown.
- VBA construct: Shift parameter of Range.Insert method.
- Description:
- Shifts rows down (xlShiftDown) to make space for the row inserted by item #3 above.
- You can usually omit this parameter. By default, VBA decides how to shift the cells based on the range’s shape. When inserting a row, this usually results in Excel shifting the cells down.
Effects of Executing the Macro
The following GIF illustrates the results of executing this macro. As expected, VBA inserts a row below row 5 of the worksheet.

Example #2: Excel VBA Insert Multiple Rows
VBA Code to Insert Multiple Rows
The following macro inserts 5 rows below row 10 of the worksheet named “Insert row”.
Sub insertMultipleRows()
    'Source: powerspreadsheets.com/
    'For further information: https://powerspreadsheets.com/excel-vba-insert-row/
    Worksheets("Insert row").Rows("11:15").Insert Shift:=xlShiftDown
End Sub

Process Followed by Macro

VBA Statement Explanation
Worksheets(“Insert row”).Rows(“11:15”).Insert Shift:=xlShiftDown
- Item: Worksheets(“Insert row”).
- VBA construct: Workbook.Worksheets property.
- Description: Returns a Worksheet object representing the “Insert row” worksheet.
- Item: Rows(“11:15”).
- VBA construct: Worksheet.Rows property.
- Description: Returns a Range object representing rows 11 to 15 of the worksheet returned by item #1 above.
- Item: Insert.
- VBA construct: Range.Insert method.
- Description:
- Inserts new rows above the rows returned by item #2 above.
- The number of inserted rows is equal to the number of rows returned by item #2 above. This is calculated as follows:
lastRow# - firstRow# + 1
In this example:
15 - 11 + 1 = 5
- Item: Shift:=xlShiftDown.
- VBA construct: Shift parameter of Range.Insert method.
- Description:
- Shifts rows down (xlShiftDown) to make space for the rows inserted by item #3 above.
- You can usually omit this parameter. By default, VBA decides how to shift the cells based on the range’s shape. When inserting a row, this usually results in Excel shifting the cells down.
Effects of Executing the Macro
The following GIF illustrates the results of executing this macro. As expected, VBA inserts 5 rows below row 10 of the worksheet.

Example #3: Excel VBA Insert Row with Same Format as Row Above
VBA Code to Insert Row with Same Format as Row Above
The following macro (i) inserts a row below row 20, and (ii) applies the formatting of row 20 to the newly-inserted row.
Sub insertRowFormatFromAbove()
    'Source: powerspreadsheets.com/
    'For further information: https://powerspreadsheets.com/excel-vba-insert-row/
    Worksheets("Insert row").Rows(21).Insert Shift:=xlShiftDown, CopyOrigin:=xlFormatFromLeftOrAbove
End Sub

Process Followed by Macro

VBA Statement Explanation
Worksheets(“Insert row”).Rows(21).Insert Shift:=xlShiftDown, CopyOrigin:=xlFormatFromLeftOrAbove
- Item: Worksheets(“Insert row”).
- VBA construct: Workbook.Worksheets property.
- Description: Returns a Worksheet object representing the “Insert row” worksheet.
- Item: Rows(21).
- VBA construct: Worksheet.Rows property.
- Description: Returns a Range object representing row 21 of the worksheet returned by item #1 above.
- Item: Insert.
- VBA construct: Range.Insert method.
- Description: Inserts a new row above the row returned by item #2 above.
- Item: Shift:=xlShiftDown.
- VBA construct: Shift parameter of Range.Insert method.
- Description:
- Shifts rows down (xlShiftDown) to make space for the row inserted by item #3 above.
- You can usually omit this parameter. By default, VBA decides how to shift the cells based on the range’s shape. When inserting a row, this usually results in Excel shifting the cells down.
- Item: CopyOrigin:=xlFormatFromLeftOrAbove.
- VBA construct: CopyOrigin parameter of Range.Insert method.
- Description:
- Sets formatting of row inserted by item #3 above to be equal to that of row above (xlFormatFromLeftOrAbove).
- You can usually omit this parameter. xlFormatFromLeftOrAbove (or 0) is the default value of CopyOrigin.
Effects of Executing the Macro
The following GIF illustrates the results of executing this macro. As expected, VBA (i) inserts a row below row 20, and (ii) applies the formatting of row 20 to the newly-inserted row.

Example #4: Excel VBA Insert Row with Same Format as Row Below
VBA Code to Insert Row with Same Format as Row Below
The following macro (i) inserts a row below row 25, and (ii) applies the formatting of the row below to the newly-inserted row.
Sub insertRowFormatFromBelow()
    'Source: powerspreadsheets.com/
    'For further information: https://powerspreadsheets.com/excel-vba-insert-row/
    Worksheets("Insert row").Rows(26).Insert Shift:=xlShiftDown, CopyOrigin:=xlFormatFromRightOrBelow
End Sub

Process Followed by Macro

VBA Statement Explanation
Worksheets(“Insert row”).Rows(26).Insert Shift:=xlShiftDown, CopyOrigin:=xlFormatFromRightOrBelow
- Item: Worksheets(“Insert row”).
- VBA construct: Workbook.Worksheets property.
- Description: Returns a Worksheet object representing the “Insert row” worksheet.
- Item: Rows(26).
- VBA construct: Worksheet.Rows property.
- Description: Returns a Range object representing row 26 of the worksheet returned by item #1 above.
- Item: Insert.
- VBA construct: Range.Insert method.
- Description: Inserts a new row above the row returned by item #2 above.
- Item: Shift:=xlShiftDown.
- VBA construct: Shift parameter of Range.Insert method.
- Description:
- Shifts rows down (xlShiftDown) to make space for the row inserted by item #3 above.
- You can usually omit this parameter. By default, VBA decides how to shift the cells based on the range’s shape. When inserting a row, this usually results in Excel shifting the cells down.
- Item: CopyOrigin:=xlFormatFromRightOrBelow.
- VBA construct: CopyOrigin parameter of Range.Insert method.
- Description: Sets formatting of row inserted by item #3 above to be equal to that of row below (xlFormatFromRightOrBelow).
Effects of Executing the Macro
The following GIF illustrates the results of executing this macro. As expected, VBA (i) inserts a row below row 25, and (ii) applies the formatting of the row below to the newly-inserted row.

Example #5: Excel VBA Insert Row without Formatting
VBA Code to Insert Row without Formatting
The following macro inserts a row below row 30 without applying the formatting from the rows above or below the newly- inserted row.
Sub insertRowWithoutFormat()
    'Source: powerspreadsheets.com/
    'For further information: https://powerspreadsheets.com/excel-vba-insert-row/
    Dim myNewRowNumber As Long
    myNewRowNumber = 31
    With Worksheets("Insert row")
        .Rows(myNewRowNumber).Insert Shift:=xlShiftDown
        .Rows(myNewRowNumber).ClearFormats
    End With
End Sub

Process Followed by Macro

VBA Statement Explanation
Lines #4 and #5: Dim myNewRowNumber As Long | myNewRowNumber = 31
- Item: Dim myNewRowNumber As Long.
- VBA construct: Dim statement.
- Description:
- Declares a new variable (myNewRowNumber) as of the Long data type.
- myNewRowNumber represents the number of the newly inserted row.
- Item: myNewRowNumber = 31.
- VBA construct: Assignment statement.
- Description: Assigns the value 31 to myNewRowNumber
Lines #6 and #9: With Worksheets(“Insert row”) | End With
- Item: With | End With.
- VBA construct: With… End With statement.
- Description: Statements within the With… End With statement (lines #7 and #8 below) are executed on the worksheet returned by item #2 below.
- Item: Worksheets(“Insert row”).
- VBA construct: Workbook.Worksheets property.
- Description: Returns a Worksheet object representing the “Insert row” worksheet.
Line #7: .Rows(myNewRowNumber).Insert Shift:=xlShiftDown
- Item: Rows(myNewRowNumber).
- VBA construct: Worksheet.Rows property.
- Description:
- Returns a Range object representing a row (whose number is represented by myNewRowNumber) of the worksheet in the opening statement of the With… End With statement (line #6 above).
- In this example, myNewRowNumber equals 31. Therefore, Worksheet.Rows returns row 31 prior to the insertion of the new row. This is a different row from that returned by Worksheet.Rows in line #8 below.
- This line #7 returns a row prior to the row insertion. This line is that above which the new row is inserted.
- Line #8 below returns a row after the row insertion. This line is the newly-inserted row.
- Item: Insert.
- VBA construct: Range.Insert method.
- Description: Inserts a new row above the row returned by item #1 above.
- Item: Shift:=xlShiftDown.
- VBA construct: Shift parameter of Range.Insert method.
- Description:
- Shifts rows down (xlShiftDown) to make space for the row inserted by item #2 above.
- You can usually omit this parameter. By default, VBA decides how to shift the cells based on the range’s shape. When inserting a row, this usually results in Excel shifting the cells down.
Line #8: .Rows(myNewRowNumber).ClearFormats
- Item: Rows(myNewRowNumber).
- VBA construct: Worksheet.Rows property.
- Description:
- Returns a Range object representing a row (whose number is represented by myNewRowNumber) of the worksheet in the opening statement of the With… End With statement (line #6 above).
- In this example, myNewRowNumber equals 31. Therefore, Worksheet.Rows returns row 31 after the insertion of the new row. This is a different row from that returned by Worksheet.Rows in line #7 above.
- This line #8 returns a row after the row insertion. This line is the newly-inserted row.
- Line #7 above returns a row prior to the row insertion. This line is that below the newly-inserted row.
- Item: ClearFormats.
- VBA construct: Range.ClearFormats method.
- Description: Clears the formatting of the row returned by item #1 above.
Effects of Executing the Macro
The following GIF illustrates the results of executing this macro. As expected, VBA inserts a row below row 30 without applying the formatting from the rows above or below the newly- inserted row.

Example #6: Excel VBA Insert Row Below Active Cell
VBA Code to Insert Row Below Active Cell
The following macro inserts a row below the active cell.
Sub insertRowBelowActiveCell()
    'Source: powerspreadsheets.com/
    'For further information: https://powerspreadsheets.com/excel-vba-insert-row/
    ActiveCell.Offset(1).EntireRow.Insert Shift:=xlShiftDown
End Sub

Process Followed by Macro

VBA Statement Explanation
ActiveCell.Offset(1).EntireRow.Insert Shift:=xlShiftDown
- Item: ActiveCell.
- VBA construct: Application.ActiveCell property.
- Description: Returns a Range object representing the active cell.
- Item: Offset(1).
- VBA construct: Range.Offset property.
- Description:
- Returns a Range object representing the cell range 1 row below the cell returned by item #1 above.
- In this example, Range.Offset returns the cell immediately below the active cell.
- Item: EntireRow:
- VBA construct: Range.EntireRow property.
- Description: Returns a Range object representing the entire row containing the cell range returned by item #2 above.
- Item: Insert.
- VBA construct: Range.Insert method.
- Description: Inserts a new row above the row returned by item #3 above.
- Item: Shift:=xlShiftDown.
- VBA construct: Shift parameter of Range.Insert method.
- Description:
- Shifts rows down (xlShiftDown) to make space for the row inserted by item #4 above.
- You can usually omit this parameter. By default, VBA decides how to shift the cells based on the range’s shape. When inserting a row, this usually results in Excel shifting the cells down.
Effects of Executing the Macro
The following GIF illustrates the results of executing this macro. When I execute the macro, the active cell is B35. As expected, inserts a row below the active cell.

Example #7: Excel VBA Insert Copied Row
VBA Code to Insert Copied Row
The following macro (i) copies row 45, and (ii) inserts the copied row below row 40.
Sub insertCopiedRow()
    'Source: powerspreadsheets.com/
    'For further information: https://powerspreadsheets.com/excel-vba-insert-row/
    With Worksheets("Insert row")
        .Rows(45).Copy
        .Rows(41).Insert Shift:=xlShiftDown
    End With
    Application.CutCopyMode = False
End Sub

Process Followed by Macro

VBA Statement Explanation
Lines #4 and #7: With Worksheets(“Insert row”) | End With
- Item: With | End With.
- VBA construct: With… End With statement.
- Description: Statements within the With… End With statement (lines #5 and #6 below) are executed on the worksheet returned by item #2 below.
- Item: Worksheets(“Insert row”).
- VBA construct: Workbook.Worksheets property.
- Description: Returns a Worksheet object representing the “Insert row” worksheet.
Line #5: .Rows(45).Copy
- Item: Rows(45).
- VBA construct: Worksheet.Rows property.
- Description: Returns a Range object representing row 45 of the worksheet in the opening statement of the With… End With statement (line #4 above).
- Item: Copy.
- VBA construct: Range.Copy method.
- Description: Copies the row returned by item #1 above to the Clipboard.
Line #6: .Rows(41).Insert Shift:=xlShiftDown
- Item: Rows(41).
- VBA construct: Worksheet.Rows property.
- Description: Returns a Range object representing row 41 of the worksheet in the opening statement of the With… End With statement (line #4 above).
- Item: Insert.
- VBA construct: Range.Insert method.
- Description:
- Inserts a new row above the row returned by item #1 above.
- The newly-inserted row isn’t blank. VBA inserts the row copied by line #5 above.
- Item: Shift:=xlShiftDown.
- VBA construct: Shift parameter of Range.Insert method.
- Description:
- Shifts rows down (xlShiftDown) to make space for the row inserted by item #2 above.
- You can usually omit this parameter. By default, VBA decides how to shift the cells based on the range’s shape. When inserting a row, this usually results in Excel shifting the cells down.
Line #8: Application.CutCopyMode = False
- Item: Application.CutCopyMode = False.
- VBA construct: Application.CutCopyMode property.
- Description: Cancels (False) the Cut or Copy mode and removes the moving border that accompanies this mode.
Effects of Executing the Macro
The following GIF illustrates the results of executing this macro. As expected, VBA (i) copies row 45, and (ii) inserts the copied row below row 40.

Example #8: Excel VBA Insert Blank Rows Between Rows in a Data Range
VBA Code to Insert Blank Rows Between Rows in a Data Range
The following macro inserts blank rows within the specified data range. This results in all rows within the data range being separated by a blank row.
Sub insertBlankRowsBetweenRows()
    'Source: powerspreadsheets.com/
    'For further information: https://powerspreadsheets.com/excel-vba-insert-row/
    Dim myFirstRow As Long
    Dim myLastRow As Long
    Dim myWorksheet As Worksheet
    Dim iCounter As Long
    myFirstRow = 5
    Set myWorksheet = Worksheets("Insert blank rows")
    myLastRow = myWorksheet.Cells.Find( _
                                        What:="*", _
                                        LookIn:=xlFormulas, _
                                        LookAt:=xlPart, _
                                        SearchOrder:=xlByRows, _
                                        SearchDirection:=xlPrevious).Row
    For iCounter = myLastRow To (myFirstRow + 1) Step -1
        myWorksheet.Rows(iCounter).Insert Shift:=xlShiftDown
    Next iCounter
End Sub

Process Followed by Macro

VBA Statement Explanation
Lines #4 through #9: Dim myFirstRow As Long | Dim myLastRow As Long | Dim myWorksheet As Worksheet | Dim iCounter As Long | myFirstRow = 5 | Set myWorksheet = Worksheets(“Insert blank rows”)
- Item: Dim myFirstRow As Long.
- VBA construct: Dim statement.
- Description:
- Declares a new variable (myFirstRow) as of the Long data type.
- myFirstRow represents the number of the first row with data in the data range you work with.
- Item: Dim myLastRow As Long.
- VBA construct: Dim statement.
- Description:
- Declares a new variable (myLastRow) as of the Long data type.
- myLastRow represents the number of the last row with data in the data range you work with.
- Item: Dim myWorksheet As Worksheet.
- VBA construct: Dim statement.
- Description:
- Declares a new object variable (myWorksheet) to reference a Worksheet object.
- myWorksheet represents the worksheet you work with.
- Item: Dim iCounter As Long.
- VBA construct: Dim statement.
- Description:
- Declares a new variable (iCounter) as of the Long data type.
- iCounter represents a loop counter.
- Item: myFirstRow = 5.
- VBA construct: Assignment statement.
- Description: Assigns the value 5 to myFirstRow.
- Item: Set myWorksheet = Worksheets(“Insert blank rows”).
- VBA constructs:
- Set statement.
- Workbooks.Worksheets property.
- Description: Assigns the Worksheet object representing the “Insert blank rows” worksheet to myWorksheet.
- VBA constructs:
Lines #10 through #15: myLastRow = myWorksheet.Cells.Find( What:=”*”, LookIn:=xlFormulas, LookAt:=xlPart, SearchOrder:=xlByRows, SearchDirection:=xlPrevious).Row
- Item: myLastRow =.
- VBA construct: Assignment statement.
- Description: Assigns the value returned by items #2 through #9 below to myLastRow.
- Item: myWorksheet.Cells.
- VBA construct: Worksheet.Cells property.
- Description: Returns a Range object representing all cells on myWorksheet.
- Item: Find.
- VBA construct: Range.Find method.
- Description:
- Finds information in the cell range returned by item #2 above and returns a Range object representing the first cell where the information is found.
- In this example, the Range object Range.Find returns represents the last cell with data in last row with data in myWorksheet.
- Item: What:=”*”.
- VBA construct: What parameter of Range.Find method.
- Description: Specifies the data Range.Find searches for. The asterisk (*) is a wildcard and, therefore, Range.Find searches for any character sequence.
- Item: LookIn:=xlFormulas.
- VBA construct: LookIn parameter of Range.Find method.
- Description: Specifies that Range.Find looks in formulas (xlFormulas).
- Item: LookAt:=xlPart.
- VBA construct: LookAt parameter of Range.Find method.
- Description: Specifies that Range.Find looks at (and matches) a part (xlPart) of the search data.
- Item: SearchOrder:=xlByRows.
- VBA construct: SearchOrder parameter of Range.Find method.
- Description: Specifies that Range.Find searches by rows (xlByRows).
- Item: SearchDirection:=xlPrevious.
- VBA construct: SearchDirection parameter of Range.Find method.
- Description: Specifies that Range.Find searches for the previous match (xlPrevious).
- Item: Row.
- VBA construct: Range.Row property.
- Description:
- Returns the row number of the Range object returned by item #3 above.
- In this example, the number returned by Range.Row corresponds to the last row with data in myWorksheet.
Lines #16 and #18: For iCounter = myLastRow To (myFirstRow + 1) Step -1 | Next iCounter
- Item: For | Next iCounter.
- VBA construct: For… Next statement.
- Description:
- Repeats the statement inside the For… Next loop (line #17 below) a specific number of times.
- In this example:
- The macro starts on the last row of the data range as specified by item #2 below.
- Every iteration, the loop counter decreases by 1, as specified by item #4 below. Therefore, the macro moves to the previous row.
- The macro exits the loop after working with the second row in the data range (myFirstRow + 1), as specified by item #3 below.
- Item: iCounter = myLastRow.
- VBA construct: Counter and Start of For… Next statement.
- Description: Specifies myLastRow as the initial value of the loop counter (iCounter).
- Item: To (myFirstRow + 1).
- VBA construct: End of For… Next statement.
- Description: Specifies the value represented by myFirstRow plus 1 (myFirstRow + 1) as the final value of the loop counter.
- Item: Step -1.
- VBA construct: Step of For… Next statement.
- Description: Specifies that the loop counter (iCounter) decreases by 1 (-1) every loop iteration.
Line #17: myWorksheet.Rows(iCounter).Insert Shift:=xlShiftDown
- Item: myWorksheet.Rows(iCounter).
- VBA construct: Worksheet.Rows property.
- Description:
- Returns a Range object representing the row (whose number is represented by iCounter) of myWorksheet.
- Worksheet.Rows returns the row through which the macro is currently looping.
- Item: Insert.
- VBA construct: Range.Insert method.
- Description:
- Inserts a new row above the row returned by item #1 above.
- The macro loops through each line in the data range (excluding the first) as specified by lines #16 and #18 above. Therefore, Range.Insert inserts a row between all rows with data.
- Item: Shift:=xlShiftDown.
- VBA construct: Shift parameter of Range.Insert method.
- Description:
- Shifts rows down (xlShiftDown) to make space for the row inserted by item #2 above.
- You can usually omit this parameter. By default, VBA decides how to shift the cells based on the range’s shape. When inserting a row, this usually results in Excel shifting the cells down.
Effects of Executing the Macro
The following GIF illustrates the results of executing this macro. As expected, VBA inserts blank rows within the specified data range. This results in all rows within the data range being separated by a blank row.

Example #9: Excel VBA Insert a Number of Rows Every Number of Rows in a Data Range
VBA Code to Insert a Number of Rows Every Number of Rows in a Data Range
The following macro inserts 2 rows every 3 rows within the specified data range.
Sub insertMRowsEveryNRows()
    'Source: powerspreadsheets.com/
    'For further information: https://powerspreadsheets.com/excel-vba-insert-row/
    Dim myFirstRow As Long
    Dim myLastRow As Long
    Dim myNRows As Long
    Dim myRowsToInsert As Long
    Dim myWorksheet As Worksheet
    Dim iCounter As Long
    myFirstRow = 5
    myNRows = 3
    myRowsToInsert = 2
    Set myWorksheet = Worksheets("Insert M rows every N rows")
    myLastRow = myWorksheet.Cells.Find( _
                                        What:="*", _
                                        LookIn:=xlFormulas, _
                                        LookAt:=xlPart, _
                                        SearchOrder:=xlByRows, _
                                        SearchDirection:=xlPrevious).Row
    For iCounter = myLastRow To (myFirstRow + myNRows) Step -1
        If (iCounter - myFirstRow) Mod myNRows = 0 Then myWorksheet.Rows(iCounter & ":" & iCounter + myRowsToInsert - 1).Insert Shift:=xlShiftDown
    Next iCounter
End Sub

Process Followed by Macro

VBA Statement Explanation
Lines #4 through 13: Dim myFirstRow As Long | Dim myLastRow As Long | Dim myNRows As Long | Dim myRowsToInsert As Long | Dim myWorksheet As Worksheet | Dim iCounter As Long | myFirstRow = 5 | myNRows = 3 | myRowsToInsert = 2 | Set myWorksheet = Worksheets(“Insert M rows every N rows”)
- Item: Dim myFirstRow As Long.
- VBA construct: Dim statement.
- Description:
- Declares a new variable (myFirstRow) as of the Long data type.
- myFirstRow represents the number of the first row with data in the data range you work with.
- Item: Dim myLastRow As Long.
- VBA construct: Dim statement.
- Description:
- Declares a new variable (myLastRow) as of the Long data type.
- myLastRow represents the number of the last row with data in the data range you work with.
- Item: Dim myNRows As Long.
- VBA construct: Dim statement.
- Description:
- Declares a new variable (myNRows) as of the Long data type.
- myNRows represents the number of rows per block. The macro doesn’t insert rows between these rows.
- Item: Dim myRowsToInsert As Long.
- VBA construct: Dim statement.
- Description:
- Declares a new variable (myRowsToInsert) as of the Long data type.
- myRowsToInsert represents the number of rows to insert.
- Item: Dim myWorksheet As Worksheet.
- VBA construct: Dim statement.
- Description:
- Declares a new object variable (myWorksheet) to reference a Worksheet object.
- myWorksheet represents the worksheet you work with.
- Item: Dim iCounter As Long.
- VBA construct: Dim statement.
- Description:
- Declares a new variable (iCounter) as of the Long data type.
- iCounter represents a loop counter.
- Item: myFirstRow = 5.
- VBA construct: Assignment statement.
- Description: Assigns the value 5 to myFirstRow.
- Item: myNRows = 3.
- VBA construct: Assignment statement.
- Description: Assigns the value 3 to myNRows.
- Item: myRowsToInsert = 2.
- VBA construct: Assignment statement.
- Description: Assigns the value 2 to myRowsToInsert.
- Item: Set myWorksheet = Worksheets(“Insert M rows every N rows”).
- VBA constructs:
- Set statement.
- Workbooks.Worksheets property.
- Description: Assigns the Worksheet object representing the “Insert M rows every N rows” worksheet to myWorksheet.
- VBA constructs:
Lines #14 through #19: myLastRow = myWorksheet.Cells.Find( What:=”*”, LookIn:=xlFormulas, LookAt:=xlPart, SearchOrder:=xlByRows, SearchDirection:=xlPrevious).Row
- Item: myLastRow =.
- VBA construct: Assignment statement.
- Description: Assigns the value returned by items #2 through #9 below to myLastRow.
- Item: myWorksheet.Cells.
- VBA construct: Worksheet.Cells property.
- Description: Returns a Range object representing all cells on myWorksheet.
- Item: Find.
- VBA construct: Range.Find method.
- Description:
- Finds information in the cell range returned by item #2 above and returns a Range object representing the first cell where the information is found.
- In this example, the Range object Range.Find returns represents the last cell with data in last row with data in myWorksheet.
- Item: What:=”*”.
- VBA construct: What parameter of Range.Find method.
- Description: Specifies the data Range.Find searches for. The asterisk (*) is a wildcard and, therefore, Range.Find searches for any character sequence.
- Item: LookIn:=xlFormulas.
- VBA construct: LookIn parameter of Range.Find method.
- Description: Specifies that Range.Find looks in formulas (xlFormulas).
- Item: LookAt:=xlPart.
- VBA construct: LookAt parameter of Range.Find method.
- Description: Specifies that Range.Find looks at (and matches) a part (xlPart) of the search data.
- Item: SearchOrder:=xlByRows.
- VBA construct: SearchOrder parameter of Range.Find method.
- Description: Specifies that Range.Find searches by rows (xlByRows).
- Item: SearchDirection:=xlPrevious.
- VBA construct: SearchDirection parameter of Range.Find method.
- Description: Specifies that Range.Find searches for the previous match (xlPrevious).
- Item: Row.
- VBA construct: Range.Row property.
- Description:
- Returns the row number of the Range object returned by item #3 above.
- In this example, the number returned by Range.Row corresponds to the last row with data in myWorksheet.
Lines #20 and #22: For iCounter = myLastRow To (myFirstRow + myNRows) Step -1 | Next iCounter
- Item: For | Next iCounter.
- VBA construct: For… Next statement.
- Description:
- Repeats the statement inside the For… Next loop (line #21 below) a specific number of times.
- In this example:
- The macro starts on the last row of the data range as specified by item #2 below.
- Every iteration, the loop counter decreases by 1, as specified by item #4 below. Therefore, the macro moves to the previous row.
- The macro exits the loop after working with the row below the first block of rows you want to keep, as specified by item #3 below. Each block of rows has a number of rows equal to myNRows.
- In this example, myNRows equals 3. Therefore, the macro exits the loop after working with the fourth row in the data range.
- Item: iCounter = myLastRow.
- VBA constructs: Counter and Start of For… Next statement.
- Description: Specifies myLastRow as the initial value of the loop counter (iCounter).
- Item: To (myFirstRow + myNRows).
- VBA construct: End of For… Next statement.
- Description: Specifies the value represented by myFirstRow plus myNRows (myFirstRow + myNRows) as the final value of the loop counter.
- Item: Step -1.
- VBA construct: Step of For… Next statement.
- Description: Specifies that the loop counter (iCounter) decreases by 1 (-1) every loop iteration.
Line #21: If (iCounter – myFirstRow) Mod myNRows = 0 Then myWorksheet.Rows(iCounter & “:” & iCounter + myRowsToInsert – 1).Insert Shift:=xlShiftDown
- Item: If | Then.
- VBA construct: If… Then… Else statement.
- Description: Conditionally executes the statement specified by items #3 and #4 below, subject to condition specified by item #2 below being met.
- Item: (iCounter – myFirstRow) Mod myNRows = 0.
- VBA constructs:
- Condition of If… Then… Else statement.
- Numeric expression with Mod operator.
- Description:
- The Mod operator (Mod) (i) divides one number (iCounter – myFirstRow) by a second number (myNRows), and (ii) returns the remainder of the division.
- The condition ((iCounter – myFirstRow) Mod myNRows = 0) is met (returns True) if the remainder returned by Mod is 0.
- The condition is met (returns True) every time the macro loops through a row above which blank rows should be added.
- iCounter represents the number of the row through which the macro is currently looping.
- (iCounter – myFirstRow) is the number of rows (in the data range) above the row through which the macro is currently looping.
- ((iCounter – myFirstRow) Mod myNRows) equals 0 when the number of rows returned by (iCounter – myFirstRow) is a multiple of myNRows. This ensures that the number of rows left above the row through which the macro is currently looping can be appropriately separated into blocks of myNRows. In this example, myNRows equals 3. Therefore, the condition is met every 3 rows.
- VBA constructs:
- Item: myWorksheet.Rows(iCounter & “:” & iCounter + myRowsToInsert – 1).
- VBA constructs:
- Statements executed if the condition specified by item #2 above is met.
- Worksheet.Rows property.
- Description:
- Returns an object representing several rows of myWorksheet. The first row is represented by iCounter. The last row is represented by (iCounter + myRowsToInsert – 1).
- The number of rows Worksheet.Rows returns equals the number of rows to insert (myRowsToInsert).
- iCounter represents the number of the row through which the macro is currently looping.
- (iCounter + myRowsToInsert – 1) returns a row located a number of rows (myRowsToInsert – 1) below the row through which the macro is currently looping. In this example, myRowsToInsert equals 2. Therefore, (iCounter + myRowsToInsert – 1) returns a row located 1 (2 – 1) rows below the row through which the macro is currently looping.
- VBA constructs:
- Item: Insert.
- VBA construct: Range.Insert method.
- Description:
- Inserts new rows above the rows returned by item #3 above.
- The number of inserted rows is equal to the value of myRowsToInsert. This is calculated as follows:
lastRow# - firstRow# + 1
(iCounter + myRowsToInsert - 1) - iCounter + 1 = myRowsToInsert
In this example, if the current value of iCounter is 8:
(8 + 2 - 1) - 8 + 1
9 - 8 + 1 = 2
- Item: Shift:=xlShiftDown.
- VBA construct: Shift parameter of Range.Insert method.
- Description:
- Shifts rows down (xlShiftDown) to make space for the rows inserted by item #4 above.
- You can usually omit this parameter. By default, VBA decides how to shift the cells based on the range’s shape. When inserting a row, this usually results in Excel shifting the cells down.
Effects of Executing the Macro
The following GIF illustrates the results of executing this macro. As expected, VBA inserts 2 rows every 3 rows within the specified data range.

VBA Add row to Table in Excel. We can add a single row or multiple rows and data to table. Default new rows added at the end of the table. In this tutorial we have explained multiple examples with explanation. We also shown example output screenshots. We have specified three examples in the following tutorial. You can change table and sheet name as per your requirement. We also specified step by step instructions how to run VBA macro code at the end of the session.
Table of Formats:
- Objective
- Syntax to Add Row to Table using VBA in Excel
- Example to Add New Row to Table on the Worksheet in Excel
- Add Multiple Rows to Table in Excel using VBA
- Add Row & Data to Table on the Worksheet in Excel
- Instructions to Run VBA Macro Code
- Other Useful Resources
Syntax to Add Row to Table using VBA in Excel
Here is the syntax to add new row to table on the worksheet using VBA in Excel.
expression.Add(Position, AlwaysInsert)
Where expression represents the ListRows.
Position is an optional parameter. It represents the relative position of the new row. Accepts the Integer value.
AlwaysInsert is an optional parameter. It represents the cells to be shifted to down or not, based on Boolean value. Accepts the Boolean value either True or False.
Note: If position is not specified, default adds new row at the end of the table.
Example to Add New Row to Table on the Worksheet
Let us see the example to add new row to table on the worksheet. The sheet name defined as ‘Table‘. And we use table name as ‘MyDynamicTable‘. You can change these two as per your requirement. We Add method of the ListObject object.
 'VBA Add New Row to Table
Sub VBAF1_Add_Row_to_Table()

    'Declare Variables
    Dim oSheetName As Worksheet
    Dim sTableName As String
    Dim loTable As ListObject

    'Define Variable
    sTableName = "MyDynamicTable"

    'Define WorkSheet object
    Set oSheetName = Sheets("Table")

    'Define Table Object
    Set loTable = oSheetName.ListObjects(sTableName)

    'Add New row to the table
    loTable.ListRows.Add

End Sub
Output: Here is the following output screenshot of above example macro VBA code.

Add Multiple Rows to Table in Excel using VBA
Here is another example to add multiple rows to table. In this example we add five(5) rows to the table. You can specify the number of rows count in the for loop.
'VBA Add Multiple Rows to Table
Sub VBAF1_Add_Multiple_Rows_to_Table()

    'Declare Variables
    Dim oSheetName As Worksheet
    Dim sTableName As String
    Dim loTable As ListObject
    Dim iCnt As Integer

    'Define Variable
    sTableName = "MyDynamicTable"

    'Define WorkSheet object
    Set oSheetName = Sheets("Table")

    'Define Table Object
    Set loTable = oSheetName.ListObjects(sTableName)

    For iCnt = 1 To 5 'You can change based on your requirement
        'Add multiple rows to the table
        loTable.ListRows.Add
    Next

End Sub
Output: Let us see the following output screenshot of above example macro VBA code.

Add Row & Data to Table on the Worksheet in Excel
Let us see how to add new row and data to the table using VBA in Excel. In the below example we add new row and data of 5 columns.
 'VBA Add Row and Data to Table
Sub VBAF1_Add_Row_And_Data_to_Table()

    'Declare Variables
    Dim oSheetName As Worksheet
    Dim sTableName As String
    Dim loTable As ListObject
    Dim lrRow As ListRow

    'Define Variable
    sTableName = "MyDynamicTable"

    'Define WorkSheet object
    Set oSheetName = Sheets("Table")

    'Define Table Object
    Set loTable = oSheetName.ListObjects(sTableName)

    'Add New row to the table
    Set lrRow = loTable.ListRows.Add

    'Add Data to recently added row
    With lrRow
        .Range(1) = 20
        .Range(2) = 30
        .Range(3) = 40
        .Range(4) = 50
        .Range(5) = 60
    End With

End Sub
Output: Here is the following output screenshot of above example VBA macro code.

Instructions to Run VBA Macro Code or Procedure:
You can refer the following link for the step by step instructions.
Instructions to run VBA Macro Code
Other Useful Resources:
Click on the following links of the useful resources. These helps to learn and gain more knowledge.
VBA Tutorial VBA Functions List VBA Arrays in Excel VBA Tables and ListObjects
VBA Editor Keyboard Shortcut Keys List VBA Interview Questions & Answers Blog
I have an excel which serves to record the food you ingest for a specific day and meal. I hav a grid in which each line represent a food you ate, how much sugar it has, etc.
Then i’ve added an save button to save all the data to a table in another sheet.
This is what i have tried
    Public Sub addDataToTable(ByVal strTableName As String, ByRef arrData As Variant)
    Dim lLastRow As Long
    Dim iHeader As Integer
    Dim iCount As Integer

    With Worksheets(4).ListObjects(strTableName)
        'find the last row of the list
        lLastRow = Worksheets(4).ListObjects(strTableName).ListRows.Count

        'shift from an extra row if list has header
        If .Sort.Header = xlYes Then
            iHeader = 1
        Else
            iHeader = 0
        End If
    End With

    'Cycle the array to add each value
    For iCount = LBound(arrData) To UBound(arrData)
        **Worksheets(4).Cells(lLastRow + 1, iCount).Value = arrData(iCount)**
    Next iCount
End Sub
but i keep getting the same error on the highlighted line:
Application-defined or object-defined error
What i am doing wrong?
Thanks in advance!
![]()
asked Sep 6, 2012 at 10:11
![]()
Miguel TeixeiraMiguel Teixeira
7731 gold badge10 silver badges29 bronze badges
You don’t say which version of Excel you are using. This is written for 2007/2010 (a different apprach is required for Excel 2003 )
You also don’t say how you are calling addDataToTable and what you are passing into arrData.
I’m guessing you are passing a 0 based array. If this is the case (and the Table starts in Column A) then iCount will count from 0 and .Cells(lLastRow + 1, iCount) will try to reference column 0 which is invalid.
You are also not taking advantage of the ListObject. Your code assumes the ListObject1 is located starting at row 1. If this is not the case your code will place the data in the wrong row.
Here’s an alternative that utilised the ListObject
Sub MyAdd(ByVal strTableName As String, ByRef arrData As Variant)
    Dim Tbl As ListObject
    Dim NewRow As ListRow

    ' Based on OP
    ' Set Tbl = Worksheets(4).ListObjects(strTableName)
    ' Or better, get list on any sheet in workbook
    Set Tbl = Range(strTableName).ListObject
    Set NewRow = Tbl.ListRows.Add(AlwaysInsert:=True)

    ' Handle Arrays and Ranges
    If TypeName(arrData) = "Range" Then
        NewRow.Range = arrData.Value
    Else
        NewRow.Range = arrData
    End If
End Sub
Can be called in a variety of ways:
Sub zx()
    ' Pass a variant array copied from a range
    MyAdd "MyTable", [G1:J1].Value
    ' Pass a range
    MyAdd "MyTable", [G1:J1]
    ' Pass an array
    MyAdd "MyTable", Array(1, 2, 3, 4)
End Sub
answered Sep 6, 2012 at 11:06
![]()
chris neilsenchris neilsen
52.2k10 gold badges84 silver badges122 bronze badges
6
Tbl.ListRows.Add doesn’t work for me and I believe lot others are facing the same problem. I use the following workaround:
    'First check if the last row is empty; if not, add a row
    If table.ListRows.count > 0 Then
        Set lastRow = table.ListRows(table.ListRows.count).Range
        For col = 1 To lastRow.Columns.count
            If Trim(CStr(lastRow.Cells(1, col).Value)) <> "" Then
                lastRow.Cells(1, col).EntireRow.Insert
                'Cut last row and paste to second last
                lastRow.Cut Destination:=table.ListRows(table.ListRows.count - 1).Range
                Exit For
            End If
        Next col
    End If

    'Populate last row with the form data
    Set lastRow = table.ListRows(table.ListRows.count).Range
    Range("E7:E10").Copy
    lastRow.PasteSpecial Transpose:=True
    Range("E7").Select
    Application.CutCopyMode = False
Hope it helps someone out there.
answered Mar 25, 2013 at 10:22
![]()
1
I had the same error message and after lots of trial and error found out that it was caused by an advanced filter which was set on the ListObject.
After clearing the advanced filter .listrows.add worked fine again.
To clear the filter I use this — no idea how one could clear the filter only for the specific listobject instead of the complete worksheet.
Worksheets("mysheet").ShowAllData
answered Dec 4, 2014 at 17:18
![]()
1
I actually just found that if you want to add multiple rows below the selection in your table
Selection.ListObject.ListRows.Add AlwaysInsert:=True works really well. I just duplicated the code five times to add five rows to my table
answered Sep 28, 2015 at 20:16
![]()
I had the same problem before and i fixed it by creating the same table in a new sheet and deleting all the name ranges associated to the table, i believe whene you’re using listobjects you’re not alowed to have name ranges contained within your table hope that helps thanks
answered Jun 25, 2017 at 20:13
![]()
0
Ran into this issue today (Excel crashes on adding rows using .ListRows.Add).
After reading this post and checking my table, I realized the calculations of the formula’s in some of the cells in the row depend on a value in other cells.
In my case of cells in a higher column AND even cells with a formula!
The solution was to fill the new added row from back to front, so calculations would not go wrong.
Excel normally can deal with formula’s in different cells, but it seems adding a row in a table kicks of a recalculation in order of the columns (A,B,C,etc..).
Hope this helps clearing issues with .ListRows.Add
![]()
answered Sep 4, 2018 at 12:35
![]()
As using ListRow.Add can be a huge bottle neck, we should only use it if it can’t be avoided.
If performance is important to you, use this function here to resize the table, which is quite faster than adding rows the recommended way.
Be aware that this will overwrite data below your table if there is any!
This function is based on the accepted answer of Chris Neilsen
Public Sub AddRowToTable(ByRef tableName As String, ByRef data As Variant)
    Dim tableLO As ListObject
    Dim tableRange As Range
    Dim newRow As Range

    Set tableLO = Range(tableName).ListObject
    tableLO.AutoFilter.ShowAllData

    If (tableLO.ListRows.Count = 0) Then
        Set newRow = tableLO.ListRows.Add(AlwaysInsert:=True).Range
    Else
        Set tableRange = tableLO.Range
        tableLO.Resize tableRange.Resize(tableRange.Rows.Count + 1, tableRange.Columns.Count)
        Set newRow = tableLO.ListRows(tableLO.ListRows.Count).Range
    End If

    If TypeName(data) = "Range" Then
        newRow = data.Value
    Else
        newRow = data
    End If
End Sub
answered Apr 25, 2017 at 23:41
![]()
Jonas_HessJonas_Hess
1,8241 gold badge20 silver badges32 bronze badges
1
Just delete the table and create a new table with a different name. Also Don’t delete entire row for that table. It seems when entire row containing table row is delete it damages the DataBodyRange is damaged
answered Jun 11, 2016 at 13:19
![]()
Bhanu SinhaBhanu Sinha
1,51612 silver badges10 bronze badges