
By designing different views in your form, you can offer users different ways to look at data, either depending on the type of form that you want to create or the type of user that you are presenting the form to. For example, with multiple views you can:
-
Simplify a long, complex form, such as a lengthy survey, by splitting it into multiple pages that users can navigate through by clicking Next and Back buttons.
-
Show different versions of a form to different people based on their role in your organization, such as having policyholder, agent, and adjuster views when processing insurance claims.
-
Create a print-friendly view of your form.
All views in the same InfoPath form share the same data. As a result, if a form has two views and one of them has an e-mail address text box, you can copy that text box to the second view. When a user types their e-mail address in one view, it will automatically appear in the other view.
In this article
-
Introduction to views
-
The user experience
-
Design considerations
-
The Views group on the Page Design tab
-
-
Add a view
-
Delete a view
-
Change the default view
-
Rename a view
-
Add a button for switching views
-
Display a view using a form load rule
Introduction to views
The user experience
By default, users of your form can switch views by selecting the desired view from the Views/Page Views group on the ribbon. Each view will be listed by its name and the active view will be highlighted. All views will be listed, except those views that have had the Show on the View menu when filling out this form check box unchecked on the View Properties dialog box.
If none of the views have the Show on the View menu when filling out this form check box selected, the Page Views group on the Home tab will not appear. This is useful in scenarios where you don’t want users to be able to access views other than the one that you intend for them to fill out. For example, a form that is used to collect feedback about job applicants might have three distinct user roles associated with it — one for recruiters, one for interviewers, and one for hiring managers. For each user role, you can design a slightly different view of the form.
Note: The ability to hide views from users is not a security feature. Users can still see the data if they know how to access the XML data itself.
To help prevent interviewers from switching to the recruiter or hiring manager views, when you design the recruiter and hiring manager views, you can open the View Properties dialog box and clear the Show on the View menu when filling out this form check box.
Note: In form options, the ability to switch views can be disabled for users who fill out the form in a Web browser. Click the File tab, click Info, click Form Options, and then in the Web Browsers section, clear the Views check box.
To customize the view switching experience, add view switch buttons to the form as explained later in this article.
Design considerations
As you design a new view, you will typically need to perform the following tasks:
-
Plan the view.
Plan each of the views and how they will work together while paying attention to considerations like:
-
Which one of the views should appear when the form is first opened?
-
Do users need to use multiple views? How will they move between them?
-
Do any of the views need to be read-only?
-
Are users likely to print any views from the InfoPath form?
-
Populate the view.
When you add a new view to a form, it will start with a page layout template. From here, you can add layout tables from the Insert tab on the ribbon to structure your form and add controls from the Home tab in the Controls group.
You can also add controls to the new view that share the same field as controls that are used on other views by dragging the appropriate field from the Fields task pane.
-
Customize the navigation experience.
How will users be able to navigate through the form? Will the user know what the default commands for switching views mean? Are the default commands adequate, or do you want users to be able to switch between views by clicking a button that appears directly on the form? If the user will click a button, will you use a tabbed user interface or back and next buttons? For print views, do you want users to print all of the views at once, or only the active view?
The Views group on the Page Design tab
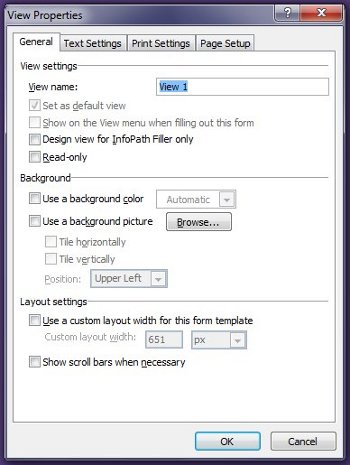
On the Page Design tab of the ribbon, in the Views group, you can add or delete views, or switch between different views. To customize the settings and behavior of a selected view, click the Properties buttonto open the View Properties dialog box.
You can also create and associate a print view with an existing view by first creating the print view to appear when you want the form view printed, then assigning it to an existing view via the View Properties dialog box. You can also specify custom printing options for the print view on the Print Settings and Page Setup tabs of the View Properties dialog box, such as headers, footers, and page margins.
Top of Page
Add a view
Use the following procedure to add additional views to a form.
-
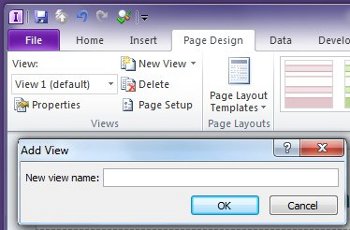
Click the Page Design tab then, from the Views group, click New View.
-
Type a name for the view, and then click OK.
-
To open the View Properties dialog box, click the Page Design tab then, from the Views group, click Properties.
-
In the View Properties dialog box, change or specify the desired settings or options for the view, and then click OK.
-
In the workspace, design the view by adding layout tables and controls to it.
If you want to base the design of a new view on an existing view, open the existing view, press CTRL+A to select everything in the view and press CTRL+C to copy the selection to the Clipboard. Select the new view from the View list in the Views group on the Page Design tab, delete the pre-populated content in the view then press CTRL+V to paste the selection into the new view.
Top of Page
Delete a view
You cannot recover or restore a view after you delete it. If you delete the default view in a form that has only one view, InfoPath creates a new default view automatically. If you delete the default view in a form that has multiple views, InfoPath will assign default view status to the next view in the list of views shown on the Page Design tab, in the Views group, on the View list.
-
Select the view that you want to delete on the Page Design tab, in the Views group, from the View list.
-
On the Page Design tab, in the Views group, click Delete.
-
When prompted to delete the view, click Yes.
Top of Page
Change the default view
Each form has a default view. Users see this view when they open a form that is based on your form. If you create custom views for a form, you can choose which of the available views will be the default view for your users.
-
Select the view that you want to make the default view on the Page Design tab, in the Views group, from the View list.
-
On the Page Design tab, in the Views group, click Properties.
-
Select the Set as default view check box, and then click OK.
If a form has only one view then it is automatically designated as the default view.
Top of Page
Rename a view
-
Select the view that you want to rename on the Page Design tab, in the Views group, from the View list.
-
On the Page Design tab, in the Views group, click Properties.
-
On the View Properties dialog box, type the new name for the tab in the View name text box then click OK.
Note: If you rename a view that is associated with custom code, the code may not work as expected. To fix this problem, you must find all references to the old name of the view in the code and update them with the new name of the view.
Top of Page
Add a button for switching views
Views are often designed to work with rules. Rules enable you to automate certain tasks in response to events or actions initiated by the person filling out the form. For example, you can insert a button on your form and create a rule that switches views when the button is clicked and, after you insert the button on your form, you can associate the rule with the button so that it switches views when a user clicks it.
More specifically, in an insurance claim form, you might create a Show Summary button that opens a high-level view of the claim data when clicked. In the summary view, users could then click a Show Details button to return to the more detailed view. Likewise, if you have a very long form, you could break it into multiple views and add next and back buttons or tabbed navigation to allow users to navigate through the form.
-
Insert a button in each view.
To complete the following procedure, you must have a form with two existing views.
-
Select the view that you want to add a button to on the Page Design tab, in the Views group, from the View list.
-
Place the cursor on the form where you want to insert the button.
-
On the Home tab, in the Controls group, select Button.
-
Under Control Tools, click the Properties tab in the ribbon.
-
In the Label box, type a name for the button, and then click OK.
-
Create a rule that switches views.
-
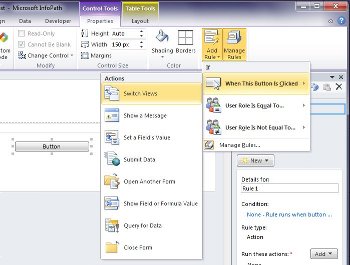
Select the button.
-
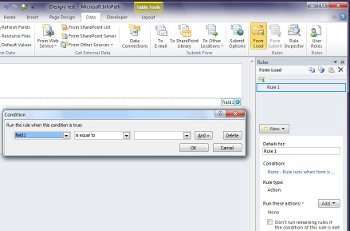
Under Control Tools, on the Properties tab, in the Rules group, click Add Rule.

-
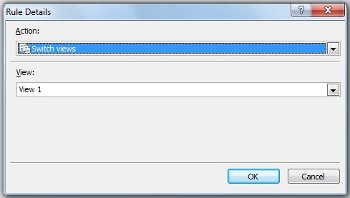
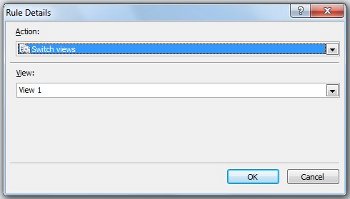
Select When this button is clicked then select Switch Views from the Actions list.
-
In the View text box, select the view to display when the button is clicked, and then click OK.
-
-
Repeat steps 1 and 2 to create additional buttons and corresponding rules for each view.
-
After you have added buttons to your views and created the necessary rules, it is recommended that you test the form to ensure that it works as expected.
-
On the Home tab, in the Form group, click Preview.
-
Click the buttons to make sure that you are able to switch between views as desired.
The view that you were working in most recently is the view that will appear in the preview window, unless a rule has been created to switch the view based on the user’s role at form load.
Note: In read-only views, buttons are not available. For navigation in read-only views, such as the display view in a SharePoint list form, use a picture button and clear the Hide picture button in read-only views check box from the control properties dialog in the Properties tab of the ribbon.
Top of Page
Display a view using a form load rule
When a user opens a form, the view can be specific to that user or other criteria. For example, if you are designing a form that includes user roles and contains multiple views, it can be useful to display a view that is based on the user role that is assigned to a user. Specifically, you can use a rule to display a view when a user who is assigned to a particular user role opens a form that is based on your form.
User roles can only be used in forms designed for the InfoPath filler. To switch views based on a group membership for web enabled forms, consider creating a Form Load rule that uses the getUserMemberships method of the User Profile Web Service to determine user memberships.
This procedure assumes that you have a user role defined in your form. If you do not have at least one user role in your form, add a user role from the Data tab before you begin this procedure.
-
On the Data tab, in the Rules group, click Form Load.
-
Click New, click Action, and then in the Details for text box enter a name for the rule.
-
To have the form load a view based on a user role, click the link under the Condition section. On the first list, click User’s current role, and then select the user’s role.
You can select other options depending on the conditions that you want to affect the way the form loads.
-
Click OK.
-
Click the Add button then select Switch views.
-
In the Views list, click the view that you want, and then click OK.
Top of Page
Windows 10: How to add page to Word fillable form
Discus and support How to add page to Word fillable form in Windows 10 Network and Sharing to solve the problem; I want to add a page to a Word fillable form. Who knows how can I do this?…
Discussion in ‘Windows 10 Network and Sharing’ started by ManaDaisuke, Jan 21, 2020.
-
How to add page to Word fillable form
I want to add a page to a Word fillable form. Who knows how can I do this?
-
Brand new computer with Windows 10 OS, will not fill in a fillable PDF form
Hello Beth,
We realize the inconvenience you are experiencing with not able to fill in fillable forms. We will certainly help you
- On which browser are you face this problem?
- Did you cross checked with some other browsers?
- Where and what challenges you are facing with drag and drop?
Let me confirm that all forms are not fillable. Sometimes form creators don’t enable the PDFs to interactive
fillable forms based on the requirement. Or, they intentionally design a form that you can fill in only by hand or with the
Fill & Sign tool. Non-interactive forms are called flat forms.Do refer the
link for more help on Filling in PDF forms.Further you can also try uninstall and downloading Acrobat reader again and check if it helps.
Keep us posted for any concerns with windows, we’re glad to assist you.
Thank you.
-
Fillable forms online
Ever since upgrading to Windows 10 I am unable to fill in forms on various sites that are fillable online. I have Adobe Acrobat and Reader. Can you help? Thanks!
-
How to add page to Word fillable form
IRS Fillable Forms Not WOrking in IE11 or EDGE
Once again it is time to file some IRS forms and once again Windows 10 is showing that it does not work well/easily. When I try to open from IE 11 an IRS fillable form, such as Form 941, the form opens in EDGE. Once it is open in EDGE, the form is not
fillable. I have tried to get the form to open in IE 11 (which was the suggestion elsewhere), but it stubbornly defers to EDGE.I can go to Chrome on my WIN 10 machine and open the fillable form without problems there. I can also go to my WIN 8.1 machine and open the form in IE 11 with no problem (which is how I finally completed the forms).
Surely EDGE is capable of such a simple and frequently used functionality. What am I missing?
This is one of the reasons I retain WIN 7 and WIN 8.1 machines, and have not yet upgraded them. Many features in WIN 10 are nice, but it remains problem plagued from my perspective. MS VPN does not work correctly. Many enterprise solutions are not
EDGE compatible. MS wants everything to be in the cloud (which is nice when it works), but there are frequent problems with maintaining One Drive for Business connectivity — why I have no idea. Outlook has suffered frequent issues. EDGE does not cooperate
with Norton Internet Security. The Windows APPS can suddenly stop working… When will WIN 10 be a mature enough product to reliably use?

How to add page to Word fillable form
-
How to add page to Word fillable form — Similar Threads — add page Word
-
If I paste a form into Word, how can I fill in the blanks to complete the form for printing?
in Windows 10 Gaming
If I paste a form into Word, how can I fill in the blanks to complete the form for printing?: I have scanned a pre-printed Form that has blank spaces to be filled in to my computer. The scanned image came up as a PDF file in my Pictures/My Scans folder which I opened & clicked on the Form file & then selected «cut» from the options. I opened my Word program& selected… -
If I paste a form into Word, how can I fill in the blanks to complete the form for printing?
in Windows 10 Software and Apps
If I paste a form into Word, how can I fill in the blanks to complete the form for printing?: I have scanned a pre-printed Form that has blank spaces to be filled in to my computer. The scanned image came up as a PDF file in my Pictures/My Scans folder which I opened & clicked on the Form file & then selected «cut» from the options. I opened my Word program& selected… -
It is impossible to add forms to existing projects
in Windows 10 Gaming
It is impossible to add forms to existing projects: Hi!Is it a bug or a feature? I suppose it a bug.It is impossible to add forms to existing projects. You can only add forms derived by existing forms to existing projects no other options are given.*** moved to english Community ***… -
It is impossible to add forms to existing projects
in Windows 10 Software and Apps
It is impossible to add forms to existing projects: Hi!Is it a bug or a feature? I suppose it a bug.It is impossible to add forms to existing projects. You can only add forms derived by existing forms to existing projects no other options are given.*** moved to english Community ***… -
Windows 10 File Explorer: Edge PDF Viewer popup when previewing PDF with fillable forms
in Windows 10 Gaming
Windows 10 File Explorer: Edge PDF Viewer popup when previewing PDF with fillable forms: We have a user that has started to get this popup when previewing PDF’s with fillable forms, clicking OK makes it go away and allows document to preview. We have Adobe Reader latest version installed and set as default PDF viewer. User wants to know if this window can be… -
Excel and Word page size
in Windows 10 Software and Apps
Excel and Word page size: I cannot select an Excel or Word document page size = Legal 8.5X14. The Legal Size option has disappeared. How do I get it back?https://answers.microsoft.com/en-us/windows/forum/all/excel-and-word-page-size/a4a625c3-67a2-4e3a-bdf1-ce8de0243a47
-
Excel and Word page size
in Windows 10 Customization
Excel and Word page size: I cannot select an Excel or Word document page size = Legal 8.5X14. The Legal Size option has disappeared. How do I get it back?https://answers.microsoft.com/en-us/windows/forum/all/excel-and-word-page-size/a4a625c3-67a2-4e3a-bdf1-ce8de0243a47
-
A form sent by email, how to make it fillable on the computer ?
in AntiVirus, Firewalls and System Security
A form sent by email, how to make it fillable on the computer ?: A form sent by email, how to make it fillable on the computer ?https://answers.microsoft.com/en-us/windows/forum/all/a-form-sent-by-email-how-to-make-it-fillable-on/346d419b-0e3b-4944-b0be-d435afff7a20
-
Word form autofill help
in Microsoft Office and 365
Word form autofill help: Hello!
ive made an app for use in my job. The output sends an email with information, but the information is just picked up from the Database within the app so it is not «presentable» ill give an example of the output here:Name: Testing Tester
Snow 1-4 cm:
Snow above 4 cm…
By Amy Dombrower
Updated September 28, 2017
i livre blanc ouvert pages a4 image by Melisback from Fotolia.com
The widely-used word processing program Microsoft Word allows you to create endless text documents. As you type and fill up pages, Word automatically adds a new blank page as you go along. However, you also can add pages manually by inserting a blank page at a particular place in a document.
Word 2007 or 2010
Open a document in Microsoft Word 2007 or Microsoft Word 2010.
Place your cursor where you want to add a new blank page.
Click the “Insert” tab. In the “Pages” group, click “Blank Page.”
Scroll down and begin typing on the new page to add content. Repeat the above steps to add more pages to the document.
Click the “Microsoft Office Button” or the “File” tab, then “Save” to save the changes to the document.
Word 2003
Open a document in Microsoft Word 2003.
Place your cursor where you want to insert a new page.
Click the “Insert” menu. Select “Break.” Choose “Page Break” to insert a new page.
Place your cursor on the new blank page and begin adding content. Repeat the above steps to add more pages.
Click “File,” then “Save” to save the changes.
- You can add a blank page into a Word document by clicking the Blank Page option in the Insert menu.
- Using this option will keep your Word document’s formatting intact.
- You can also insert a new page break in a Microsoft Word document to add space between sections.
Microsoft Word allows you to insert blank pages between existing pages with just a few clicks.
It’s a helpful feature when you’re working on long documents or presentations, because it seamlessly inserts a blank page without disrupting the format of the existing content.
Page breaks are another option for adding space between sections. This formatting tool moves the content after a page break to the beginning of the next page.
If you want to add or insert a new blank page into your existing Word document, here are two ways to do it.
Abigail Abesamis Demarest is a contributing writer for Insider based in New York. She loves a good glazed donut and nerdy deep dives into the science of food and how it’s made.
Read more
Read less