
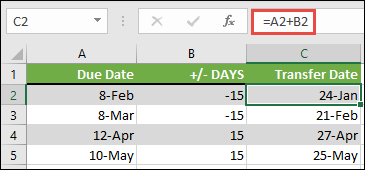
Add or subtract days from a date
Suppose that a bill of yours is due on the second Friday of each month. You want to transfer funds to your checking account so that those funds arrive 15 calendar days before that date, so you’ll subtract 15 days from the due date. In the following example, you’ll see how to add and subtract dates by entering positive or negative numbers.
-
Enter your due dates in column A.
-
Enter the number of days to add or subtract in column B. You can enter a negative number to subtract days from your start date, and a positive number to add to your date.
-
In cell C2, enter =A2+B2, and copy down as needed.
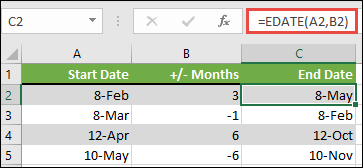
Add or subtract months from a date with the EDATE function
You can use the EDATE function to quickly add or subtract months from a date.
The EDATE function requires two arguments: the start date and the number of months that you want to add or subtract. To subtract months, enter a negative number as the second argument. For example, =EDATE(«9/15/19»,-5) returns 4/15/19.
-
For this example, you can enter your starting dates in column A.
-
Enter the number of months to add or subtract in column B. To indicate if a month should be subtracted, you can enter a minus sign (-) before the number (e.g. -1).
-
Enter =EDATE(A2,B2) in cell C2, and copy down as needed.
Notes:
-
Depending on the format of the cells that contain the formulas that you entered, Excel might display the results as serial numbers. For example, 8-Feb-2019 might be displayed as 43504.
-
Excel stores dates as sequential serial numbers so that they can be used in calculations. By default, January 1, 1900 is serial number 1, and January 1, 2010 is serial number 40179 because it is 40,178 days after January 1, 1900.
-
If your results appear as serial numbers, select the cells in question and continue with the following steps:
-
Press Ctrl+1 to launch the Format Cells dialog, and click the Number tab.
-
Under Category, click Date, select the date format you want, and then click OK. The value in each of the cells should appear as a date instead of a serial number.
-
-
Add or subtract years from a date
In this example, we’re adding and subtracting years from a starting date with the following formula:
=DATE(YEAR(A2)+B2,MONTH(A2),DAY(A2))
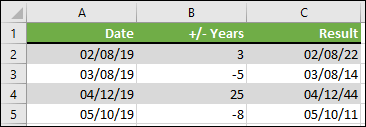
How the formula works:
-
The YEAR function looks at the date in cell A2, and returns 2019. It then adds 3 years from cell B2, resulting in 2022.
-
The MONTH and DAY functions only return the original values from cell A2, but the DATE function requires them.
-
Finally, the DATE function then combines these three values into a date that’s 3 years in the future — 02/08/22.
Add or subtract a combination of days, months, and years to/from a date
In this example, we’re adding and subtracting years, months and days from a starting date with the following formula:
=DATE(YEAR(A2)+B2,MONTH(A2)+C2,DAY(A2)+D2)
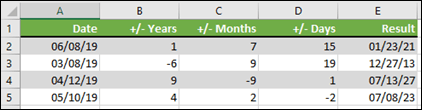
How the formula works:
-
The YEAR function looks at the date in cell A2, and returns 2019. It then adds 1 year from cell B2, resulting in 2020.
-
The MONTH function returns 6, then adds 7 to it from cell C2. This gets interesting, because 6 + 7 = 13, which is 1-year and 1-month. In this case, the formula will recognize that and automatically add another year to the result, bumping it from 2020 to 2021.
-
The DAY function returns 8, and adds 15 to it. This will work similarly to the MONTH portion of the formula if you go over the number of days in a given month.
-
The DATE function then combines these three values into a date that is 1 year, 7 months, and 15 days in the future — 01/23/21.
Here are some ways you could use a formula or worksheet functions that work with dates to do things like, finding the impact to a project’s schedule if you add two weeks, or time needed to complete a task.
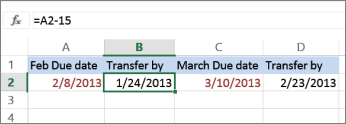
Let’s say your account has a 30-day billing cycle, and you want to have the funds in your account 15 days before the March 2013 billing date. Here’s how you would do that, using a formula or function to work with dates.
-
In cell A1, type 2/8/13.
-
In cell B1, type =A1-15.
-
In cell C1, type =A1+30.
-
In cell D1, type =C1-15.

Add months to a date
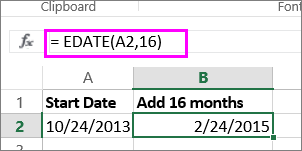
We’ll use the EDATE function and you’ll need the start date and the number of months you want to add. Here’s how to add 16 months to 10/24/13:
-
In cell A1, type 10/24/13.
-
In cell B1, type =EDATE(A1,16).
-
To format your results as dates, select cell B1. Click the arrow next to Number Format, > Short Date.
Subtract months from a date
We’ll use the same EDATE function to subtract months from a date.
Type a date in Cell A1 and in cell B1, type the formula =EDATE(4/15/2013,-5).
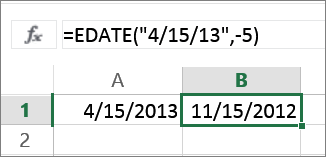
Here, we’re specifying the value of the start date entering a date enclosed in quotation marks.
You can also just refer to a cell that contains a date value or by using the formula =EDATE(A1,-5)for the same result.
More examples
To add years to or subtract years from a date
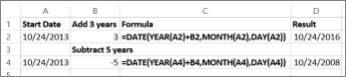
|
Start Date |
Years added or subtracted |
Formula |
Result |
|---|---|---|---|
|
10/24/2013 |
3 (add 3 years) |
=DATE(YEAR(A2)+B2,MONTH(A2),DAY(A2)) |
10/24/2016 |
|
10/24/2013 |
-5 (subtract 5 years) |
=DATE(YEAR(A4)+B4,MONTH(A4),DAY(A4)) |
10/24/2008 |
Home / Excel Formulas / Add Month to a Date (Excel Formula)
Just like years, you can add months in a date to get a future date and subtract to get a date from the past. In this tutorial, we will look at all the methods with multiple examples to do that.
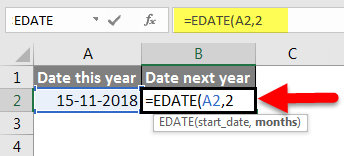
In the first example, we will write a formula to get the date from the next month and we will use the EDATE formula. As you can see in the following example, we have a date in cell A1, for which we need to get the exact date for the next month.

Follow the below steps:
- First, enter “=EDATE(” in cell B1.
- After that, refer to cell A1, where you have the date.
- Now, in the second argument, enter 1.
- In the end, type a closing parenthesis and hit enter.
Here you have the date 10-Feb-2022 in cell B1 which is exactly 1 month ahead (next month) from the date we have specified in the formula.

=EDATE(A1,1)Add 6 Months to a Date
In the same way, you can add 6 months to a date and get a date that is 6 months ahead of the current date. In the following example, we have the same date in cell A1 that we had earlier.

Now to add 6 months to this you just need to use the following formula.

=EDATE(A1,6)Add 3 Months to a Date
And in the same way, you want to add three days.

=EDATE(A1,3)Subtract Months from a Date
Now let’s say you want to subtract months from a date. In this case, you just need to use a negative number in the second argument (month).

In the following example, we have used -6 in the month argument, and we have the date 10-Jul-21 which is exactly 6 months back from 10-Jan-22.
=EDATE(A1,-6)
In this tutorial, you will learn how to add months to a date in Excel. We show you how to do this with the EDATE function and the MONTH and DATE functions. You will also learn how to create a series with a starting date with the Fill Series feature. But why would you need to do any of this?
If you are calculating product expiry dates or delivery dates, you will need to add months to starting dates. This will be covered in the sections with using functions to add months, years, or days. We will also go over how to deduct months to return an earlier date. The Fill Series feature will cover how to list a series of dates e.g. for an event that takes place monthly on the same day.
Let’s get adding!
 1")
Using EDATE Function To Add Months to a Date
The EDATE function can be used to add months to a date in Excel. The EDATE function adds or deducts given months from a date and returns the relevant serial number. Using the formula below, we will add and deduct months mentioned in a separate column with the EDATE function:
=EDATE(B3,C3)
Column B contains the manufacturing dates of products and column C has their shelf life mentioned in months. Our objective is to arrive at the expiry dates by adding the shelf life to the manufacturing dates. The EDATE function takes the date from cell B3 and adds the number of months in C3 to arrive at the expiry date. The date will however return as a serial number. Format the target cells to a date format to convert the serial numbers to dates.
 2")
The same formula applies for deducting months from dates. E.g. To arrive at an advance booking date for offering discounts, we would have to deduct the number of months from the regular booking date. For that, the months will be entered as negative values and the same formula will be applied to arrive at an earlier date:
 3")
The second argument can take a numeric value instead of a cell reference. But that would be more convenient if all the dates need the same number of months added.
Adding Years to a Date
The second argument of the EDATE function can be adjusted to add years to the dates. This is the formula we are using to add years to dates with the EDATE function:
=EDATE(B3,C3*12)
The values in column C represent the shelf life of products in years. The second argument of the EDATE function will take them as months, therefore the second argument is multiplied by 12. In this way, the years are added to the dates using the EDATE function:
 4")
Using MONTH & DATE Functions
Another way of adding months to dates involves the MONTH function. The MONTH function itself returns the number of the month from a date. Using the DATE, YEAR, and DAY functions with the MONTH function we can add months to a date. To add months to a date, we will use the following formula:
=DATE(YEAR(B3),MONTH(B3)+C3,DAY(B3))
The DATE function takes a year, month, and day argument to return a date in a serial number (dates are stored as serial numbers in Excel). The YEAR, MONTH, and DAY functions are used to pick the year, month, and day from the date in B3. But with the MONTH function, we have added the value in C3 i.e. 1 in this case. This will add 1 month to the date in B3 and return the date with 1 month added:
 5")
The formula is also applicable for deducting months from dates.
For adding years or days to dates, the given numbers can be added to the YEAR or DAY functions within the DATE function, in the same way they were added to the MONTH function.
E.g. To add 1 day to the date July 1, 2025, the formula will be edited to:
=DATE(YEAR(B3),MONTH(B3),DAY(B3)+C3)
This formula will return July 2, 2025
To add 1 year to the date July 1, 2025, the formula will be edited to:
=DATE(YEAR(B3)+C3,MONTH(B3),DAY(B3))
This formula will return July 1, 2026
Using Fill Series Feature
The Fill Series feature adds a consistent number of months, days, or years to a date. These are the steps for using Fill Series to add a set number of days, months, or years to a date:
- Select the date and the target cells where you want the dates to be filled.
 6")
- In the Home tab, from the Editing section, select the Fill icon and then select Series from the menu.
 7")
- In the Series dialog box make the following selections:
- the Columns radio button from the Series in section,
- the Date radio button in the Type section,
- the Day radio button in the Date unit
- In the Step value field, enter the increment value for the number of days.
- For adding 7 days to the dates, we are entering the number 7 in the provided field.
 8")
- When done, click on the OK
- The series will be created with the incremental value and filled in the selected cells:
 9")
- Follow the same steps to create a series with incremental months, selecting the Month radio button in the Date unit
- Enter the incremental value in the Step value field e.g. we are entering the number 2 for creating a series with 2 months.
 10")
- The series with 2 incremental months will be created in the selected cells:
 11")
- Similarly, create a series with 1 added year by selecting the Year radio button and adding 1 as the Step value:
 12")
This fills the selected cells with a series of dates with 1 added year:
 13")
Now we add a wind-up. Today you learned how to add months to a date in Excel with various functions and the Fill Series. The methods in this guide allow you to add varying months, years, or days to each date or create a series with incremental values. We won’t be adding months to your wait for the next Excel trick, so stay tuned!
Sometimes, when working with dates, you may want to know the date after a specific number of months.
For example, you may want to know the date three months after a specific date.
Thankfully, Excel has an in-built function (EDATE) that does exactly this.
In this tutorial, I will show you how to use a simple formula to add or subtract months to a date in Excel.
Add Months to a Date
Suppose you have a dataset as shown below and you want to add the given number of months in column B to the dates in column A.

This can be done using the EDATE function.
Below is the syntax of the EDATE function:
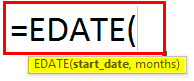
=EDATE(start_date, months)
- start_date – the date for which you want to get a certain number of months before or after it
- months – the number of months before or after the start date. In case that you want to subtract months, you need to enter a negative number, since the function is by default adding months to a date.
In our example, we want to add 5 months (cell B2) to May 31, 2021 (A2) and get the result in cell C2.
The formula in C2 looks like:
=EDATE(A2, B2)
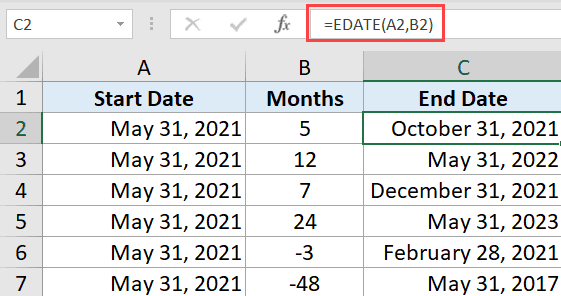
The result is October 31, 2021, as this is a date 5 months after May 31, 2021.
Note that you can use the same formula to add months as well as subtract months from any given date.
In our example, we have a couple of month values that are negative. When used in the formula, these will give you the date which is the specific number of months ago in the past.
Also, the formula will only consider the integer part of the second argument. So if enter 1.5 as the months to be added to the date, you will still get the date after one month (anything after the decimal is ignored).
Note: The prerequisite of the function is that columns containing a start date (column B) and a result date (D) are formatted as dates.
Also read: How to Add Week to Date in Excel?
Add Years to a Date
Apart from adding months to a date, you can also use the EDATE function to add years.
Suppose you have a dataset as shown below where you want to add the number of years in column B to the dates in column A

Below is the formula that will do this:
=EDATE(A2, B2*12)

The result in C2 is May 31, 2022, which is 1 year after May 31, 2021. As you can see, the parameter months is 12 (1 year * 12 months).
Also, since we are multiplying the month’s value with 12, you can also use decimal numbers as years and it should still work in most cases. For example, if you want to know the date after 1.5 years, you can do that (as 1.5*12 is 18, which is an integer).
This way, we can use the EDATE formula to also make the function to add/subtract years from a date.
So this is a simple formula method you can use to add months or years to a date in Excel.
I hope you found this tutorial useful!
Other Excel tutorials you may also like:
- Combine Date and Time in Excel (Easy Formula)
- How to Get Month Name from Date in Excel
- How to Add or Subtract Days to a Date in Excel (Shortcut + Formula)
- How to Convert Serial Numbers to Dates in Excel
- Calculate Quarter from Date in Excel
- Calculate the Number of Months Between Two Dates in Excel
- How to Calculate Years of Service in Excel (Easy Formulas)
- How to Compare Dates in Excel (Greater/Less Than, Mismatches)
Excel Add Months to Dates (Table of Contents)
- Add Months to Dates in Excel
- How to use the EDATE Function to Add Months to Dates in Excel?
Add Months to Dates in Excel
Adding months to date in Excel becomes very easy when we use the “EDATE” function. It is a built-in function that can be used to add months to any date.
What is the EDATE function in Excel?
EDATE is a built-in function in Excel. It falls under the Date and Time functions category in Excel. So, it is used to get the same date of the month ‘Y’ months in the future or in the past. So basically, it returns the serial number of the date, which is the specified number of months prior to or subsequent to the mentioned start date. EDATE Function becomes highly useful while calculating the expiration dates of products, maturity dates of policies, or other types of due dates. To get a date from the future, just provide a positive month value and in order to get a date from the past, just provide a negative month value.
Syntax of EDATE Function in Excel
The Syntax of EDATE is shown below:

There are two arguments for the EDATE function in Excel. Both arguments are mandatory.
- start_date: This has to be a valid date that represents the start date. It has to be in a valid Excel serial number format.
- Months: This is the argument that denotes the number of months, either in the past or in the future from the start_date, based on whether it has a positive or negative value.
How to Use the EDATE Function to Add Months to Dates in Excel?
EDATE Function in Excel is a typical worksheet function; like all Worksheet functions, EDATE too can be entered in a cell of a worksheet as a part of the formula. Let us understand how to add months to dates in Excel through some examples.
You can download this Add month to Date Excel Template here – Add month to Date Excel Template
Each example will try to explore a different use case which is implemented using the EDATE function.
Add Months to Dates in Excel – Example #1
Get the same date of two months in the future
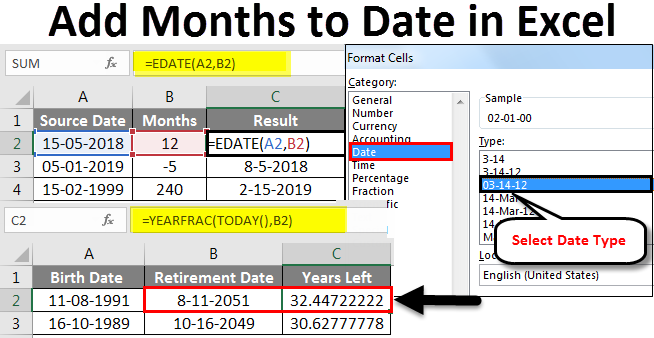
The above example shows that EDATE(A2,2) gives us a value of two months into the future with respect to the start date provided in cell A2. Cell A2 has a date – 15th November 2018.
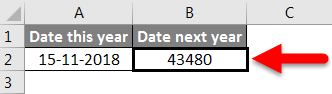
Two months into the future would bring us to 15th January 2019. But as of now, we have a serial number which is not easily understandable. Hence, we will now attempt to change the format of this date value.
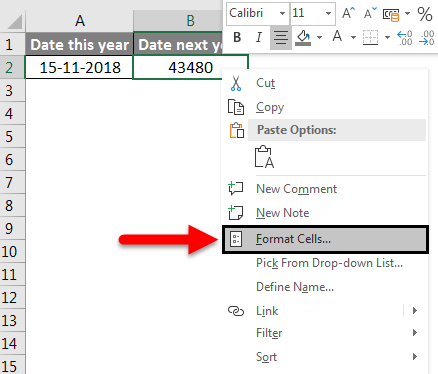
To do that, first, we will select this cell B2 and then right-click. In the menu that opens up, we will select the Format Cell option.
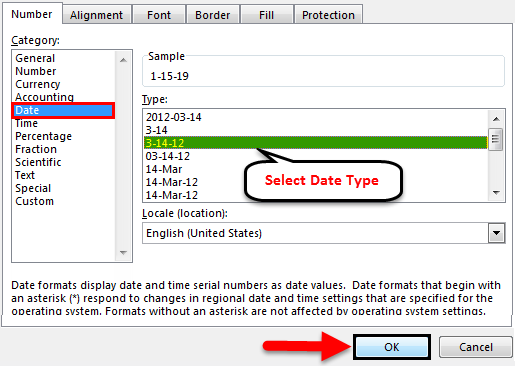
Next, we will click on Date in the category section and then select the desired Date Type and click OK to apply the changes.
Now our changes should be reflected, and we get the EDATE result in the format shown below.

This is exactly what we had calculated theoretically. We have the 15th of January 2019, which is 2 months after the start date provided.
Add Months to Dates in Excel – Example #2
Adding Months to given Date
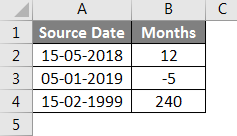
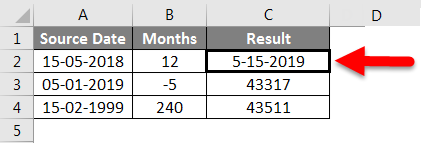
In the above example, we have the source dates defined in Column A (from A2 to A4). The source date is in MM/DD/YYYY format, which is a valid Excel date.

We have the “months” that are to be added or subtracted to go to the past or future, defined in Column B (from B2 to B4).
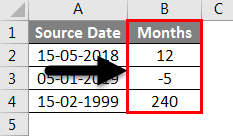
Now we have our results in Column C (from cells C2 to C4). We are using the EDATE function to calculate the results.
The formula used for each case is shown below:
- C2: =EDATE(A2,B2)
- C3: =EDATE(A3,B3)
- C4: =EDATE(A4,B4)
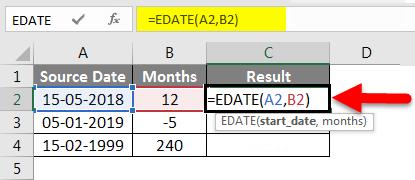
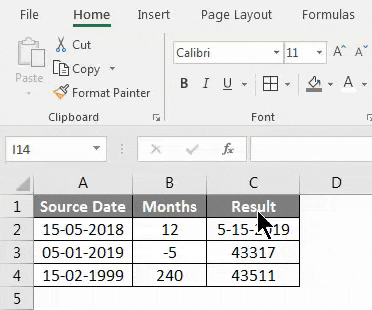
But as of now, we have a serial number which is not easily understandable.
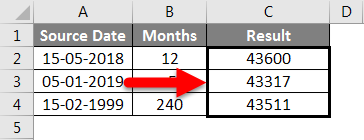
Hence, we will now attempt to change the format of this date value.
To do that, first, we will select this cell C2 and then right-click. In the menu that opens up, we will select the Format Cell option.
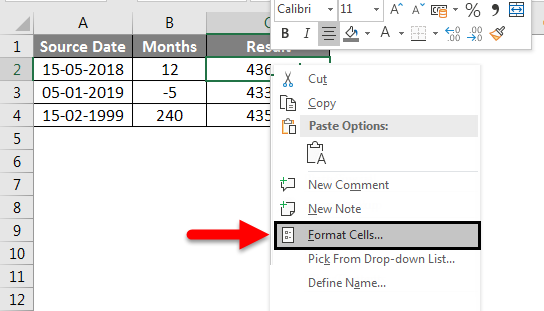
Next, we will click on Date in the category section and then select the desired Date type and click OK to apply the changes.
Now our changes should be reflected, and we get the EDATE result in the format shown below.
Now we will drag this format to the remaining Result cells (C3, C4) by clicking on Format Painter while we have selected cell C2 and then pasting the format to cells C3 and C4.
So, we see that our results are in line with our expectations. Cell C2 evaluated to 5-15-2019, which is 12 months after the source date 5-15-2018. Similarly, cell C3 evaluated to 8-5-2018, which is 5 months before the source date 1-5-2019. Cell C4 evaluated to 2-15-2019, which is 240 months or 20 years after the source date 2-15-1999.
Add Months to Dates in Excel – Example #3
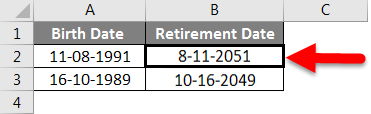
Figure out Retirement date from Birthdate
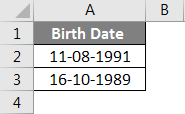
In the example shown above, we have a Birth date, defined in Column A (from A2 to A3). The Birthdate is in MM/DD/YYYY format, which is a valid Excel date. To calculate the retirement date, we use the EDATE function as shown below.
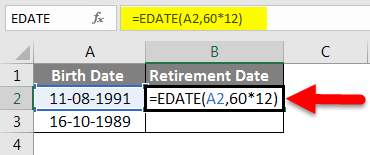
Here we have taken 60 as the retirement age in years, and we multiply it by 12 to get the number of months to be added. Now in the first case, 60*12 gives us 720 months, which is to be added to the birth date, i.e. 8/11/1991. This gives us 8/11/2051.
To calculate the years left until retirement, we use the YEARFRAC function
YEARFRAC returns the year fraction representing the number of full days between the end date and the start date. YEARFRAC accepts two arguments – a start date and an end date.
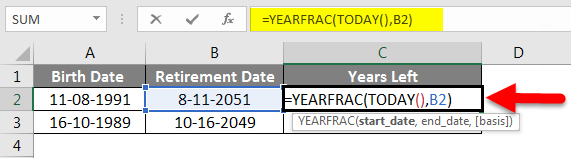
In this case, the start date is today’s date, and our end date is the date of retirement in Column B (cells B2,B3). The Excel function TODAY() returns today’s date in date format. Hence we use TODAY() as the start date and the end date as the retirement date.
After that, YEARFRAC gives us the difference in fractions, which in the first case is: 2/15/2019 (minus) 8/11/2051, i.e. 32 years and 5 months and 27 days or 32.455 years.
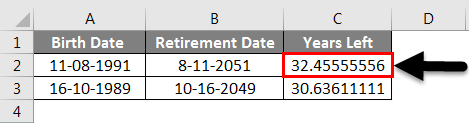
In the example shown above, we have the source date, i.e. the birth dates defined in Column A (from cells A2 to A3). We have the retirement date calculated in Column B (from cells B2 to B3), and finally, we have the number of years left until retirement calculated in Column C (from cells C2 to C3).
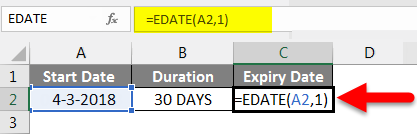
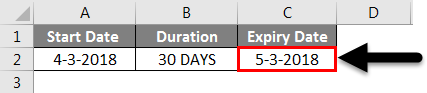
Add Months to Dates in Excel – Example #4
Calculate the Expiration Date
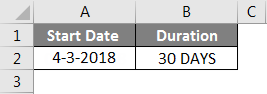
In the above example, we have the start date defined in Column A (cell A2). The duration is defined in Column B (cell B2). The duration is 30 days or 1 month.
Hence the expiry date is one month after the start date 04/03/2018 (3rd April 2018), which is 3rd May 2018. We get this result using the EDATE function as shown below:
Things to Remember
- The second argument of this EDATE function must always be positive.
- EDATE will return #VALUE! error if the start date is an invalid date.
- If the “months” is not an integer, then the truncated integer value is considered.
- Excel, by default stores, dates as sequential serial numbers. This is done so as to make using dates for calculations easier. The default start date is 1st January 1900, which has a serial number of 1. All dates after this have incremental values. For example – 1st January 2001 is 36892.
Recommended Articles
This has been a guide to Add Months to Dates in Excel. Here we discussed How to Add Months to Dates in Excel and the uses of Adding Months to Dates in Excel, practical examples, and a downloadable excel template. You can also go through our other suggested articles–
- Compare Dates in Excel
- Excel Sort by Date
- Excel Date Function
- Excel Format Painter