
Excel for Microsoft 365 Excel for Microsoft 365 for Mac Excel for the web Excel 2021 Excel 2021 for Mac Excel 2019 Excel 2019 for Mac Excel 2016 Excel 2016 for Mac Excel 2013 Excel 2010 Excel 2007 More…Less
Although Excel includes a multitude of built-in worksheet functions, chances are it doesn’t have a function for every type of calculation you perform. The designers of Excel couldn’t possibly anticipate every user’s calculation needs. Instead, Excel provides you with the ability to create custom functions, which are explained in this article.
Custom functions, like macros, use the Visual Basic for Applications (VBA) programming language. They differ from macros in two significant ways. First, they use Function procedures instead of Sub procedures. That is, they start with a Function statement instead of a Sub statement and end with End Function instead of End Sub. Second, they perform calculations instead of taking actions. Certain kinds of statements, such as statements that select and format ranges, are excluded from custom functions. In this article, you’ll learn how to create and use custom functions. To create functions and macros, you work with the Visual Basic Editor (VBE), which opens in a new window separate from Excel.
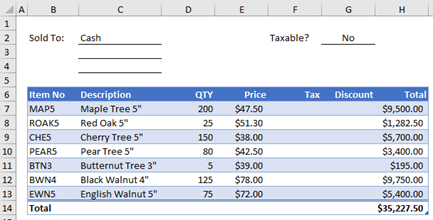
Suppose your company offers a quantity discount of 10 percent on the sale of a product, provided the order is for more than 100 units. In the following paragraphs, we’ll demonstrate a function to calculate this discount.
The example below shows an order form that lists each item, quantity, price, discount (if any), and the resulting extended price.
To create a custom DISCOUNT function in this workbook, follow these steps:
-
Press Alt+F11 to open the Visual Basic Editor (on the Mac, press FN+ALT+F11), and then click Insert > Module. A new module window appears on the right-hand side of the Visual Basic Editor.
-
Copy and paste the following code to the new module.
Function DISCOUNT(quantity, price)
   If quantity >=100 Then
     DISCOUNT = quantity * price * 0.1
   Else
     DISCOUNT = 0
   End If

 DISCOUNT = Application.Round(Discount, 2)
End Function
Note: To make your code more readable, you can use the Tab key to indent lines. The indentation is for your benefit only, and is optional, as the code will run with or without it. After you type an indented line, the Visual Basic Editor assumes your next line will be similarly indented. To move out (that is, to the left) one tab character, press Shift+Tab.
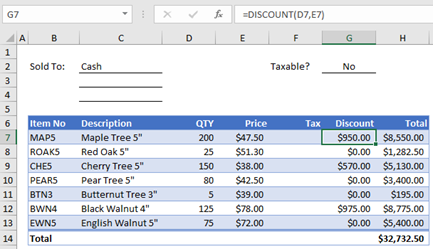
Now you’re ready to use the new DISCOUNT function. Close the Visual Basic Editor, select cell G7, and type the following:
=DISCOUNT(D7,E7)
Excel calculates the 10 percent discount on 200 units at $47.50 per unit and returns $950.00.
In the first line of your VBA code, Function DISCOUNT(quantity, price), you indicated that the DISCOUNT function requires two arguments, quantity and price. When you call the function in a worksheet cell, you must include those two arguments. In the formula =DISCOUNT(D7,E7), D7 is the quantity argument, and E7 is the price argument. Now you can copy the DISCOUNT formula to G8:G13 to get the results shown below.
Let’s consider how Excel interprets this function procedure. When you press Enter, Excel looks for the name DISCOUNT in the current workbook and finds that it is a custom function in a VBA module. The argument names enclosed in parentheses, quantity and price, are placeholders for the values on which the calculation of the discount is based.
The If statement in the following block of code examines the quantity argument and determines whether the number of items sold is greater than or equal to 100:
If quantity >= 100 Then
 DISCOUNT = quantity * price * 0.1
Else
 DISCOUNT = 0
End If
If the number of items sold is greater than or equal to 100, VBA executes the following statement, which multiplies the quantity value by the price value and then multiplies the result by 0.1:
Discount = quantity * price * 0.1
The result is stored as the variable Discount. A VBA statement that stores a value in a variable is called an assignment statement, because it evaluates the expression on the right side of the equal sign and assigns the result to the variable name on the left. Because the variable Discount has the same name as the function procedure, the value stored in the variable is returned to the worksheet formula that called the DISCOUNT function.
If quantity is less than 100, VBA executes the following statement:
Discount = 0
Finally, the following statement rounds the value assigned to the Discount variable to two decimal places:
Discount = Application.Round(Discount, 2)
VBA has no ROUND function, but Excel does. Therefore, to use ROUND in this statement, you tell VBA to look for the Round method (function) in the Application object (Excel). You do that by adding the word Application before the word Round. Use this syntax whenever you need to access an Excel function from a VBA module.
A custom function must start with a Function statement and end with an End Function statement. In addition to the function name, the Function statement usually specifies one or more arguments. You can, however, create a function with no arguments. Excel includes several built-in functions—RAND and NOW, for example—that don’t use arguments.
Following the Function statement, a function procedure includes one or more VBA statements that make decisions and perform calculations using the arguments passed to the function. Finally, somewhere in the function procedure, you must include a statement that assigns a value to a variable with the same name as the function. This value is returned to the formula that calls the function.
The number of VBA keywords you can use in custom functions is smaller than the number you can use in macros. Custom functions are not allowed to do anything other than return a value to a formula in a worksheet, or to an expression used in another VBA macro or function. For example, custom functions cannot resize windows, edit a formula in a cell, or change the font, color, or pattern options for the text in a cell. If you include “action” code of this kind in a function procedure, the function returns the #VALUE! error.
The one action a function procedure can do (apart from performing calculations) is display a dialog box. You can use an InputBox statement in a custom function as a means of getting input from the user executing the function. You can use a MsgBox statement as a means of conveying information to the user. You can also use custom dialog boxes, or UserForms, but that’s a subject beyond the scope of this introduction.
Even simple macros and custom functions can be difficult to read. You can make them easier to understand by typing explanatory text in the form of comments. You add comments by preceding the explanatory text with an apostrophe. For example, the following example shows the DISCOUNT function with comments. Adding comments like these makes it easier for you or others to maintain your VBA code as time passes. If you need to make a change to the code in the future, you’ll have an easier time understanding what you did originally.
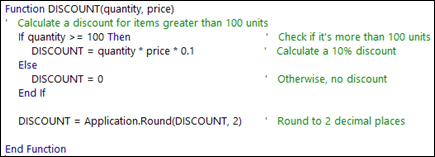
An apostrophe tells Excel to ignore everything to the right on the same line, so you can create comments either on lines by themselves or on the right side of lines containing VBA code. You might begin a relatively long block of code with a comment that explains its overall purpose and then use inline comments to document individual statements.
Another way to document your macros and custom functions is to give them descriptive names. For example, rather than name a macro Labels, you could name it MonthLabels to describe more specifically the purpose the macro serves. Using descriptive names for macros and custom functions is especially helpful when you’ve created many procedures, particularly if you create procedures that have similar but not identical purposes.
How you document your macros and custom functions is a matter of personal preference. What’s important is to adopt some method of documentation, and use it consistently.
To use a custom function, the workbook containing the module in which you created the function must be open. If that workbook is not open, you get a #NAME? error when you try to use the function. If you reference the function in a different workbook, you must precede the function name with the name of the workbook in which the function resides. For example, if you create a function called DISCOUNT in a workbook called Personal.xlsb and you call that function from another workbook, you must type =personal.xlsb!discount(), not simply =discount().
You can save yourself some keystrokes (and possible typing errors) by selecting your custom functions from the Insert Function dialog box. Your custom functions appear in the User Defined category:

An easier way to make your custom functions available at all times is to store them in a separate workbook and then save that workbook as an add-in. You can then make the add-in available whenever you run Excel. Here’s how to do this:
-
After you have created the functions you need, click File > Save As.
In Excel 2007, click the Microsoft Office Button, and click Save As
-
In the Save As dialog box, open the Save As Type drop-down list, and select Excel Add-In. Save the workbook under a recognizable name, such as MyFunctions, in the AddIns folder. The Save As dialog box will propose that folder, so all you need to do is accept the default location.
-
After you have saved the workbook, click File > Excel Options.
In Excel 2007, click the Microsoft Office Button, and click Excel Options.
-
In the Excel Options dialog box, click the Add-Ins category.
-
In the Manage drop-down list, select Excel Add-Ins. Then click the Go button.
-
In the Add-Ins dialog box, select the check box beside the name you used to save your workbook, as shown below.

-
After you have created the functions you need, click File > Save As.
-
In the Save As dialog box, open the Save As Type drop-down list, and select Excel Add-In. Save the workbook under a recognizable name, such as MyFunctions.
-
After you have saved the workbook, click Tools > Excel Add-Ins.
-
In the Add-Ins dialog box, select the Browse button to find your add-in, click Open, then check the box beside your Add-In in the Add-Ins Available box.
After you follow these steps, your custom functions will be available each time you run Excel. If you want to add to your function library, return to the Visual Basic Editor. If you look in the Visual Basic Editor Project Explorer under a VBAProject heading, you will see a module named after your add-in file. Your add-in will have the extension .xlam.
Double-clicking that module in the Project Explorer causes the Visual Basic Editor to display your function code. To add a new function, position your insertion point after the End Function statement that terminates the last function in the Code window, and begin typing. You can create as many functions as you need in this manner, and they will always be available in the User Defined category in the Insert Function dialog box.
This content was originally authored by Mark Dodge and Craig Stinson as part of their book Microsoft Office Excel 2007 Inside Out. It has since been updated to apply to newer versions of Excel as well.
Need more help?
You can always ask an expert in the Excel Tech Community or get support in the Answers community.
Need more help?
Excel для Microsoft 365 Excel для Microsoft 365 для Mac Excel для Интернета Excel 2021 Excel 2021 для Mac Excel 2019 Excel 2019 для Mac Excel 2016 Excel 2016 для Mac Excel 2013 Excel 2010 Excel 2007 Еще…Меньше
Хотя в Excel предлагается большое число встроенных функций, в нем может не быть той функции, которая нужна для ваших вычислений. К сожалению, разработчики Excel не могли предугадать все потребности пользователей. Однако в Excel можно создавать собственные функции, и ниже вы найдете все нужные для этого инструкции.
Пользовательские функции (как и макросы) записываются на языке программирования Visual Basic для приложений (VBA). Они отличаются от макросов двумя вещами. Во-первых, в них используются процедуры Function, а не Sub. Это значит, что они начинаются с оператора Function, а не Sub, и заканчиваются оператором End Function, а не End Sub. Во-вторых, они выполняют различные вычисления, а не действия. Некоторые операторы (например, предназначенные для выбора и форматирования диапазонов) исключаются из пользовательских функций. Из этой статьи вы узнаете, как создавать и применять пользовательские функции. Для создания функций и макросов используется редактор Visual Basic (VBE), который открывается в отдельном окне.
Предположим, что ваша компания предоставляет скидку в размере 10 % клиентам, заказавшим более 100 единиц товара. Ниже мы объясним, как создать функцию для расчета такой скидки.
В примере ниже показана форма заказа, в которой перечислены товары, их количество и цена, скидка (если она предоставляется) и итоговая стоимость.
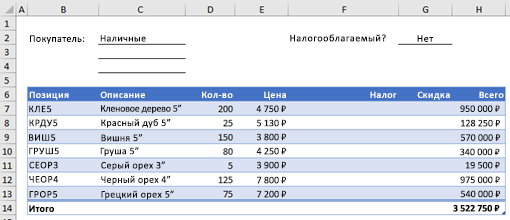
Чтобы создать пользовательскую функцию DISCOUNT в этой книге, сделайте следующее:
-
Нажмите клавиши ALT+F11 (или FN+ALT+F11 на Mac), чтобы открыть редактор Visual Basic, а затем щелкните Insert (Вставка) > Module (Модуль). В правой части редактора Visual Basic появится окно нового модуля.
-
Скопируйте указанный ниже код и вставьте его в новый модуль.
Function DISCOUNT(quantity, price)
   If quantity >=100 Then
     DISCOUNT = quantity * price * 0.1
   Else
     DISCOUNT = 0
   End If

 DISCOUNT = Application.Round(Discount, 2)
End Function
Примечание: Чтобы код было более удобно читать, можно добавлять отступы строк с помощью клавиши TAB. Отступы необязательны и не влияют на выполнение кода. Если добавить отступ, редактор Visual Basic автоматически вставит его и для следующей строки. Чтобы сдвинуть строку на один знак табуляции влево, нажмите SHIFT+TAB.
Теперь вы готовы использовать новую функцию DISCOUNT. Закройте редактор Visual Basic, выделите ячейку G7 и введите следующий код:
=DISCOUNT(D7;E7)
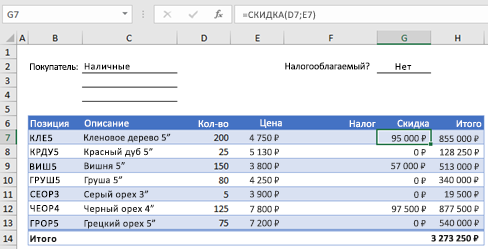
Excel вычислит 10%-ю скидку для 200 единиц по цене 47,50 ₽ и вернет 950,00 ₽.
В первой строке кода VBA функция DISCOUNT(quantity, price) указывает, что функции DISCOUNT требуется два аргумента: quantity (количество) и price (цена). При вызове функции в ячейке листа необходимо указать эти два аргумента. В формуле =DISCOUNT(D7;E7) аргумент quantity имеет значение D7, а аргумент price — значение E7. Если скопировать формулу в ячейки G8:G13, вы получите указанные ниже результаты.
Рассмотрим, как Excel обрабатывает эту функцию. При нажатии клавиши ВВОД Excel ищет имя DISCOUNT в текущей книге и определяет, что это пользовательская функция в модуле VBA. Имена аргументов, заключенные в скобки (quantity и price), представляют собой заполнители для значений, на основе которых вычисляется скидка.
Оператор If в следующем блоке кода проверяет аргумент quantity и сравнивает количество проданных товаров со значением 100:
If quantity >= 100 Then
 DISCOUNT = quantity * price * 0.1
Else
 DISCOUNT = 0
End If
Если количество проданных товаров не меньше 100, VBA выполняет следующую инструкцию, которая перемножает значения quantity и price, а затем умножает результат на 0,1:
Discount = quantity * price * 0.1
Результат хранится в виде переменной Discount. Оператор VBA, который хранит значение в переменной, называется оператором назначения, так как он вычисляет выражение справа от знака равенства и назначает результат имени переменной слева от него. Так как переменная Discount называется так же, как и процедура функции, значение, хранящееся в переменной, возвращается в формулу листа, из которой была вызвана функция DISCOUNT.
Если значение quantity меньше 100, VBA выполняет следующий оператор:
Discount = 0
Наконец, следующий оператор округляет значение, назначенное переменной Discount, до двух дробных разрядов:
Discount = Application.Round(Discount, 2)
В VBA нет функции округления, но она есть в Excel. Чтобы использовать округление в этом операторе, необходимо указать VBA, что метод (функцию) Round следует искать в объекте Application (Excel). Для этого добавьте слово Application перед словом Round. Используйте этот синтаксис каждый раз, когда нужно получить доступ к функции Excel из модуля VBA.
Пользовательские функции должны начинаться с оператора Function и заканчиваться оператором End Function. Помимо названия функции, оператор Function обычно включает один или несколько аргументов. Однако вы можете создать функцию без аргументов. В Excel доступно несколько встроенных функций (например, СЛЧИС и ТДАТА), в которых нет аргументов.
После оператора Function указывается один или несколько операторов VBA, которые проверят соответствия условиям и выполняют вычисления с использованием аргументов, переданных функции. Наконец, в процедуру функции следует включить оператор, назначающий значение переменной с тем же именем, что у функции. Это значение возвращается в формулу, которая вызывает функцию.
Количество ключевых слов VBA, которые можно использовать в пользовательских функциях, меньше числа, используемого в макросах. Настраиваемые функции не могут выполнять другие задачи, кроме возврата значения в формулу на этом или в выражение, используемом в другом макросе или функции VBA. Например, пользовательские функции не могут изменять размер окна, редактировать формулу в ячейке, а также изменять шрифт, цвет или узор текста в ячейке. Если в процедуру функции включить такой код действия, функция возвращает #VALUE! ошибку «#ВЫЧИС!».
Единственное действие, которое может выполнять процедура функции (кроме вычислений), — это отображение диалогового окна. Чтобы получить значение от пользователя, выполняющего функцию, можно использовать в ней оператор InputBox. Кроме того, с помощью оператора MsgBox можно выводить сведения для пользователей. Вы также можете использовать настраиваемые диалоговые окна (UserForms), но эта тема выходит за рамки данной статьи.
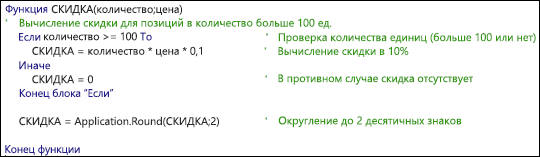
Даже простые макросы и пользовательские функции может быть сложно понять. Чтобы сделать эту задачу проще, добавьте комментарии с пояснениями. Для этого нужно ввести перед текстом апостроф. Например, ниже показана функция DISCOUNT с комментариями. Благодаря подобным комментариями и вам, и другим будет впоследствии проще работать с кодом VBA. Так, код будет легче понять, если потребуется внести в него изменения.
Апостроф указывает приложению Excel на то, что следует игнорировать всю строку справа от него, поэтому вы можете добавлять комментарии в отдельных строках или в правой части строк, содержащих код VBA. Советуем начинать длинный блок кода с комментария, в котором объясняется его назначение, а затем использовать встроенные комментарии для документирования отдельных операторов.
Кроме того, рекомендуется присваивать макросам и пользовательским функциям описательные имена. Например, присвойте макросу название MonthLabels вместо Labels, чтобы более точно указать его назначение. Описательные имена макросов и пользовательских функций особенно полезны, если существует множество процедур с похожим назначением.
То, как документировать макрос и пользовательские функции, имеет личный выбор. Важно принятия определенного способа документации и его согласованного использования.
Для использования настраиваемой функции должна быть открыта книга, содержащая модуль, в котором она была создана. Если книга не открыта, вы получите #NAME? при попытке использования функции. Если вы ссылались на функцию в другой книге, ее имя должно предшествовать названию книги, в которой она находится. Например, при создании функции DISCOUNT в книге Personal.xlsb и вызове ее из другой книги необходимо ввести =personal.xlsb!discount(),а не просто =discount().
Чтобы вставить пользовательскую функцию быстрее (и избежать ошибок), ее можно выбрать в диалоговом окне «Вставка функции». Пользовательские функции доступны в категории «Определенные пользователем»:
Чтобы пользовательские функции всегда были доступны, можно хранить их в отдельной книге, а затем сохранять в качестве надстройки. Затем надстройку можно сделать доступной при запуске Excel. Вот как это сделать:
-
Создав нужные функции, выберите Файл > Сохранить как.
В Excel 2007 нажмите кнопку Microsoft Office, а затем щелкните Сохранить как.
-
В диалоговом окне Сохранить как откройте раскрывающийся список Тип файла и выберите значение Надстройка Excel. Сохраните книгу с запоминающимся именем, таким как MyFunctions, в папке AddIns. Она будет автоматически предложена в диалоговом окне Сохранить как, поэтому вам потребуется только принять расположение, используемое по умолчанию.
-
Сохранив книгу, выберите Файл > Параметры Excel.
В Excel 2007 нажмите кнопку Microsoft Office и щелкните Параметры Excel.
-
В диалоговом окне Параметры Excel выберите категорию Надстройки.
-
В раскрывающемся списке Управление выберите Надстройки Excel. Затем нажмите кнопку Перейти.
-
В диалоговом окне Надстройки установите флажок рядом с именем книги, как показано ниже.
-
Создав нужные функции, выберите Файл > Сохранить как.
-
В диалоговом окне Сохранить как откройте раскрывающийся список Тип файла и выберите значение Надстройка Excel. Сохраните книгу с запоминающимся именем, таким как MyFunctions.
-
Сохранив книгу, выберите Сервис > Надстройки Excel.
-
В диалоговом окне Надстройки нажмите кнопку «Обзор», найдите свою надстройку, нажмите кнопку Открыть, а затем установите флажок рядом с надстройкой в поле Доступные надстройки.
После этого пользовательские функции будут доступны при каждом запуске Excel. Если вы хотите добавить его в библиотеку функций, вернимся в Visual Basic редактора. Если вы заглянуть в Visual Basic редактора Project проводника под заголовком VBAProject, вы увидите модуль с именем файла надстройки. У надстройки будет расширение XLAM.
Дважды щелкните модуль в Project Explorer, чтобы вывести код функций. Чтобы добавить новую функцию, установите точку вставки после оператора End Function, который завершает последнюю функцию в окне кода, и начните ввод. Вы можете создать любое количество функций, и они будут всегда доступны в категории «Определенные пользователем» диалогового окна Вставка функции.
Эта статья основана на главе книги Microsoft Office Excel 2007 Inside Out, написанной Марком Доджем (Mark Dodge) и Крейгом Стинсоном (Craig Stinson). В нее были добавлены сведения, относящиеся к более поздним версиям Excel.
Дополнительные сведения
Вы всегда можете задать вопрос специалисту Excel Tech Community или попросить помощи в сообществе Answers community.
Нужна дополнительная помощь?
Содержание
- Tutorial: Create custom functions in Excel
- Prerequisites
- Create a custom functions project
- Try out a prebuilt custom function
- Create a custom function that requests data from the web
- Create a streaming asynchronous custom function
- Troubleshooting
- Next steps
- Create custom functions in Excel
- How a custom function is defined in code
- Script file
- Manifest file
- Coauthoring
- Next steps
Tutorial: Create custom functions in Excel
Custom functions enable you to add new functions to Excel by defining those functions in JavaScript as part of an add-in. Users within Excel can access custom functions as they would any native function in Excel, such as SUM() . You can create custom functions that perform simple tasks like calculations or more complex tasks such as streaming real-time data from the web into a worksheet.
In this tutorial, you will:
- Create a custom function add-in using the Yeoman generator for Office Add-ins.
- Use a prebuilt custom function to perform a simple calculation.
- Create a custom function that gets data from the web.
- Create a custom function that streams real-time data from the web.
Prerequisites
Node.js (the latest LTS version).
The latest version of Yeoman and the Yeoman generator for Office Add-ins. To install these tools globally, run the following command via the command prompt.
Even if you’ve previously installed the Yeoman generator, we recommend you update your package to the latest version from npm.
Office connected to a Microsoft 365 subscription (including Office on the web).
If you don’t already have Office, you can join the Microsoft 365 developer program to get a free, 90-day renewable Microsoft 365 subscription to use during development.
Create a custom functions project
To start, create the code project to build your custom function add-in. The Yeoman generator for Office Add-ins will set up your project with some prebuilt custom functions that you can try out. If you’ve already run the custom functions quick start and generated a project, continue to use that project and skip to this step instead.
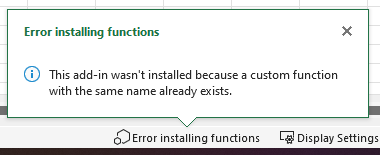
If you recreate the yo office project, you may get an error because the Office cache already has an instance of a function with the same name. You can prevent this by clearing the Office cache before running npm run start .
Run the following command to create an add-in project using the Yeoman generator.
When you run the yo office command, you may receive prompts about the data collection policies of Yeoman and the Office Add-in CLI tools. Use the information that’s provided to respond to the prompts as you see fit.
When prompted, provide the following information to create your add-in project.
- Choose a project type: Excel Custom Functions using a Shared Runtime
- Choose a script type: JavaScript
- What do you want to name your add-in? My custom functions add-in
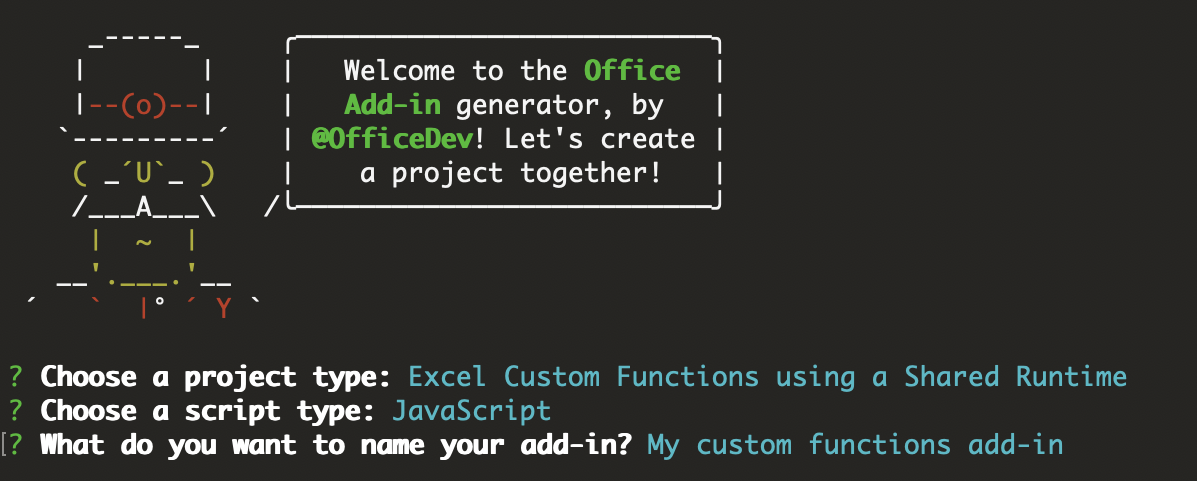
The Yeoman generator will create the project files and install supporting Node components.
You can ignore the next steps guidance that the Yeoman generator provides after the add-in project’s been created. The step-by-step instructions within this article provide all of the guidance you’ll need to complete this tutorial.
Navigate to the root folder of the project.
Build the project.
Office Add-ins should use HTTPS, not HTTP, even when you are developing. If you are prompted to install a certificate after you run npm run build , accept the prompt to install the certificate that the Yeoman generator provides.
Start the local web server, which runs in Node.js. You can try out the custom function add-in in Excel.
To test your add-in in Excel on Windows or Mac, run the following command. When you run this command, the local web server will start and Excel will open with your add-in loaded.
Office Add-ins should use HTTPS, not HTTP, even when you are developing. If you are prompted to install a certificate after you run one of the following commands, accept the prompt to install the certificate that the Yeoman generator provides. You may also have to run your command prompt or terminal as an administrator for the changes to be made.
To test your add-in in Excel on the web, run the following command. When you run this command, the local web server will start. Replace «» with the URL of an Excel document on your OneDrive or a SharePoint library to which you have permissions.
The following are examples.
- npm run start:web — —document https://contoso.sharepoint.com/:t:/g/EZGxP7ksiE5DuxvY638G798BpuhwluxCMfF1WZQj3VYhYQ?e=F4QM1R
- npm run start:web — —document https://1drv.ms/x/s!jkcH7spkM4EGgcZUgqthk4IK3NOypVw?e=Z6G1qp
- npm run start:web — —document https://contoso-my.sharepoint-df.com/:t:/p/user/EQda453DNTpFnl1bFPhOVR0BwlrzetbXvnaRYii2lDr_oQ?e=RSccmNP
If you are developing on a Mac, enclose the in single quotation marks. Do not do this on Windows.
If your add-in doesn’t sideload in the document, manually sideload it by following the instructions in Manually sideload add-ins to Office on the web.
Office Add-ins should use HTTPS, not HTTP, even when you are developing. If you are prompted to install a certificate after you run one of the following commands, accept the prompt to install the certificate that the Yeoman generator provides. You may also have to run your command prompt or terminal as an administrator for the changes to be made.
Try out a prebuilt custom function
The custom functions project that you created contains some prebuilt custom functions, defined within the ./src/functions/functions.js file. The ./manifest.xml file specifies that all custom functions belong to the CONTOSO namespace. You’ll use the CONTOSO namespace to access the custom functions in Excel.
Next, try out the ADD custom function by completing the following steps.
In Excel, go to any cell and enter =CONTOSO . Notice that the autocomplete menu shows the list of all functions in the CONTOSO namespace.
Run the CONTOSO.ADD function, with numbers 10 and 200 as input parameters, by typing the value =CONTOSO.ADD(10,200) in the cell and pressing enter.
The ADD custom function computes the sum of the two numbers that you provided and returns the result of 210.
If the CONTOSO namespace isn’t available in the autocomplete menu, take the following steps to register the add-in in Excel.
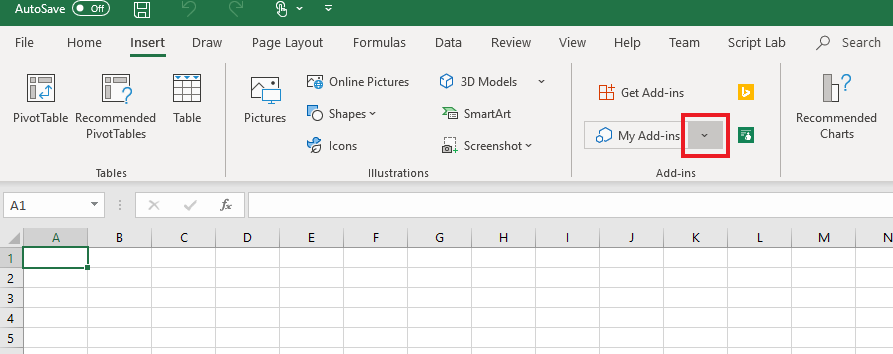
In Excel, choose the Insert tab and then choose the down-arrow located to the right of My Add-ins.
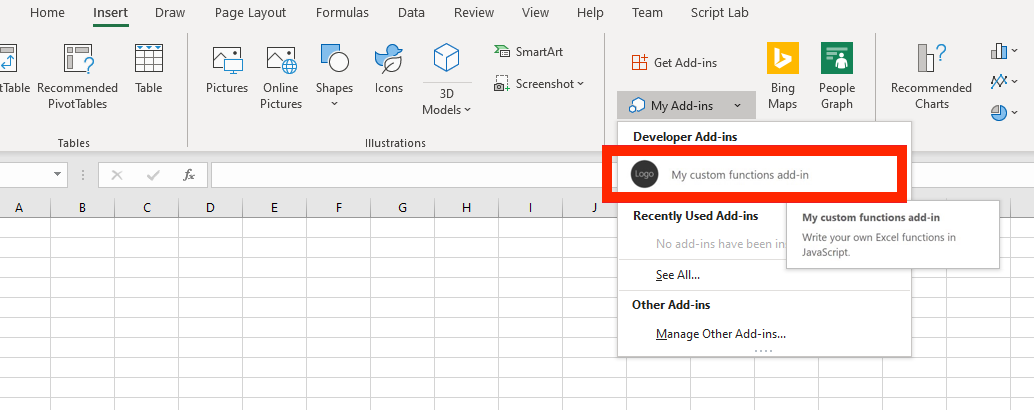
In the list of available add-ins, find the Developer Add-ins section and select My custom functions add-in to register it.
In Excel, choose the Insert tab and then choose Add-ins.

Choose Manage My Add-ins and select Upload My Add-in.
Choose Browse. and navigate to the root directory of the project that the Yeoman generator created.
Select the file manifest.xml and choose Open, then choose Upload.
Try out the new function. In cell B1, type the text =CONTOSO.GETSTARCOUNT(«OfficeDev», «Excel-Custom-Functions») and press Enter. You should see that the result in cell B1 is the current number of stars given to the Excel-Custom-Functions Github repository.
See the Troubleshooting section of this article if you encounter errors when sideloading the add-in.
Create a custom function that requests data from the web
Integrating data from the Web is a great way to extend Excel through custom functions. Next you’ll create a custom function named getStarCount that shows how many stars a given Github repository possesses.
In the My custom functions add-in project, find the file ./src/functions/functions.js and open it in your code editor.
In function.js, add the following code.
Run the following command to rebuild the project.
Complete the following steps (for Excel on the web, Windows, or Mac) to re-register the add-in in Excel. You must complete these steps before the new function will be available.
Close Excel and then reopen Excel.
In Excel, choose the Insert tab and then choose the down-arrow located to the right of My Add-ins.
In the list of available add-ins, find the Developer Add-ins section and select My custom functions add-in to register it.
Try out the new function. In cell B1, type the text =CONTOSO.GETSTARCOUNT(«OfficeDev», «Office-Add-in-Samples») and press Enter. You should see that the result in cell B1 is the current number of stars given to the Office-Add-in-Samples repository.
In Excel, choose the Insert tab and then choose Add-ins.
Choose Manage My Add-ins and select Upload My Add-in.
Choose Browse. and navigate to the root directory of the project that the Yeoman generator created.
Select the file manifest.xml and choose Open, then choose Upload.
Try out the new function. In cell B1, type the text =CONTOSO.GETSTARCOUNT(«OfficeDev», «Excel-Custom-Functions») and press Enter. You should see that the result in cell B1 is the current number of stars given to the Excel-Custom-Functions Github repository.
See the Troubleshooting section of this article if you encounter errors when sideloading the add-in.
Create a streaming asynchronous custom function
The getStarCount function returns the number of stars a repository has at a specific moment in time. Custom functions also return data that is continuously changing. These functions are called streaming functions. They must include an invocation parameter which refers to the cell that called the function. The invocation parameter is used to update the contents of the cell at any time.
In the following code sample, notice that there are two functions, currentTime and clock . The currentTime function is a static function that doesn’t use streaming. It returns the date as a string. The clock function uses the currentTime function to provide the new time every second to a cell in Excel. It uses invocation.setResult to deliver the time to the Excel cell and invocation.onCanceled to handle function cancellation.
The My custom functions add-in project already contains the following two functions in the ./src/functions/functions.js file.
To try out the functions, type the text =CONTOSO.CLOCK() in cell C1 and press enter. You should see the current date, which streams an update every second. While this clock is just a timer on a loop, you can use the same idea of setting a timer on more complex functions that make web requests for real-time data.
Troubleshooting
You may encounter issues if you run the tutorial multiple times. If the Office cache already has an instance of a function with the same name, your add-in gets an error when it sideloads.
You can prevent this conflict by clearing the Office cache before running npm run start . If your npm process is already running, enter npm stop , clear the Office cache, and then restart npm.
Next steps
Congratulations! You’ve created a new custom functions project, tried out a prebuilt function, created a custom function that requests data from the web, and created a custom function that streams data. Next, learn about Custom functions naming guidelines.
Источник
Create custom functions in Excel
Custom functions enable developers to add new functions to Excel by defining those functions in JavaScript as part of an add-in. Users within Excel can access custom functions just as they would any native function in Excel, such as SUM() .
Custom function is a general term that is interchangeable with user-defined function. Both terms apply to VBA, COM, and Office.js add-ins. The Office Add-ins documentation uses the term custom function when referring to custom functions that use Office JavaScript APIs.
Note that Excel custom functions are available on the following platforms.
- Office on Windows
- Microsoft 365 subscription
- retail perpetual Office 2016 and later
- Office on Mac
- Office on the web
Excel custom functions are currently not supported in the following:
- Office on iPad
- volume-licensed perpetual versions of Office 2019 or earlier
- retail perpetual Office 2013
The following animated image shows your workbook calling a function you’ve created with JavaScript or TypeScript. In this example, the custom function =MYFUNCTION.SPHEREVOLUME calculates the volume of a sphere.
The following code defines the custom function =MYFUNCTION.SPHEREVOLUME .
If your custom function add-in will use a task pane or a ribbon button, in addition to running custom function code, you’ll need to set up a shared runtime. To learn more, see Configure your Office Add-in to use a shared runtime.
How a custom function is defined in code
If you use the Yeoman generator for Office Add-ins to create an Excel custom functions add-in project, it creates files which control your functions and task pane. We’ll concentrate on the files that are important to custom functions.
| File | File format | Description |
|---|---|---|
| ./src/functions/functions.js or ./src/functions/functions.ts |
JavaScript or TypeScript |
Contains the code that defines custom functions. |
| ./src/functions/functions.html | HTML | Provides a reference to the JavaScript file that defines custom functions. |
| ./manifest.xml | XML | Specifies the location of multiple files that your custom function use, such as the custom functions JavaScript, JSON, and HTML files. It also lists the locations of task pane files, command files, and specifies which runtime your custom functions should use. |
Script file
The script file (./src/functions/functions.js or ./src/functions/functions.ts) contains the code that defines custom functions and comments which define the function.
The following code defines the custom function add . The code comments are used to generate a JSON metadata file that describes the custom function to Excel. The required @customfunction comment is declared first, to indicate that this is a custom function. Next, two parameters are declared, first and second , followed by their description properties. Finally, a returns description is given. For more information about what comments are required for your custom function, see Autogenerate JSON metadata for custom functions.
Manifest file
The XML manifest file for an add-in that defines custom functions (./manifest.xml in the project that the Yeoman generator for Office Add-ins creates) does several things.
- Defines the namespace for your custom functions. A namespace prepends itself to your custom functions to help customers identify your functions as part of your add-in.
- Uses and elements that are unique to a custom functions manifest. These elements contain the information about the locations of the JavaScript, JSON, and HTML files.
- Specifies which runtime to use for your custom function. We recommend always using a shared runtime unless you have a specific need for another runtime, because a shared runtime allows for the sharing of data between functions and the task pane.
If you’re using the Yeoman generator for Office Add-ins to create files, we recommend adjusting your manifest to use a shared runtime, as this is not the default for these files. To change your manifest, follow the instructions in Configure your Excel add-in to use a shared runtime.
To see a full working manifest from a sample add-in, see the manifest in the one of our Office Add-in samples Github repositories.
If you’ll be testing your add-in across multiple environments (for example, in development, staging, demo, etc.), we recommend that you maintain a different XML manifest file for each environment. In each manifest file, you can:
- Specify the URLs that correspond to the environment.
- Customize metadata values like DisplayName and labels within Resources to indicate the environment, so that end users will be able to identify a sideloaded add-in’s corresponding environment.
- Customize the custom functions namespace to indicate the environment, if your add-in defines custom functions.
By following this guidance, you’ll streamline the testing process and avoid issues that would otherwise occur when an add-in is simultaneously sideloaded for multiple environments.
Excel on the web and on Windows connected to a Microsoft 365 subscription allow end users to coauthor in Excel. If an end user’s workbook uses a custom function, that end user’s coauthoring colleague is prompted to load the corresponding custom functions add-in. Once both users have loaded the add-in, the custom function shares results through coauthoring.
For more information on coauthoring, see About coauthoring in Excel.
Next steps
Want to try out custom functions? Check out the simple custom functions quick start or the more in-depth custom functions tutorial if you haven’t already.
Another easy way to try out custom functions is to use Script Lab, an add-in that allows you to experiment with custom functions right in Excel. You can try out creating your own custom function or play with the provided samples.
Источник
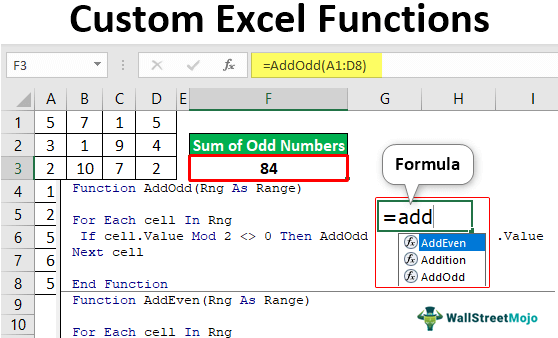
How to Create Custom Excel Functions? (with Examples)
To create a custom function, we need to write a code for our functions’ working, called “UDFUser Defined Function in VBA is a group of customized commands created to give out a certain result. It is a flexibility given to a user to design functions similar to those already provided in Excel.read more.” The custom functions are user-defined in Excel, so you need to know VBA coding thoroughly to create these functions.
Table of contents
- How to Create Custom Excel Functions? (with Examples)
- Example #1 – Add Any Two Numbers
- Example #2 – Add All Odd Numbers
- Example #3 – Add All Even Numbers
- Things to Remember
- Recommended Articles
Example #1 – Add Any Two Numbers
For example, if you want to add two numbers, we will show you a simple User Defined Function (UDF).
- First, press Alt+F11 and insert the module.

- Write code in a module to create a custom function.
Any custom function should start with the word “Function,” followed by the formula name.
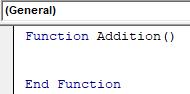
Any function has its arguments or parameters, similar to custom functions. We need to define those parameters. Since we add just two numbers, let us define those parameters and assign data types to those argument variables.
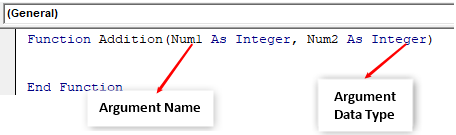
Once the parameters are defined with a data type, we also need to define the outcome data types. First, let us define the outcome as the “Integer” value.

Inside this “Function Procedure,” we will write the formula code.
Code:
Function Addition(Num1 As Integer, Num2 As Integer) As Integer

  Additiona = Num1 + Num2

End Function
The function name “Addition” result will be the sum of “Num1” and “Num2” values.
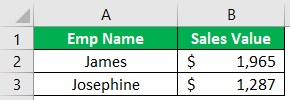
- Now return to the worksheet and insert any two integer numbers.
- We will add these two numbers now. Open the equal sign and enter the custom function name “Addition.”
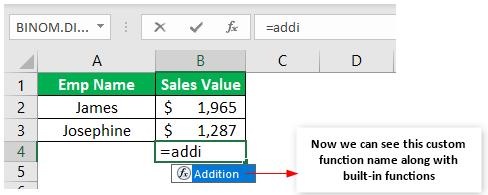
Select the first and second numbers by entering the separator as a comma (,).

- Press the “Enter” key to get the result.

Like the SUM function, we got the result of the sum of two numbers.
Now, look at these numbers.

We will try adding these two numbers now.

We got the error value because the arguments “Num1” and “Num2” data type is “integer,” i.e., these two arguments can hold values between -32767 to 32767, so anything more than this will cause these errors.
Now, we will try adding these two numbers.

Even this will cause the below error value.

Even though individual argument values are within the “integer” data type limit, we still got this error because the total sum of these numbers is more than the integer limit value.
Since we have also declared the result type as “integer,” the result of adding two numbers should also be an integer number limit.
Example #2 – Add All Odd Numbers
Excel does not have any built-in function which can add all the odd numbers from the list of numbers. But nothing to worry about. We will create a custom Excel function to support this.
We must open the VBA editorThe Visual Basic for Applications Editor is a scripting interface. These scripts are primarily responsible for the creation and execution of macros in Microsoft software.read more window and give a name to the function procedure.
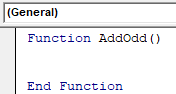
Give the parameter for this function as “Range.”
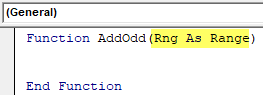
We provide the input value for this function as the “Range” of cell values.
Since we need to loop through more than one cell, we need to use the “For Each” loop in VBA, so open the “For Each” loop.

Inside this loop, add the below code.
Code:
Function AddOdd(Rng As Range)

 For Each cell In Rng
  If cell.Value Mod 2 <> 0 Then AddOdd = AddOdd + cell.Value
 Next cell

End Function
We have to use the “MOD” function to test the number. When each cell value is divided by the number 2 and the remainder value is not equal to zero, our code should add all the odd number values.
We need to return to the worksheet and open the Excel custom function.

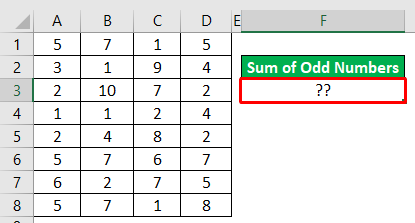
Select the number range from A1 to D8.

Press the “Enter” key to get the “odd” number result.”

So, in the range A1 to D8, we have the sum of odd numbers 84.
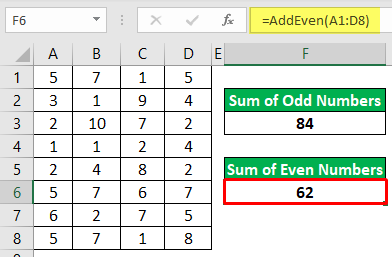
Example #3 – Add All Even Numbers
Similarly, the below function will add all the even numbers.
Code:
Function AddEven(Rng As Range)

 For Each cell In Rng
  If cell.Value Mod 2 = 0 Then AddEven = AddEven + cell.Value
 Next cell

End Function
This function will add only an even number. In this case, we have used the logic that if each cell value is divided by 2, and the remainder equals zero, the code will add only those values.
Like this, by using VBA coding, we can create custom functions of our own.
You can download this Custom Functions Excel Template here – Custom Functions Excel Template
Things to Remember
- Creating custom functions is nothing but “User-Defined Functions.”
- To create custom functions, one should know advanced VBA codingVBA code refers to a set of instructions written by the user in the Visual Basic Applications programming language on a Visual Basic Editor (VBE) to perform a specific task.read more skills.
- While making the custom Excel functions, watching arguments and their data types is important.
Recommended Articles
This article has been a guide to Excel Custom Functions. We learn to create our custom function using code and a downloadable Excel template. You may learn more about Excel from the following articles: –
- List of VBA Functions
- Custom List in Excel
- Custom Number Format in Excel
- Excel Functions
![]()
Download Article
![]()
Download Article
Microsoft Excel has many built-in functions, such as SUM, VLOOKUP, and LEFT. As you start using Excel for more complicated tasks, you may find that you need a function that doesn’t exist. That’s where custom functions come in! This wikiHow teaches you how to create your own functions in Microsoft Excel.
-
1
Open an Excel workbook. Double-click the workbook in which you want to use the custom-defined function to open it in Excel.
-
2
Press Alt+F11 (Windows) or Fn+⌥ Opt+F11 (Mac). This opens the Visual Basic Editor.
Advertisement
-
3
Click the Insert menu and select New Module. This opens a module window in the right panel of the editor.[1]
- You can create the user defined function in the worksheet itself without adding a new module, but that will make you unable to use the function in other worksheets of the same workbook.
-
4
Create your function’s header. The first line is where you will name the function and define our range.[2]
Replace «FunctionName» with the name you want to assign your custom function. The function can have as many parameters as you want, and their types can be any of Excel’s basic data or object types as Range:Function FunctionName (param1 As type1, param2 As type2 ) As return Type
- You may think of parameters as the «operands» your function will act upon. For example, when you use SIN(45) to calculate the Sine of 45 degree, 45 will be taken as a parameter. Then the code of your function will use that value to calculate something else and present the result.
-
5
Add the code of the function. Make sure you use the values provided by the parameters, assign the result to the name of the function, and close the function with «End Function.» Learning to program in VBA or in any other language can take some time and a detailed tutorial. However, functions usually have small code blocks and use very few features of the language. Some useful elements are:
- The If block, which allows you to execute a part of the code only if a condition is met. Notice the elements in an If code block: IF condition THEN code ELSE code END IF. The Else keyword along with the second part of the code are optional:
Function Course Result(grade As Integer) As String
  If grade >= 5 Then
    CourseResult = "Approved"
  Else
    CourseResult = "Rejected"
  End If
End Function
- The Do block, which executes a part of the code While or Until a condition is met. In the example code below, notice the elements DO code LOOP WHILE/UNTIL condition. Also notice the second line in which a variable is declared. You can add variables to your code so you can use them later. Variables act as temporary values inside the code. Finally, notice the declaration of the function as BOOLEAN, which is a datatype that allows only the TRUE and FALSE values. This method of determining if a number is prime is by far not the optimal, but I’ve left it that way to make the code easier to read.
Function IsPrime(value As Integer) As Boolean
  Dim i As Integer
  i = 2
  IsPrime = True
  Do
    If value / i = Int(value / i) Then
      IsPrime = False
    End If
    i = i + 1
  Loop While i < value And IsPrime = True
End Function
- The For block executes a part of the code a specified number of times. In this next example, you’ll see the elements FOR variable = lower limit TO upper limit code NEXT. You’ll also see the added ElseIf element in the If statement, which allows you to add more options to the code that is to be executed. Additionally, the declaration of the function and the variable result as Long. The Long datatype allows values much larger than Integer:
Public Function Factorial(value As Integer) As Long
  Dim result As Long
  Dim i As Integer
  If value = 0 Then
    result = 1
  ElseIf value = 1 Then
    result = 1
  Else
    result = 1
    For i = 1 To value
      result = result * i
    Next
  End If
  Factorial = result
End Function
- The If block, which allows you to execute a part of the code only if a condition is met. Notice the elements in an If code block: IF condition THEN code ELSE code END IF. The Else keyword along with the second part of the code are optional:
-
6
Close the Visual Basic Editor. Once you’ve created your function, close the window to return to your workbook. Now you can start using your user-defined function.
-
7
Enter your function. First, click the cell in which you want to enter the function. Then, click the function bar at the top of Excel (the one with the fx to its left) and type =FUNCTIONNAME(), replacing FUNCTIONNAME with the name you assigned your custom function.
- You can also find your user-defined formula in the «User Defined» category in the Insert Formula wizard—just click the fx to pull up the wizard.
-
8
Enter the parameters into the parentheses. For example, =NumberToLetters(A4). The parameters can be of three types:
- Constant values typed directly in the cell formula. Strings have to be quoted in this case.
- Cell references like B6 or range references like A1:C3. The parameter has to be of the Range datatype.
- Other functions nested inside your function. Your function can also be nested inside other functions. Example: =Factorial(MAX(D6:D8)).
-
9
Press ↵ Enter or ⏎ Return to run the function. The results will display in the selected cell.


Advertisement
Add New Question
-
Question
How can I use these functions in all Excel files?

Igal Livne
Community Answer
Save the workbook with the custom class as «Excel Add-In (*.xlam»),» by default Excel will take you to «Addins» folder. Go to Excel Options > Add-ins > Manage: «Excel Addins» — press «Go…» button. Browse for your newly create xlam file.
-
Question
How can I do well in exams?
Read the directions several times, leaving time for you to absorb between readings. Also practice writing VBA to do various things.
-
Question
How do I know what to write as the function code?
In order to create functions, you need a skill called «programming». Excel macros are written in a language called «Visual Basic for Applications», which you will need to learn to be able to write macros. It’s quite easy once you’ve got the hang of it though!
Ask a Question
200 characters left
Include your email address to get a message when this question is answered.
Submit
Advertisement
Video
-
Use a name that’s not already defined as a function name in Excel or you’ll end up being able to use only one of the functions.
-
Whenever you write a block of code inside a control structure like If, For, Do, etc. make sure you indent the block of code using a few blank spaces or the Tab key. That will make your code easier to understand and you’ll find a lot easier to spot errors and make improvements.
Show More Tips
Thanks for submitting a tip for review!
Advertisement
-
The functions used in this article are, by no means, the best way to solve the related problems. They were used here only to explain the usage of the control structures of the language.
-
VBA, as any other language, has several other control structures besides Do, If and For. Those have been explained here only to clarify what kind of things can be done inside the function source code. There are many online tutorials available where you can learn VBA.
-
Due to security measures, some people may disable macros. Make sure you let your colleagues know the book you’re sending them has macros and that they can trust they’re not going to damage their computers.
Advertisement
About This Article
Article SummaryX
1. Open Excel.
2. Press Alt + F11 to open the Visual Basic editor.
3. Create the function’s name and set the parameter types.
4. Use VB code to write your function.
5. Close the editor.
6. Run your function as you would other functions.
Did this summary help you?
Thanks to all authors for creating a page that has been read 640,161 times.