
One way you can change the style of a document is by adding a new text font. To add a font to Word, download and install the font in Windows, where it will become available to all Microsoft 365 applications.
Fonts come as files, and there are many sites on the Internet where you can download free fonts, such as DaFont. You can also import font files from a CD, a DVD, or your organization’s network. TrueType (file extension .ttf) and OpenType (.otf) fonts both work fine.
Note: Before you download a font, make sure that you trust the source.
Add a font
-
Download the font files. These often come compressed in .zip folders. In one .zip folder, you might find several variations on the same font, such as “light” and “heavy.” A .zip folder usually looks like this:

-
If the font files are zipped, unzip them by right-clicking the .zip folder and then clicking Extract. Now you’ll see the available TrueType and OpenType font files:
-
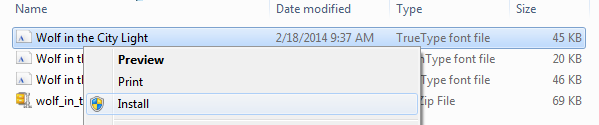
Right-click the fonts you want, and click Install.
-
If you’re prompted to allow the program to make changes to your computer, and if you trust the source of the font, click Yes.
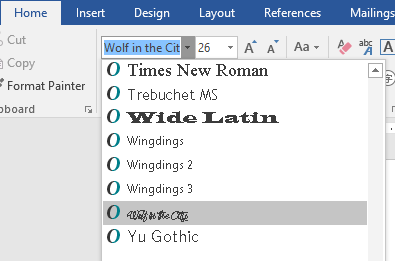
Your new fonts will appear in the fonts list in Word.


Here are two other ways to install and manage fonts:
-
All fonts are stored in the C:WindowsFonts folder. You can also add fonts by simply dragging font files from the extracted files folder into this folder. Windows will automatically install them. If you want to see what a font looks like, open the Fonts folder, right-click the font file, and then click Preview.
-
Another way to see your installed fonts is through Control Panel. In Windows 7 and Windows 10, go to Control Panel > Fonts. In Windows 8.1, go to Control Panel > Appearance and Personalization > Fonts.
The next time you start Word, you’ll see the fonts you added in the Font list.
Need more help?
Want more options?
Explore subscription benefits, browse training courses, learn how to secure your device, and more.
Communities help you ask and answer questions, give feedback, and hear from experts with rich knowledge.
-
1
Download the font from a trusted website. Fonts are a common way to transmit viruses, so take care to only download fonts from trusted sources, and avoid any fonts that come in EXE format. Fonts typically come packed into ZIP files, or in TTF or OTF format. A few of the more popular font sites include the following:
- dafont.com
- fontspace.com
- fontsquirrel.com
- 1001freefonts.com
-
2
Extract the font file if necessary. If your font downloads in a ZIP folder, double-click the folder, then click Extract at the top of the window, click Extract all, and click Extract at the bottom of the window.
- Skip this step if the font downloads in TTF or OTF format, not in a ZIP folder.
Advertisement
-
3
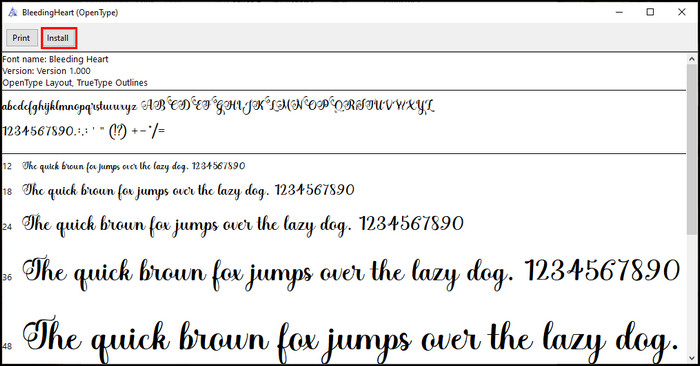
Double-click the font file. Doing so will open the font in a preview window.
-
4
Click Install. It’s at the top of the preview window.
-
5
Click Yes if prompted. Since installing a font requires administrator permissions, you may be prompted to confirm this step.
- If you aren’t on an administrator account, you can’t install a font.
-
6
Wait for the font to install. This will usually only take a few seconds. Once the font is installed on your computer, it will be accessible by any programs which use system fonts, including Microsoft Word.


Advertisement
-
1
Download a font. There are tons of sites that host font files that you can download for free (for home use). MacOS supports both OTF and TTF font formats, which are two of the most common font types. Some of the more popular font sites include the following:
- dafont.com
- fontspace.com
- fontsquirrel.com
- 1001freefonts.com
-
2
Extract the font file if necessary. Since most font files download in a ZIP folder, you’ll need to unzip the folder by double-clicking it and waiting for the extracted folder to open.
- Skip this step if your font downloads as a TTF or OTF file, not a ZIP folder.
-
3
Double-click the font file. Doing so will bring up a preview window.
-
4
Click Install Font. It’s at the top of the preview window. This will install your font for all text-based programs on your Mac, thus making it usable with Microsoft Word.[1]


Advertisement
-
1
Note the installed font’s name. Since fonts in Word are listed in alphabetical order, you’ll need to know the first few letters of your font in order to find it.
-
2
Open Microsoft Word. Its app icon resembles a white «W» on a dark-blue background.
- If Microsoft Word was already open, close it and then re-open it. Failing to do this may prevent your font from showing up until you restart Word.
-
3
Click Blank document. You’ll find this option in the upper-left side of the launch page. Doing so opens a new Word document.
-
4
Click the Home tab. It’s at the top of the Word window.
-
5
Open the «Font» drop-down menu. Click
to the right of the current font’s name in the toolbar. You should see a drop-down menu appear.
-
6
Find your new font. Scroll through the drop-down menu until you find your font’s name.
-
7
Test the font. Click the font’s name, then try typing using the font. You may need to adjust the size of the font in order for it to appear normal.


Advertisement
Add New Question
-
Question
What can I do if my fonts don’t appear in the dropdown?

Closing Microsoft Word and then opening it again will usually refresh the font list. If this doesn’t work, try re-installing the font.
-
Question
It says it does not appear to be a valid font and cannot install. What should I do?
Instead of copying onto the control panel, double click on the extracted font file. You will then see either an open type or a true type file, double click on this and a preview of the font will show up. On the top left area of the window, there will be a button saying install. Click that.
-
Question
How do I rename the font?
Never rename a font while it’s in the installed folder; it could get corrupted. Delete the font, and reinstall it. Before putting it into the fonts folder, right-click it, and select the option «Rename.» After naming it whatever you want, put it into the fonts folder normally.
See more answers
Ask a Question
200 characters left
Include your email address to get a message when this question is answered.
Submit
Advertisement
-
After a font is installed, it will be available in all Microsoft Office programs.
-
If you plan on sending your Word document to someone else, save it as a PDF to ensure that your custom font is retained. You can save as a PDF by clicking the «Save as type» (Windows) or «Format» (Mac) drop-down box on the «Save» window and then selecting PDF.
Thanks for submitting a tip for review!
Advertisement
-
Some symbols aren’t available in all fonts.
Advertisement
About This Article
Article SummaryX
1. Download the font.
2. Unzip the font if necessary.
3. Double-click the font.
4. Click Install or Install Font.
Did this summary help you?
Thanks to all authors for creating a page that has been read 1,721,473 times.
Is this article up to date?
Inject some personality into your words
What to Know
- Easiest option for Windows: Right-click the .ttf or .otf file and select Install.
- Next easiest: Go to Start > Control Panel > Fonts. In another window, drag the .ttf or .otf file into the font folder you just opened.
- For Word for Mac, double-click the font file to open a preview > Install Font.
This article explains how to install fonts in Windows, Word for macOS, Microsoft Word Online, Word for Android, and Word for iOS. Instructions in this article apply to all versions of Word going back to 2011 as well for Windows 10, 8, and 7, macOS, Android, and iOS.
How to Install a Font on Windows
Let’s learn how to install a font on Windows so we can then add it to Word. Installing a font on Windows is the same from Windows 10 all the way back to Windows 7. There are 2 ways to install.
Method 1
-
If you don’t see a .ttf or .otf file, you may have to extract it from a zip file.
-
Once you have a .ttf or .otf file, right-click the file and select Install.
-
You will briefly see an installation progress window as it installs.
Method 2
-
Select Start > Control Panel > Fonts to open your system’s font folder.
-
In another window, find the font you want to install. If you downloaded the font from a website, then the file is probably in your Downloads folder. The font file will likely have a .ttf or .otf extension.
-
Drag the desired font into your system’s font folder. You can drop it into any white space between the other font icons in the font control panel.
Font sets are often contained within .zip files, so you must extract them before dragging the actual font files into your system’s Fonts folder. For guidance on how to extract, or unzip, a .zip file, see Zip Files: Unzip Them With the Right Software. If a .zip file contains multiple variations of a font, you must install each one individually.
-
Once the font is in the correct folder, it should install automatically. If it doesn’t, double-click the font file to open the Font Previewer, and click the Install button in the upper-left corner. The next time you open Word, the new font should appear as an option in the font list.
How to Add Fonts to Word for Mac
Before you can use new Microsoft Word fonts on Mac, you must add them to the app for managing fonts on macOS, the Font Book:
-
Locate your font file and double-click it to open the font preview window. You may need to unzip the file first.
-
Click Install Font near the bottom of the font preview window, which should open the Font Book.
-
If you’re using the 2011 version of Office for Mac, then you must also drag and drop the font file into the Windows Office Compatible collection, which can be found in the left sidebar of the Font Book.
-
After restarting your Mac, the font should be available in Word and most other apps including PowerPoint and Excel.
Fonts will only display properly in Word if they are installed on the user’s device. Text formatted with unsupported fonts will usually appear in a default font such as Times New Roman. If you plan on sharing your Word files with others, you may need to embed some fonts. You can only embed fonts in the Windows versions of Word, and the specific font must allow embedding. Check the list of Microsoft fonts supported by each version of MS Office to determine which fonts you might need to embed.
How to Add Fonts to Word Online
If you’re using the Microsoft Word Online app as part of Microsoft 365, you can make use of any font installed on your system. Just type the name of the font file minus the extension into the Font Options box.
When you save the document, the font name will appear in the font options box and display properly for any user who has that font installed on their device. Unfortunately, Word Online doesn’t let you embed fonts.
If I Add Fonts in Word, Do They Transfer Over to Excel or PowerPoint?
Yes. Once you add a font to your operating system and ensure that it’s compatible with Word, then you should be able to use it in any MS Office application including Microsoft Excel and PowerPoint.
How to Add Fonts to Microsoft Word for Android
Unfortunately, adding fonts to the newest version of MS Word for Android is much more difficult than it used to be. Before you begin, you’ll need root access to your device. Lifewire has an in-depth guide explaining how to root any Android device.
Rooting your device could void the warranty and cause hardware malfunctions. Before you attempt rooting, back up your important data using an app like Helium.
-
With your rooted Android device, download FX File Explorer and install the root add-on.
-
Open FX File Explorer and locate your font file.
-
Select the font file by holding your finger on it for a few seconds, and then tap Copy in the upper right corner of the screen. If successful, you’ll see a new icon in the upper right corner that says «1 copied.»
Use the FX File Explorer app to locate your font and copy it.
-
Now, close out FX File Explorer, locate the MS Word app and hold your finger on the file icon to make a menu pop up. If your device has been rooted, you should see an Explore data option in addition to Open and Uninstall.
-
Tap Explore data and find the font directory by navigating to Files > Data > Fonts.
-
Paste the font file inside the font directory by tapping the «1 copied» icon in the upper right of your screen and selecting Paste from the menu that appears.
-
The font will now appear as an option in MS Word.
How to Add Fonts to Microsoft Word for iOS
To add a font to an iPhone or iPad, you’ll need a font installer app such as AnyFont, which you can download from the App Store.
-
Move the desired font file into your iCloud.
-
From iCloud, tap the font file, and then tap Share > More (ellipsis) in the upper right corner of your screen.
-
From the Apps menu, tap AnyFont.
-
Once AnyFont opens, you should see your font file. Tap > next to the font on the right side.
-
Tap Install on the next screen that appears.
-
Tap Allow if prompted to allow a configuration profile download.
-
Go to Settings > General > Profiles,
-
Under Downloaded Profile, select the font.
-
Select Install on the top right corner.
-
Select Next.
-
Select Install on the Unsigned Profile window.
-
When asked for confirmation, select Install.
-
Select Done.
-
Open Word and select font under iOS Fonts.
Download Fonts for Microsoft Word
You can install any font file on any OS. You can find fonts online at Creative Market, Dafont, FontSpace, MyFonts, FontShop, and Awwwards. Some fonts are free while others must be purchased. When you download a font, it typically goes to your system’s Downloads folder unless you specify otherwise.
FAQ
-
How do I embed my Word fonts into a PDF?
On a Mac, select File > Print > PDF > Save as PDF > Save to convert the document to a PDF and embed all fonts. Windows machines should also automatically embed fonts when you convert a Word document to a PDF. To check, open the PDF in Acrobat Reader then select File > Properties > Fonts tab and make sure your fonts are embedded.
-
Why aren’t the correct fonts appearing in my PDF?
You might need to adjust your Acrobat conversion settings. In Word, select Acrobat > Preferences > Advanced Settings. Select the Fonts section and check Embed all fonts.
-
How do I remove fonts from Word?
In Windows, open the Control Panel and enter fonts into the search, then choose the font you don’t want and select Delete. On a Mac, open Font Book and pick the font you want to get rid of, then select File > Remove.
Thanks for letting us know!
Get the Latest Tech News Delivered Every Day
Subscribe
Microsoft Word is the ultimate tool to fulfill your writing requirements. It offers almost every possible function for a better user experience, except the ability to add a new font directly to Word documents.
Word has a ton of pre-installed fonts to choose from. However, you may need to add a font to your Word file to make the document more visually satisfying and appealing.
Though Word doesn’t have any option to add a font to the Word font list, you can install any font on your device and use them on Microsoft Word.
In this guide, I will walk you through the steps to installing or removing a new font for Word and other MS Office applications.
Tag Along!
Check out our separate post on how to Double Space in Microsoft Word
Adding fonts to MS Word is very straightforward. There are several ways to install fonts. On Windows, you can directly install a font by right-clicking on it, or you can use your Windows settings.
There are two types of font files; one of them is TrueType (.ttf), and the other one is OpenType (.otf). You can download font files from numerous websites, including Google Fonts, DaFont, or FontSpace.
Many more websites also offer a vast list of font collections. Before downloading any font, ensure the site is trusted; otherwise, you can download a file that contains viruses and malware.
After downloading the fonts, unzip the font folder if the folder is zipped. Now follow the below instructions to install the fonts on your system directly.
Also, check out our separate post on how to Fix: Microsoft Word Table Of Contents Not Updating
1. Install Fonts Using the Installer
Use the basic installer to install any font for word or other Office applications. Go through the subsequent instructions to successfully install a fond with the installer.
Here are the steps to install fonts using the installer:
- Open the File Explorer by pressing the Windows + E keys.
- Go to the folder where you stored the font files.
- Double-click on the font file.
- Click on the Install button.

After successfully installing the font, you can now access the font on your MS Word application along with other Office apps. Install each font individually to access additional styles of a font family.
Read more on Microsoft Word Read Aloud Stopped Working
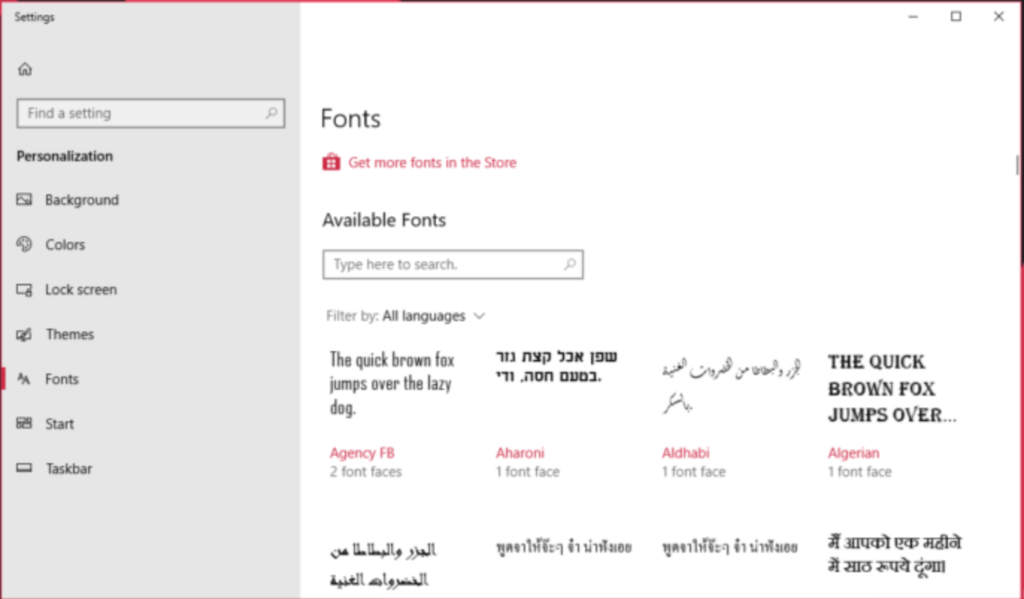
2. Install Fonts Using Settings
You can also use the Settings of Windows to install a font. The process is almost similar for Windows 10, 7, & 8. Follow the following methods to install fonts using Settings.
Here are the methods to install fonts using Settings:
Following the above steps will install your fonts on your device, instantly available within any Office application, including MS Word.
You can also search for fonts in the Microsoft Store and install them directly on your computer from the Get more fonts in Microsoft Store option. 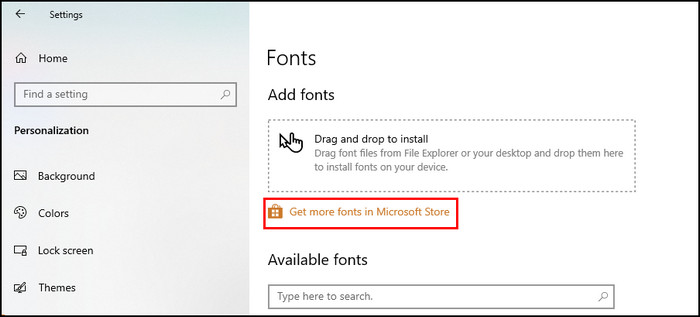
Also, check out our separate post on how to Unlock Selection in Word
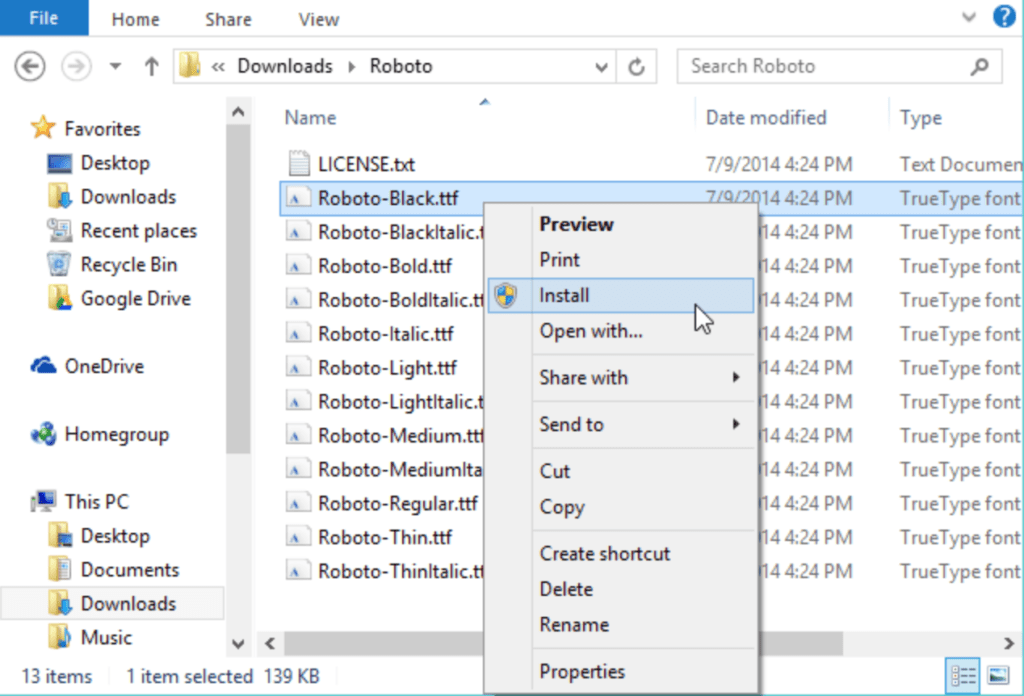
If you have multiple users on your computer, you can install fonts using the context menu to limit the access to who can use the specific font. The instructions below show you how to install fonts using the context menu.
Here are the ways to install fonts using the context menu:
- Launch the File Explorer.
- Navigate to the font folder.
- Right-click on the font file.
- Select Install to install the font only for your account. You can also select the Install for all users option to install the font for all user’s accounts.

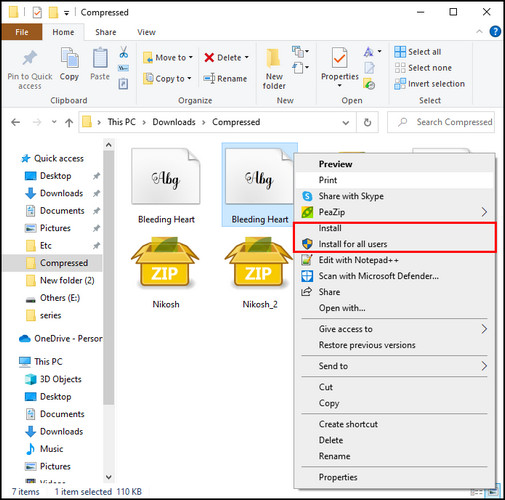
Installing the font with the context menu will immediately install your fonts on your computer. And the font can be used by every user if you choose the Install for all users option when installing the font.
After completing the installation, your font will be ready to use on MS Word and other Office applications. It is also possible to add fonts on your Mac devices. Keep reading the following to install fonts on your Mac successfully.
Check out our separate post on Fix Export to PDF Error in Word
How to Install Fonts to MS Word on Mac
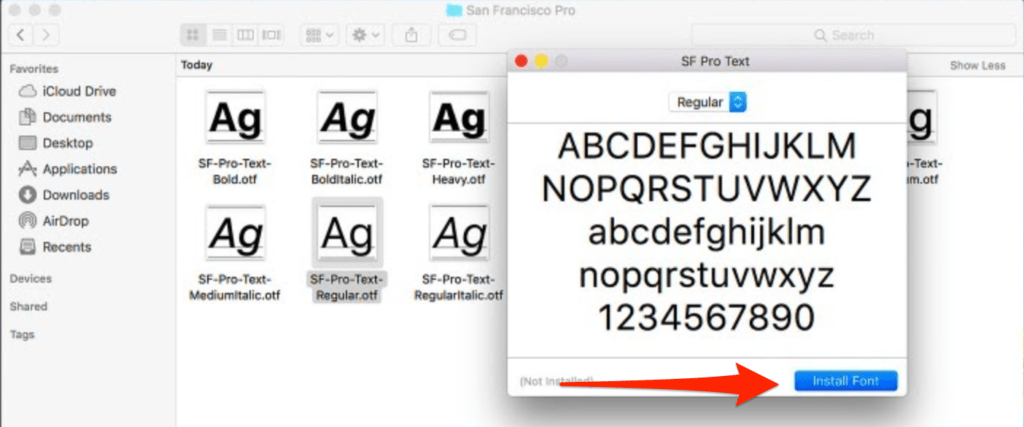
Installing fonts to Mac is super simple; download your desired fonts from any trusted site and unzip the file. After unzipping, place the file in a folder and follow the instructions below to install fonts on your Mac.
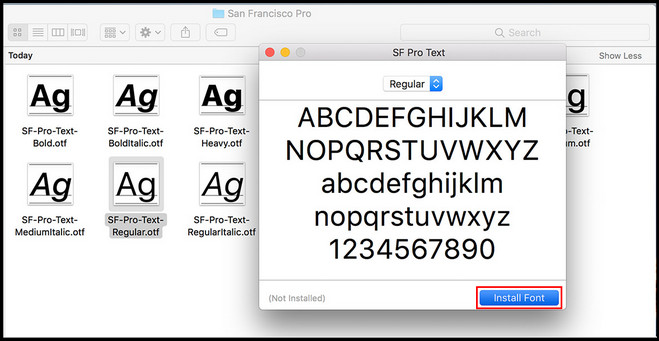
Here are the steps to install fonts to MS Word on Mac:
- Navigate to the folder where you stored the font files.
- Open the file by double-clicking on it.
- Wait for the Font Preview window to appear.
- Click Install Font from the bottom-right corner.

That will successfully install the font on your Mac device. It will be available on MS Word and other applications.
There are also some font manager applications for better managing your fonts on Mac. Font Book is one of them. In case you use Microsoft Word Online, you can easily add any fonts to MS Word. To learn more, keep reading.
Also, check out our separate post on how to Fix: Find and Replace Not Working On Microsoft Word
How to Add Fonts to Word Online
You can use your device fonts for the Word online version. To use any font in the Word web version, first install the font on your device by following the previous methods.
Quick Note: When installing a new font on your device, ensure the Word Online is closed. If you install the font while Word Online is running, you may not be able to see the font on the Word font list.
The instructions below will help you use any font for Word Online. Just type the font’s name in the font name box to use the desired font.
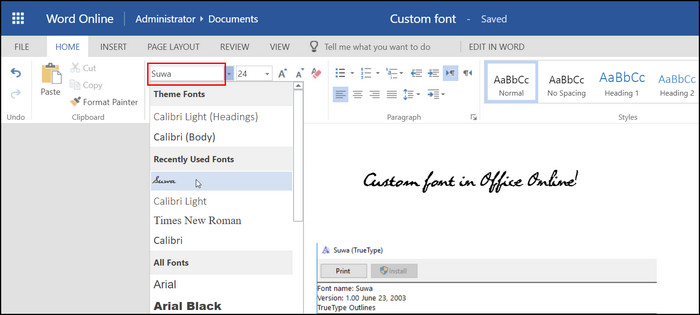
Here are the steps to add fonts to Word Online:
- Install the font on your device while Word Online is closed.
- Launch Microsoft Word Online on your web browser.
- Select the Font tab from the top toolbar.
- Type the font name in the display box.
- Press the Enter button to apply the font for your current document.

Following the above steps, you can quickly use any preferred font for your Word document or as a part of your Word file’s text.
You may also like to read How to Flip Quotation Marks in Word
How to Embed Fonts in a Microsoft Word Document
When you use a less popular font style for your word file and share it with someone, there is an excellent chance that they will not be able to see the font on their device if they don’t have the specific font installed.
To avoid this unwanted situation, you can embed the font with your word file, so the receiver can easily enjoy the doc with your favorite font. Follow the instructions below to embed a fond within the word file.
Here are the methods to embed a font within the Word file:
The above process will embed the essential font styles within the Word document, and anyone from any device can easily read the document with the embedded fonts.
Here’s a complete guide on how to Make a Resume in Word
Frequently Asked Questions
How do I import a font into Word?
You can import a font into Word by installing the font on your device. Right-click on the font file you want to import and click Install. After the installation, launch Word and search by the font name and select it to use for your document.
How do I remove fonts from Word?
In Windows, navigate to Control Panel > Fonts. Search for the font name, then choose the font you want to remove. Select the Delete button and click Yes to successfully remove the font.
Why does the font change in Word?
When you use a font installed on your device, and then you open the same document with another device that doesn’t have the same font installed. The MS Word will automatically change the font for the missing one.
A Final Thought
Though you will find a considerable pre-installed font collection in Microsoft Word or other programs, you can efficiently add various fonts to enhance the quality and looks of your documents.
While adding a new font to your Word document, remember that the document with not be able to show the fonts appropriately on other devices that don’t have the same font installed. In that case, embed your fonts with the document.
In this article, I have covered all the possible ways to download, install and use any fonts in your Word document. Do you have any additional queries? Mention them in the below comment section.
Microsoft Word is an incredible app used by several people around the world. It has tons of features to make it a well-rounded writing and editing platform.
The fact that it comes with so many fonts is another one of its excellent features. However, despite the wide choice range, you may not find the right match at times. Sometimes you may want a more formal-looking font; sometimes you may need something funkier to achieve that “wow“ effect.
The good news is you can do this. All you have to do is find and download the font you like and then add it to Word.
Sounds simple, right? It is if you know the right way to do it.
In this guide, I’ll show you how you can add fonts to Microsoft Word on Windows, Mac, and directly from your web browser.
Using Third-Party Services to Download Fonts for Your Microsoft Word
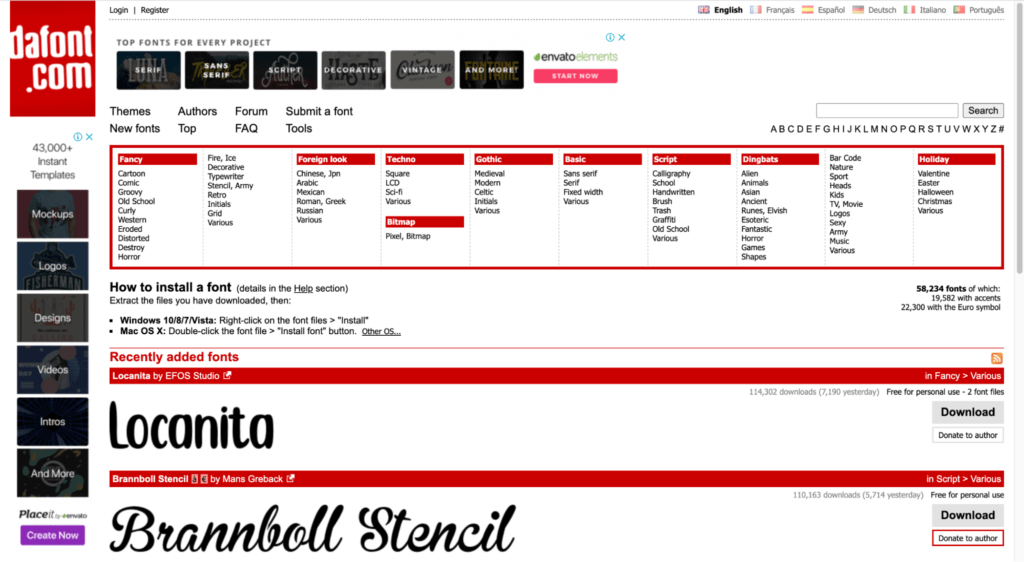
Start by downloading the font from a trusted website. You must be extremely careful while doing this as fonts are one of the most common ways to transmit viruses. Make a point to only download fonts from trusted sources, and avoid any fonts that come in EXE format.
It’s very common for all fonts to come into ZIP files, in addition to the TTF or OTF formats. Below, we have a compiled list of some of the most popular font sites that contain hundreds of varied and unique fonts:
- www.dafont.com
- www.fontspace.com
- www.fontsquirrel.com
- www.1001freefonts.com
You can select a font size that suits your requirements best from these sites The good news is that most of them offer free fonts. Therefore, you can be sure to find what you’re looking for.
How to Add Fonts to Microsoft Word on Windows
Before adding a font to Microsoft Word, you have to first download the fonts. Let’s take a look at how you can achieve this.
Step #1 – Go to the font manager on your Windows desktop. Click on Start, followed by Control Panel.
Step #2 – Select Fonts. A Font menu will appear.
Step #3 – Choose the font that you want to add to Microsoft Word and then download it.
Step #4 – The font will be saved to the folder on your Windows desktop once the download folder is complete. The file will then be saved in a TTF or OTF format.
Note that if it’s a zip file, you’ll have to extract it.

Step #5 – At this stage, you’ll have to add fonts to Microsoft Word. Since you’ve already downloaded the font file, you can proceed to open the font control panel on Windows again.
Step #6 – Drag the font folder to the font control panel. This will successfully add the font to your system.
Once the font is added, it’ll be automatically installed as well.
If the added font fails to function properly, you‘ll have to install it manually by opening the file and clicking on the Install button. So keep this in mind when proceeding.
Step #7 – Once the font is installed on your Windows, it’ll be automatically added to your Microsoft Word. Therefore, you don’t need to do much here.
You can then open the Word software and use the font by selecting it in the font menu.
How to Add Fonts to Microsoft Word on Mac
The process of adding fonts to Microsoft Word on a MacBook is typing different from that on Windows. That said, the difference is slight and not hard to comprehend.
Here’s what you need to do:
Step #1 – The first step is to download the font. On the Mac system, users have to install a font manager before all. We highly recommend using Font Book for this purpose.
Step #2 – Look for the font file you want to add to Microsoft Word once the Font Book is done getting installed. Open it in the font preview window on your device.
Step #3 – Once you’ve finalized the font, click on the Install Font button located under the bottom of the font preview window. Click on it, and send the font to the Font Book software. This way, the font will be saved on your MacBook.
Step #4 – Open Font Book on your device and find the installed font you just added to the manager.
Step #5 – On the left side of the Font Book software, you’ll find a Windows Office Compatible field. Add the installed font here.
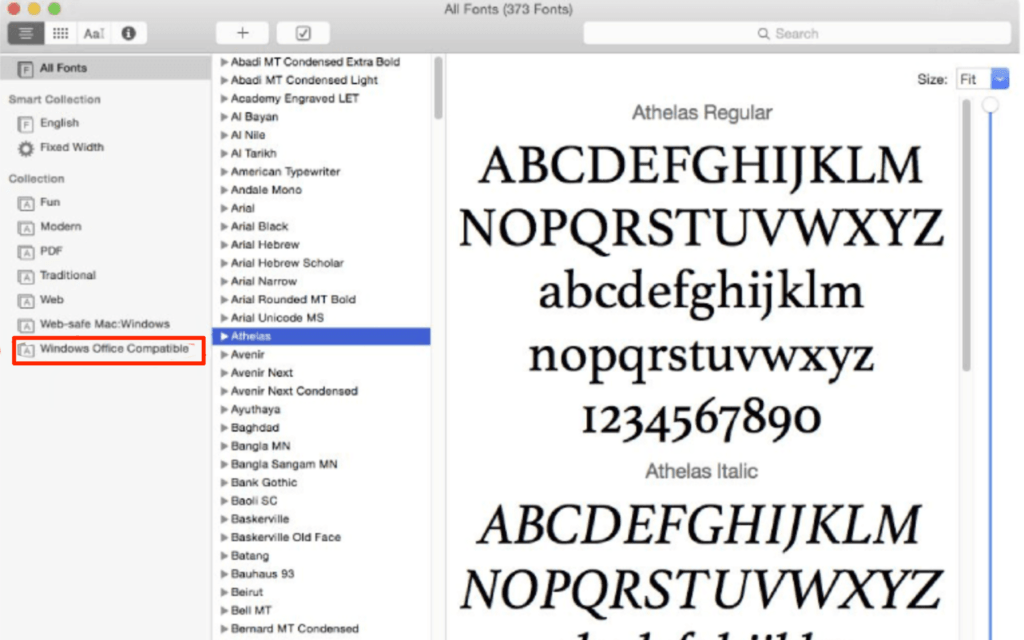
Once the font is added to the Windows Office Compatible field in Font Book, all that’s left for you to do is restart your device.
Step #6 – Scroll your cursor to the top of your Mac’s screen and click on the Restart button after selecting the Apple icon. The font will be automatically added to Microsoft Word once your Mac reopens.

Moreover, once you install a font on your MacBook, you can use it across all applications installed on the device.
How to Add Fonts to Word Online
You can use any of the fonts installed on your system if you’re using the Microsoft Word online app as part of Microsoft 365. All you have to do is type the name of the font file minus extension, and it’ll be done.
Let’s discuss the steps in more detail below.
Step #1 – Install the new font you want to use on your device.
Step #2 – Open Microsoft Word Online directly from your web browser. You should see the installed new font in the Home toolbar section.
Step #3 – Click on the Font tab on the presented toolbar. Follow this by clicking on the box that is indicating the font that’s currently active.
Step #4 – Type in the name of the new font in the display box.
Step #5 – Hit the Enter button. The font will then be applied to the document or your current text selection.
Alternatively, you can click on the downward-facing arrow and scroll through the presented list. This is only applicable when you want to test the available font options. Otherwise, you can simply type in the name of your desired font if you know what it’s called.
Disclaimer: If Word Online is already active while you’re installing the font, the changes won’t be applied, due to which you won’t be able to see the new font on the present list. In this case, you’ll restart Word Online, after which the new font will be added to the selection.
Keep in mind that you must change the font every time you start a new document. You see, the change in the font will only apply to the current document – and not the future documents.
The Bottom Line
Your fonts can play a crucial role in enhancing the personality of your documents and text. So don’t be afraid to play around with them to make your content more effective.
Even if you don’t like the current font selection of your device, you can always add new ones that suit your requirements better.
Hopefully you find this guide useful and can download and add fonts to your Windows, Macbook devices, and the online version of Microsoft Word.