Add-ins provide optional commands and features for Microsoft Excel. By default, add-ins are not immediately available in Excel, so you must first install and (in some cases) activate these add-ins so that you can use them.
Are you looking for information about Office Add-ins based on HTML, CSS, and JS? If you are, see Get an Office Add-in for Excel.
Some add-ins are built in to Excel, such as Solver and the Analysis ToolPak. Other add-ins are available from the Download Center and must first be downloaded and installed. Finally, there are add-ins that are created by third parties, such as a programmer in your organization or a software solution provider. These can be Component Object Model (COM) add-ins, Visual Basic for Applications (VBA) add-ins, and DLL add-ins. These add-ins must also be installed to use them.
Most add-ins can be categorized into three different types:
-
Excel add-ins These typically include Excel add-in (.xlam), Excel 97-2003 add-in (.xla), or DLL add-in (.xll) files or they are automation add-ins. Some Excel add-ins, such as Solver and the Analysis ToolPak, may be available after you install Excel or Microsoft Office. Typically, you only need to activate these add-ins to use them.
-
Downloadable add-ins Additional add-ins for Excel can be downloaded and installed from Downloads at Office.com.
-
Custom add-ins Developers and solution providers usually design custom Component Object Model (COM) add-ins, automation add-ins, VBA add-ins, and XLL add-ins. These must be installed for you to use them.
After you have installed or activated an add-in, the add-in and its commands may be available in one of the following locations:
-
Data tab. After you install and activate the Analysis ToolPak and Solver add-ins, the Data Analysis and Solver commands are available in the Analysis group.
-
Formulas tab. After you install and activate the Euro Currency Tools, the Euro Conversion and Euro Formatting commands are displayed in the Solutions group.
-
Add-Ins tab. Other add-ins may be added to the Add-Ins tab. This tab is added to the ribbon when you install and activate the first add-in that is shown in the Add-Ins tab. If you don’t see the Add-Ins tab, you should exit and then restart Excel.
Other add-ins, such as the Get Started tab, are available in other places in Excel, such as a tab on the ribbon, or through macros or customized menus.
Important: If you are a software developer, you can use this procedure to install or remove an automation program before you design installation and removal programs for your add-in.
To activate an Excel add-in
-
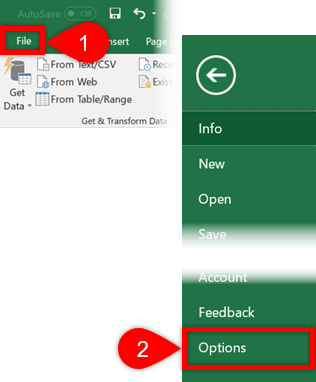
Click the File tab, click Options, and then click the Add-Ins category.
-
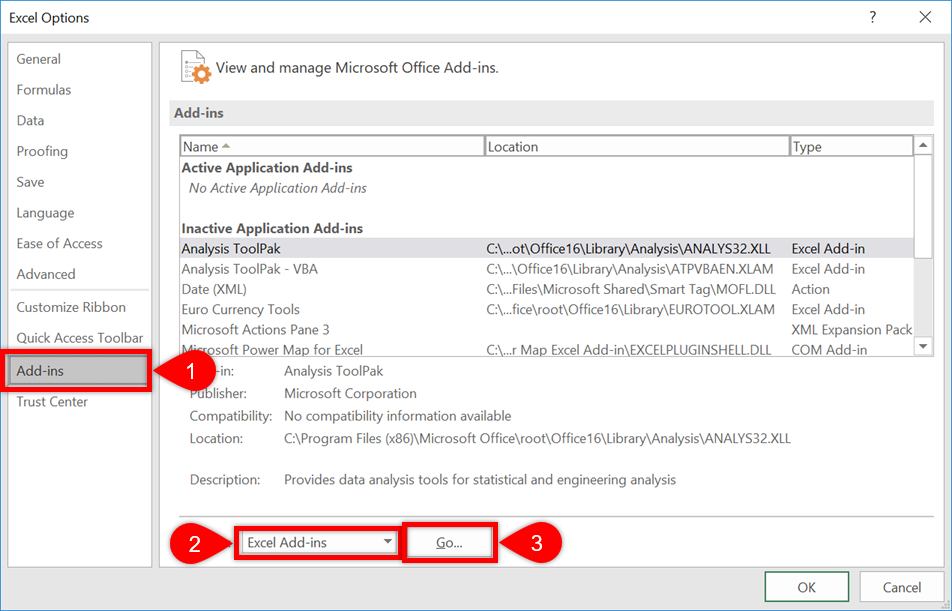
In the Manage box, click Excel Add-ins, and then click Go.
The Add-Ins dialog box appears.
-
In the Add-Ins available box, select the check box next to the add-in that you want to activate, and then click OK.
If you cannot find the add-in that you want to activate in the Add-Ins available box, you may need to install it.
To install an Excel add-in
-
To install an add-in that is typically installed with Excel, such as Solver or the Analysis ToolPak, run the setup program for Excel or Microsoft Office and choose the Change option to install the add-in. After you restart Excel, the add-in should appear in the Add-Ins available box.
-
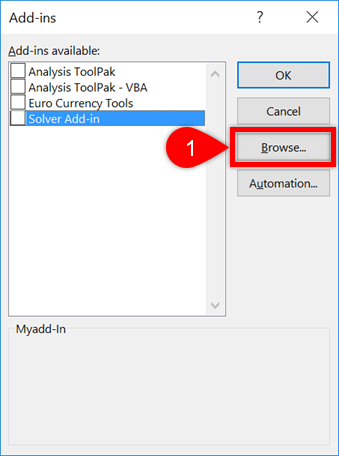
Some Excel add-ins are located on your computer and can be installed or activated by clicking Browse (in the Add-Ins dialog box) to locate the add-in, and then clicking OK.
-
Some Excel add-ins require running an installation package. You may need to download or copy the installation package to your computer (an installation package is typically a file with an .msi file name extension), and then run it.
-
Other add-ins that are not available on your computer can be downloaded and installed through a Web browser from Downloads or from other sites on the Internet or a server in your organization. Follow the setup instructions for the download as needed.
To inactivate an Excel add-in
-
Click the File tab, click Options, and then click the Add-Ins category.
-
In the Manage box, click Excel Add-ins, and then click Go.
-
In the Add-Ins available box, clear the check box next to the add-in that you want to inactivate, and then click OK.
In many cases, when you inactivate an add-in, it is removed from its group on the ribbon. In other cases, to remove the add-in from the ribbon, you may need to restart Excel.
Note Inactivating an add-in does not remove the add-in from your computer. To remove the add-in from your computer, you must uninstall it.
To remove an Excel add-in
Important: If you originally installed the Excel add-in from a network file server or from a shared folder, you might need to remove the add-in from that location. If you installed the Excel add-in from a CD and you mapped your CD drive to a new drive letter after installing the add-in, you need to reinstall the add-in from the CD. If you are running any Excel add-ins from the CD, you must uninstall the Excel add-ins, and then reinstall them from the CD.
-
Click the File tab, and then click Exit.
-
In Control Panel, click Programs and Features (Windows 7 and Windows Vista) or Add/Remove Programs (Windows XP).
-
Do one of the following:
-
If you installed Excel as part of Microsoft Office, click Microsoft Office in the list of installed programs, and then click the Change button.
-
If you installed Excel individually, click the name of your program in the list of installed programs, and then click the Change button.
-
If you installed the add-in from the Download Center, click the name of your program in the list of installed programs, and then click the Uninstall button.
-
-
Follow the instructions in the installation program.
Important: If you are a software developer, you can use this procedure to install or remove an automation program before you design installation and removal programs for your add-in. If you are not a developer, you should not need to use this procedure. Contact the system administrator who provided the add-in if you want installation and removal instructions.
Add a COM add-in
-
Click the File tab, click Options, and then click the Add-Ins category.
-
In the Manage box, click COM Add-ins, and then click Go.
The COM Add-Ins dialog box appears.
-
In the Add-Ins available box, select the check box next to the add-in that you want to install, and then click OK.
Tip If the add-in that you want to use is not listed in the Add-Ins available box, click Add, and then locate the add-in.
Remove a COM add-in
-
Click the File tab, click Options, and then click the Add-Ins category.
-
In the Manage box, click COM Add-ins, and then click Go.
The COM Add-Ins dialog box appears.
-
In the Add-Ins available box, clear the check box next to the add-in that you want to remove, and then click OK.
Note This removes the add-in from memory but keeps its name in the list of available add-ins. It does not delete the add-in from your computer.
-
To remove a COM add-in from the list of available add-ins and to delete the add-in from your computer, click its name in the Add-ins available box, and then click Remove.
Note: If you are a software developer, you can use this procedure to install or remove an automation program before you design installation and removal programs for your add-in. If you are not a developer, you should not need to use this procedure. Contact the system administrator who provided the add-in if you want installation and removal instructions.
-
Click the File tab, click Options, and then click the Add-Ins category.
-
In the Manage box, click Excel Add-ins, and then click Go.
The Add-Ins dialog box appears.
-
To install an automation add-in, in the Automation servers available box, click Automation, and then click the add-in that you want.
Tip If the add-in that you want isn’t in the list, click Browse, locate the add-in, and then click OK.
-
To remove an automation add-in, you must remove it from the registry. See your system administrator for details.
Some add-ins are built in to Excel, such as Solver and the Analysis ToolPak. Other add-ins are available from the Download Center and must first be downloaded and installed. Finally, there are add-ins that are created by third parties, such as a programmer in your organization or a software solution provider. These can be Component Object Model (COM) add-ins, Visual Basic for Applications (VBA) add-ins, and DLL add-ins. These add-ins must also be installed to use them.
Most add-ins can be categorized into three different types:
-
Excel add-ins These typically include Excel add-in (.xlam), Excel 97-2003 add-in (.xla), or DLL add-in (.xll) files or they are automation add-ins. Some Excel add-ins, such as Solver and the Analysis ToolPak, may be available after you install Excel or Microsoft Office. Typically, you only need to activate these add-ins to use them.
-
Downloadable add-ins Additional add-ins for Excel can be downloaded and installed from Downloads at Office.com.
-
Custom add-ins Developers and solution providers usually design custom Component Object Model (COM) add-ins, automation add-ins, VBA add-ins, and XLL add-ins. These must be installed for you to use them.
After you have installed or activated an add-in, the add-in and its commands may be available in one of the following locations:
-
Data tab. After you install and activate the Analysis ToolPak and Solver add-ins, the Data Analysis and Solver commands are available in the Data tab on the ribbon.
-
Home tab. Other add-ins may be added to the Home tab.
Other add-ins, such as the Get Started tab, are available in other places in Excel, such as a tab on the ribbon, or through macros or customized menus.
Important: If you are a software developer, you can use this procedure to install or remove an automation program before you design installation and removal programs for your add-in.
To activate a pre-installed Excel add-in
-
On the Tools menu, select Add-ins.
-
In the Add-Ins available box, select the check box for the Add-in you want to activate, and then click OK.
To install an Excel add-in
-
Some Excel add-ins are located on your computer and can be installed or activated by clicking Browse (in the Add-Ins dialog box above) to locate the add-in, and then clicking OK.
-
Some Excel add-ins require running an installation package. You may need to download or copy the installation package to your computer (an installation package is typically a file with an .msi file name extension), and then run it.
-
Other add-ins that are not available on your computer can be downloaded and installed through a Web browser from Downloads or from other sites on the Internet, a server in your organization, , or using the built-in Store option in Excel. Follow the setup instructions for the download as needed.
To install Add-ins from the Store
-
Click the Insert tab in the ribbon.
-
Click the Store button.
-
Use the Categories or Search field to find Add-ins.
-
Click Add to install the Add-in.
Note: Some Add-ins need to be purchased.
-
To remove an Excel add-in
-
Click the Insert tab, and then click My Add-ins.
-
In Office Add-ins, click the 3 dots menu next to the Add-in.
-
Click Remove.
-
Read the notice that appears regarding other devices and click Remove.
Excel для Microsoft 365 Excel для Microsoft 365 для Mac Excel 2021 Excel 2021 для Mac Excel 2019 Excel 2019 для Mac Excel 2016 Excel 2016 для Mac Excel 2013 Excel 2010 Excel 2007 Еще…Меньше
Надстройки расширяют диапазон команд и возможностей Microsoft Excel. По умолчанию они доступны не сразу, поэтому сначала их необходимо установить и (в некоторых случаях) активировать.
Ищете сведения о Office на основе HTML, CSS и JS? Если да, см. статью Office надстройки для Excel.
Некоторые надстройки, такие как «Пакет анализа» и «Поиск решения», встроены в Excel. Другие доступны в Центре загрузки, и их необходимо предварительно скачать и установить. Кроме того, некоторые надстройки создаются сторонними организациями, например поставщиками программных решений или программистами. Это могут быть надстройки модели COM, надстройки Visual Basic для приложений (VBA) и надстройки DLL. Они также требуют установки.
Большинство надстроек можно разделить на три типа, описанных ниже.
-
Надстройки Excel. Обычно к этому типу относят файлы надстроек Excel (XLAM), Excel 97–2003 (XLA) и надстроек DLL (XLL), а также надстройки автоматизации. Некоторые надстройки Excel, такие как «Пакет анализа» и «Поиск решения», становятся доступны после установки Microsoft Office или Excel. Для использования этих надстроек в большинстве случаев нужно лишь активировать их.
-
Скачиваемые надстройки. Дополнительные надстройки для Excel можно скачать и установить со страницы Загрузки на сайте Office.com.
-
Пользовательские надстройки. Многие разработчики и поставщики решений создают пользовательские надстройки модели COM, надстройки автоматизации, VBA и XLL. Они требуют установки.
После установки надстройки или ее активации соответствующие команды становятся доступны в одном из указанных ниже мест.
-
Вкладка Данные. После установки и активации надстроек «Пакет анализа» и «Поиск решения» в группе Анализ становятся доступны команды Анализ данных и Поиск решения.
-
Вкладка Формулы. После установки и активации инструментов для евро в группе Решения становятся доступны команды Пересчет в евро и Формат евро.
-
Вкладка Надстройки. Другие надстройки можно добавить на вкладку Надстройки. Эта вкладка добавляется на ленту после установки и активации первой надстройки, которая должна отображаться на ней. Если вы не видите вкладку Надстройки, зайдите и перезапустите Excel.
Другие надстройки, такие как вкладка Начало работы, доступны в Excel в других местах, например в виде вкладки на ленте, или через макросы или пользовательские меню.
Важно: С помощью этой процедуры разработчики могут добавлять и удалять надстройки автоматизации перед разработкой программ установки и удаления данных надстроек.
Активация надстройки Excel
-
На вкладке Файл выберите команду Параметры, а затем — категорию Надстройки.
-
В поле Управление выберите элемент Надстройки Excel и нажмите кнопку Перейти.
Откроется диалоговое окно Надстройки.
-
В поле Доступные надстройки установите флажок той надстройки, которую необходимо активировать, а затем нажмите кнопку ОК .
Если в окне Доступные надстройки не удается найти надстройку, которую требуется активировать, возможно, ее требуется установить.
Установка надстройки Excel
-
Чтобы установить надстройку, которая обычно устанавливается вместе с Excel, например «Пакет анализа» или «Поиск решения», запустите программу установки Excel или Microsoft Office и выберите вариант Изменить, а затем выберите требуемую надстройку. После перезапуска Excel она должна появиться в поле Доступные надстройки.
-
Некоторые надстройки Excel хранятся на компьютере. Чтобы установить или активировать их, нажмите кнопку Обзор (в диалоговом окне Надстройки), найдите надстройку, а затем нажмите кнопку ОК.
-
Некоторые надстройки Excel требуют запуска пакета установки. В этом случае может потребоваться загрузить или скопировать пакет установки на компьютер (обычно пакеты установки имеют расширение MSI), а затем запустить его.
-
Другие надстройки, отсутствующие на компьютере, можно скачать и установить с помощью веб-браузера со страницы Загрузки или с других сайтов в Интернете или на сервере организации. Чтобы скачать их, следуйте инструкциям по установке.
Отключение надстройки Excel
-
На вкладке Файл выберите команду Параметры, а затем — категорию Надстройки.
-
В поле Управление выберите элемент Надстройки Excel и нажмите кнопку Перейти.
-
В поле Доступные надстройки снимите флажок той надстройки, которую нужно деактивировать, а затем нажмите кнопку ОК .
Во многих случаях деактивация надстройки приводит к ее удалению с ленты. В других случаях для удаления надстройки с ленты может потребоваться перезапустить Excel.
Примечание. При деактивации надстройки она не удаляется с компьютера. Чтобы удалить надстройку с компьютера, необходимо воспользоваться средством установки/удаления программ.
Удаление надстройки Excel
Важно: Если надстройка Excel была установлена с сетевого файлового сервера или из общей папки, удалять ее, возможно, потребуется там же. Если надстройка Excel была установлена с компакт-диска, а после установки буква диска для дисковода компакт-дисков была изменена, следует выполнить повторную установку надстройки с компакт-диска. При запуске надстроек Excel с компакт-диска необходимо сначала удалить их с компьютера, а затем выполнить повторную установку с компакт-диска.
-
Откройте вкладку Файл и выберите пункт Выход.
-
Выберите в панели управления пункт Программы и компоненты (для Windows 7 и Windows Vista) или Установка и удаление программ (для Windows XP).
-
Выполните одно из указанных ниже действий.
-
Если приложение Excel было установлено в составе пакета Microsoft Office, в списке установленных программ выберите пункт Microsoft Office, а затем нажмите кнопку Заменить.
-
Если приложение Excel было установлено отдельно, в списке установленных программ выберите название программы, а затем нажмите кнопку Заменить.
-
Если вы установили надстройку из Центра загрузки, выберите имя программы в списке установленных и нажмите кнопку Удалить.
-
-
Следуйте инструкциям программы установки.
Важно: С помощью этой процедуры разработчики могут добавлять и удалять надстройки автоматизации перед разработкой программ установки и удаления данных надстроек. Пользователям эта процедура не потребуется. Инструкции по установке и удалению надстройки можно получить у системного администратора, который предоставил эту надстройку.
Добавление надстройки COM
-
На вкладке Файл выберите команду Параметры, а затем — категорию Надстройки.
-
В списке Управление нажмите Надстройки COM, а затем — Перейти.
Откроется диалоговое окно Надстройки COM.
-
В поле Доступные надстройки установите флажок для той надстройки, которую необходимо установить, и нажмите кнопку ОК.
Совет Если нужная надстройка отсутствует в поле Список надстроек, нажмите кнопку Добавить, а затем найдите надстройку.
Удаление надстройки COM
-
На вкладке Файл выберите команду Параметры, а затем — категорию Надстройки.
-
В списке Управление нажмите Надстройки COM, а затем — Перейти.
Откроется диалоговое окно Надстройки COM.
-
В поле Список надстроек снимите флажок той надстройки, которую нужно удалить, а затем нажмите кнопку ОК .
Примечание. В результате надстройка будет удалена из памяти, но ее имя останется в списке доступных надстроек. Надстройка не будет удалена с компьютера.
-
Чтобы удалить надстройку COM из списка доступных надстроек и с компьютера, щелкните ее имя в поле Список надстроек, а затем нажмите кнопку Удалить.
Примечание: С помощью этой процедуры разработчики могут добавлять и удалять надстройки автоматизации перед разработкой программ установки и удаления данных надстроек. Пользователям эта процедура не потребуется. Инструкции по установке и удалению надстройки можно получить у системного администратора, который предоставил эту надстройку.
-
На вкладке Файл выберите команду Параметры, а затем — категорию Надстройки.
-
В поле Управление выберите элемент Надстройки Excel и нажмите кнопку Перейти.
Откроется диалоговое окно Надстройки.
-
Чтобы установить надстройку автоматизации, в поле Доступные серверы автоматизации выберите пункт Автоматизация и щелкните нужную надстройку.
Совет Если нужной надстройки нет в списке, нажмите кнопку Обзор , найдите нужную надстройку, а затем нажмите кнопку ОК .
-
Чтобы удалить надстройку автоматизации, ее нужно удалить из реестра. За дополнительными сведениями обратитесь к системному администратору.
Некоторые надстройки, такие как «Пакет анализа» и «Поиск решения», встроены в Excel. Другие доступны в Центре загрузки, и их необходимо предварительно скачать и установить. Кроме того, некоторые надстройки создаются сторонними организациями, например поставщиками программных решений или программистами. Это могут быть надстройки модели COM, надстройки Visual Basic для приложений (VBA) и надстройки DLL. Они также требуют установки.
Большинство надстроек можно разделить на три типа, описанных ниже.
-
Надстройки Excel. Обычно к этому типу относят файлы надстроек Excel (XLAM), Excel 97–2003 (XLA) и надстроек DLL (XLL), а также надстройки автоматизации. Некоторые надстройки Excel, такие как «Пакет анализа» и «Поиск решения», становятся доступны после установки Microsoft Office или Excel. Для использования этих надстроек в большинстве случаев нужно лишь активировать их.
-
Скачиваемые надстройки. Дополнительные надстройки для Excel можно скачать и установить со страницы Загрузки на сайте Office.com.
-
Пользовательские надстройки. Многие разработчики и поставщики решений создают пользовательские надстройки модели COM, надстройки автоматизации, VBA и XLL. Они требуют установки.
После установки надстройки или ее активации соответствующие команды становятся доступны в одном из указанных ниже мест.
-
Вкладка Данные. После установки и активации надстроек «Надстройка анализа» и «Решение» команды «Анализ данных» и «Найти решение» доступны на вкладке «Данные» на ленте.
-
Вкладка «Главная». Другие надстройки можно добавить на вкладку Главная.
Другие надстройки, такие как вкладка Начало работы, доступны в Excel в других местах, например в виде вкладки на ленте, или через макросы или пользовательские меню.
Важно: С помощью этой процедуры разработчики могут добавлять и удалять надстройки автоматизации перед разработкой программ установки и удаления данных надстроек.
Активация предварительно установленной Excel надстройки
-
В меню Инструменты выберите Надстройки.
-
В поле Доступные надстройки выберите для надстройки, которая вы хотите активировать, и нажмите кнопку ОК.
Установка надстройки Excel
-
Некоторые Excel надстройки находятся на вашем компьютере, и их можно установить или активировать, нажав кнопку Обзор (в диалоговом окне Надстройки выше), чтобы найти надстройку, и нажав кнопку ОК.
-
Некоторые надстройки Excel требуют запуска пакета установки. В этом случае может потребоваться загрузить или скопировать пакет установки на компьютер (обычно пакеты установки имеют расширение MSI), а затем запустить его.
-
Другие надстройки, недоступные на компьютере, можно скачать и установить с помощью веб-браузера из скачивания или с других сайтов в Интернете, с сервера в организации или с помощью встроенной службы Store в Excel. Чтобы скачать их, следуйте инструкциям по установке.
Установка надстройок из Магазина
-
На ленте щелкните вкладку Вставка.
-
Нажмите кнопку Магазин.
-
Для поиска надстройокиспользуйте поле «Категории» или «Поиск».
-
Нажмите кнопку Добавить, чтобы установить надстройки.
Примечание: Некоторые надстройки необходимо приобрести.
-
Удаление надстройки Excel
-
На вкладке Вставка нажмите кнопку Мои надстройки.
-
В Office надстройкищелкните меню 3 точки рядом с надстройки.
-
Нажмите Удалить.
-
Ознакомьтесь с уведомлением о других устройствах и нажмите кнопку Удалить.
Нужна дополнительная помощь?
What are Add-ins in Excel?
An add-ins is an extension that adds more features and options to Microsoft Excel. Providing additional functions to the user increases the power of Excel. An add-in needs to be enabled for usage. Once enabled, it activates as Excel is started.
For example, Excel add-ins can perform tasks like creating, deleting, and updating the data of a workbook. Moreover, one can add buttons to the Excel ribbon and run custom functions with add-ins.
The Solver, Data Analysis (Analysis ToolPakExcel’s data analysis toolpak can be used by users to perform data analysis and other important calculations. It can be manually enabled from the addins section of the files tab by clicking on manage addins, and then checking analysis toolpak.read more), and Analysis ToolPak-VBA are some essential add-ins.
The purposes of activating add-ins are listed as follows: –
- To interact with the objects of Excel
- To avail an extended range of functions and buttons
- To facilitate the setting up of standard add-ins throughout an organization
- To serve the varied needs of a broad audience
In Excel, one can access several Add-ins from “Add-ins” under the “Options” button of the “File” tab. In addition, one can select from the drop-down “Manage” in the “Add-ins” window for more add-ins.
By default, it might hide some add-ins. One can view the unhidden add-ins in the “Data” tab on the Excel ribbonThe ribbon is an element of the UI (User Interface) which is seen as a strip that consists of buttons or tabs; it is available at the top of the excel sheet. This option was first introduced in the Microsoft Excel 2007.read more. For example, it is shown in the following image.
Table of contents
- What are Add-ins in Excel?
- How to Install Add-ins in Excel?
- Types of Add-ins in Excel
- The Data Analysis Add-in
- Create Custom Functions and Install as an Excel Add-in
- Example #1–Extract Comments from the Cells of Excel
- Example #2–Hide Worksheets in Excel
- Example #3–Unhide the Hidden Sheets of Excel
- The Cautions While Creating Add-ins
- Frequently Asked Questions
- Recommended Articles
How to Install Add-ins in Excel?
If Excel is not displaying the add-ins, they need to be installed. The steps to install Excel add-ins are listed as follows:
- First, click on the “File” tab located at the top left corner of Excel.
- Click “Options,” as shown in the following image.
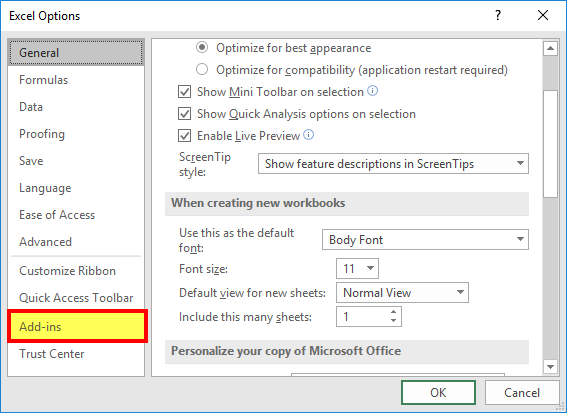
- The “Excel Options” window opens. Select “Add-ins.”
- There is a box to the right of “Manage” at the bottom. Click the arrow to view the drop-down menu. Select “Excel add-ins” and click “Go.”
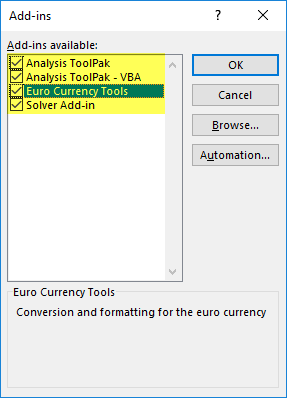
- The “Add-ins” dialog box appears. Select the required checkboxes and click “OK.” We have selected all four add-ins.
- The “Data Analysis” and “Solver” options appear under the “Data tab” of the Excel ribbon.
Types of Add-ins in Excel
The types of add-ins are listed as follows:
- Inbuilt add-ins: These are built into the system. One can unhide them by performing the steps listed under the preceding heading (how to install add-ins in Excel?).
- Downloadable add-ins: These can be downloaded from the Microsoft website (www.office.com).
- Custom add-ins: These are designed to support the basic functionality of Excel. They may be free or chargeable.
The Data Analysis Add-in
The “Data Analysis Tools” pack analyzes statistics, finance, and engineering data.
The various tools available under the “Data Analysis” add-in are shown in the following image.
Create Custom Functions and Install them as an Excel Add-in
Generally, an add-in is created with the help of VBA macrosVBA Macros are the lines of code that instruct the excel to do specific tasks, i.e., once the code is written in Visual Basic Editor (VBE), the user can quickly execute the same task at any time in the workbook. It thus eliminates the repetitive, monotonous tasks and automates the process.read more. Let us learn to create an add-in (in all Excel files) for a custom functionCustom Functions, also known as UDF (User Defined Functions) in Excel, are personalized functions that the users create through VBA programming code to fulfill their particular requirements. read more. For this, first, we make a custom function.
Let us consider some examples.
You can download this Excel Add-Ins Excel Template here – Excel Add-Ins Excel Template
We want to extract comments from specific cells of Excel. Then, create an add-in for the same.
The steps for creating an add-in and extracting comments from cells are listed as follows:
Step 1: Open a new workbook.
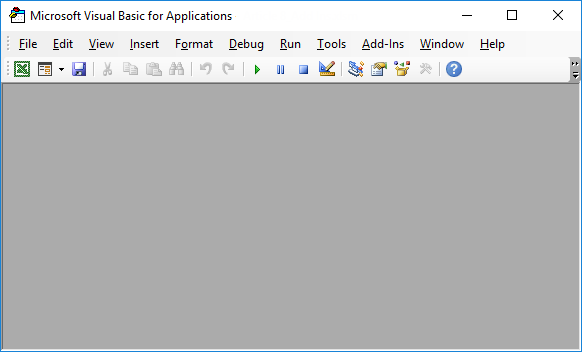
Step 2: Press the shortcutAn Excel shortcut is a technique of performing a manual task in a quicker way.read more “ALT+F11” to access the “Visual Basic Editor.” The following image shows the main screen of Microsoft Visual Basic for Applications.
Step 3: Click “Module” under the “Insert” tab, shown in the following image.
Step 4: Enter the following code in the “module” window.
Function TakeOutComment(CommentCell As Range) As String
TakeOutComment = CommentCell.Comment.Text
End Function
Step 5: Once the code is entered, save the file with the type “Excel add-in.”
Step 6: Open the file containing comments.
Step 7: Select ” Options ” in the “File” tab and select “Options.” Choose “Add-ins.” In the box to the right of “Manage,” select “Excel Add-ins.” Click “Go.”
Click the “Browse” option in the “Add-ins” dialog box.
Step 8: Select the add-in file that had been saved. Click “Ok.”
We saved the file with the name “Excel Add-in.”
Step 9: The workbook’s name (Excel Add-in) that we had saved appears as an add-in, as shown in the following image.
This add-in can be applied as an Excel formula to extract comments.
Step 10: Go to the sheet containing comments. The names of three cities appear with comments, as shown in the following image.
Step 11: In cell B1, enter the symbol “equal to” followed by the function’s name. Type “TakeOutComment,” as shown in the following image.
Step 12: Select cell A1 as the reference. It extracts the comment from the mentioned cell.
Since there are no comments in cells A2 and A3, the formula returns “#VALUE!.”
Example #2–Hide Worksheets in Excel
We want to hide Excel worksheets except for the active sheet. Create an add-in and icon on the Excel toolbar for the same.
The steps to hide worksheets (except for the currently active sheet) and, after that, create an add-in and icon are listed as follows:
Step 1: Open a new workbook.
Step 2: In the “Visual Basic” window, insert a “Module” from the Insert tab. The same is shown in the following image.
Step 3: Copy and paste the following code into the module.
Sub Hide_All_Worksheets_()
Dim As Worksheet
For Each Ws In ActiveWorkbook.Worksheets
If Ws.Name <> ActiveSheet.Name Then
Ws.Visible = xlSheetVeryHidden
End If
Next Ws
End Sub
Step 4: Save this workbook with the type “Excel add-in.”
Step 5: Add this add-in to the new workbook. For this, click “Options” under the “File” tab. Select “Add-ins.” In the box to the right of “Manage,” select “Excel add-in” Click “Go.”
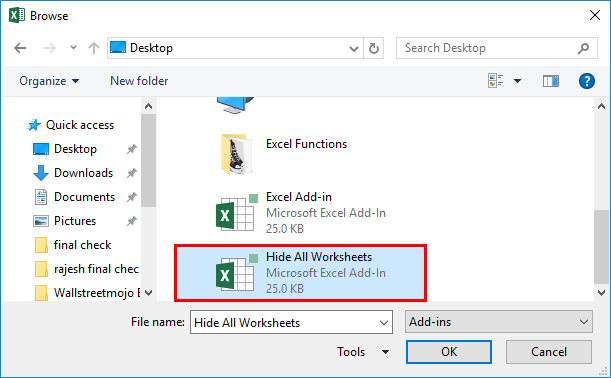
In the “Add-ins” window, choose “Browse.”
Step 6: Select the saved add-in file. Click “Ok.”
We have saved the file with the name “Hide All Worksheets.”
Step 7: The new add-in “Hide All Worksheets” appears in the “Add-ins” window.
Step 8: Right-click the Excel ribbon and select “Customize the Ribbon.”
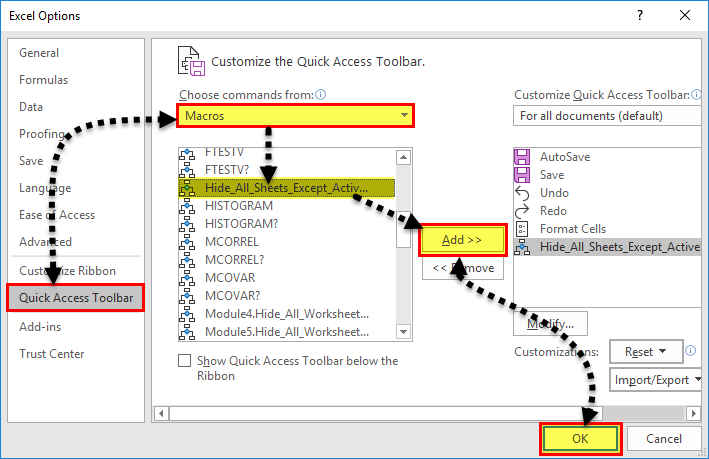
Step 9: The “Excel Options” window appears. Click “Quick Access Toolbar.” Under the drop-down of “Choose commands from,” select “macrosA macro in excel is a series of instructions in the form of code that helps automate manual tasks, thereby saving time. Excel executes those instructions in a step-by-step manner on the given data. For example, it can be used to automate repetitive tasks such as summation, cell formatting, information copying, etc. thereby rapidly replacing repetitious operations with a few clicks.
read more.”
In the box following this drop-down, choose the name of the macro. Then, click “Add” followed by “OK.” The tasks of this step are shown with the help of black arrows in the following image.
Step 10: A small icon appears on the toolbar. Clicking this icon hides all worksheets except for the currently active sheet.
Example #3–Unhide the Hidden Sheets of Excel
If we want to unhide the sheetsThere are different methods to Unhide Sheets in Excel as per the need to unhide all, all except one, multiple, or a particular worksheet. You can use Right Click, Excel Shortcut Key, or write a VBA code in Excel. read more hidden in the preceding example (example #2). Create an add-in and toolbar icon for the same.
The steps to unhide the sheets and, after that, create an add-in and toolbar icon are listed as follows:
Step 1: Copy and paste the following code to the “Module” inserted in Microsoft Visual Basic for Applications.
Sub UnHide_All_HiddenSheets_()
Dim Ws As Worksheet
For Each Ws In ActiveWorkbook.Worksheets
Ws.Visible = xlSheetVisible
Next Ws
End Sub
Step 2: Save the file as “Excel add-in.” Add this add-in to the sheet.
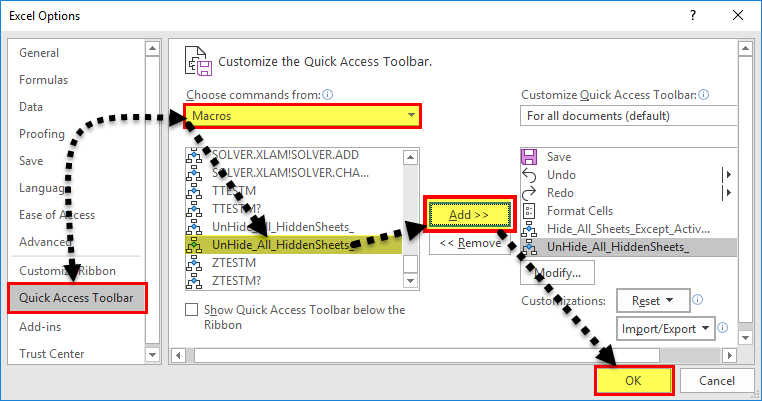
Right-click the Excel ribbon and choose the option “Customize the ribbon.” Then, in the “Quick Access Toolbar,” select “Macros” under the drop-down of “Choose commands from.”
Choose the macro’s name, click “Add” and “OK.” The tasks of this step are shown with the help of black arrows in the following image.
Step 3: Another icon appears on the toolbar. Clicking this icon unhides the hidden worksheets.
The Cautions While Creating Add-ins
The points to be observed while working with add-ins are listed as follows:
- First, remember to save the file in Excel’s “Add-in” extensionExcel extensions represent the file format. It helps the user to save different types of excel files in various formats. For instance, .xlsx is used for simple data, and XLSM is used to store the VBA code.read more of Excel.
- Be careful while selecting the add-ins to be inserted by browsing in the “Add-ins” window.
Note: It is possible to uninstall the unnecessary add-ins at any time.
Frequently Asked Questions
1. What is an add-in? where is it in Excel?
An add-in extends the functions of Excel. It provides more features to the user. It is also possible to create custom functions and insert them as an add-in in Excel.
An add-in can be created, used, and shared with an audience. One can find the add-ins in the “Add-ins” window of Excel.
The steps to access the add-ins in Excel are listed as follows:
a. Click “Options” in the “File” tab of Excel. Select “Add-ins.”
b. In the box to the right of “Manage,” select “Excel add-ins.” Click “Go.”
c. The “Add-ins” window opens. Click “Browse.”
d. Select the required add-in file and click “OK.”
Note: The add-ins already present in the system can be accessed by browsing. Select the corresponding checkbox in the “Add-ins” window and click “OK” to activate an add-in.
2. How to remove an Add-in from Excel?
For removing an add-in from the Excel ribbon, it needs to be inactivated. The steps to inactivate an add-in of Excel are listed as follows:
a. In the File tab, click “Options” and choose “Add-ins”.
b. From the drop-down menu of the “Manage” box, select “Excel add-ins.” Click “Go.”c.
c. In the “Add-ins” window, deselect the checkboxes of the add-ins to be inactivated. Click “OK.”
The deselected add-ins are inactivated. Sometimes, one may need to restart Excel after inactivation. It helps remove the add-in from the ribbon.
Note: Inactivation does not remove an add-in from the computer. For removing an inactivated add-in from the computer, it needs to be uninstalled.
3. How to add an Add-in to the Excel toolbar?
The steps to add an Add-in to the Excel toolbar are listed as follows:
a. In an Excel workbook, press “Alt+F11” to open the Visual Basic Editor. Enter the code by inserting a “module.”
b. Press “Alt+F11” to return to Excel. Save the file as “Excel add-in” (.xlam).
c. In File, select “Options” followed by “Add-ins.” Select “Excel add-ins” in the “Manage” box and click “Go.”
d. Browse this file in the “Add-ins” window. Select the required checkbox and click “OK.”
e. Right-click the ribbon and choose “Customize the Ribbon.” Click “Quick Access Toolbar.”
f. Select “Macros” from the drop-down of “Choose commands from.”
g. Choose the required macro, click “Add” and” OK.”
The icon appears on the toolbar. This icon works in all Excel workbooks as the add-in has been enabled.
Recommended Articles
This article is a step-by-step guide to creating, installing, and using add-ins in Excel. Here, we also discuss the types of Excel add-ins and create a custom function. Take a look at these useful functions of Excel: –
- What is the Quick Access Toolbar in Excel?
- “Save As” Shortcut in Excel
- Remove Duplicates in Excel
- How to Show Formula in Excel?
Home > Data Recovery > How to Add and Disable Add-Ins for Your Excel Files
You can use add-ins in Excel to fulfill some complex task. And in this article, we will introduce how to add and disable add-ins in Excel.
If you need to use add-ins in Excel, you need to add and activate it into Excel. On the other hand, if you don’t need to use add-ins, you can also disable it. Here we will demonstrate the steps to add and disable add-ins in Excel.
Add Add-Ins
- Click “File” in the ribbon.
- And then click the button “Options”.
- In the “Excel Options” window, choose the option “Add-ins”.
- Next choose the type of add-ins in the “Manage” textbox. Here we choose the “Excel Add-ins” as an example”.
- Next click the button “Go” next to the “Manage”.
- And then the window of “Add-Ins” will pop up. In this window, check the option that you need. Here we check the “Analysis ToolPak” in the window. If you need to install other add-ins, you can click the button “Browse” to add it. Besides, some add-ins require running installation packages. You need to run it in your computer.
- After that, click the button “OK”.
- Now you can come back and check the result. The “Analysis ToolPak” will be added in the tab of “Data”. Thus, here click the tab “Data” in the ribbon. You can see that the add-in has already appeared in the toolbar.
Therefore, whenever you need to use this tool, you can click the tab “Data” and select it.
Disable Add-Ins
Now if you don’t need to use the add-ins, you can also remove it from the toolbar.
- Click “File” in the ribbon.
- And then click the button “Options” to activate the “Excel Options” window.
- Here still choose the “Add-ins”.
- In the manage text box, choose the type of the add-in that you need to disable. Here we need to disable the “Analysis ToolPak”, therefore we choose the “Excel Add-Ins”.
- And then click the button “Go”.
- In the “Add-Ins” window, uncheck the add-in that you don’t need.
- Next click the button “OK”.
- Thus, this “Analysis ToolPak” will not appear in the toolbar.
Actually, this method only removes the Excel add-in from the ribbon. The add-in is still in your computer. If you need to delete the add-in from your computer, you need to uninstall the add-ins. Therefore, don’t mix these two different concepts.
In addition, as for removing the “Com Add-Ins”, things are different. You can select the add-in and then click the button “Remove”. And then you can remove it from your computer.
Be Careful When Using Add-ins in Excel
Even if you can acquire a lot of convenience from add-ins, you still need to be careful. Some malicious hacker will develop add-ins that can steal your data and information. And even worse, your file will be damaged due to the abnormal add-ins. When such accident happens, you can use our repair tool to repair xls corruption and other errors in Excel. This tool is exactly the insurance for your file.
Author Introduction:
Anna Ma is a data recovery expert in DataNumen, Inc., which is the world leader in data recovery technologies, including repair doc damage and outlook repair software products. For more information visit www.datanumen.com
An Excel Add-in is a mini-software application that provides Excel with enhanced functionality and automation features. Whilst they can be created by third-party suppliers, even Microsoft themselves develop add-ins to provide additional functionality.
Add-ins can take a number of forms:
- Excel Add-ins – typically these are Excel files saved with .xlam or .xla file types. They can be opened for single use, or installed to ensure the features and functionality are always available.
- COM Add-ins – requires full software installation process for the functionality to be available.
- Office Download Store Add-ins – These are purchased and available through the Microsoft Office Add-ins store. (Click Insert > Get Add-ins > Store from the Excel Ribbon).
COM Add-ins and Office Download Store Add-ins will have their own installation processes. Excel Add-ins, however, have a more flexible approach and require a few manual step to ensure the software installs correctly. But don’t worry, it’s pretty easy.
This post specifically covers the steps to install an Excel Add-in for both Windows and Mac.
Manually opening an Add-in for single use
To use an Add-in it is not essential to install it. Opening the file as a standard Excel file will enable the use of the Add-in whilst that session of Excel remains open. The next time Excel opens, the Add-in will not be available automatically, it will need to be manually opened again.
The steps into install an Add-in on a Windows PC are as follows:
Save the file
Save the file on your computer in a location which is accessible at all times.
There is an official Add-ins folder, which can usually be found here: C:Users[user name]AppDataRoamingMicrosoftAddIns. However, there is no need to use this folder; any folder will do. Personally, I use an Add-ins folder within the Documents folder.
Unblock the file
If the Add-in file was saved from the internet, there is an extra step to permit access to the file.
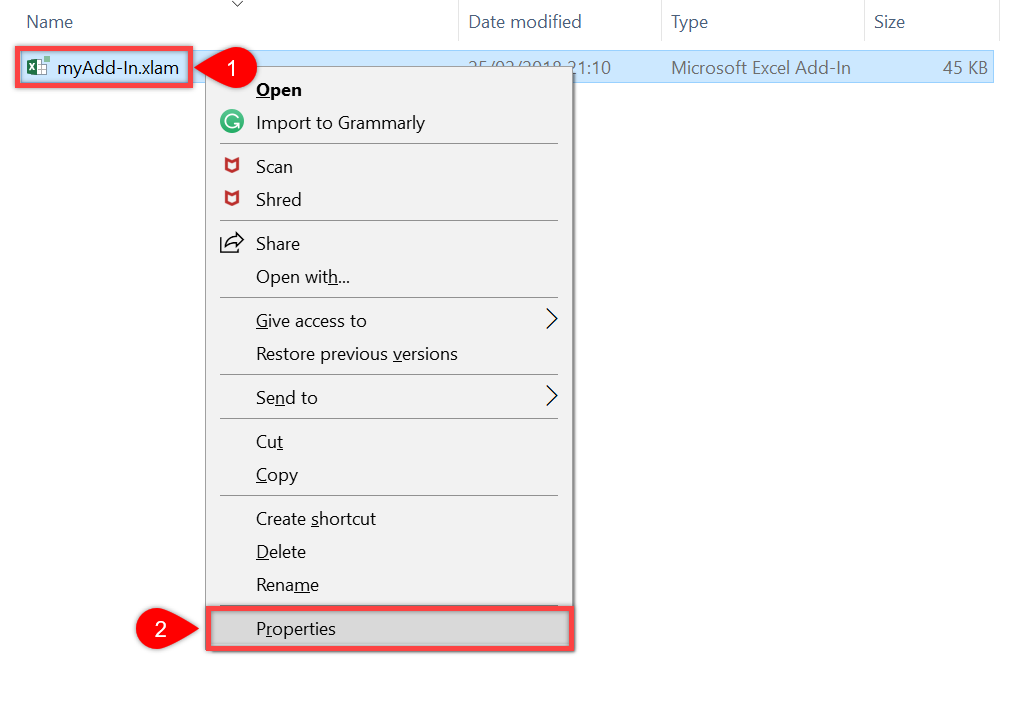
Right-click on the Add-in file, select Properties from the menu.
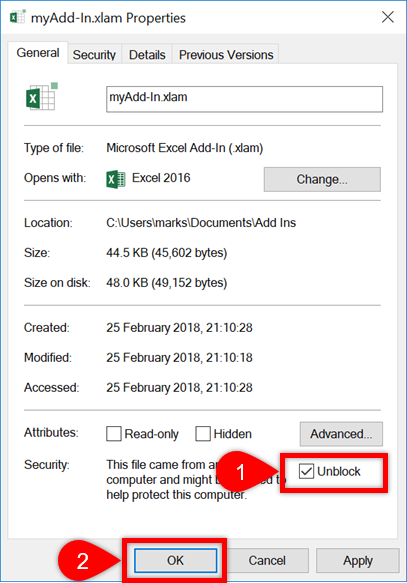
From the Properties window unblock the file and click OK.
It is only necessary to unblock the file once.
If there is not an unblock option you can skip this step, as Windows has not deemed the file to be a security risk. Add-ins can be harmful to your computer, (they can be used to transfer viruses), so only unblock files which come from reputable sources.
Install the Add-in within Excel
Open Excel. From the Excel Ribbon click File -> Options
From the Excel Options window select Add-ins. The main window will change to show a list of active and inactive Add-ins. At the bottom of this window select Excel Add-ins and click Go…
From the Add-ins window click Browse…
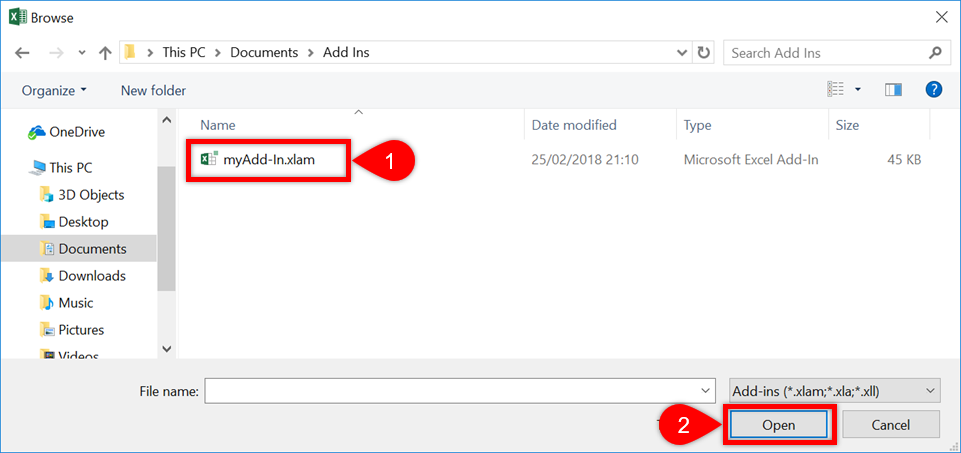
Navigate to the location where you save the Add-in file. Select the file, click Open.
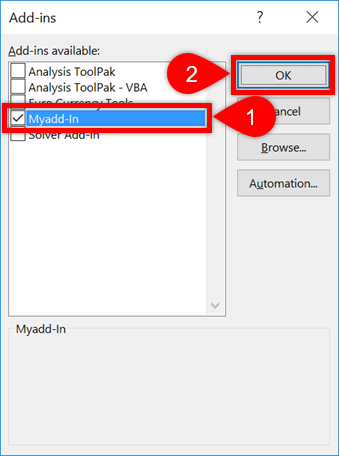
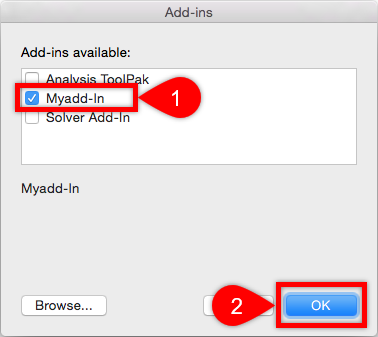
The Add-in will appear in the list with a tick next to it. Click OK.
The Add-in has installed and is now ready for use.
How to deactivate an Add-in (Windows)
If you wish to keep an Add-in, but do not need it to be active, follow these steps (see screenshots in the section above).
Open Excel. From the Excel Ribbon click File -> Options.
From the Excel Options window select Add-ins, at the bottom of that window select Excel Add-ins from the Manage drop-down, then click Go…
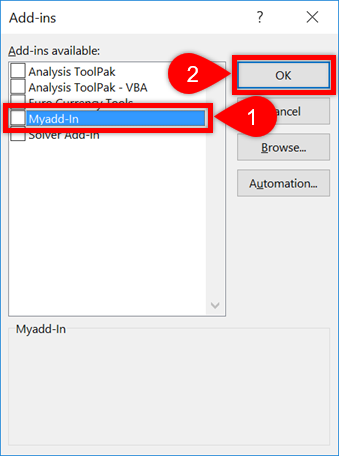
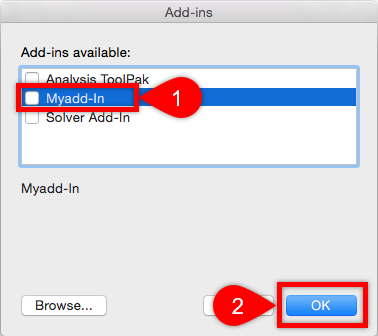
Untick the box next to the name of the Add-in to deactivate. Click OK.
The Add-in will remain in the list Add-ins, but will not be active. It will no longer open automatically when Excel starts.
How to uninstall an Add-in (Windows)
If you wish to uninstall an Add-in completely delete, move or rename the original Add-in file.
Follow the steps above to deactivate the Add-in.
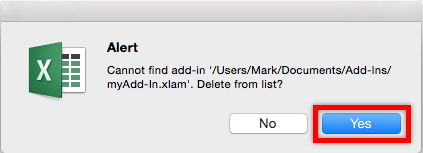
When ticking or unticking the Add-in, a message box will appear, asking for permission to delete the reference to the Add-in. Click Yes to uninstall the file.
How to install an Add-in (Mac)
On a Mac there are fewer steps than on Windows (Yes, the Mac version is better at somethings). This procedure only applies to Excel 2016.
Save the file
Save the file on your computer in a location which is accessible at all times.
Install the Add-in within Excel
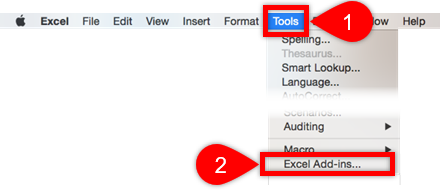
Open Excel. From the Menu Bar select Tools -> Excel add-ins…
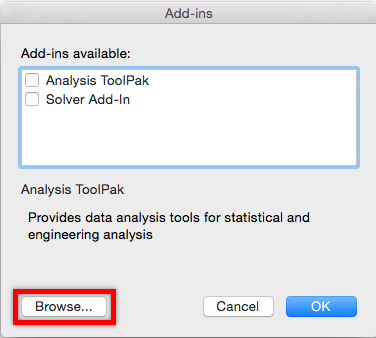
The Add-ins window will open, click Browse.
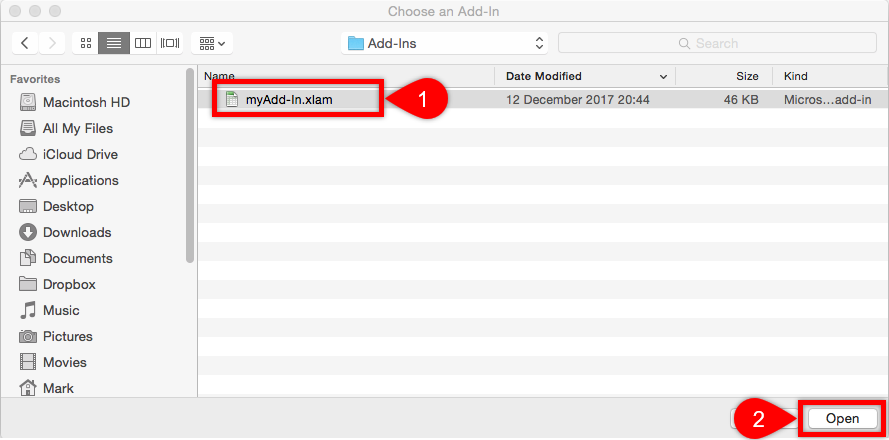
Navigate to the location where you saved the Add-in file. Select the file, click Open.
The Add-in will appear in the list with a tick next to it. Click OK.
The Add-in has installed and is now ready for use.
How to deactivate an Add-in (Mac)
If you wish to keep an Add-in, but do not need it to be active follow these steps (see screenshots in the section above).
Open Excel. From the Menu Bar select Tools -> Excel add-ins…
In the Add-ins window remove the tick next to the Add-in to be deactivated, then click OK.
The Add-in will no longer be available to use and will not load automatically when Excel starts.
How to uninstall an Add-in (Mac)
If you wish to uninstall an Add-in completely, delete, move or rename the original Add-in file.
Follow the steps above to deactivate the Add-in.
When ticking or unticking the Add-in, a message box will appear, asking for permission to delete the reference to the Add-in. Click Yes.
The Add-in will no longer appear in the list of Add-ins.
Conclusion
To install an Add-in requires a few manual steps. For both Mac and Windows these steps are quick and easy to apply.
Related Posts:
- Useful VBA codes for Excel (30 example macros + Free ebook)
- How to fix “Microsoft has blocked macros” (2 simple ways)
- How to convert color codes (RGB, HSL, HSV, Hex, Long, CMYK)
About the author
Hey, I’m Mark, and I run Excel Off The Grid.
My parents tell me that at the age of 7 I declared I was going to become a qualified accountant. I was either psychic or had no imagination, as that is exactly what happened. However, it wasn’t until I was 35 that my journey really began.
In 2015, I started a new job, for which I was regularly working after 10pm. As a result, I rarely saw my children during the week. So, I started searching for the secrets to automating Excel. I discovered that by building a small number of simple tools, I could combine them together in different ways to automate nearly all my regular tasks. This meant I could work less hours (and I got pay raises!). Today, I teach these techniques to other professionals in our training program so they too can spend less time at work (and more time with their children and doing the things they love).
Do you need help adapting this post to your needs?
I’m guessing the examples in this post don’t exactly match your situation. We all use Excel differently, so it’s impossible to write a post that will meet everybody’s needs. By taking the time to understand the techniques and principles in this post (and elsewhere on this site), you should be able to adapt it to your needs.
But, if you’re still struggling you should:
- Read other blogs, or watch YouTube videos on the same topic. You will benefit much more by discovering your own solutions.
- Ask the ‘Excel Ninja’ in your office. It’s amazing what things other people know.
- Ask a question in a forum like Mr Excel, or the Microsoft Answers Community. Remember, the people on these forums are generally giving their time for free. So take care to craft your question, make sure it’s clear and concise. List all the things you’ve tried, and provide screenshots, code segments and example workbooks.
- Use Excel Rescue, who are my consultancy partner. They help by providing solutions to smaller Excel problems.
What next?
Don’t go yet, there is plenty more to learn on Excel Off The Grid. Check out the latest posts:


