

First, you need to customize Word’s ribbon and enable the “Developer” tab to show the option to add check boxes. Then, select “Developer” and click the “Check Box Content Control” button to insert a check box into your document. You can also transform Word’s bullets into checkboxes.
When you create surveys or forms with Microsoft Word, check boxes make the options easier to read and answer. We’re covering two good options for doing just that. The first is ideal for documents that you want people to fill out digitally within the Word document itself. The second option is easier if you’re planning to print documents like to-do lists.
Option 1: Use Word’s Developer Tools to Add the Check Box Option for Forms
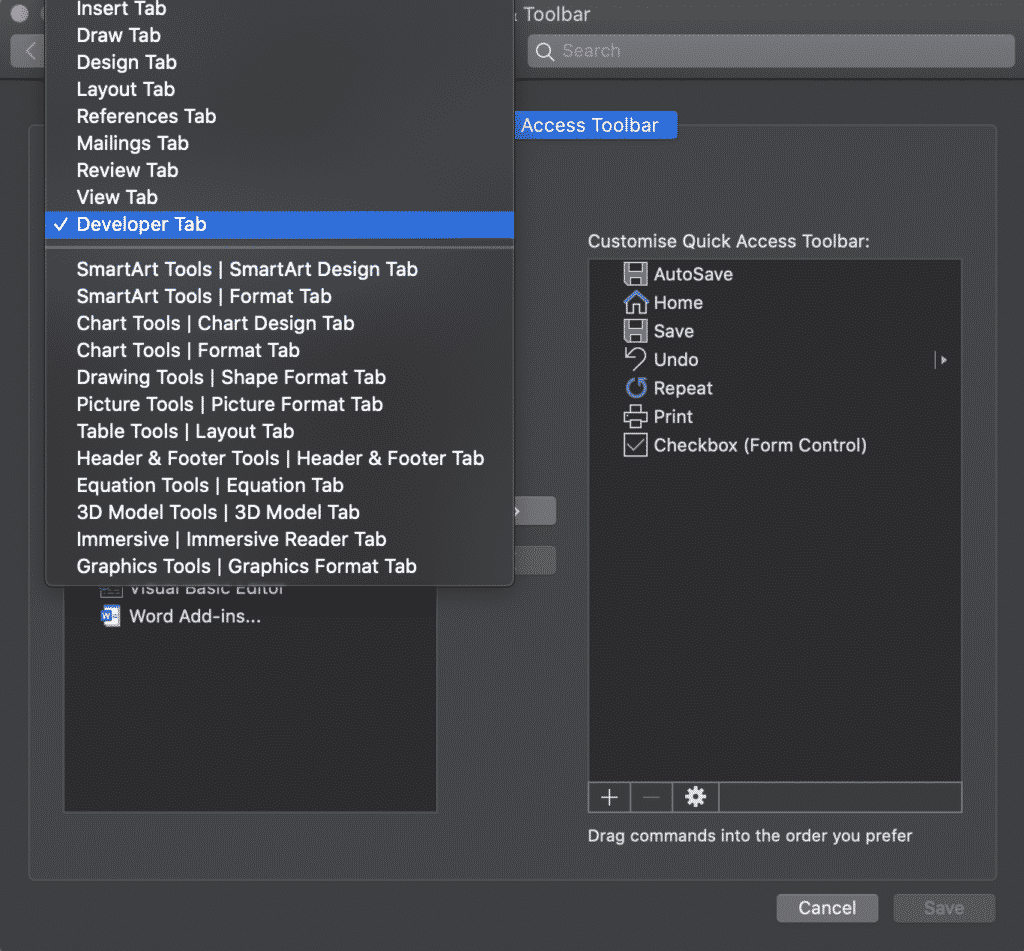
In order to create fillable forms that include checkboxes, you first need to enable the “Developer” tab on the Ribbon. With a Word document open, click the “File” drop-down menu and then choose the “Options” command. In the “Word Options” window, switch to the “Customize Ribbon” tab. On the right-hand “Customize the Ribbon” list, select “Main Tabs” on the dropdown menu.

On the list of available main tabs, select the “Developer” check box, and then click the “OK” button
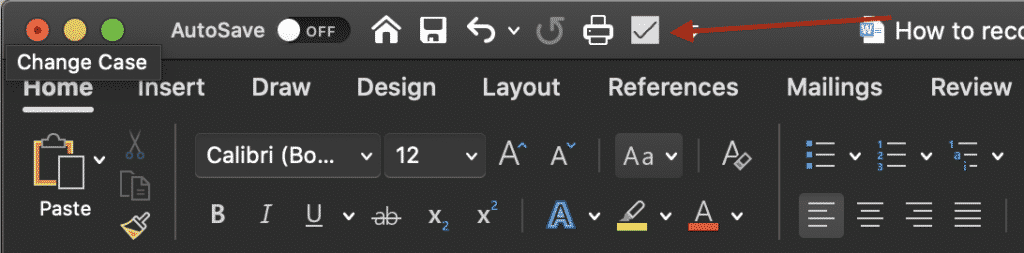
Notice that the “Developer” tab is added to your Ribbon. Just position your cursor in the document where you want a check box, switch to the “Developer” tab, and then click the “Check Box Content Control” button.
You should see a check box appear wherever you placed your cursor. Here, we’ve gone ahead and placed a check box next to each answer and, as you can see, those check boxes are interactive. Click a box to mark it with an “X” (as we’ve done for answers 2, 3, and 4) or select the whole form box (as we’ve done for answer 4) to move the check box around, format it, and so on.
RELATED: How to Create a Fillable Form With Microsoft Word
Option 2: Change Bullets to Check Boxes for Printed Documents
If you’re creating a document to print out—like a to-do list or printed survey—and just want check boxes on it, you don’t have to mess around with adding Ribbon tabs and using forms. Instead, you can create a simple bullet list and then change the bullets from the default symbol to check boxes.
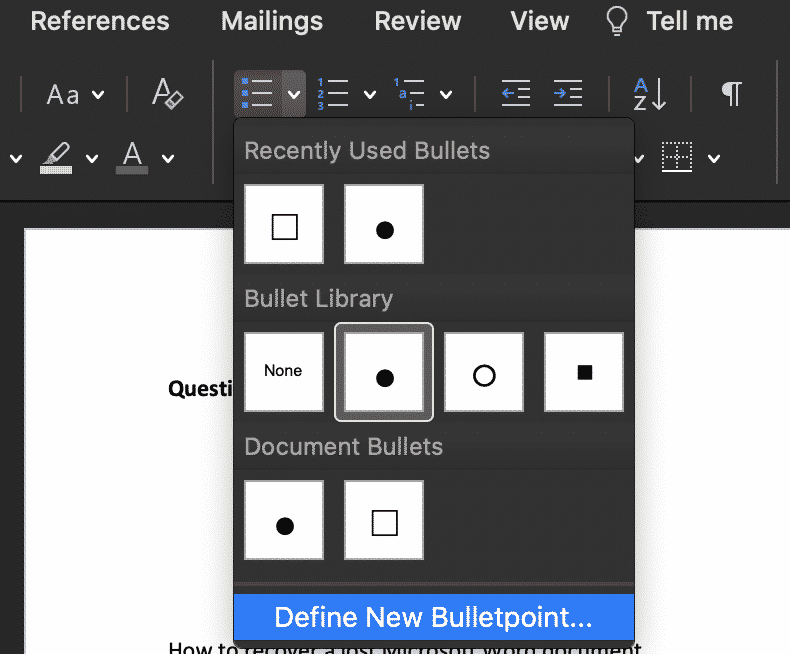
In your Word document, on the “Home” tab, click the small arrow to the right of the “Bullet List” button. On the dropdown menu, select the “Define new bullet” command.
In the “Define New Bullet” window, click the “Symbol” button.
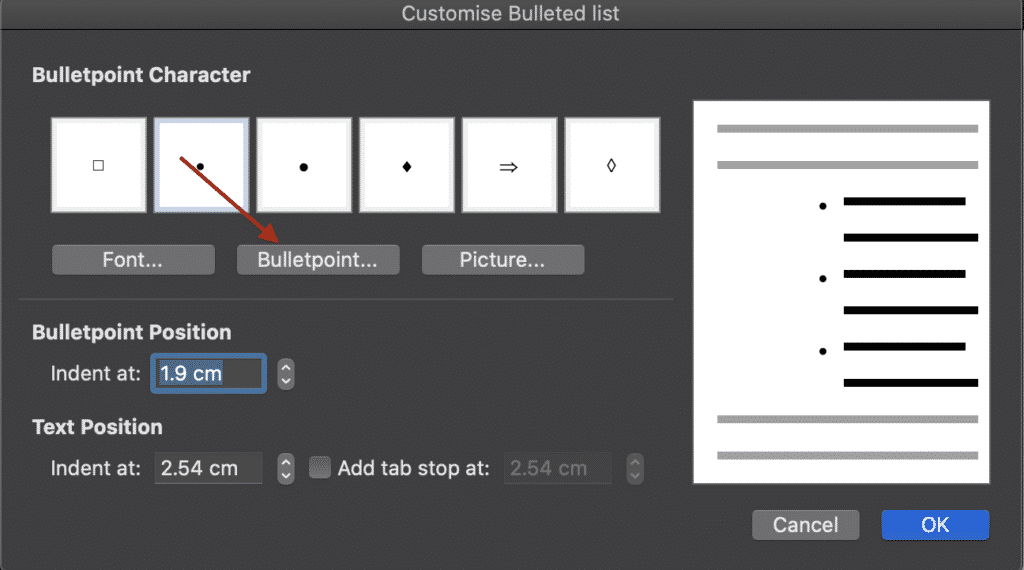
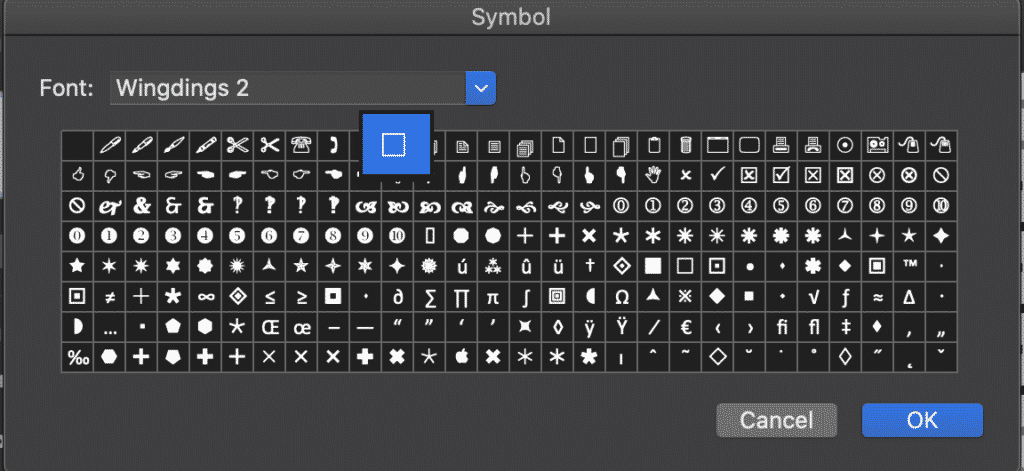
In the “Symbol” window, click the “Font” dropdown and choose the “Wingdings 2” option.
You can scroll through the symbols to find the empty square symbol that looks like a check box, or you just type the number “163” into the “Character Code” box to automatically select it. Of course, if you see a symbol you like better—like the open circle (symbol 153)—feel free to choose that instead.
When you’ve selected your symbol, click the “OK” button to close the “Symbol” window, and then click the “OK” button to close the “Define New Bullet” window, too.
Back in your Word document, you can now type your bullet list. The check boxes appear instead of the regular bullet symbol.
And the next time you need the check box symbol, you don’t have to navigate through that whole set of windows. Just click that small arrow to the right of the “Bullet List” button again, and you’ll see the checkbox listed under the “Recently Used Bullets” section.
Again, this method is really only useful for documents you want to print out. The check box symbols are not interactive, so you can’t check them off inside a Word document.
If you’re also creating spreadsheets and presentations, you may want to learn how to insert checkboxes in Excel and add checkboxes to PowerPoint too.
RELATED: How to Add a Check Mark or Tick Mark in Word
READ NEXT
- › How to Add a Check Mark or Tick Mark in Word
- › How to Count Checkboxes in Microsoft Excel
- › How to Add a Drop-Down List to a Word Document
- › How to Create a Fillable Form With Microsoft Word
- › How to Create a Basic Survey in Microsoft Word
- › Why the Right-Click Menu in Windows 11 Is Actually Good
- › Universal Audio Volt 2 Review: A Workhorse Audio Interface With Vintage Charm
- › Google+ Will Come to a Final End on July 5, 2023
![]()
Download Article
![]()
Download Article
Want to add a check box or tick box to a list or form in Microsoft Word? It’s easy to do, and you can even make it checkable so you can click the box with your mouse. We’ll show you an easy way to add a clickable checkbox using Developer Mode in Microsoft Word.
Steps
-

1
Open a new file in Microsoft Word. Do so by opening the app shaped like a blue W. Then click on File in the menu bar at the top of the screen, and click on New Blank Document.
-
2
Click on File in the menu bar and then Options in the menu.
- On Mac, click on Word in the menu bar and then Preferences… in the menu.
Advertisement
-
3
Click on Customize Ribbon and then Main Tabs in the «Customize the Ribbon:» drop-down menu.»[1]
- On Mac, click on Ribbon & Toolbar in the «Authoring and Proofing Tools» section of the dialog box, then click on the Ribbon tab at the top of the dialog box.
-
4
Check «Developer» in the «Main Tabs» pane.
-
5
Click on Ok.
-
6
Click on Developer. It’s a tab in the upper-right part of the window.
-
7
Position the cursor where you’d like to insert the check box.
-
8
Click on Check Box. It’s in the menu bar at the top of the window.
-
9
Add additional check boxes and text as needed.
-
10
Lock the form. To do so, select the entire list, to be found in the Controls section on the Developer tab, then click on Group and Group.
- On Mac, click Protect Form in the Developer tab toolbar.


Advertisement
Add New Question
-
Question
What should I do if the check box is grayed out in my ribbon?

It is grayed out for me too. However, if you click on the one icon that isn’t — Legacy Tools — then you will find the exact same checkbox, which you should be able to select.
-
Question
How can I enlarge the size of a text box without enlarging the text?
In Word, just dragging the corner of the text box should be sufficient. If the text changes size accidentally, you can always highlight it and change it back to the desired size.
-
Question
How do you make a drop box in word?
Download LibreOffice. Follow the manual on how to add a list or list/add or list/multiselect box (or just look under «insert» in the menu). You can add a data source for the dropdown menu items from a database, a spreadsheet or within the file structure itself.
See more answers
Ask a Question
200 characters left
Include your email address to get a message when this question is answered.
Submit
Advertisement
Thanks for submitting a tip for review!
About This Article
Article SummaryX
1. Open a document.
2. Click File.
3. Select Customize Ribbon and then click Main Tabs.
4. Check the «Developer» box.
5. Click Save.
6. Click Developer.
7. Click where you want to insert the check box.
8. Click Check Box.
9. Add additional boxes and text.
10. Lock the form.
Did this summary help you?
Thanks to all authors for creating a page that has been read 1,240,190 times.
Is this article up to date?
Adding checkboxes to your Microsoft Word document gives you the functionality of a check list. Ticking off line items as they are complete, actioned or done.
Inserting a check list into your Word document is incredibly handy, most commonly used when creating surveys in word.

There are two ways to insert check boxes into Word, the first being more suitable for digital marking within Word itself and the second more suited to documents being printed and then checked off, such as a to do list.
In this post, we will show you how to insert both types of check boxes into your document with ease.
Inserting a tick-box in Microsoft Word
Option 1: Best for Digital Marking in Word itself

- Open Word
- Check that ‘Developer’ is turned on
- How to Turn Developer on
- Select the Customize Quick Access Toolbar dropdown
- Select More Commands
- Select Developer Tab
- Select Tick Box
- Press Insert
- How to Turn Developer on
- Once the Developer Tab has been activated:
- Place your cursor where you would like to insert the tick box

- Select the Tick Box in your Quick Access Short Cuts
- Repeat for each line that you would like a tick box added in front of

Option 2: Best for Printing

- Open Word
- Highlight your list
- Click the Bullet Point button
- Click Define New Bulletpoint…
- Click Bulletpoint…
- Change Font to Wingdings 2
- Select the Square Symbol
- Press OK
You have now successfully inserted check boxes in front of all highlighted lines.
Is Version Control causing issues for you? We have a solution!
If you are collaborating on a Microsoft Word Document with others and are required to keep each version saved away for future reference, it is likely you are facing the same version control pain points that every other company is.
A very cluttered shared drive or cloud, one where each new version is saved every time one of your colleagues makes an edit. Leaving you with a shared drive full of documents looking something like ReportV4_updated_final_FINAL1 and no idea if that is actually the final version or not.
Then you face the challenge of naming your new document, do you add another _FINAL2 or is _JDsedits enough for everyone else to understand what’s going on?

If it wasn’t for the ability to sort your files in date order, I’m sure most of us would have given up on the search for the most recent file a decade ago and just rolled the dice on what looked like it was most recent. It must be _final_FINAL2_FINALFINAL right?
Or those days you don’t have shared drive access and do the drag and drop to your desktop and hope you remember to take that file back over into the shared drive next time you are in the office.
Its risky business. There must be an easier way!
Lucky for us all there is, companies such as Simul Docs offer purpose built tools to help us collaborate better and manage our version control for us.
Yep thats right, Simul docs will manage the version control for you. When you open your file, from the moment you start making edits Simul will save the document as the newest version giving it a version number such as 0.0.2 or 0.0.3.
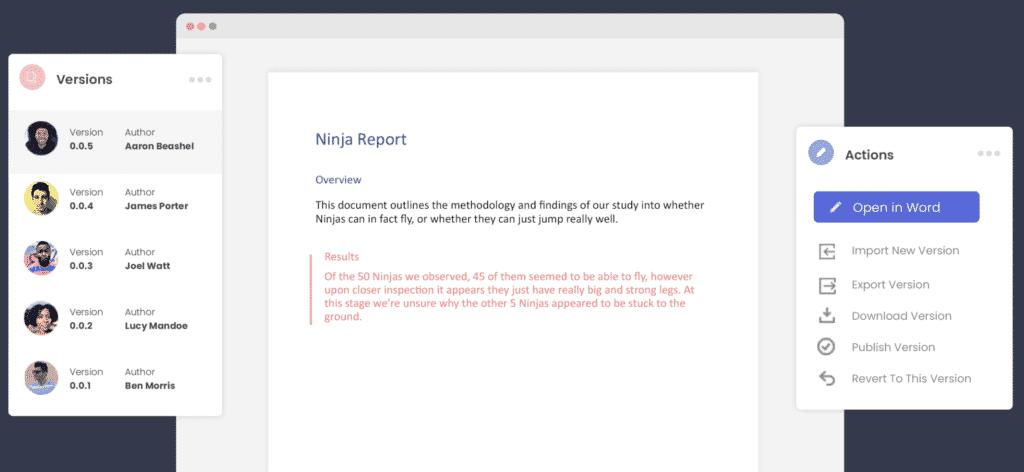
You can then refer back to any version with ease, knowing at a glance which version is the most recent (goodbye _FINAL2_Updated) and hello simple numbered versions and clearly marked authors next to each.
Its version control bliss!
Not only that, but Simul Docs allows you to access your Word Document from anywhere, anytime. There is no need for remote shared drive access or the old clunky desktop saving. Simul gives you access to every version, anywhere, all you need is an internet connection.
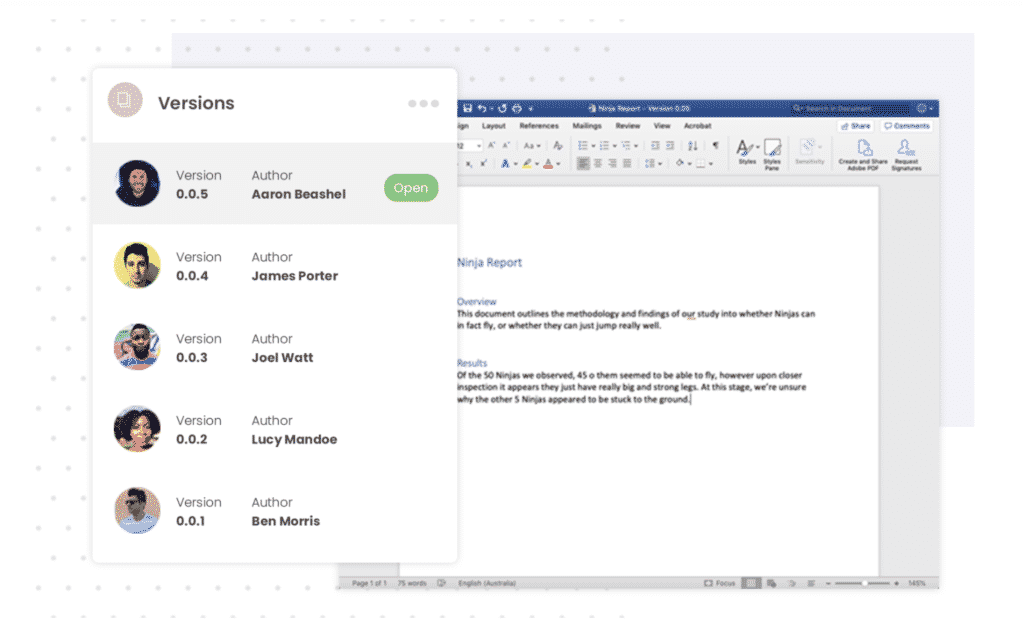
Now that you have accessed your document from the comfort of the airport or your own home, you can add your tracked changes and comments, press save and let Simul notify the other collaborators that you have made some changes and they should probably jump in and check them out.
That means, no more emailing Word Documents back and forth with every edit.
Did your shared drive and inbox get a little lighter just thinking about these possibilities?

There really isn’t a downside to collaborating better with Simul Docs.
With free entry level packages on offer, its worth checking out.

Contents
- 1 How to Insert a Checkbox in Word using Developer Tools
- 2 How to Create a Checklist in Word for Printed Documents
- 3 Extra: How to use Double Spacing in Word
- 4 Extra: How to Customize the Ribbon in Microsoft Word
Check boxes are an important Word processing feature for anybody creating surveys or forms. We’re going to cover how to add check boxes in Word for both printed and digital documents so that you can add extra clarity to your questions.
Inserting a Check Box in Word Is Still Possible!
Though Microsoft has tucked the Word check box feature away, it is entirely functional and works great. When sent the document, users can view the checklist in Word, tick any boxes that apply to them, and save the changes to the document.
Alternatively, writers can switch bullet points out for a check box square that is non-interactable, but easier to implement and larger for printed documents. Here’s how to insert a checkbox in Word using either method:
How to Insert a Checkbox in Word using Developer Tools
For some strange reason, Microsoft has hidden the Microsoft Word checkbox feature behind the developer tab of the ribbon, which you have to enable manually in settings. This makes creating a checklist in Word finicky the first time you do it, but once you get into the flow of things, it’s quite simple. Here’s how to enable and use the check box tool:
- Open your Word document and press “File” in the top left

- Press “More… > Options” in the sidebar

- Click “Customize Ribbon” in the sidebar, then chose “Main Tabs” in the “Customize the Ribbon” dropdown

- Scroll down until you find the “Developer” option, tick it, and press “OK”
That’s right, you have to check a box to enable check boxes. Good practice, I guess.

- Place your cursor before your checklist item, open the “Developer” tab, and click the check box icon
This will add a checkbox in Word directly behind the list item.

- Repeat the process for your other Word checklist items
You can speed up the process by selecting the box and copy-pasting it for each line.

- Click on a square to mark it with an “x”

- Use the “⋮” to format or reposition the Word check box if necessary


How to Create a Checklist in Word for Printed Documents
If your survey is only going to be filled out physically, you don’t need to go through the process of enabling developer tools and inserting a real checkbox. Instead, below we’ll show you how to add check boxes in Word by changing your bullet point simple to blank squares:
- Open the “Home” tab of your ribbon, press the bullet point button, then click “Define New Bullet…”
This feature will allow you to create your own custom bullet point symbol from Microsoft Word’s library of fonts.

- Click the “Symbol…” button

- In the “Font” dropdown, choose “Wingdings 2”
That’s right – contrary to popular belief, Wingdings can actually be useful.

- Select Character code 163 (the empty square) and press “OK”
Squares with thicker borders are available, but they’re generally a bit cramped for our purposed.

- Press “OK” in the “Define New Bullet” window

- Place your cursor in front of your list item and select your new bullet style via the bullet icon in your “Home” tab
That’s it. You now know how to add check boxes in Word via the bullet point menu. Now that it’s all set up, you should be able to repeat this trick very easily.


With that out of the way, you can learn how to double space your surveys in Word by following the linked guide. Doing so will give respondents more space to write their answers between the lines of questions.

If you’d like to insert checkboxes without the developer tab in the future, you can also follow our guide on how to customize the ribbon in Word. This will allow you to add the checkbox button to a custom tab.

623
623 people found this article helpful
Insert a Check Box in Microsoft Word
Add check boxes to electronic and printed Microsoft Word documents
Updated on December 26, 2021
What to Know
- To insert decorative bullets: Select Home > Bullets > Define New Bullet > Symbol.
- To add functional bullets: Select File > Options > Customize Ribbon > Main Tabs > Developer > Controls > Check Box Content Control.
This article explains how to insert two types of check boxes into a Word document: check boxes that are decorative only and are useful in printed documents and check boxes that can be checked electronically in the document. This tutorial applies to Word 2010 and above on macOS or Windows operating systems.
Insert Check Boxes for Printed Documents
Placing check boxes in your document strictly for visual purposes, whether on paper or on screen, is a simple process. You can’t add a check mark to them within Word.
-
Select a location in the Word document.
-
Select the Home tab if it is not already selected.
-
Choose the drop-down list accompanying the Bullets button.
-
When the Bullet Library pop-out appears, select Define New Bullet.
-
The Define New Bullet dialog displays, overlaying the main Word window. Select Symbol.
-
Scroll the symbols list until you locate one suitable to use as a check box, clicking it once to select it. If you do not see an option that you like, choose a different value from the Font drop-down list—Webdings, for example—to peruse additional sets of symbols.
-
Select OK when you’ve made your choice.
Lifewire / Scott Orgera
-
From the Define New Bullet interface, select OK. If you followed the instructions correctly, the check box should now be added to your document.
Insert Check Boxes for Electronic Documents
In addition to visual symbol, Word supports functional check boxes. These come in handy for online checklists or other types of forms that require user interaction.
-
Select File > Options.
-
In the Word Options dialog, select Customize Ribbon.
-
Under Customize the Ribbon, choose the Main Tabs option from the drop-down menu.
-
Locate the Developer option and select + to expand the list. Place a check mark next to Developer by selecting its accompanying check box once.
-
Select + next to the option labeled Controls, expanding its list as well.
-
Select Check Box Content Control and select OK to return to the main Word interface.
-
Activate the Developer tab, now added to the main menu toward the top of your screen.
-
In the Controls section, select the check box icon.
-
A new check box should now be inserted into your document.
How to Change the Check Box Symbol
By default, an X appears in the check box when someone clicks it. This symbol can be changed, along with many other attributes of the new check box. Select it, then select Properties. From here you can modify the appearance of both checked and unchecked symbols, as well as the behavior of the check box itself when used within your electronic document.
Thanks for letting us know!
Get the Latest Tech News Delivered Every Day
Subscribe