
How to Add Cells in Excel (Table of Contents)
- Adding Cells in Excel
- Examples of Add Cells in Excel
Adding Cells in Excel
Adding a cell is nothing but inserting a new cell or group of cells in between the existing cells by using the insert option in excel. We can insert the cells in row-wise or column-wise as per requirement, which allows us to input the additional data or new data in between the existing data.
Explanation: Sometimes, while working with Excel, we may forget to add some portion of date that should be inserted in between the existing data. In that case, we can cut the data and paste it a bit down or right and can input the required data in the gap. However, we can achieve the same without using the cut and paste option but by using the insert option in Excel.
There are four different options available to insert new cells. We will see each option and the respective example.
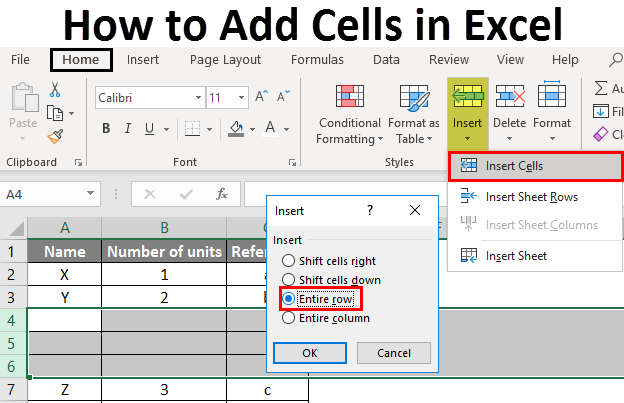
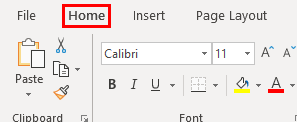
We can insert new cells in two ways; one way is to select the insert option from the worksheet, and the other is the shortcut key. Click on the “Home” menu at the top left corner in case if you are in a different menu.
After the selection of “Home”, observe the right-hand side we have a section called “cells”. Which covers the options like “Insert”, “Delete”, and “format”, which are highlighted with a red colour box.

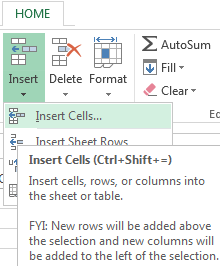
Each option has a drop-down if we observe under each option name. Click on the Insert option drop down then the drop-down menu will appear as below.
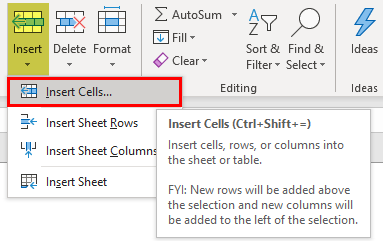
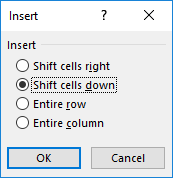
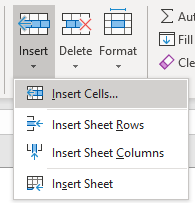
It has four different options: insert cells, insert sheet rows, insert sheet columns, and insert sheet. Click on the option Insert cells; then it will open a pop-up menu with four options as below.
Examples of Add Cells in Excel
Here are some examples of How to Add Cells in Excel, which are given below
You can download this How to Add Cells Excel Template here – How to Add Cells Excel Template
Example #1 – Add a Cell using Shift Cells Right
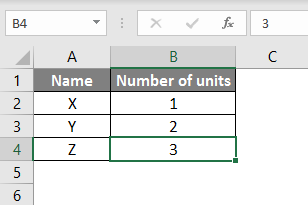
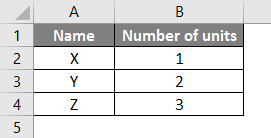
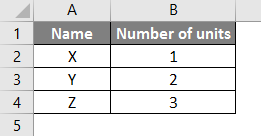
Consider a table having data of two columns like below.

Now it has three rows of data. But in case if we need to add a cell at the cell B4 by moving the data to the right, we can do that. Follow the steps.
Step 1: Select the cell where you want to add a new cell. Here we have selected B4 as shown below.
Step 2: Select the Insert menu option for the drop-down as below.
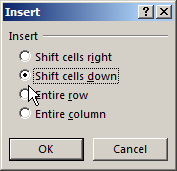
Step 3: Select the Insert Cells option then a pop-up menu will appear as below.
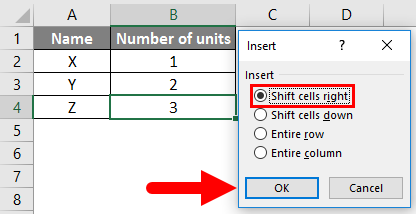
Step 4: Select the “Shift cells right” option, then click on OK. Then the result will appear as below.
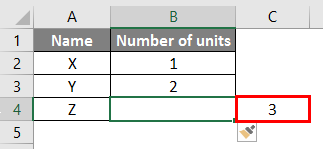
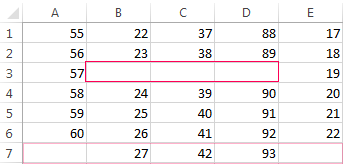
If we observe the above screen, number 3 is shifted to the right and created a new empty cell. This is how “shift cell right” will work. Similarly, we can do the shift cells down also.
Example #2 – Insert a New Column and New Row
To add a new column, follow the below steps. It is as similar to shifting cells.
Step 1: Consider the same table which we took in the above example. Now we need to insert a column in between the two columns.
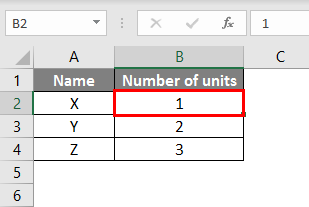
Step 2: A column will always be added on the left-hand side; hence select any one cell in the number of units as below.
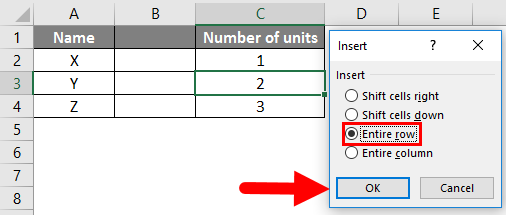
Step 3: Now select the “Entire column” option from the insert option as shown in the below image.
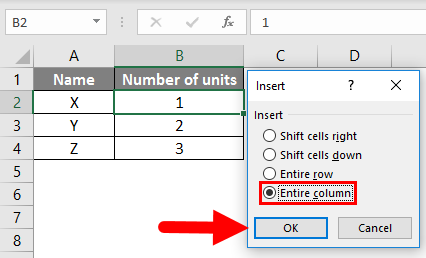
Step 4: Select the OK button. A new column will be added in between the existing two columns as below.
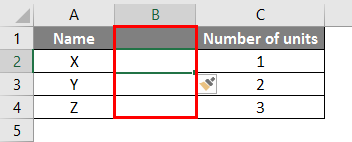
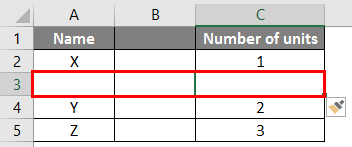
In a similar way, we can add the row by clicking the Entire row option as below.
The result will be as below. A new row is added between the data X and Y.
Example #3 – Adding Rows After Each Row using the Sort Option
Up to now, we covered how to add a single cell by shifting cells right and down, adding an entire row an entire column.
But these actions will affect only one row or one column. In case if we want to add an empty row under each existing row, we can perform in another way. Follow the below steps to add an empty row.
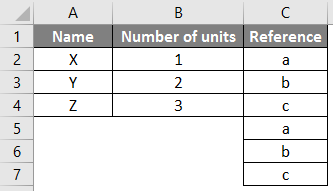
Step 1: Take the same table which we used in the previous example.
Step 2: Take some reference for the time being column ‘C’ as below.
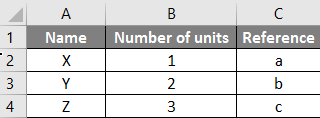
Step 3: Now copy the references and paste them in under the last reference in the table as below.
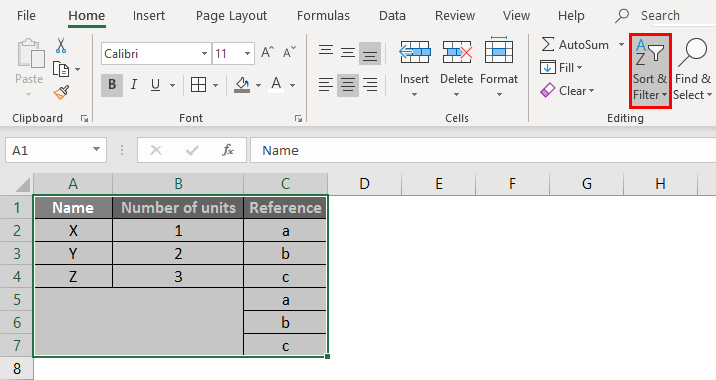
Step 4: To add an empty line under each existing data line, we are using a sorting option. Highlight the entire table and click on the sort option. It is available under “Home”, highlighted in the below picture for reference.
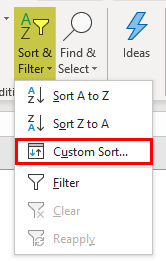
Step 5: From the drop-down of the Sort option, select the custom sort.
Step 6: A window will open as below.
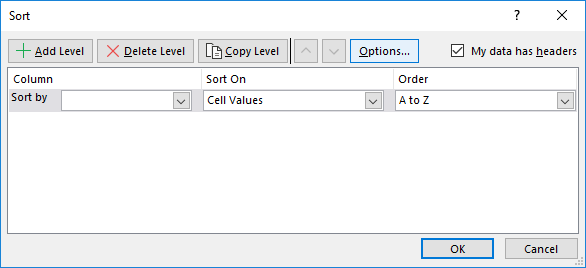
Step 7: From Sort by select the “Reference” option as shown in the below image.
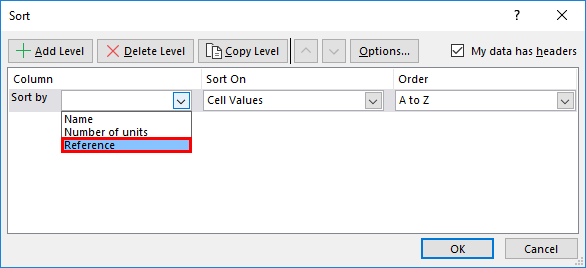
Step 8: Select OK, then see it will sort in such an empty line between each data existing line as below.

Step 9: Now, we can remove the reference column. I hope you understand why we added the reference column.

Example #4 – Adding Multiple Rows or Columns or Cells
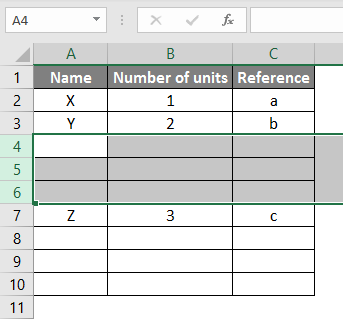
If we want to add multiple lines or cells at the same time, highlight the number of cells or lines that you required and perform the insert option as per selection. If we select the multiple row lines as below.
Now use the insert option, which we add for rows.
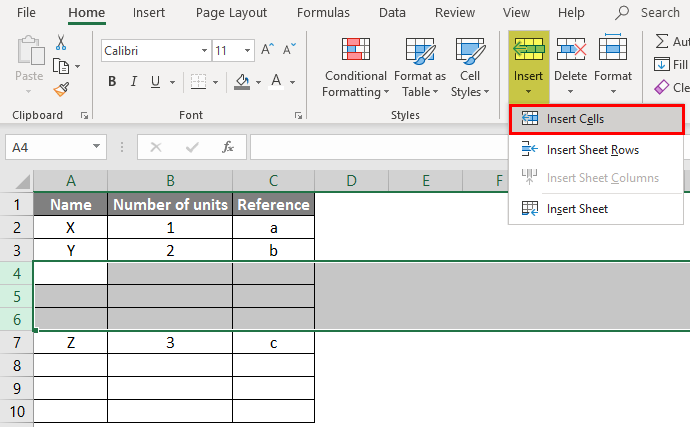
The moment we select “insert cells”, it will directly add the rows without asking for another pop-up as how it asked before. Here we highlighted 3 lines; hence when we click on “Insert Cells”, it will add another 3 empty lines under the selected lines.
Things to Remember
- “Alt + I” is the shortcut key to add a cell or line in the excel spreadsheet.
- A new cell can be added only on the right-hand side and down only. We cannot add the cells to the left and up; hence whenever you want to add the cells to highlight the cell as per this rule.
- A row will always be added at the bottom of the highlighted cell.
- A column will always be added on the left side of the highlighted cell.
- If you want to add multiple cells or rows at a time, highlight multiple cells or rows.
Recommended Articles
This is a guide on How to Add Cells in Excel. Here we discuss How to Add Cells along with examples and downloadable excel template. You may also look at the following articles to learn more –
- How to Sum Multiple Rows in Excel
- SUM Cells in Excel
- Count Cells with Text in Excel
- Excel Shortcut For Merge Cells
Insert or delete rows and columns
Insert and delete rows and columns to organize your worksheet better.

Note: Microsoft Excel has the following column and row limits: 16,384 columns wide by 1,048,576 rows tall.
Insert or delete a column
-
Select any cell within the column, then go to Home > Insert > Insert Sheet Columns or Delete Sheet Columns.
-
Alternatively, right-click the top of the column, and then select Insert or Delete.
Insert or delete a row
-
Select any cell within the row, then go to Home > Insert > Insert Sheet Rows or Delete Sheet Rows.
-
Alternatively, right-click the row number, and then select Insert or Delete.
Formatting options
When you select a row or column that has formatting applied, that formatting will be transferred to a new row or column that you insert. If you don’t want the formatting to be applied, you can select the Insert Options button after you insert, and choose from one of the options as follows:
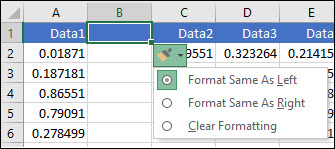
If the Insert Options button isn’t visible, then go to File > Options > Advanced > in the Cut, copy and paste group, check the Show Insert Options buttons option.
Insert rows
To insert a single row: Right-click the whole row above which you want to insert the new row, and then select Insert Rows.
To insert multiple rows: Select the same number of rows above which you want to add new ones. Right-click the selection, and then select Insert Rows.
Insert columns
To insert a single column: Right-click the whole column to the right of where you want to add the new column, and then select Insert Columns.
To insert multiple columns: Select the same number of columns to the right of where you want to add new ones. Right-click the selection, and then select Insert Columns.
Delete cells, rows, or columns
If you don’t need any of the existing cells, rows or columns, here’s how to delete them:
-
Select the cells, rows, or columns that you want to delete.
-
Right-click, and then select the appropriate delete option, for example, Delete Cells & Shift Up, Delete Cells & Shift Left, Delete Rows, or Delete Columns.
When you delete rows or columns, other rows or columns automatically shift up or to the left.
Tip: If you change your mind right after you deleted a cell, row, or column, just press Ctrl+Z to restore it.
Insert cells
To insert a single cell:
-
Right-click the cell above which you want to insert a new cell.
-
Select Insert, and then select Cells & Shift Down.
To insert multiple cells:
-
Select the same number of cells above which you want to add the new ones.
-
Right-click the selection, and then select Insert > Cells & Shift Down.
Need more help?
You can always ask an expert in the Excel Tech Community or get support in the Answers community.
See Also
Basic tasks in Excel
Overview of formulas in Excel
Need more help?
Want more options?
Explore subscription benefits, browse training courses, learn how to secure your device, and more.
Communities help you ask and answer questions, give feedback, and hear from experts with rich knowledge.
Updated: 07/31/2022 by

Below is information about how to add and remove a cell, column, or row in a Microsoft Excel spreadsheet.
Adding a cell
Note
When adding a new cell, data around the cell is moved down or to the right depending on how it’s shifted. If there is data in adjacent cells that line up with the selected cell, it becomes unaligned. In some situations, it may be better to add a new column or add a new row instead of a new cell.
To add a new individual cell to an Excel spreadsheet, follow the steps below.
- Select the cell of where you want to insert a new cell by clicking the cell once with the mouse.
- Right-click the cell of where you want to insert a new cell.
- In the right-click menu that appears, select Insert.
- Choose either Shift cells right or Shift cells down depending on how you want to affect the data around the cells.
Removing a cell
Note
When removing a cell, data around the cell is moved up or to the left depending on how it’s shifted. If there’s data in adjacent cells that line up with the selected cell, it becomes unaligned.
To remove a cell from an Excel spreadsheet, follow the steps below.
- Right-click the cell you want to remove.
- In the pop-up menu that appears, select Delete.
- Choose Shift cells left or Shift cells up, depending on how you want to affect the data around the cells.
Adding a row
Excel 2007 and later
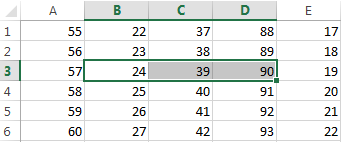
- Select the cell where you want to add a row. For example, to add a row on the ‘3’ row, select the A3 cell or any other cell in row 3.
- On the Home tab in the Ribbon menu, click Insert and select Insert Sheet Rows. You can also right-click the selected cell, select Insert, then select the Entire row option.
Tip
If you want to add multiple rows at once, highlight more than one row, then click Insert and select Insert Sheet Rows. For example, if you wanted to add four rows beginning at row 3, highlight row 3 and the three rows following it. Do this by clicking and dragging your mouse on the number 3, 4, 5, and 6. Then click Insert, and select Insert Sheet Rows.
Excel 2003 and earlier
- Select the cell where you want to add a row. For example, to add a row on the ‘3’ row, select the A3 cell or any other cell in row 3.
- In the menu bar, click Insert and select Rows. This option won’t be available if you’re highlighting columns and not rows.
Tip
If you want to add multiple rows at once, highlight more than one row and then click Insert and select Rows. For example, to add four rows beginning at row 3, highlight row 3 and the three rows following it. Do this by clicking and dragging your mouse on the number 3, 4, 5, and 6. Then, click Insert, and select Rows.
Removing a row
Excel 2007 and later
- Highlight the row you want to delete.
- On the Home tab in the Ribbon menu, click Delete and select Delete Sheet Rows. You can also right-click the highlighted row and select Delete.
Using the steps above, delete the row and move the rows under the deleted row up. If you want to delete the contents of the row, press Delete on the keyboard.
Excel 2003 and earlier
- Highlight the row you want to delete.
- In the menu bar, click Edit and select Delete. You can also right-click with your mouse on the highlighted row and select Delete.
Using the above steps, delete the row and move the rows under the deleted row up. If you want to delete the contents of the row, press Delete on the keyboard.
Adding a column
Excel 2007 and later
- Select the cell where you want to add a column. For example, to add a column on the ‘C’ column, select the C1 cell or any other cell in column C.
- On the Home tab in the Ribbon menu, click Insert and select Insert Sheet Columns. You can also right-click the selected cell, select Insert, then select the Entire column option.
Tip
If you want to add multiple columns at once, highlight more than one column, click Insert and select Insert Sheet Columns. For example, if you want to add four rows on column C, highlight the C column. Then, additionally highlight the three columns to the right, by clicking and dragging on the C, D, E, and F letters. Alternatively, with column C highlighted, hold Shift and click the F column header. Then click Insert and select Insert Sheet Column.
Excel 2003 and earlier
- Select the cell where you want to add a column. For example, to add a column on the ‘C’ column, select the C1 cell or any other cell in column C.
- In the menu bar, click Insert and select Columns. This option is not available if you’re highlighting rows and not columns.
Tip
If you want to add multiple columns at once, highlight more than one column, click Insert and select Columns. For example, if you want to add four rows on column C, highlight the C column. Then, additionally highlight the three columns to the right, by clicking and dragging on the C, D, E, and F letters. Alternatively, with column C highlighted, hold Shift and click the F column header. Then click Insert and select Column.
Removing a column
Excel 2007 and later
- Highlight the column or columns you want to delete.
- On the Home tab in the Ribbon menu, click Delete and select Delete Sheet Columns. You can also right-click the highlighted column and select Delete.
Using the steps above, delete the column and move the columns to the right over to the left. If you want to delete the contents of the column, press Delete on the keyboard.
Excel 2003 and earlier
- Highlight the column or columns you want to delete.
- In the menu bar, click Edit and select Delete. You can also right-click with your mouse on the highlighted column and select Delete.
Using the steps above, delete the column and move the columns to the right over to the left. If you want to delete the contents of the column, press Delete on the keyboard.
Inserting rows and columns in Excel is very convenient when formatting tables and sheets. But function of inserting cells and entire adjacent and non-adjacent ranges enhances program features to new level.
Consider the practical examples how to add (or remove) cells and their ranges in the spreadsheet in Excel. In fact the cells are not added as the value moves on other. This fact should be taken into account when the sheet is filled with more than 50%. Then the remaining amount of cells for rows or columns may not be enough and this operation will delete the data. In such cases you should divide content of one sheet into 2 or 3 sheets. This is one of the main reasons why the new Excel version has more numbers of columns and rows (65,000 lines in the older versions and 1 000 000 in new one).
Inserting a range of empty cells
How to insert a cell in an Excel spreadsheet? Let’s say we have a table of values to which you want to insert two empty cells in between.
Perform the following procedure:
- Select the range in the place where you need to add new empty blocks. Go to the tab «HOME» — «Insert» — «Insert Cells». Or simply right click on the highlighted area and select the paste option. Or you may press the hotkey combination CTRL + SHIFT + «+».
- A «Insert» dialog box appears where it is necessary to set the required parameters. In this case select «Shift down».
- Click OK. After that in the table with values new cells will be added. And the old will retain values and move down giving its place.
In this situation you can simply press the tool «HOME» — «Insert» (without choosing other options). Then the new cells will be inserted and the old ones will shift down (by default) without calling the dialog box options.
Use hotkeys combination CTRL + SHIFT + «plus» to add cells in Excel after selecting them.
Note. Pay attention to the settings dialog box. The last two parameters allow us to insert rows and columns in the same manner.
Removing cells
Now let’s remove the same range from our table with values. Just select the desired range. Right-click on the selected range and choose «Delete». Or go to the tab «HOME» — «Delete», «Shift up». The result is inversely proportional to the previous result.
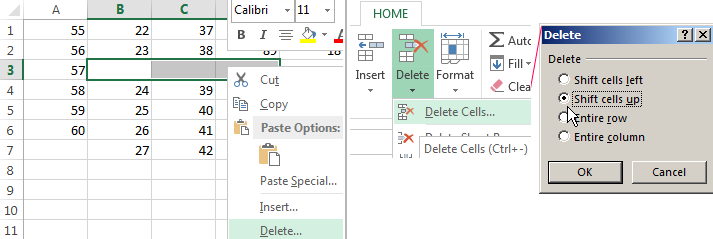
Select the range and use shortcut keys CTRL + «negative» if you want to remove cells in Excel.
Note. Likewise you can delete rows and columns.
Attention! In practice using tools «Insert» or «Delete» while inserting or deleting ranges without window with settings should be avoided so as not to get lost in the large and complex tables. Use the hotkeys if you want to save time. They cause a dialog box with removing the paste options and it also allows you to cope with the task much quickly.
In this article, we will learn How to add cells in Excel.
Scenario :
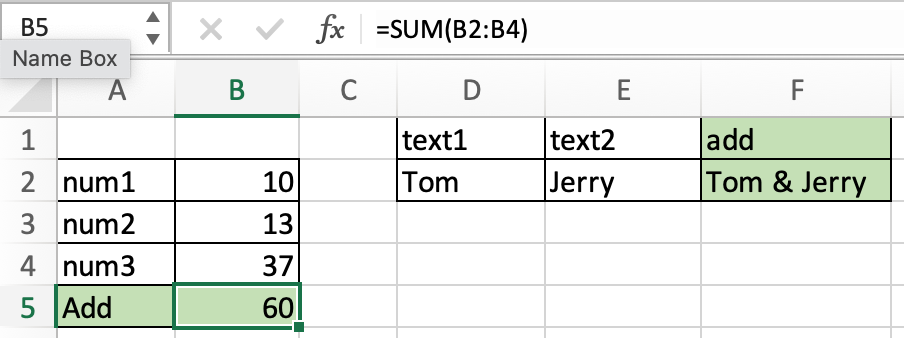
Excel Add cells. Adding means two different things in excel either adding number values or joining text values. For example finding the sum of sales of a product. To add numbers we use the SUM function to directly add values or use + operator with numbers or cell references. For example Joining the First name and Last name into one cell with space. To join or combine two texts we use CONCATENATE function or & operator with text values or cell references. Let’s learn how to add cells in excel using both methods and sample data calculation to illustrate the usage.
Add number cells in Excel
To add numbers cells in excel using cell references you can use either of the two methods mentioned below.
- =SUM(A1, A2, A3) or =SUM(A1:A3).
- =A1 + A2 + A3
Add text cells in Excel
To add text cells in excel using cell references you can use either of the two methods mentioned below.
- =CONCATENATE(A2, B2, C2)
- =A2 & B2 & C2
Example :
All of these might be confusing to understand. Let’s understand how to use the function using an example. Here we have sample data to sum. And we need to add D2, D3, D4 cells. Just go to any cell and use the formula for the required cells.
Use the formula:
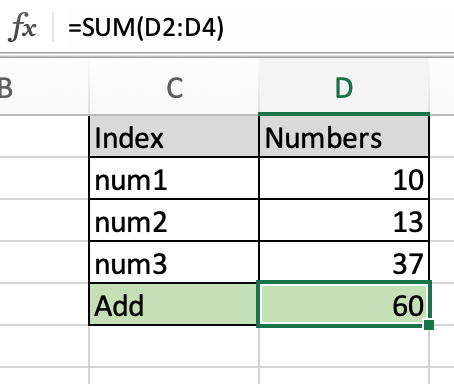
As you can see the sum of values in the D5 cell. You can use conditional summing using SUMIF or SUMIFS function.
Add two text cells in Excel
Here we are given two names and we need to add them to make a name out of it. Here the result expected is Tom & Jerry. To combine the two values
Use the formula:
=CONCATENATE(D2,» & «,E2) or =D2&» & «&E2
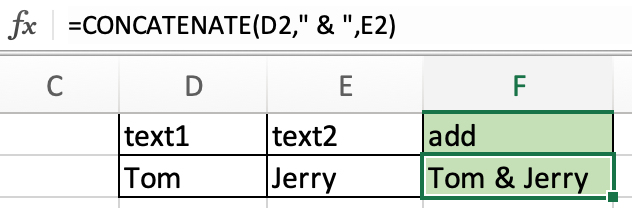
As you can see clearly the two cells are added in the new cell. Using the cell reference in excel. Use the TEXTJOIN function in Excel 365 (newer version) to add texts in excel directly.
Here are all the observational notes using the formula in Excel.
Notes :
- + and & are operators to add numbers or cells.
- Use cell reference wherever possible inplace of giving manual input in a formula.
Hope this article about How to add cells in Excel is explanatory. Find more articles on calculating values and related Excel formulas here. If you liked our blogs, share it with your friends on Facebook. And also you can follow us on Twitter and Facebook. We would love to hear from you, do let us know how we can improve, complement or innovate our work and make it better for you. Write to us at info@exceltip.com.
Related Articles :
Relative and Absolute Reference in Excel : Understanding of Relative and Absolute Reference in Excel is very important to work effectively on Excel. Relative and Absolute referencing of cells and ranges.
How to use the SUMPRODUCT function in Excel : Returns the SUM after multiplication of values in multiple arrays in excel.
SUM if date is between : Returns the SUM of values between given dates or period in excel.
Sum if date is greater than given date : Returns the SUM of values after the given date or period in excel.
2 Ways to Sum by Month in Excel : Returns the SUM of values within a given specific month in excel.
How to Sum Multiple Columns with Condition : Returns the SUM of values across multiple columns having condition in excel.
How to use wildcards in excel : Count cells matching phrases using the wildcards in excel.
How to Insert Row Shortcut in Excel : Use Ctrl + Shift + = to open the Insert dialog box where you can insert row, column or cells in Excel.
Popular Articles :
50 Excel Shortcuts to Increase Your Productivity : Get faster at your tasks in Excel. These shortcuts will help you increase your work efficiency in Excel.
How to use the IF Function in Excel : The IF statement in Excel checks the condition and returns a specific value if the condition is TRUE or returns another specific value if FALSE.
How to use the VLOOKUP Function in Excel : This is one of the most used and popular functions of excel that is used to lookup value from different ranges and sheets.
How to use the SUMIF Function in Excel : This is another dashboard essential function. This helps you sum up values on specific conditions.
How to use the COUNTIF Function in Excel : Count values with conditions using this amazing function. You don’t need to filter your data to count specific values. Countif function is essential to prepare your dashboard.