
Inserting rows and columns in Excel is very convenient when formatting tables and sheets. But function of inserting cells and entire adjacent and non-adjacent ranges enhances program features to new level.
Consider the practical examples how to add (or remove) cells and their ranges in the spreadsheet in Excel. In fact the cells are not added as the value moves on other. This fact should be taken into account when the sheet is filled with more than 50%. Then the remaining amount of cells for rows or columns may not be enough and this operation will delete the data. In such cases you should divide content of one sheet into 2 or 3 sheets. This is one of the main reasons why the new Excel version has more numbers of columns and rows (65,000 lines in the older versions and 1 000 000 in new one).
Inserting a range of empty cells
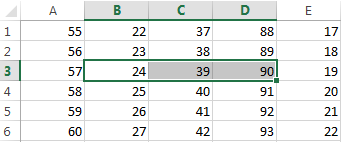
How to insert a cell in an Excel spreadsheet? Let’s say we have a table of values to which you want to insert two empty cells in between.
Perform the following procedure:
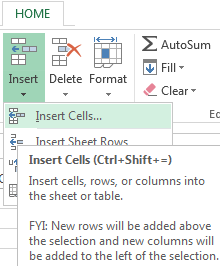
- Select the range in the place where you need to add new empty blocks. Go to the tab «HOME» — «Insert» — «Insert Cells». Or simply right click on the highlighted area and select the paste option. Or you may press the hotkey combination CTRL + SHIFT + «+».
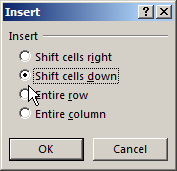
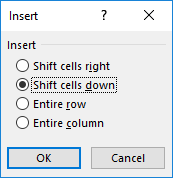
- A «Insert» dialog box appears where it is necessary to set the required parameters. In this case select «Shift down».
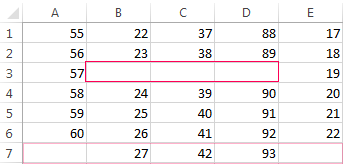
- Click OK. After that in the table with values new cells will be added. And the old will retain values and move down giving its place.
In this situation you can simply press the tool «HOME» — «Insert» (without choosing other options). Then the new cells will be inserted and the old ones will shift down (by default) without calling the dialog box options.
Use hotkeys combination CTRL + SHIFT + «plus» to add cells in Excel after selecting them.
Note. Pay attention to the settings dialog box. The last two parameters allow us to insert rows and columns in the same manner.
Removing cells
Now let’s remove the same range from our table with values. Just select the desired range. Right-click on the selected range and choose «Delete». Or go to the tab «HOME» — «Delete», «Shift up». The result is inversely proportional to the previous result.
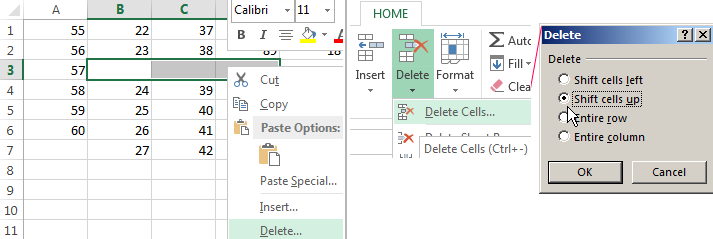
Select the range and use shortcut keys CTRL + «negative» if you want to remove cells in Excel.
Note. Likewise you can delete rows and columns.
Attention! In practice using tools «Insert» or «Delete» while inserting or deleting ranges without window with settings should be avoided so as not to get lost in the large and complex tables. Use the hotkeys if you want to save time. They cause a dialog box with removing the paste options and it also allows you to cope with the task much quickly.
How to Add Cells in Excel (Table of Contents)
- Adding Cells in Excel
- Examples of Add Cells in Excel
Adding Cells in Excel
Adding a cell is nothing but inserting a new cell or group of cells in between the existing cells by using the insert option in excel. We can insert the cells in row-wise or column-wise as per requirement, which allows us to input the additional data or new data in between the existing data.
Explanation: Sometimes, while working with Excel, we may forget to add some portion of date that should be inserted in between the existing data. In that case, we can cut the data and paste it a bit down or right and can input the required data in the gap. However, we can achieve the same without using the cut and paste option but by using the insert option in Excel.
There are four different options available to insert new cells. We will see each option and the respective example.
We can insert new cells in two ways; one way is to select the insert option from the worksheet, and the other is the shortcut key. Click on the “Home” menu at the top left corner in case if you are in a different menu.
After the selection of “Home”, observe the right-hand side we have a section called “cells”. Which covers the options like “Insert”, “Delete”, and “format”, which are highlighted with a red colour box.

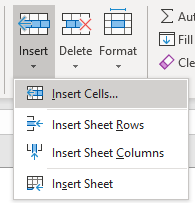
Each option has a drop-down if we observe under each option name. Click on the Insert option drop down then the drop-down menu will appear as below.
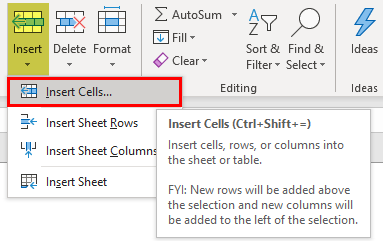
It has four different options: insert cells, insert sheet rows, insert sheet columns, and insert sheet. Click on the option Insert cells; then it will open a pop-up menu with four options as below.
Examples of Add Cells in Excel
Here are some examples of How to Add Cells in Excel, which are given below
You can download this How to Add Cells Excel Template here – How to Add Cells Excel Template
Example #1 – Add a Cell using Shift Cells Right
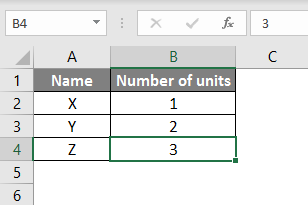
Consider a table having data of two columns like below.

Now it has three rows of data. But in case if we need to add a cell at the cell B4 by moving the data to the right, we can do that. Follow the steps.
Step 1: Select the cell where you want to add a new cell. Here we have selected B4 as shown below.
Step 2: Select the Insert menu option for the drop-down as below.
Step 3: Select the Insert Cells option then a pop-up menu will appear as below.
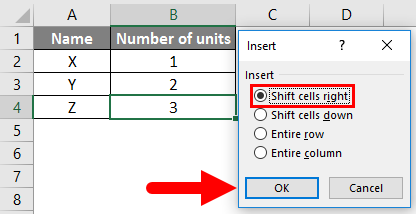
Step 4: Select the “Shift cells right” option, then click on OK. Then the result will appear as below.
If we observe the above screen, number 3 is shifted to the right and created a new empty cell. This is how “shift cell right” will work. Similarly, we can do the shift cells down also.
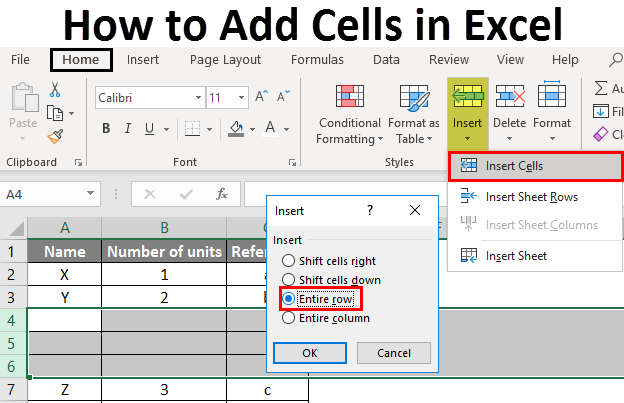
Example #2 – Insert a New Column and New Row
To add a new column, follow the below steps. It is as similar to shifting cells.
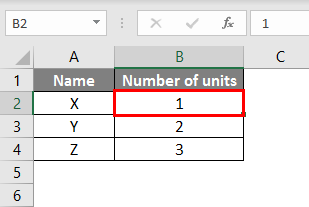
Step 1: Consider the same table which we took in the above example. Now we need to insert a column in between the two columns.
Step 2: A column will always be added on the left-hand side; hence select any one cell in the number of units as below.
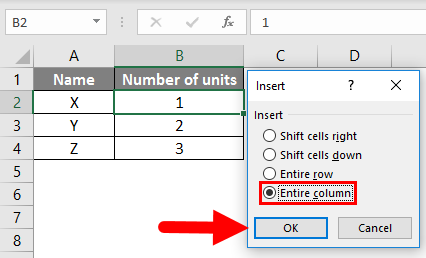
Step 3: Now select the “Entire column” option from the insert option as shown in the below image.
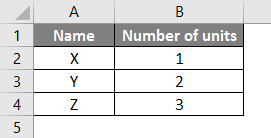
Step 4: Select the OK button. A new column will be added in between the existing two columns as below.
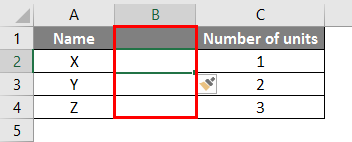
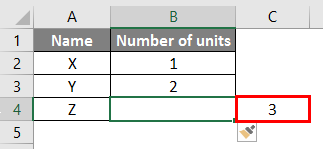
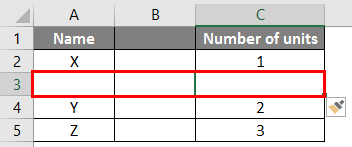
In a similar way, we can add the row by clicking the Entire row option as below.
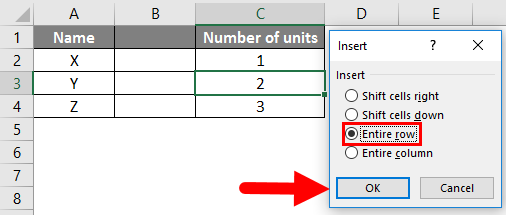
The result will be as below. A new row is added between the data X and Y.
Example #3 – Adding Rows After Each Row using the Sort Option
Up to now, we covered how to add a single cell by shifting cells right and down, adding an entire row an entire column.
But these actions will affect only one row or one column. In case if we want to add an empty row under each existing row, we can perform in another way. Follow the below steps to add an empty row.
Step 1: Take the same table which we used in the previous example.
Step 2: Take some reference for the time being column ‘C’ as below.
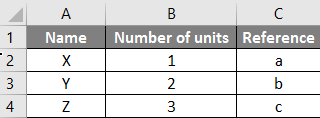
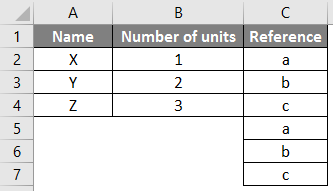
Step 3: Now copy the references and paste them in under the last reference in the table as below.
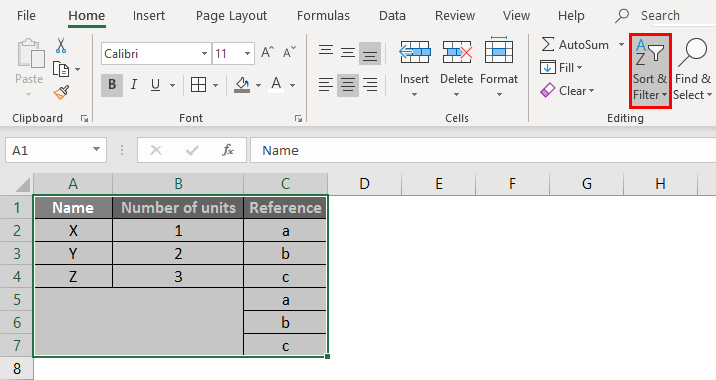
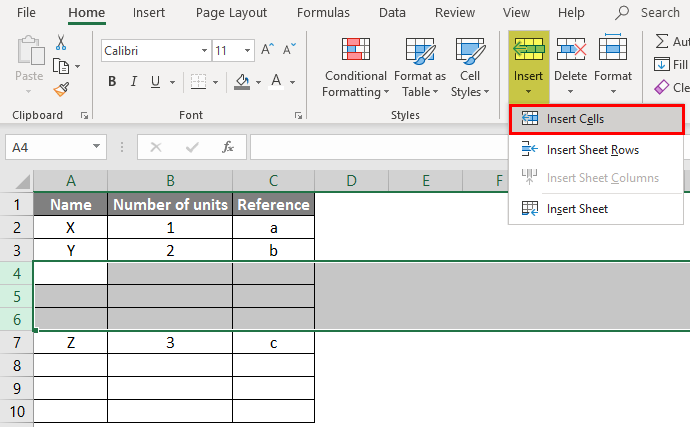
Step 4: To add an empty line under each existing data line, we are using a sorting option. Highlight the entire table and click on the sort option. It is available under “Home”, highlighted in the below picture for reference.
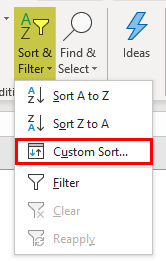
Step 5: From the drop-down of the Sort option, select the custom sort.
Step 6: A window will open as below.
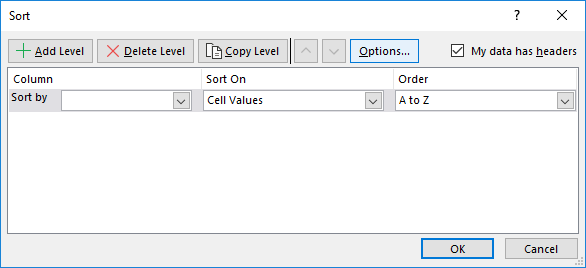
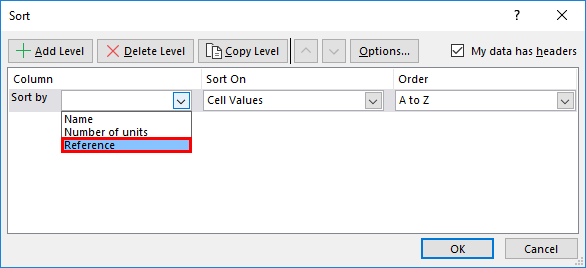
Step 7: From Sort by select the “Reference” option as shown in the below image.
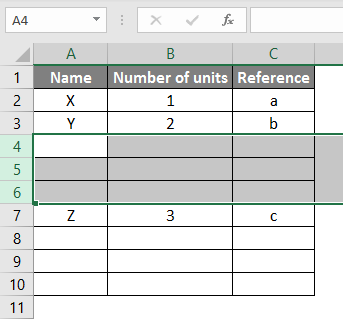
Step 8: Select OK, then see it will sort in such an empty line between each data existing line as below.

Step 9: Now, we can remove the reference column. I hope you understand why we added the reference column.

Example #4 – Adding Multiple Rows or Columns or Cells
If we want to add multiple lines or cells at the same time, highlight the number of cells or lines that you required and perform the insert option as per selection. If we select the multiple row lines as below.
Now use the insert option, which we add for rows.
The moment we select “insert cells”, it will directly add the rows without asking for another pop-up as how it asked before. Here we highlighted 3 lines; hence when we click on “Insert Cells”, it will add another 3 empty lines under the selected lines.
Things to Remember
- “Alt + I” is the shortcut key to add a cell or line in the excel spreadsheet.
- A new cell can be added only on the right-hand side and down only. We cannot add the cells to the left and up; hence whenever you want to add the cells to highlight the cell as per this rule.
- A row will always be added at the bottom of the highlighted cell.
- A column will always be added on the left side of the highlighted cell.
- If you want to add multiple cells or rows at a time, highlight multiple cells or rows.
Recommended Articles
This is a guide on How to Add Cells in Excel. Here we discuss How to Add Cells along with examples and downloadable excel template. You may also look at the following articles to learn more –
- How to Sum Multiple Rows in Excel
- SUM Cells in Excel
- Count Cells with Text in Excel
- Excel Shortcut For Merge Cells
In this tutorial, learn to use Cell Range In Excel with its different operations. A cell range is a collection of two or more cells to use in Excel formula. You can perform operations over single or multiple cells in MS Excel.
What is Cell Range in Excel
A cell range is a group of cells you select to use in functions and perform certain operations. The cell you have to use for the range is the intersection of rows and columns.
You can select multiple cells in a regular and irregular manner. To use the range in any function of Excel, you have to select the cell range with the method given below. You may also like to read post on rows and columns to create a cell in MS Excel.
Select Single Cell Range in Excel
A single cell is the intersection of the row and column of excel. If you click on any cell of the Excel sheet, you can find that it contains a column name and row name.
Let us take an example for the image given below. The below-selected cell is the intersection of column B and row 3. You can read the cell as the combination of row and column name as B3.
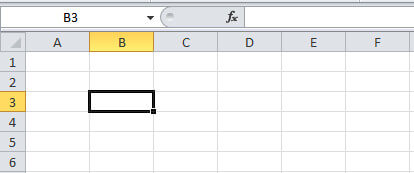
The same rule you have to follow the same naming rule when you select any cell.
Regular Multiple Range Selection
It the method of selecting multiple cells in a certain pattern like square, rectangular, etc. You can select the small and larger area of cells using this method.
To select your pattern, you have followed the steps given below.
Step 1: Go to start cell using mouse or keyboard.
Step 2: Hold ‘shift’ key of the keyboard.
Step 3: Click the last cell
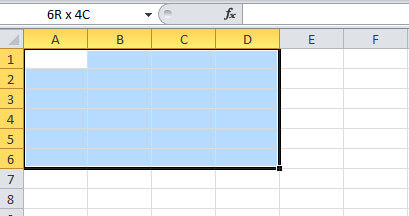
Example: Suppose you want to select the range (A1: D6) as you check in the above image. You have to first go to the cell A1 using your mouse or keyboard. Now, hold the keyboard ‘shift’ key and click the cell D6. This will select the required cell range as given in the above image.
Irregular Multiple Range Selection
An irregular selection is the selection of multiple cells without any patterns. You have to select any numbers of cells in Excel.
To select an irregular pattern, you have to follow the below-given steps:
Step 1: Click on the start cell using the mouse.
Step 2: Hold ‘ctrl’ key of your keyboard.
Step 3: Click the cells you want to select
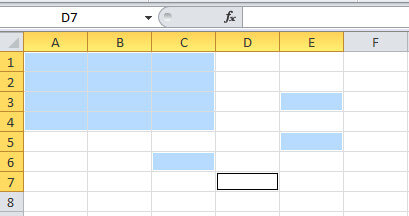
Example: Suppose you want to select the range (A1:C4,C6,E3,E5) given in the above image. Click the start cell or visit start cell using the arrow key of the keyboard. Now, hold the ‘ctrl’ key and click C4. Again click C6, E3, and E5 cells to select with the hold of the ‘ctrl’ keyboard key.
Column Range Selection Using Mouse and Keyboard
If you select all column cell, this also describes the range in Excel. To select all the cells of a column, you can use either your mouse or keyboard depend upon your choice. below are the methods to select all column cell.
Using Mouse
Step 1: Click the column cell name.
Using Keyboard
Step 1: Go the cell to select the column for.
Step 2: Hold ‘ctrl’ and press ‘space’ key of the keyboard.
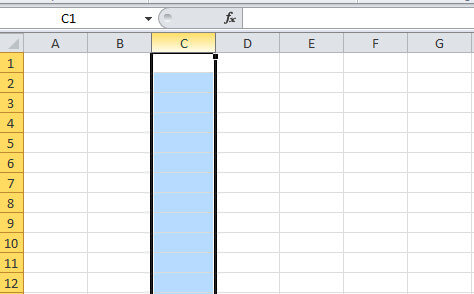
Example Suppose you want to select all the cells of column C given in the above image. You have to just click the column name C using the mouse.
If you want to select using the keyboard, you have to go the column C using arrow key. After that hold the ‘ctrl’ key and press the ‘space’ button of your keyboard. You may also like to read post on how to insert a new column in Excel using a keyboard.
Row Cell Range Selection with Mouse and Keyboard
To select all the cell range of a row, you can use a keyboard or mouse. For mouse use, you have to click the row name given to the left of the cell.
If you want to select all the row cell using only the keyboard, you have to follow the below-given steps.
Step 1: Go to the cell for the row you want using the arrow key.
Step 2: Hold the ‘shift’ key and press ‘space’ button of the keyboard to select the row.
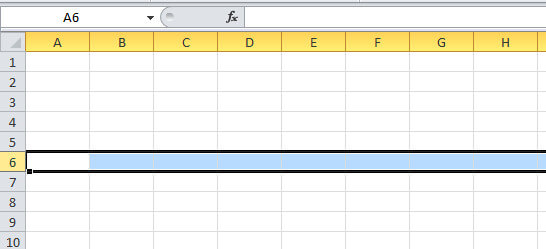
Example: If you want to select the row named 6 as given above. You have to click the name of the row using the mouse. You can also select a row using your keyboard shortcut. Go to any cell of row 6 using your keyboard arrow key. Now, hold the ‘shift’ key and push the ‘space’ bar of your keyboard.`
This will select the row with name 6. You may also like to read post on how to add a new row using MS Excel using the keyboard.
Get Range Selection for A Function of Excel
If you want to select the range from A1 to D7. Go to the cell A1 to start selecting the range. You have to select the range by pressing and holding the keyboard shift key. Now, click the cell D7 to complete the selection.
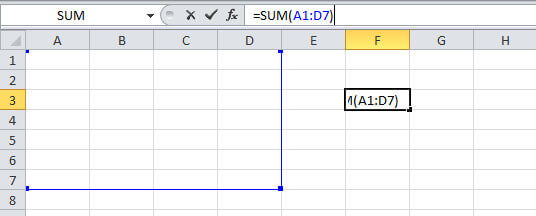
The range after selection showing in the function as SUM(A1:D7). See the image below showing the selection and the output of the sum function.
How to Autofill Numbers for the Selected Cell Range in Excel
Excel comes with many useful features to fill numbers in range. You can autofill range of number in multiple of 1, 2, 3, etc. You have to just grab the plus symbol creates when hovering over the cell. So, let’s create some useful autofill numbers in Excel.
Copy Same Number to Certain Cell Range
Step 1: Go to any cell( e.g.B2) and press the numeric 1 button.
Step 2: Mouse hovers over as indicated arrow location in the below image and holds the left mouse button. You will get a plus(+) sign in place of boxed mouse arrow sign.
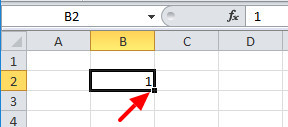
Step 3: Drag the mouse to B7 to get the copy of the number 1 from cell B2 to B7.
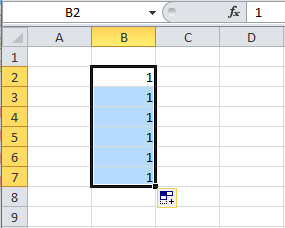
You can copy any number within a certain range using this method.
Autofill Number in Multiples of 2 to Certain Cell Range
Step 1: Go to cell B2, B3 and fill number by pressing button 2,4. In such a manner that 2 is in B2 and 4 is in B3.
Step 2: Go to cell B2 and press and hold ‘shift’ key. Now, click the B3 cell while holding the ‘shift’ key. This selects the cell B2 and B3.
Step 3: Mouse hovers the indicated arrow location given below and holds the left button of the mouse. A plus(+) sign starts to appear in place of boxed mouse arrow sign.
Step 4: Now, you have to just drag the mouse to B8 to get the multiples of 2 from B2 to B8.
You can fill multiples of any number using the above method. All you have to do is to put the number in multiple first in step 1.
Autofill Dates in the Certain Cell Range in Excel
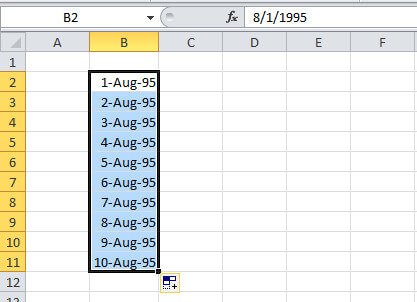
Step 1: Go to cell B2 and type 1-Aug-95.
Step 2: After typing date, hover over the indicated place given in the image and hold the mouse left button. plus(+) sign showing when you hover over the indicated place.
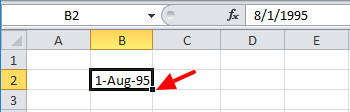
Step 3: Drag the mouse to B11 while holding the mouse left button. This will autofill the date range to a certain cell range.
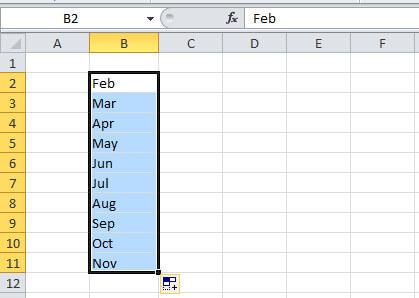
Generate Sequence of Months in Cell Range in Excel
In addition to the above date format, you can also autofill the months. To perform this task and autofill months, follow the given below step-by-step method.
Step 1: Click the cell B2 and type Feb.
Step 2: Now, take your mouse to indicated place as given in the image and hold the mouse left button. A plus(+) sign displays when hovering over the indicated place.
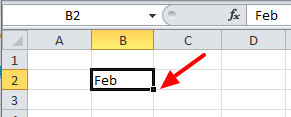
Step 3: You have to just drag the mouse down to the cell B11 with mouse left the button on hold. The selected cell range auto-filled with the sequence of months.
Hope, you like this post of cell range in excel with certain operations. If you have any query regarding the tutorial, please comment below.
Also tell me, what other operations you perform with the range in Excel
Cell, Row, Column | Range Examples | Fill a Range | Move a Range | Copy/Paste a Range | Insert Row, Column
A range in Excel is a collection of two or more cells. This chapter gives an overview of some very important range operations.
Cell, Row, Column
Let’s start by selecting a cell, row and column.
1. To select cell C3, click on the box at the intersection of column C and row 3.

2. To select column C, click on the column C header.

3. To select row 3, click on the row 3 header.

Range Examples
A range is a collection of two or more cells.
1. To select the range B2:C4, click on cell B2 and drag it to cell C4.

2. To select a range of individual cells, hold down CTRL and click on each cell that you want to include in the range.

Fill a Range
To fill a range, execute the following steps.
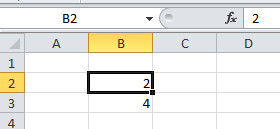
1a. Enter the value 2 into cell B2.

1b. Select cell B2, click on the lower right corner of cell B2 and drag it down to cell B8.

Result:

This dragging technique is very important and you will use it very often in Excel. Here’s another example.
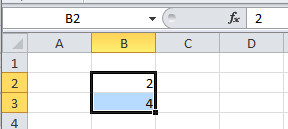
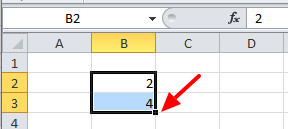
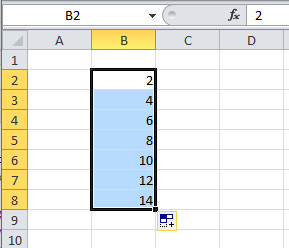
2a. Enter the value 2 into cell B2 and the value 4 into cell B3.

2b. Select cell B2 and cell B3, click on the lower right corner of this range and drag it down.

Excel automatically fills the range based on the pattern of the first two values. That’s pretty cool huh!? Here’s another example.
3a. Enter the date 6/13/2016 into cell B2 and the date 6/16/2016 into cell B3.

3b. Select cell B2 and cell B3, click on the lower right corner of this range and drag it down.

Note: visit our page about AutoFill for many more examples.
Move a Range
To move a range, execute the following steps.
1. Select a range and click on the border of the range.

2. Drag the range to its new location.

Copy/Paste a Range
To copy and paste a range, execute the following steps.
1. Select the range, right click, and then click Copy (or press CTRL + c).

2. Select the cell where you want the first cell of the range to appear, right click, and then click Paste under ‘Paste Options:’ (or press CTRL + v).

Insert Row, Column
To insert a row between the values 20 and 40 below, execute the following steps.
1. Select row 3.

2. Right click, and then click Insert.

Result.

The rows below the new row are shifted down. In a similar way, you can insert a column.
Is it possible to add cells to a range? Because the cells i need, aren’t next to each other.
Example:
I need to add the cells with x in one range
x 0 x x
x 0 x x
x 0 x x
Is this possible? and if so, how?
Thanks
asked Jun 10, 2010 at 10:53
![]()
1
Try this
VBA:
Range("B26,B19,B13").Select
C#
Excel.Range excelCell = (Excel.Range)excelWorksheet.get_Range("B26,B19,B13", Type.Missing);
answered Jun 10, 2010 at 11:00
![]()
TommyTommy
39.4k10 gold badges89 silver badges120 bronze badges
2
I couldn’t find a way around it so I ended up having to create new series for those columns.
Excel.SeriesCollection series =  chartPage[1].SeriesCollection();
        Excel.Series TSeries1 = series.NewSeries();
        TSeries1.XValues = xlWorkSheet.Range[xlWorkSheet.Cells[2, 1], xlWorkSheet.Cells[chart1.Series[0].Points.Count + 1, 1]];
        TSeries1.Values = xlWorkSheet.Range[xlWorkSheet.Cells[2, 5], xlWorkSheet.Cells[chart1.Series[0].Points.Count + 1, 5]];
        TSeries1.Name = "Setpoint Value";
        Excel.Series TSeries2 = series.NewSeries();
        TSeries2.XValues = xlWorkSheet.Range[xlWorkSheet.Cells[2, 1], xlWorkSheet.Cells[chart1.Series[0].Points.Count + 1, 1]];
        TSeries2.Values = xlWorkSheet.Range[xlWorkSheet.Cells[2, 6], xlWorkSheet.Cells[chart1.Series[0].Points.Count + 1, 6]];
        TSeries2.Name = "Process Value";
answered Jan 21, 2021 at 20:02
![]()
VBA
Option Explicit

Sub ShowAreaUse()

    Dim oRange As Range
    Dim oArea As Range

    'create range with four cells
    Set oRange = Range("C9,E22,F15,I6")

    Debug.Print "Range with four area ranges"
    Debug.Print oRange.Address

    For Each oArea In oRange.Areas
        Debug.Print "    " + oArea.Address
    Next

    'add more cells
    Set oRange = Range(oRange.Address + ",A1:B10")

    Debug.Print "Range with added cells"
    Debug.Print oRange.Address

    For Each oArea In oRange.Areas
        Debug.Print "    " + oArea.Address
    Next

    Debug.Print "Dump Range Cells"

    For Each oArea In oRange
        Debug.Print "    " + oArea.Address
    Next

End Sub
answered Jun 10, 2010 at 11:13
![]()
AMissicoAMissico
21.4k6 gold badges76 silver badges106 bronze badges
ignore this, my suggestion didn’t work properly
answered Jan 20, 2021 at 22:44
![]()