
Word для Microsoft 365 Outlook для Microsoft 365 Word 2021 Outlook 2021 Word 2019 Outlook 2019 Word 2016 Outlook 2016 Word 2013 Outlook 2013 Word 2010 Outlook 2010 Word 2007 Outlook 2007 Еще…Меньше
Закладка в Word играет ту же роль, что и в обычной книге: это пометка в тексте, позволяющая легко найти нужный фрагмент снова. Вы можете создать в документе (или в сообщении Outlook) сколько угодно закладок и присвоить каждой из них уникальное имя, чтобы легко их опознавать.
Чтобы добавить закладку, пометьте в документе ту позицию, где вы хотите ее расположить. После этого вы сможете переходить в эту позицию или добавлять ссылки на нее внутри документа или сообщения Outlook. Вы также можете удалять закладки из документа Word или сообщения Outlook.
Создание закладки
-
Выделите текст, изображение или место в документе, с которым нужно связать закладку.
-
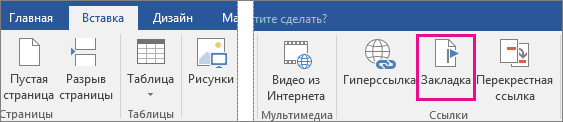
Выберите Вставка > Закладка.

-
В поле Имя закладки введите имя и нажмите кнопку Добавить.
Примечание: Имена закладок должны начинаться с буквы. Они могут содержать цифры и буквы, но не пробелы. Если вам требуется разделить слова, используйте символ подчеркивания (_), например Первый_заголовок.
Переход к закладке
После создания закладки вы можете добавлять ссылки на нее внутри документа или быстро переходить к ней в любой момент.
Переход к определенной закладке
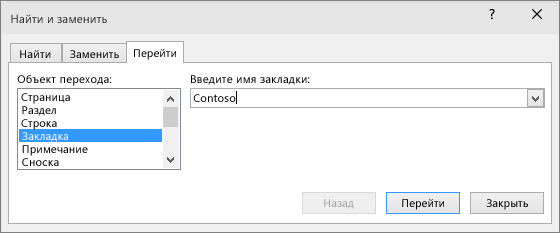
Нажмите клавиши CTRL+G, чтобы открыть вкладку Перейти в окне Найти и заменить. В списке Объект перехода выберите пункт Закладка. Введите или выберите имя закладки, а затем нажмите кнопку «Перейти».
Ссылка на закладку
Вы можете также добавлять гиперссылки, которые будут вызывать переход к определенной закладке в том же документе.
-
Выделите текст или объект, который вы хотите использовать в качестве гиперссылки.
-
Щелкните правой кнопкой мыши и выберите «Гиперссылка
. -
В разделе Связать с выберите параметр Место в документе.
-
В списке выберите заголовок или закладку, на которую должна указывать гиперссылка.
Примечание: Чтобы настроить всплывающую подсказку, которая появляется, когда вы наводите указатель мыши на гиперссылку, выберите пункт Всплывающая подсказка, а затем введите нужный текст.
-
Нажмите кнопку ОК.
 .
.Если при использовании закладок у вас возникают вопросы или проблемы, ознакомьтесь с различными методами устранения неполадок с закладками.
Удаление закладки
-
Выберите Вставка > Закладка.
-
Чтобы отсортировать список закладок в документе, выберите параметр Имя или Положение.
-
Выберите имя закладки, которую нужно удалить, и нажмите Удалить.
-
Если вы добавили в документ гиперссылку на удаленную закладку, щелкните правой кнопкой мыши связанный текст и выберите пункт Удалить гиперссылку.
Примечание: Чтобы удалить и закладку, и связанный с ней элемент документа, например блок текста, выделите этот элемент и нажмите клавишу DELETE.
Нужна дополнительная помощь?
![]()
Download Article
![]()
Download Article
Microsoft Word’s Bookmark feature lets you quickly find passages in long documents without having to scroll through large blocks of text or use the Find feature with words that may be interspersed in many places in the overall text. This feature can be useful when editing a passage that requires you to look at other places in the document to ensure text consistency. Following are instructions in how to add a bookmark in Microsoft Word 2003, 2007, and 2010, as well as how to show bookmark brackets, go to a bookmark, cross-reference a bookmark, and delete a bookmark.
-
1
Select the place in the text you wish to bookmark. You can either highlight a block of text or click to place your cursor at the start of a paragraph.
-
2
Access the Bookmark feature. This displays the Bookmark dialog box.
- In Word 2003, select «Bookmark» from the Insert menu.
- In Word 2007 and 2010, select «Bookmark» from the Links group in the Insert menu ribbon.
Advertisement
-
3
Name the bookmark. Bookmark names have to begin with a letter, but they may contain numbers. Spaces aren’t allowed, but you can separate words with an underscore (_), as in «Heading_1.»
-
4
Click the «Add» button. This creates your bookmark.


Advertisement
-
1
Display the Word Options dialog box. The method for doing this differs according to your version of Word.
- In Word 2003, select «Options» from the Tools menu, then click the View tab.
- In Word 2007, click the «Microsoft Office» button in the upper left to display the File menu, then click «Word Options.»
- In Word 2010, click the File tab and select «Options» from the File menu on the left side of the File page.
-
2
Select «Advanced.»
-
3
Scroll down to the «Show document content» section.
-
4
Check the «Show bookmarks» box. Click «OK» to close the Word Options dialog. Any text within the bookmarked section will be surrounded by brackets; if there is no text within the bookmark, it instead appears as an I-beam. Neither the brackets nor the I-beam print.
- Text within a bookmark can be edited the same as text outside the bookmark. If you cut or copy a portion of the bookmarked text to a new location, the moved text is not bookmarked. If you add to the text within the bookmark brackets, the new text becomes part of the bookmarked text; if you delete part of the text inside the bookmark brackets, the bookmark remains with the remaining text. If you cut and paste an entire bookmarked item, including the bookmark itself, to a new location in the same document, the bookmark moves with the moved text; if you do not include the bookmark, it remains where it is in the document. If you copy a bookmarked item to another document, including the bookmark brackets, both the original and the new document will have bookmarks. For this reason, it’s a good idea to display any bookmarks before editing your text to make sure the bookmarks end up where you want them to end up when you’re done editing.


Advertisement
-
1
Display the Bookmark dialog box.
- In Word 2003, select «Bookmark» from the Insert menu.
- In Word 2007 and 2010, select «Bookmark» from the Links group on the Insert menu ribbon.
-
2
Choose one of the «Sort by:» options. Select «Name» to sort the bookmarks alphabetically by name or «Location» to sort them by their location in the document.
- To display hidden bookmarks in the list, check the «Hidden bookmarks» box.
-
3
Select the bookmark you want to go to.
-
4
Click the «Go To» button.


Advertisement
-
1
Access the cross-reference feature. You set up a cross reference in the Cross-reference dialog box. To access it, do the following for your version of Word:
- In Word 2003, select «Reference» from the Insert menu and then select «Cross-Reference.»
- In Word 2007 and 2010, select «Cross-Reference» from the Links group on the Insert menu ribbon.
-
2
Select «Bookmark» from the «Reference type:» field.
-
3
Choose the type of bookmark reference from the «Insert reference to:» field. In most cases, you’ll use the «Bookmark text» option.
-
4
Select the bookmark from the «For which bookmark:» list. A cross-reference will be created to your bookmark. The cross-reference will take the form of a hyperlink in the document, unless you uncheck the «Insert as hyperlink» box.


Advertisement
-
1
Display the Bookmark dialog box.
-
2
Select the name of the bookmark you wish to delete.
-
3
Click the «Delete» button. Your bookmark is deleted. Any text associated with the bookmark remains, however.
- To delete book the bookmark and its associated text, select the item and press the «Delete» key on your keyboard. To make sure the bookmark is also deleted, follow the instructions under «Show Bookmark Brackets in Text.»


Advertisement
Add New Question
-
Question
How do I bookmark a picture?

Open Word, go to the picture or the content you wan’t to bookmark, and click it/edit it. Go up to the magnifying glass, just under the name of the document on top of Word. Search «bookmark», click on Insert a Bookmark, give the bookmark a name, click Add, and OK.
Ask a Question
200 characters left
Include your email address to get a message when this question is answered.
Submit
Advertisement
Video
-
The Bookmark feature can be used in conjunction with the Split, Arrange All, and View Side by Side features to quickly find and display a particular passage and compare it with other passages in the same document, different documents, or different versions of the same document.
Thanks for submitting a tip for review!
Advertisement
About This Article
Thanks to all authors for creating a page that has been read 285,795 times.
Is this article up to date?
Содержание
- Добавление закладки в документ
- Отображение и изменение закладок в документе
- Переключение между закладками
- Удаление закладок в документе
- Устранение ошибки «Закладка не определена»
- Создание активных ссылок в документе
- Вопросы и ответы

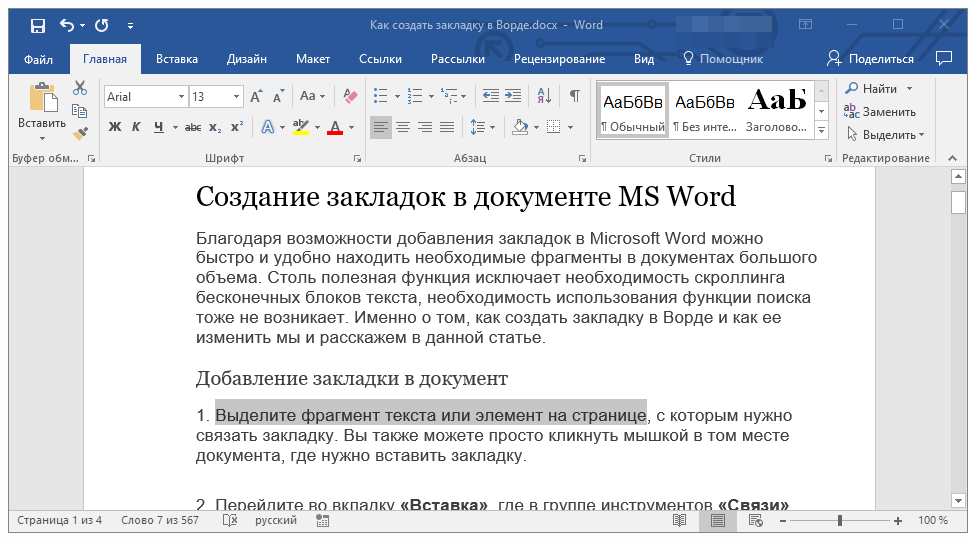
Благодаря возможности добавления закладок в Microsoft Word можно быстро и удобно находить необходимые фрагменты в документах большого объема. Столь полезная функция исключает необходимость скроллинга бесконечных блоков текста, необходимость использования функции поиска тоже не возникает. Именно о том, как создать закладку в Ворде и как ее изменить мы и расскажем в данной статье.
Урок: Функция поиска и замены в Word
Добавление закладки в документ
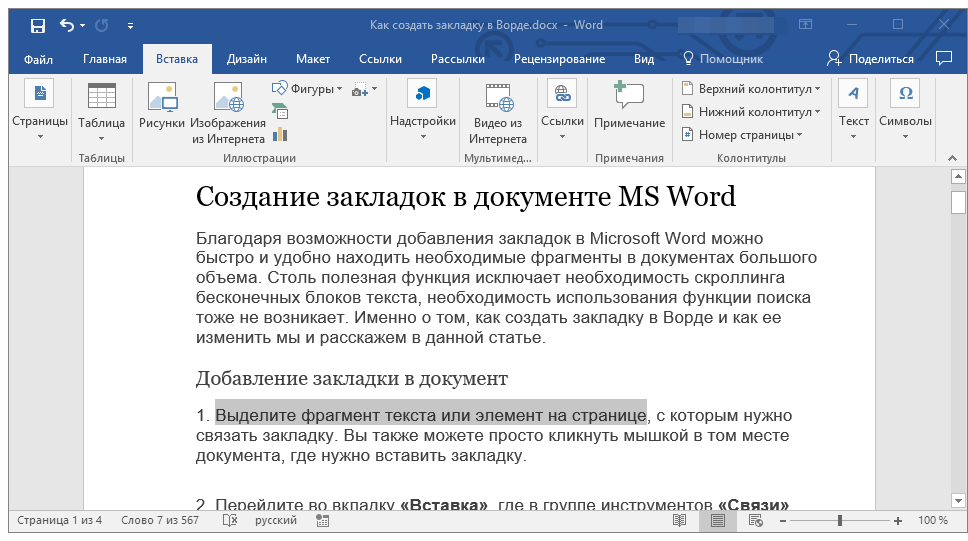
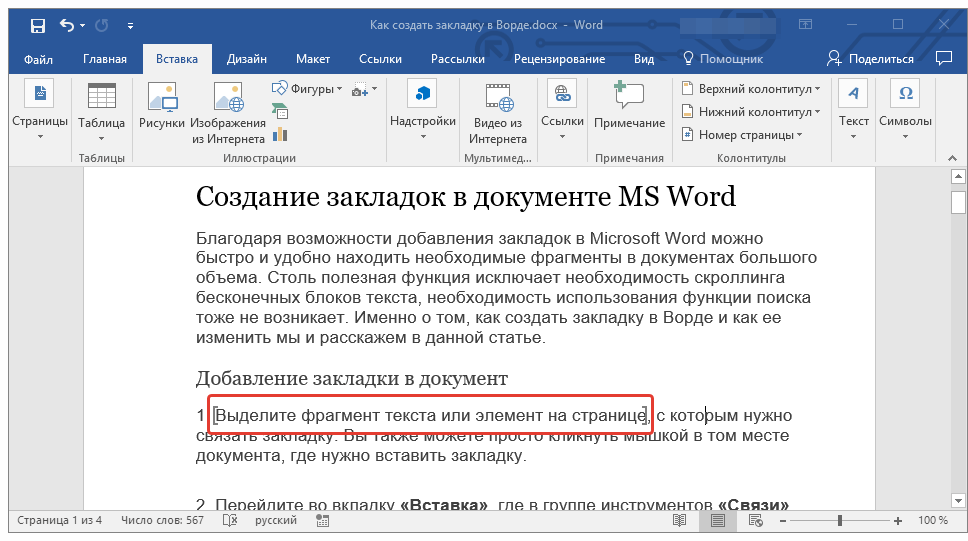
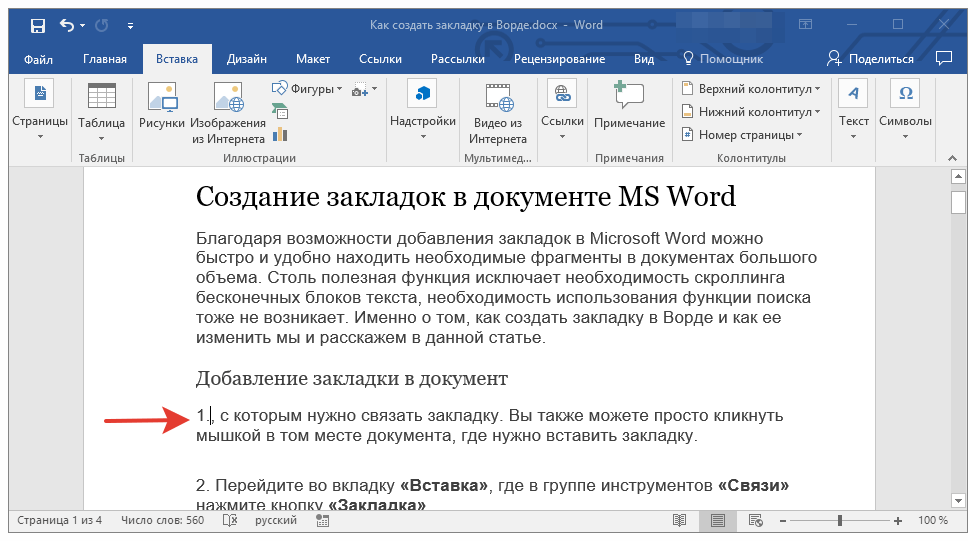
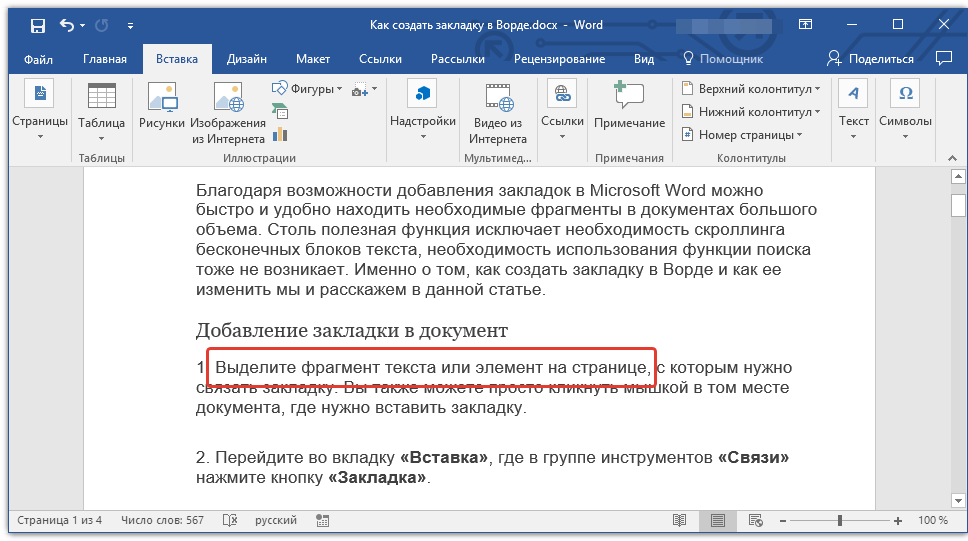
1. Выделите фрагмент текста или элемент на странице, с которым нужно связать закладку. Вы также можете просто кликнуть мышкой в том месте документа, где нужно вставить закладку.
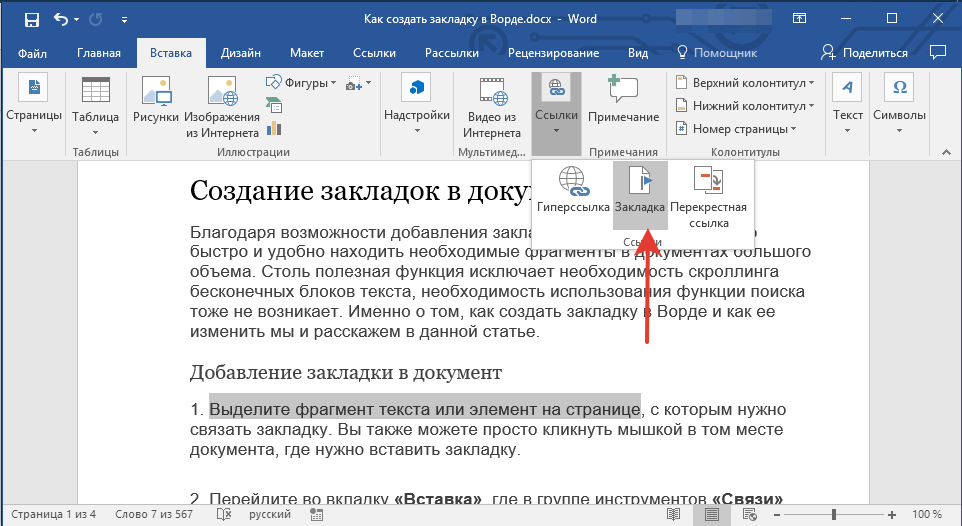
2. Перейдите во вкладку «Вставка», где в группе инструментов «Ссылки» (ранее «Связи») нажмите кнопку «Закладка».
3. Задайте имя закладки.
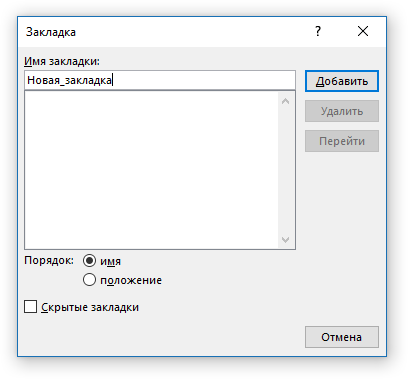
Примечание: Имя закладки обязательно должно начинаться с буквы. В нем могут содержаться цифры, но не допускается использование пробелов. Вместо отступа можно использовать нижнее подчеркивание, к примеру, имя закладки может выглядеть так: «Первая_закладка».
4. После того, как вы нажмете кнопку «Добавить», закладка будет добавлена в документ, правда, пока она визуально не будет отличаться от остального текста.
Отображение и изменение закладок в документе
После того, как вы добавите фрагмент текста или любой другой элемент со страницы в закладки, он будет заключен в квадратные скобки, которые по умолчанию отображаются не во всех версиях Ворда.
Примечание: Прежде, чем приступить к изменению элемента с закладкой, следует убедиться, что текст, который вы изменяете, находится внутри квадратных скобок.
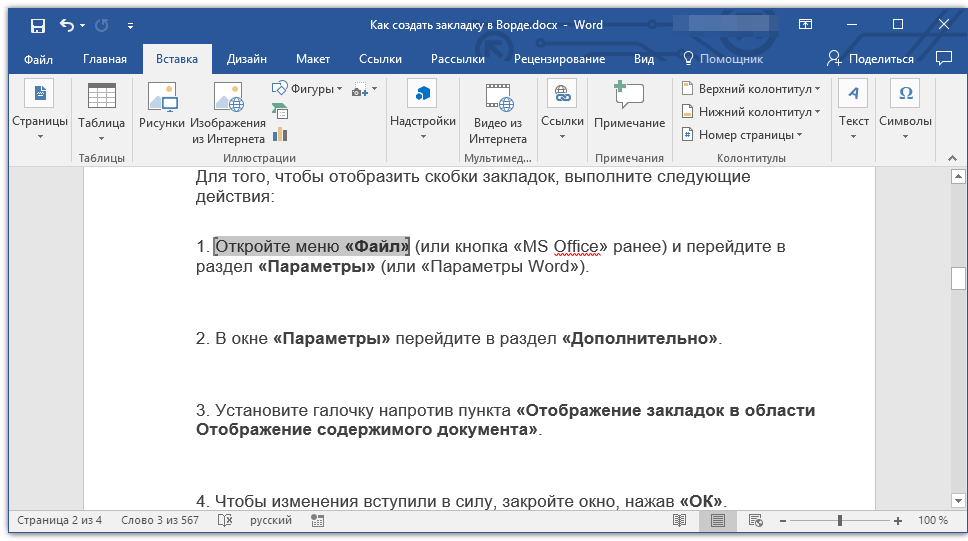
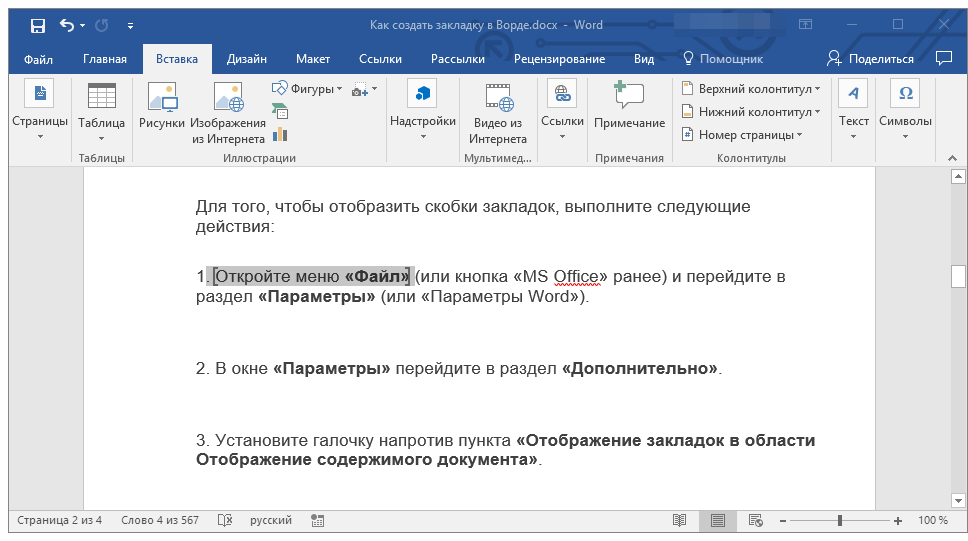
Для того, чтобы отобразить скобки закладок, выполните следующие действия:

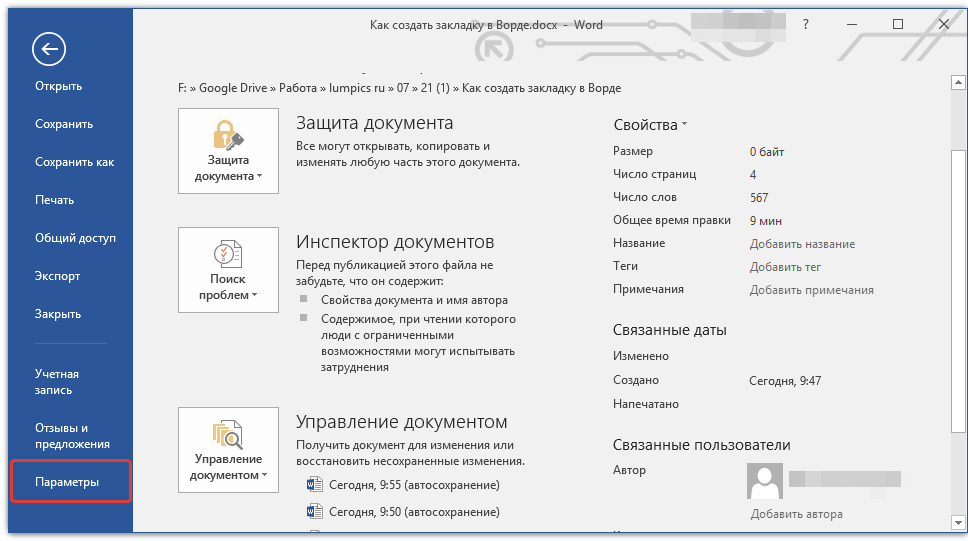
1. Откройте меню «Файл» (или кнопка «MS Office» ранее) и перейдите в раздел «Параметры» (или «Параметры Word»).
2. В окне «Параметры» перейдите в раздел «Дополнительно».
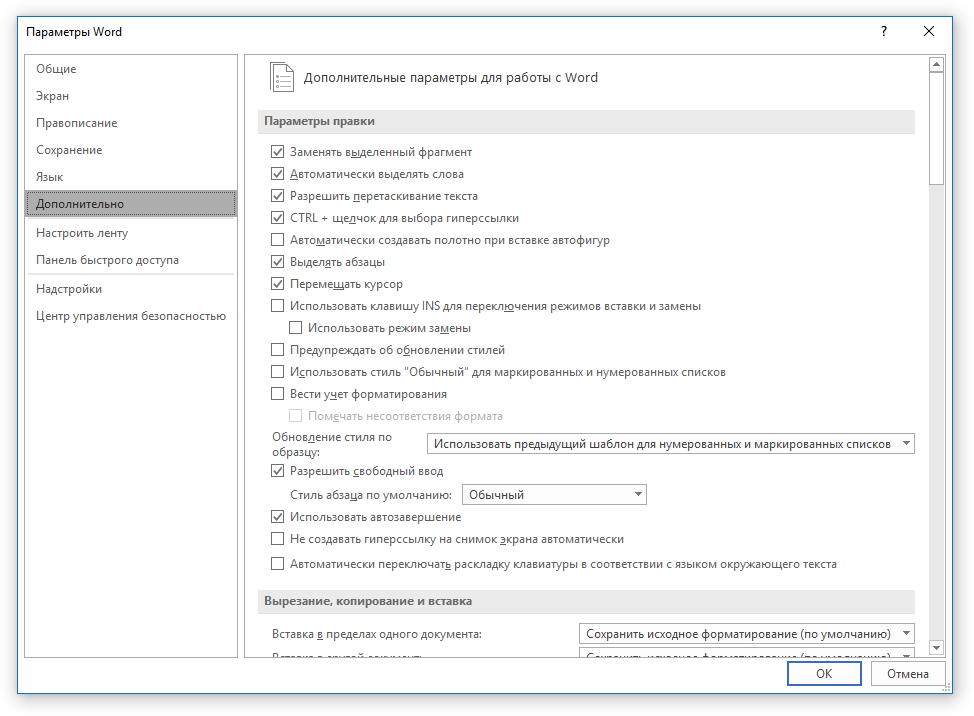
3. Установите галочку напротив пункта «Показать закладки» в разделе «Показывать содержимое документа» (ранее «Отображение закладок» в области «Отображение содержимого документа»).

4. Чтобы изменения вступили в силу, закройте окно, нажав «ОК».
Теперь элементы в документе, назначенные закладками, будут отображается на экране заключенными в квадратные скобки […].
Урок: Как в Word поставить квадратные скобки
Примечание: Квадратные скобки, внутри которых содержатся закладки, на печать не выводятся.
Урок: Печать документов в Ворде
Фрагменты текста и другие элементы, помеченные закладками, могут быть скопированы в буфер обмена, вырезаны и вставлены в любое место документа. Помимо этого, присутствует возможность удаления текста внутри закладок.
Переключение между закладками
1. Перейдите во вкладку «Вставка» и нажмите кнопку «Закладка», расположенную в группе инструментов «Ссылки».

2. Для сортировки списка закладок в текстовом документе выберите необходимый параметр:
- Имя;
- Положение.

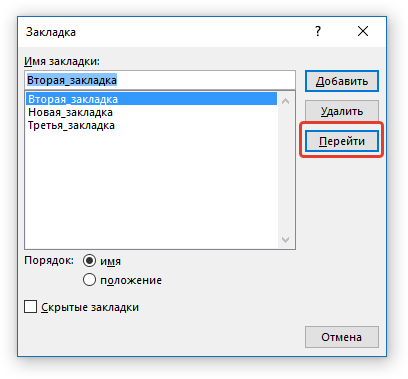
3. Теперь выберите закладку, к которой требуется перейти и нажмите «Перейти».
Удаление закладок в документе
Если возникнет необходимость удалить закладку из документа, просто выполните следующие действия:
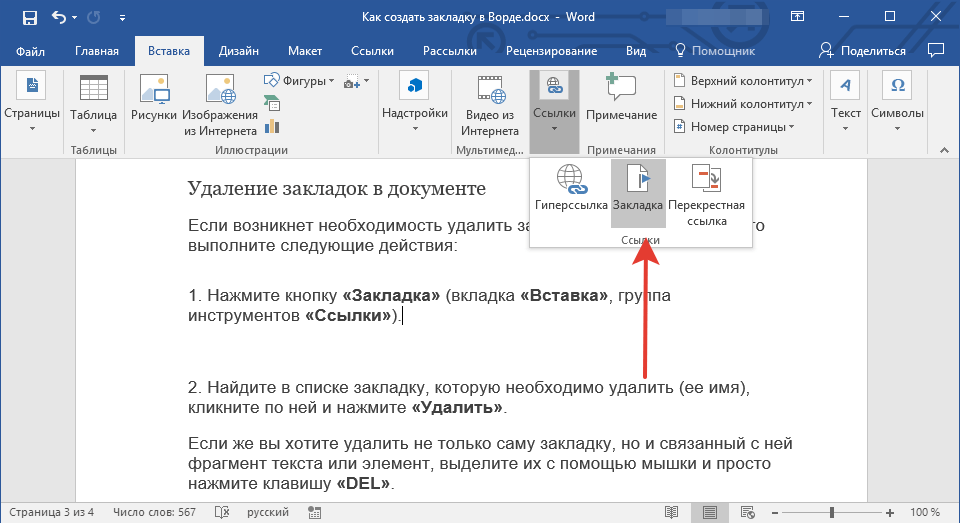
1. Нажмите кнопку «Закладка» (вкладка «Вставка», группа инструментов «Ссылки»).
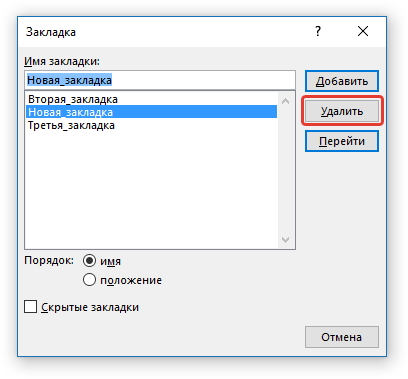
2. Найдите в списке закладку, которую необходимо удалить (ее имя), кликните по ней и нажмите «Удалить».
Если же вы хотите удалить не только саму закладку, но и связанный с ней фрагмент текста или элемент, выделите их с помощью мышки и просто нажмите клавишу «DEL».
Устранение ошибки «Закладка не определена»
В некоторых случаях закладки не отображаются в документах Microsoft Word. Особенно актуальная данная проблема для документов, созданных другими пользователями. Самая распространенная ошибка — «Закладка не определена», о том, как ее устранить, вы можете прочесть на нашем сайте.
Урок: Устранение ошибки Ворд «Закладка не определена»
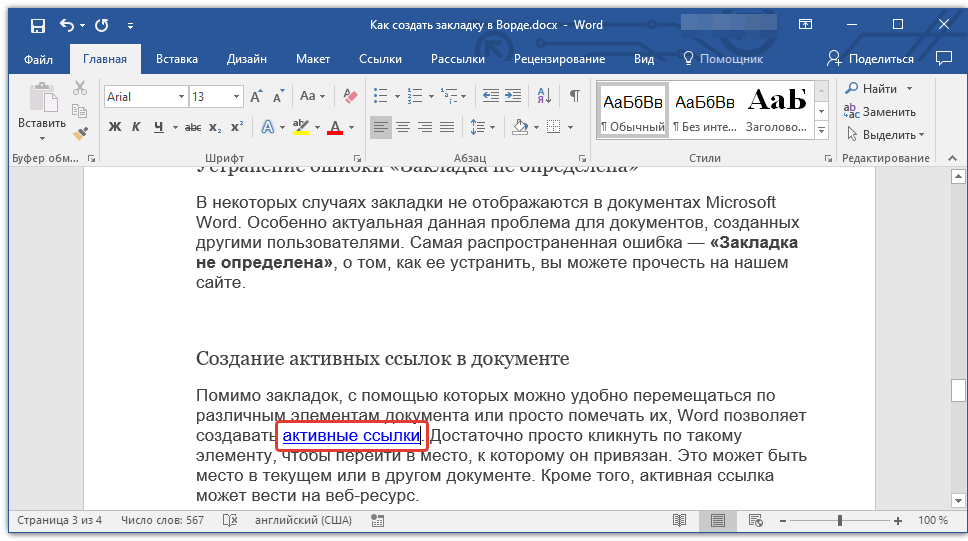
Создание активных ссылок в документе
Помимо закладок, с помощью которых можно удобно перемещаться по различным элементам документа или просто помечать их, Word позволяет создавать активные ссылки. Достаточно просто кликнуть по такому элементу, чтобы перейти в место, к которому он привязан. Это может быть место в текущем или в другом документе. Кроме того, активная ссылка может вести на веб-ресурс.
О том, как создавать активные ссылки (гиперссылки), вы можете прочесть в нашей статье.
Урок: Как в Ворд создавать активные ссылки
На этом мы закончим, ведь теперь вы знаете, как создавать закладки в Word, а также знаете о том, как их можно изменять. Успехов в дальнейшем освоении многогранных возможностей этого текстового процессора.
A bookmark marks a place (word, phrase, object, etc.) in the document for navigation from other places. Bookmarks are often used to display the bookmarked content elsewhere in the document. A unique name identifies each bookmark, and you can create as many bookmarks as you like in the document.
Create a bookmark
To create a bookmark in a Word document, follow the next steps:
1. Do one of the following:
- Position the cursor at the location where you want to insert the bookmark, or
- Select the text that you want to include into the bookmark:

2. On the Insert tab, in the Links group, click the Bookmark button:

3. In the Bookmark dialog box, in the Bookmark name box, enter a name for the bookmark you want to create or replace the name that is currently in the Bookmark name box, then click the Add button:

Notes:
- Bookmark names need to begin with a letter and contain only letters, numbers, and underscore characters (“_”). If you type any prohibited symbols, the Add button becomes inactive.
- If there are other bookmarks in the document, the last created bookmark is selected, and its name is displayed in the Bookmark name box.
- If you have selected a text that contains a bookmark (bookmarks), that bookmark (last created from the selected bookmarks) will be selected in the list, and its name is displayed in the Bookmark name box.
Display a bookmark
By default, Word hides bookmarks. They can be displayed using the Word settings (see How to show/hide bookmarks in a Word document). Two kinds of markers indicate bookmarks:
- Large, gray I-beams indicate bookmarks that mark only locations:


- Gray square brackets at the beginning and end indicate bookmarks that mark a block of text:


Go to a bookmark
You can quickly jump directly to any bookmark from:
1. The Bookmark dialog box:
In the Bookmark dialog box, in the Bookmark name list, select bookmark name and click the Go To button (or double-click the bookmark you want to go to):

Notes:
- It is convenient to sort bookmarks by location (in document order). To do so, select the Location item from the Sort by options.
- In addition to bookmarks created by authors or editors, a document can contain bookmarks created by Word – technical bookmarks. To see all bookmarks in a document, select the Hidden bookmarks check box:

2. The Find and Replace dialog box:
2.1. Open the Find and Replace dialog box with the Go To tab displayed by doing one of the following:
- Press Ctrl+G.
- Press F5.
- On the Home tab, in the Editing group, click the Find dropdown list, and then choose Go To…:

2.2. In the Find and Replace dialog box, on the Go To tab:
- In the Go to what list, select Bookmark,
- In the Enter bookmark name field, type the bookmark name, or select the bookmark name from the dropdown list:

- Click the Go To button.

3. A hyperlink to the bookmark. Select a reference in the document and click it to jump to the bookmark (see how to create a cross-reference):

Create a reference to a bookmark
Word offers two ways how to link to a bookmark:
- By creating a cross-reference,
- By adding a hyperlink to a bookmark.
To create a hyperlink to a bookmark (same as to a heading), do the following:
1. Type or select a text or object you want to use as a hyperlink.
2. Do one of the following:
- Right-click the selection, select the Link in the popup menu, then click Insert Link…:

- On the Insert tab, in the Links group, click the Link button:

- Press Ctrl+K on the keyboard.


3. In the Insert Hyperlink dialog box:
- In the Link to list, select the Place in This Document item,
- Make sure that the Text to display text box contains the correct text for the link,
- In the Select a place in this document list, select the heading or bookmark that you want to link to:

- Optionally, click the ScreenTip… button to add the text to the screen tip that will be displayed when you hover the mouse cursor over the link:

- Click OK to insert the hyperlink in the document:


Delete a bookmark
To delete any bookmark, do one of the following:
- Select text inside the bookmark and delete it.
If you select all bookmark text (between square grey brackets), this deletes the bookmark with the selected text.
- Do the following:
- On the Insert tab, in the Links group, click the Bookmark button.
- In the Bookmark dialog box, select the bookmark that you want to delete and click the Delete button:


Bookmark the location
- Select text, a picture, or a place in your document where you want to insert a bookmark.
- Click Insert > Bookmark.
- Under Bookmark name, type a name and click Add. Note: Bookmark names need to begin with a letter. They can include both numbers and letters, but not spaces.
Contents
- 1 Why can’t I add a bookmark in Word?
- 2 How do I add a bookmark?
- 3 Where is bookmark in Word?
- 4 How do I add and see bookmarks in Word?
- 5 How do you insert a cover page?
- 6 How do I add a bookmark in Word for Mac?
- 7 How do I create a shortcut to a bookmark?
- 8 How do I bookmark a page in Windows 10?
- 9 How do I create a bookmark in Word 2010?
- 10 How do I edit bookmarks in Word?
- 11 How do you insert table of contents in Word?
- 12 How do I add a table of contents to bookmarks in Word?
- 13 How do I save a Cover Page in Word?
- 14 How do I insert a page in Word?
- 15 How do you add a Cover Page to a Word document?
- 16 Where do you bookmark a page?
- 17 How do I bookmark a page?
- 18 Why are my Bookmarks not showing up?
- 19 Where are Bookmarks stored in Windows?
- 20 Where is the bookmark icon?
Why can’t I add a bookmark in Word?
If you use an unacceptable character in the “Bookmark name:” field, the “Add” button appears grayed out and unavailable. You must then change the name to continue. To add the bookmark and close the dialog box, click the “Add” button.
How do I add a bookmark?
Android
- Open Chrome.
- Go to the webpage you want to bookmark.
- Select the “Menu” icon (3 Vertical dots)
- Select the “Add Bookmark” icon (Star)
- A bookmark is automatically created and saved to your “Mobile Bookmarks” folder.
Where is bookmark in Word?
Bookmark Feature in Microsoft Word
- Select or highlight a location, picture, or text in your document.
- In the “Insert” tab on the ribbon menu, within the “Links” group select “Bookmark.”
- Type a name for your bookmark and click “Add.”
How do I add and see bookmarks in Word?
First and foremost, click “File” tab in the Ribbon. Then click “Options” to open the “Word Options” dialog box. Next click “Advanced” in the left column. Scroll down to “Show document content” section and check “Show bookmarks” box.
How do you insert a cover page?
Insert a cover page
- On the Insert tab, click Cover Page.
- Click a cover page layout from the gallery of options. After you insert a cover page, you can replace the sample text with your own text by clicking to select an area of the cover page, such as the title, and typing your text.
How do I add a bookmark in Word for Mac?
Insert a bookmark
- Select the text to which you want to assign a bookmark, or click where you want to insert a bookmark.
- Click Insert >Bookmark.
- Under Bookmark name, type a name. Bookmark names must begin with a letter and can contain numbers.
- Click Add.
How do I create a shortcut to a bookmark?
- Ctrl+D: Bookmark the current site.
- Ctrl+Shift+B: To bring into view the Bookmarks bar or to make it disappear.
- Ctrl+Shift+O: Opens the bookmarks manager.
- F6: Moves between the address bar, the bookmarks bar, and the website.
- SEE ALSO: How to get Android Oreo’s PiP mode on any Android smartphone?
How do I bookmark a page in Windows 10?
How to Add a Favorite Site/Bookmark in Microsoft Edge
- MORE: Windows 10: Full Review.
- Open up Microsoft Edge.
- Go to the website you want to favorite.
- Click on the Star button in the top right to open the favorites menu.
- Or.
- 3b.
- Hit Add to save the current page as a favorite.
How do I create a bookmark in Word 2010?
To create a bookmark in a specific area of a Word 2010, 2013, or 2016 document, simply place the cursor where you want the bookmark. Then under the Insert tab on the Ribbon, in the Links section, click on Bookmark. A Bookmark dialog comes up and you can give it a name.
How do I edit bookmarks in Word?
When you change the text in the bookmark, make sure you edit inside the brackets (use Tools – Options – View and click Bookmarks to see them). Then select Edit – Select All (or press Ctrl A), and press F9 to update the text in all the Ref fields.
How do you insert table of contents in Word?
On the toolbar ribbon, select References. Near the left end, select Insert Table of Contents. (Or select Table of Contents > Insert Table of Contents. The table of contents is inserted, showing the headings and page numbering in your document.
How do I add a table of contents to bookmarks in Word?
Add the bookmarks
- Select the section that you want to create a table of contents for.
- On the Insert tab, in the Links group, click Bookmark.
- In the Bookmark name box, type a name for the bookmark.
- Click Add.
- Repeat steps 1-4 for each section that you want to add a table of contents to.
How do I save a Cover Page in Word?
Saving As Cover
Go to the Insert tab and pull down the Cover Page gallery. Scroll to the very bottom and click the ‘Save Selection to Cover Page Gallery…’ option.
How do I insert a page in Word?
To put a blank page into your Word document, place the cursor where you want the new page to begin and then click Insert > Blank Page. The blank page opens, ready for whatever you want to add.
How do you add a Cover Page to a Word document?
Microsoft Word 2016
- Open the first document.
- Place the cursor where you want the second document to be inserted.
- From the Insert tab, Text group, click on the down arrow next to Object and choose Text from file.
- Select the file to be inserted.
- Click on Insert.
Where do you bookmark a page?
Find a bookmark
- On your computer, open Chrome.
- At the top right, click More. Bookmarks.
- Find and click a bookmark.
How do I bookmark a page?
If You’re Using an Android Smartphone or Tablet
- Select the Menu in the top right corner.
- Select Bookmarks.
- Select the Bookmark you’d like to visit.
- Chrome will go to the page instantly.
Why are my Bookmarks not showing up?
Search for “bookmarks.In Chrome, go to Settings > Advanced sync settings (under the Sign in section) and change the sync settings so that Bookmarks aren’t synced, if they currently are set to sync. Close Chrome. Back in the Chrome user data folder, find another “Bookmarks” file without an extension.
Where are Bookmarks stored in Windows?
AppData folder
To reach the bookmark file in Windows, you will have to access your AppData folder. To find the folder, follow these steps: Open “File Explorer.” Go to “C:/Users/[YourUserNameHere]” and select the “AppData” folder.
Where is the bookmark icon?
For the most part, the bookmarks feature can usually be identified by a star-shaped icon located on the right side of your browser’s main search bar.