
Excel for Microsoft 365 Excel for Microsoft 365 for Mac Excel 2021 Excel 2021 for Mac Excel 2019 Excel 2019 for Mac Excel 2016 Excel 2016 for Mac Excel 2013 Excel 2010 Excel 2007 More…Less
Add-ins provide optional commands and features for Microsoft Excel. By default, add-ins are not immediately available in Excel, so you must first install and (in some cases) activate these add-ins so that you can use them.
Are you looking for information about Office Add-ins based on HTML, CSS, and JS? If you are, see Get an Office Add-in for Excel.
Some add-ins are built in to Excel, such as Solver and the Analysis ToolPak. Other add-ins are available from the Download Center and must first be downloaded and installed. Finally, there are add-ins that are created by third parties, such as a programmer in your organization or a software solution provider. These can be Component Object Model (COM) add-ins, Visual Basic for Applications (VBA) add-ins, and DLL add-ins. These add-ins must also be installed to use them.
Most add-ins can be categorized into three different types:
-
Excel add-ins These typically include Excel add-in (.xlam), Excel 97-2003 add-in (.xla), or DLL add-in (.xll) files or they are automation add-ins. Some Excel add-ins, such as Solver and the Analysis ToolPak, may be available after you install Excel or Microsoft Office. Typically, you only need to activate these add-ins to use them.
-
Downloadable add-ins Additional add-ins for Excel can be downloaded and installed from Downloads at Office.com.
-
Custom add-ins Developers and solution providers usually design custom Component Object Model (COM) add-ins, automation add-ins, VBA add-ins, and XLL add-ins. These must be installed for you to use them.
After you have installed or activated an add-in, the add-in and its commands may be available in one of the following locations:
-
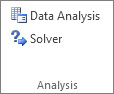
Data tab. After you install and activate the Analysis ToolPak and Solver add-ins, the Data Analysis and Solver commands are available in the Analysis group.

-
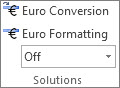
Formulas tab. After you install and activate the Euro Currency Tools, the Euro Conversion and Euro Formatting commands are displayed in the Solutions group.
-
Add-Ins tab. Other add-ins may be added to the Add-Ins tab. This tab is added to the ribbon when you install and activate the first add-in that is shown in the Add-Ins tab. If you don’t see the Add-Ins tab, you should exit and then restart Excel.
Other add-ins, such as the Get Started tab, are available in other places in Excel, such as a tab on the ribbon, or through macros or customized menus.
Important: If you are a software developer, you can use this procedure to install or remove an automation program before you design installation and removal programs for your add-in.
To activate an Excel add-in
-
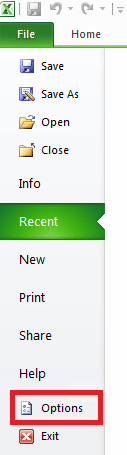
Click the File tab, click Options, and then click the Add-Ins category.
-
In the Manage box, click Excel Add-ins, and then click Go.
The Add-Ins dialog box appears.
-
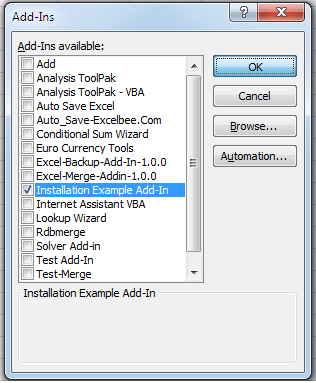
In the Add-Ins available box, select the check box next to the add-in that you want to activate, and then click OK.
If you cannot find the add-in that you want to activate in the Add-Ins available box, you may need to install it.
To install an Excel add-in
-
To install an add-in that is typically installed with Excel, such as Solver or the Analysis ToolPak, run the setup program for Excel or Microsoft Office and choose the Change option to install the add-in. After you restart Excel, the add-in should appear in the Add-Ins available box.
-
Some Excel add-ins are located on your computer and can be installed or activated by clicking Browse (in the Add-Ins dialog box) to locate the add-in, and then clicking OK.
-
Some Excel add-ins require running an installation package. You may need to download or copy the installation package to your computer (an installation package is typically a file with an .msi file name extension), and then run it.
-
Other add-ins that are not available on your computer can be downloaded and installed through a Web browser from Downloads or from other sites on the Internet or a server in your organization. Follow the setup instructions for the download as needed.
To inactivate an Excel add-in
-
Click the File tab, click Options, and then click the Add-Ins category.
-
In the Manage box, click Excel Add-ins, and then click Go.
-
In the Add-Ins available box, clear the check box next to the add-in that you want to inactivate, and then click OK.
In many cases, when you inactivate an add-in, it is removed from its group on the ribbon. In other cases, to remove the add-in from the ribbon, you may need to restart Excel.
Note Inactivating an add-in does not remove the add-in from your computer. To remove the add-in from your computer, you must uninstall it.
To remove an Excel add-in
Important: If you originally installed the Excel add-in from a network file server or from a shared folder, you might need to remove the add-in from that location. If you installed the Excel add-in from a CD and you mapped your CD drive to a new drive letter after installing the add-in, you need to reinstall the add-in from the CD. If you are running any Excel add-ins from the CD, you must uninstall the Excel add-ins, and then reinstall them from the CD.
-
Click the File tab, and then click Exit.
-
In Control Panel, click Programs and Features (Windows 7 and Windows Vista) or Add/Remove Programs (Windows XP).
-
Do one of the following:
-
If you installed Excel as part of Microsoft Office, click Microsoft Office in the list of installed programs, and then click the Change button.
-
If you installed Excel individually, click the name of your program in the list of installed programs, and then click the Change button.
-
If you installed the add-in from the Download Center, click the name of your program in the list of installed programs, and then click the Uninstall button.
-
-
Follow the instructions in the installation program.
Important: If you are a software developer, you can use this procedure to install or remove an automation program before you design installation and removal programs for your add-in. If you are not a developer, you should not need to use this procedure. Contact the system administrator who provided the add-in if you want installation and removal instructions.
Add a COM add-in
-
Click the File tab, click Options, and then click the Add-Ins category.
-
In the Manage box, click COM Add-ins, and then click Go.
The COM Add-Ins dialog box appears.
-
In the Add-Ins available box, select the check box next to the add-in that you want to install, and then click OK.
Tip If the add-in that you want to use is not listed in the Add-Ins available box, click Add, and then locate the add-in.
Remove a COM add-in
-
Click the File tab, click Options, and then click the Add-Ins category.
-
In the Manage box, click COM Add-ins, and then click Go.
The COM Add-Ins dialog box appears.
-
In the Add-Ins available box, clear the check box next to the add-in that you want to remove, and then click OK.
Note This removes the add-in from memory but keeps its name in the list of available add-ins. It does not delete the add-in from your computer.
-
To remove a COM add-in from the list of available add-ins and to delete the add-in from your computer, click its name in the Add-ins available box, and then click Remove.
Note: If you are a software developer, you can use this procedure to install or remove an automation program before you design installation and removal programs for your add-in. If you are not a developer, you should not need to use this procedure. Contact the system administrator who provided the add-in if you want installation and removal instructions.
-
Click the File tab, click Options, and then click the Add-Ins category.
-
In the Manage box, click Excel Add-ins, and then click Go.
The Add-Ins dialog box appears.
-
To install an automation add-in, in the Automation servers available box, click Automation, and then click the add-in that you want.
Tip If the add-in that you want isn’t in the list, click Browse, locate the add-in, and then click OK.
-
To remove an automation add-in, you must remove it from the registry. See your system administrator for details.
Some add-ins are built in to Excel, such as Solver and the Analysis ToolPak. Other add-ins are available from the Download Center and must first be downloaded and installed. Finally, there are add-ins that are created by third parties, such as a programmer in your organization or a software solution provider. These can be Component Object Model (COM) add-ins, Visual Basic for Applications (VBA) add-ins, and DLL add-ins. These add-ins must also be installed to use them.
Most add-ins can be categorized into three different types:
-
Excel add-ins These typically include Excel add-in (.xlam), Excel 97-2003 add-in (.xla), or DLL add-in (.xll) files or they are automation add-ins. Some Excel add-ins, such as Solver and the Analysis ToolPak, may be available after you install Excel or Microsoft Office. Typically, you only need to activate these add-ins to use them.
-
Downloadable add-ins Additional add-ins for Excel can be downloaded and installed from Downloads at Office.com.
-
Custom add-ins Developers and solution providers usually design custom Component Object Model (COM) add-ins, automation add-ins, VBA add-ins, and XLL add-ins. These must be installed for you to use them.
After you have installed or activated an add-in, the add-in and its commands may be available in one of the following locations:
-
Data tab. After you install and activate the Analysis ToolPak and Solver add-ins, the Data Analysis and Solver commands are available in the Data tab on the ribbon.
-
Home tab. Other add-ins may be added to the Home tab.
Other add-ins, such as the Get Started tab, are available in other places in Excel, such as a tab on the ribbon, or through macros or customized menus.
Important: If you are a software developer, you can use this procedure to install or remove an automation program before you design installation and removal programs for your add-in.
To activate a pre-installed Excel add-in
-
On the Tools menu, select Add-ins.
-
In the Add-Ins available box, select the check box for the Add-in you want to activate, and then click OK.
To install an Excel add-in
-
Some Excel add-ins are located on your computer and can be installed or activated by clicking Browse (in the Add-Ins dialog box above) to locate the add-in, and then clicking OK.
-
Some Excel add-ins require running an installation package. You may need to download or copy the installation package to your computer (an installation package is typically a file with an .msi file name extension), and then run it.
-
Other add-ins that are not available on your computer can be downloaded and installed through a Web browser from Downloads or from other sites on the Internet, a server in your organization, , or using the built-in Store option in Excel. Follow the setup instructions for the download as needed.
To install Add-ins from the Store
-
Click the Insert tab in the ribbon.
-
Click the Store button.
-
Use the Categories or Search field to find Add-ins.
-
Click Add to install the Add-in.
Note: Some Add-ins need to be purchased.
-
To remove an Excel add-in
-
Click the Insert tab, and then click My Add-ins.
-
In Office Add-ins, click the 3 dots menu next to the Add-in.
-
Click Remove.
-
Read the notice that appears regarding other devices and click Remove.
Need more help?
Excel Add-Ins are third party components which can be installed into MS Excel anytime. It extends functionality and power of Microsoft Excel. This is a powerful automation tool that can save your hours of hard word daily. All you need to write and install an Add-In and it will run on your command to complete the given instruction.
Add-Ins are used as strong reporting, control and analysis tools. It simply gives you power to customize your Excel application to enhance its utilization beyond imagination. There is no limitations on number of Add-Ins to install in your Excel.
Add-Ins can be turned on or off anytime. Here we will learn how we can Add or install new Add-In to our Excel 2016, 2007, 2010 and 2013.
MS Excel 2007 has changed interface since Excel 2003. Although most of the functions are same but accessing menu options are a bit changed. Here is how you can as Add new Add-In to Excel 2007:
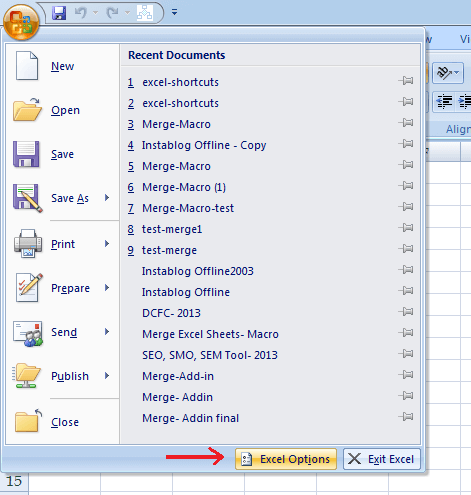
First click on the big round “Office Button” in the top left of the Excel window.
![]()
Now click on the “Excel Options” button at the bottom. You can also use the shortcut keys- ALT -> F -> I.
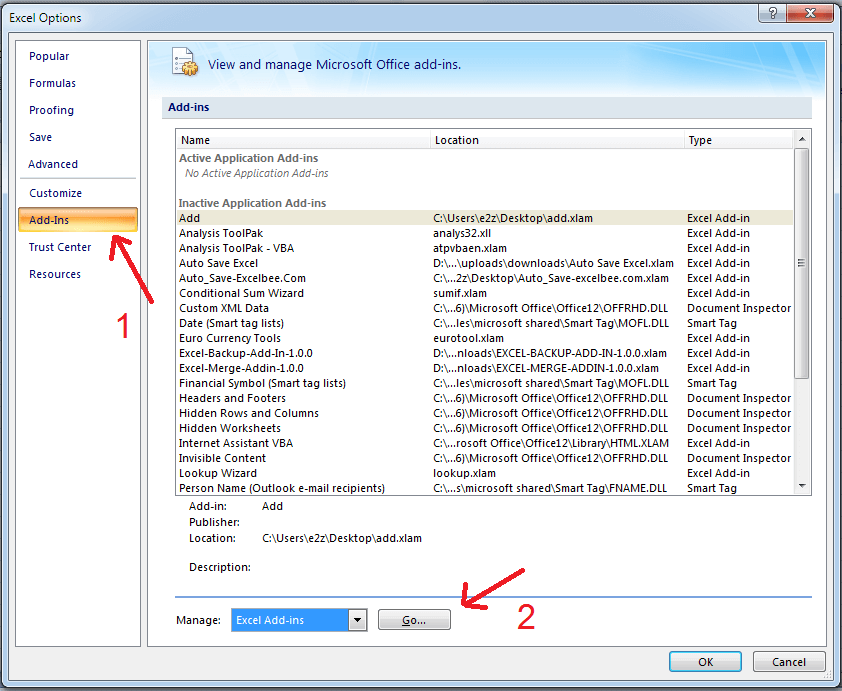
In the Excel Option window choose “Add-In” from the listed items in left panel. Check the dropdown below and select Excel Add-ins then click on go.
You will get a list of available Add-Ins by default. You may choose from the available Add-Ins and if you have additional add-In saved in your local system to install, then click on browse.
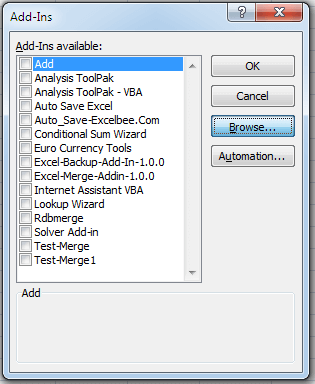
Choose the Add-In from your local system and click on “OK”. Check that the added Add-In checkbox is also checked.
And here your Add-In is ready to use.
Installing Add-In in 2010:
Add-In installation process is almost same for both 2007 and 2010. Only difference is you need click on “File” option instead of “Office Button“” and select “Options” from the menu list instead of clicking on “Excel Options” to open “Excel Options” window in Excel 2010. Rest of the process is same as Excel 2007.
Installing Add-In in 2010:
Installing Add-In in Excel 2013 and 2016 is same as installing Add-In in 2010. So the only difference is in menu options in 2007 and 2013, rest remains same.
Hope it helps.
Was this article helpful?
YesNo
Продолжая традицию прошлых версий, новый Excel 2013 поставляется с набором из нескольких весьма примечательных COM-надстроек, заметно расширяющих возможности стандартного Excel. Подключение надстроек производится на вкладке Разработчик (Developer) кнопками Надстройки (Add-ins) и Надстройки COM (COM Add-Ins). Некоторые из описанных ниже надстроек доступны только в полной версии Office 2013 Professional.
Inquire
Мощный инструмент диагностики и отладки. После подключения этой надстройки в интерфейсе Excel 2013 появляется новая вкладка на ленте:

Надстройка умеет проводить подробный анализ ваших книг (Workbook Analysis) и выдавать подробнейший отчет по более чем трем десяткам параметров:

Надстройка умеет наглядно отображать связи между книгами в виде диаграммы (команда Workbook Relationship):

Также возможно создать подобную диаграмму для формульных связей между листами и между ячейками в пределах одного листа с помощью команд Worksheet Relationship и Cell Relationship:

Такой функционал позволяет оперативно отслеживать и исправлять нарушенные связи в формулах и наглядно представлять логику в сложных файлах.
Особого внимания заслуживает функция Compare Files. Наконец-то появился инструмент для сравнения двух файлов в Excel! Вы указываете два файла (например, оригинальная книга и ее копия после внесения правок) и наглядно видите что, где и как изменилось по сравнению с оригиналом:

Отдельно, с помощью разных цветов, подсвечиваются изменения содержимого ячеек, формул, форматирования и т.д. В Word подобная функция есть уже с 2007 версии, а в Excel ее многим очень не хватало.
Ну, а для борьбы с любителями заливать цветом целиком все строки или столбцы в таблице пригодится функция Clean Excess Cell Formatting. Она убирает форматирования с незадействованных ячеек листа за пределами ваших таблиц, сильно уменьшая размер книги и ускоряя обработку, пересчет и сохранение тяжелых медленных файлов.
Power Pivot
Эта надстройка появилась еще для прошлой версии Excel 2010. Раньше ее требовалось отдельно скачать с сайта www.powerpivot.com и специально установить. Сейчас (в слегка измененном виде) она входит в стандартный комплект поставки Excel 2013 и подключается одной галочкой в окне надстроек. Вкладка Power Pivot выглядит так:

Фактически, эта надстройка является Excel-подобным пользовательским интерфейсом к полноценной базе данных SQL, которая устанавливается на ваш компьютер и представляет собой мощнейший инструмент обработки огромных массивов данных, открывающийся в отдельном окне при нажатии на кнопку Управление (Manage):

Power Pivot практически всеяден — вы можете загрузить в него информацию сразу из нескольких различных источников: текстовые файлы, базы данных, облачные интернет хранилища, другие файлы Excel или Access и т.д. — полный список включает почти двадцать вариантов и доступен через команду Получение внешних данных (Get External Data):

Размер загружаемых таблиц не ограничен. А поскольку вся обработка происходит в оперативной памяти — скорость весьма впечатляющая. Как насчет сортировки 12 млн. строк меньше чем за секунду? Или построения сводной таблицы по такому же количеству записей меньше чем за пару секунд?
Инструменты Power Pivot позволяют связывать импортированные таблицы между собой по ключевым столбцам, фильтровать и сортировать их, выполнять над ними математические и логические операции с помощью более чем 150 функций встроенного языка DAX (вкладка Конструктор — Вставка функции). Многие инструменты этой надстройки теперь присутствуют и в стандартном Excel 2013. В частности, возможность строить сводные таблицы сразу по нескольким исходным таблицам из разных источников с помощью Data Model.
Тем, кто жаждет подробностей, рекомендую сходить на http://www.powerpivot.com/ и http://www.powerpivotpro.com/ — эти сайты содержат кучу информации по данной теме.
Power View
Эта надстройка попала в Excel 2013 из SharePoint, где она называлась Microsoft SQL Server 2012 Reporting Services Add-in. Ее основное назначение — представить пользователю инструменты для быстрого создания наглядных «живых» отчетов с использованием сводных таблиц и диаграмм на основе баз данных (то, что сейчас называют модным термином Business Intelligence = BI).
Вставить в книгу лист отчета Power View можно при помощи одноименной кнопки на вкладке Вставка (Insert):

В основе отчетов Power View лежит «движок» Silverlight. Если он у вас его нет, то программа скачает и установит его сама (примерно 11 Мб).
Power View автоматически «цепляется» ко всем загруженным в оперативную память данным, включая кэш сводных таблиц и данные, импортированные ранее в надстройку Power Pivot. Вы можете добавить в отчет итоги в виде простой таблицы, сводной таблицы, разного вида диаграмм. Вот такой, например, интерактивный отчет я сделал меньше чем за 5 минут (не касаясь клавиатуры):

Впечатляет, не правда ли?
Весьма примечательно, что Power View позволяет привязывать данные из таблиц даже к географическим картам Bing:

Совершенно фантастический инструмент. В двух словах и даже статьях о нем не расскажешь — интересующихся отсылаю к соответствующим сайтам (раз, два, три). Если есть пять минут — посмотрите это видео, демонстрирующее основные возможности и приемы работы в Power View.
Apps for Office
Для Office 2013 и для Excel в частности, теперь есть свой онлайновый магазин ПО — Office Store, где пользователь может прикупить или скачать бесплатно дополнительные модули к программам пакета. Сделать это можно, используя команду Приложения для Office (Apps for Office) на вкладке Вставка (Insert):

Российского варианта магазина, правда, еще нет, так что вас перекидывает на родной штатовский магазин. Выбор достаточно велик:

Так, например, на данный момент оттуда можно установить приложение для создания интерактивного календаря на листе Excel, отображения географических карт Bing, модуль онлайнового перевода, построители различных нестандартных диаграмм (водопад, гантт) и т.д. Выбранные приложения вставляются на лист Excel как отдельные объекты и легко привязываются к данным из ячеек листа. Думаю, сообщество разработчиков не заставит себя ждать и очень скоро мы увидим большое количество полезных расширений и приложений для Excel на этой платформе.
Установка надстроек в Excel 2003/2007/2010/2013/2016 процесс однотипный для всех версий, но имеет и некоторые различия. Условно можно разбить механизм установки надстроек в Excel на несколько шагов. Рассмотрим процедуру установки надстроек подробно для каждой из перечисленных версий Excel в отдельности. Для этого нам понадобится надстройка (чаще всего это файл с расширением .xla, но бывают и другие) и установленное приложение Excel со встроенным редактором Visual Basic.
Для тех кому лучше один раз увидеть — представлен видеоролик по установке и подключению![]()
Шаг 1. Сохраняем файл надстройки на компьютер и запоминаем место его хранения (расположения).
Шаг 2. Запускаем приложение Excel 2003 и выбираем меню «Сервис»/»Надстройки…»

После выбора пункта меню «Надстройки…» появляется список доступных надстроек, которые можно подключать и отключать установкой и снятием галочек перед названиями соответствующих надстроек.

Шаг 3. Для добавления (подключения) новой надстройки, нажимаем кнопку «Обзор». При нажатии на эту кнопку, появляется вот такое окно «Обзор»:

Excel отправляет нас искать надстройки в папку с названием Addins и это не с проста. Именно здесь и должны располагаться файлы надстроек для максимально быстрого доступа к ним как приложения, так и самого пользователя. Размещение надстроек в папке Addins ускорит загрузку приложения Excel и подключение к ней надстройки (надстроек) при последующих запусках. Остается переместить файл надстройки с того места, которое мы запомнили в Шаге 1, в эту папку (можно и прямо в это окно, чтобы не искать саму папку на жестком диске). Если по каким-то причинам Вы не смогли, либо не захотели размещать свои надстройки в папке Addins, то через окно «Обзор» просто добираетесь до того места, куда сохранили файл надстройки. Дважды кликнув по выбранному файлу, Вы добавите его в список доступных надстроек. Вот собственно и все, надстройка установлена.
В случае установки готовых надстроек (макросов) для Excel 2003, взятых с этого сайта, по окончании установки будет сформирована новая панель инструментов с кнопками, запускающими макросы.

Установка надстроек в Excel 2007
Устанавливать надстройки в Excel 2007 не сложнее, чем в Excel 2003. Рассмотри по шагам.
Шаг 1. Сохраняем файл надстройки на компьютер и запоминаем место его хранения (расположения).
Шаг 2. Запускаем приложение Excel 2007, нажимаем кнопку «Office» ![]() и выбираем «Параметры Excel» как показано на рисунке
и выбираем «Параметры Excel» как показано на рисунке

Шаг 3. В появившемся окне «Параметры Excel» в поле «Управление:» выбираем «Надстройки Excel» и жмем кнопку «Перейти…»

Шаг 4. В очередном окне с названием «Надстройки» появляется список доступных надстроек, которые можно подключать и отключать установкой и снятием галочек перед названиями соответствующих надстроек. Для добавления (подключения) новых надстроек, нажимаем кнопку «Обзор».

Появляется окно «Обзор», которое отправляет нас искать надстройки в папку с названием Addins и это не случайно.
 Именно в этом месте и должны располагаться файлы надстроек для максимально быстрого доступа к ним как приложения, так и самих пользователей. Размещение надстроек в папке Addins ускоряет загрузку приложения Excel и подключение к нему надстройки (надстроек) при последующих запусках. Перемещаем (добавляем) в это окно (в эту папку) файл, который присутствовал в Шаге 1. Если по каким-то причинам Вы не смогли, либо не захотели расположить свои надстройки в папке Addins, то через окно «Обзор» просто добираетесь до того места, где был изначально сохранен файл надстройки. Дважды кликаете по выбранному файлу и надстройка добавляется в список доступных надстроек. Все, надстройка установлена. Обращаю Ваше внимание на то, что если после установки файл надстройки будет перемещен в другое место жесткого диска, либо название папки, в которой он находится будет изменено, то весь процесс установки придется повторить заново.
Если Вы устанавливали готовые надстройки для Excel 2007, взятые с этого сайта, то после окончания процесса установки на ленте будет сформирована новая вкладка «Надстройки». При этом в настраиваемой панели инструментов будут отображены кнопки, запускающие макросы.

Установка надстройки в Excel 2010
Стоит заметить, что в Excel 2010 редактор Visual Basic устанавливается как отдельный компонент пакета с наименованием «Общие средства Office» и называется «Visual Basic для приложений». Узнать установлен ли у Вас редактор Visual Basic — очень просто. Нужно его запустить! О том как это сделать, можно прочитать отдельно. Если редактор Visual Basic не запустился — доустанавливаем его. Итак, переходим непосредственно к установке надстроек в Эксель!
Установить надстройку в Excel 2010 можно аналогично тому как это делается в Excel 2007.
Шаг 1. Сохраняем файл надстройки на компьютер и запоминаем место его хранения (расположения).
Шаг 2. Запускаем приложение Excel 2010, выбираем вкладку «Файл», а затем «Параметры Excel» как показано на рисунке

Шаг 3. В появившемся окне «Параметры Excel» в поле «Управление:» выбираем «Надстройки Excel» и жмем кнопку «Перейти…»

Шаг 4. В очередном окне с названием «Надстройки» появляется список доступных надстроек, которые можно подключать и отключать установкой и снятием галочек перед названиями соответствующих надстроек. Для добавления (подключения) новых надстроек, нажимаем кнопку «Обзор».

Появляется окно «Обзор», которое отправляет нас искать надстройки в папку с названием Addins и это имеет свой смысл.
 Именно в этом месте и должны располагаться файлы надстроек для максимально быстрого доступа к ним как приложения, так и самих пользователей. Размещение надстроек в папке Addins ускоряет загрузку приложения Excel и подключение к нему надстройки (надстроек) при последующих запусках. Перемещаем (добавляем) в это окно (в эту папку) файл, который присутствовал в Шаге 1. Если по каким-то причинам Вы не смогли, либо не захотели расположить свои надстройки в папке Addins, то через окно «Обзор» просто добираетесь до того места, где был изначально сохранен файл надстройки. Дважды кликаете по выбранному файлу и надстройка добавляется в список доступных надстроек. Все, надстройка установлена. Обращаю Ваше внимание на то, что если после установки файл надстройки будет перемещен в другое место жесткого диска, либо название папки, в которой он находится будет изменено, то весь процесс установки придется повторить заново.
Если Вы устанавливали готовые надстройки для Excel 2010, взятые с этого сайта, то после окончания процесса установки на ленте будет сформирована новая вкладка «Надстройки». При этом в настраиваемой панели инструментов будут отображены кнопки, запускающие макросы.

Начиная с Excel 2010 появилась возможность установки надстроек на вкладке «Разработчик».
Установка надстройки в Excel 2013
Надстройки в Excel 2013 устанавливаются через Файл/Параметры/Надстройки после чего нажимается кнопка «Перейти» и в менеджере надстроек подключаются необходимые надстройки. Окно менеджера надстроек можно вызывать кнопкой, расположенной на вкладке «Разработчик».
Быстрая установка надстроек через вкладку «Разработчик»
Начиная с Excel 2010 на вкладку «Разработчик» добавлена новая группа кнопок «Надстройки». По умолчанию эта вкладка на ленте Excel отсутствует, для её отображения необходимо зайти в меню Файл/Параметры/Настройка ленты и в правой части диалогового окна установить флажок перед полем «Разработчик». После этого на ленте приложения появляется одноименная вкладка с группой кнопок «Надстройки». При помощи одной из них вызывается менеджер надстроек, в котором можно произвести выбор файла устанавливаемой надстройки.

При помощи кнопки, расположенной рядом, можно управлять COM-надстройками.
Установка, подключение и отключение надстроек в Excel 2016 и выше
Как и в более ранних версиях окно менеджера надстроек вызывается одним из двух способов, либо через меню Файл/Параметры/Надстройки/Перейти, либо через вкладку «Разработчик», которую предварительно необходимо отобразить на ленте.
Другие материалы по теме:
- Remove From My Forums
-
Question
-
Hi,
I have been searching the internet with no luck to find XML add-in to Excel 2013.
Can anybody advise where I can download it and how to install.
Thank you.
Answers
-
-
Marked as answer by
Thursday, June 8, 2017 8:52 AM
-
Marked as answer by
-
Hi,
I made a mistake, please follow these steps and check if you can install XML ADD-IN TOOL in Excel 2013.
-
Start Excel.
-
Click the File tab.
-
Click Options, and then click the Add-Ins category.
-
In the Manage box, click Excel Add-ins, and then click
Go. -
In the Add-Ins dialog box, click Browse, locate the
XmlTools.xla file, select the file, and then click OK.By default, this file is stored in the following folder on your hard drive:
Office SamplesOfficeExcel2003XMLToolsAddin. -
Verify that the XmlTools check box is selected in the
Add-Ins available list, and then click OK to load the add-in. -
To verify that the add-in is active, on the Add-ins tab, in the
Menu commands category, make sure that the XML Tools command menu appears.
Regards,
Emi Zhang
TechNet Community SupportPlease remember to mark the replies as answers if they helped.
If you have feedback for TechNet Subscriber Support, contact
tnmff@microsoft.com.-
Marked as answer by
jaburmester
Thursday, June 8, 2017 11:26 AM
-