
Once you start learning VBA one of the coolest things you can do is to write a VBA code to insert new a worksheet in a workbook.
Well, there is already a shortcut key to insert a new worksheet or you can also use the normal option but the benefit of using a VBA code is you can add multiple worksheets with a single click and you can also define that where you want to add it.
For this, you need to use the Sheets.Add method, and in this post, we will be learning how to use it to add one or more worksheets in a workbook.
Sheets.Add Method
Sheets.Add ([Before], [After], [Count], [Type])- Before: To add a new sheet before a sheet.
- After: To add the new sheet before a sheet.
- Count: Number of sheets to add.
- Type: Type of the sheet you want to add (LINK)
Open the visual basic editor and follow these steps.
- First, you need to enter Sheets.Add method.
- Then you need to define the place to add the new sheet (Before or After).
- Next thing is to enter the count of worksheets.
- In the end, the type of sheet.

Different Ways to Add New Sheets in a Workbook using a VBA Code
Below you have different ways to add a new sheet to a workbook:
1. Add a Single Sheet
To add a single sheet, you can use the below code, where you didn’t specify any argument.
Sub SheetAddExample1()
ActiveWorkbook.Sheets.Add
End Sub
This code tells Excel to add a sheet in the active workbook, but as you don’t have any argument it will use the default values and add one worksheet(xlWorksheet) before the active sheet.
Here’s one more way to write this, check out the below code.
Sub SheetAddExample2()
Sheets.Add
End Sub
As you are already in the active workbook you can use the below code as well. It does the same thing.
2. Add Multiple Sheets
To add multiple sheets in one go, you just need to define the COUNT argument with the number of sheets you want to add.
Sub AddSheets3()
Sheets.Add Count:=5
End Sub
Now the count of the sheets that you have defined is 5, so when you run this code it instantly adds the five new sheets in the workbook.
3. Add a Sheet with a Name
If you want to rename the sheet after adding it, you can use the following code:
Sub AddNewSheetswithNameExample1()
Sheets.Add.Name = "myNewSHeet"
End Sub
In the above code, we have used the name object (LINK) which helps you to specify the name of a sheet.
4. Add a Sheet with a Name from a Cell
You can also take the value to use as the sheet’s name from a cell.
Sub AddNewSheetswithNameExample2()
Sheets.Add.Name = Range("A1")
End Sub
In the above code, cell A1 is used to get the name for the new sheet.
5. Add a Sheet After/Before a Specific Sheet
As these arguments are already there in the Sheets.Add where you can specify the sheet to add a new sheet before or after it.
Sub AddSheetsExample5()
Sheets.Add Before:=Worksheets("mySheet")
Sheets.Add After:=Worksheets("mySheet")
End Sub
Now in the above code, you have two lines of code that you have used before and after an argument in the Sheet.Add method. So, when you run this code it adds two sheets one is before and one is after the “mySheet”.
6. Add a New Sheet at Beginning
By using the before argument using you can also add a sheet at the beginning of the sheets that you have in the workbook.
So basically, what we are going to do is we’re going to specify the sheet number instead of the sheet name.
Sub AddSheetsExample6()
Sheets.Add Before:=Sheets(1)
End Sub
In the above code, you have used sheet number (1) that tells VBA to add the sheet before the sheet which is in the first position in all the worksheets. In this way, it will always add the new sheet at the beginning.
7. Add a New Sheet at the End (After the Last Sheet)
To add a new sheet in the end you need to write the code in a different way. So, for this, you need to know how many sheets there in the workbook are so that you can add a new sheet at the end.
Sub AddSheetsExample8()
Sheets.Add After:=Sheets(Sheets.Count)
End Sub
In the above code, Sheet.Count returns the count of the sheets that you have in the workbook, and as you have defined the after argument it adds the new sheet after the last sheet in the workbook.
8. Add Multiple Sheets and use Names from a Range
The following code counts rows from the range A1:A7. After that, it loops to add sheets according to the count from the range and uses values from the range to name the sheet while adding it.
Sub AddSheetsExample9()

Dim sheets_count As Integer
Dim sheet_name As String
Dim i As Integer

sheet_count = Range("A1:A7").Rows.Count

For i = 1 To sheet_count
  sheet_name = Sheets("mySheet").Range("A1:A7").Cells(i, 1).Value
  Worksheets.Add().Name = sheet_name
Next i

End Sub
But with the above code, there could be a chance that the sheet name you want to add already exists or you have a blank cell in the name range.
In that case, you need to write a code that can verify if the sheet with the same name already exists or not and whether the cell from where you want to take the sheet name is blank or not.
If both conditions are fulfilled only then it should add a new sheet. Let me put it in steps two steps:
First, you need to write an Excel User Defined Function to check if a sheet with the same name already exists or not.
Function SheetCheck(sheet_name As String) As Boolean

Dim ws As Worksheet

SheetCheck = False

For Each ws In ThisWorkbook.Worksheets

    If ws.Name = sheet_name Then

        SheetCheck = True

    End If

Next

End Function
Second, you need to write a code using this function and that code should also check if the name cell is blank or not.
Sub AddMultipleSheet2()

Dim sheets_count As Integer
Dim sheet_name As String
Dim i As Integer

sheet_count = Range("A1:A7").Rows.Count

For i = 1 To sheet_count

    sheet_name = Sheets("mySheet").Range("A1:A10").Cells(i, 1).Value

    If SheetCheck(sheet_name) = False And sheet_name <> "" Then
    Worksheets.Add().Name = sheet_name
    End If

Next i

End Sub
Now in the above code, you have used the VBA IF Statement and in this statement, you have the sheet check function which checks for the sheet name and then you have a condition to check if the name cell has a blank value.
Sample File
More Tutorials on Worksheets
- VBA Worksheet – Excel VBA Examples – VBA Tutorial
This tutorial explains how to add new work sheets using Worksheets.Add Method in Excel VBA, or add new worksheets at the back or before specific worksheet
You may also want to read:
Excel VBA Worksheets.Copy Method to copy worksheet
Excel VBA Worksheets.Add Method is to add new worksheet in a workbook.
Syntax of Excel VBA Worksheets.Add Method
Worksheets.Add([Before],[After],[Count],[Type])
| Before | Optional. Add new worksheet before specific worksheet | ||||
| After | Optional, add new worksheet after specific worksheet | ||||
| Count | Optional. Number of worksheets to add, default is 1 | ||||
| Type | Optional. Worksheet type, default is xlWorksheet
|
If Before and After are not specified, worksheet is added before Active worksheet (the worksheet you selected before running the Add Method).
Example 1 – Add new worksheet after specific worksheet
The below code add new worksheet after Sheet8
Set newWS = ThisWorkbook.Worksheets.Add(After:=Worksheets("Sheet8"))
Example 2 – Add new worksheet and move to the end of worksheet
The below code makes use of Worksheets(Worksheets.Count) to find the last worksheet. Worksheets(Index) returns the Nth worksheet from left to right.
Set newWS = ThisWorkbook.Worksheets.Add(After:=Worksheets(Worksheets.Count))
Example 3 – Add new worksheet and move to the first worksheet
Set newWS = ThisWorkbook.Worksheets.Add(Before:=Worksheets(1))
Example 4 – add new worksheet if not exist
The below code makes use of a custom Function called wsExist to check if a worksheet already exists, returns TRUE if exists, FALSE if not exist.
Sub createWS()
    Dim ws, newWS As Worksheet
    For Each ws In ActiveWorkbook.Worksheets
        If wsExists("worksheet1") Then
           counter = 1
        End If
    Next ws

    If counter = 0 Then
        Set newWS = ThisWorkbook.Worksheets.Add(After:=Worksheets(Worksheets.Count))
        newWS.Name = "worksheet1"
    End If
End Sub

Function wsExists(wksName As String) As Boolean
    On Error Resume Next
    wsExists = CBool(Len(Worksheets(wksName).Name) > 0)
    On Error GoTo 0
End Function
Outbound References
https://msdn.microsoft.com/en-us/library/office/microsoft.office.interop.excel.worksheets.add.aspx?f=255&MSPPError=-2147217396
In this Article
- Add Sheet
- Add Sheet with Name
- Create New Sheet with Name from a Cell
- Add Sheet Before / After Another Sheet
- Insert Sheet After Another Sheet
- Add Sheet To End of Workbook
- Add Sheet To Beginning of Workbook:
- Add Sheet to Variable
- More Add Sheet Examples
- Create Sheet if it Doesn’t Already Exist
- Create Worksheets From List of Names
- VBA Coding Made Easy
This tutorial will discuss how to add / insert worksheets using VBA.
This simple macro will add a Sheet before the ActiveSheet:
Sub Add ()
    Sheets.Add
End Sub
After inserting a Sheet, the new Sheet becomes the ActiveSheet. You can then use the ActiveSheet object to work with the new Sheet (At the bottom of this article we will show how to insert a new sheet directly to a variable).
ActiveSheet.Name = "NewSheet"Add Sheet with Name
You can also define a Sheet name as you create the new Sheet:
Sheets.Add.Name = "NewSheet"Create New Sheet with Name from a Cell
Or use a cell value to name a new Sheet:
Sheets.Add.Name = range("a3").valueAdd Sheet Before / After Another Sheet
You might also want to choose the location of where the new Sheet will be inserted. You can use the After or Before properties to insert a sheet to a specific location in the workbook.
Insert Sheet After Another Sheet
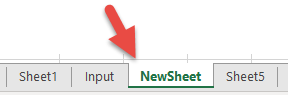
This code will insert the new sheet AFTER another sheet:
Sheets.Add After:=Sheets("Input")This will insert a new Sheet AFTER another sheet and specify the Sheet name:
Sheets.Add(After:=Sheets("Input")).Name = "NewSheet"Notice the extra parenthesis required in the second example (the first example will generate an error if the second parenthesis are added).
or Before:
Sheets.Add(Before:=Sheets("Input")).Name = "NewSheet"In these examples we explicitly named the Sheet used to determine the sheet location. Often you’ll want to use the Sheet Index number instead, so that you can insert the sheet to the beginning or end of the Workbook:
Add Sheet To End of Workbook
To add a Sheet to the end of the workbook:
Sheets.Add After:=Sheets(Sheets.Count)Add Sheet To Beginning of Workbook:
To add a Sheet to the beginning of the workbook:
Sheets.Add(Before:=Sheets(1)).Name = "FirstSheet"Add Sheet to Variable
This code assigns the new Sheet to a variable as the sheet is created:
Dim ws As Worksheet
Set ws = Sheets.Add
From here you can reference the new sheet with the variable ‘ws’:
ws.name = "VarSheet"More Add Sheet Examples
Create Sheet if it Doesn’t Already Exist
You might want to create a sheet only if it doesn’t already exist.
VBA Programming | Code Generator does work for you!
Create Worksheets From List of Names
The following routine will look at the contents of a single column set up Excel worksheets within the current workbook with these names. It makes a call to another function to see if a sheet with that name already exists, and if so the sheet isn’t created.
Private Sub CommandButton1_Click()

Call CreateWorksheets(Sheets("Sheet2").Range("A1:a10"))

End Sub

Sub CreateWorksheets(Names_Of_Sheets As Range)
Dim No_Of_Sheets_to_be_Added As Integer
Dim Sheet_Name As String
Dim i As Integer

No_Of_Sheets_to_be_Added = Names_Of_Sheets.Rows.Count

For i = 1 To No_Of_Sheets_to_be_Added

Sheet_Name = Names_Of_Sheets.Cells(i, 1).Value

'Only add sheet if it doesn't exist already and the name is longer than zero characters

If (Sheet_Exists(Sheet_Name) = False) And (Sheet_Name <> "") Then
    Worksheets.Add().Name = Sheet_Name
End If

Next i

End Sub
Function Sheet_Exists(WorkSheet_Name As String) As Boolean
Dim Work_sheet As Worksheet
Sheet_Exists = False
For Each Work_sheet In ThisWorkbook.Worksheets
If Work_sheet.Name = WorkSheet_Name Then
Sheet_Exists = True
End If
Next
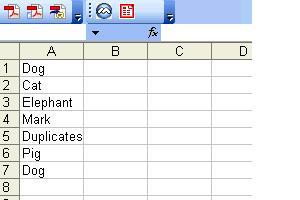
End FunctionSo if we have the following text in cells A1:A30 in Sheet 2:
Then the following sheets will be created:
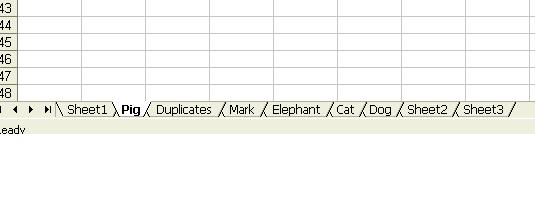
Note that although “Dog” appears twice, only one sheet is created.
To download the .XLS file for this tutorial, click here.
VBA Coding Made Easy
Stop searching for VBA code online. Learn more about AutoMacro – A VBA Code Builder that allows beginners to code procedures from scratch with minimal coding knowledge and with many time-saving features for all users!
Learn More!
<<Return to VBA Examples
Создание, копирование, перемещение и удаление рабочих листов Excel с помощью кода VBA. Методы Sheets.Add, Worksheet.Copy, Worksheet.Move и Worksheet.Delete.
Создание новых листов
Создание новых рабочих листов осуществляется с помощью метода Sheets.Add.
Синтаксис метода Sheets.Add
expression.Add [Before, After, Count, Type]
где expression — переменная, представляющая собой объект Sheet.
Компоненты метода Sheets.Add
- Before* — необязательный параметр типа данных Variant, указывающий на лист, перед которым будет добавлен новый.
- After* — необязательный параметр типа данных Variant, указывающий на лист, после которого будет добавлен новый.
- Count — необязательный параметр типа данных Variant, указывающий, сколько листов будет добавлено (по умолчанию — 1).
- Type — необязательный параметр типа данных Variant, указывающий тип листа: xlWorksheet** (рабочий лист) или xlChart (диаграмма), по умолчанию — xlWorksheet.
*Если Before и After не указаны, новый лист, по умолчанию, будет добавлен перед активным листом.
**Для создания рабочего листа (xlWorksheet) можно использовать метод Worksheets.Add, который для создания диаграмм уже не подойдет.
Примеры создания листов
|
1 2 3 4 5 6 7 8 9 10 11 12 13 14 15 16 17 18 19 20 |
‘Создание рабочего листа: Sheets.Add Worksheets.Add ThisWorkbook.Sheets.Add After:=ActiveSheet, Count:=2 Workbooks(«Книга1.xlsm»).Sheets.Add After:=Лист1 Workbooks(«Книга1.xlsm»).Sheets.Add After:=Worksheets(1) Workbooks(«Книга1.xlsm»).Sheets.Add After:=Worksheets(«Лист1») ‘Создание нового листа с заданным именем: Workbooks(«Книга1.xlsm»).Sheets.Add.Name = «Мой новый лист» ‘Создание диаграммы: Sheets.Add Type:=xlChart ‘Добавление нового листа перед ‘последним листом рабочей книги Sheets.Add Before:=Sheets(Sheets.Count) ‘Добавление нового листа в конец Sheets.Add After:=Sheets(Sheets.Count) |
- Лист1 в After:=Лист1 — это уникальное имя листа, указанное в проводнике редактора VBA без скобок.
- Лист1 в After:=Worksheets(«Лист1») — это имя на ярлыке листа, указанное в проводнике редактора VBA в скобках.
Создаваемый лист можно присвоить объектной переменной:
|
Dim myList As Object ‘В активной книге Set myList = Worksheets.Add ‘В книге «Книга1.xlsm» Set myList = Workbooks(«Книга1.xlsm»).Worksheets.Add ‘Работаем с переменной myList.Name = «Listok1» myList.Cells(1, 1) = myList.Name ‘Очищаем переменную Set myList = Nothing |
Если создаваемый лист присваивается объектной переменной, он будет помещен перед активным листом. Указать дополнительные параметры невозможно.
Копирование листов
Копирование рабочих листов осуществляется с помощью метода Worksheet.Copy.
Синтаксис метода Worksheet.Copy
expression.Copy [Before, After]
где expression — переменная, представляющая собой объект Worksheet.
Компоненты метода Worksheet.Copy
- Before* — необязательный параметр типа данных Variant, указывающий на лист, перед которым будет добавлена копия.
- After* — необязательный параметр типа данных Variant, указывающий на лист, после которого будет добавлена копия.
*Если Before и After не указаны, Excel создаст новую книгу и поместит копию листа в нее. Если скопированный лист содержит код в проекте VBA (в модуле листа), он тоже будет перенесен в новую книгу.
Примеры копирования листов
|
1 2 3 4 5 6 7 8 9 10 11 12 13 14 15 16 17 18 19 20 21 22 23 |
‘В пределах активной книги ‘(уникальные имена листов) Лист1.Copy After:=Лист2 ‘В пределах активной книги ‘(имена листов на ярлычках) Worksheets(«Лист1»).Copy Before:=Worksheets(«Лист2») ‘Вставить копию в конец Лист1.Copy After:=Sheets(Sheets.Count) ‘Из одной книги в другую Workbooks(«Книга1.xlsm»).Worksheets(«Лист1»).Copy _ After:=Workbooks(«Книга2.xlsm»).Worksheets(«Лист1») ‘Один лист активной книги в новую книгу Лист1.Copy ‘Несколько листов активной книги в новую книгу* Sheets(Array(«Лист1», «Лист2», «Лист3»)).Copy ‘Все листы книги с кодом в новую книгу ThisWorkbook.Worksheets.Copy |
* Если при копировании в новую книгу нескольких листов хотя бы один лист содержит умную таблицу — копирование невозможно. Один лист, содержащий умную таблицу, копируется в новую книгу без проблем.
Если рабочие книги указаны как элементы коллекции Workbooks, в том числе ActiveWorkbook и ThisWorkbook, листы нужно указывать как элементы коллекции Worksheets, использование уникальных имен вызовет ошибку.
Перемещение листов
Перемещение рабочих листов осуществляется с помощью метода Worksheet.Move.
Синтаксис метода Worksheet.Move
expression.Move [Before, After]
где expression — переменная, представляющая собой объект Worksheet.
Компоненты метода Worksheet.Move
- Before* — необязательный параметр типа данных Variant, указывающий на лист, перед которым будет размещен перемещаемый лист.
- After* — необязательный параметр типа данных Variant, указывающий на лист, после которого будет размещен перемещаемый лист.
*Если Before и After не указаны, Excel создаст новую книгу и переместит лист в нее.
Примеры перемещения листов
Простые примеры перемещения листов:
|
1 2 3 4 5 6 7 8 9 10 11 12 13 14 15 16 17 |
‘В пределах активной книги ‘(уникальные имена листов) Лист1.Move After:=Лист2 ‘В пределах активной книги ‘(имена листов на ярлычках) Worksheets(«Лист1»).Move Before:=Worksheets(«Лист2») ‘Размещение после последнего листа: Лист1.Move After:=Sheets(Sheets.Count) ‘Из одной книги в другую Workbooks(«Книга1.xlsm»).Worksheets(«Лист1»).Move _ After:=Workbooks(«Книга2.xlsm»).Worksheets(«Лист1») ‘В новую книгу Лист1.Move |
Если рабочие книги указаны как элементы коллекции Workbooks, в том числе ActiveWorkbook и ThisWorkbook, листы нужно указывать как элементы коллекции Worksheets, использование уникальных имен вызовет ошибку.
Перемещение листа «Лист4» в позицию перед листом, указанным как по порядковому номеру, так и по имени ярлыка:
|
Sub Peremeshcheniye() Dim x x = InputBox(«Введите имя или номер листа», «Перемещение листа «Лист4»») If IsNumeric(x) Then x = CLng(x) Sheets(«Лист4»).Move Before:=Sheets(x) End Sub |
Удаление листов
Удаление рабочих листов осуществляется с помощью метода Worksheet.Delete
Синтаксис метода Worksheet.Delete
expression.Delete
где expression — переменная, представляющая собой объект Worksheet.
Примеры удаления листов
|
‘По уникальному имени Лист1.Delete ‘По имени на ярлычке Worksheets(«Лист1»).Delete ‘По индексу листа Worksheets(1).Delete ‘В другой книге Workbooks(«Книга1.xlsm»).Worksheets(«Лист1»).Delete |
Если рабочие книги указаны как элементы коллекции Workbooks, в том числе ActiveWorkbook и ThisWorkbook, листы нужно указывать как элементы коллекции Worksheets, использование уникальных имен вызовет ошибку.
Как обратиться к рабочему листу, переименовать, скрыть или отобразить его с помощью кода VBA Excel, смотрите в этой статье.
“The visionary starts with a clean sheet of paper, and re-imagines the world” – Malcolm Gladwell
This post provides a complete guide to using the Excel VBA Worksheet in Excel VBA. If you want to know how to do something quickly then check out the quick guide to the VBA Worksheet below.
If you are new to VBA then this post is a great place to start. I like to break things down into simple terms and explain them in plain English without the jargon.
You can read through the post from start to finish as it is written in a logical order. If you prefer, you can use the table of contents below and go directly to the topic of your choice.
A Quick Guide to the VBA Worksheet
The following table gives a quick run down to the different worksheet methods.
Note: I use Worksheets in the table below without specifying the workbook i.e.Worksheets rather than ThisWorkbook.Worksheets, wk.Worksheets etc. This is to make the examples clear and easy to read. You should always specify the workbook when using Worksheets. Otherwise the active workbook will be used by default.
| Task | How to |
|---|---|
| Access worksheet by name | Worksheets(«Sheet1») |
| Access worksheet by position from left | Worksheets(2) Worksheets(4) |
| Access the left most worksheet | Worksheets(1) |
| Access the right most worksheet | Worksheets(Worksheets.Count) |
| Access using worksheet code name(current workbook only) | see Code Name section below |
| Access using worksheet code name(other workbook) | see Code Name section below |
| Access the active worksheet | ActiveSheet |
| Declare worksheet variable | Dim sh As Worksheet |
| Assign worksheet variable | Set sh = Worksheets(«Sheet1») |
| Add worksheet | Worksheets.Add |
| Add worksheet and assign to variable | Set sh =Worksheets.Add |
| Add worksheet to first position(left) | Worksheets.Add Before:=Worksheets(1) |
| Add worksheet to last position(right) | Worksheets.Add after:=Worksheets(Worksheets.Count) |
| Add multiple worksheets | Worksheets.Add Count:=3 |
| Activate Worksheet | sh.Activate |
| Copy Worksheet | sh.Copy |
| Copy after a worksheet | sh1.Copy After:=Sh2 |
| Copy before a worksheet | sh1.Copy Before:=Sh2 |
| Delete Worksheet | sh.Delete |
| Delete Worksheet without warning | Application.DisplayAlerts = False sh.Delete Application.DisplayAlerts = True |
| Change worksheet name | sh.Name = «Data» |
| Show/hide worksheet | sh.Visible = xlSheetHidden sh.Visible = xlSheetVisible |
| Loop through all worksheets(For) | Dim i As Long For i = 1 To Worksheets.Count Debug.Print Worksheets(i).Name Next i |
| Loop through all worksheets(For Each) | Dim sh As Worksheet For Each sh In Worksheets Debug.Print sh.Name Next |
Introduction
The three most important elements of VBA are the Workbook, the Worksheet and Cells. Of all the code your write, 90% will involve one or all of them.
The most common use of the worksheet in VBA is for accessing its cells. You may use it to protect, hide, add, move or copy a worksheet. However, you will mainly use it to perform some action on one or more cells on the worksheet.
Using Worksheets is more straightforward than using workbooks. With workbooks you may need to open them, find which folder they are in, check if they are in use and so on. With a worksheet, it either exists in the workbook or it doesn’t.
Accessing the Worksheet
In VBA, each workbook has a collection of worksheets. There is an entry in this collection for each worksheet in the workbook. This collection is simply called Worksheets and is used in a very similar way to the Workbooks collection. To get access to a worksheet all you have to do is supply the name.
The code below writes “Hello World” in Cell A1 of Sheet1, Sheet2 and Sheet3 of the current workbook.
' https://excelmacromastery.com/
Public Sub WriteToCell1()

    ' Write To cell A1 In Sheet1,Sheet2 And Sheet3
    ThisWorkbook.Worksheets("Sheet1").Range("A1") = "Hello World"
    ThisWorkbook.Worksheets("Sheet2").Range("A1") = "Hello World"
    ThisWorkbook.Worksheets("Sheet3").Range("A1") = "Hello World"

End Sub
The Worksheets collection is always belong to a workbook. If we don’t specify the workbook then the active workbook is used by default.
' https://excelmacromastery.com/
Public Sub WriteToCell1()

    ' Worksheets refers to the worksheets in the active workbook
    Worksheets("Sheet1").Range("A1") = "Hello World"
    Worksheets("Sheet2").Range("A1") = "Hello World"
    Worksheets("Sheet3").Range("A1") = "Hello World"

End Sub
Hide Worksheet
The following examples show how to hide and unhide a worksheet
ThisWorkbook.Worksheets("Sheet1").Visible = xlSheetHidden

ThisWorkbook.Worksheets("Sheet1").Visible = xlSheetVisible
If you want to prevent a user accessing the worksheet, you can make it “very hidden”. This means it can only be made visible by the code.
' Hide from user access
ThisWorkbook.Worksheets("Sheet1").Visible = xlVeryHidden

' This is the only way to make a xlVeryHidden sheet visible
ThisWorkbook.Worksheets("Sheet1").Visible = xlSheetVisible
Protect Worksheet
Another example of using the worksheet is when you want to protect it
ThisWorkbook.Worksheets("Sheet1").Protect Password:="MyPass"

ThisWorkbook.Worksheets("Sheet1").Unprotect Password:="MyPass"
Subscript Out of Range
When you use Worksheets you may get the error:
Run-time Error 9 Subscript out of Range

This means you tried to access a worksheet that doesn’t exist. This may happen for the following reasons
- The worksheet name given to Worksheets is spelled incorrectly.
- The name of the worksheet has changed.
- The worksheet was deleted.
- The index was to large e.g. You used Worksheets(5) but there are only four worksheets
- The wrong workbook is being used e.g. Workbooks(“book1.xlsx”).Worksheets(“Sheet1”) instead of Workbooks(“book3.xlsx”).Worksheets(“Sheet1”).
If you still have issues then use one of the loops from Loop Through The Worksheets section to print the names of all worksheets the collection.
Using the Index to Access the Worksheet
So far we have been using the sheet name to access the sheet. The index refers to the sheet tab position in the workbook. As the position can easily be changed by the user it is not a good idea to use this.
The following code shows examples of using the index
' https://excelmacromastery.com/
' Using this code is a bad idea as
' sheet positions changes all the time
Public Sub UseSheetIdx()

    With ThisWorkbook
        ' Left most sheet
        Debug.Print .Worksheets(1).Name
        ' The third sheet from the left
        Debug.Print .Worksheets(3).Name
        ' Right most sheet
        Debug.Print .Worksheets(.Worksheets.Count).Name
    End With

End Sub
In the example above, I used Debug.Print to print to the Immediate Window. To view this window select View->Immediate Window(or Ctrl G)


Using the Code Name of a Worksheet
The best method of accessing the worksheet is using the code name. Each worksheet has a sheet name and a code name. The sheet name is the name that appears in the worksheet tab in Excel.
Changing the sheet name does not change the code name meaning that referencing a sheet by the code name is a good idea.
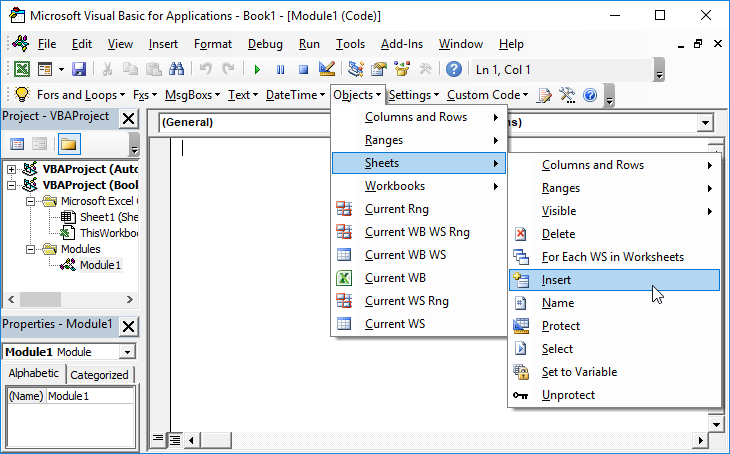
If you look in the VBE property window you will see both names. In the image you can see that the code name is the name outside the parenthesis and the sheet name is in the parenthesis.

You can change both the sheet name and the code name in the property window of the sheet(see image below).

If your code refers to the code name then the user can change the name of the sheet and it will not affect your code. In the example below we reference the worksheet directly using the code name.
' https://excelmacromastery.com/
Public Sub UseCodeName2()

    ' Using the code name of the worksheet
    Debug.Print CodeName.Name
    CodeName.Range("A1") = 45
    CodeName.Visible = True

End Sub
This makes the code easy to read and safe from the user changing the sheet name.
Code Name in other Workbooks
There is one drawback to using the code name. It can only refer to worksheets in the workbook that contains the code i.e. ThisWorkbook.
However, we can use a simple function to find the code name of a worksheet in a different workbook.
' https://excelmacromastery.com/
Public Sub UseSheet()

    Dim sh As Worksheet
    ' Get the worksheet using the codename
    Set sh = SheetFromCodeName("CodeName", ThisWorkbook)
    ' Use the worksheet
    Debug.Print sh.Name

End Sub

' This function gets the worksheet object from the Code Name
Public Function SheetFromCodeName(Name As String, bk As Workbook) As Worksheet

    Dim sh As Worksheet
    For Each sh In bk.Worksheets
        If sh.CodeName = Name Then
           Set SheetFromCodeName = sh
           Exit For
        End If
    Next sh

End Function
Using the above code means that if the user changes the name of the worksheet then your code will not be affected.
There is another way of getting the sheet name of an external workbook using the code name. You can use the VBProject element of that Workbook.
You can see how to do this in the example below. I have included this for completeness only and I would recommend using the method in the previous example rather than this one.
' https://excelmacromastery.com/
Public Function SheetFromCodeName2(codeName As String _
                             , bk As Workbook) As Worksheet

    ' Get the sheet name from the CodeName using the VBProject
    Dim sheetName As String
    sheetName = bk.VBProject.VBComponents(codeName).Properties("Name")

    ' Use the sheet name to get the worksheet object
    Set SheetFromCodeName2 = bk.Worksheets(sheetName)

End Function
Code Name Summary
The following is a quick summary of using the Code Name
- The code name of the worksheet can be used directly in the code e.g. Sheet1.Range
- The code name will still work if the worksheet name is changed.
- The code name can only be used for worksheets in the same workbook as the code.
- Anywhere you see ThisWorkbook.Worksheets(“sheetname”) you can replace it with the code name of the worksheet.
- You can use the SheetFromCodeName function from above to get the code name of worksheets in other workbooks.
The Active Sheet
The ActiveSheet object refers to the worksheet that is currently active. You should only use ActiveSheet if you have a specific need to refer to the worksheet that is active.
Otherwise you should specify the worksheet you are using.
If you use a worksheet method like Range and don’t mention the worksheet, it will use the active worksheet by default.
' Write to Cell A1 in the active sheet
ActiveSheet.Range("A1") = 99

' Active sheet is the default if no sheet used
Range("A1") = 99
Declaring a Worksheet Object
Declaring a worksheet object is useful for making your code neater and easier to read.
The next example shows code for updating ranges of cells. The first Sub does not declare a worksheet object. The second sub declares a worksheet object and the code is therefore much clearer.
' https://excelmacromastery.com/
Public Sub SetRangeVals()

    Debug.Print ThisWorkbook.Worksheets("Sheet1").Name
    ThisWorkbook.Worksheets("Sheet1").Range("A1") = 6
    ThisWorkbook.Worksheets("Sheet1").Range("B2:B9").Font.Italic = True
    ThisWorkbook.Worksheets("Sheet1").Range("B2:B9").Interior.Color = rgbRed

End Sub
' https://excelmacromastery.com/
Public Sub SetRangeValsObj()

    Dim sht As Worksheet
    Set sht = ThisWorkbook.Worksheets("Sheet1")

    sht.Range("A1") = 6
    sht.Range("B2:B9").Font.Italic = True
    sht.Range("B2:B9").Interior.Color = rgbRed

End Sub
You could also use the With keyword with the worksheet object as the next example shows.
' https://excelmacromastery.com/
Public Sub SetRangeValsObjWith()

    Dim sht As Worksheet
    Set sht = ThisWorkbook.Worksheets("Sheet1")

    With sht
        .Range("A1") = 6
        .Range("B2:B9").Font.Italic = True
        .Range("B2:B9").Interior.Color = rgbRed
    End With

End Sub
Accessing the Worksheet in a Nutshell
With all the different ways to access a worksheet, you may be feeling overwhelmed or confused. So in this section, I am going to break it down into simple terms
1. If you want to use whichever worksheet is currently active then use ActiveSheet.
ActiveSheet.Range("A1") = 55
2. If the worksheet is in the same workbook as the code then use the Code Name.
Sheet1.Range("A1") = 55
3. If the worksheet is in a different workbook then first get workbook and then get the worksheet.
' Get workbook
Dim wk As Workbook
Set wk = Workbooks.Open("C:DocsAccounts.xlsx", ReadOnly:=True)

' Then get worksheet
Dim sh As Worksheet
Set sh = wk.Worksheets("Sheet1")
If you want to protect against the user changing the sheet name then use the SheetFromCodeName function from the Code Name section.
' Get workbook
Dim wk As Workbook
Set wk = Workbooks.Open("C:DocsAccounts.xlsx", ReadOnly:=True)

' Then get worksheet
Dim sh As Worksheet
Set sh = SheetFromCodeName("sheetcodename",wk)
Add Worksheet
The examples in this section show you how to add a new worksheet to a workbook. If you do not supply any arguments to the Add function then the new worksheet will be placed before the active worksheet.
When you add a Worksheet, it is created with a default name like “Sheet4”. If you want to change the name then you can easily do this using the Name property.
The following example adds a new worksheet and changes the name to “Accounts”. If a worksheet with the name “Accounts” already exists then you will get an error.
' https://excelmacromastery.com/
Public Sub AddSheet()

    Dim sht As Worksheet

    ' Adds new sheet before active sheet
    Set sht = ThisWorkbook.Worksheets.Add
    ' Set the name of sheet
    sht.Name = "Accounts"

    ' Adds 3 new sheets before active sheet
    ThisWorkbook.Worksheets.Add Count:=3

End Sub
In the previous example, you are adding worksheets in relation to the active worksheet. You can also specify the exact position to place the worksheet.
To do this you need to specify which worksheet the new one should be inserted before or after. The following code shows you how to do this.
' https://excelmacromastery.com/
Public Sub AddSheetFirstLast()

    Dim shtNew As Worksheet
    Dim shtFirst As Worksheet, shtLast As Worksheet

    With ThisWorkbook

        Set shtFirst = .Worksheets(1)
        Set shtLast = .Worksheets(.Worksheets.Count)

        ' Adds new sheet to first position in the workbook
        Set shtNew = Worksheets.Add(Before:=shtFirst)
        shtNew.Name = "FirstSheet"

        ' Adds new sheet to last position in the workbook
        Set shtNew = Worksheets.Add(After:=shtLast)
        shtNew.Name = "LastSheet"

    End With

End Sub
Delete Worksheet
To delete a worksheet you simply call the Delete member.
Dim sh As Worksheet
Set sh = ThisWorkbook.Worksheets("Sheet12")
sh.Delete
Excel will display a warning message when you delete a worksheet. If you want to hide this message you can use the code below
Application.DisplayAlerts = False
sh.Delete
Application.DisplayAlerts = True
There are two issues to watch out for when it comes to deleting worksheets.
If you try to access the worksheet after deleting it you will get the “Subscript out of Range” error we saw in the Accessing the Worksheet section.
Dim sh As Worksheet
Set sh = ThisWorkbook.Worksheets("Sheet2")
sh.Delete

' This line will give 'Subscript out of Range' as "Sheet2" does not exist
Set sh = ThisWorkbook.Worksheets("Sheet2")
The second issue is when you assign a worksheet variable. If you try to use this variable after the worksheet is deleted then you will get an Automation error like this
Run-Time error -21147221080 (800401a8′) Automation Error
If you are using the Code Name of the worksheet rather than a variable, then this will cause Excel to crash rather than give the automation error.
The following example shows how an automation errors occurs
sh.Delete

' This line will give Automation error
Debug.Assert sh.Name
If you assign the Worksheet variable to a valid worksheet it will work fine
sh.Delete

' Assign sh to another worksheet
Set sh = Worksheets("sheet3")

' This line will work fine
Debug.Assert sh.Name
Loop Through the Worksheets
The Worksheets member of Workbooks is a collection of worksheets belonging to a workbook. You can go through each sheet in the worksheets collection using a For Each Loop or a For Loop.
The following example uses a For Each loop.
' https://excelmacromastery.com/
Public Sub LoopForEach()

    ' Writes "Hello World" into cell A1 for each worksheet
    Dim sht As Worksheet
    For Each sht In ThisWorkbook.Worksheets
         sht.Range("A1") = "Hello World"
    Next sht

End Sub
The next example uses the standard For loop
' https://excelmacromastery.com/
Public Sub LoopFor()

    ' Writes "Hello World" into cell A1 for each worksheet
    Dim i As Long
    For i = 1 To ThisWorkbook.Worksheets.Count
         ThisWorkbook.Worksheets(i).Range("A1") = "Hello World"
    Next sht

End Sub
You have seen how to access all open workbooks and how to access all worksheets in ThisWorkbook. Lets take it one step further. Lets access all worksheets in all open workbooks.
Note: If you use code like this to write to worksheets then back everything up first as you could end up writing the incorrect data to all the sheets.
' https://excelmacromastery.com/
Public Sub AllSheetNames()

    ' Prints the workbook and sheet names for
    ' all sheets in open workbooks
    Dim wrk As Workbook
    Dim sht As Worksheet
    For Each wrk In Workbooks
        For Each sht In wrk.Worksheets
            Debug.Print wrk.Name + ":" + sht.Name
        Next sht
    Next wrk

End Sub
Using the Sheets Collection
The workbook has another collection similar to Worksheets called Sheets. This causes confusion at times among users. To explain this first you need to know about a sheet type that is a chart.
It is possible in Excel to have a sheet that is a chart. To do this
- Create a chart on any sheet.
- Right click on the chart and select Move.
- Select the first option which is “New Sheet” and click Ok.
Now you have a workbook with sheets of type worksheet and one of type chart.
- The Worksheets collection refers to all worksheets in a workbook. It does not include sheets of type chart.
- The Sheets collection refers to all sheets belonging to a workbook including sheets of type chart.
There are two code examples below. The first goes through all the Sheets in a workbook and prints the name of the sheet and type of sheet it is. The second example does the same with the Worksheets collection.
To try out these examples you should add a Chart sheet to your workbook first so you will see the difference.
' https://excelmacromastery.com/
Public Sub CollSheets()

    Dim sht As Variant
    ' Display the name and type of each sheet
    For Each sht In ThisWorkbook.Sheets
        Debug.Print sht.Name & " is type " & TypeName(sht)
    Next sht

End Sub

Public Sub CollWorkSheets()

    Dim sht As Variant
    ' Display the name and type of each sheet
    For Each sht In ThisWorkbook.Worksheets
        Debug.Print sht.Name & " is type " & TypeName(sht)
    Next sht

End Sub
If do not have chart sheets then using the Sheets collection is the same as using the Worksheets collection.
Conclusion
This concludes the post on the VBA Worksheet. I hope you found it useful.
The three most important elements of Excel VBA are Workbooks, Worksheets and Ranges and Cells. These elements will be used in almost everything you do. Understanding them will make you life much easier and make learning VBA much simpler.
What’s Next?
Free VBA Tutorial If you are new to VBA or you want to sharpen your existing VBA skills then why not try out the The Ultimate VBA Tutorial.
Related Training: Get full access to the Excel VBA training webinars and all the tutorials.
(NOTE: Planning to build or manage a VBA Application? Learn how to build 10 Excel VBA applications from scratch.)