
Word for Microsoft 365 Outlook for Microsoft 365 PowerPoint for Microsoft 365 Word 2021 Outlook 2021 PowerPoint 2021 OneNote 2021 Word 2019 Outlook 2019 PowerPoint 2019 Word 2016 Outlook 2016 PowerPoint 2016 OneNote 2016 Word 2013 Outlook 2013 PowerPoint 2013 OneNote 2013 Office for business Office 365 Small Business Word 2010 Outlook 2010 PowerPoint 2010 OneNote 2010 More…Less
Speak is a built-in feature of Word, Outlook, PowerPoint, and OneNote. You can use Speak to have text read aloud in the language of your version of Office.
Text-to-speech (TTS) is the ability of your computer to play back written text as spoken words. Depending upon your configuration and installed TTS engines, you can hear most text that appears on your screen in Word, Outlook, PowerPoint, and OneNote. For example, if you’re using the English version of Office, the English TTS engine is automatically installed. To use text-to-speech in different languages, see Using the Speak feature with Multilingual TTS.
To learn how to configure Excel for text-to-speech, see Converting text to speech in Excel.
Add Speak to the Quick Access Toolbar
You can add the Speak command to your Quick Access Toolbar by doing the following in Word, Outlook, PowerPoint, and OneNote:
-
Next to the Quick Access Toolbar, click Customize Quick Access Toolbar.

-
Click More Commands.
-
In the Choose commands from list, select All Commands.
-
Scroll down to the Speak command, select it, and then click Add.
-
Click OK.
Use Speak to read text aloud
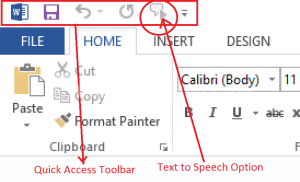
After you have added the Speak command to your Quick Access Toolbar, you can hear single words or blocks of text read aloud by selecting the text you want to hear and then clicking the Speak icon on the Quick Access Toolbar.
Learn more
Listen to your Word documents with Read Aloud
Listen to your Outlook email messages with Read Aloud
Converting text to speech in Excel
Dictate text using Speech Recognition
Learning Tools in Word
Hear text read aloud with Narrator
Using the Save as Daisy add-in for Word
Need more help?
Want more options?
Explore subscription benefits, browse training courses, learn how to secure your device, and more.
Communities help you ask and answer questions, give feedback, and hear from experts with rich knowledge.
To use Speak:
- Select a word or block of text in your document.
- In the Quick Access Toolbar, select the Speak selected text icon.
Contents
- 1 How do you make a Word document speak?
- 2 How do I turn on Text to Speech in Word?
- 3 Where is the speak command in Word?
- 4 Can you do text to speech?
- 5 How do I choose to speak?
- 6 How do I make Google Talk?
- 7 What does select to speak mean?
- 8 How do I get rid of select to speak?
- 9 Is voice Google free?
- 10 How do I use Google text-to-Speech?
- 11 Can Google Talk to me like Siri?
- 12 How can I talk naturally?
- 13 How can I speak more?
- 14 How can I improve my speaking?
- 15 How do I get narrator to read highlighted text?
- 16 How do I use Samsung text to speech?
- 17 Where can I find accessibility options?
- 18 How do I use Windows text to speech?
- 19 How do I make my computer read to me Windows 10?
- 20 How do I turn off text to speech engine?
How do you make a Word document speak?
Go to Word Options >Customize the Quick Access Toolbar and locate the Choose Commands From box. Scroll down to the Speak command. 4. Select the Speak command, click the Add button in the middle of the screen, then click OK.
How do I turn on Text to Speech in Word?
Enable “Text to Speech” in Word:
Select “More Commands”. The “Word Options” menu will open and the Quick Access Toolbar commands display by default. From the “Choose command from:” drop-down menu, select “All Commands”. Scroll down and select “Speak”.
Where is the speak command in Word?
Add the Speak button to the Quick Access Toolbar
- Click the Customize arrow on the Quick Access Toolbar.
- From the dropdown menu, select More Commands.
- On the Word Options screen >Customize the Quick Access Toolbar, locate the Choose Commands From box and scroll down to the Speak command.
Can you do text to speech?
On an Android phone, tap Settings (the Gear icon) and then tap Accessibility > Select to Speak. Tap the Select to Speak toggle switch to turn on the feature.Open any app, and then tap Select to Speak > Play to hear the phone read the text aloud.
How do I choose to speak?
You can select items on your screen and hear them read or described aloud with Select to Speak for Android.
Use Select to Speak
- Open your device’s Settings app .
- Tap Accessibility, then tap Select to Speak.
- Turn on Select to Speak shortcut.
- Optional: To change your shortcut, tap Select to Speak shortcut.
How do I make Google Talk?
Turn on voice search
- On your Android phone or tablet, open the Google app .
- At the top right, tap your Profile picture or initial Settings. Voice.
- Under “Hey Google,” tap Voice Match.
- Turn on Hey Google.
What does select to speak mean?
‘Select to Speak’ is a built-in accessibility feature of Android that enables you to select any text (such as emails and messages) and have it read aloud using the in-built screen reader technology.
How do I get rid of select to speak?
Procedure
- Open Settings.
- Scroll down and tap Accessibility. You will need to scroll using two fingers.
- Tap Select to Speak.
- Tap to disable this setting.
Is voice Google free?
Google Voice is a free service that lets you merge multiple phone numbers into a single number that you can call or text from. You can set up a Google Voice account on either your computer or mobile device, and immediately begin placing domestic and international calls, or sending texts.
How do I use Google text-to-Speech?
Android: Google Voice Typing
Install the Google Docs app, open a document, and tap the microphone icon located to the left of the space bar on the on-screen keyboard. Then talk. Google Voice Typing turns your speech into text.
Can Google Talk to me like Siri?
You can use Google Voice to make calls or send text messages from Siri, the digital assistant, on your iPhone and iPad.
How can I talk naturally?
6 Keys to Acting Naturally in a Presentation
- Know Your Audience. Yes, it’s often easier talking to people you know.
- Practice, Practice, Practice. Next, know your material.
- Make Your Presentation a Conversation.
- Look Your Audience in the Eye.
- Project Warmth When Presenting.
- Reveal Yourself — Warts and All.
How can I speak more?
This is how I went from quiet and sometimes shy to an outgoing conversationalist.
- Signal to people that you are friendly.
- Use small talk to find mutual interests.
- Ask gradually more personal questions.
- Practice in everyday interactions.
- Say it even if you think it’s uninteresting.
- Talk about what’s going on around.
How can I improve my speaking?
How to improve the way you speak
- Read aloud to yourself, every day.
- Note and memorise any new words.
- Speak at a moderate pace.
- Speak slightly louder than the average.
- Speak using the lower-end of your voice range.
- Never swear, or use profane language.
- Actively study to expand your vocabulary.
- Enunciate!
How do I get narrator to read highlighted text?
Read text from the current location
To read from where focus or your cursor is, press Narrator + R. To start reading from where your cursor is, press Narrator + Ctrl + R or Narrator + Down arrow key.
How do I use Samsung text to speech?
Text to speech settings
- From any Home screen, tap Apps.
- Tap Settings.
- Scroll to ‘PHONE,’ then tap Language & keyboard.
- Under ‘SPEECH,’ tap Text-to-speech output.
- Tap Speech rate and then adjust how fast the text will be spoken.
- Tap the Settings icon next to the desired TTS engine (Samsung or Google).
Where can I find accessibility options?
- Step 1: Turn on the Accessibility Menu. On your device, open the Settings app. Tap Accessibility. Accessibility Menu.
- Step 2: Use the Accessibility Menu. To open the Accessibility Menu, use your Accessibility Menu shortcut: Swipe up with two fingers, or with three fingers if TalkBack is on.
How do I use Windows text to speech?
Click Start, click Control Panel, and then double-click Speech. On the Text-to-Speech tab, click Preview Voice to hear the currently selected voice. The text is spoken and the words are highlighted as they are spoken. If the speakers are working properly, you will hear the spoken words.
How do I make my computer read to me Windows 10?
How to turn Narrator on or off on Windows 10 using Settings
- Click the Start button and then click the Settings icon, which resembles a gear.
- Click “Ease of Access.”
- In the pane on the left, click “Narrator.”
- In the “Use Narrator” section, turn the feature on or off by clicking the button labeled “Turn on Narrator.”
How do I turn off text to speech engine?
Tap on Google voice typing and tap on the settings button. Tap “Ok Google” Detection. From the Google App option, move the slider to the left to turn off Google text to speech.
Turn On Speak Selected Text in Microsoft Word (All Versions)
by Avantix Learning Team | Updated September 10, 2021
Applies to: Microsoft® Word® 2010, 2013, 2016, 2019 or 365 (Windows)
In Microsoft Word, you can have Word speak or read a document to you. You will need to add the Speak command to your Quick Access Toolbar or the Ribbon to use this feature. Once you’ve added the command, simply click Speak and Word will read the selected text aloud. This feature is available in all versions of Word (2010 and later).
For those with Word 2019 or 365, there is also a new Read Aloud feature on the Ribbon as an alternative to Speak.
Recommended article: 3 Simple Ways to Copy or Import Excel Data into Word (Linked or Unlinked)
Note: Buttons and Ribbon tabs may display in a different way (with or without text) depending on your version of Word, the size of your screen and your Control Panel settings. For Word 365 users, Ribbon tabs may appear with different names.
Do you want to learn more about Microsoft Word? Check out our virtual classroom or live classroom Word courses >
Adding Speak to the Quick Access Toolbar
You will need to add Speak to the Quick Access Toolbar (or the Ribbon) to use it.
It’s usually easier to work with the Quick Access Toolbar if you display it below the Ribbon. If the Quick Access Toolbar is above the Ribbon, click the down arrow to the right of the Quick Access Toolbar and select Show Below the Ribbon from the drop-down menu.
To add Speak to the Quick Access Toolbar:
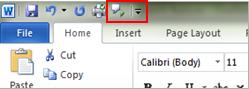
- Click the down arrow to the right of the Quick Access Toolbar. A drop-down menu appears.
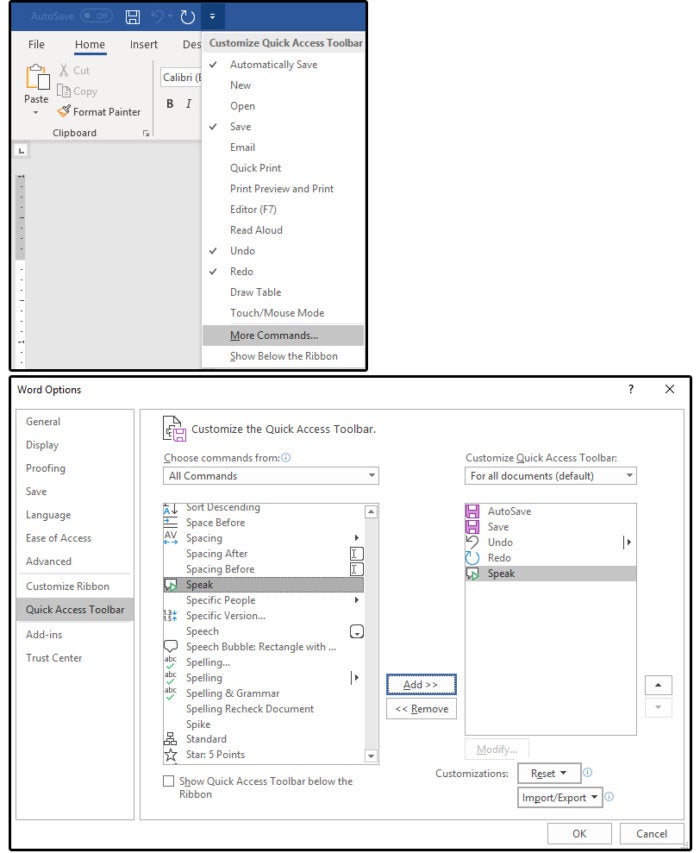
- Select More Commands. The Word Options dialog box appears. The Quick Access Toolbar category should be selected on the left.
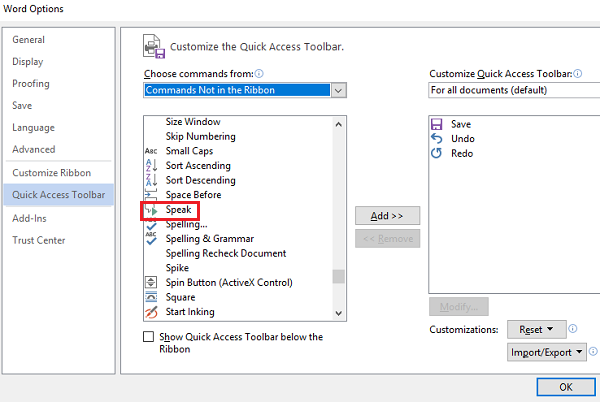
- From the drop-down menu at the top of the dialog box below Choose commands from, select All Commands.
- In the list of commands, click Speak.
- Click Add.
- Click OK. The Speak command will be added to the Quick Access Toolbar.
In the example below, Speak has been added to the Quick Access Toolbar in the Word Options dialog box:

Speaking selected text
To speak selected text:
- Select the text you want to be read aloud. To select the entire document, press Ctrl + A to select all.
- Click Speak on the Quick Access Toolbar. Word will read the selected text (your sound must be turned on for your device).
- To turn off Speak, click the Speak again.
The voice used by Speak is set by default in your Windows Control Panel settings.
Subscribe to get more articles like this one
Did you find this article helpful? If you would like to receive new articles, join our email list.
More resources
How to Insert or Type the Delta Symbol in Word (Δ or δ)
How to Keep Text Together in Microsoft Word (Paragraphs, Lines or Words)
How to Create a Table of Contents in Word (Insert, Format and Update a TOC)
How to Insert Reusable Text Snippets in Word with Quick Parts (Great Timesaver)
How to Convert a PDF to Word in Microsoft Word (for Free – No Third Party Programs Needed)
Related courses
Microsoft Word: Intermediate / Advanced
Microsoft Excel: Intermediate / Advanced
Microsoft PowerPoint: Intermediate / Advanced
Microsoft Word: Long Documents Master Class
Microsoft Word: Styles, Templates and Tables of Contents
Microsoft Word: Designing Dynamic Word Documents Using Fields
VIEW MORE COURSES >
Our instructor-led courses are delivered in virtual classroom format or at our downtown Toronto location at 18 King Street East, Suite 1400, Toronto, Ontario, Canada (some in-person classroom courses may also be delivered at an alternate downtown Toronto location). Contact us at info@avantixlearning.ca if you’d like to arrange custom instructor-led virtual classroom or onsite training on a date that’s convenient for you.
Copyright 2023 Avantix® Learning
Microsoft, the Microsoft logo, Microsoft Office and related Microsoft applications and logos are registered trademarks of Microsoft Corporation in Canada, US and other countries. All other trademarks are the property of the registered owners.
Avantix Learning |18 King Street East, Suite 1400, Toronto, Ontario, Canada M5C 1C4 | Contact us at info@avantixlearning.ca
Can Microsoft Word read to me? Yes, it can. There are three ways to accomplish this task: The Speak and Read Aloud features in Word, or the Narrator feature in Windows.
The Speak feature was incorporated into Microsoft Office (Word, Outlook, PowerPoint, etc.) back in version 2003. It was called Text to Speech (TTS) then, and it functioned much the same as it does now. Fortunately, it’s a very simple procedure to set up and use, so you can get started immediately.
1. Click the Customize arrow on the Quick Access Toolbar.
2. From the dropdown menu, select More Commands.
3. Go to Word Options >Customize the Quick Access Toolbar and locate the Choose Commands From box. Scroll down to the Speak command.
4. Select the Speak command, click the Add button in the middle of the screen, then click OK.
5. Word adds the Speak command to the Quick Access Toolbar at the end, and you’re ready to go.
Add Speak button to Quick Access Toolbar JD Sartain / IDG Worldwide
Click the Speak button to listen to your text
1. Ensure that your system’s speakers or sound devices are turned on.
2. Highlight a paragraph of text, then click the Speak command button.
3. Word reads any text that’s highlighted, even the entire document. Press Ctrl+ A to select the entire document.
4. Click the Speak command button once to begin the reading session, then click it again to stop. There is no pause-and-continue option at this time, but many users have requested this feature, so we hope to see it in future versions.
Select the Read Aloud command
1. Another way to have your text read aloud in Word is to select the Review tab > Read Aloud button.
The greatest benefit of Read Aloud as opposed to the Speak command is…
(a) You don’t have to highlight the text. Just position your cursor where you want the reading aloud to begin and click the Read Aloud button.
And (b), when you click the Read Aloud button a second time, it stops. Click the button again to continue from that point on. So, essentially, you have a Pause feature with Read Aloud that is not available with Speak.
Change the Speak preferences in the Windows Control Panel
The Speak preferences are defined in Widows, not in Word specifically.
1. Click Start > Windows System > Control Panel
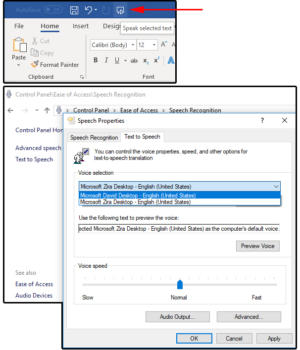
2. Select Ease of Access > Speech Recognition > Text to Speech, and the Speech Properties dialog window opens on the Text to Speech tab.
 JD Sartain / IDG Worldwide
3. Under Voice Selection, choose MS David Desktop for a male voice or MS Zira Desktop for a female voice.
4. Click the Preview button to listen to each voice, then make your selection.
5. Use the slider under Voice Speed to adjust the pace (slow, normal, or fast) of the reader.
6. Click the Audio Output button to define the Sound preferences.
7. Click the Advanced button to select or change the output device.
Using Windows 10 Narrator in Word and beyond
Windows 10 Narrator is an accessibility feature designed for vision-impaired users, however, anyone can use it. It reads everything onscreen: documents, websites, comments, page instructions, commands, and more. It’s also not restricted to Word, as the Speak feature is.
Using Narrator is really easy, though learning all the commands may take some time. See Microsoft’s “Complete guide to Windows Narrator” for full information. (If you search elsewhere online for WIndows 10 Narrator help, check the date of the article and the Windows version before you start memorizing commands.)
There are two keyboard layouts available: Standard and Legacy. The default is Standard. Follow these instructions to change the keyboard (which changes how the commands function). For more information, go to Microsoft’s support page about Narrator keyboard layouts.
1. Right-click the Windows Start button and select Settings.
2. Select Ease of Access.
3. Click Narrator in the left panel.
4. Browse to Choose Keyboard Setting.
5. From the Select Keyboard Layout field box, choose Standard or Legacy.
6. Next, select your Narrator Modifier key (that is the key used to activate the Narrator commands). Options include Caps Lock, Insert, or Caps Lock and Insert. I chose the Caps Lock key, because its location on the keyboard is more efficient.
7. Once you have chosen the Narrator Modifier key, the instructions here and on the web will refer to that key as the Narrator key (or, in some cases, the SR key).
8. Exit the Settings menu.
Windows Narrator keyboard settings.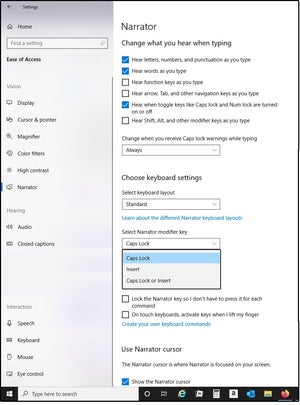 JD Sartain / IDG
The basics for using Narrator are this:
1. Press Windows logo key + Ctrl +Enter (simultaneously) to access or exit Narrator.
2. If you have not memorized all the “reader” keystrokes yet, the easiest method to read text is to place your cursor on the target word/sentence/paragraph and press Narrator key + Down Arrow. Press Narrator key (by itself) to stop, then Narrator key + Down Arrow to continue. There are other keys that perform this same function, but these are the easiest.
3. Most important: For a list of all the Narrator commands, press Narrator + F1.
4. For reading the current paragraph, press Narrator + Ctrl + K.
5. For the next paragraph, press Narrator + Ctrl + L.
6. For the current page, press Narrator + Ctrl + I.
7. For the next page, press Narrator + Ctrl + O.
The list goes on and on. In addition to the complete guide above, check out the support pages for Windows 10 Narrator keyboard commands and touch gestures, and Windows 10 narrator reading text.
Can Microsoft Word read to me? Yes, it can. The Speak feature was incorporated into Microsoft Office (Word, Outlook, PowerPoint, etc.) back in version 2003. It was called Text to Speech (TTS) then, and it functioned much the same as it does now. Fortunately, it’s a very simple procedure to set up and use, so you can get started immediately.
Add the Speak button to the Quick Access Toolbar
1. Click the Customize arrow on the Quick Access Toolbar.
2. From the dropdown menu, select More Commands.
3. On the Word Options screen >Customize the Quick Access Toolbar, locate the Choose Commands From box and scroll down to the Speak command.
4. Select the Speak command, click the Add button in the middle of the screen, then click OK.
5. Word adds the Speak command to the Quick Access Toolbar at the end, and you’re ready to go.
JD Sartain / IDG Worldwide
Add Speak button to Quick Access Toolbar
Click the Speak button to listen to your text
1. Ensure that your system’s speakers or sound devices are turned on.
2. Highlight a paragraph of text, then click the Speak command button.
3. Word reads any text that’s highlighted, even the entire document. Press Ctrl+ A to select the entire document.
4. Click the Speak command button once to begin the reading session, then click it again to stop. There is no pause-and-continue option at this time, but many users have requested this feature, so look for it in future versions.
Select the Read Aloud command
1. Another way to have your text read aloud in Word is to select the Review tab > Read Aloud button.
The greatest benefit of Read Aloud as opposed to the Speak command is…
(a) you don’t have to highlight the text. Just position your cursor where you want the reading aloud to begin and click the Read Aloud button.
And (b), when you click the Read Aloud button a second time, it stops. Click the button again to continue from that point on. So, essentially, you have a Pause feature with Read Aloud that is not available with Speak.
Change the Speak preferences in the Windows Control Panel.
The Speak preferences are defined in Widows, not in Word specifically.
1. Click Start > Windows System > Control Panel
2. Select Ease of Access > Speech Recognition > Text to Speech, and the Speech Properties dialog window opens on the Text to Speech tab.
3. Under Voice Selection, choose MS David Desktop for a male voice or MS Zira Desktop for a female voice.
4. Click the Preview button to listen to each voice, then make your selection.
5. Use the slider under Voice Speed to adjust the pace (slow, normal, or fast) of the reader.
6. Click the Audio Output button to define the Sound preferences.
7. Click the Advanced button to select or change the output device.
Download PC Repair Tool to quickly find & fix Windows errors automatically
Microsoft Office ships with a useful feature called Speak. This incredible feature allows multilingual Text-To-Speech or TTS to be used in PowerPoint, OneNote, Word, and Outlook. This is not readily available on the Ribbon, so to use its full features, you would need to add it to the Quick Access Toolbar or the Ribbon. You can use the Mini Translator with it and also use the keyboard rather than the mouse.
Speak enables text-to-speech matching in terms of the language used in the text. You can also check out the installed text-to-speech engines when you go to Control Panel. Text-to-speech playback is also available for Excel through Speak Cells.
To start with, please download the speech platform from Microsoft. Choose the 32-bit or 64-bit version as per your requirements. 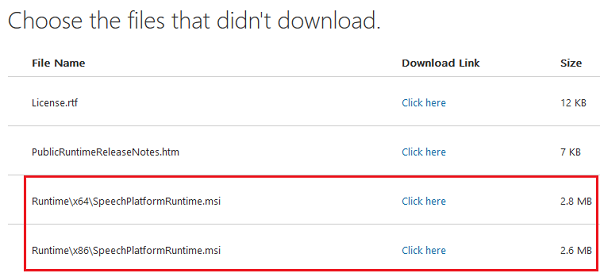
The English language pack can be downloaded from here.
How to add Speak feature to Quick Access Toolbar
- Begin by opening up your Office program. Let us assume we are using MS Word for the sake of the example. Go to Backstage View, and then click on File.
- Click on Options and then hover on to the Quick Access Toolbar tab.
- Click on the drop-down menu and then select Commands Not In The Ribbon.
- Choose Speak from the box and then click on Add.
- Hit OK and then the Speak icon will automatically appear in the Quick Access Toolbar.
How to add Speak to the Ribbon
- Launch Word, click on File, and then open Backstage View.
- Go to Options and then select Customize Ribbon.
- Under the Choose Commands drop-down menu, select Commands Not In the Ribbon.
- Create a new or custom tab by clicking on options New Group or New Tab. Hit on Rename to create a new name for a group.
- In the scroll box, select Speak, and then click on Add to add it to your custom group or tab.
- Click OK, and then the Speak feature will automatically appear on the Ribbon.
Speak is now ready and running for text-to-speech playback. It functions automatically when your selected text or the cursor is in any word on the document. Click on Speak to begin and then hit the button during the speech in order to cancel playback.
You can also use Speak and bind this to a Hotkey for easy access and functionality. Word supports all keyboard shortcuts for commands of your choice. This enables the usage of Speak without adding it manually to the Quick Access Toolbar or Ribbon. To do this, just do the following:
- Go to the Customize Ribbon menu and then select Customize.
- Choose All Commands category.
- Bind or link SpeakStopSpeaking command to any hotkey.
That’s it! I hope this helps.

Karan is a B.Tech, with several years of experience as an IT Analyst. He is a passionate Windows user who loves troubleshooting problems and writing about Microsoft technologies.
Microsoft Word, Office 2010, Office 2013, Office 2016 /
Text to Speech /
10 July 2020
Word 2016, Word 2013 and Word 2010 for Windows all have a ‘text to speech’ or ‘Speak’ feature to read back a document. It’s hiding away behind the ribbon but works fine once you’ve found it.
Speak button can be put on the Quick Access Toolbar or Ribbon.

Select some text or Ctrl + A for the whole document then click the Speak button.
If there’s no selection, Speak will say the current word at the cursor.
A somewhat mechanical voice will talk to you.
Adding the Speak button
You’ll find Speak on the ‘Commands not on the Ribbon’ list. The easiest choice is adding it to the Quick Access Toolbar.

Now it’s on the QAT, select some text and click the Speak button.
Changing Voices
The controls for Speak or Read Aloud are in Windows | Control Panel | Speech Recognition | Text to Speech. Office ‘Speak’ is making use of a little-appreciated ‘Text to Speech’ part of Windows.

That means the Speech options available depend somewhat on the version of Windows, not Office.
Voice Selection – the English language options are ‘David’ or ‘Zira’ – male or female.
Preview Voice – click to hear the current voice.
Voice speed – faster or slower than the Normal setting.
No nonsense guide to fixing Windows audio problems – speakers
Make Microsoft Office speak or read aloud
Hello!!! friends, how are you? Do you have a hard time for reading through reams of paperwork or hate spending the time reading long documents? Why not use the Text to Speech feature in Office 2013 to give your eyes a break?
Let us learn a new technique in Microsoft Office Word 2013. It is a new feature of Word 2013. If you want to hear your written text of Microsoft Word 2013 by the speaker of headphone, then you can use the Text to Speech feature of Microsoft Office 2013.
Now follow the steps to add speak option in Microsoft word 2013.
At first, Add “Speak” option to the Quick Access Toolbar.
1. Right, Click on Quick Access Toolbar.
2. Go to Customize Quick Access Toolbar.
3. Select All Commands instead of Popular Commands.
4. Scroll down for “Speak” command, select it, and then click Add Button.
5. Click OK.
Check it Now… Is it working or not working?
Type some texts or some sentences, then “Select All the Text” then “click on Speak button” from Quick Access Toolbar.
Check the video tutorial from Youtube to add speak option in Microsoft word 2013 …

on
August 26, 2013, 8:34 AM PDT
Quick Tip: Add Speak to the Word Quick Access Bar
With a little clicking and a lot of scrolling you can add any command to the Word Quick Access Bar.
 Not too long ago, I received an email asking me if there was
a way to make Word say text out loud without using a third-party application. I
had not looked at this feature in a long time, but there is indeed a Speak
command in Word. However, it is not on any ribbon and is buried deep within the
thousands of available commands in Word.
The best solution in these situations is to too add the
command for the feature you are looking to use to the Word Quick Access Bar.
Note: the screenshots in this article are from Office 2010,
but they could just have well been from Office 2013 – the steps are the same
for any ribbon-based version.
Quick Access Bar
The steps are not difficult, but there is likely to be a bit
of scrolling. First, start Word, left-click the Quick Access Bar options button
(it’s the down arrow), and then click the More Commands item. (Figure A)
Figure A

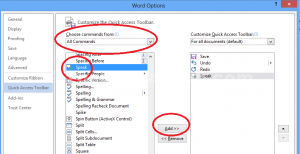
Click the dropdown arrow under the Choose commands from section and change the selection to read Commands not in the Ribbon. Scroll down
the list until you find Speak, as shown in Figure B.
Figure B

Click Speak and then click the Add button to add it to your
Quick Access Bar, as shown in Figure C. Click OK when you are done.
Figure C

While you are viewing the list you might want to add other
features that are not listed in any Ribbons. This process will work for any
command.
As you can see in Figure D, there is now a speak button on
my Word Quick Access Bar.
Figure D

-
Microsoft
-
Software