
This article describes the keyboard shortcuts and function keys in Word for Windows.
Notes:
-
To quickly find a shortcut in this article, you can use Search. Press Ctrl+F, and then type your search words.
-
If an action that you use often does not have a shortcut key, you can record a macro to create one. For instructions, go to Create or run a macro or Use a screen reader to create a macro in Word.
-
If you are using Microsoft Word Starter, be aware that not all the features listed for Word are supported in Word Starter. For more information about the features available in Word Starter, go to Word features that are not fully supported in Word Starter.
-
Get these keyboard shortcuts in a Word document at this link: Word 2016 for Windows keyboard shortcuts.
In this topic
-
Frequently used shortcuts
-
Ribbon keyboard shortcuts
-
Navigate the document
-
Preview and print documents
-
Select text and graphics
-
Edit text and graphics
-
Work with web content
-
Work with tables
-
Review a document
-
Work with references, citations, and indexing
-
Work with mail merge and fields
-
Work with text in other languages
-
Work with document views
-
Use function key shortcuts
Frequently used shortcuts
This table shows the most frequently used shortcuts in Microsoft Word.
|
To do this |
Press |
|---|---|
|
Open a document. |
Ctrl+O |
|
Create a new document. |
Ctrl+N |
|
Save the document. |
Ctrl+S |
|
Close the document. |
Ctrl+W |
|
Cut the selected content to the Clipboard. |
Ctrl+X |
|
Copy the selected content to the Clipboard. |
Ctrl+C |
|
Paste the contents of the Clipboard. |
Ctrl+V |
|
Select all document content. |
Ctrl+A |
|
Apply bold formatting to text. |
Ctrl+B |
|
Apply italic formatting to text. |
Ctrl+I |
|
Apply underline formatting to text. |
Ctrl+U |
|
Decrease the font size by 1 point. |
Ctrl+Left bracket ([) |
|
Increase the font size by 1 point. |
Ctrl+Right bracket (]) |
|
Center the text. |
Ctrl+E |
|
Align the text to the left. |
Ctrl+L |
|
Align the text to the right. |
Ctrl+R |
|
Cancel a command. |
Esc |
|
Undo the previous action. |
Ctrl+Z |
|
Redo the previous action, if possible. |
Ctrl+Y |
|
Adjust the zoom magnification. |
Alt+W, Q, then use the Tab key in the Zoom dialog box to go to the value you want. |
|
Split the document window. |
Ctrl+Alt+S |
|
Remove the document window split. |
Alt+Shift+C or Ctrl+Alt+S |
Top of Page
Close a task pane
To close a task pane using the keyboard:
-
Press F6 until the task pane is selected.
-
Press Ctrl+Spacebar.
-
Use the arrow keys to select Close, and then press Enter.
Ribbon keyboard shortcuts
The ribbon groups related options on tabs. For example, on the Home tab, the Font group includes the Font Color option. Press the Alt key to display the ribbon shortcuts, called Key Tips, as letters in small images next to the tabs and options as shown in the image below.

Note: Add-ins and other programs can add new tabs to the ribbon and might provide access keys for those tabs.
You can combine the Key Tips letters with the Alt key to make shortcuts called Access Keys for the ribbon options. For example, press Alt+H to open the Home tab, and Alt+Q to move to the Tell Me or Search field. Press Alt again to see Key Tips for the options for the selected tab.
Depending on the version of Microsoft 365 you are using, the Search text field at the top of the app window might be called Tell Me instead. Both offer a largely similar experience, but some options and search results can vary.
In Office 2013 and Office 2010, most of the old Alt key menu shortcuts still work, too. However, you need to know the full shortcut. For example, press Alt, and then press one of the old menu keys E (Edit), V (View), I (Insert), and so on. A notification pops up saying you’re using an access key from an earlier version of Microsoft 365. If you know the entire key sequence, go ahead and use it. If you don’t know the sequence, press Esc and use Key Tips instead.
Use the Access Keys for ribbon tabs
To go directly to a tab on the ribbon, press one of the following access keys. Additional tabs might appear depending on your selection in the document.
|
To do this |
Press |
|---|---|
|
Move to the Tell Me or Search field on the Ribbon to search for assistance or Help content. |
Alt+Q, then enter the search term. |
|
Open the File page to use Backstage view. |
Alt+F |
|
Open the Home tab to use common formatting commands, paragraph styles, and the Find tool. |
Alt+H |
|
Open the Insert tab to insert tables, pictures and shapes, headers, or text boxes. |
Alt+N |
|
Open the Design tab to use themes, colors, and effects, such as page borders. |
Alt+G |
|
Open the Layout tab to work with page margins, page orientation, indentation, and spacing. |
Alt+P |
|
Open the References tab to add a table of contents, footnotes, or a table of citations. |
Alt+S |
|
Open the Mailings tab to manage Mail Merge tasks and to work with envelopes and labels. |
Alt+M |
|
Open the Review tab to use Spell Check, set proofing languages, and to track and review changes to your document. |
Alt+R |
|
Open the View tab to choose a document view or mode, such as Read Mode or Outline view. You can also set the zoom magnification and manage multiple document windows. |
Alt+W |
Top of Page
Work in the ribbon with the keyboard
|
To do this |
Press |
|---|---|
|
Select the active tab on the ribbon and activate the access keys. |
Alt or F10. To move to a different tab, use access keys or the arrow keys. |
|
Move the focus to commands on the ribbon. |
Tab key or Shift+Tab |
|
Move between command groupings on the ribbon. |
Ctrl+Left or Right arrow key |
|
Move among the items on the ribbon. |
Arrow keys |
|
Show the tooltip for the ribbon element currently in focus. |
Ctrl+Shift+F10 |
|
Activate the selected button. |
Spacebar or Enter |
|
Open the list for the selected command. |
Down arrow key |
|
Open the menu for the selected button. |
Alt+Down arrow key |
|
When a menu or submenu is open, move to the next command. |
Down arrow key |
|
Expand or collapse the ribbon. |
Ctrl+F1 |
|
Open the context menu. |
Shift+F10 Or, on a Windows keyboard, the Windows Menu key (between the right Alt and right Ctrl keys) |
|
Move to the submenu when a main menu is open or selected. |
Left arrow key |
Top of Page
Navigate the document
|
To do this |
Press |
|---|---|
|
Move the cursor one word to the left. |
Ctrl+Left arrow key |
|
Move the cursor one word to the right. |
Ctrl+Right arrow key |
|
Move the cursor up by one paragraph. |
Ctrl+Up arrow key |
|
Move the cursor down by one paragraph. |
Ctrl+Down arrow key |
|
Move the cursor to the end of the current line. |
End |
|
Move the cursor to the beginning the current line. |
Home |
|
Move the cursor to the top of the screen. |
Ctrl+Alt+Page up |
|
Move the cursor to the bottom of the screen. |
Ctrl+Alt+Page down |
|
Move the cursor by scrolling the document view up by one screen. |
Page up |
|
Move the cursor by scrolling the document view down by one screen. |
Page down |
|
Move the cursor to the top of the next page. |
Ctrl+Page down |
|
Move the cursor to the top of the previous page. |
Ctrl+Page up |
|
Move the cursor to the end of the document. |
Ctrl+End |
|
Move the cursor to the beginning of the document. |
Ctrl+Home |
|
Move the cursor to the location of the previous revision. |
Shift+F5 |
|
Move the cursor to the location of the last revision made before the document was last closed. |
Shift+F5, immediately after opening the document. |
|
Cycle through floating shapes, such as text boxes or images. |
Ctrl+Alt+5, and then the Tab key repeatedly |
|
Exit the floating shape navigation and return to the normal navigation. |
Esc |
|
Display the Navigation task pane, to search within the document content. |
Ctrl+F |
|
Display the Go To dialog box, to navigate to a specific page, bookmark, footnote, table, comment, graphic, or other location. |
Ctrl+G |
|
Cycle through the locations of the four previous changes made to the document. |
Ctrl+Alt+Z |
Top of Page
Navigate the document using the browse options in Word 2007 and 2010
In Word 2007 and 2010, you can browse the document by various types of objects, such as fields, footnotes, headings, and graphics.
|
To do this |
Press |
|---|---|
|
Open the list of browse options to define the type of object to browse by. |
Ctrl+Alt+Home |
|
Move to the previous object of the defined type. |
Ctrl+Page up |
|
Move to the next object of the defined type. |
Ctrl+Page down |
Top of Page
Preview and print documents
|
To do this |
Press |
|---|---|
|
Print the document. |
Ctrl+P |
|
Switch to print preview. |
Ctrl+Alt+I |
|
Move around the preview page when zoomed in. |
Arrow keys |
|
Move by one preview page when zoomed out. |
Page up or Page down |
|
Move to the first preview page when zoomed out. |
Ctrl+Home |
|
Move to the last preview page when zoomed out. |
Ctrl+End |
Top of Page
Select text and graphics
|
To do this |
Press |
|---|---|
|
Select text. |
Shift+Arrow keys |
|
Select the word to the left. |
Ctrl+Shift+Left arrow key |
|
Select the word to the right. |
Ctrl+Shift+Right arrow key |
|
Select from the current position to the beginning of the current line. |
Shift+Home |
|
Select from the current position to the end of the current line. |
Shift+End |
|
Select from the current position to the beginning of the current paragraph. |
Ctrl+Shift+Up arrow key |
|
Select from the current position to the end of the current paragraph. |
Ctrl+Shift+Down arrow key |
|
Select from the current position to the top of the screen. |
Shift+Page up |
|
Select from the current position to the bottom of the screen. |
Shift+Page down |
|
Select from the current position to the beginning of the document. |
Ctrl+Shift+Home |
|
Select from the current position to the end of the document. |
Ctrl+Shift+End |
|
Select from the current position to the bottom of the window. |
Ctrl+Alt+Shift+Page down |
|
Select all document content. |
Ctrl+A |
Top of Page
Extend a selection
|
To do this |
Press |
|---|---|
|
Start extending the selection. |
F8 In the extend selection mode, clicking a location in the document extends the current selection to that location. |
|
Select the nearest character to the left or right. |
F8, Left or Right arrow key |
|
Expand the selection. |
F8 repeatedly to expand the selection to the entire word, sentence, paragraph, section, and document. |
|
Reduce the selection. |
Shift+F8 |
|
Select a vertical block of text. |
Ctrl+Shift+F8, then press the arrow keys |
|
Stop extending the selection. |
Esc |
Top of Page
Edit text and graphics
|
To do this |
Press |
|---|---|
|
Delete one word to the left. |
Ctrl+Backspace |
|
Delete one word to the right. |
Ctrl+Delete |
|
Open the Clipboard task pane and enable the Office Clipboard, which allows you to copy and paste content between Microsoft 365 apps. |
Alt+H, F, O |
|
Cut the selected content to the Clipboard. |
Ctrl+X |
|
Copy the selected content to the Clipboard. |
Ctrl+C |
|
Paste the contents of the Clipboard. |
Ctrl+V |
|
Move the selected content to a specific location. |
F2, move the cursor to the destination, and then press Enter. |
|
Copy the selected content to a specific location. |
Shift+F2, move the cursor to the destination, and then press Enter. |
|
Define an AutoText block with the selected content. |
Alt+F3 |
|
Insert an AutoText block. |
The first few characters of the AutoText block, and then press Enter when the ScreenTip appears. |
|
Cut the selected content to the Spike. |
Ctrl+F3 |
|
Paste the contents of the Spike. |
Ctrl+Shift+F3 |
|
Copy the selected formatting. |
Ctrl+Shift+C |
|
Paste the selected formatting. |
Ctrl+Shift+V |
|
Copy the header or footer used in the previous section of the document. |
Alt+Shift+R |
|
Display the Replace dialog box, to find and replace text, specific formatting, or special items. |
Ctrl+H |
|
Display the Object dialog box, to insert a file object into the document. |
Alt+N, J, J |
|
Insert a SmartArt graphic. |
Alt+N, M |
|
Insert a WordArt graphic. |
Alt+N, W |
Top of Page
Align and format paragraphs
|
To do this |
Press |
|---|---|
|
Center the paragraph. |
Ctrl+E |
|
Justify the paragraph. |
Ctrl+J |
|
Align the paragraph to the left. |
Ctrl+L |
|
Align the paragraph to the right. |
Ctrl+R |
|
Indent the paragraph. |
Ctrl+M |
|
Remove a paragraph indent. |
Ctrl+Shift+M |
|
Create a hanging indent. |
Ctrl+T |
|
Remove a hanging indent. |
Ctrl+Shift+T |
|
Remove paragraph formatting. |
Ctrl+Q |
|
Apply single spacing to the paragraph. |
Ctrl+1 |
|
Apply double spacing to the paragraph. |
Ctrl+2 |
|
Apply 1.5-line spacing to the paragraph. |
Ctrl+5 |
|
Add or remove space before the paragraph. |
Ctrl+0 (zero) |
|
Enable AutoFormat. |
Ctrl+Alt+K |
|
Apply the Normal style. |
Ctrl+Shift+N |
|
Apply the Heading 1 style. |
Ctrl+Alt+1 |
|
Apply the Heading 2 style. |
Ctrl+Alt+2 |
|
Apply the Heading 3 style. |
Ctrl+Alt+3 |
|
Display the Apply Styles task pane. |
Ctrl+Shift+S |
|
Display the Styles task pane. |
Ctrl+Alt+Shift+S |
Top of Page
Format characters
|
To do this |
Press |
|---|---|
|
Display the Font dialog box. |
Ctrl+D or Ctrl+Shift+F |
|
Increase the font size. |
Ctrl+Shift+Right angle bracket (>) |
|
Decrease the font size. |
Ctrl+Shift+Left angle bracket (<) |
|
Increase the font size by 1 point. |
Ctrl+Right bracket (]) |
|
Decrease the font size by 1 point. |
Ctrl+Left bracket ([) |
|
Switch the text between upper case, lower case, and title case. |
Shift+F3 |
|
Change the text to all upper case. |
Ctrl+Shift+A |
|
Hide the selected text. |
Ctrl+Shift+H |
|
Apply bold formatting. |
Ctrl+B |
|
Add a bulleted list. |
Ctrl+Shift+L |
|
Apply underline formatting. |
Ctrl+U |
|
Apply underline formatting to the words, but not the spaces. |
Ctrl+Shift+W |
|
Apply double-underline formatting. |
Ctrl+Shift+D |
|
Apply italic formatting. |
Ctrl+I |
|
Apply small caps formatting. |
Ctrl+Shift+K |
|
Apply subscript formatting. |
Ctrl+Equal sign ( = ) |
|
Apply superscript formatting. |
Ctrl+Shift+Plus sign (+) |
|
Remove manual character formatting. |
Ctrl+Spacebar |
|
Change the selected text to the Symbol font. |
Ctrl+Shift+Q |
Top of Page
Manage text formatting
|
To do this |
Press |
|---|---|
|
Display all nonprinting characters. |
Ctrl+Shift+8 (do not use the numeric keypad) |
|
Display the Reveal Formatting task pane. |
Shift+F1 |
Top of Page
Insert special characters
|
To do this |
Press |
|---|---|
|
Insert a line break. |
Shift+Enter |
|
Insert a page break. |
Ctrl+Enter |
|
Insert a column break. |
Ctrl+Shift+Enter |
|
Insert an em dash (—). |
Ctrl+Alt+Minus sign (on the numeric keypad) |
|
Insert an en dash (–). |
Ctrl+Minus sign (on the numeric keypad) |
|
Insert an optional hyphen. |
Ctrl+Hyphen (-) |
|
Insert a nonbreaking hyphen. |
Ctrl+Shift+Hyphen (-) |
|
Insert a nonbreaking space. |
Ctrl+Shift+Spacebar |
|
Insert a copyright symbol (©). |
Ctrl+Alt+C |
|
Insert a registered trademark symbol (®). |
Ctrl+Alt+R |
|
Insert a trademark symbol (™). |
Ctrl+Alt+T |
|
Insert an ellipsis (…) |
Ctrl+Alt+Period (.) |
|
Insert the Unicode character for the specified Unicode (hexadecimal) character code. For example, to insert the euro currency symbol ( Tip: To find out the Unicode character code for a selected character, press Alt+X. |
The character code, then press Alt+X |
|
Insert the ANSI character for the specified ANSI (decimal) character code. For example, to insert the euro currency symbol, hold down Alt and press 0128 on the numeric keypad. |
Alt+the character code (on the numeric keypad) |
 ), type
 Top of Page
Work with web content
|
To do this |
Press |
|---|---|
|
Insert a hyperlink. |
Ctrl+K |
|
Go back one page. |
Alt+Left arrow key |
|
Go forward one page. |
Alt+Right arrow key |
|
Refresh the page. |
F9 |
Top of Page
Work with tables
Move around in a table
|
To do this |
Press |
|---|---|
|
Move to the next cell in the row and select its content. |
Tab key |
|
Move to the previous cell in the row and select its content. |
Shift+Tab |
|
Move to the first cell in the row. |
Alt+Home |
|
Move to the last cell in the row. |
Alt+End |
|
Move to the first cell in the column. |
Alt+Page up |
|
Move to the last cell in the column. |
Alt+Page down |
|
Move to the previous row. |
Up arrow key |
|
Move to the next row. |
Down arrow key |
|
Move one row up. |
Alt+Shift+Up arrow key |
|
Move one row down. |
Alt+Shift+Down arrow key |
Top of Page
Select table content
|
To do this |
Press |
|---|---|
|
Select the content in the next cell. |
Tab key |
|
Select the content in the previous cell. |
Shift+Tab |
|
Extend a selection to adjacent cells. |
Shift+Arrow keys |
|
Select a column. |
Select the top or bottom cell of the column, and then press Shift+Up or Down arrow key |
|
Select a row. |
Select the first or last cell in the row, and then press Shift+Alt+End or Home. |
|
Select the whole table. |
Alt+5 on the numeric keypad, with Num Lock switched off |
Top of Page
Insert paragraphs and tab characters in a table
|
To do this |
Press |
|---|---|
|
Insert a new paragraph in a cell. |
Enter |
|
Insert a tab character in a cell. |
Ctrl+Tab |
Top of Page
Review a document
|
To do this |
Press |
|---|---|
|
Insert a comment. |
Ctrl+Alt+M |
|
Turn change tracking on or off. |
Ctrl+Shift+E |
|
Close the Reviewing Pane. |
Alt+Shift+C |
Top of Page
Work with references, citations, and indexing
Use the following shortcuts to add references to your document, such as a table of contents, footnotes, and citations.
|
To do this |
Press |
|---|---|
|
Mark a table of contents entry. |
Alt+Shift+O |
|
Mark a table of authorities entry (citation). |
Alt+Shift+I |
|
Choose citation options. |
Alt+Shift+F12, Spacebar |
|
Mark an index entry. |
Alt+Shift+X |
|
Insert a footnote. |
Ctrl+Alt+F |
|
Insert an endnote. |
Ctrl+Alt+D |
|
Go to the next footnote. |
Alt+Shift+Right angle bracket (>) |
|
Go to the previous footnote. |
Alt+Shift+Left angle bracket (<) |
Top of Page
Work with mail merge and fields
To use the following keyboard shortcuts, the Mailings ribbon tab must be selected. To select the Mailings tab, press Alt+M.
Perform a mail merge
|
To do this |
Press |
|---|---|
|
Preview the mail merge. |
Alt+Shift+K |
|
Merge a document. |
Alt+Shift+N |
|
Print the merged document. |
Alt+Shift+M |
|
Edit a mail-merge data document. |
Alt+Shift+E |
|
Insert a merge field. |
Alt+Shift+F |
Top of Page
Work with fields
|
To do this |
Press |
|---|---|
|
Insert a DATE field. |
Alt+Shift+D |
|
Insert a LISTNUM field. |
Ctrl+Alt+L |
|
Insert a PAGE field. |
Alt+Shift+P |
|
Insert a TIME field. |
Alt+Shift+T |
|
Insert an empty field. |
Ctrl+F9 |
|
Update the linked information in a Word source document. |
Ctrl+Shift+F7 |
|
Update the selected fields. |
F9 |
|
Unlink a field. |
Ctrl+Shift+F9 |
|
Switch between a selected field code and its result. |
Shift+F9 |
|
Switch between all field codes and their results. |
Alt+F9 |
|
Run GOTOBUTTON or MACROBUTTON from a field displaying field results. |
Alt+Shift+F9 |
|
Go to the next field. |
F11 |
|
Go to the previous field. |
Shift+F11 |
|
Lock a field. |
Ctrl+F11 |
|
Unlock a field. |
Ctrl+Shift+F11 |
Top of Page
Work with text in other languages
Set the proofing language
Every document has a default language, typically the same default language as your computer’s operating system. If your document also contains words or phrases in a different language, it’s a good idea to set the proofing language for those words. This not only makes it possible to check spelling and grammar for those phrases, but it also enables assistive technologies like screen readers to handle them appropriately.
|
To do this |
Press |
|---|---|
|
Display the Language dialog box to set the proofing language. |
Alt+R, U, L |
|
Set default languages. |
Alt+R, L |
Top of Page
Insert international characters
To type a lowercase character by using a key combination that includes the Shift key, hold down the Ctrl+Shift+symbol keys simultaneously, and then release them before you type the letter.
Note: If you type extensively in another language, you might prefer to switch to a different keyboard instead.
|
To insert this |
Press |
|---|---|
|
à, è, ì, ò, ù, |
Ctrl+Grave accent (`), the letter |
|
á, é, í, ó, ú, ý |
Ctrl+Single quotation mark (‘), the letter |
|
â, ê, î, ô, û |
Ctrl+Shift+Caret (^), the letter |
|
ã, ñ, õ |
Ctrl+Shift+Tilde (~), the letter |
|
ä, ë, ï, ö, ü, ÿ, |
Ctrl+Shift+Colon (:), the letter |
|
å, Å |
Ctrl+Shift+At sign (@), a or A |
|
æ, Æ |
Ctrl+Shift+Ampersand (&), a or A |
|
œ, Œ |
Ctrl+Shift+Ampersand (&), o or O |
|
ç, Ç |
Ctrl+Comma (,), c or C |
|
ð, Ð |
Ctrl+Single quotation mark (‘), d or D |
|
ø, Ø |
Ctrl+Forward slash (/), o or O |
|
¿ |
Ctrl+Alt+Shift+Question mark (?) |
|
¡ |
Ctrl+Alt+Shift+Exclamation point (!) |
|
ß |
Ctrl+Shift+Ampersand (&), s |
Top of Page
Use Input Method Editors for East Asian languages
|
To do this |
Press |
|---|---|
|
Switch to the Japanese Input Method Editor (IME) for a 101-key keyboard, if available. |
Alt+Tilde (~) |
|
Switch to the Korean Input Method Editor (IME) for a 101-key keyboard, if available. |
Right Alt |
|
Switch to the Chinese Input Method Editor (IME) for a 101-key keyboard, if available. |
Ctrl+Spacebar |
Top of Page
Work with document views
Word offers several different views of a document. Each view makes it easier to do certain tasks. For example, Read Mode enables you view the document as a horizontal sequence of pages, which you can quickly browse using the Left and Right arrow keys.
Switch the document view
|
To do this |
Press |
|---|---|
|
Switch to the Read Mode view. In Word 2007 and 2010, this is called Full Screen Reading view. |
Alt+W, F |
|
Switch to the Print Layout view. |
Ctrl+Alt+P |
|
Switch to the Outline view. |
Ctrl+Alt+O |
|
Switch to the Draft view. |
Ctrl+Alt+N |
Top of Page
Outline a document
These shortcuts only apply when the document is in the Outline view.
|
To do this |
Press |
|---|---|
|
Promote a paragraph. |
Alt+Shift+Left arrow key |
|
Demote a paragraph. |
Alt+Shift+Right arrow key |
|
Demote the paragraph to body text. |
Ctrl+Shift+N |
|
Move the selected paragraphs up. |
Alt+Shift+Up arrow key |
|
Move the selected paragraphs down. |
Alt+Shift+Down arrow key |
|
Expand the text under a heading. |
Alt+Shift+Plus sign (+) |
|
Collapse the text under a heading. |
Alt+Shift+Minus sign (-) |
|
Expand or collapse all text or headings. |
Alt+Shift+A |
|
Hide or display the character formatting. |
Forward slash (/) (on the numeric keypad) |
|
Switch between showing the first line of body text and showing all body text. |
Alt+Shift+L |
|
Show all headings with the Heading 1 style. |
Alt+Shift+1 |
|
Show all headings with the specified heading level. |
Alt+Shift+Heading level number |
|
Insert a tab character. |
Ctrl+Tab |
Top of Page
Move through the document in Read Mode
|
To do this |
Press |
|---|---|
|
Move to the beginning of the document. |
Home |
|
Move to the end of the document. |
End |
|
Go to a specific page. |
Type the page number, then press Enter |
|
Exit Read Mode. |
Esc |
Top of Page
Use function key shortcuts
|
Key |
Description |
|---|---|
|
F1 |
|
|
F2 |
|
|
F3 |
|
|
F4 |
|
|
F5 |
|
|
F6 |
|
|
F7 |
|
|
F8 |
|
|
F9 |
|
|
F10 |
|
|
F11 |
|
|
F12 |
|
Top of Page
See also
Word help center
Basic tasks using a screen reader with Word
Use a screen reader to explore and navigate Word
Screen reader support for Word
This article describes the keyboard shortcuts and function keys in Word for Mac.
Notes:
-
The settings in some versions of the Mac operating system (OS) and some utility applications might conflict with keyboard shortcuts and function key operations in Microsoft 365 for Mac. For information about changing the key assignment for a keyboard shortcut, see Mac Help for your version of macOS, your utility application, or refer to Shortcut conflicts.
-
If you don’t find a keyboard shortcut here that meets your needs, you can create a custom keyboard shortcut. For instructions, go to Create a custom keyboard shortcut for Office for Mac.
-
Many of the shortcuts that use the Ctrl key on a Windows keyboard also work with the Control key in Word for Mac. However, not all do.
-
To quickly find a shortcut in this article, you can use Search. Press Command+F, and then type your search words.
For the best experience using your keyboard with the ribbon, enable your keyboard to access all controls.
-
To open the System Preferences, press
 +Spacebar, type system preferences, and press Return.
 -
To go to Keyboard Settings, type keyboard and press Return.
-
In the Shortcuts tab, press Control+F7 to change the Full Keyboard Access setting from Text boxes and lists only to All Controls.
In this topic
-
Frequently used shortcuts
-
Shortcut conflicts
-
Navigate the document
-
Select text and graphics
-
Edit text and graphics
-
Work with tables
-
Drawing
-
Work with fields
-
Outline a document
-
Review a document
-
Use footnotes and endnotes
-
Work with right-to-left languages
-
Use function key shortcuts
Frequently used shortcuts
This table lists frequently used shortcuts in Word for Mac.
|
To do this |
Press |
|---|---|
|
Undo the previous action. |
|
|
Redo the previous action, if possible. |
|
|
Cut the selected content to the Clipboard. |
|
|
Copy the selected content to the Clipboard. |
|
|
Paste the contents of the Clipboard. |
|
|
Display the shortcut menu for the selected item. * |
Shift+F10 |
|
Display the Go To dialog box. |
|
|
Display the Spelling and Grammar dialog box. |
|
|
Enable extended selection mode. |
F8 |
|
Switch to the next window. |
|
|
Switch to the previous window. |
|
|
Display the Save As dialog box. |
|
|
Find text (move focus to the Search in Document box). |
|
|
Display the Find and Replace pane. |
Control+H |
|
Display the Print dialog box. |
|
|
Close the current document. |
|
|
Expand or minimize the ribbon. |
|
|
Find the next spelling or grammatical error. The Check spelling as you type feature must be enabled. |
Option+F7 |
|
Open the Dictionary. |
In Word 2011, Option+Shift+F7 |
Top of Page
Shortcut conflicts
Some Word for Mac keyboard shortcuts conflict with default macOS keyboard shortcuts. This topic flags such shortcuts with an asterisk ( * ). To use these shortcuts, you may have to change your Mac keyboard settings to change the shortcut for the key.
Change system preferences for keyboard shortcuts
-
From the Apple menu, select System Preferences.
-
Select Keyboard.
-
Select the Shortcuts tab.
-
Select Mission Control.
-
Clear the check box for the keyboard shortcut conflicting with the Word for Mac shortcut that you want to use.
Navigate the document
|
To do this |
Press |
|---|---|
|
Move the cursor one word to the left. |
Option+Left arrow key |
|
Move the cursor one word to the right. |
Option+Right arrow key |
|
Move the cursor up by one paragraph. |
|
|
Move the cursor down by one paragraph. |
|
|
Move the cursor to the beginning of the current line. |
Home |
|
Move the cursor to the end of the current line. |
End |
|
Move the cursor to the top of the previous page. |
On a MacBook, press |
|
Move the cursor to the top of the next page. |
On a MacBook, press |
|
Move the cursor to the beginning of the document. |
On a MacBook, press |
|
Move the cursor to the end of the document. |
On a MacBook, press |
|
Move the cursor to the previous insertion point. |
Shift+F5 |
|
Move the cursor by scrolling the document view up by one screen. |
Page up |
|
Move the cursor by scrolling the document view down by one screen. |
Page down |
Top of Page
Select text and graphics
Tip: If you know the key combination to move the cursor, you can generally select the text by using the same key combination while holding down Shift. For example,  +Right arrow moves the cursor to the next word, and +Shift+Right arrow selects the text from the cursor to the beginning of the next word.
|
To do this |
Press |
|---|---|
|
Select multiple items that are not next to each other. |
Select the first item that you want, hold down |
|
Select text. |
Shift+Arrow keys |
|
Select the word to the left. |
Shift+Option+Left arrow key |
|
Select the word to the right. |
Shift+Option+Right arrow key |
|
Select from the current position to the beginning of the current line. |
Shift+Home |
|
Select from the current position to the end of the current line. |
Shift+End |
|
Select from the current position to the beginning of the current paragraph. |
|
|
Select from the current position to the end of the current paragraph. |
|
|
Select from the current position to the top of the screen. |
Shift+Page up |
|
Select from the current position to the bottom of the screen. |
Shift+Page down |
|
Select from the current position to the beginning of the document. |
|
|
Select from the current position to the end of the document. |
|
|
Select from the current position to the bottom of the window. |
|
|
Select all document content. |
|
Top of Page
Extend a selection
|
To do this |
Press |
|---|---|
|
Start extending the selection. * |
F8 In the extend selection mode, clicking a location in the document extends the current selection to that location. |
|
Select the nearest character to the left. |
F8, Left arrow key |
|
Select the nearest character to the right. |
F8, Right arrow key |
|
Expand the selection. |
F8 repeatedly to expand the selection to the entire word, sentence, paragraph, section, and document. |
|
Reduce the selection. * |
Shift+F8 |
|
Select a vertical block of text. |
|
|
Stop extending the selection. |
Esc |
Top of Page
Edit text and graphics
|
To do this |
Press |
|---|---|
|
Cut the selected content to the Clipboard. |
F2 |
|
Copy the selected content to the Clipboard. |
F3 |
|
Paste the contents of the Clipboard. |
F4 |
|
Display the Paste Special dialog box. |
|
|
Cut the selected content to the Spike. |
|
|
Paste the contents of the Spike. |
|
|
Copy the selected formatting. |
|
|
Paste the copied formatting. |
|
|
Create an AutoText entry. |
Option+F3 |
Top of Page
Align and format paragraphs
|
To do this |
Press |
|---|---|
|
Center the paragraph. |
|
|
Justify the paragraph. |
|
|
Align the paragraph to the left. |
|
|
Align the paragraph to the right. |
|
|
Indent the paragraph. |
Control+Shift+M |
|
Remove a paragraph indent. |
|
|
Create a hanging indent. |
|
|
Remove a hanging indent. |
|
|
Apply single-spacing to the paragraph. |
|
|
Apply double-spacing to the paragraph. |
|
|
Apply 1.5-line spacing to the paragraph. |
|
|
Enable AutoFormat. |
|
|
Apply the Normal style. |
|
|
Apply the Heading 1 style. |
|
|
Apply the Heading 2 style. |
|
|
Apply the Heading 3 style. |
|
|
Apply the List style. |
|
|
Insert a nonbreaking space. |
Option+Spacebar |
Top of Page
Format characters
|
To do this |
Press |
|---|---|
|
Increase the font size. |
|
|
Decrease the font size. |
|
|
Increase the font size by 1 point. |
|
|
Decrease the font size by 1 point. |
|
|
Display the Font dialog box. |
|
|
Switch the text between upper case, lower case, and title case. |
Shift+F3 |
|
Change the text to all upper case. |
|
|
Apply bold formatting. |
|
|
Add a bulleted list. |
|
|
Apply underline formatting. |
|
|
Apply underline formatting to the words, but not the spaces. |
|
|
Apply double-underline formatting. |
|
|
Apply italics formatting. |
|
|
Apply small caps formatting. |
|
|
Apply strike-through formatting. |
|
Top of Page
Insert special characters
|
To do this |
Press |
|---|---|
|
Insert an empty field. |
|
|
Insert a line break. |
Shift+Return |
|
Insert a page break. |
|
|
Insert a column break. |
|
|
Insert a nonbreaking hyphen. |
|
|
Insert a registered trademark symbol (®). |
Option+R |
|
Insert a trademark symbol (™). |
Option+2 |
Top of Page
Work with tables
Move around in a table
|
To do this |
Press |
|---|---|
|
Move to the next cell and select its content. |
Tab key |
|
Move to the previous cell and select its content. |
Shift+Tab |
|
Move to the next row. |
Down arrow key |
|
Move to the previous row. |
Up arrow key |
|
Move to the first cell in the row. |
Control+Home |
|
Move to the last cell in the row. |
Control+End |
|
Move to the first cell in the column. |
Control+Page up |
|
Move to the last cell in the column. |
Control+Page down |
|
Add a new row to the bottom of the table. |
Tab key, at the end of the last row |
|
Insert a row. |
|
Top of Page
Select table content
|
To do this |
Press |
|---|---|
|
Select the content in the next cell. |
Tab key |
|
Select the content in the previous cell. |
Shift+Tab |
|
Extend a selection to adjacent cells. |
Shift+Arrow keys |
|
Select a row. |
Select the first or last cell in the row, and then press Shift+Alt+End or Home. |
Top of Page
Resize table columns with the ruler
|
To do this |
Press |
|---|---|
|
Retain the column sizes to the right and change the table width. |
Drag the column boundary in the ruler |
|
Move a single column line and retain the table width. |
Shift+Drag the column boundary in the ruler |
|
Equally resize all columns to the right and retain the table width. |
|
|
Proportionally resize all columns to the right and retain the table width. |
|
Top of Page
Resize table columns directly in a table
Tip: To finely adjust the column width and display the column’s measurements in the ruler when you resize the column, turn off the snap-to functionality by pressing Option with the shortcut keys.
|
To do this |
Press |
|---|---|
|
Move a single column line and retain the table width. |
Drag the column boundary |
|
Retain column sizes to the right and change the table width. |
Shift+Drag the column boundary |
|
Equally resize all columns to the right and retain the table width. |
|
|
Proportionally resize all columns to the right and retain the table width. |
|
Top of Page
Insert paragraphs and tab characters in a table
|
To do this |
Press |
|---|---|
|
Insert a new paragraph in a cell. |
Return |
|
Insert a Tab character in a cell. |
Option+Tab |
Top of Page
Drawing
|
To do this |
Press |
|---|---|
|
Toggle drawing mode. |
|
Top of Page
Work with fields
|
To do this |
Press |
|---|---|
|
Insert a DATE field. |
Control+Shift+D |
|
Insert a LISTNUM field. |
|
|
Insert a PAGE field. |
Control+Shift+P |
|
Insert a TIME field. |
Control+Shift+T |
|
Insert an empty field. |
|
|
Update the selected fields. * |
F9 |
|
Switch between a field code and its result. * |
Shift+F9 |
|
Switch between all field codes and their results. |
Option+F9 |
|
Run GOTOBUTTON or MACROBUTTON from a field displaying field results. |
Option+Shift+F9 |
|
Lock a field. |
|
|
Unlock a field. |
|
Top of Page
Outline a document
These shortcuts only apply when the document is in the Outline view.
|
To do this |
Press |
|---|---|
|
Promote a paragraph. |
Control+Shift+Left arrow key |
|
Demote a paragraph. |
Control+Shift+Right arrow key |
|
Demote the paragraph to body text. |
|
|
Move the selected paragraphs up. * |
Control+Shift+Up arrow key |
|
Move the selected paragraphs down. * |
Control+Shift+Down arrow key |
|
Expand the text under a heading. |
Control+Shift+Plus sign (+) |
|
Collapse text under a heading. * |
Control+Shift+Minus sign (-) |
|
Expand all body text and headings, or collapse all body text. |
Control+Shift+A |
|
Switch between showing the first line of body text and showing all body text. |
Control+Shift+L |
|
Show all headings with the specified heading level. |
Control+Shift+Heading level number |
Top of Page
Review a document
|
To do this |
Press |
|---|---|
|
Insert a comment. |
|
|
Turn change tracking on or off. |
|
|
Move to the beginning of a comment. |
Home |
|
Move to the end of a comment. |
End (The End key is not available on all keyboards.) |
|
Move to the beginning of the list of comments. |
|
|
Move to the end of the list of comments. |
|
Top of Page
Use footnotes and endnotes
|
To do this |
Press |
|---|---|
|
Insert a footnote. |
|
|
Insert an endnote. |
|
Top of Page
Work with right-to-left languages
Word supports right-to-left functionality for languages that work in a right-to-left or a combined right-to-left, left-to-right environment for writing, editing, and displaying text. In this context, right-to-left languages refers to any writing system that is written from right to left and includes languages that require contextual shaping, such as Arabic, and languages that do not.
Before you can use these keyboard shortcuts, you need to ensure keyboard shortcuts are enabled for the language you are using:
-
Go to Apple > System Preferences > Keyboard.
-
On the Input Sources tab, select the language for which you want to enable shortcuts.
-
On the right side of the tab, select the check box for Enable keyboard shortcuts.
|
To do this |
Press |
|---|---|
|
Switch the writing direction to right-to-left. |
Control+ |
|
Switch the writing direction to left-to-right. |
Control+ |
Top of Page
Use function key shortcuts
Word for Mac uses the function keys for common commands, including Copy and Paste. For quick access to these shortcuts, you can change your Apple system preferences so you don’t have to press the Fn key every time you use a function key shortcut.
Note: Changing system function key preferences affects how the function keys work on your Mac, not just in Word. After changing this setting, you can still perform the special features printed on a function key. Just press the Fn key. For example, to use the F12 key to change your volume, press Fn+F12.
If a function key doesn’t work as you expect it to, press the Fn key in addition to the function key. If you don’t want to press the Fn key each time, you can change your Apple system preferences. For instructions, go to Change function key preferences.
The following table provides the function key shortcuts for Word for Mac.
|
Key |
Description |
|---|---|
|
F1 |
|
|
F2 |
|
|
F3 |
|
|
F4 |
|
|
F5 |
|
|
F6 |
|
|
F7 |
|
|
F8 |
|
|
F9 |
|
|
F10 |
|
|
F11 |
|
Top of Page
Change function key preferences
-
In the Apple menu, select System Preferences.
-
Select Keyboard.
-
On the Keyboard tab, select the check box for Use all F1, F2, etc. keys as standard function keys.
See also
Word help center
Basic tasks using a screen reader with Word
Use a screen reader to explore and navigate Word
Screen reader support for Word
This article describes the keyboard shortcuts in Word for the web.
Notes:
-
If you use Narrator with the Windows 10 Fall Creators Update, you have to turn off scan mode in order to edit documents, spreadsheets, or presentations with Microsoft 365 for the web. For more information, refer to Turn off virtual or browse mode in screen readers in Windows 10 Fall Creators Update.
-
To quickly find a shortcut in this article, you can use Search. Press Ctrl+F and then type your search words.
-
When you use Word for the web, we recommend that you use Microsoft Edge as your web browser. Because Word for the web runs in your web browser, the keyboard shortcuts are different from those in the desktop program. For example, you’ll use Ctrl+F6 instead of F6 for jumping in and out of the commands. Also, common shortcuts like F1 (Help) and Ctrl+O (Open) apply to the web browser – not Word for the web.
In this topic
-
Frequently used shortcuts
-
Ribbon keyboard shortcuts
-
Navigate the document
-
Edit and format the document
-
Work with comments
Frequently used shortcuts
This table lists the most frequently used shortcuts in Word for the web.
Tip: To quickly create a new document in Word for the web, open your browser, type Word.new in the address bar, and then press Enter.
|
To do this |
Press |
|---|---|
|
In the Reading view, open a PDF-based view tagged to work with screen readers. |
Press the Tab key until you reach the Accessibility Mode button, and then press Enter |
|
Find text in the Reading view. |
Ctrl+F or F3 |
|
Find text in the Editing view. |
Ctrl+F or Ctrl+G |
|
Find and replace text in the Editing view. |
Ctrl+H |
|
Hide the task pane, if one is open. |
Esc |
|
Switch to the Zoom control. |
Alt+Period, W, then Q or Alt+Windows logo key, W, then Q |
|
Print the document. |
Ctrl+P |
|
Move to the next landmark region. |
Ctrl+F6 |
|
Go to the Tell Me or Search text field. |
Alt+Q |
Top of Page
Ribbon keyboard shortcuts
Word for the web offers shortcuts called access keys to navigate the ribbon. If you’ve used access keys to save time on Word for desktop computers, you’ll find access keys very similar in Word for the web.
On a Windows computer, access keys all start with Alt+Period (.) or Alt+Windows logo key, then add a letter for the ribbon tab. For example, to go to the Review tab, press Alt+Period, R or Alt+Windows logo key, R.
If you’re using Word for the web on a Mac computer, press Control+Period (.) to start.

-
To get to the ribbon, press Alt+Period or Alt+Windows logo key. You can alternatively press Ctrl+F6 until you reach the Home tab.
-
To move between tabs on the ribbon, press the Tab key.
-
To hide the ribbon so you have more room to work, press Ctrl+F3. Repeat to display the ribbon again.
Go to the access keys for the ribbon
To go directly to a tab on the ribbon, press one of the following access keys:
|
To do this |
Press |
|---|---|
|
Open the Tell Me or Search text field on the ribbon to type a search term. |
Alt+Period, Q or Alt+Windows logo key, Q |
|
Open the File tab to use the Backstage view. |
Alt+Period, F or Alt+Windows logo key, F |
|
Open the Home tab to format text and use the Find tool. |
Alt+Period, H or Alt+Windows logo key, H |
|
Open the Insert tab to insert a picture, link, comment, header or footer, or a page number. You can also access the Symbol gallery. |
Alt+Period, N or Alt+Windows logo key, N |
|
Open the Page Layout tab to set page margins, orientation, and size, and paragraph spacing. |
Alt+Period, A or Alt+Windows logo key, A |
|
Open the References tab to insert a table of contents, footnotes, or endnotes. |
Alt+Period, S or Alt+Windows logo key, S |
|
Open the Review tab to check spelling, add comments, or track and review changes to your document. |
Alt+Period, R or Alt+Windows logo key, R |
|
Open the View tab to choose a view, open the Navigation pane, edit the Header & Footer, and to Zoom the document view. |
Alt+Period, W or Alt+Windows logo key, W |
Top of Page
Use Search
To find an option or perform an action quickly, use the Search text field. To learn more about the Search feature, go to Find what you need with Microsoft Search.
Note: Depending on the version of Microsoft 365 you are using, the Search text field at the top of the app window might be called Tell Me instead. Both offer a largely similar experience, but some options and search results can vary.
-
Select the item or place in your document, presentation, or spreadsheet where you want to perform an action.
-
To go to the Search text field, press Alt+Q.
-
Type the search words for the action that you want to perform. For example, if you want to add a bulleted list, type bullets.
-
Press the Down arrow key to browse through the search results.
-
Once you’ve found the result that you want, press Enter to select it and to perform the action.
Work in the ribbon tabs and menus
The following shortcuts can save time when you work with the ribbon tabs and ribbon menus.
|
To do this |
Press |
|---|---|
|
Select the active tab on the ribbon, and activate the access keys. |
Alt+Period or Alt+Windows logo key. To move to a different tab, use an access key or the Tab key. |
|
When a Ribbon tab is selected, move the focus to the tab commands. |
Enter, then Tab key or Shift+Tab |
|
Activate a selected button. |
Spacebar or Enter |
|
Open the list for a selected command. |
Spacebar or Enter |
|
Open the menu for a selected button. |
Alt+Down arrow key |
|
When a menu or submenu is open, move to the next command. |
Down arrow key |
|
Collapse or expand the ribbon. |
Ctrl+F3 |
Top of Page
Navigate the document
|
To do this |
Press |
|---|---|
|
Move the cursor right by one word. |
Ctrl+Right arrow key |
|
Move the cursor left by one word. |
Ctrl+Left arrow key |
|
Move the cursor up by one paragraph. |
Ctrl+Up arrow key |
|
Move the cursor down by one paragraph. |
Ctrl+Down arrow key |
|
Move the cursor to the beginning of the current line. |
Home |
|
Move the cursor to the end of the current line. |
End |
|
Move the cursor to the beginning of the document. |
Ctrl+Home |
|
Move the cursor to the end of the document. |
Ctrl+End |
|
Select text. |
Shift+Arrow keys |
|
Select the word to the right. |
Shift+Ctrl+Right arrow key |
|
Select the word to the left. |
Shift+Ctrl+Left arrow key |
|
Select the paragraph above. |
Shift+Ctrl+Up arrow key |
|
Select the paragraph below. |
Shift+Ctrl+Down arrow key |
|
Select from the current position to the beginning of the line. |
Shift+Home |
|
Select from the current position to the end of the line. |
Shift+End |
|
Select from the current position to the beginning of the document. |
Shift+Ctrl+Home |
|
Select from the current position to the end of the document. |
Shift+Ctrl+End |
|
Select all document content. |
Ctrl+A |
Top of Page
Edit and format the document
|
To do this |
Press |
|---|---|
|
Cut the selected content to the Clipboard. |
Ctrl+X |
|
Copy the selected content to the Clipboard. |
Ctrl+C |
|
Paste the content from the Clipboard. |
Ctrl+V |
|
Undo the previous action. |
Ctrl+Z |
|
Redo the previous action. |
Ctrl+Y |
|
Shrink the font size. |
Ctrl+Left bracket ([) |
|
Grow the font size. |
Ctrl+Right bracket (]) |
|
Apply bold formatting to the selected text. |
Ctrl+B |
|
Apply italic formatting to the selected text. |
Ctrl+I |
|
Underline the selected text. |
Ctrl+U |
|
Align the paragraph to the left. |
Ctrl+L |
|
Align the paragraph to the right. |
Ctrl+R |
|
Center the paragraph. |
Ctrl+E |
|
Justify the paragraph. |
Ctrl+J |
|
Create a bulleted list. |
Ctrl+Period (.) |
|
Create a numbered list. |
Ctrl+Slash (/) |
Top of Page
See also
Word help center
Basic tasks using a screen reader with Word
Use a screen reader to explore and navigate Word
Screen reader support for Word
(Image credit: Windows Central)
Microsoft Word allows you to create custom keyboard shortcuts to quickly use a combination of keys to execute a command or macro, apply a style, and insert a symbol without the need of extra steps utilizing a mouse.
In addition to creating new shortcuts, whether you use the version of Office from Microsoft 365 or Office 2019, Microsoft Word also lets you modify existing shortcuts or remove those you do not want.
In this Windows 10 guide, we will walk you through the steps of creating a custom keyboard shortcut for your most frequent Word commands. In addition, we will also outline the steps of removing a specific shortcut and resetting all custom settings to their defaults.
- How to create custom keyboard shortcut in Word
- How to remove custom keyboard shortcut in Word
- How to reset custom keyboard shortcut settings in Word
How to create custom keyboard shortcut in Word
To assign a custom keyboard shortcut to a command or item in Word, use these steps:
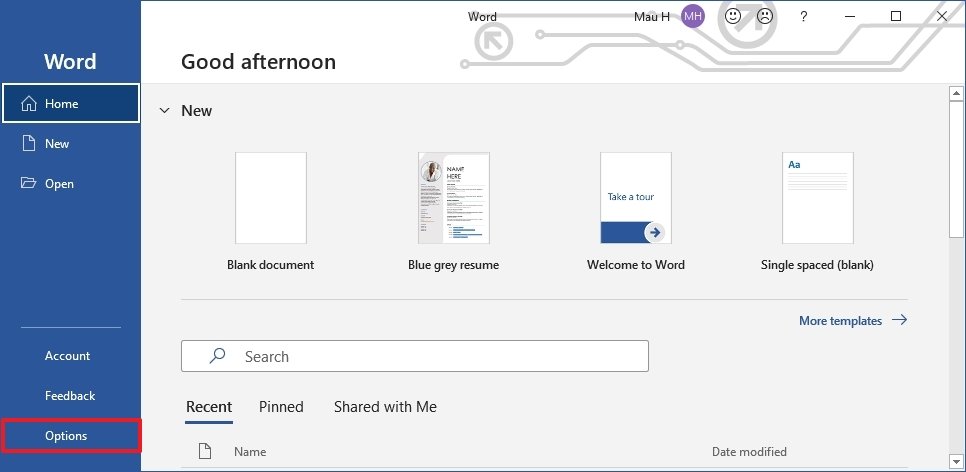
- Open Microsoft Word.
- Click on Options from the bottom-left corner.Quick note: If you have a blank document open, click the File menu to access the Options button. Alternatively, you can also right-click anywhere in the Ribbon and select the Customize the Ribbon option to access the settings.
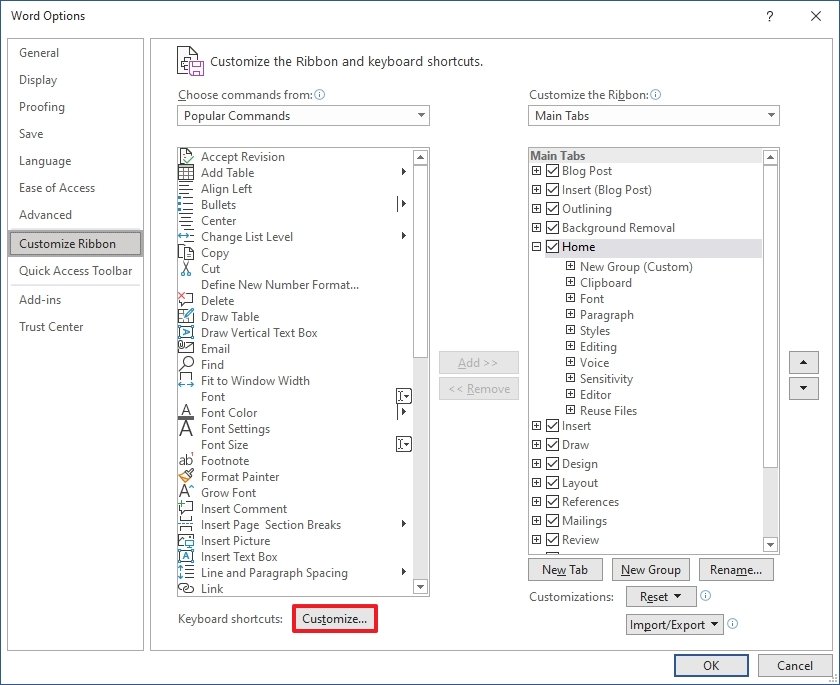
- Click on Customize Ribbon.
- Under the «Customize the Ribbon and keyboard shortcuts» section, click the Customize button for «Keyboard shortcuts.»
- In the Categories section, select the category that contains the command, macro, or style you want to customize.
- In the Command section, select the item to which you want to add a custom keyboard shortcut.Quick note: If the command has a shortcut already assigned, it will be listed under the «Current keys» section. You can always add more shortcuts for the same command or remove shortcuts as needed (see steps below).
- In the Press new shortcut key box, confirm the keyboard shortcut you want to use.Quick tip: You can use a number of key combinations. For example, you can use a function key, such as F3 and F4, Alt and/or Ctrl + other keys like Alt + Ctrl + F7. If the shortcut is already in use, you can still use it, but the keyboard shortcut will no longer be available for the other item.
- In the «Save changes in» option, select the Normal.dotm option to make the keyboard available for all documents.
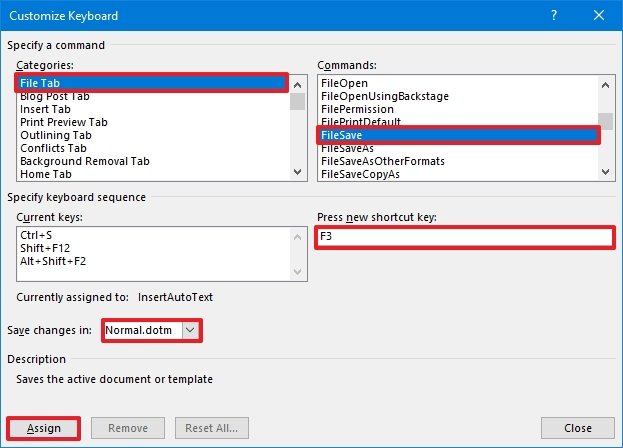
- Click the Assign button.
- Click the Close button.
Once you complete the steps, you can now start using the keyboard shortcut to quickly run command, macro, style, font, or symbol.
While the ability to customize shortcuts is available in older versions, you should consider upgrading to Office from Microsoft 365. The subscription-based service offers a free upgrade and other benefits, such as sharing the apps with up to six family members and friends, and you get access to services like Microsoft Teams, Family Safety, Microsoft Editor, and 1TB of OneDrive storage.
 Get subscribed
Microsoft 365 gives you full access to all the Office apps and benefits like 1TB OneDrive storage and Skype minutes. You can also install Word, Excel, PowerPoint, Outlook, and other apps on up to five devices, and depending on the subscription, you can share the account with up to six people.
How to remove custom keyboard shortcut in Word
To remove a keyboard shortcut in Word, use these steps:
- Open Microsoft Word.
- Click on Options from the bottom-left corner.
- Click on Customize Ribbon.
- Under the «Customize the Ribbon and keyboard shortcuts» section, click the Customize button for «Keyboard shortcuts.»
- In the Categories section, select the category that contains the command you want to customize.
- In the Command section, select the item from which you want to remove a custom keyboard shortcut.
- Under the «Current keys» section, select the shortcut you want to remove.
- Click the Remove button.
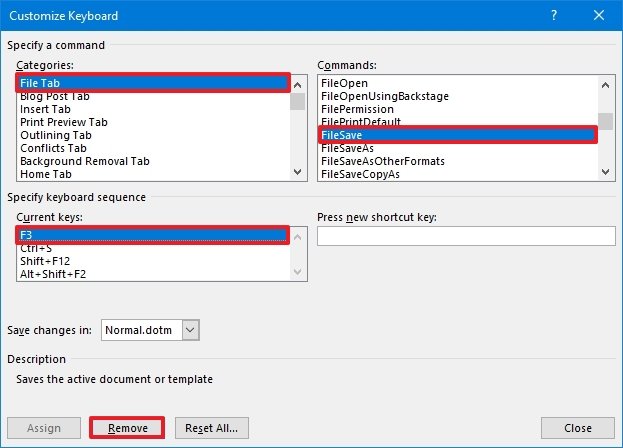
- Click the Close button.
After you complete the steps, the shortcut will no longer be available in Microsoft Word.
How to reset custom keyboard shortcut settings in Word
To reset all the shortcut settings in Word, use these steps:
- Open Microsoft Word.
- Click on Options from the bottom-left corner.
- Click on Customize Ribbon.
- Under the «Customize the Ribbon and keyboard shortcuts» section, click the Customize button for «Keyboard shortcuts.»
- Click the Reset All button.
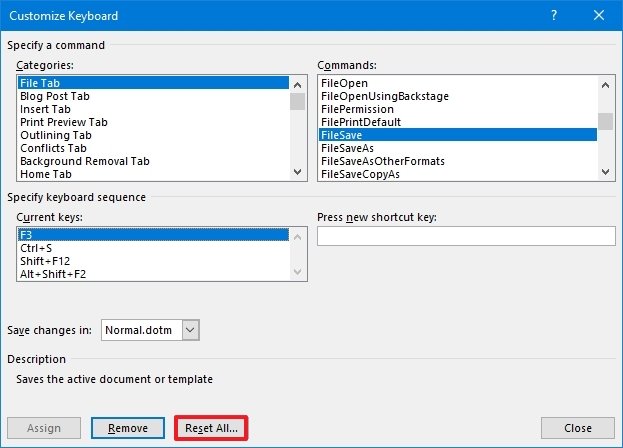
- Click the Yes button.
- Click the Close button.
Once you complete the steps, the keyboard settings will reset to their original configuration.
More Windows 10 resources
For more helpful articles, coverage, and answers to common questions about Windows 10, visit the following resources:
- Windows 10 on Windows Central — All you need to know
- Windows 10 help, tips, and tricks
- Windows 10 forums on Windows Central
All the latest news, reviews, and guides for Windows and Xbox diehards.
Mauro Huculak is technical writer for WindowsCentral.com. His primary focus is to write comprehensive how-tos to help users get the most out of Windows 10 and its many related technologies. He has an IT background with professional certifications from Microsoft, Cisco, and CompTIA, and he’s a recognized member of the Microsoft MVP community.
Most Popular
If you are one of those who care about the productivity of the work and tend to use a keyboard instead of
using a mouse to open menus and run commands, you might be interested in how to reveal keyboard shortcuts and
add more shortcuts to Word.
To add shortcut keys, do the following:
1. On the File tab, click the Options button:

2. On the Word Options dialog box, choose the Customize
Ribbon tab:

3. Near label Keyboard shortcuts: click the Customize…
button to see the Customize Keyboard dialog box:

4. In the Customize Keyboard dialog box:
- In the Categories field and the Commands field, select the menu and the command you
want to use, - In the Press new shortcut key box, press the key combination you want to add or change,
- Click Assign to apply the change to the document,
- Then click Close to close the dialog box.
For example:

See also this tip in French:
Comment créer des raccourcis.
Please, disable AdBlock and reload the page to continue
Today, 30% of our visitors use Ad-Block to block ads.We understand your pain with ads, but without ads, we won’t be able to provide you with free content soon. If you need our content for work or study, please support our efforts and disable AdBlock for our site. As you will see, we have a lot of helpful information to share.
Jump to: Word Shortcuts to Navigate Documents, Word Shortcuts to select Words and Paragraphs, Word Shortcuts to Format Text and Align Text, Word Shortcuts to Align Text, Headings, and Paragraph Spacing, Undo, Redo, Cut, Copy and Paste Word Shortcuts, Word Shortcuts for Special Characters, Word Shortcuts for Find and Replace, …Word Shortcuts to Open, Close, Manage, and Print Documents, Word Shortcuts to Manage Views, Split Screen and Multiple Documents, Word Shortcuts for Date, Time, and other Fields, Word Shortcuts for Outline View, Word Shortcuts for Tables
|
Arrow Keys |
Move one character to left/right or one line up/down |
|
Ctrl+Arrow Left/Arrow Right |
Move one word to the left/ to the right |
|
Home/End |
Jump to beginning/ to end of the line |
|
Ctrl+Arrow Down/Arrow Up |
Jump to next/ to previous paragraph |
|
Page Down/Page Up |
Jump up one screen/ down one screen |
|
Ctrl+Alt+Page Up/Page Down |
Jump to beginning/ end of the screen |
|
Ctrl+Home/End |
Jump to beginning/ to end of document |
|
Ctrl+G or F5 |
Go to a page, bookmark, footnote, table, comment, graphic, or other location |
|
Alt+Ctrl+Z |
Go back to previously edited location in document (up to 4 places) |
|
Shift+F5 |
Go to the last change or revision. Also works after opening document. |
|
Ctrl+Shift+F5 |
Set, go to and edit bookmarks |
|
Shift+Arrow Keys |
Select/ extend selection by one character left/ right or one line up/ down |
|
Ctrl+Shift+Arrow Left/Arrow Right |
Select/ extend selection by one word |
|
Shift+Home/End |
Select/ extend selection to beginning/ to end of the line |
|
Ctrl+Shift+Arrow Up/Arrow Down |
Select/ extend selection by one paragraph up/ down |
|
Shift+Page Up/Page Down |
Select/ extend selection up one screen/ down one screen |
|
Shift+Ctrl+Alt+Page Up/Page Down |
Jump to beginning/ end of the screen |
|
Ctrl+A |
Select All |
|
Click left of line |
Select line |
|
Double-click left of line |
Select paragraph |
|
Triple-click left of line |
Select document |
|
Double-click on word |
Select word |
|
Triple-click on word |
Select paragraph |
|
F8 |
Set extended selection mode; use arrow keys |
|
2x F8 |
Select word, then press Escape to exit selection mode. |
|
3x F8 |
Select sentence , then press Escape to exit selection mode |
|
4x F8 |
Select paragraph, then press Escape to exit selection mode |
|
5x F8 |
Select document, then press Escape to exit selection mode |
|
Shift+F8 |
Go backwards in extending selection |
|
Esc |
Exit selection mode |
|
Press and hold Alt+left-drag mouse |
Select vertically |
|
Ctrl+Shift+F8, then arrow keys |
Select vertically |
|
Delete |
Delete character to the right of cursor |
|
Ctrl+Delete |
Delete word to the right of cursor |
|
Backspace |
Delete character to the left of cursor |
|
Ctrl+Backspace |
Delete word to the left of cursor |
|
Alt+Shift+F or Ctrl+D |
Open the Font dialog box (or Font Dialog box if you prefer to memorize D) |
|
Ctrl+Space |
Clear most formatting from selection (bold, underline, italic, color, etc) |
|
Ctrl+Shift+N |
Apply Normal style |
|
Ctrl+Shift+8 |
Toggle display of hidden formatting symbols |
|
Ctrl+B |
Apply/remove Bold |
|
Ctrl+I |
Apply/remove Italic |
|
Ctrl+U |
Apply/remove Underline |
|
Ctrl+Shift+D |
Apply/remove Double-underline |
|
Ctrl+Shift+W |
Apply/remove Words underline (only words, no spaces) |
|
Shift+F3 |
Change text between all upper-, first letter upper- and all lower-case |
|
Ctrl+Shift+A |
Apply/remove Capitalization format |
|
Ctrl+Shift+K |
Apply/remove Small Caps format |
|
Ctrl+= |
Apply/remove subscript |
|
Ctrl+Shift+= |
Apply/remove superscript |
|
Ctrl+[/] |
Decrease / Increase font size one point |
|
Ctrl+Shift+</> |
Decrease / Increase font size one value as defined in font style |
|
Shift+F1 |
Reveal Formatting (show all formats of selection) |
|
Ctrl+Alt+H |
Apply/remove text Highlight to selection |
|
Ctrl+Shift+H |
Hide selected text; e.g. for sharing and letting others focus on specific sections in a document only. Not a security feature. |
|
Ctrl+A, then Ctrl+D, then 2x Alt+H |
Show all hidden text via Select All, Font Dialog, remove Hidden text format |
|
H, FF |
Change Font Face, then start typing for autocomplete, or Alt+Arrow Down to open drop down |
|
H, FS |
Change Font Size, type number and hit Enter |
|
H, FC |
Change Font Color. Press Escape, then Enter to apply current color |
|
Alt+H+4 |
Apply strikethrough formatting |
|
Ctrl+R |
Right-align selected text |
|
Ctrl+L |
Left-align selected text |
|
Ctrl+J |
Justify-align selected text (straight edges on both sides) |
|
Ctrl+E |
Center-align selected text |
|
Ctrl+M |
Indent Text (Move text to the right) |
|
Ctrl+Shift+M |
Outdent Text |
|
Ctrl+T |
Create/ increase hanging indent |
|
Ctrl+Shift+T |
Remove/ decrease hanging indent |
|
Ctrl+0 |
Toggle spacing before paragraph |
|
Ctrl+1 |
Single line spacing |
|
Ctrl+2 |
Double line spacing |
|
Ctrl+5 |
Apply line spacing of 1.5 |
|
Alt+Ctrl+1 |
Apply Heading 1 style |
|
Alt+Ctrl+2 |
Apply Heading 2 style |
|
Alt+Ctrl+3 |
Apply Heading 3 style |
|
Alt+Shift+Arrow Right/Arrow Left |
Promote / demote Headings |
|
Ctrl+Shift+S |
Open Apply Styles task pane (will not close with pressing it a second time) |
|
Ctrl+Z |
Undo previous action (up to 100 by default; limit can be changed) |
|
Ctrl+Y |
Redo undone action |
|
F4 |
Repeat action |
|
Ctrl+C |
Copy selected content to clipboard |
|
Ctrl+X |
Cut selected content to clipboard |
|
Ctrl+V |
Paste clipboard content into document |
|
Alt+H, VT |
Paste text only via Home Ribbon, Paste (V), Text only |
|
Ctrl+Shift+C |
Copy format of selection into Format Clipboard |
|
Ctrl+Shift+V |
Paste format to selection from Format Clipboard |
|
Ctrl+F3 |
Cut text into to Spike (additive clipboard). Add as many non-adjacent areas as desired |
|
Ctrl+Shift+F3 |
Paste text from Spike and reset Spike |
|
Shift+Alt+Arrow Up/Arrow Down |
Move current paragraph or (if selected) multiple paragraphs in text. Cannot move part of paragraph with this |
|
Ctrl+Drag |
Move selected text |
|
F2, move cursor to new location, then enter |
Moves selected text to new location |
|
Shift+F2, move cursor to new location, then enter |
Copies selected text to new location |
|
Alt+Ctrl+C |
Insert Copyright symbol |
|
Alt+Ctrl+T |
Insert Ttrademark symbol |
|
Alt+Ctrl+R |
Insert Registered Trademark symbol |
|
Alt+Ctrl+E |
Insert Euro Currency symbol |
|
Alt+Ctrl+. |
Insert horizontal ellipsis (…) |
|
Alt, then n,u |
Insert Symbol (insert menu) |
|
Ctrl+Shift+Space |
Insert nonbreaking space |
|
Ctrl+Shift+— (Hyphen) |
Insert nonbreaking hyphen |
|
Ctrl+— |
Insert optional hyphen |
|
Type character code and press Alt+X |
Insert Unicode character, e.g. 20ac |
|
Alt+character code on numeric keyboard |
Insert ANSI character |
|
Ctrl+K |
Insert a hyperlink |
|
Ctrl+H |
Open classic find and replace window |
|
Ctrl+H, then Alt+D |
Open classic find window |
|
Alt+F |
Find next |
|
Shift+F4 |
Repeat last find after closing find window |
|
Ctrl+Tab |
Jump between find menu and document |
|
Alt+Space, Arrow keys and Enter |
Move find menu window |
|
Esc |
Close traditional search window if active |
|
Ctrl+F |
Open (new) search menu in navigation task pane |
|
Alt,W,K |
Open and close Navigation pane (View, Navigation) |
|
Ctrl+N |
Create new document |
|
Ctrl+O |
Open document |
|
Ctrl+W |
Close document (Close Window) |
|
Ctrl+S |
Save document |
|
F12 |
Save document as |
|
Alt, then F, R |
Open Recent (File, Recent) |
|
Ctrl+P |
Go to Print document/ print preview |
|
Ctrl+P, then Enter |
Print document |
|
Ctrl+mouse wheel |
Zoom in/ zoom out in preview |
|
Page Up/Page Down |
Up a page/ down a page in preview |
|
Ctrl+Home/Ctrl+End |
Jump to beginning/ end of document in preview |
|
Esc |
Exit print preview and return to document |
|
Alt+Ctrl+S |
Toggle Split of document window |
|
Ctrl+scroll mouse up/down |
Zoom in/ out |
|
Alt then w, q |
Open Zoom Menu (no native shortcut exists for zoom in/ zoom out) |
|
Alt+Ctrl+O |
Switch to Outline view |
|
Alt+Ctrl+P |
Switch to Print Layout view |
|
Alt+Ctrl+N |
Switch to Draft view (used to be normal view) |
|
Ctrl+F6 |
Switch forward to next open Word documents (easier than Alt+Tab as only word documents are iterated) |
|
Ctrl+Shift+F6 |
Switch backwards to previous open Word documents (easier than Alt+Tab as only word documents are iterated) |
|
Alt+Shift+D |
Insert current Date field |
|
Alt+Shift+T |
Insert current Tate field |
|
Alt+Shift+P |
Insert Page number field |
|
Alt+Shift+O |
Insert Table of Content field |
|
Alt+Shift+X |
Insert Index field |
|
Alt+Shift+L |
Insert LISTNUM field |
|
Alt+F9 |
Toggle show/ hide fields |
|
F9 |
Update all fields |
|
F11/Shift+F11 |
Go to next/ go to previous field |
|
Ctrl+F11 |
Lock field |
|
Ctrl+Shift+F11 |
Unlock field |
|
Ctrl+Shift+O |
Switch to Outline View |
|
Tab/Shift+Tab |
Promote / Demote a paragraph (or Alt+Shift+Arrow Left/Arrow Right) |
|
Alt+Shift+Arrow Up/Arrow Down |
Move selected paragraphs up / down |
|
Ctrl+Shift+N |
Demote to body text (set style to normal) |
|
Alt+Shift+plus /— |
Expand / Collapse text under a heading |
|
Alt+Shift+A |
Expand or collapse all text or headings |
|
/ key on the numeric keypad |
Hide or display character formatting |
|
Alt+Shift+L |
Show the first line of body text or all body text |
|
Alt+Shift+1 |
Show all headings with the Heading 1 style |
|
Alt+Shift+N |
Show all headings up to Heading n |
|
Ctrl+Tab |
Insert a tab character |
|
Arrow Down/Arrow Up |
Jump one row down / one row up |
|
Tab/Shift+Tab |
Jump to (and select) next / previous table cell |
|
Alt+Home/Alt+End |
Jump to first column/ jump to last column |
|
Alt+Page Up/Alt+Page Down |
Jump to first row / jump to last row |
|
Ctrl+Arrow Left/Ctrl+Arrow Right |
One cell to the left / to the right |
|
Shift+End |
Select current table cell |
|
end, then shift+Home |
Select content of current table cell |
|
Press and hold shift and press arrow keys repeatedly |
Extend selection to adjacent cells |
|
Ctrl+Shift+f8, then press |
Extend selection or block |
|
Alt+5 on numeric keypad (with numLock off) |
Select an entire table |
|
Alt+Shift+Arrow Up/Alt+Shift+Arrow Down |
Move current row up or down |
|
In first column, press shift+End |
Select row* |
|
In first row press Alt+Shift+Page Down |
Select column |
|
Shift+Delete |
Delete columns with columns selected |
Created by rank17 on 3/4/2017. Last updated by max on 1/14/2021
![]()
Microsoft Word Shortcuts
Advertising for Consideration:
Related:
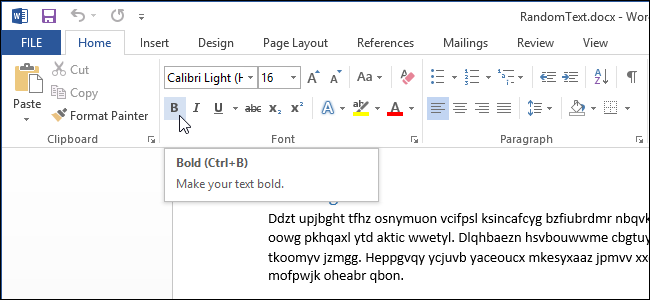
Многим командам в Word назначены сочетания клавиш. Это позволяет быстрее применять форматирование, сохранять файлы или выполнять другие задачи. Сочетания клавиш разрешено настраивать, так что вы можете назначить сочетание команде, у которой его пока нет. В этом уроке мы покажем вам, как получить доступ к сочетаниям клавиш для команд Word, добавить новые или изменить уже имеющие.
Есть несколько способов получить доступ к меню настройки Ленты, где и находится диалоговое окно, позволяющее назначить горячие клавиши.
Откройте вкладку File (Файл).
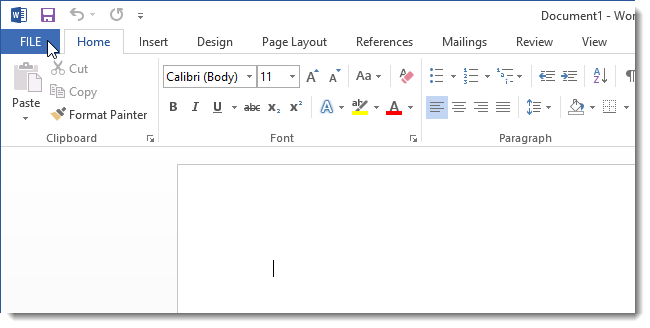
В меню слева кликните по Options (Параметры).
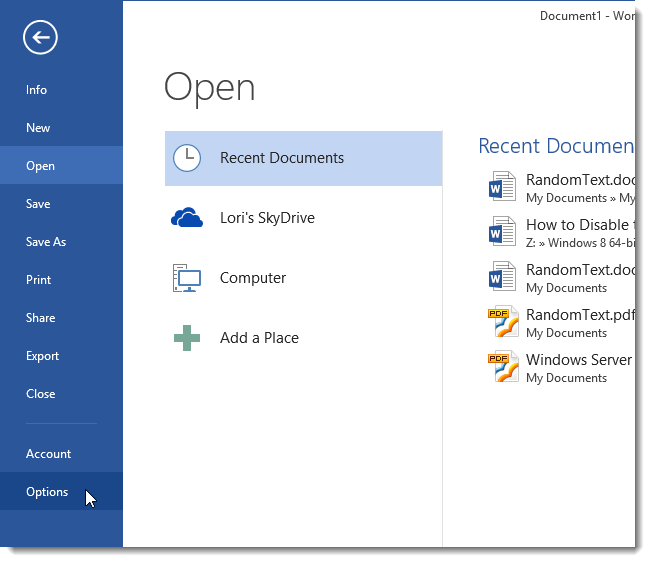
В диалоговом окне Word Options (Параметры Word) в списке слева выберите Customize Ribbon (Настроить ленту).
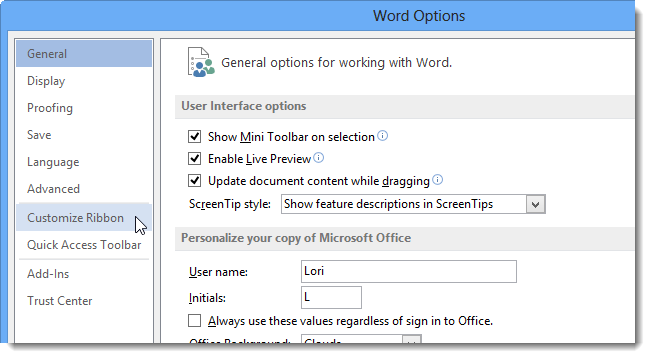
Получить доступ к этому окну можно и быстрее: кликните правой кнопкой мыши по названию любой вкладки на Ленте и в выпадающем меню выберите пункт Customize the Ribbon (Настройка ленты).
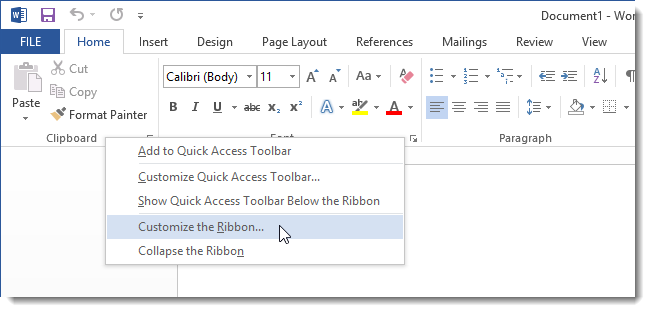
В левой части окна Customize the Ribbon and keyboard shortcuts (Настройка ленты и сочетаний клавиш) находится список команд. Под этим списком рядом с надписью Keyboard shortcuts (Сочетания клавиш) нажмите на кнопку Customize (Настройка).
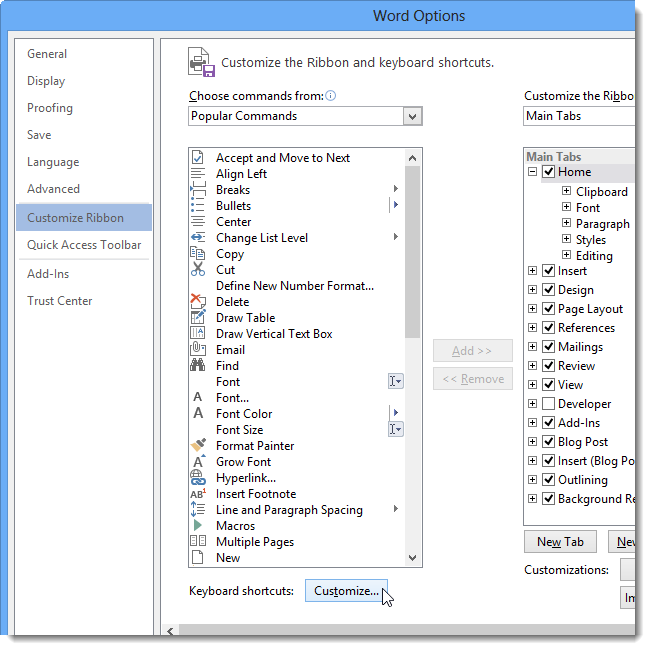
Появится диалоговое окно Customize Keyboard (Настройка клавиатуры). Чтобы отсортировать все команды, представленные в перечне справа, выберите пункт All Commands (Все команды) в списке Categories (Категории). Если вы знаете, в какой категории содержится команда, для которой необходимо назначить горячие клавиши, можете выбрать её, чтобы сократить число команд в списке справа.
Выделите нужную команду из списка Commands (Команды). Если сочетание клавиш в поле Current keys (Текущие сочетания) не указано, значит, оно ещё не назначено.
Чтобы присвоить команде сочетание клавиш, поставьте курсор в поле Press new shortcut key (Новое сочетание клавиш) и нажмите удобную вам комбинацию. Если указанное сочетание не используется ни одной командой Word, поле Currently assigned (Текущее назначение) отобразит ответ Unassigned (Нет). Нажмите кнопку Assign (Назначить), чтобы закрепить выбранное сочетание за командой.
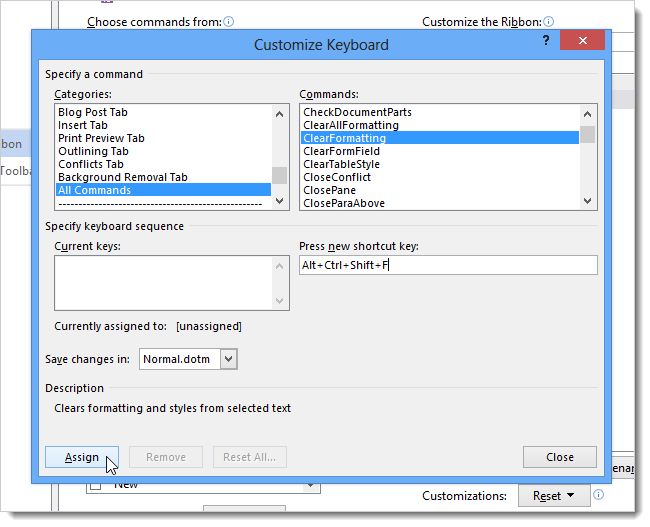
Примечание: Если вы вводите сочетание клавиш, которое уже назначено какой-то команде, Word сообщит вам об этом, показав название соответствующей команды. Просто вбивайте в поле ввода другие сочетания, пока не увидите надпись Unassigned (Нет), как это показано на изображении ниже.
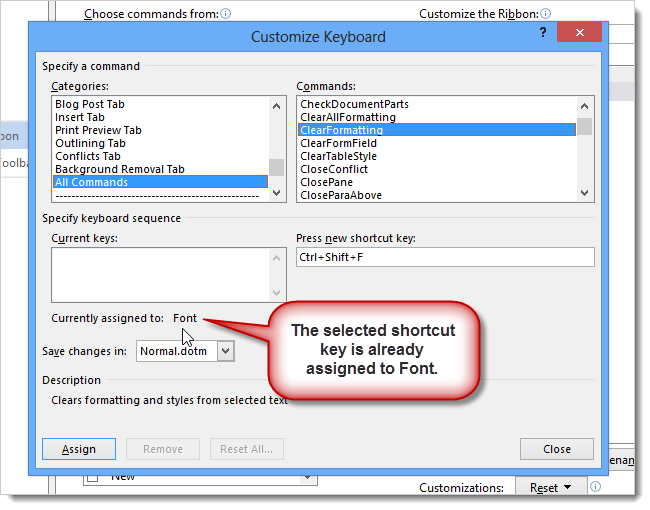
Как только вы нажмёте Assign (Назначить), новое сочетание клавиш будет добавлено в список Current keys (Текущие сочетания).
Примечание: Одной команде можно назначить несколько сочетаний клавиш.
Нажмите на Close (Закрыть), чтобы выйти из диалогового окна Customize Keyboard (Настройка клавиатуры).
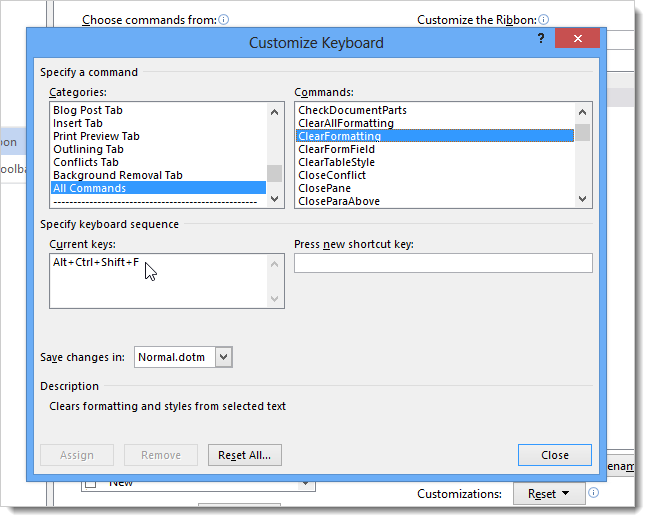
Примечание: Чтобы отменить сочетание клавиш, выберите его в списке Current keys (Текущие сочетания) и нажмите на Remove (Удалить).
Кликните ОК в диалоговом окне Word Options (Параметры Word), чтобы закрыть его.
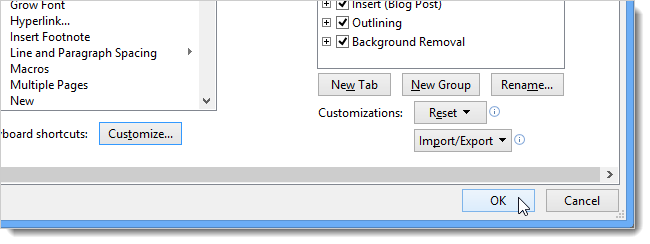
Вы всегда можете изменить уже существующее сочетание клавиш для команды. Для этого необходимо удалить текущее и назначить новое.
Оцените качество статьи. Нам важно ваше мнение:
The keyboard shortcuts in Microsoft Word can be useful when proofreading, giving you quick access to common commands. But what about when a command you need doesn’t have a shortcut? The solution is to create a custom keyboard shortcut or two.
For example, rather than switching between ‘All Markup’ and ‘Simple Markup’ via the ribbon when tracking changes in Microsoft Word, you can assign a shortcut to the ‘View insertions and deletions’ command. This will then let you toggle between a view where all the markup in the document is visible and one in which you get to preview the finished version.
In this post, then, we’re going to explain how to create a custom shortcut in Microsoft Word.
Creating a Custom Shortcut in Word for Windows
To create or customise shortcuts in Word for Windows:
- Go to File > Options > Customize Ribbon.
- Next to Keyboard shortcuts, click Customize at the bottom of the dialog box.
This will bring up a new dialog box with three key sections:
- Specify a command – At the top of this dialog box, you’ll see lists of Categories and Commands (e.g. to toggle markup, we would select Review Tab from the Categories list and ShowInsertionsAndDeletions from the Commands list). If you are not sure what a command does, check the Description section at the bottom of the dialog box.
- Specify keyboard sequence – Here, you will see which (if any) keys are currently assigned to a command. To change this or add a shortcut, enter a combination of keys in the Press new shortcut key field (it will tell you if you select a key combination already used elsewhere, and using the same key combination will override the existing shortcut). Make sure to include at least one function key in your shortcut (e.g. Ctrl or Alt).
- Save changes in – Here, you can select where to save the new shortcut. Typically, this will either be in a template, in which case it will also work in other documents that use the same template, or in the current document you’re working on.
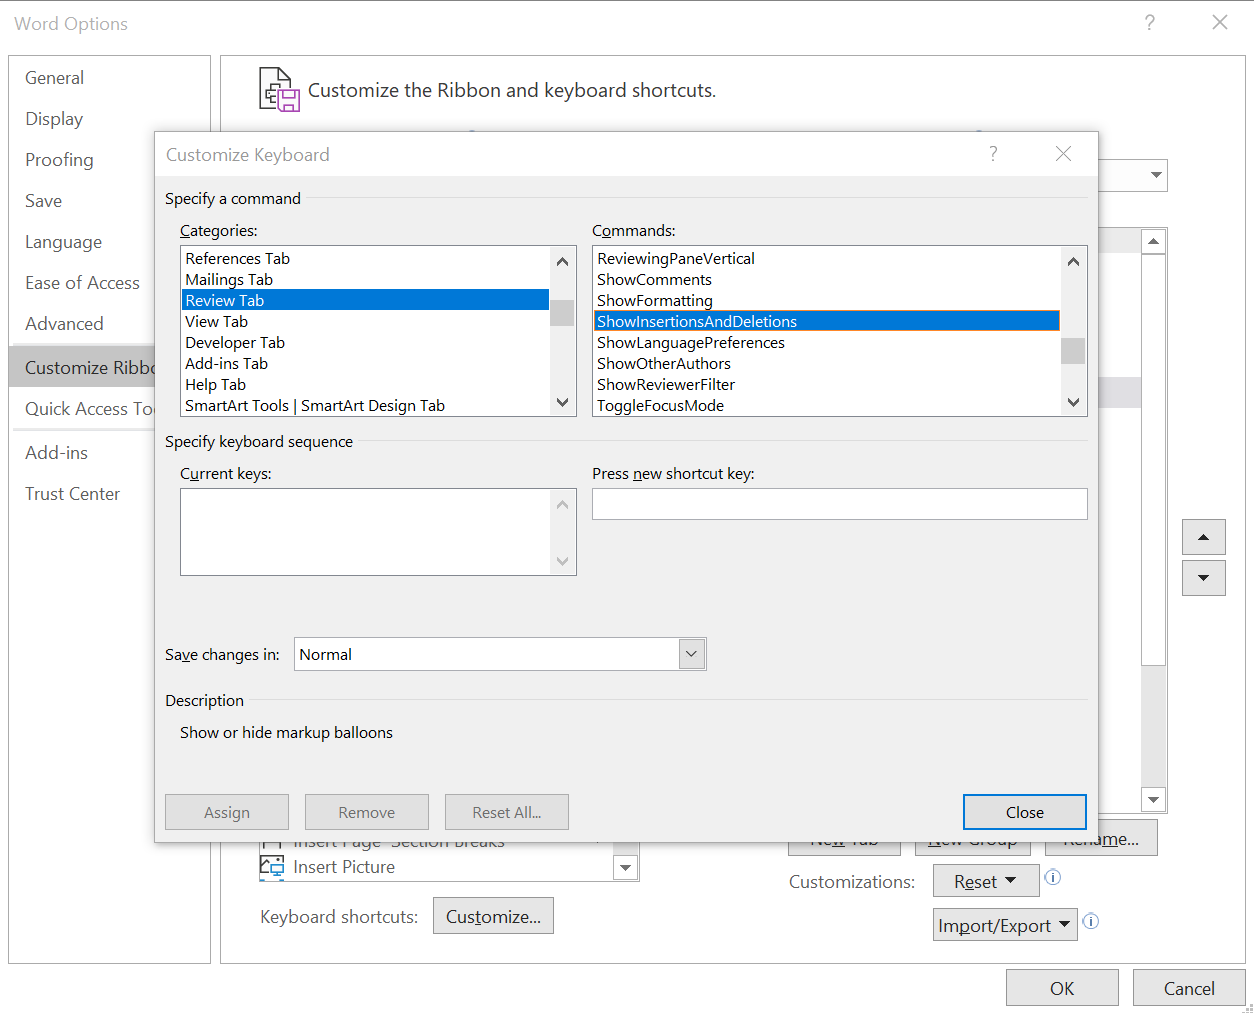
Once you’ve done all this, all you need to do is click on Assign at the bottom of the dialog box and your new shortcut will be ready to use. In addition, you can use the Remove button here to remove an existing shortcut, or Reset All to restore the original settings.
Creating a Custom Shortcut in Word for Mac
To create or customise keyboard shortcuts in Word for Mac, first go to Tools > Customize Keyboard on the menu system. This will bring up a dialog box with three key sections:
- Specify a command – Here, you can select a command via the Categories and Commands lists (e.g. to toggle markup, we would select Tools from the Categories list and ShowInsertionsAndDeletions from the Commands list). Alternatively, you can use the search field to look for a specific command. Check the Description section at the bottom of the dialog box if you’re not sure what a command does.
- Specify a keyboard shortcut – Here, you can see whether a command has a shortcut in the Current Keys field. To add (or edit) a shortcut, enter a combination of keys in the Press new keyboard shortcut field, then click Assign. Ideally, this should include at least one function key (e.g. Cmd or Ctrl). If you select a key combination used elsewhere, you will see this in the Currently assigned to field (using an existing key combination for a new command will override the old shortcut).
- Save changes in – Finally, you can also select whether to save the new shortcut in a template (i.e. so it will also work in other documents that use the same template) or just the open document (i.e. so it will only apply to the current document).

When you have assigned your new shortcut, simply click OK to close the dialog box. In addition, you can also remove existing shortcuts via the Remove option in this dialog box, or you can hit Reset All to restore the original settings and remove any changes you’ve made.
Becoming A Proofreader
Hopefully you’ll now find it easy to create a custom shortcut in Microsoft Word. For more about how to make the best use of Word as a proofreader, why not give our Becoming A Proofreader course a try? Sign up for a free trial to see how it works.
Sometimes using Microsoft Word menus is slower. Granted, many built-in commands have keyboard shortcuts, but most do not. This was the case for me when I wanted to use Word’s Reading Mode. Instead of finding the correct tab and button each time, I decided to customize Word to access this mode with a custom keyboard shortcut. In this tutorial, I’ll show you how to create keyboard shortcuts in Word.
I suspect there are keyboard button commands that you frequently use that could be assigned to a key combination. My motivation was speed. I’m sure if you glance down the long list of Word commands, you’ll see plenty of ideas. Once you know how to customize keyboard shortcuts, you’ll find more ways to use them.
Which Word Commands to Customize
It’s hard for me to tell you which Microsoft Word commands to map to a key combination. I do have 2 criteria:
- Is this command a common task I frequently use?
- How easy is it to access the command?
For example, some commands like All Caps have a keyboard shortcut of Ctrl + Shift + A. You might want to remap it if the key combinations were cumbersome. Other commands don’t even show in the Word ribbon or have shortcut keys. These are prime candidates if you use them enough.
In my case, my frustration came from trying to figure out how to exit Read Mode. Once I clicked to enter Read Mode, the Word ribbon disappeared, and I lost my bearings. Yes, I know the buttons are in the lower right. Anyway, I just assigned a keyboard shortcut that toggles Reading mode on and off.
Complete List of Word Keyboard Shortcuts
Another approach to finding candidates is to list all the Microsoft Word commands and their keyboard shortcuts. This long list will get you thinking of possibilities. It includes everything from Save as HTML to Security. It will also show your current shortcuts.
- From the View menu, click Macros.
- From the drop-down menu, select View Macros.
- On the Macros dialog, click in the Macros in: box and select Word commands.
- In the Macro name: box above, delete the current macro name.
- Type lis to advance the macro name list.
- Click ListCommands.
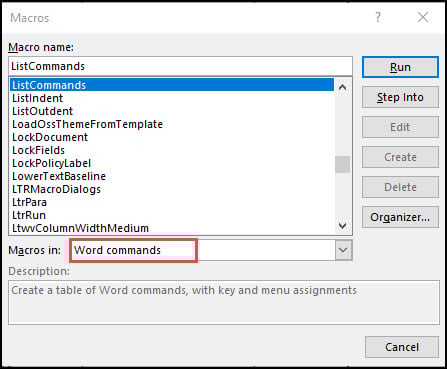
- Click the Run button on the right.
- On the List Commands dialog box, click Current keyboard settings.
- Click OK.
A long table appears showing the Command Name, Modifiers, and Key. A much longer list appears if you select All Word documents. A snapshot of the long table appears below. The “shortcut keys” are a combination of the Modifier and Key. For instance, the Cut command equates to Ctrl + X.
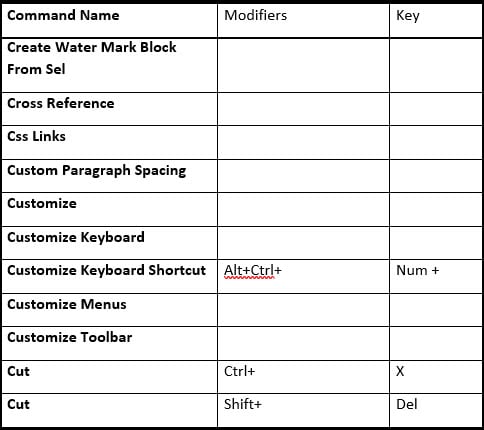
How to Create Keyboard Shortcuts in Word
For this example, I’ll assign a keyboard mapping to the Read Mode command.
- From the File menu, select Options. It’s on the bottom.
- On the Word Options dialog box, click Customize Ribbon.
- Click the Customize… button next to Keyboard shortcuts.
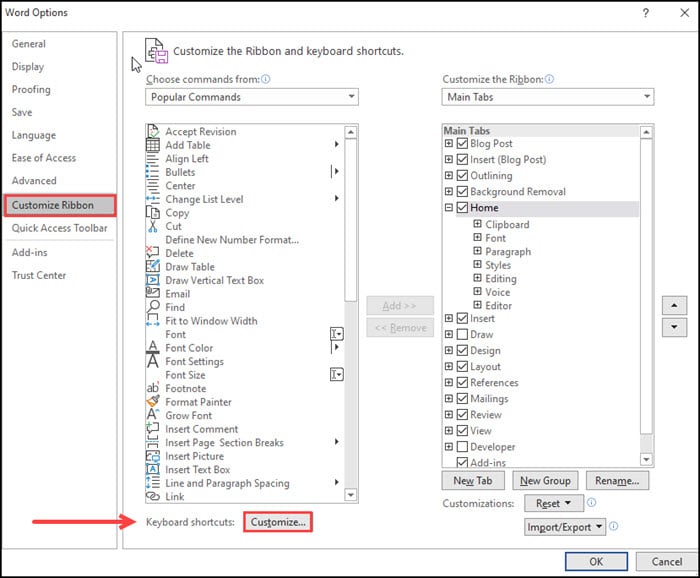
- The Customize Keyboard dialog box opens. The left side shows Categories, which are your ribbon tabs. The right side shows Commands within the highlighted category.
- Scroll down the Categories list and select All Commands.
- Click into the Commands: section on the right side to set focus.
- Type R to advance the Commands list.
- Scroll down to ReadingMode.
- Click in the Press new shortcut key box.
- Press the key combinations you’d like to assign to the Command.
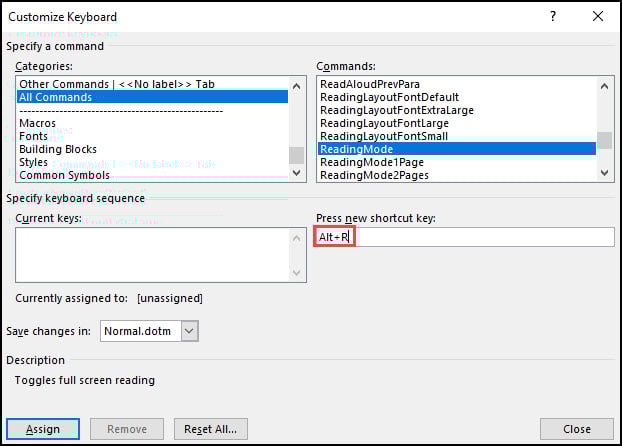
- Press Assign.
- Press Close.
- Press OK.
Once you’ve saved your new shortcut key, it will appear in the Current keys: box.
✪ It is possible to have multiple shortcuts display in the Specify keyboard sequence area and Current keys: box. For example, there could be several assignments for common shortcuts such as File | Save.
When I first did this exercise, I got confused because there were many reading modes and layout commands. To ensure you’re mapping the correct command, read the Description that shows on the Customize Keyboard dialog. For example, in the screen snap above, you can see it says Toggles full-screen reading. Lastly, make sure you test your new keyboard combos.
Remember Ribbon Shortcuts
Word has another feature that you’ll find useful. The Ribbon tabs also have common shortcuts assigned to them. From any Ribbon tab, press your Alt key. You should see a small black square appear under the tab name. These are the ribbon keyboard shortcuts. So, for example, you could press Alt + F from any tab and jump to the File Tab. No button clicking is needed.

Building Block and Symbol Shortcuts
While many people will link commands, you can also assign keyboard shortcuts to building blocks or common symbols. For example, if you frequently used the DRAFT watermark in Word, you could speed up your process by mapping it to ALT + D or some key combo you prefer.
The process is very similar. Instead of selecting a command, we’ll select Building Blocks. From the right side, you’ll see a list of default building blocks such as the DRAFT 1. This is the slanted watermark.

In the Common Symbols category, you’ll see a long list of items ranging from accented letters to trademarks. While many of these have preassigned keyboard shortcuts, you can change them. For example, you can remap the trademark shortcut to something other than Ctrl + Alt + T
As you can see, Microsoft Word allows you many ways to map actions or things to some key combinations. Even if the shortcut has been defined, you can always delete the keyboard sequence and create your own.
- Spell Check not Working in Word?
- How to Make a Letterhead with Word
- How to Make Symbols with Keyboard
Make commonly used tasks easier with custom hotkeys
Updated on February 9, 2023
If you spend a lot of time in Microsoft Office or Microsoft 365, you can save time by customizing your own keyboard shortcuts. Keyboard shortcuts are just one way to streamline how you work, but they can make a big difference, especially for tasks you use often.
Shortcut assignments might vary depending on the operating system you’re on and the software version you have installed.
How to Customize Keyboard Shortcuts
Before looking at how to actually change a keyboard shortcut, let’s open the appropriate window:
-
Open a Microsoft program, such as Word.
-
Navigate to File > Options to open that program’s options window, such as Word Options in MS Word.
-
Open the Customize Ribbon option from the left.
-
Choose the Customize… button on the bottom of that screen, next to Keyboard shortcuts:.
Creating ‘Hotkeys’
The Customize Keyboard window is how you can control the hotkeys used in Microsoft Word (or whatever other program you’ve opened). Choose an option from the Categories: section and then pick an action for the hotkey in the Commands: area.
For example, maybe you want to change the shortcut key used to open a new document in Microsoft Word. Here’s how:
-
Choose File Tab from the Categories: section.
-
Select FileOpen from the right pane, in the Commands: section.
One of the default shortcut keys (Ctrl+F12) is shown here in the Current key: box, but next to it, in the Press new shortcut key: text box, is where you can define a new hotkey for this particular command.
-
Select that text box and then enter the shortcut you want to use. Instead of typing letters like Ctrl, just strike that key on your keyboard. In other words, hit the shortcut keys as if you were actually using them, and the program will auto-detect them and enter the appropriate text.
For example, hit the Ctrl+Alt+Shift+O keys if you want to use that new shortcut to open documents in Word.
-
You’ll see a Currently assigned to: sentence show up under the Current keys: area after hitting the keys. If it says [unassigned], then you’re good to move on to the next step.
Otherwise, the shortcut key you entered is already assigned to a different command, which means that if you assign that same hotkey to this new command, the original command will no longer work with this shortcut.
-
Choose Assign to make the new keyboard shortcut apply to the command you selected.
-
You can now close any open windows relating to the settings and options.
Additional Tips
- You can remove custom and built-in keyboard shortcuts by returning to Step 4 in the first set of instructions above. In that Customize Keyboard window, just select a hotkey from the Current keys: box, and use the Remove button to delete it.
- Setting too many custom keyboard shortcuts can get confusing. Create them sparingly for those functions that do not already have a shortcut assigned to them. Reserve this method of reassigning or creating keyboard shortcuts for tasks that you use often.
- The quickest way to restore all the original shortcut keys is to return to the Customize Keyboard screen mentioned above. Use the Reset All… button to reset all the hotkeys to their default, original settings.
- To view the program’s default keyboard shortcuts in one simple place, select Help in the upper-right corner, and then select it again if you’re using the Ribbon menu. Search for Shortcuts and find the program you’re interested in, like Word, to see Microsoft’s list of keyboard shortcuts.
How to Remap a Keyboard in Windows 10
Thanks for letting us know!
Get the Latest Tech News Delivered Every Day
Subscribe
Microsoft 365 or the Office 2019 version of Word allows you to create your own customized keyboard shortcuts for carrying out various commands. You can use the key combinations to carry out various tasks like applying a style to your text, insert symbols, carry out macros, etc. In this tutorial, I am going to show you how to create custom keyboard shortcuts in Word. Just follow these steps, and whether you have Office 2019 or Microsoft 365, you will be able to create your own list of commands.
Custom Keyboard Shortcuts Settings
With these two versions of Word, you can modify any existing shortcuts and even remove them if you wish. I am going to show you how to create shortcuts, remove shortcuts and reset shortcut settings.
Create Custom Keyboard Shortcuts
Step-1: Open Microsoft Word.
Step-2: Click on File.

Step-3: Click on Options at the bottom left corner of the window.

Step-4: Click on Customize Ribbon.

• There is another way to access these settings. Right-click on the ribbon in Word and select the Customize the Ribbon option.

Step-5: In the Customize the Ribbon and keyboard shortcuts section, click on Customize at the bottom of the window next to Keyboard shortcuts.

Step-6: In the Categories section, select the category you want to customize. [I selected Insert tab]

Step-7: When you click on a category, you will notice that the Commands section options will change. From this section, select the item for which you want to add a shortcut for. [I want to add a shortcut for the excel table]

Step-8: In the new shortcut key section, add the keys you want to allot for this particular command. You can use combinations using Alt, Ctrl, Shift, and other alphabet or numeric keys. You can also use a single function key.

[If you use a combination that is already allotted to another function, then you can no longer use the keys for the previous function. The combo keys will be allotted to the new function. For example, if I use Ctrl + S to insert tables, I will no longer be able to use Ctrl + S to save files as it did before]
Step-9: In the Save changes in the drop-down menu, select Normal to apply the changes to all word documents. Otherwise, select the document.

Step-10: Click Assign.

Step-11: Click Close.

Remove Custom Shortcuts
-
- Open Microsoft Word.
- Click on File.
- Click on Customize Ribbon. (You can also right-click on the ribbon in Word and select the Customize the Ribbon option.)
- In the Customize the Ribbon and keyboard shortcuts section, click on Customize at the bottom of the window next to Keyboard shortcuts.
- Select the Category in which you want the change.
- Select the command from the Commands section for which you want to remove the shortcut.
- In the Current Keys section, click on the shortcut keys you want to remove.
- Select Remove.
- Click Close.

Reset Custom Shortcuts Settings
-
- Open Microsoft Word.
- Click on File.
- Click on Customize Ribbon. (Right-click on the ribbon in Word and select the Customize the Ribbon option.)
- In the Customize the Ribbon and keyboard shortcuts section, click on Customize at the bottom of the window next to Keyboard shortcuts.
- Click on Reset All. [This button will be greyed out if you have not added any custom shortcut keys before. You can only reset if you have added your own shortcuts]

6. Click Yes.

7. Click Close.
This is how you can customize shortcuts for all Word documents or just one document you are currently working on.