Insert a worksheet
-
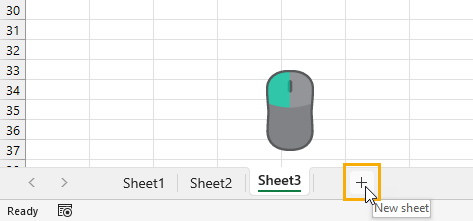
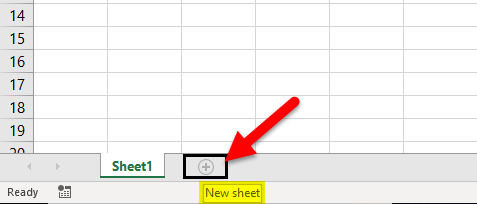
Select the New Sheet plus icon
at the bottom of the workbook.
-
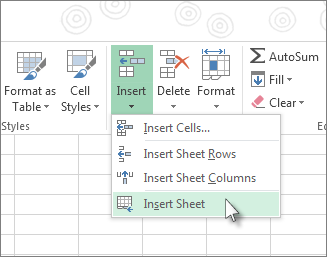
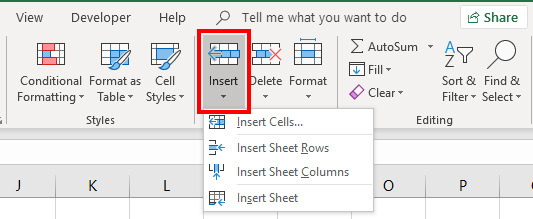
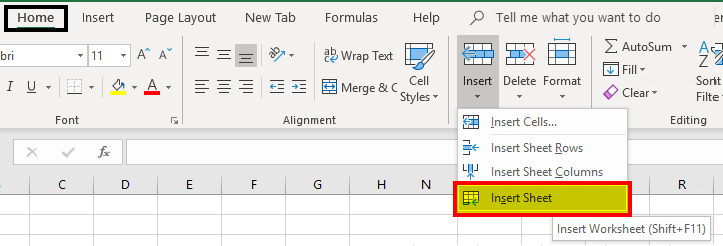
Or, select Home > Insert > Insert Sheet.
Rename a worksheet
-
Double-click the sheet name on the Sheet tab to quickly rename it.
-
Or, right-click on the Sheet tab, click Rename, and type a new name.
Move a worksheet
-
To move the tab to the end, right-click the Sheet tab then Move or Copy > (move to end) > OK .
-
Or, click and drag to tab to any spot.
Delete a worksheet
-
Right-click the Sheet tab and select
Delete.
-
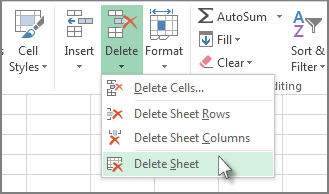
Or, select the sheet, and then select Home > Delete > Delete Sheet.
Note: Sheet tabs are displayed by default. If you don’t see them, click Options > Advanced > Display options for this workbook > Show Sheet tabs.
To insert a new worksheet, do one of the following:
-
To quickly insert a new worksheet at the end of the existing worksheets, click the Insert Worksheet tab at the bottom of the screen.
-
To insert a new worksheet in front of an existing worksheet, select that worksheet and then, on the Home tab, in the Cells group, click Insert, and then click Insert Sheet.
Tip: You can also right-click the tab of an existing worksheet, and then click Insert. On the General tab, click Worksheet, and then click OK.
Note: To change the order of the worksheets in a workbook, click the tab of the worksheet that you want to move, and then drag it to the location that you want.
What do you want to do?
-
Insert multiple worksheets at the same time
-
Change the default number of worksheets in a new workbook
-
Insert a new sheet that is based on a custom template
-
Rename a worksheet
-
Delete one or more worksheets
Insert multiple worksheets at the same time
-
Hold down SHIFT, and then select the same number of existing sheet tabs of the worksheets that you want to insert in the open workbook.
For example, if you want to add three new worksheets, select three sheet tabs of existing worksheets.
-
On the Home tab, in the Cells group, click Insert, and then click Insert Sheet.
Tip: You can also right-click the selected sheet tabs, and then click Insert. On the General tab, click Worksheet, and then click OK.
-
To change the order of the worksheets in a workbook, click the tab of the worksheet that you want to move, and then drag it to the location that you want.
Change the default number of worksheets in a new workbook
-
Click the File tab.
What and where is the Microsoft Backstage Button?
For more information about the Microsoft Backstage Button, see What and where is the Backstage?
-
Under Excel, click Options.
-
In the General category, under When creating new workbooks, in the Include this many sheets box, enter the number of sheets that you want to include by default when you create a new workbook.
-
Click any other tab to return to your file.
Insert a new sheet that is based on a custom template
-
If needed, create the worksheet template that you want to base a new worksheet on.
How to create a worksheet template
-
Select the worksheet that you want to use as a template.
-
Click the File tab.
-
Under Info, click Save As.
-
In the File name box, type the name of the worksheet template.
-
To create a custom worksheet template, type the file name that you want to use.
-
To create the default worksheet template, type sheet.
Note: Custom templates are automatically saved in the Templates folder. The default worksheet template, sheet.xltx or sheet.xltm, should be saved in the XLStart folder, which is usually C:Program FilesMicrosoft OfficeOffice14XLStart.
-
-
Do one of the following:
-
On a computer that is running Windows Vista, in the list, click Excel Template or Excel Macro-Enabled Template.
-
On a computer that is running Microsoft Windows XP, in the Save as type box, click Excel Template or Excel Macro-Enabled Template.
-
-
Click Save.
-
-
Right-click the sheet tab of a worksheet, and then click Insert.
-
Double-click the template for the type of sheet that you want.
Rename a worksheet
-
On the Sheet tab bar, right-click the sheet tab that you want to rename, and then click Rename Sheet.
-
Select the current name, and then type the new name.
Tip: You can include the name of the sheet when you print the worksheet.
How to print sheet names
-
On the Insert tab, in the Text group, click Header & Footer.
-
In the Page Layout View, click the location where you want the sheet name to appear.
-
In the Header & Footer elements group, click Sheet Name
.
-
Delete one or more worksheets
-
Select the worksheet or worksheets that you want to delete.
Tip: When multiple worksheets are selected, [Group] appears in the title bar at the top of the worksheet. To cancel a selection of multiple worksheets in a workbook, click any unselected worksheet. If no unselected sheet is visible, right-click the tab of a selected sheet, and then click Ungroup Sheets on the shortcut menu.
-
On the Home tab, in the Cells group, click the arrow next to Delete, and then click Delete Sheet.
Tip: You can also right-click the sheet tab of a worksheet or a sheet tab of any selected worksheets that you want to delete, and then click Delete Sheet.
Do you need to add a new sheet tab to your Excel workbook? This post is going to show you all the ways that you can insert a new sheet in Excel!
Excel allows you to add multiple sheets within a workbook. This is a great way to organize your spreadsheet solutions as you can separate your inputs, data, calculations, reports, and visuals into different sheets.
Organizing your workbooks with sheets can also make the spreadsheet easier to navigate for any user.
How can you add new sheets to an Excel workbook? Follow this post to find out all the ways to add sheet tabs in Excel. You’ll even learn how to add multiple sheets based on a list!
Add a New Sheet with the New Sheet Button
The quickest and easiest way to insert a new sheet in Excel is using the New Sheet button located to the right of the current sheet tabs.
Left click on the plus sign icon to the right of the sheet tabs and Excel will create a new blank sheet in your workbook!
Add a New Sheet from the Home Tab
Adding a new sheet can also be done from the Excel ribbon.
You might think this action would be located in the Insert tab, but it will actually be found in the Home tab.
Follow these steps to insert a new sheet from the Home tab.
- Go to the Home tab.
- Click on the lower part of the Insert command found in the Cells section.
- Choose the Insert Sheet option from the menu.
This will create a new sheet in your workbook.
Add a New Sheet with a Keyboard Shortcut
Good news for anyone who prefers to navigate Excel with their keyboard as much as possible! There is a dedicated keyboard shortcut for adding a new sheet.
Press Shift + F11 on your keyboard to insert a new sheet.
Add a New Sheet with Excel Options
When you create a new Excel workbook, the number of sheets it comes with will be determined by your Excel Options settings.
You can change this default so that any time you create a new workbook, it will have your desired number of blank sheets available.
The Excel Options menu allows you to customize your Excel experience with various app and workbook settings.
Follow these steps to adjust the default number of sheets in a workbook.
- Go to the File tab.
- Select Excel Options in the lower left.
- Go to the General section of the Excel Options menu.
- Scroll down to the When creating new workbooks section.
- Change the number in the Including this many sheets input.
- Press the OK button.
The next time you create a new Excel workbook, it will have your desired number of blank sheets.
💡 Tip: You can test out this new setting by pressing Ctrl + N to create a new workbook.
Add Multiple New Sheets with a Pivot Table
Did you know you can create multiple sheets from a list in the grid by using a pivot table?
This is a hidden gem for when you need to quickly create many sheets.
For example, suppose you need to create new sheets for each US state or each product that your company sells. This would be a tedious process with the previous methods.
If you have these sheet names as a list inside the grid, then you can create a pivot table based on this list and use the Show Report Filter Pages feature to generate the sheets for you.
This example shows a list of US states which can then be used to generate sheets with those US state names.
Follow these steps to automatically generate sheets from a list using a pivot table.
- Create a pivot table based on your list.
💡 Tip: Check out this post to see how to insert a pivot table from your list.
- Click and drag the sheet name field to the Filters area in the PivotTable Fields menu.
- Go to the PivotTable Analyze tab.
- Click on the Chevron icon in the Options command.
- Choose the Show Report Filter Page option from the menu.
This will open the Show Report Filter Pages menu.
- Select the field with your sheet names.
- Press the OK button.
You will only see multiple field choices in the menu if you have added multiple fields to the Filters area of your pivot table.
This will create a new sheet for each unique item in your list, and each sheet will be named based on the text in your list.
Each sheet will contain a filtered version of your pivot table in cell A1. The pivot table will be filtered on the same item as the sheet name.
Add Multiple New Sheets with VBA
VBA is a great way to automate any task for Excel in the desktop app. This includes adding sheets!
You can create a VBA macro that will create new sheets based on a selected list.
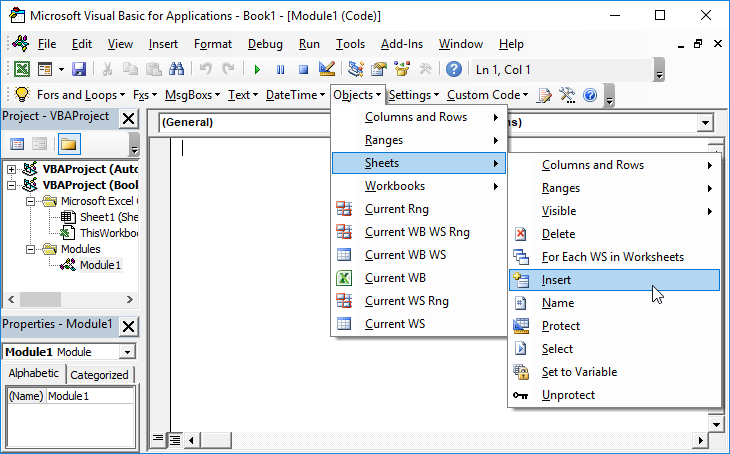
Go to the Developer tab and select the Visual Basic command or press Alt + F11 to open the visual basic editor.
📝 Note: You might need to enable the Developer tab first as it is disabled by default.
Go to the Insert menu in the visual basic editor and select the Module option from the menu.
Sub AddSheets()
Dim myRange As Range
Dim sheetTest As Boolean
Set myRange = Selection

For Each c In myRange.Cells
sheetTest = False
    For Each ws In ThisWorkbook.Worksheets
        If ws.Name = c.Value Or c.Value = "" Then
            sheetTest = True
        End If
    Next ws
    If Not (sheetTest) Then
          Sheets.Add.Name = c.Value
    End If
Next c
End Sub
Paste the above code into the new module.
This code will loop through the selected range in your workbook and will create a new sheet for each cell. If the sheet name already exists, then this item will be skipped.
Now you will be able to select any range in your workbook and run the VBA code to automatically create multiple sheets.
Add Multiple New Sheets with Office Scripts
Another way you can automate the creation of your sheets is by using Office Scripts.
Office Scripts is the JavaScript language for automating tasks in Excel online. You will need to be using Excel on the web with a business Microsoft 365 account as this feature isn’t available otherwise.
Open Excel online and go to the Automate tab and select the New Script option. This will open the Office Script editor on the right side.
function main(workbook: ExcelScript.Workbook) {

	//Create an array with the values in the selected range
	let selectedRange = workbook.getSelectedRange();
	let selectedValues = selectedRange.getValues();
	//Get dimensions of selected range
	let rowHeight = selectedRange.getRowCount();
	let colWidth = selectedRange.getColumnCount();

	//Loop through each item in the selected range
	for (let i = 0; i < rowHeight; i++) {
		for (let j = 0; j < colWidth; j++) {
			try {
				workbook.addWorksheet(selectedValues[i][j]);
			}
			catch (e) {
				//do nothing
			};
		};
	};
};
Add the above code to the editor and press the Save script button.
This code will loop through the selected range on your sheet and create a new sheet for each item in the range.
Now you select a range in your sheet and press the Run button in the Code Editor. This will run the code and create the required sheets in your workbook!
Add Multiple New Sheets with Power Automate
Microsoft Power Automate is a cloud-based service that makes it easy for end users to create and run automated workflows.
Users can build workflows in a matter of minutes, without any need for coding or complex configuration with the intuitive user interface.
The service can be used to automate a wide range of tasks, including sending emails, copying files, and creating records in databases.
Power Automate is part of the Microsoft Power Platform, which also includes Power BI and Power Apps. Together, these products provide a powerful end-to-end solution for business process automation.
But the best part is it’s available for use as part of any Microsoft 365 subscription!
You can use Power Automate to create sheets from a list inside an Excel Table. In this example, the desired sheet names are in an Excel Table with a column named Names.
📝 Note: This Excel file will need to be saved in either SharePoint or OneDrive in order to work with Power Automate.
Go to the Power Automate Portal and log in with your Microsoft credentials.
Then go to the Create tab and select an Instant cloud flow. This will allow you to run the flow manually with a button in the Power Automate portal.
Give your Flow a name then select the Manually trigger a flow option and then press the Create button.
This will open the flow builder and you can add steps to your workflow.
- Add a List rows present in a table step and then select the relevant file and table location in the various fields.
This action will read all the items in your table of sheet names. This will be used in the next step to create and name new worksheets.
- Add a Create worksheet step and select the same file.
- Select the Names field from the previous List rows present in a table action.
When you add the Names field to the Name input in the Create worksheet step, it will automatically add this step into an Apply to each action. This way a worksheet will be created for each item in your list of sheet names.
Press the Save button to save your flow and it will be ready to run!
Go to the My flows menu, select the Cloud flows tab, and then press the Run button for your flow.
You don’t even have to have the file open, and the sheets will be added to your workbook!
Conclusions
Most of your workbooks will need more than one sheet, so learning how to add sheets in Excel is essential.
There are manual ways to create new sheets such as the New Sheet button, the Home tab, and a keyboard shortcut. There are all great methods when you only need to add a few sheets.
There are also several methods for adding sheets in an automated manner based on a list! VBA, Office Scripts, Power Automate, and even pivot tables can all be used for situations where you need to add a lot of sheets.
Which method do you prefer for adding sheets to your workbooks? Do you have any other tips for this? Let me know in the comments section below!
About the Author
John is a Microsoft MVP and qualified actuary with over 15 years of experience. He has worked in a variety of industries, including insurance, ad tech, and most recently Power Platform consulting. He is a keen problem solver and has a passion for using technology to make businesses more efficient.
A worksheet is a sheet in a workbook. The workbook is the name of an Excel file, and that workbook contains one or more worksheets.
The worksheet is a single page inside a file designed with an electronic spreadsheet program like Microsoft Excel. The worksheet is used to accumulate data or to work with data. We all know that we cannot work on a single worksheet in Excel as it has a limited number of cells, rows, and columns. Therefore, we need to have multiple worksheets with a big database.
We also need to know how to insert a new worksheet in excel on the existing worksheet. Again, this has been explained above through various examples.
Table of contents
- Insert New Worksheet In Excel
- How to Insert a New Worksheet in Excel?
- Example #1 – Shortcut Keys for Insert New Worksheet In Excel
- Alt + Shift Shortcut #1
- Shift + F11 Shortcut #2
- Example #2 – To Insert a New Worksheet Using the Mouse
- Example #3
- Example #4
- Things to Remember in Insert a New Worksheets in Excel
- Recommended Articles
How to Insert a New Worksheet in Excel?
We have learned these ways to insert a worksheet into an excel file:
- Using Excel Shortcut KeysAn Excel shortcut is a technique of performing a manual task in a quicker way.read more.
- Using Insert Tab
There are multiple ways to insert a new worksheet in excel. Inserting a new worksheet is quite simple.
Let us discuss it one by one with a few examples.
Example #1 – Shortcut Keys for Insert New Worksheet In Excel
There are two shortcut keys to insert a new worksheet in Excel, They are:
Alt + Shift Shortcut #1
- Click on the ALT button from the keyboard hold it.
- Now click on the Shift button from the keyboard hold it along with the ALT button.
- Click on the F1 key from the keyboard then release it.
- Now release the alt and shift keys.
Now, we will add a new worksheet to an open workbook.
Shift + F11 Shortcut #2
Step #1 – Click on the ‘SHIFT” button from the keyboard.
Step #2 – Click on the ‘F11’ key from the keyboard & release it.
Step #3 – Now release the “shift” key.
Now, we will add a new worksheet to an open workbook.
Example #2 – To Insert a New Worksheet Using the Mouse
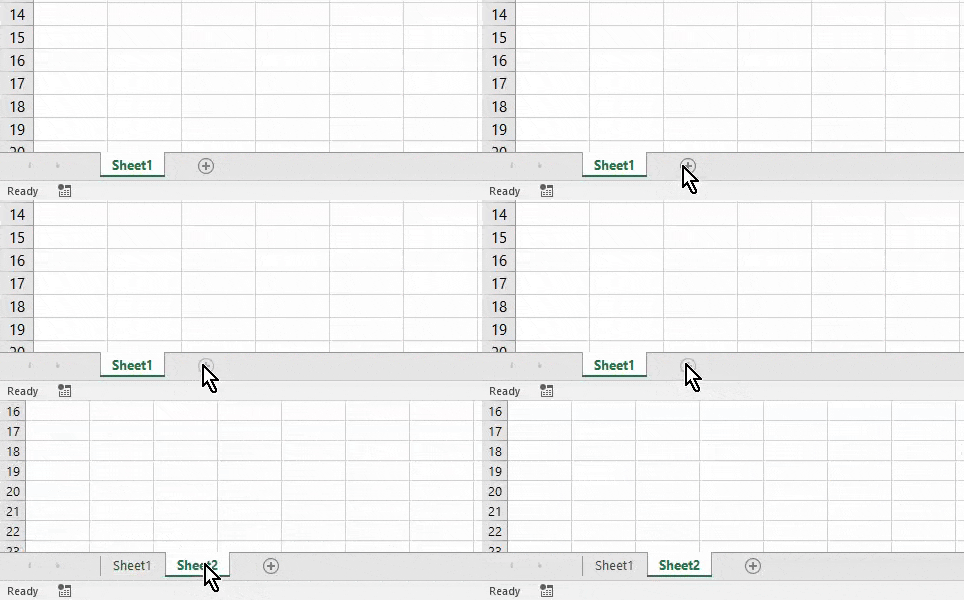
Step #1 – We will find a “+” sign at the bottom of the sheet highlighted in dark red in a workbook.
Step #2 – Click on the “+” sign to insert a new worksheet in Excel, as shown below.
Example #3
There is another way to insert a new worksheet in Excel. Let us understand it with an example.
Step #1 – Open a new workbook, as shown below.
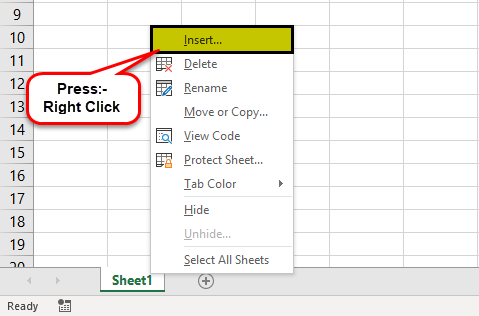
Step #2 – Now, right-click on the existing sheet named as ‘Sheet1’ by default
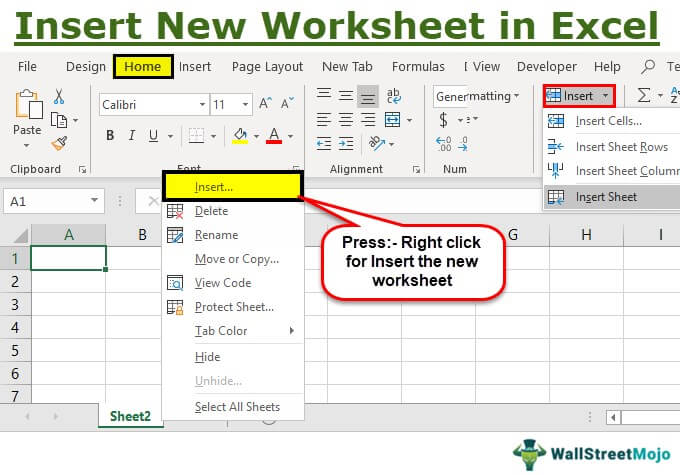
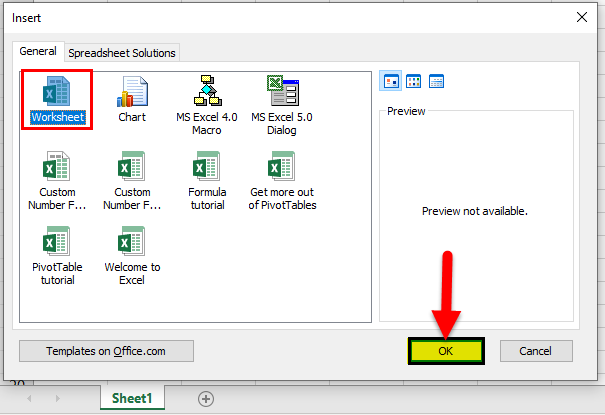
Step #3 – From the above image, click on the “INSERT” option to insert anything. Then, you will get a pop-up, as shown below.
Step #4 – Now, select the “Worksheet” option to insert a new worksheet and click on the “OK” button.
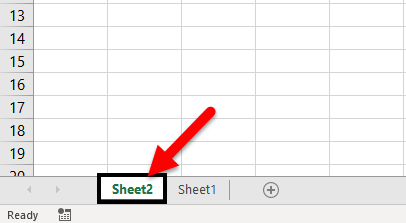
From the above image, we can see the second sheet, named “Sheet 2.” By default, this is the sheet inserted by us using the third procedure.
Example #4
Let us see a new way to insert a new worksheet in Excel, which is another easy and simplest way to insert a worksheet. In this procedure, we will use the “INSERT” option available in the Ribbon bar of an excel.Ribbons in Excel 2016 are designed to help you easily locate the command you want to use. Ribbons are organized into logical groups called Tabs, each of which has its own set of functions.read more
Let us understand it with the help of an example.
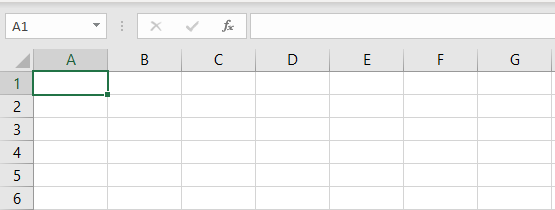
Step #1 – Open a new workbook, as shown below.
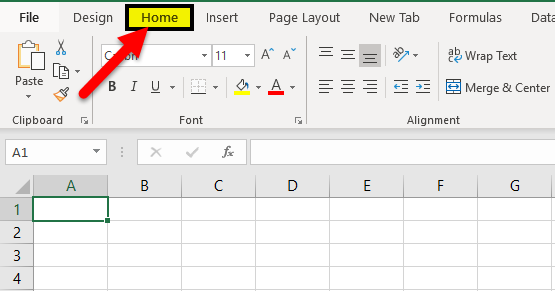
Step #2 – Click on the ‘Home’ tab available in the Ribbon bar of a workbook.
Step #3 – We may find an “Insert” tab on the right side of a ribbon bar under the “Home” tab.
Step #4 – Now, click on the “Insert” icon available on the right side of the ribbon bar to open a drop-down list of options to be selected.
Step #5 – We will find an “Insert Sheet” option available at the end of the drop-down list.
Step #6 – Click on the “Insert Sheet” option available at the end of the drop-down list to insert a new worksheet in Excel, as shown below.
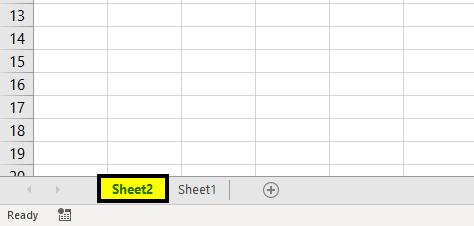
The above figure shows that the second sheet named “Sheet2” has been added to a workbook.
Things to Remember in Insert a New Worksheets in Excel
- A workbook can contain 255 Worksheets.
- A workbook may be slow to use with many worksheets and formulas.
Recommended Articles
This article is a guide to Insert New Worksheet In Excel. Here, we discuss inserting a new worksheet in Excel using shortcut keys and practical examples. You may learn more about Excel from the following articles: –
- Protect Sheet in VBAVBA Protect Sheet is an In-built function that protects the worksheet with a password & prohibits the users from editing, deleting, or moving the contained data. read more
- Rows and Columns in ExcelA cell is the intersection of rows and columns. Rows and columns make the software that is called excel. The area of excel worksheet is divided into rows and columns and at any point in time, if we want to refer a particular location of this area, we need to refer a cell.read more
- Group Worksheets In ExcelGrouping gives the best results to users when the same type of data is presented in the cells of the same addresses. Grouping also improves the accuracy of data and eliminates the error made by a human in performing the calculations.read more
- Protect Sheet in ExcelWhen we don’t want any other user to make changes to our worksheet, we can use the Protect worksheet feature in Excel. It can be found in Excel’s Review tab. read more
Working with MS Excel means working in the worksheets in Excel.
A worksheet is an area that has all the cells where you can store data, enter formulas, insert charts and create reports and dashboards.
When you open a new Excel workbook file, by default there is only one worksheet. Earlier versions of Excel (2013 or 2016 used to have 3 worksheets by default)
There are some simple shortcuts and techniques that you can use to quickly insert new worksheets in the same workbook in Excel.
In this tutorial, I will show you a couple of methods that you can use to insert a new worksheet in the same workbook (one at a time).
I will also show you a method to quickly insert worksheets in bulk, in case you want to add 5, 10, or 20 worksheets in one go (using a simple VBA code).
So let’s get started!
Keyboard Shortcut to Insert a New Worksheet
If you are a fan of keyboard shortcuts, this is probably the fastest way to insert a new worksheet in an already open workbook in excel.
Below is the keyboard shortcut to insert a new worksheet
SHIFT + F11
For this shortcut, hold the SHIFT key and then press the F11 key.
Another keyboard shortcut that does the same job is ALT + SHIFT + F1 (hold the ALT and the SHIFT keys and press the F1 key)
Personally, I find using the keyboard shortcut to be the best way to insert a new worksheet in Excel. Even if I have to insert multiple worksheets (say 3 or 5 or 10), I can still do that very quickly
Insert New Sheet Using the Plus Icon
If you’re not a big fan of keyboard shortcuts and prefer using the mouse instead, this method is for you.
At the bottom of your worksheet (in the area that has all the sheet names), you will see the plus icon.
Clicking on this plus icon will immediately insert a new worksheet.
Insert New Sheet Using the Insert Dialog Box
Another way to insert a new sheet in Excel is by using the Insert dialog box.
Below are the steps to do this:
- Right-click on any of the sheets
- Click the Insert option

- In the Insert dialog box, make sure Worksheet is already selected (which is also the default option).

- Click on Ok
While this is not the fastest way to add a new sheet in an Excel workbook, it’s good to know as it gives you access to some other things as well.
Apart from inserting a regular worksheet, you can also use this to insert a ‘Chart Sheet’ or a ‘Macro Sheet’ using the insert dialog box.
If you’re wondering, a Chart Sheet is just like a worksheet but is meant only to hold a chart. A macro sheet is something that was used earlier before the VBA days and is no longer used.
In most cases, you won’t be needing these, but it’s good to know.
There is also the Spreadsheet Solutions tab that holds some of the templates. You can also create and get your own templates here. So the next time you need to quickly insert a template, you can do it from here.
Adding New Worksheets Using the Insert Tab in the Ribbon
And finally, you also have an option in the Excel ribbon to add a new worksheet.
To do this:
- Click the Home tab

- In the Cells group, click on the Insert option

- Click on the Insert Sheet option.

This will insert one new worksheet in the open workbook
How to Insert Multiple Worksheets in One Go (One Line VBA Code)
So far, the methods that I have shown you insert one new worksheet at a time.
In case you want to insert multiple worksheets, you would have to use these methods again and again (i.e., use the keyboard shortcuts multiple times or use the plus icon multiple times).
While this works fine in most cases, if you have to insert worksheets in bulk, saying so 10 or 20 or 30 worksheets in one go, then this could be time-consuming and error-prone.
So let me show you a better way to insert multiple new worksheets in one go.
This can be done easily using a simple one-line VBA code:
Sheets.Add Count:=10
The above code would instantly add 10 new sheets in the workbook in which it’s run (if you want any other number of sheets to be added, just change the value in the code)
Below are the steps to run this macro code:
- Click the Developer tab (or use the keyboard shortcut ALT + F11) and then click on Visual Basic
- If you don’t see the immediate window in the VB Editor, click on the View option and then click on Immediate window

- Copy and paste the above code in the immediate window

- Place the cursor at the end of the VBA code line and hit Enter
As soon as you hit Enter, it would instantly insert 10 new sheets in the workbook. In case you want to insert more (say 20 or 30), just change the number in the code
The good thing about using this code is that you can be sure that it would insert the right number of sheets (no chance of human error if the code is executed without any errors).
In case you need to do this quite often, you can use the below code and paste it into our Personal Macro workbook.
Sub AddSheets()
Sheets.Add Count:=10
End Sub
Once in Personal Macro Workbook, you can add it to the Quick Access Toolbar so you always have access to it in the workbook.
This way, you can easily add 10 or 20 sheets with just a single click.
Changing the Default Number of Sheets with New Excel Workbooks
If you always have a need for more worksheets in the workbook, you can change the default number of sheets you get when you open a new Excel file.
For example, you can change the setting so that you always get 5 or 10 sheets by default with every newly opened workbook.
Below are the steps to change this default setting:
- Open any Excel workbook
- Click the File tab

- Click on Options. This will open the Excel Options dialog box
- In the Excel Options dialog box, make sure the General option is selected in the left-pane

- In the ‘When creating new workooks’ section, enter the number of sheets you want (in the Include this many sheets value).

- Click OK
Now when you open a new Excel workbook, it will have the specified number of worksheets.
Note that an Excel file can have a maximum of 255 sheets.
These are all the ways you can use to insert a new sheet in Excel. In most cases, you only need to add one or a couple of new sheets, so you can use the keyboard shortcut or the plus icon in the worksheet.
And in case you have a need to insert many new sheets in bulk, you can use the VBA code. Alternatively, you can also change the default number of sheets in any new Excel workbook.
I hope you found this tutorial useful!
Other Excel tutorials you may also like:
- How to Delete Sheets in Excel (Shortcuts + VBA)
- How to Rename a Sheet in Excel (4 Easy Ways + Shortcut)
- How to Print Excel Sheet on One Page (Fit to One Page)
- How to Group Worksheets in Excel (Step-by-Step)
- How to Compare Two Excel Sheets (for differences)
- How to Move Chart to New Sheet in Excel?
- Count Sheets in Excel (using VBA)
How to Insert a New Worksheet in Excel (2023 Guide)
When you create a new Excel workbook, you automatically create an Excel worksheet. That’s like hitting two birds with one stone 😀
However, it’s important to note that an Excel workbook is different from an Excel worksheet.
An Excel workbook is an Excel file that contains one or more worksheets. These worksheets (also called spreadsheets) consist of cells organized into rows and columns. It’s where we do the work of storing, organizing, and calculating data.
Today, learn more about Excel worksheets so you can make them work for you. In this article, you’ll learn the best ways how to insert a new worksheet in Excel, and how to rename or delete it as well 😊
Let’s go!
Add worksheet with mouse clicks
To add a new worksheet, you need to first create a new Excel workbook. You can also open an existing Excel file on your computer.
For our example, let’s create a new blank workbook.
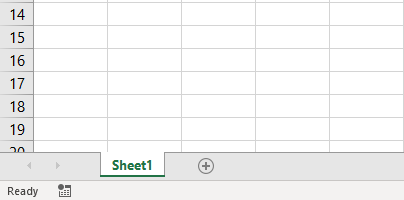
By creating a new blank workbook, a new blank worksheet is seen on your screen 👇
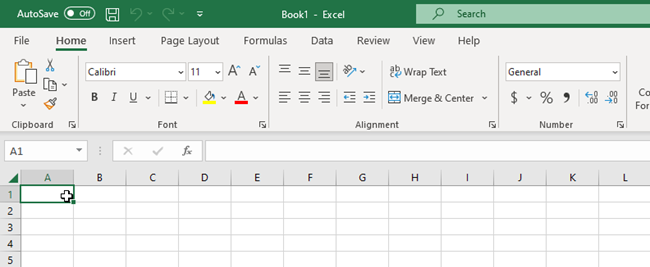
If you want to see your worksheets, just look at the Sheets Tab at the bottom left of your Excel window👀umn.
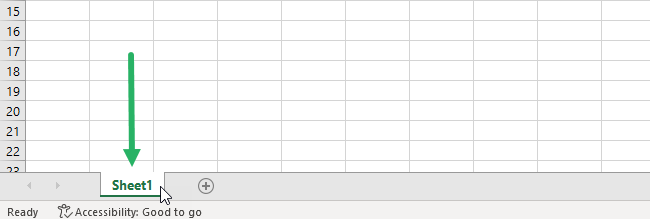
Let’s add another Excel sheet to our new workbook.
All you have to do is to click the plus icon (+) next to Sheet 1.
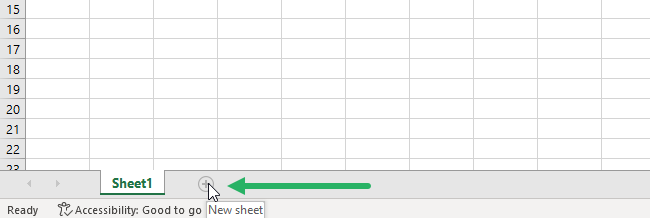
And that’s it! You will be automatically directed to the new worksheet you can work on 😊
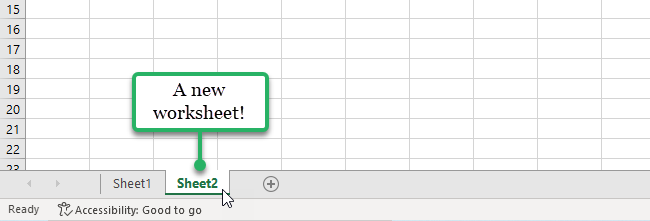
Simply click the plus icon if you want to add more worksheets to the workbook. The sheet name will follow as Sheets 1, 2, 3, and so on. The newly added worksheet will be the rightmost sheet in your Excel sheet tab.
One new sheet in one click 👍
Add worksheet using right-click menu option
Alternatively, you can also insert a new worksheet using the right-click menu option. Here’s how to do that 👇
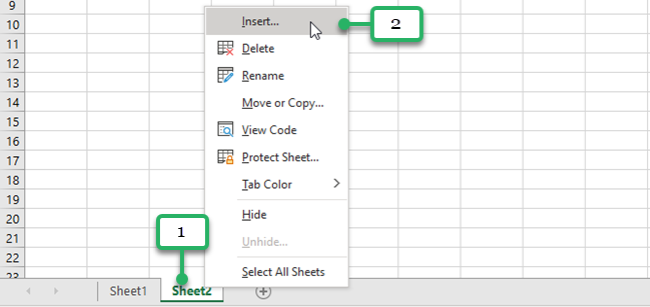
- Right-click on the Sheet2 tab.
- Select Insert.
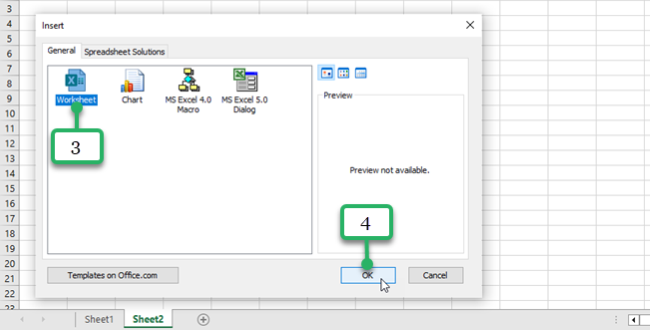
The Insert dialog box will appear. It will show you what you can insert.
- Click Worksheet.
- Finally, click OK.
The new worksheet will be inserted before the selected sheet tab. In our case, between Sheets 1 and 2.
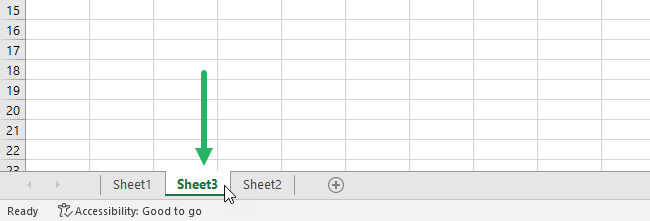
You might be saying: “This isn’t in order.” 🤔 and you’re right.
But you don’t need to worry. You can move a sheet tab to where you want it to be.
Move your worksheet
To move an Excel worksheet, you just need to press on that sheet tab and drag.
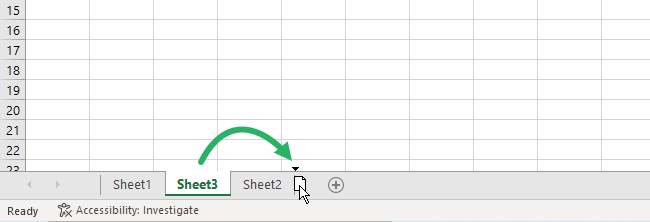
Alternatively, you can also right-click on the sheet tab to find the Move or Copy option to move or copy the worksheet 😊
Add worksheet with a keyboard shortcut
If you don’t want to insert worksheets using your mouse, you can also use the keyboard shortcut.
Keyboard shortcuts or shortcut keys can perform the same tasks and functions in Excel without having to use your mouse. Many users find keyboard shortcuts in Excel help them work more efficiently and also feel like an Excel PRO 😎
The keyboard shortcut to insert a new worksheet is Shift + F11.
Let’s use this keyboard shortcut to insert a new worksheet into our workbook.
- Click Sheet 3 in the sheet tab.
- Press the Shift key and F11 on your keyboard. Make sure you hold down the Shift key before hitting the F11 key.
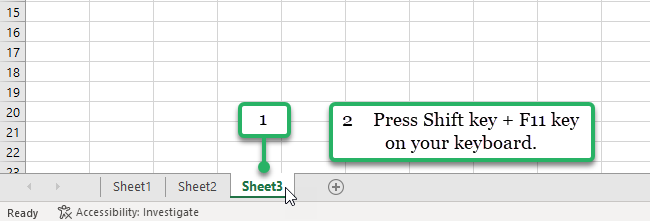
The new sheet is inserted before sheet 3 in the tab, that quick ⚡
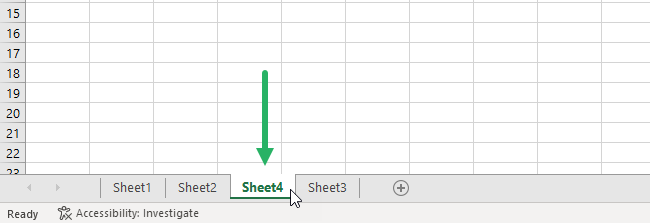
If you want to insert multiple worksheets, just press the keys on your keyboard multiple times as well.
Many Microsoft Office users find keyboard shortcuts very helpful for them to work more efficiently. Aside from that, keyboard shortcuts are of great help for users with vision and mobility disabilities. They prefer keyboard shortcuts better than using touch screens or using a mouse 😊
Add a worksheet from the ribbon menu
Of course, the most obvious method to add worksheets to your workbook is using the Insert button in the Home tab of the Excel ribbon.
To insert a new worksheet from the ribbon menu, follow these easy steps.
- Click on the Home Tab.
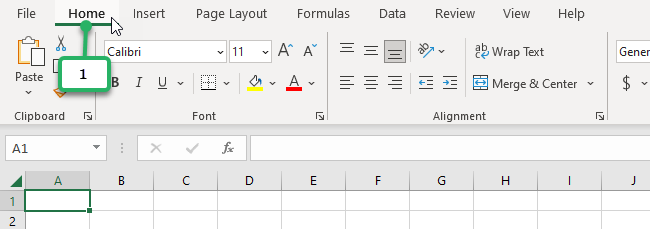
- Click the Insert button in the Cells group.
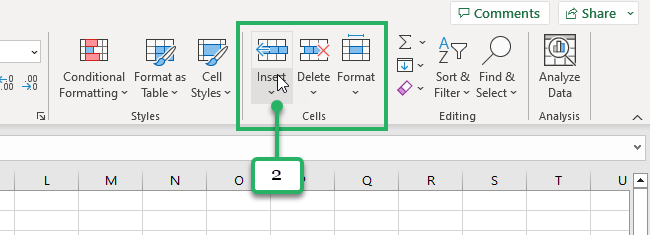
- From the drop-down list, select the Insert Sheet option.
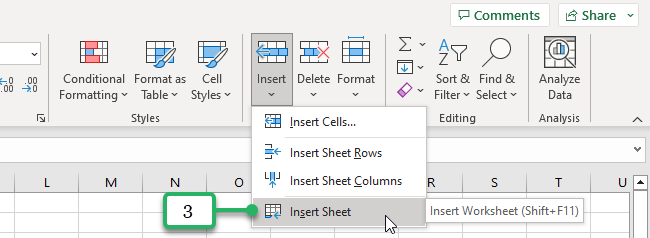
And there you have it! One new worksheet is ready for you to use 😀
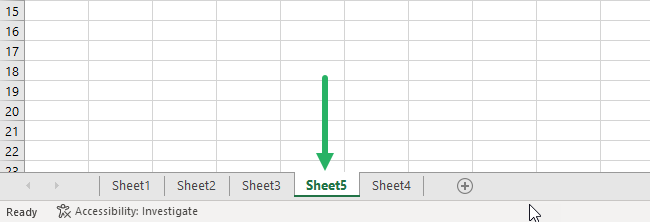
This may be the best time to rename your worksheets.
Renaming your worksheets
Renaming the worksheets in your workbook will keep your workbook organized and save you time in finding the data you want 👍
To rename your worksheets, double-click on their sheet tab like this.
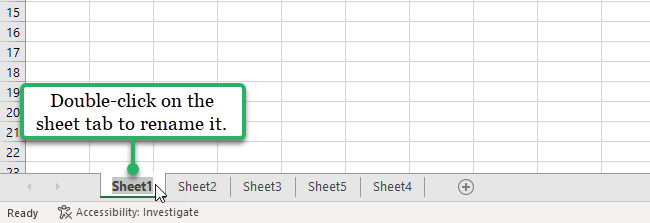
Or do this 2-step method.
- Right-click on the sheet tab.
- Select Rename in the menu.
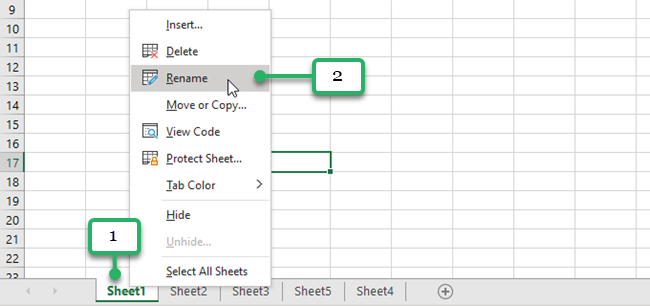
Now, we can then go ahead and type.
Let’s say this workbook will be a list of employees in each department. We can label the worksheets this way 😀
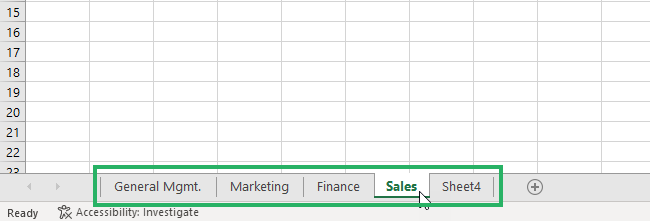
Sometimes, there are worksheets we no longer need or want to delete. It could be duplications or a blank one that we wish to eliminate. To do that, continue to scroll down 👇
Delete your worksheets
To delete your Excel Worksheet, right-click on the worksheet tab and select the delete option from the dialog box as shown below.
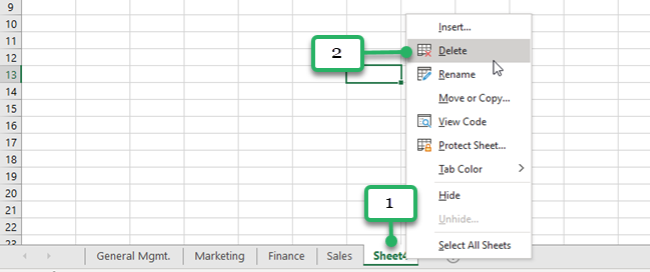
That’s it – Now what
Well, now you know how to work your way with worksheets in Microsoft Excel. From inserting one or multiple worksheets to organizing them so you won’t be lost in your workbooks 👍
The next time you want to insert a new sheet, try using the keyboard shortcut to feel like the Excel PRO you are on your way to becoming 😎
If your goal is to learn how to keep your data organized or level up your Excel skills, then my free Excel Intermediate training is for YOU!
I’ll be sending you FREE lessons about How to effectively clean your data, and the most important Excel functions like IF, SUMIF, and VLOOKUP 🚀
Click here to join my free email course and become an Excel PRO!
Other resources
Did you know that you can group multiple worksheets in your workbook? Learn how by clicking this link!
Want to learn more keyboard shortcuts? We’ve written 11 Best Excel Shortcuts you’ll ever need. It comes with practical examples too. Click here to learn more.
I hope you find this helpful 👋
Frequently asked questions
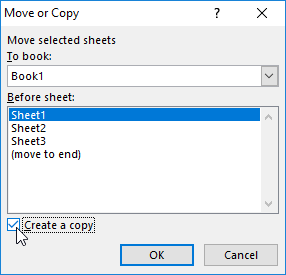
To create a new sheet with the same format as an existing worksheet, right-click on the sheet tab of the worksheet you want to copy. Then select the Move or Copy option.
Tick the checkbox “Create a copy” in the Move and Copy dialog box. Finally, click OK.
You can press Shift + F11 keys to insert a new worksheet. Then double-click the tab of the current worksheet to rename it.
Kasper Langmann2023-01-09T08:31:53+00:00
Page load link
Содержание
- VBA Routine to Add and Name Worksheets
- Add Sheet
- Add Sheet with Name
- Create New Sheet with Name from a Cell
- Add Sheet Before / After Another Sheet
- Insert Sheet After Another Sheet
- Add Sheet To End of Workbook
- Add Sheet To Beginning of Workbook:
- Add Sheet to Variable
- More Add Sheet Examples
- Create Sheet if it Doesn’t Already Exist
- Create Worksheets From List of Names
- VBA Coding Made Easy
- VBA Code Examples Add-in
- How to add sheet to workbook: VBA, Excel
- Copy method
- Syntax
- What happens then?
- Examples of use
- The Add Method
- Syntax
- Examples of use
- Testing the sheet
- Check if sheet already exists in the workbook
- Check if the filename contains forbidden characters
- Calling the verification function
- Some useful tips for Office 2013
- Copy a range of cell using the FillAcrossSheets method
- Insert or delete a worksheet
- Insert a worksheet
- Rename a worksheet
- Move a worksheet
- Delete a worksheet
- What do you want to do?
- Insert multiple worksheets at the same time
- Change the default number of worksheets in a new workbook
- Insert a new sheet that is based on a custom template
- Rename a worksheet
- Delete one or more worksheets
- Need more help?
VBA Routine to Add and Name Worksheets
In this Article
This tutorial will discuss how to add / insert worksheets using VBA.
Add Sheet
This simple macro will add a Sheet before the ActiveSheet:
After inserting a Sheet, the new Sheet becomes the ActiveSheet. You can then use the ActiveSheet object to work with the new Sheet (At the bottom of this article we will show how to insert a new sheet directly to a variable).
Add Sheet with Name
You can also define a Sheet name as you create the new Sheet:
Create New Sheet with Name from a Cell
Or use a cell value to name a new Sheet:
Add Sheet Before / After Another Sheet
You might also want to choose the location of where the new Sheet will be inserted. You can use the After or Before properties to insert a sheet to a specific location in the workbook.
Insert Sheet After Another Sheet
This code will insert the new sheet AFTER another sheet:
This will insert a new Sheet AFTER another sheet and specify the Sheet name:
Notice the extra parenthesis required in the second example (the first example will generate an error if the second parenthesis are added).
In these examples we explicitly named the Sheet used to determine the sheet location. Often you’ll want to use the Sheet Index number instead, so that you can insert the sheet to the beginning or end of the Workbook:
Add Sheet To End of Workbook
To add a Sheet to the end of the workbook:
Add Sheet To Beginning of Workbook:
To add a Sheet to the beginning of the workbook:
Add Sheet to Variable
This code assigns the new Sheet to a variable as the sheet is created:
From here you can reference the new sheet with the variable ‘ws’:
More Add Sheet Examples
Create Sheet if it Doesn’t Already Exist
You might want to create a sheet only if it doesn’t already exist.
Create Worksheets From List of Names
The following routine will look at the contents of a single column set up Excel worksheets within the current workbook with these names. It makes a call to another function to see if a sheet with that name already exists, and if so the sheet isn’t created.
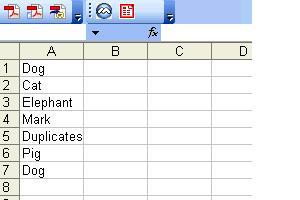
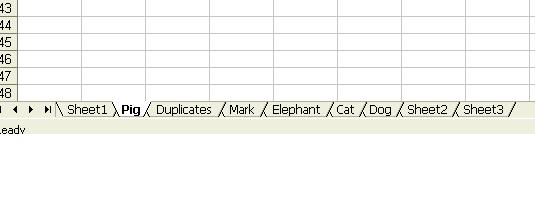
So if we have the following text in cells A1:A30 in Sheet 2:
Then the following sheets will be created:
Note that although “Dog” appears twice, only one sheet is created.
VBA Coding Made Easy
Stop searching for VBA code online. Learn more about AutoMacro – A VBA Code Builder that allows beginners to code procedures from scratch with minimal coding knowledge and with many time-saving features for all users!
VBA Code Examples Add-in
Easily access all of the code examples found on our site.
Simply navigate to the menu, click, and the code will be inserted directly into your module. .xlam add-in.
Источник
How to add sheet to workbook: VBA, Excel
In this article we will show you how to add a sheet to an Excel workbook using VBA. There are 2 different methods detailed below in order to do this.
To add a sheet to a workbook using VBA:
Depending on the result you want to achieve, you can either use the:
- Copy method => For a copy of an existing sheet
- Add method => To add a new blank sheet to your workbook.
You must also make sure that the name of the new sheet is compliant. That is to say, the name of the sheet should not be identical to an existing one or contain any forbidden characters. In both cases, the verification methods should be the same.
Copy method
Copy a sheet. The data and format of the new sheet will be identical to the source sheet.
Syntax
expression .Copy(Before, After) Expression can either be a Sheet or Worksheet object. The Before and After parameters are optional. You can only specify one of these two parameters. They are of the Variant type and can either represent the sheet locate before or after the one you want to copy. If the parameter is omitted, the sheet is automatically copied into a new workbook.
What happens then?
When creating a new sheet with the Copy method:
- The sheet is created at the desired location (before or after another sheet in the workbook)
- It is renamed based on the name of the source sheet. Example: Sheet1 => Sheet1(2)
- It is identical to the copied sheet.
- It becomes the active sheet. If the sheet is copied to a new workbook, it becomes the active workbook.
Examples of use
Copy the «Sheet1» after «Sheet3»
Copy the «Sheet4» before the «Sheet2»:
Copy the «recap» sheet in a new workbook
Copy the sheet indexed as 1 at the last position of the workbook, regardless of the name of the last sheet:
Copy the sheet indexed as 10 at the beginning of the workbook, regardless of the name of the last sheet:
You want to copy multiple sheets of your active workbook into a new workbook:
The Add Method
Creates a new spreadsheet (graphics or macro). The new worksheet becomes the active sheet. This new sheet doesn’t contain any data or formatting.
Syntax
expression .Add(Before, After,Count,Type) Expression can either be a Sheet or Worksheet object. The Before, After, Count and type parameters are optional. Either and Before — You can only specify one of these parameters. They are of the Variant type and can either represent the sheet locate before or after the one you want to copy. The Count parameter is also a Variant. It represents the number of sheets you want to add. The Type parameter represent the type of sheet you want to add.
- xlWorkSheet — adds a worksheet
- xlChart — adds a chart sheet
- xlExcel4MacroSheet — adds a macro sheet (Excel4)
- xlExcel4IntlMacroSheet — adss a macro sheet
- xlDialogSheet — adds a dialog sheet.
NB: Don’t forget to rename your parameters or the syntax will return the below error:
Examples of use
Put a sheet after the last sheet in the workbook:
Adds three sheets at the «first position» of the active workbook:
Adds a chart sheet in a workbook named «Wbk18» (Open!) after the sheet named «Sheet4»
Testing the sheet
Check if sheet already exists in the workbook
Check if the filename contains forbidden characters
Calling the verification function
The code is the same for both the Copy or Add method.
Some useful tips for Office 2013
Office 2013 brings two complementary methods to those seen previously:
- Copy a range of cells to a sheet and multiple sheets
- The Add2 method for collections of Charts objects.
Copy a range of cell using the FillAcrossSheets method
This method is only available for Office 2013. You want to copy range of cells from «Sheet1» to «Sheet3», «Sheet5» and «Sheet7».
The parameters of this method are:
- Range: Required
- Type: Optional
- xlFillWithAll: Copy the contents and formats.
- xlFillWithContents: Copy the contents.
- xlFillWithFormats: Copy formats.
Источник
Insert or delete a worksheet
In Excel, you can easily insert, rename, and delete worksheets in your workbook.
Insert a worksheet
Select the New Sheet plus icon 
Or, select Home > Insert > Insert Sheet.
Rename a worksheet
Double-click the sheet name on the Sheet tab to quickly rename it.
Or, right-click on the Sheet tab, click Rename, and type a new name.
Move a worksheet
To move the tab to the end, right-click the Sheet tab then Move or Copy > (move to end) > OK .
Or, click and drag to tab to any spot.
Delete a worksheet
Right-click the Sheet tab and select 
Or, select the sheet, and then select Home > Delete > Delete Sheet.
Note: Sheet tabs are displayed by default. If you don’t see them, click Options > Advanced > Display options for this workbook > Show Sheet tabs.
To insert a new worksheet, do one of the following:
To quickly insert a new worksheet at the end of the existing worksheets, click the Insert Worksheet tab at the bottom of the screen.
To insert a new worksheet in front of an existing worksheet, select that worksheet and then, on the Home tab, in the Cells group, click Insert, and then click Insert Sheet.
Tip: You can also right-click the tab of an existing worksheet, and then click Insert. On the General tab, click Worksheet, and then click OK.
Note: To change the order of the worksheets in a workbook, click the tab of the worksheet that you want to move, and then drag it to the location that you want.
What do you want to do?
Insert multiple worksheets at the same time
Hold down SHIFT, and then select the same number of existing sheet tabs of the worksheets that you want to insert in the open workbook.
For example, if you want to add three new worksheets, select three sheet tabs of existing worksheets.
On the Home tab, in the Cells group, click Insert, and then click Insert Sheet.
Tip: You can also right-click the selected sheet tabs, and then click Insert. On the General tab, click Worksheet, and then click OK.
To change the order of the worksheets in a workbook, click the tab of the worksheet that you want to move, and then drag it to the location that you want.
Change the default number of worksheets in a new workbook
Click the File tab.
What and where is the Microsoft Backstage Button?
For more information about the Microsoft Backstage Button, see What and where is the Backstage?
Under Excel, click Options.
In the General category, under When creating new workbooks, in the Include this many sheets box, enter the number of sheets that you want to include by default when you create a new workbook.
Click any other tab to return to your file.
Insert a new sheet that is based on a custom template
If needed, create the worksheet template that you want to base a new worksheet on.
How to create a worksheet template
Select the worksheet that you want to use as a template.
Click the File tab.
Under Info, click Save As.
In the File name box, type the name of the worksheet template.
To create a custom worksheet template, type the file name that you want to use.
To create the default worksheet template, type sheet.
Note: Custom templates are automatically saved in the Templates folder. The default worksheet template, sheet.xltx or sheet.xltm, should be saved in the XLStart folder, which is usually C:Program FilesMicrosoft OfficeOffice14XLStart.
Do one of the following:
On a computer that is running Windows Vista, in the list, click Excel Template or Excel Macro-Enabled Template.
On a computer that is running Microsoft Windows XP, in the Save as type box, click Excel Template or Excel Macro-Enabled Template.
Right-click the sheet tab of a worksheet, and then click Insert.
Double-click the template for the type of sheet that you want.
Rename a worksheet
On the Sheet tab bar, right-click the sheet tab that you want to rename, and then click Rename Sheet.
Select the current name, and then type the new name.
Tip: You can include the name of the sheet when you print the worksheet.
How to print sheet names
On the Insert tab, in the Text group, click Header & Footer.
In the Page Layout View, click the location where you want the sheet name to appear.
In the Header & Footer elements group, click Sheet Name 
Delete one or more worksheets
Select the worksheet or worksheets that you want to delete.
Tip: When multiple worksheets are selected, [Group] appears in the title bar at the top of the worksheet. To cancel a selection of multiple worksheets in a workbook, click any unselected worksheet. If no unselected sheet is visible, right-click the tab of a selected sheet, and then click Ungroup Sheets on the shortcut menu.
On the Home tab, in the Cells group, click the arrow next to Delete, and then click Delete Sheet.
Tip: You can also right-click the sheet tab of a worksheet or a sheet tab of any selected worksheets that you want to delete, and then click Delete Sheet.
Need more help?
You can always ask an expert in the Excel Tech Community or get support in the Answers community.
Источник
This code creates an Excel file with one sheet. This sheet contains the code of an item like (ASR/Floor/Dept./Item_Name/Item_details/1) which I created and works fine, but I want to add a sheet into this Excel file to create another item code, and then save this file.
Dim xlApp As Excel.Application
Dim wb As Workbook
Dim ws As Worksheet
Dim var As Variant
Dim code As String
Dim i, nocode As Integer
Dim fname, heading As String

code = "ASR/" & Text1.Text & "/" & Text2.Text & "/" & Text3.Text & "/" & Text4.Text

Set xlApp = New Excel.Application
Set wb = xlApp.Workbooks.Add ' Create a new WorkBook
Set ws = wb.Worksheets("Sheet1") 'Specify your worksheet name

nocode = txtnocode.Text
heading = Text6.Text

For i = 2 To nocode + 1
  ws.Cells(i, 1).Value = code & "/" & i - 1 '"ORG"
Next i

fname = "c:" & Text5.Text & ".xls"

wb.SaveAs (fname)
wb.Close
xlApp.Quit

Set ws = Nothing
Set wb = Nothing
Set xlApp = Nothing
ashleedawg
20k8 gold badges73 silver badges104 bronze badges
asked Jul 16, 2011 at 7:35
The Worksheets.Add method is what you are looking for:
wb.WorkSheets.Add().Name = "SecondSheet"
See MSDN(scroll down and expand Sheets and Worksheets) for the different parameters you can give to .Add including being able to add the sheet before or after a specific one.
answered Jul 16, 2011 at 8:54
jonscajonsca
10.2k26 gold badges56 silver badges62 bronze badges
Set ws = wb.Sheets("Sheet1")
Set ws = wb.Sheets.Add
ws.Activate
Taryn
241k56 gold badges362 silver badges405 bronze badges
answered Jul 12, 2013 at 13:16
This is some standard code I use for this type of problem
Note: This code is VBA, to run from within the Excel document itself
 Option Explicit

Private m_sNameOfOutPutWorkSheet_1 As String


Sub Delete_Recreate_TheWorkSheet()

    On Error GoTo ErrorHandler

    '=========================
    Dim strInFrontOfSheetName As String
    m_sNameOfOutPutWorkSheet_1 = "Dashboard_1"
    strInFrontOfSheetName = "CONTROL"    'create the new worksheet in front of this sheet

    '1] Clean up old data if it is still there
    GetRidOf_WorkSheet_IfItExists (m_sNameOfOutPutWorkSheet_1)

    CreateNewOutputWorkSheet m_sNameOfOutPutWorkSheet_1, strInFrontOfSheetName
    'Color the tab of the new worksheet
    ActiveWorkbook.Sheets(m_sNameOfOutPutWorkSheet_1).Tab.ColorIndex = 5

    'Select the worksheet that I started with
    Worksheets(strInFrontOfSheetName).Select

    '=========================
      Exit Sub

ErrorHandler:
        Select Case Err.Number
            Case Else
                MsgBox "One_Main - Error: " & Err.Number & " " & Err.Description
        End Select
 End Sub

Sub GetRidOf_WorkSheet_IfItExists(sWorkSheetName_ForInitalData As String)
    On Error GoTo ErrorHandler

    '=========================

    If fn_WorkSheetExists(sWorkSheetName_ForInitalData) Then
        'Sheet Exists
        Application.DisplayAlerts = False
        Worksheets(sWorkSheetName_ForInitalData).Delete
        Application.DisplayAlerts = True

    End If

    '=========================
      Exit Sub

ErrorHandler:
        Select Case Err.Number
            Case Else
                MsgBox "GetRidOf_WorkSheet_IfItExists - Error: " & Err.Number & " " & Err.Description
        End Select
    End Sub


Function fn_WorkSheetExists(wsName As String) As Boolean
    On Error Resume Next
    fn_WorkSheetExists = Worksheets(wsName).Name = wsName
End Function


Sub CreateNewOutputWorkSheet(sWorkSheetName_ForOutputData As String, strInFrontOfSheetName As String)
    On Error GoTo ErrorHandler

    '=========================
    If fn_WorkSheetExists(sWorkSheetName_ForOutputData) Then
        'Sheet Exists
        Application.DisplayAlerts = False
        Worksheets(sWorkSheetName_ForOutputData).Delete
        Application.DisplayAlerts = True
    End If

    Dim wsX As Worksheet
    Set wsX = Sheets.Add(Before:=Worksheets(strInFrontOfSheetName))

    wsX.Name = sWorkSheetName_ForOutputData

    '=========================
      Exit Sub

ErrorHandler:
        Select Case Err.Number
            Case Else
                MsgBox "CreateNewOutputWorkSheet - Error: " & Err.Number & " " & Err.Description
        End Select
End Sub
answered Aug 9, 2013 at 19:32
In this article we will show you how to add a sheet to an Excel workbook using VBA. There are 2 different methods detailed below in order to do this.
To add a sheet to a workbook using VBA:
Depending on the result you want to achieve, you can either use the:
- Copy method => For a copy of an existing sheet
- Add method => To add a new blank sheet to your workbook.
You must also make sure that the name of the new sheet is compliant. That is to say, the name of the sheet should not be identical to an existing one or contain any forbidden characters. In both cases, the verification methods should be the same.
Copy method
Copy a sheet. The data and format of the new sheet will be identical to the source sheet.
Syntax
expression .Copy(Before, After) Expression can either be a Sheet or Worksheet object. The Before and After parameters are optional. You can only specify one of these two parameters. They are of the Variant type and can either represent the sheet locate before or after the one you want to copy. If the parameter is omitted, the sheet is automatically copied into a new workbook.
What happens then?
When creating a new sheet with the Copy method:
- The sheet is created at the desired location (before or after another sheet in the workbook)
- It is renamed based on the name of the source sheet. Example: Sheet1 => Sheet1(2)
- It is identical to the copied sheet.
- It becomes the active sheet. If the sheet is copied to a new workbook, it becomes the active workbook.
Examples of use
Copy the «Sheet1» after «Sheet3»
Worksheets("Sheet1").Copy After:=Worksheets("Sheet3")
Copy the «Sheet4» before the «Sheet2»:
Sheets("Sheet4").Copy Before:=Sheets("Sheet2")
Copy the «recap» sheet in a new workbook
Worksheets("recap").Copy
Copy the sheet indexed as 1 at the last position of the workbook, regardless of the name of the last sheet:
Sheets(1).Copy After:=Sheets(Sheets.Count)
Copy the sheet indexed as 10 at the beginning of the workbook, regardless of the name of the last sheet:
Sheets(10).Copy Before:=Sheets(1)
You want to copy multiple sheets of your active workbook into a new workbook:
Sheets(Array("Sheet1", "Sheet3", "Sheet5")).Copy
The Add Method
Creates a new spreadsheet (graphics or macro). The new worksheet becomes the active sheet. This new sheet doesn’t contain any data or formatting.
Syntax
expression .Add(Before, After,Count,Type) Expression can either be a Sheet or Worksheet object. The Before, After, Count and type parameters are optional. Either and Before — You can only specify one of these parameters. They are of the Variant type and can either represent the sheet locate before or after the one you want to copy. The Count parameter is also a Variant. It represents the number of sheets you want to add. The Type parameter represent the type of sheet you want to add.
- xlWorkSheet — adds a worksheet
- xlChart — adds a chart sheet
- xlExcel4MacroSheet — adds a macro sheet (Excel4)
- xlExcel4IntlMacroSheet — adss a macro sheet
- xlDialogSheet — adds a dialog sheet.
NB: Don’t forget to rename your parameters or the syntax will return the below error:
ActiveWorkbook.Sheets.Add Before:=Worksheets(Worksheets.Count), , 1, xlChart
Examples of use
Put a sheet after the last sheet in the workbook:
Sheets.Add After:=Worksheets(Worksheets.Count)
Adds three sheets at the «first position» of the active workbook:
ActiveWorkbook.Sheets.Add Before:=Worksheets(1), Count:=3
Adds a chart sheet in a workbook named «Wbk18» (Open!) after the sheet named «Sheet4»
WorkBooks("Wbk18").Sheets.Add After:=Worksheets("Sheet4"), Type:=xlChart
Testing the sheet
Check if sheet already exists in the workbook
'Test si la feuille existe déjà
Function Feuil_Exist(strWbk As String, strWsh As String) As Boolean

'Gestionnaire d'erreur
On Error Resume Next
    '"Test"
    Feuil_Exist = (Workbooks(strWbk).Sheets(strWsh).Name = strWsh)
End Function
Check if the filename contains forbidden characters
'Test si la chaine contient un caractère à éviter
Function Valid_Name(strName As String, strChr As String) As Boolean
Dim i As Byte, Tb_Car() As String, strProhib As String

strProhib = "/:*?""<>|" ' Liste des caractères à éviter
Tb_Car = Split(StrConv(strProhib, vbUnicode), Chr$(0))
'Boucle sur tous les caractères à éviter
 'Nota : le -1 est dû au Split de la chaine par le séparateur Chr(0)
 'En effet, la chaine se terminant par un Chr(0) il convient d'exclure ce dernier caractère
For i = LBound(Tb_Car) To UBound(Tb_Car) - 1
    'Test si la chaîne contient un caractère prohibé
    If InStr(strName, Tb_Car (i)) > 0 Then
 'Si oui : Return False
        Valid_Name = False
 'ET Retourne le caractère prohibé
        strChr = Tb_Car(i)
        Exit Function
    End If
Next i
'Si OK : Return True
Valid_Name = True
End Function
Calling the verification function
The code is the same for both the Copy or Add method.
Sub Principale()
Dim strNewName As String, strCara As String

strNewName = "NewSheet"
If Valid_Name(strNewName, strCara) = False Then
    MsgBox "Le nom : " & strNewName & " est invalide." & vbCrLf & _
            "Un nom de feuille ne peut pas contenir le caractère : " & strCara, vbCritical
    Exit Sub
End If
If Feuil_Exist(ThisWorkbook.Name, strNewName) = True Then
    MsgBox "Le nom : " & strNewName & " est invalide." & vbCrLf & _
            "Ce nom de feuille est déjà utilisé dans ce classeur.", vbCritical
    Exit Sub
End If
ThisWorkbook.Sheets.Add 'Ou : ThisWorkbook.Sheets("Feuil1").Copy After:=Sheets(Sheets.Count)
ActiveSheet.Name = strNewName
End Sub
Some useful tips for Office 2013
Office 2013 brings two complementary methods to those seen previously:
- Copy a range of cells to a sheet and multiple sheets
- The Add2 method for collections of Charts objects.
Copy a range of cell using the FillAcrossSheets method
This method is only available for Office 2013. You want to copy range of cells from «Sheet1» to «Sheet3», «Sheet5» and «Sheet7».
Sheets = Array("Sheet3", "Sheet5", "Sheet7")
Sheets(Sheets).FillAcrossSheets Worksheets("Sheet1").Range("A1:C5")
The parameters of this method are:
- Range: Required
- Type: Optional
- xlFillWithAll: Copy the contents and formats.
- xlFillWithContents: Copy the contents.
- xlFillWithFormats: Copy formats.
The Add2 method
This method is only available for Office 2013. The method applies to collections of Charts objects and returns a «Runtime» error when used with Sheets and WorkSheets objects. No more info on Microsoft.com except the syntax: expression .Add(Before, After,Count,NewLayout) Expression represents a Worksheet object. The parameters are identical to the Add method, simply replace the Type parameter with NewLayout. If NewLayout is set to True, the graphic is inserted using the new rules.
any more excel questions? check out our forum!
The Excel worksheet – is the workspace under the toolbar. This sheet consists from a set of cells arranged among it selves relative to rows and columns.
Its appearance resembles to a large table. There are 3 sheets are default in each new Excel workbook.
For the user, the sheet is a file with a document that is nested in the folder (Excel workbook). Sheets can and should be managed. The sheets can be moved in other workbooks. This operation saves a lot of time than just copying and transferring the contents of the sheet itself.
Excel sheets as a data environment
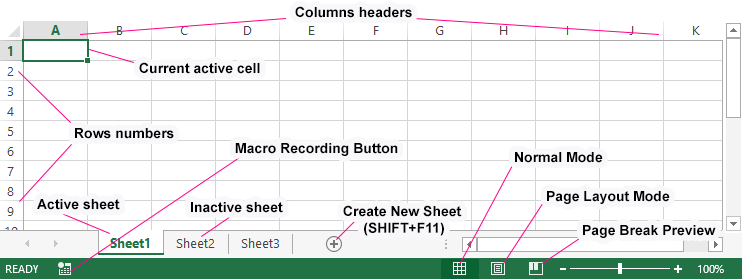
In a standard book, each sheet is the large tables, that are filled with data and formulas. How to add a sheet in Excel? As necessary, you can insert the additional sheets (SHIFT+F11) or delete unused ones. To create a new worksheet in Excel, you can clicking on the last tab of the sheets, as it shown in the picture:
The book can contain from 1 to 255 sheets.
How do I copy a worksheet to Excel? For fast implementation of this task it is necessary:
- To point the mouse cursor on the sheet tab (shortcut) that you need to copy.
- To make the click with the left button of the teddy bear, holding down the button + CTRL key and move the cursor to the place of the bookmarks where the copy should be inserted.
If there are too many sheets, or if you need to copy / move a sheet to a new workbook, then we do the following:
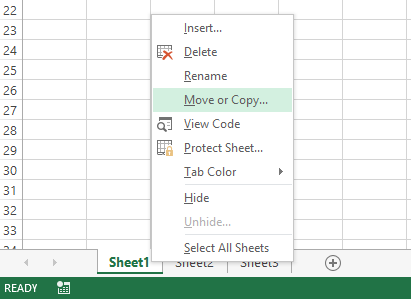
- Right-click on the bookmark tab (shortcut) to call the context menu, where we select the option «Move or Copy …».
- In the window that appears, we configure the parameters for copying the worksheet. From the top you need to choose what of the opening work books should copy. Below we indicate, what sheets to insert a copy between.
- If we copy the sheet, but do not transfer it, check the «Create a copy» option.
The exercises with sheet elements
Task 1: Click on each element shown in the picture above and try to remember its location, name.
Task 2: Click on the tabs located in the bottom (Sheet2, Sheet3 and Sheet1) alternately. After clicking, the tab of each sheet becomes active, and its bookmark is highlighted.
Note: each book can contain a lot of sheets (up to 255 pcs.), similar to how the folder contains files.
Various operations with sheets will be considered in the following lessons.
Working with Sheet Cells
The most important element of the sheet is the cell. Each cell has its own sequence number relative to the rows and a Latin letter relative to the columns. Thus, each cell has its own address (like cells in a chessboard). That is, the first cell (in the upper left corner) has the address A1, and under it the cell with the address A2. On the right side of the cell address B1, etc.
The number of rows in each sheet of Excel 2010 is slightly more than one million, more precisely is 1 048 578 pcs. The number of columns is much smaller — 16 384 pcs.
Pay attention! After 26 Latin letters, the name of the columns is no longer of one, but of 2 or more letters in logical, alphabetical order. Thus, the address of the last cell in the bottom-right corner of the sheet is XFD1048578.
Each cell can be written:
- text;
- number;
- date and time;
- formulas;
- logical expressions.
Each cell can be formatted and assigned a note. All data and cell formatting styles can be changed. It is also worth noting that formatting the borders of cells is the key basis for designing the appearance of tables (for example, for printing forms, etc.).
Once you start learning VBA one of the coolest things you can do is to write a VBA code to insert new a worksheet in a workbook.
Well, there is already a shortcut key to insert a new worksheet or you can also use the normal option but the benefit of using a VBA code is you can add multiple worksheets with a single click and you can also define that where you want to add it.
For this, you need to use the Sheets.Add method, and in this post, we will be learning how to use it to add one or more worksheets in a workbook.
Sheets.Add Method
Sheets.Add ([Before], [After], [Count], [Type])- Before: To add a new sheet before a sheet.
- After: To add the new sheet before a sheet.
- Count: Number of sheets to add.
- Type: Type of the sheet you want to add (LINK)
Open the visual basic editor and follow these steps.
- First, you need to enter Sheets.Add method.
- Then you need to define the place to add the new sheet (Before or After).
- Next thing is to enter the count of worksheets.
- In the end, the type of sheet.

Different Ways to Add New Sheets in a Workbook using a VBA Code
Below you have different ways to add a new sheet to a workbook:
1. Add a Single Sheet
To add a single sheet, you can use the below code, where you didn’t specify any argument.
Sub SheetAddExample1()
ActiveWorkbook.Sheets.Add
End Sub
This code tells Excel to add a sheet in the active workbook, but as you don’t have any argument it will use the default values and add one worksheet(xlWorksheet) before the active sheet.
Here’s one more way to write this, check out the below code.
Sub SheetAddExample2()
Sheets.Add
End Sub
As you are already in the active workbook you can use the below code as well. It does the same thing.
2. Add Multiple Sheets
To add multiple sheets in one go, you just need to define the COUNT argument with the number of sheets you want to add.
Sub AddSheets3()
Sheets.Add Count:=5
End Sub
Now the count of the sheets that you have defined is 5, so when you run this code it instantly adds the five new sheets in the workbook.
3. Add a Sheet with a Name
If you want to rename the sheet after adding it, you can use the following code:
Sub AddNewSheetswithNameExample1()
Sheets.Add.Name = "myNewSHeet"
End Sub
In the above code, we have used the name object (LINK) which helps you to specify the name of a sheet.
4. Add a Sheet with a Name from a Cell
You can also take the value to use as the sheet’s name from a cell.
Sub AddNewSheetswithNameExample2()
Sheets.Add.Name = Range("A1")
End Sub
In the above code, cell A1 is used to get the name for the new sheet.
5. Add a Sheet After/Before a Specific Sheet
As these arguments are already there in the Sheets.Add where you can specify the sheet to add a new sheet before or after it.
Sub AddSheetsExample5()
Sheets.Add Before:=Worksheets("mySheet")
Sheets.Add After:=Worksheets("mySheet")
End Sub
Now in the above code, you have two lines of code that you have used before and after an argument in the Sheet.Add method. So, when you run this code it adds two sheets one is before and one is after the “mySheet”.
6. Add a New Sheet at Beginning
By using the before argument using you can also add a sheet at the beginning of the sheets that you have in the workbook.
So basically, what we are going to do is we’re going to specify the sheet number instead of the sheet name.
Sub AddSheetsExample6()
Sheets.Add Before:=Sheets(1)
End Sub
In the above code, you have used sheet number (1) that tells VBA to add the sheet before the sheet which is in the first position in all the worksheets. In this way, it will always add the new sheet at the beginning.
7. Add a New Sheet at the End (After the Last Sheet)
To add a new sheet in the end you need to write the code in a different way. So, for this, you need to know how many sheets there in the workbook are so that you can add a new sheet at the end.
Sub AddSheetsExample8()
Sheets.Add After:=Sheets(Sheets.Count)
End Sub
In the above code, Sheet.Count returns the count of the sheets that you have in the workbook, and as you have defined the after argument it adds the new sheet after the last sheet in the workbook.
8. Add Multiple Sheets and use Names from a Range
The following code counts rows from the range A1:A7. After that, it loops to add sheets according to the count from the range and uses values from the range to name the sheet while adding it.
Sub AddSheetsExample9()

Dim sheets_count As Integer
Dim sheet_name As String
Dim i As Integer

sheet_count = Range("A1:A7").Rows.Count

For i = 1 To sheet_count
  sheet_name = Sheets("mySheet").Range("A1:A7").Cells(i, 1).Value
  Worksheets.Add().Name = sheet_name
Next i

End Sub
But with the above code, there could be a chance that the sheet name you want to add already exists or you have a blank cell in the name range.
In that case, you need to write a code that can verify if the sheet with the same name already exists or not and whether the cell from where you want to take the sheet name is blank or not.
If both conditions are fulfilled only then it should add a new sheet. Let me put it in steps two steps:
First, you need to write an Excel User Defined Function to check if a sheet with the same name already exists or not.
Function SheetCheck(sheet_name As String) As Boolean

Dim ws As Worksheet

SheetCheck = False

For Each ws In ThisWorkbook.Worksheets

    If ws.Name = sheet_name Then

        SheetCheck = True

    End If

Next

End Function
Second, you need to write a code using this function and that code should also check if the name cell is blank or not.
Sub AddMultipleSheet2()

Dim sheets_count As Integer
Dim sheet_name As String
Dim i As Integer

sheet_count = Range("A1:A7").Rows.Count

For i = 1 To sheet_count

    sheet_name = Sheets("mySheet").Range("A1:A10").Cells(i, 1).Value

    If SheetCheck(sheet_name) = False And sheet_name <> "" Then
    Worksheets.Add().Name = sheet_name
    End If

Next i

End Sub
Now in the above code, you have used the VBA IF Statement and in this statement, you have the sheet check function which checks for the sheet name and then you have a condition to check if the name cell has a blank value.
Sample File
More Tutorials on Worksheets
- VBA Worksheet – Excel VBA Examples – VBA Tutorial

