
Word for Microsoft 365 Word for Microsoft 365 for Mac Word for the web Word 2021 Word 2021 for Mac Word 2019 Word 2019 for Mac Word 2016 Word 2016 for Mac Word 2013 Word 2010 Word 2007 Word Starter 2010 More…Less
Use sections breaks to divide and format documents of all sizes. For example, you can break down sections into chapters, and add formatting such as columns, headers and footers, page borders, to each.
Add a section break
-
Select where you want a new section to begin.
-
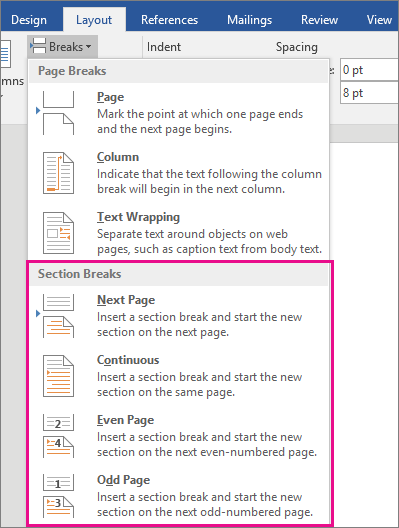
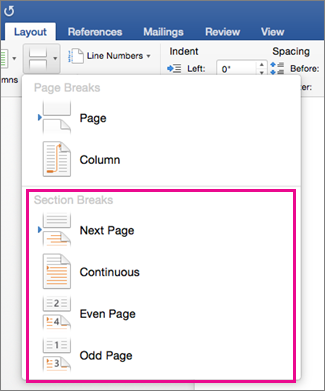
Go to Layout > Breaks.

-
Choose the type of section break you want:
-
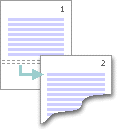
Next Page Section break starts the new section on the following page.
-
Continuous Section break starts the new section on the same page. This type of section break is often used to change the number of columns without starting a new page.
-
Even Page Section break starts a new section on the next even-numbered page.
-
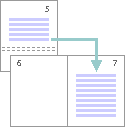
Odd Page Section break starts a new section on the next odd-numbered page.
-


Important:
Office 2010 is no longer supported. Upgrade to Microsoft 365 to work anywhere from any device and continue to receive support.
Upgrade now
Insert a section break
-
Select where you want a new section to begin.
-
Go to Page Layout > Breaks.
-
Section break that you want to add:
-
A Next Page section break starts the new section on the next page
-
A Continuous section break starts the new section on the same page.
Tip: You can use Continuous section breaks to create pages with different number of columns.
-
An Even Page or an Odd Page section break starts the new section on the next even-numbered or odd-numbered page.
-

Insert a section break
-
Select where you want a new section to begin.
-
Go to Layout > Breaks, and then choose the type of section break you want.
-
Next Page Starts the new section on the following page.
-
Continuous Starts the new section on the same page. This section break is particularly useful for documents that have columns. You can use it to change the number of columns without starting a new page.
-
Even Page Starts the new section on the next even-numbered page. For example, if you insert an Even Page Break at the end of page 3, the next section will start on page 4.
-
Odd Page Starts the new section on the next odd-numbered page. For example, if you insert an Odd Page Section Break at the end of page 3, the next section will start on page 5.
-
You can add page breaks, but Word for the web can’t add section breaks yet.
If you have the Word desktop application, use the Open in Word command to open the document and add section breaks there. When you’re done and you save the document, it will continue to be stored where you opened it in Word for the web.
See also
Use section breaks to change the layout or formatting in a section of your document
Insert a page break
Need more help?
Insert a section break
- Select where you want a new section to begin.
- Go to Layout > Breaks, and then choose the type of section break you want. Next Page Starts the new section on the following page. Continuous Starts the new section on the same page.
Contents
- 1 How do you add sections and chapters in Word?
- 2 How do you add or remove sections in Word?
- 3 How do I make 4 sections in Word?
- 4 How do I manage sections in Word?
- 5 How do you repeat sections in Word?
- 6 How do I put sections side by side in Word?
- 7 How do I type two sections in Word?
- 8 How do you type sections on a keyboard?
- 9 How do I split a Word document into 5 sections?
- 10 How do you copy and paste sections in Word?
- 11 How do I split a Word document into 6 sections?
- 12 How do I create a quadrant in Word?
- 13 How do I copy and paste a large section in Word?
- 14 How do you copy different sections?
- 15 How do I copy and paste a section?
How do you add sections and chapters in Word?
Click where you want to insert the new chapter heading and insert a page break (see Section and Page Breaks). In the Styles Pane, click Heading 1 style. The word “Chapter” and the chapter number will appear. Click after the chapter number and enter the text for the chapter heading.
How do you add or remove sections in Word?
New section breaks can be added by clicking the Breaks button on the Layout tab. You can also delete a section break by placing your cursor to the left of the break, then pressing the Delte key on your keyboard.
How do I make 4 sections in Word?
To split a page to 4 parts, you can insert a table to deal with the job.
- Place the cursor at left-top of the page, then click Insert > Table, select 2×2 Table.
- The table has been inserted, then drag right-corner of the table to resize it as you need.
- Insert texts into the columns and rows separately.
How do I manage sections in Word?
Change a section break
- Click or tap in the section break you want to change.
- Go to Layout and select the Page Setup launcher button .
- Select the Layout tab.
- Select a new section type from the Section Start drop down list.
- Select OK.
How do you repeat sections in Word?
If the Controls task pane is not visible, click More Controls on the Insert menu, or press ALT+I, C. Under Insert controls, click Repeating Section. In the Repeating Section Binding dialog box, select the repeating group in which you want to store repeating section data, and then click OK.
How do I put sections side by side in Word?
How to Make Two-Column Text in Word 2016
- Start up a new document. Or if you have an existing document, move the toothpick cursor to the document’s tippy-top by pressing Ctrl+Home.
- Click the Layout tab.
- Click the Columns button and choose Two. You’re done.
How do I type two sections in Word?
To add columns to a document:
- Select the text you want to format. Selecting text to format.
- Select the Page Layout tab, then click the Columns command. A drop-down menu will appear.
- Select the number of columns you want to create. Formatting text into columns.
- The text will format into columns. The formatted text.
How do you type sections on a keyboard?
For the section symbol on a Windows computer, you would press and hold the Alt key. Next, type the numbers, “0167,” and then release the Alt key. This would create the section symbol (§) in your text.
How do I split a Word document into 5 sections?
Divide a Document into Sections
- Place the insertion point where you want the section break.
- Choose the Page Layout tab.
- Click the down-arrow next to the Breaks button. A menu appears.
- Click the type of section break you want. Word inserts the section break.
How do you copy and paste sections in Word?
Press Ctrl + C to copy. Click where you want to paste the text. You can copy, cut, and paste text or other items within a document, between documents, or between programs. Click the Paste button.
How do I split a Word document into 6 sections?
Follow these general steps:
- Open a new document and set the paper orientation and margins the way you want.
- Insert a three-column, single-row table in your document.
- Remove the borders around the table, if desired.
- Format the second (center) column to be rather narrow.
- Adjust the width of the other columns as desired.
How do I create a quadrant in Word?
How to make a SWOT analysis Diagram in Word
- Open a new document in Word.
- Add a text box by selecting the Insert tab and clicking the text box option.
- Choose Draw Text Box.
- To create a quadrant, hold Shift and drag your mouse to make a square.
- Right click the text box to format the color.
How do I copy and paste a large section in Word?
In FrontPage and word processing programs, to select extensive lengths of text to copy and paste, one clicks the cursor at the beginning of the selection to be copied, moves forward in the text, then holds the Shift key and clicks the cursor at the end of the selection to be copied.
How do you copy different sections?
To use Spike, follow the steps below:
- Select the block of text that you want to copy.
- Press Ctrl + F3 to copy the text into Spike.
- Highlight the next block of text that you want to copy, and press Ctrl + F3 to add it to the Clipboard.
- Use Ctrl + Shift + F3 to paste all the copied blocks into a blank document.
How do I copy and paste a section?
To copy a section, row or column, select the section, row or column you want to copy then right-click on it. Select “Copy” option on popup menu. To paste the section, row or column you copied, go to the area where you want to paste then right-click on it. Select “Paste” option on popup menu.
Содержание
- Создание раздела
- Вставка разрыва страницы
- Форматирование и настройка раздела
- Очевидная польза разбивки документа на разделы
- Вопросы и ответы

Большинство команд форматирования в Microsoft Word применяются ко всему содержимому документа или к области, которая была предварительно выделена пользователем. В числе таких команд установка полей, ориентация страницы, ее размер, колонтитулы и т.д. Все бы хорошо, вот только в некоторых случаях требуется по-разному отформатировать разные части документа, а для этого следует разбить документ на разделы.
Урок: Как убрать форматирование в Ворде
Примечание: Несмотря на то, что создавать разделы в Microsoft Word очень просто, ознакомиться с теорией по части данной функции лишним уж точно не будет. Именно с этого мы и начнем.
Раздел — это как документ внутри документа, точнее, независимая его часть. Именно благодаря такому разбиению можно изменить размеры полей, колонтитулы, ориентацию и ряд других параметров для отдельной страницы или определенного их количества. Форматирование страниц одного раздела документа будет происходить независимо от остальных разделов этого же документа.
Урок: Как убрать колонтитулы в Ворде
Примечание: Разделы, о которых идет речь в данной статье, это не часть научной работы, а элемент форматирования. Отличие вторых от первых заключается в том, что при просмотре распечатанного документа (как и его электронной копии) никто не догадается о разбиении на разделы. Такой документ выглядит и воспринимается как целостный файл.
Простой пример одного раздела — титульная страница. К этой части документа всегда применяются особые стили форматирования, который не должен распространяться на остальную часть документа. Именно поэтому без выделения титульной страницы в отдельный раздел попросту не обойтись. Также, можно выделить в раздел таблицы или любые другие фрагменты документа.
Урок: Как сделать титульную страницу в Word
Создание раздела
Как было сказано в начале статьи, создать раздел в документе не сложно. Для этого нужно добавить разрыв страницы, а затем выполнить еще несколько простых манипуляций.
Вставка разрыва страницы
Добавить разрыв страницы в документ можно двумя способами — с помощью инструментов на панели быстрого доступа (вкладка «Вставка») и с помощью горячих клавиш.
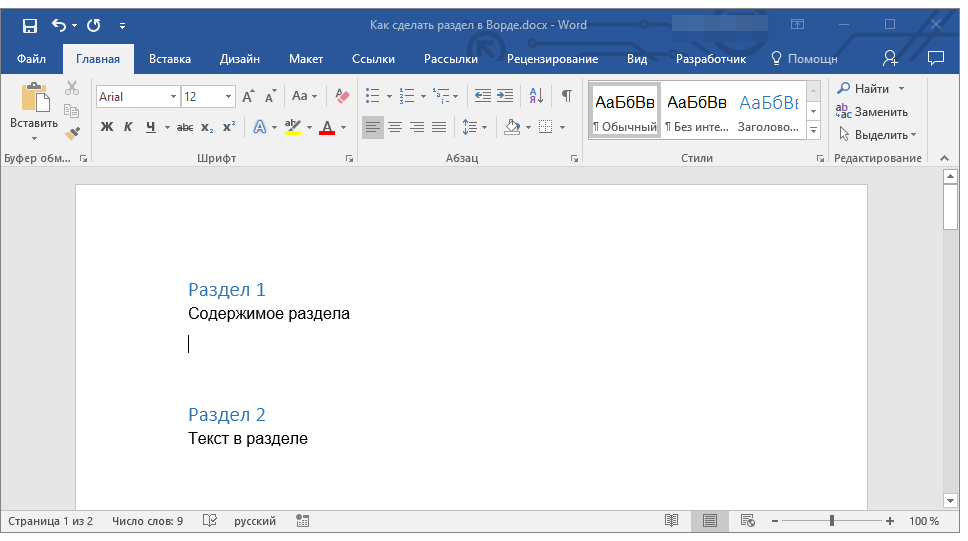
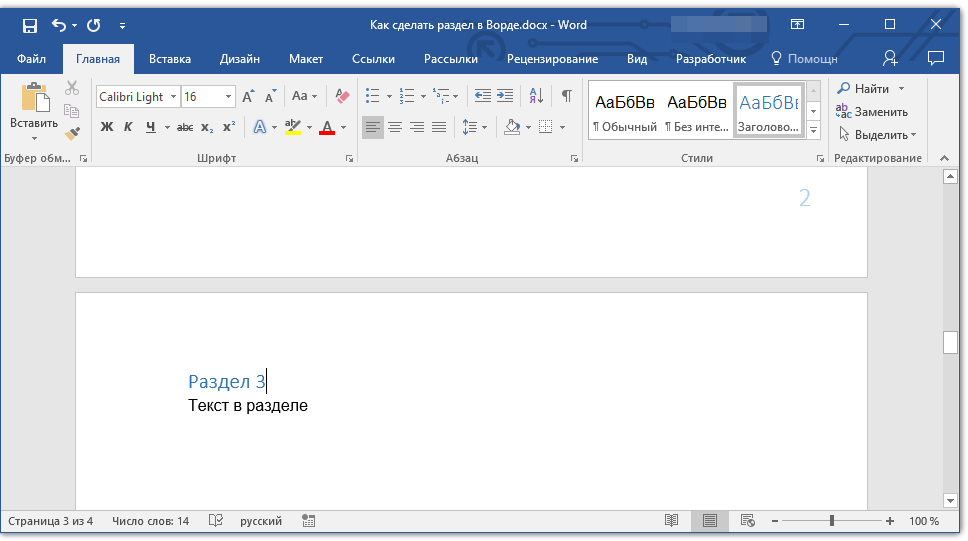
1. Установите указатель курсора в том месте документа, где должен заканчиваться один раздел и начинаться другой, то есть, между будущими разделами.
2. Перейдите во вкладку «Вставка» и в группе «Страницы» нажмите кнопку «Разрыв страницы».
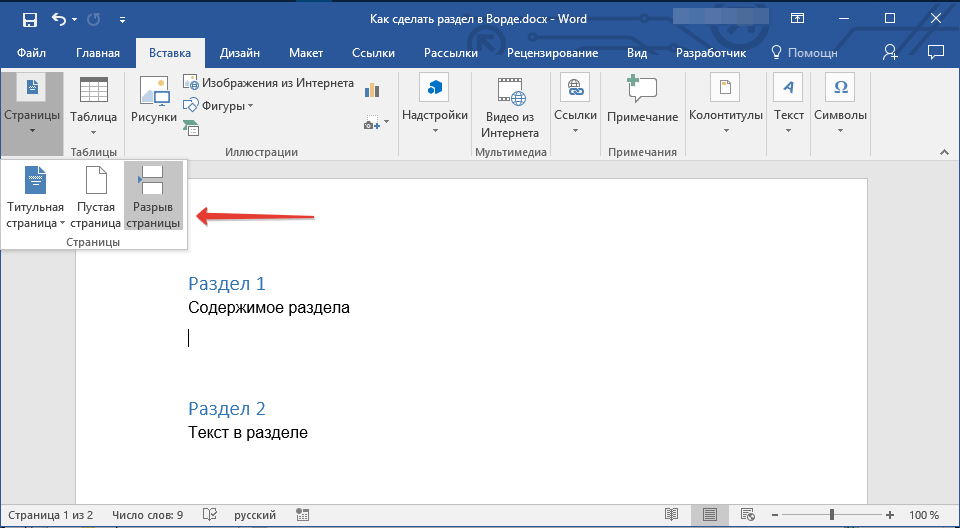

3. Документ будет разделен на два раздела с помощью принудительного разрыва страницы.
Для вставки разрыва с помощью клавиш просто нажмите «CTRL+ENTER» на клавиатуре.
Урок: Как в Ворд сделать разрыв страницы
Форматирование и настройка раздела
Разделив документ на разделы, которых, как вы понимаете, вполне может быть и больше двух, можно смело переходить к форматированию текста. Большинство средства форматирования располагаются во вкладке «Главная» программы Word. Правильно отформатировать раздел документа вам поможет наша инструкция.

Урок: Форматирование текста в Ворде
Если в разделе документа, с которым вы работаете, содержатся таблицы, рекомендуем ознакомиться с детальной инструкцией по их форматированию.
Урок: Форматирование таблиц Word
Помимо использования определенного стиля форматирования для раздела, возможно, вы пожелаете сделать отдельную нумерацию страниц для разделов. Наша статья вам в этом поможет.
Урок: Нумерация страниц в Ворде
Наряду с нумерацией страниц, которая, как известно, располагается в верхних или нижних колонтитулах страниц, при работе с разделами также может возникнуть необходимость изменения этих самых колонтитулов. О том, как их изменить и настроить вы можете прочесть в нашей статье.
Урок: Настройка и изменение колонтитулов в Word
Очевидная польза разбивки документа на разделы
Помимо возможности выполнения независимого форматирования текста и прочего содержимого части документа, разбивка на разделы имеет еще одно явное преимущество. Если в документ, с которым вы работаете, состоит из большого количества частей, каждую из них лучше всего вывести в независимый раздел.
Например, титульный лист — это первый раздел, введение — второй, глава — третий, приложение — четвертый, и т.д. Все зависит лишь от количества и типа текстовых элементов, входящих в состав документа, с которым вы работаете.
Обеспечить удобство и высокую скорость работы с документом, состоящим из большого количества разделов, поможет область навигации.
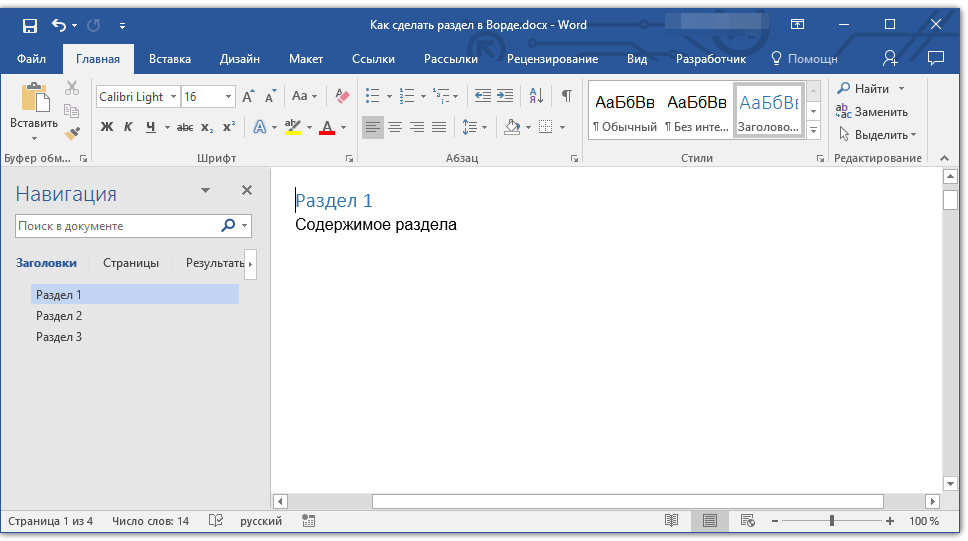
Урок: Функция навигации в Ворде
Вот, собственно, и все, из этой статьи вы узнали, как создавать разделы в документе Word, узнали об очевидной пользе этой функции в целом, а заодно и о ряде других возможностей этой программы.
Hello, my fellow Word users/combatants!
In an attempt to provide a service to humanity, I thought I’d start writing out some of the tricks I’ve learned over the years about using Microsoft Word for reports and other business documents.
Don’t get me wrong. Word is a powerful tool. I use Word daily because it is capable of decent desktop publishing in a way that Google Docs doesn’t yet come close to. But like any tool, Word can be dangerous if you don’t know how to use it properly.
To start this ongoing series, I thought I’d address one of those most common frustrations I hear from clients: section breaks that mess up the headers/footers.
Section breaks are a major nemesis for anyone who works with long and/or complicated documents in Word. They are great for inserting landscape figures or tables or just to help readers know exactly where they are in the document. But expect the wrath of Word if you are not extremely careful with your breaks, because your file can be transformed instantly from a document so organized that Martha Stewart would approve to something more of a dog’s dinner.
[For those of you who prefer an over-the-shoulder-style tutorial, now’s a good time to click Play in the video above. For those who prefer written explanations, keep reading.]
The key to header/footer happiness is deceptively simple-sounding: the Link to Previous feature. This nasty little default (and no, you can’t turn off its default-ness) is great if your pages are all oriented the same and all use the same header/footer text and images. But what fun is that?
After many painful experiences in Word, I have learned how to insert sections the hard way. Let me save you some stress.
- Insert two next-page section breaks, one after the other. (This is assuming that you want to insert a section between other content. If you are just creating the next new section, then just put in one break.)
- IMMEDIATELY turn off the Same as Previous/Link to Previous feature in the ribbon (i.e., the command area underneath the main menu dropdowns). Make sure this feature is off for both the section you just created and any other sections in the doc, either after or before the new one. I cannot underscore how important it is to do this right away!
- Adjust the header/footer of the new section to what you want and you’re on your merry way.
[Author’s note: The principles about headers/footers are the same if you use continuous-page section breaks. I just don’t use those as often.]
I know what you’re thinking. That’s too easy. This can’t be that big of a deal.
Sadly, neglecting this little default for any length of time will cause ripple effects that can mess up headers and footers all over your document, particularly if you are using an older version of Word. I once had to create an entirely new document comprised of many, many sections, and then copy all the content from the very large old file section by section to the new file, all because the footers got so messed up and then they froze that way. That’s two hours of my life I will never get back, and I’m still peeved about it.
I will grant you that my new version of Word 365 for Mac seems smarter about section breaks than older versions were, particularly in that it doesn’t seem to turn on the Same as Previous feature for sections that occur before the inserted section. But it still affects anything that comes after it. Half of chaos is still more chaos than I’m willing to deal with. We all have better things to do with our time.
Once you get used to how the Same as Previous feature works, you can try linking sections together if you feel like skirting the Word event horizon. But don’t expect that to save you any time if your document has any complexity to it at all, or if it has multiple authors. Generally speaking, it is far easier to manually adjust your headers and footers for each section than it is to untangle the knots that will result from leaving this feature on and «dealing with it later.» The difference is that the manual adjustment only needs to happen once, and the «later» option may require large donations to your family or company swear jar. I can’t predict what kind of footer black hole you’ll end up in if you leave Same as Previous on; I can only be sure you’ll be happier if you don’t.
Was this post helpful? Email me your burning writing and Word questions. If I can answer your question, I’ll craft a new post that addresses your issue and email you when your answer goes live.
Введение
Сам по себе факт существование разделов неизвестен большинству пользователей Word.
И это при том, что вновь создаваемый документ уже состоит из раздела.
Кроме того, он занимает высший уровень в иерархии объектной модели, выше него только сам документ.
Важность данного объекта сложно переоценить, так как ряд крайне востребованных свойств описываются именно для него, а не для документа, как полагают почти все.
Доступ к этим материалам предоставляется только зарегистрированным пользователям!
На следующем рисунке показано внешнее отображение всех видов разрывов при включенном отображении непечатаемых знаков.

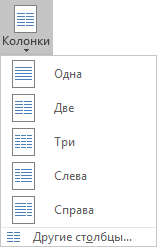
Колонки
Разбиение текста на колонки производится для текущего раздела.
Доступ к настройкам осуществляется через вкладку Макет ⇒ модуль Параметры страницы ⇒ кнопка Колонки.
Доступ к этим материалам предоставляется только зарегистрированным пользователям!
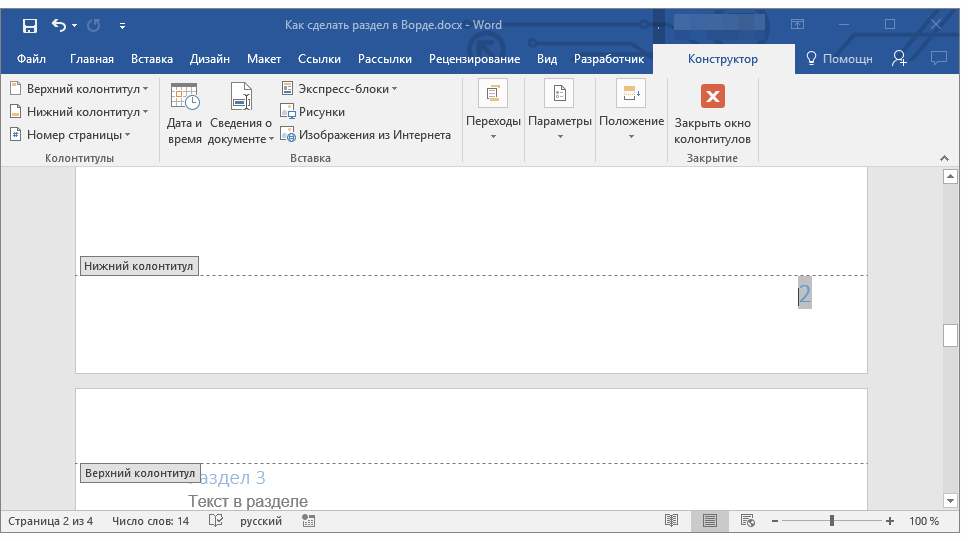
Колонтитулы
Различают верхний (header) и нижний (footer) колонтитулы, располагающиеся у соответствующих краев листа.
Кроме того, при задании зеркальных страниц, мы получим левую и правую пару.
Также можно настроить индивидуальные колонтитулы для первой страницы раздела.
Таким образом, каждый раздел может иметь от двух до шести колонтитулов, возможно, одинаковых.
Работа с колонтитулами в основном осуществляется через вкладку Ленты «Конструктор», возникающую при входе в режим редактирования любого колонтитула.
![]()
Создание колонтитулов (переход в режим их редактирования) может быть произведено несколькими способами.
Доступ к этим материалам предоставляется только зарегистрированным пользователям!
Форматирование колонтитулов всегда производится с помощью табуляции.
Использование для этого таблицы иногда бывает оправдано, но должно быть однозначно обосновано, так как порождает множество дополнительных факторов,
в том числе тех, которые невозможно контролировать в автоматическом режиме.
Например, ширина колонок.
Автоматический колонтитул
При создании достаточно сложных колонтитулов существует возможность формировать их на основе уже имеющейся информации, то есть избавиться от рутинного контроля содержания.
Позволю себе сразу огорчить читателя тем, что за автоматизацию в данном случае нужно расплачиваться квалификацией пользователя и соблюдением порядка, не всегда подконтрольного зрению.
Естественно, речь пойдет не о номере и количестве страниц.
Для примера я сразу использую наиболее сложный вариант, применяемый в журналах, когда колонтитулы внутри одной статьи чередуются, например,
на левой приводятся авторы, а на правой — название статьи.
Доступ к этим материалам предоставляется только зарегистрированным пользователям!
Возможный алгоритм примитивной работы.
Примитивность в этом случае подразумевает отсутствие перечисленных выше потенциальных трудностей.
Доступ к этим материалам предоставляется только зарегистрированным пользователям!
Другой алгоритм.
Доступ к этим материалам предоставляется только зарегистрированным пользователям!
Очевидным недостатком такого способа будет принципиальная невозможность форматирования отдельных символов, а в текстах высокой категории сложности это относится к почти обязательным вариантам.
Колонцифра (номер страницы)
В издательском деле для обозначения номера страницы используется термин колонцифра, заодно подчеркивающий норму размещения этого элемента в колонтитуле.
Расположение колонцифры определяется правилами или задачей, которая ложится на нее в конкретном издании.
Обобщенная оценка. Всего мы можем выделить 6 точек, расположенных по 3 в верхнем и нижнем колонтитулах.
Доступ к этим материалам предоставляется только зарегистрированным пользователям!
Перечисленное не имеет почти никакого отношения к реальным критериям выбора, так как доминируют тезисы «мы так привыкли» и «нам так красиво».
Логические предпосылки для использования нумерации страниц достаточно просты и определяются её важностью.
Доступ к этим материалам предоставляется только зарегистрированным пользователям!
Одной из актуальных тем является задание стартовой страницы.
Наиболее важны две ситуации:
- исключение из нумерации первой (титульной) страницы;
- разбиение большого документа на множество файлов с продолжающейся нумерацией (книга).
Доступ к этим материалам предоставляется только зарегистрированным пользователям!
Как обычно, названная проблема решается посредством VBA.
Для случая, когда вы хотите, чтобы в документе нумерация начиналась с N-ой страницы есть несколько решений с единой основой.
Доступ к этим материалам предоставляется только зарегистрированным пользователям!
Для форматирования колонцифры используется встроенный стиль «Номер страницы»!
Алгоритмы простых типовых действий
Поворот отдельной страницы
Такая необходимость всегда появится, если иллюстрации размещаются по тексту, а таблица или рисунок не помещаются в ширину полосы набора.
Примитивизированный алгоритм действий:
Доступ к этим материалам предоставляется только зарегистрированным пользователям!
Разбиение на колонки
Стандартным вариантом почти для всех случаев является переменное количество колонок в документе.
То есть, например, части сделаны на всю полосу набора (1 колонка), другие — иначе (2 колонки…).
Это, в том числе, относится ко всем научным журналам, издаваемым в большом формате (близком к A4).
Алгоритм действий, применимый по сути к любым ситуациям:
Доступ к этим материалам предоставляется только зарегистрированным пользователям!
Типовые ошибки при разбиении на колонки
Доступ к этим материалам предоставляется только зарегистрированным пользователям!
Все перечисленные ошибки встречаются в практической работе крайне часто!
Изменение типа разрыва раздела
Вопреки утверждениям на сайте
Microsoft,
сделать это совсем не так просто.
Иначе говоря, данная технология работала раньше, но не работает теперь.
Доступ к этим материалам предоставляется только зарегистрированным пользователям!
When you’re working on a long document, separating it into different parts makes it much easier to navigate. Microsoft Word eases your workflow by letting you insert document breaks, namely section and page breaks.


As you’ll see in this article by defining section and page breaks you can apply specific formatting elements in different parts of your document. You’ll also have better control over pagination.
Read on to learn how to use section and page breaks in Word to make your document more visually appealing and easier for readers to make their way around. Finally, we’ll show you some great sources for professionally designed Word templates.
How to Add Breaks in MS Word (Quick Start Video)
Are you ready to learn how how to insert breaks in MS Word? The short video below will give you a head start on inserting, viewing, and deleting MS Word section and page breaks:
To learn even more about breaks in Word (including the difference betwen section breaks and page breaks), study the written tutorial below.
Understanding Section and Page Breaks
Section and page breaks are types of breaks or partitions in a Word document. In this section, you’ll learn some basics:
1. Microsoft Word Section Break vs Page Break
A page break is a partition in the text of the document. At a page break, the succeeding text is automatically placed on top of a new page.


But, with a section break for Word the text is partitioned — along with the formatting associated with it:
- page numbers
- margins
- headers and footers
- paper size and/or orientation
Also, a Microsoft Word section break may or may not begin on a new page (more on that below).
2. Why Use Microsoft Section and Page Breaks?
Section and page breaks are useful for partitioning different parts of a document, especially a long one.
In a book, you’d use section breaks to divide it into chapters as well as delineate the front matter from the back matter. The title page, copyright page, table of contents, individual chapters, index, etc., would be separate sections.
For example, you usually want a new chapter of a book (or similar) document to begin on a new page. This is when a page break is most useful.
A section break for MS Word is useful for visually distinguishing parts of a document. An example of where you might use a section break is in a proposal where you want the summary to have a different layout. In this case, the summary section could have its own header, footer, and margins that are different from the rest of the document.
By using section breaks, each chapter can have a different running header, including the chapter title.


Microsoft Word Section breaks also let you use lower case numbers for page numbers on the introduction of the book and Arabic numerals on the rest of the pages.
Similarly, a section break in Microsoft Word lets you use a two-column format in the index section and a single column everywhere else.
You’ll also want to use section and page breaks when you want to control the pagination of your document. For example, the first page of your document may be a cover page. But you don’t want the cover page to be page 1 of your document. By inserting a section break after the cover page, you can make the next page be page 1.
You accomplish these results by inserting different types of section and page breaks in Word.
3. Types of Microsoft Word Section Breaks
There are four types of section breaks in MS Word:
- Next Page. This type of section break forces the text to the right of the cursor to a new section on the following page. All the formatting associated with the text is carried through to the new section as well.
- Continuous. A continuous section break creates a new section but keeps the text on the same page. This means two different sections can have their own formatting yet remain on the same page.
- Odd Page. This kind of section break moves the text to the right of the cursor to the top of the next odd-numbered page. If you’re on page 3, for example, and you insert an Odd Page Section Break, the next section will start on top of page 5 (page 4 will be blank). Book chapters usually begin on the next odd page of the book.
- Even Page. An Even Page section break moves the text to the right of the cursor to the top of the next even-numbered page. So, if you’re on page 6 and you insert an Even Page Section Break, the new section will begin on page 8 (leaving page 7 blank).
4. Types of Page Breaks
As for Microsoft Word page breaks, there are two kinds:


- Simple Page Breaks. A simple page break moves text to the right of the cursor to the top of the next page.
- Column Breaks. If your document is broken up into columns, a column break moves text to the right of the cursor to the top of the next column.
How to View Existing Breaks in an MS Word Doc
By default, section and page breaks are invisible in Word. You can only see their effects. You’ll see changes in formatting and pagination for each section. That’s because these breaks don’t appear when the document is printed.
As you’re editing and formatting your document, you may need to see page and section breaks. To view existing page and section breaks in Word, on the Home tab, then click on the Paragraph button.


How to Insert Section Breaks in Your Word Docs
To insert a page or section break, place the cursor where you want one section/page to end and the next section/page to begin.
Go to Insert > Break, then choose the specific type of page break or section break you want to insert.


Or, click on the Layout tab. Then click on the Breaks button on the ribbon and select the type of page or section break you wish to insert.


How to Remove/Delete Section and Page Breaks in Word
To remove a section or page break in Word, first display all the breaks.
Select the section or page break you want to remove by highlighting it. Click on either the Delete or Backspace key on your keyboard.


When you delete a section break, the text in the section adopts the formatting of the next section.
Tips for Using Section and Page Breaks in MS Word
Are you just getting comfortable with using Microsoft Word section and page breaks? Here are some extra tips to help you use them effectively:
1. Keep Your Section Breaks to a Minimum
Insert a section break in Word only when you have to (see above for when it’s a good idea to do so). Having more sections than necessary makes it more difficult to make global changes to your document, because you’d have to manually make those changes in each section.
2. Pay Attention to Which Section You’re In
If you’ve divided your document into sections, always be aware of what section you’re in when you make formatting changes. That’s because these changes will apply only to the section you’re currently in — that’s the section where your cursor is. If you want to make a formatting change to apply to the whole document, select the entire document first before making your changes.
3. Microsoft Word May Change a Continuous Section Break to the Other Section Break Types
You may be surprised that your continuous section break has been converted into a different type of section break. This happens when you’ve got a continuous section break. Then, in the next section, you try to apply a different header/footer, pagination, margins, or page size and orientation. Those formatting changes require a page break. And so, Word will automatically change the section break type to one that results in a page break.
Streamline Your Microsoft Word Workflow With Templates


There are other ways to streamline your MS Word workflow. One of them is using premium Word templates, like the ones you’ll find at Envato. Premium templates for Microsoft Word are created by professional designers to provide impressive layouts. These templates are customizable with your content, images, and branding. You can also adjust the design and layout as you please.
Envato Elements gives you unlimited downloads of Word templates as well as other inputs you need to complete your projects — fonts, graphics, stock photos, and more — all for one flat monthly subscription fee.


Or, go to GraphicRiver for Microsoft Word templates and other creative elements on a pay-per-use basis. It’s a terrific source for one-off projects.
Make Your Document Easier to Read and Navigate
Now you know how to use section and page breaks in Microsoft Word to better organize your document. Section breaks also let you have more granular control over the formatting of specific parts of your document. These make your document look better as well as easier to read and navigate through.
Use the steps you learned in this article to properly use section and page breaks. Also, use Word templates to make it much easier and faster to create impressive documents. Envato Elements provides unlimited downloads of templates for Word for one monthly subscription. For occasional projects, GraphicRiver is an excellent source of Word templates where you pay for each use.
Editorial Note: This tutorial has been updated to add a video by Andrew Childress.
В этой статье мы рассмотрим коллекцию Sections и ее объекты Section, которые предоставляют разделы документа Word. Существует тонкая грань между разделами и страницами документа, так, в созданном документе существует только один раздел, при желании можно добавить еще несколько, однако количество страниц может быть или равным количеству разделов, или больше. Добавление разделов документа Word актуально в том случае, если мы хотим оформить рамку для каждой страницы в индивидуальном стиле.
Возьмем такой пример: в документе 20 страниц и один раздел, которому они принадлежат, приложение Word позволяет применить заданную рамку ко всему разделу, к первой странице раздела или ко всем страницам кроме первой. Но, что если мы хотим, что бы каждая страница была оформлена индивидуальной рамкой (свет, стиль, толщина линии)? В таком случае, нам придется добавить 20 отдельных разделов в документ Word, и уже для каждого применить индивидуальное оформление.
Sections – разделы документа Word
Коллекция Sections содержит объекты Section для заданного документа, выделения или выбора. Отсюда следует, что мы можем получить доступ к данной коллекции тремя способами с помощью свойства Sections, которое есть у таких объектов:
Word Document – В данном случаем мы обрабатываем разделы для конкретного документа Word.
Word Selection – Тут мы можем получить те разделы документа Word, которое принадлежат заданному выделению.
Word Range – Тут мы можем получить те разделы документа Word, которое принадлежат заданному выбору.
Свойства
Count – Возвращает количество разделов (объектов Section) в коллекции.
First — Возвращает объект Section, представляющий первый элемент в коллекции Sections.
Last — Возвращает объект Section, представляющий последний элемент в коллекции Sections.
PageSetup — Возвращает объект PageSetup.
Методы
Add(Range, Start) — Возвращает объект Section, представляющий новый раздел, добавленный в документ Word. Оба параметра являются дополнительными.
Range — Диапазон перед которым нужно вставить раздел. Если этот аргумент опущен, раздел документа Word вставляется в конец.
Start — Тип раздела документа Word, который вы хотите добавить. Если параметр отсутствует, то раздел добавляется после следующей страницы. Значение константы WdSectionStart.
- wdSectionContinuous — 0 – Сплошной раздел.
- wdSectionEvenPage — 3 — Четные страницы.
- wdSectionNewColumn — 1 – Колонка.
- wdSectionNewPage — 2 — Страница.
- wdSectionOddPage — 4 — Нечетные страницы.
Item(index) – Доступ к заданному разделу по его номеру в коллекции.

Section – разделы документа Word
Свойства
Application — Возвращает объект Word Application.
Borders — Возвращает коллекцию Borders.
Footers и Headers — Свойства возвращают коллекцию HeadersFooters для нижнего или верхнего колонтитула.
Range — Возвращает объект Range.
PageSetup— Возвращает объект PageSetup.
Index — Возвращает позицию объекта Section в коллекции.
Теперь рассмотрим два программных кода на языке VBScript и JScript:
' ----------------------------------------------------------------------------
' Коллекция Sections и объект Section
' Добавление разделов в документ Word
' Sections.vbs
' ----------------------------------------------------------------------------
Option Explicit

dim oWord, oDoc, oSel, i, MyText

Set oWord = CreateObject("Word.Application")
Set oDoc = oWord.Documents
oDoc.Add()
oWord.Visible = True
Set oSel = oWord.Selection

MyText = "Разделы документа Word. "

For i=0 to 40
    oSel.TypeText MyText & MyText & MyText & MyText & MyText & MyText & MyText
    oSel.TypeParagraph
Next

MsgBox "Количество разделов в документе Word - " & oDoc(1).Sections.Count

oDoc(1).Sections.Add
oDoc(1).Sections.Add
oDoc(1).Sections.Add

MsgBox "Количество разделов в документе Word - " & oDoc(1).Sections.Count
<
// ----------------------------------------------------------------------------
// Коллекция Sections и объект Section
// Добавление разделов в документ Word
// Sections.js
// ----------------------------------------------------------------------------
var oWord, oDoc, oSel, i, MyText;

oWord = WScript.CreateObject("Word.Application");
oDoc = oWord.Documents;
oDoc.Add();
oWord.Visible = true
oSel = oWord.Selection;

MyText = "Разделы документа Word. ";

for(i=0; i<=40; i++){
    oSel.TypeText(MyText + MyText + MyText + MyText + MyText + MyText + MyText);
    oSel.TypeParagraph();
}

WScript.Echo("Количество разделов в документе Word - " + oDoc(1).Sections.Count);

oDoc(1).Sections.Add();
oDoc(1).Sections.Add();
oDoc(1).Sections.Add();

WScript.Echo("Количество разделов в документе Word - " + oDoc(1).Sections.Count);
В данных примерах все довольно просто. В самом начале мы создаем ссылку на объект Word Application, далее происходит создание нового документа и вставка в него заданного текста. Приложение Word автоматически создает один раздел для всего документа, плюс, данный раздел будет содержать в себе все страницы.
Далее в сценарии происходит вывод количества разделов документа Word, естественно, их значение равно 1. После, мы добавляем три новых раздела с помощью метода Add и снова выводим общее количество разделов.

Inserting a Section Break in a Word document gives you a number of ways to split up large walls of text. This feature is useful not just for breaking up text by pages but also for multi-column layouts.
Click anywhere on the page. This is where your new section will begin, so it’s a good idea to avoid breaking up words or sentences and instead look for opportunities to break the page at the end of a paragraph or at least a sentence.

Click the “Layout” tab on the ribbon at the top of the Word window.
Click “Breaks” under “Page Setup” to open a new drop-down menu with multiple options for both Page and Section Breaks.
Under “Section Breaks,” select the type of break you want to insert on the page. If you’re unsure, there’s a description of each below.
- Next Page: Breaks the text at the cursor. Anything to its right (or below it) will move to its own page.
- Continuous: Starts a new section on the same page. This is often used on documents with multiple columns.
- Even Page: Starts a new section at the next even-numbered page.
- Odd Page: Starts a new section at the next odd-numbered page.
Delete a Section Break
To remove a section break from your Word document, first click the “Home” tab.
Click the “non-printing characters” icon. It looks a bit like a backwards “P.”
Click the space to the left of the break you want to delete and then press the “Delete” key on the keyboard.
Change to a Different Type of Section Break
To change a section break to a different type of break, first find the Section Break you want to change and click just to the left of it.
Switch to the “Layout” tab on the ribbon.
Click “Breaks” to open the “Page and Section Breaks” menu.
Choose the new type of section break you want by clicking on any of the options. It will automatically change the type of Section Break based on what you choose.
Your document will now be broken up into whatever type of sections you selected.
READ NEXT
- › How to Add and Link to Bookmarks in Microsoft Word
- › How to Organize a Microsoft PowerPoint Slideshow Using Sections
- › How to Remove Section and Page Breaks in Microsoft Word
- › 8 Microsoft Word Tips for Professional Looking Documents
- › How to Cross-Reference in Microsoft Word
- › How to Make Only One Page Landscape in a Word Document
- › The New NVIDIA GeForce RTX 4070 Is Like an RTX 3080 for $599
- › Expand Your Tech Career Skills With Courses From Udemy
How-To Geek is where you turn when you want experts to explain technology. Since we launched in 2006, our articles have been read billions of times. Want to know more?