
Add or subtract days from a date
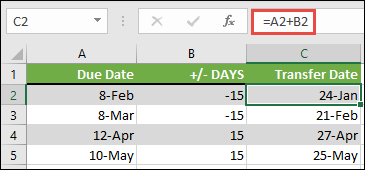
Suppose that a bill of yours is due on the second Friday of each month. You want to transfer funds to your checking account so that those funds arrive 15 calendar days before that date, so you’ll subtract 15 days from the due date. In the following example, you’ll see how to add and subtract dates by entering positive or negative numbers.
-
Enter your due dates in column A.
-
Enter the number of days to add or subtract in column B. You can enter a negative number to subtract days from your start date, and a positive number to add to your date.
-
In cell C2, enter =A2+B2, and copy down as needed.
Add or subtract months from a date with the EDATE function
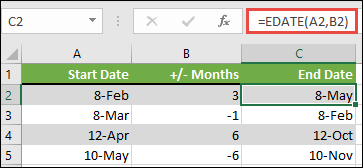
You can use the EDATE function to quickly add or subtract months from a date.
The EDATE function requires two arguments: the start date and the number of months that you want to add or subtract. To subtract months, enter a negative number as the second argument. For example, =EDATE(«9/15/19»,-5) returns 4/15/19.
-
For this example, you can enter your starting dates in column A.
-
Enter the number of months to add or subtract in column B. To indicate if a month should be subtracted, you can enter a minus sign (-) before the number (e.g. -1).
-
Enter =EDATE(A2,B2) in cell C2, and copy down as needed.
Notes:
-
Depending on the format of the cells that contain the formulas that you entered, Excel might display the results as serial numbers. For example, 8-Feb-2019 might be displayed as 43504.
-
Excel stores dates as sequential serial numbers so that they can be used in calculations. By default, January 1, 1900 is serial number 1, and January 1, 2010 is serial number 40179 because it is 40,178 days after January 1, 1900.
-
If your results appear as serial numbers, select the cells in question and continue with the following steps:
-
Press Ctrl+1 to launch the Format Cells dialog, and click the Number tab.
-
Under Category, click Date, select the date format you want, and then click OK. The value in each of the cells should appear as a date instead of a serial number.
-
-
Add or subtract years from a date
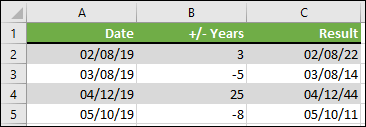
In this example, we’re adding and subtracting years from a starting date with the following formula:
=DATE(YEAR(A2)+B2,MONTH(A2),DAY(A2))
How the formula works:
-
The YEAR function looks at the date in cell A2, and returns 2019. It then adds 3 years from cell B2, resulting in 2022.
-
The MONTH and DAY functions only return the original values from cell A2, but the DATE function requires them.
-
Finally, the DATE function then combines these three values into a date that’s 3 years in the future — 02/08/22.
Add or subtract a combination of days, months, and years to/from a date
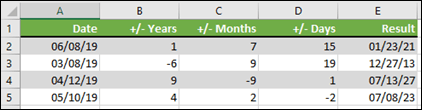
In this example, we’re adding and subtracting years, months and days from a starting date with the following formula:
=DATE(YEAR(A2)+B2,MONTH(A2)+C2,DAY(A2)+D2)
How the formula works:
-
The YEAR function looks at the date in cell A2, and returns 2019. It then adds 1 year from cell B2, resulting in 2020.
-
The MONTH function returns 6, then adds 7 to it from cell C2. This gets interesting, because 6 + 7 = 13, which is 1-year and 1-month. In this case, the formula will recognize that and automatically add another year to the result, bumping it from 2020 to 2021.
-
The DAY function returns 8, and adds 15 to it. This will work similarly to the MONTH portion of the formula if you go over the number of days in a given month.
-
The DATE function then combines these three values into a date that is 1 year, 7 months, and 15 days in the future — 01/23/21.
Here are some ways you could use a formula or worksheet functions that work with dates to do things like, finding the impact to a project’s schedule if you add two weeks, or time needed to complete a task.
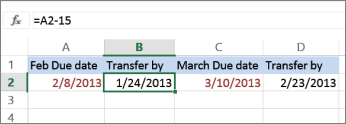
Let’s say your account has a 30-day billing cycle, and you want to have the funds in your account 15 days before the March 2013 billing date. Here’s how you would do that, using a formula or function to work with dates.
-
In cell A1, type 2/8/13.
-
In cell B1, type =A1-15.
-
In cell C1, type =A1+30.
-
In cell D1, type =C1-15.

Add months to a date
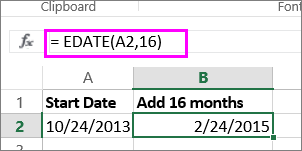
We’ll use the EDATE function and you’ll need the start date and the number of months you want to add. Here’s how to add 16 months to 10/24/13:
-
In cell A1, type 10/24/13.
-
In cell B1, type =EDATE(A1,16).
-
To format your results as dates, select cell B1. Click the arrow next to Number Format, > Short Date.
Subtract months from a date
We’ll use the same EDATE function to subtract months from a date.
Type a date in Cell A1 and in cell B1, type the formula =EDATE(4/15/2013,-5).
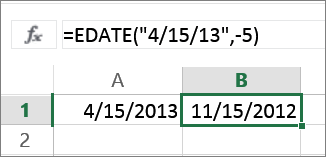
Here, we’re specifying the value of the start date entering a date enclosed in quotation marks.
You can also just refer to a cell that contains a date value or by using the formula =EDATE(A1,-5)for the same result.
More examples
To add years to or subtract years from a date
|
Start Date |
Years added or subtracted |
Formula |
Result |
|---|---|---|---|
|
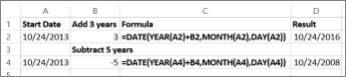
10/24/2013 |
3 (add 3 years) |
=DATE(YEAR(A2)+B2,MONTH(A2),DAY(A2)) |
10/24/2016 |
|
10/24/2013 |
-5 (subtract 5 years) |
=DATE(YEAR(A4)+B4,MONTH(A4),DAY(A4)) |
10/24/2008 |
Home / Excel Formulas / Add Month to a Date (Excel Formula)
Just like years, you can add months in a date to get a future date and subtract to get a date from the past. In this tutorial, we will look at all the methods with multiple examples to do that.
In the first example, we will write a formula to get the date from the next month and we will use the EDATE formula. As you can see in the following example, we have a date in cell A1, for which we need to get the exact date for the next month.

Follow the below steps:
- First, enter “=EDATE(” in cell B1.
- After that, refer to cell A1, where you have the date.
- Now, in the second argument, enter 1.
- In the end, type a closing parenthesis and hit enter.
Here you have the date 10-Feb-2022 in cell B1 which is exactly 1 month ahead (next month) from the date we have specified in the formula.

=EDATE(A1,1)Add 6 Months to a Date
In the same way, you can add 6 months to a date and get a date that is 6 months ahead of the current date. In the following example, we have the same date in cell A1 that we had earlier.

Now to add 6 months to this you just need to use the following formula.

=EDATE(A1,6)Add 3 Months to a Date
And in the same way, you want to add three days.

=EDATE(A1,3)Subtract Months from a Date
Now let’s say you want to subtract months from a date. In this case, you just need to use a negative number in the second argument (month).

In the following example, we have used -6 in the month argument, and we have the date 10-Jul-21 which is exactly 6 months back from 10-Jan-22.
=EDATE(A1,-6)
Содержание
- How to Add Months to a Date in Excel (In 3 Easy Ways)
- Using EDATE Function To Add Months to a Date
- Adding Years to a Date
- Using MONTH & DATE Functions
- Using Fill Series Feature
- Subscribe and be a part of our 15,000+ member family!
- How to Add Months to Date in Excel (Easy Formula)
- Add Months to a Date
- Add Years to a Date
- Add or subtract dates
- Add or subtract days from a date
- Add or subtract months from a date with the EDATE function
- Add or subtract years from a date
- Add or subtract a combination of days, months, and years to/from a date
- Add months to a date
- Subtract months from a date
How to Add Months to a Date in Excel (In 3 Easy Ways)
In this tutorial, you will learn how to add months to a date in Excel. We show you how to do this with the EDATE function and the MONTH and DATE functions. You will also learn how to create a series with a starting date with the Fill Series feature. But why would you need to do any of this?
If you are calculating product expiry dates or delivery dates, you will need to add months to starting dates. This will be covered in the sections with using functions to add months, years, or days. We will also go over how to deduct months to return an earlier date. The Fill Series feature will cover how to list a series of dates e.g. for an event that takes place monthly on the same day.
Let’s get adding!

Table of Contents
Using EDATE Function To Add Months to a Date
The EDATE function can be used to add months to a date in Excel. The EDATE function adds or deducts given months from a date and returns the relevant serial number. Using the formula below, we will add and deduct months mentioned in a separate column with the EDATE function:
Column B contains the manufacturing dates of products and column C has their shelf life mentioned in months. Our objective is to arrive at the expiry dates by adding the shelf life to the manufacturing dates. The EDATE function takes the date from cell B3 and adds the number of months in C3 to arrive at the expiry date. The date will however return as a serial number. Format the target cells to a date format to convert the serial numbers to dates.

The same formula applies for deducting months from dates. E.g. To arrive at an advance booking date for offering discounts, we would have to deduct the number of months from the regular booking date. For that, the months will be entered as negative values and the same formula will be applied to arrive at an earlier date:

The second argument can take a numeric value instead of a cell reference. But that would be more convenient if all the dates need the same number of months added.
Adding Years to a Date
The second argument of the EDATE function can be adjusted to add years to the dates. This is the formula we are using to add years to dates with the EDATE function:
The values in column C represent the shelf life of products in years. The second argument of the EDATE function will take them as months, therefore the second argument is multiplied by 12. In this way, the years are added to the dates using the EDATE function:

Using MONTH & DATE Functions
Another way of adding months to dates involves the MONTH function. The MONTH function itself returns the number of the month from a date. Using the DATE, YEAR, and DAY functions with the MONTH function we can add months to a date. To add months to a date, we will use the following formula:
The DATE function takes a year, month, and day argument to return a date in a serial number (dates are stored as serial numbers in Excel). The YEAR, MONTH, and DAY functions are used to pick the year, month, and day from the date in B3. But with the MONTH function, we have added the value in C3 i.e. 1 in this case. This will add 1 month to the date in B3 and return the date with 1 month added:

The formula is also applicable for deducting months from dates.
For adding years or days to dates, the given numbers can be added to the YEAR or DAY functions within the DATE function, in the same way they were added to the MONTH function.
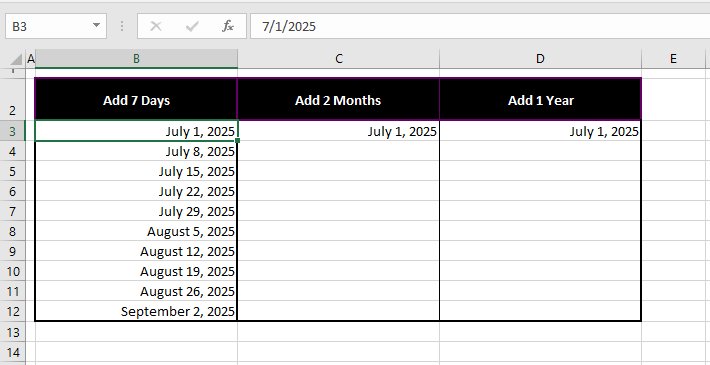
E.g. To add 1 day to the date July 1, 2025, the formula will be edited to:
This formula will return July 2, 2025
To add 1 year to the date July 1, 2025, the formula will be edited to:
This formula will return July 1, 2026
Using Fill Series Feature
The Fill Series feature adds a consistent number of months, days, or years to a date. These are the steps for using Fill Series to add a set number of days, months, or years to a date:
- Select the date and the target cells where you want the dates to be filled.
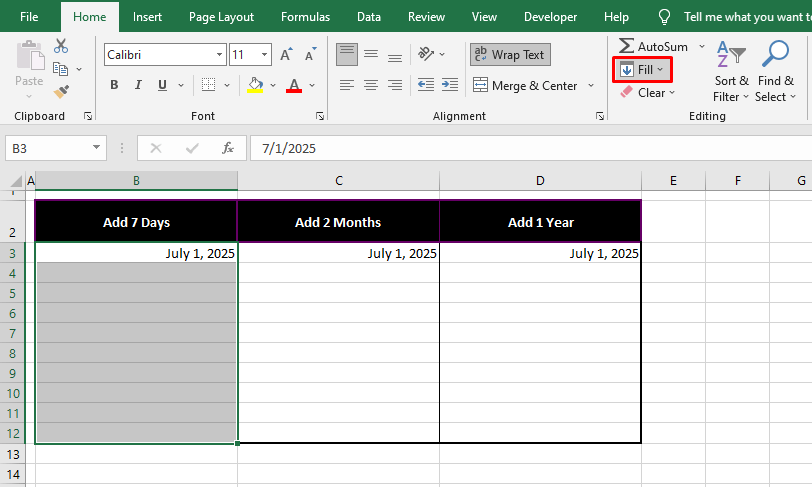
- In the Home tab, from the Editing section, select the Fill icon and then select Series from the menu.

- In the Series dialog box make the following selections:
- the Columns radio button from the Series in section,
- the Date radio button in the Type section,
- the Day radio button in the Date unit
- In the Step value field, enter the increment value for the number of days.
- For adding 7 days to the dates, we are entering the number 7 in the provided field.

- When done, click on the OK
- The series will be created with the incremental value and filled in the selected cells:
- Follow the same steps to create a series with incremental months, selecting the Month radio button in the Date unit
- Enter the incremental value in the Step value field e.g. we are entering the number 2 for creating a series with 2 months.

- The series with 2 incremental months will be created in the selected cells:

- Similarly, create a series with 1 added year by selecting the Year radio button and adding 1 as the Step value:

This fills the selected cells with a series of dates with 1 added year:

Now we add a wind-up. Today you learned how to add months to a date in Excel with various functions and the Fill Series. The methods in this guide allow you to add varying months, years, or days to each date or create a series with incremental values. We won’t be adding months to your wait for the next Excel trick, so stay tuned!
Subscribe and be a part of our 15,000+ member family!
Now subscribe to Excel Trick and get a free copy of our ebook «200+ Excel Shortcuts» (printable format) to catapult your productivity.
Источник
How to Add Months to Date in Excel (Easy Formula)
Sometimes, when working with dates, you may want to know the date after a specific number of months.
For example, you may want to know the date three months after a specific date.
Thankfully, Excel has an in-built function (EDATE) that does exactly this.
In this tutorial, I will show you how to use a simple formula to add or subtract months to a date in Excel.
This Tutorial Covers:
Add Months to a Date
Suppose you have a dataset as shown below and you want to add the given number of months in column B to the dates in column A.

This can be done using the EDATE function.
Below is the syntax of the EDATE function:
- start_date – the date for which you want to get a certain number of months before or after it
- months – the number of months before or after the start date. In case that you want to subtract months, you need to enter a negative number, since the function is by default adding months to a date.
In our example, we want to add 5 months (cell B2) to May 31, 2021 (A2) and get the result in cell C2.
The formula in C2 looks like:
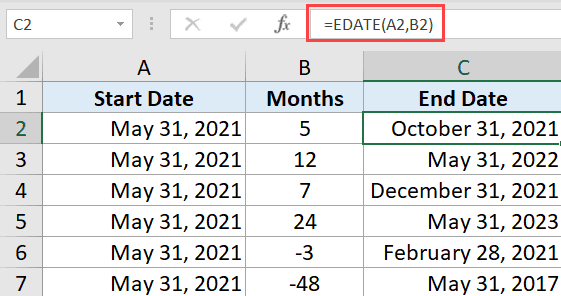
The result is October 31, 2021, as this is a date 5 months after May 31, 2021.
Note that you can use the same formula to add months as well as subtract months from any given date.
In our example, we have a couple of month values that are negative. When used in the formula, these will give you the date which is the specific number of months ago in the past.
Also, the formula will only consider the integer part of the second argument. So if enter 1.5 as the months to be added to the date, you will still get the date after one month (anything after the decimal is ignored).
Note: The prerequisite of the function is that columns containing a start date (column B) and a result date (D) are formatted as dates.
Add Years to a Date
Apart from adding months to a date, you can also use the EDATE function to add years.
Suppose you have a dataset as shown below where you want to add the number of years in column B to the dates in column A

Below is the formula that will do this:

The result in C2 is May 31, 2022, which is 1 year after May 31, 2021. As you can see, the parameter months is 12 (1 year * 12 months).
Also, since we are multiplying the month’s value with 12, you can also use decimal numbers as years and it should still work in most cases. For example, if you want to know the date after 1.5 years, you can do that (as 1.5*12 is 18, which is an integer).
This way, we can use the EDATE formula to also make the function to add/subtract years from a date.
So this is a simple formula method you can use to add months or years to a date in Excel.
I hope you found this tutorial useful!
Other Excel tutorials you may also like:
Источник
Add or subtract dates
Suppose you want to adjust a project’s schedule date by adding two weeks to see what the new completion date will be, or you want to determine how long a single activity will take to complete in a list of project tasks. You can add or subtract a number of days to or from a date by using a simple formula, or you can use worksheet functions that are designed to work specifically with dates in Excel.
Add or subtract days from a date
Suppose that a bill of yours is due on the second Friday of each month. You want to transfer funds to your checking account so that those funds arrive 15 calendar days before that date, so you’ll subtract 15 days from the due date. In the following example, you’ll see how to add and subtract dates by entering positive or negative numbers.
Enter your due dates in column A.
Enter the number of days to add or subtract in column B. You can enter a negative number to subtract days from your start date, and a positive number to add to your date.
In cell C2, enter =A2+B2, and copy down as needed.
Add or subtract months from a date with the EDATE function
You can use the EDATE function to quickly add or subtract months from a date.
The EDATE function requires two arguments: the start date and the number of months that you want to add or subtract. To subtract months, enter a negative number as the second argument. For example, =EDATE(«9/15/19»,-5) returns 4 /15/19.
For this example, you can enter your starting dates in column A.
Enter the number of months to add or subtract in column B. To indicate if a month should be subtracted, you can enter a minus sign (-) before the number (e.g. -1).
Enter =EDATE(A2,B2) in cell C2, and copy down as needed.
Depending on the format of the cells that contain the formulas that you entered, Excel might display the results as serial numbers. For example, 8-Feb-2019 might be displayed as 43504.
Excel stores dates as sequential serial numbers so that they can be used in calculations. By default, January 1, 1900 is serial number 1, and January 1, 2010 is serial number 40179 because it is 40,178 days after January 1, 1900.
If your results appear as serial numbers, select the cells in question and continue with the following steps:
Press Ctrl+1 to launch the Format Cells dialog, and click the Number tab.
Under Category, click Date, select the date format you want, and then click OK. The value in each of the cells should appear as a date instead of a serial number.
Add or subtract years from a date
In this example, we’re adding and subtracting years from a starting date with the following formula:
How the formula works:
The YEAR function looks at the date in cell A2, and returns 2019. It then adds 3 years from cell B2, resulting in 2022.
The MONTH and DAY functions only return the original values from cell A2, but the DATE function requires them.
Finally, the DATE function then combines these three values into a date that’s 3 years in the future — 02/08/22.
Add or subtract a combination of days, months, and years to/from a date
In this example, we’re adding and subtracting years, months and days from a starting date with the following formula:
How the formula works:
The YEAR function looks at the date in cell A2, and returns 2019. It then adds 1 year from cell B2, resulting in 2020.
The MONTH function returns 6, then adds 7 to it from cell C2. This gets interesting, because 6 + 7 = 13, which is 1-year and 1-month. In this case, the formula will recognize that and automatically add another year to the result, bumping it from 2020 to 2021.
The DAY function returns 8, and adds 15 to it. This will work similarly to the MONTH portion of the formula if you go over the number of days in a given month.
The DATE function then combines these three values into a date that is 1 year, 7 months, and 15 days in the future — 01/23/21.
Here are some ways you could use a formula or worksheet functions that work with dates to do things like, finding the impact to a project’s schedule if you add two weeks, or time needed to complete a task.
Let’s say your account has a 30-day billing cycle, and you want to have the funds in your account 15 days before the March 2013 billing date. Here’s how you would do that, using a formula or function to work with dates.
In cell A1, type 2/8/13.
In cell B1, type =A1-15.
In cell C1, type =A1+30.
In cell D1, type =C1-15.
Add months to a date
We’ll use the EDATE function and you’ll need the start date and the number of months you want to add. Here’s how to add 16 months to 10/24/13:
In cell A1, type 10/24/13.
In cell B1, type =EDATE(A1,16).
To format your results as dates, select cell B1. Click the arrow next to Number Format, > Short Date.
Subtract months from a date
We’ll use the same EDATE function to subtract months from a date.
Type a date in Cell A1 and in cell B1, type the formula =EDATE(4/15/2013,-5) .
Here, we’re specifying the value of the start date entering a date enclosed in quotation marks.
You can also just refer to a cell that contains a date value or by using the formula =EDATE(A1,-5)for the same result.
Источник
Sometimes, when working with dates, you may want to know the date after a specific number of months.
For example, you may want to know the date three months after a specific date.
Thankfully, Excel has an in-built function (EDATE) that does exactly this.
In this tutorial, I will show you how to use a simple formula to add or subtract months to a date in Excel.
Add Months to a Date
Suppose you have a dataset as shown below and you want to add the given number of months in column B to the dates in column A.
This can be done using the EDATE function.
Below is the syntax of the EDATE function:
=EDATE(start_date, months)
- start_date – the date for which you want to get a certain number of months before or after it
- months – the number of months before or after the start date. In case that you want to subtract months, you need to enter a negative number, since the function is by default adding months to a date.
In our example, we want to add 5 months (cell B2) to May 31, 2021 (A2) and get the result in cell C2.
The formula in C2 looks like:
=EDATE(A2, B2)
The result is October 31, 2021, as this is a date 5 months after May 31, 2021.
Note that you can use the same formula to add months as well as subtract months from any given date.
In our example, we have a couple of month values that are negative. When used in the formula, these will give you the date which is the specific number of months ago in the past.
Also, the formula will only consider the integer part of the second argument. So if enter 1.5 as the months to be added to the date, you will still get the date after one month (anything after the decimal is ignored).
Note: The prerequisite of the function is that columns containing a start date (column B) and a result date (D) are formatted as dates.
Also read: How to Add Week to Date in Excel?
Add Years to a Date
Apart from adding months to a date, you can also use the EDATE function to add years.
Suppose you have a dataset as shown below where you want to add the number of years in column B to the dates in column A
Below is the formula that will do this:
=EDATE(A2, B2*12)
The result in C2 is May 31, 2022, which is 1 year after May 31, 2021. As you can see, the parameter months is 12 (1 year * 12 months).
Also, since we are multiplying the month’s value with 12, you can also use decimal numbers as years and it should still work in most cases. For example, if you want to know the date after 1.5 years, you can do that (as 1.5*12 is 18, which is an integer).
This way, we can use the EDATE formula to also make the function to add/subtract years from a date.
So this is a simple formula method you can use to add months or years to a date in Excel.
I hope you found this tutorial useful!
Other Excel tutorials you may also like:
- Combine Date and Time in Excel (Easy Formula)
- How to Get Month Name from Date in Excel
- How to Add or Subtract Days to a Date in Excel (Shortcut + Formula)
- How to Convert Serial Numbers to Dates in Excel
- Calculate Quarter from Date in Excel
- Calculate the Number of Months Between Two Dates in Excel
- How to Calculate Years of Service in Excel (Easy Formulas)
- How to Compare Dates in Excel (Greater/Less Than, Mismatches)
In cell A1 I have the date 09/21/2010. In cell A2 I have =MONTH(A1), to display the month in cell A1, which is 9 for September. In cell A3, I would like Excel to display the month after September, which is 10 for October. I tried =MONTH(A1)+1 but that does’t work. Can anyone please tell me how to do it? Thank you for your help.
![]()
asked Apr 9, 2015 at 4:58
![]()
1
use the EDATE function: =EDATE(A1, 1) then format the row
or use DATE such as: =DATE(YEAR(A1), MONTH(A1)+1, DAY(A1))
answered Apr 9, 2015 at 5:04
![]()
LinkBerestLinkBerest
1,2713 gold badges24 silver badges30 bronze badges
1
This article outlines how to add months to a date in Excel.
How to Make Excel Add Months to Date
In Excel, you can add a number of months to a date[1] using the EDATE function. This can be very useful when performing financial modeling and you are adjusting time periods. This is a step by step guide on how to have Excel Add Months to Date.
For example, if you want to have a monthly financial model, you can add one month to the start date. If you want a quarterly financial model, you can add 3 months to the start date.
Download the Free Excel Template – Add Months to Date
Formula: Excel Add Months to Date
=EDATE(start date, number of months)
(See screenshots and example below)
Example of Adding Months to Date
Follow the steps below to perform this procedure on your own:
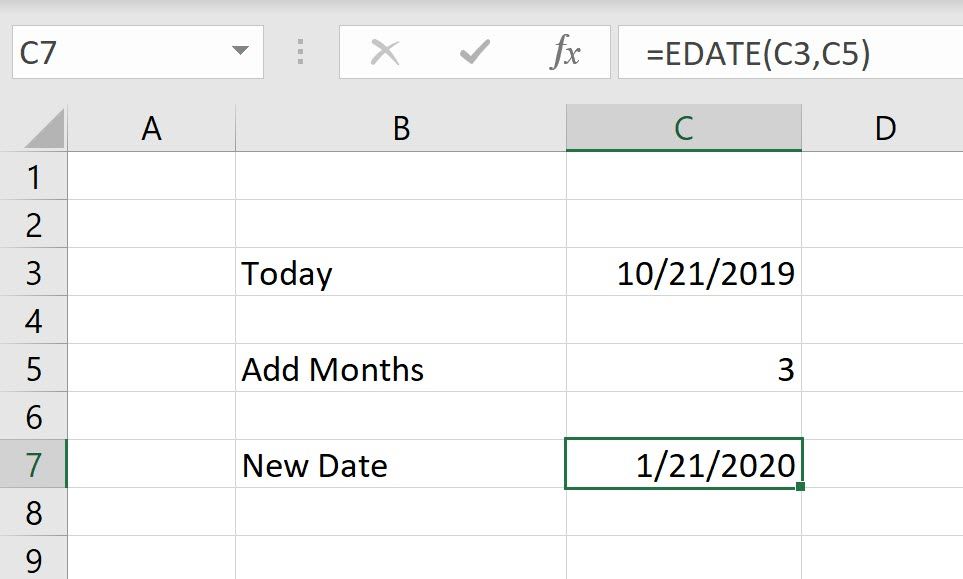
Step 1: Ensure the starting date is properly formatted – go to Format Cells (press Ctrl + 1) and make sure the number is set to Date.
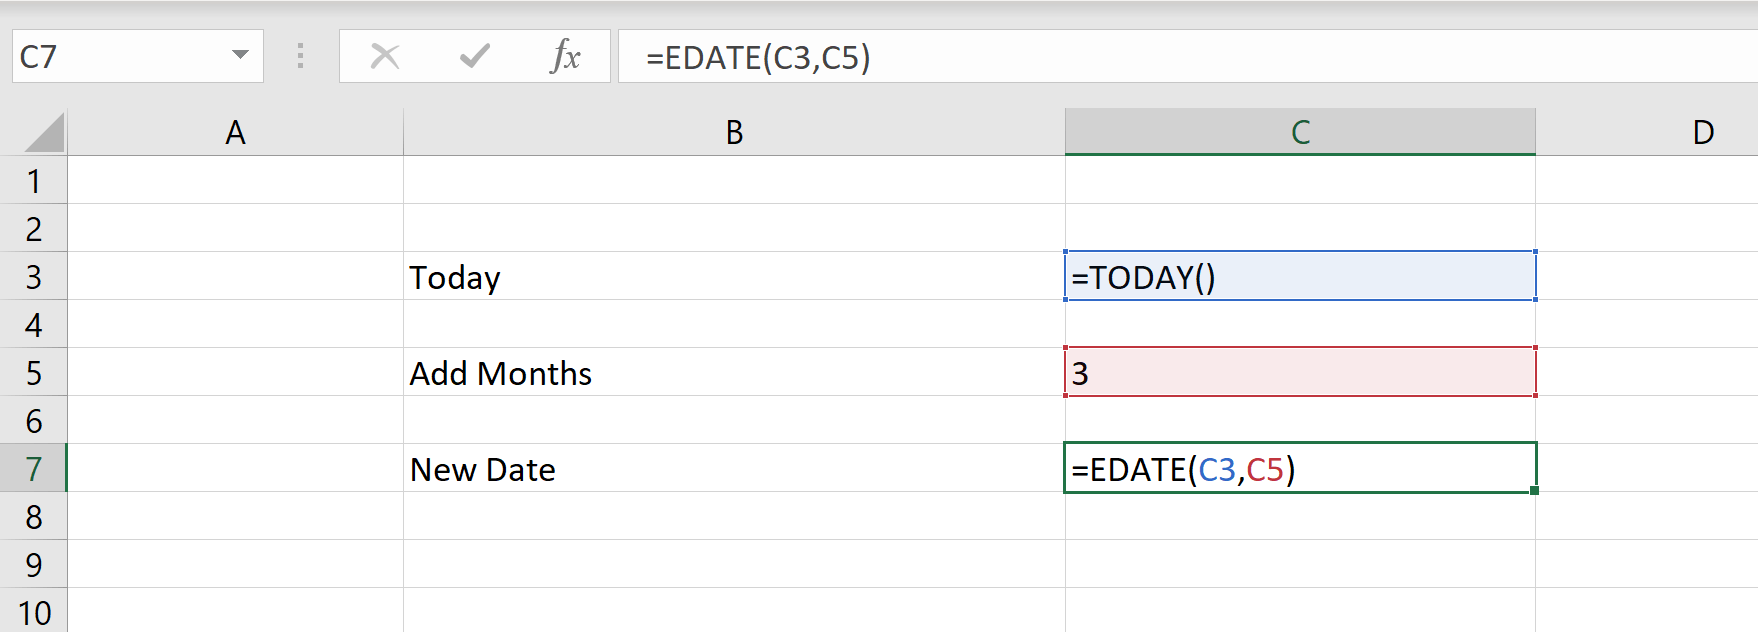
Step 2: Use the =EDATE(C3,C5) formula to add the number of specified months to the start date. Where cell C3 is equal to today’s date [the TODAY() function] and cell C5 is equal to the number 3.
Step 3: Make sure the output cell is formatted as a Date, and not as a general number (press Ctrl +1 and select Date)
Congratulations, you have now added months to a date in Excel!
Download the free template.
Formula:
Finished product:
It’s as easy as that!
Add Months to Date using EDATE Function (Step by Step with Examples)
In Excel, we have a built-in function called EDATE which adds the specified number of months to the supplied date and returns the next specified month for the same day. Before we show you how to use the EDATE function in Excel, let us introduce you to the syntax of the EDATE function.
=EDATE(start_date, months)
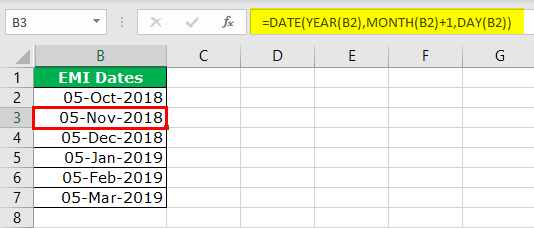
Assume you have taken a TV on EMI for six months. In addition, EMI will be deducted on the 05th of every month. Therefore, you need to create an EMI chart with the same date every month. For example, the first EMI is on 05-02-2019.

In the next five rows, we need 05th Mar 2019, 05th Apr 2019, and so on for the next five months.
- We must first open the EDATE function in the B2 cell.

- Then, the start_date is our above month, i.e., B2 cell month.

- The next thing is how many months we need to add, i.e., one month, so we must supply 1 as the argument.

- Yes, we have the next month’s change but not the date here. So we will fill down the formula to the remaining cells to have all the month’s dates as 5th.


Table of Content
- Add Months to Date using EDATE Function (Step by Step with Examples)
- Top 5 Useful Examples
- Example #1 – Different Result in Case of February
- Example #2 – Special Due Date for Leap Year
- Example #3 – Get Previous Months with Negative Number
- Example #4 – Other Ways to Add Months to Date in Excel
- Example #5 – EDATE with Other Functions
- Things to Remember
- Recommended Articles
- Top 5 Useful Examples
Top 5 Useful Examples
You can download this Add Months to Date Excel Template here – Add Months to Date Excel Template
Example #1 – Different Results in Case of February
Assume you had taken the loan and EMI due is on the 30th of every month. The first will be on 30th Oct 2018, and EMI is for six months. Let us apply the EDATE function to arrive at all the month’s due dates.
If you notice the above function, the first thing is when it ends the year 2018 in Dec. After that, it automatically jumped to the next year, i.e., 2019 (refer to C5 cell).

The second thing is in February 2019, which is a non-leap year. So, it has only 28 days. So, the formula has returned the due date as 28th Feb 2019.
Example #2 – Special Due Date for Leap Year
Now, we will take an example of a year that has a leap year. In case of a leap, the, year formulaThe year function in excel is a date function to calculate the year from a given date. This function takes a serial number as an argument and returns a four-digit numeric value representing the year of the given date, formula = year (serial number)read more will return on 29th Feb, not the 28th Feb.

Example #3 – Get Previous Months with a Negative Number
We have learned how to get next month’s date from the current date. What if we need to get the previous months from the current date?
Assume we have the starting date as 05th Sep 2018, and we need to go back for six months.

We must apply the EDATE function but in the no. of months to add mention -1 as the argument.

Example #4 – Other Ways to Add Months to Date in Excel
We can take months to days by using other methods as well. It is a complicated method, but we show this to you.
Here, the DATE function in excelThe date function in excel is a date and time function representing the number provided as arguments in a date and time code. The result displayed is in date format, but the arguments are supplied as integers.read more extracts the year, month, and day from the above. So, the only thing we have done here is adding +1 to the month for all the cells.
Example #5 – EDATE with Other Functions
We can use the EDATE with other functions as well. For example, assume we want to count the number of invoices generated from a certain date to a certain date. We need to use the EDATE functionEDATE is a date and time function in excel which adds a given number of months into a date and gives us a date in a numerical format of date. It takes dates and integers as input, the output returned by this function is also a date value. read more.

We have the below formula to count invoices from Count No. of Invoices from 17th Nov 2018 to 16th Dec 2018.

Things to Remember
- In the number of months, we can add any number. If the date falls next year, it will automatically change the year.
- If leap year comes, Feb last date will be the 29th. If not, it will be the 28th.
- A positive number will give future months, and a negative number will give previous months.
- If the date format is not there for the starting date, we will get the #VALUE! Error.
Recommended Articles
This article has been a guide to Add Months to Date in Excel. We discuss adding months to date in Excel using EDATE Formula, practical examples, and a downloadable Excel template. You may learn more about Excel from the following articles: –
- Excel Date Formula
- Date Excel Format
- Convert Date to Text in Excel
- Insert Date in Excel
Skip to content
-
Check Also Extract Substring Between Parenthesis In Excel
-
Check Also Count Number Of Users Who Are Active In An Excel Workbook
-
Check Also VBA To Open Latest Excel Workbook
-
Check Also Print Cell Height And Cell Width Of A Cell In Excel
-
Check Also Delete Non Numeric Values From Numeric Field In Excel
-
Check Also Create Rows From Column In Excel
-
Check Also Sum Numbers Separated By Symbol In Excel
-
Check Also Sort Comma Separated Values Within A Cell In Excel
In this post we will see how we could advance a date by one/n month in excel.
In several day to day excel task we are required to predict the date after exact addition of n month e.g. patient discharge date after a month or student course completion date after a certain number of month etc.
Suppose there is date Oct 7th and we want to get the same date but for different month i.e. Nov 7th.
We could advance the month by a month or by N month based on the argument that we provide in the excel formula.
We will use simple date related functions in excel to advance the month by one.

Step 1
Insert the formula =DATE(YEAR(A2),MONTH(A2)+1,DAY(A2)) in the cell B2 as shown below
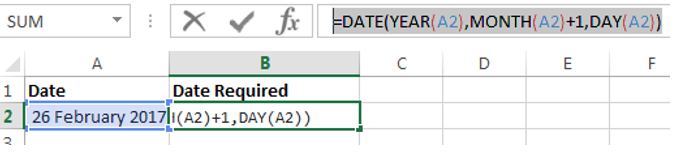
What we are doing with the help of this formula is we are extracting the date, year and month part of the date that we have in cell A2.
Now our motive is to advance the month by one so we have hardcoded “+1” in the formula in the month part.
In place of 1 add N to advance the month by n month.
Hope this helped.
Random Posts


