
The Word to PDF conversion tool is a program used to convert Microsoft Word (DOC or DOCX) documents into PDF format. It can either be online or offline software depending on the mode of operation. Of course, getting your hands on the best DOCX to PDF converter can be a headache considering just how the market is laden with such tools. It is because of this hassle that we have prepared a list of the good Word to PDF converter programs for you, but first, the factors to consider.
The Best DOCX to PDF Converter: What to Consider
If you are looking for the best Word to PDF converter, online and offline, and you are not sure how to arrive at that, here is a brief run-down of the various factors to consider.
-
Formatting and layout preservation
-
The conversion speed and overall efficiency
-
Support for OCR functionality
-
Availability of batch conversion
-
Security, especially on an online converter
Now that you have a baseline to guide your choice, let us now look at the various online and offline software that is at your disposal;
The Best Desktop Word to PDF Converters
An offline Word to PDF converter does not rely on an internet connection to achieve full functionality. It can be installed on supported operating systems as a standalone app and perform all the DOCX to PDF conversion tasks. Here are the best offline Microsoft Word to PDF conversion software we have handpicked for you;
TalkHelper PDF Converter (Recommended)
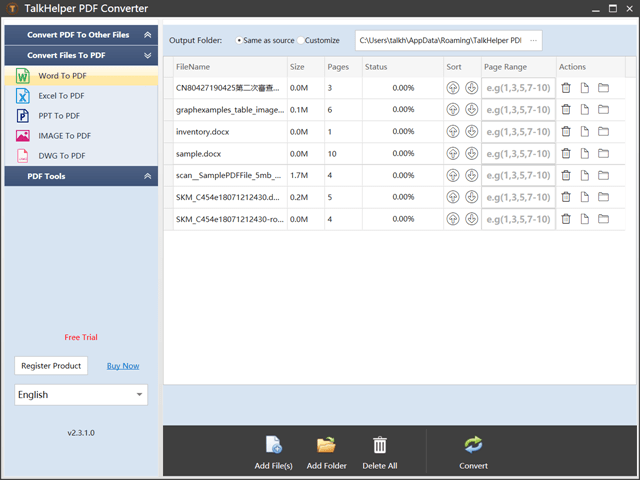
TalkHelper PDF Converter OCR is a fully-fledged tool to convert Microsoft Word documents into PDF. Apart from the Word format, this software can also convert other Microsoft Office formats (Excel and PowerPoint) into PDF format while keeping the original layout and formatting intact.
Better yet, it features the much-coveted OCR functionality, with over 40 supported languages, that comes in handy to extract text data from scanned or image-based PDFs. To save you time and effort, the batch conversion feature lets you convert multiple DOCX files into the PDF equivalent simultaneously.
As a plus, you have access to nifty tools that allow you to split, merge, and extract just the data you need to be exported into PDF.
Pros:
- Supports partial and batch conversion
- Built-in OCR with lots of supported languages
- Offers format and layout retention
- Supports a wide range of formats
- Offers options to split, merge, and extract data
Cons:
- Large PDFs may be slow to load
Supported Formats: PDF, DOC, DOCX, ODT, XLS, XLSX, ODS, HTM, HTML, TIFF, JPG, BMP, PNG, GIF, DWG, EPub, PPT.
Supported OS: Windows
Best for: Personal and commercial use
![]()
Adobe Acrobat Pro DC

Adobe Acrobat Pro DC delivers a tabbed interface to give you heaven of time when converting DOCX into PDF. You will not only aptly convert Microsoft Word to PDF but also get access to security features like PDF encryption or restricting access with passwords.
Also, you need not go through a ton of steps considering that Adobe Acrobat Pro DC can automate the conversion process for you. Amazingly, document components like images, fonts, layout, and general formatting are retained, ridding you of the need to hassle editing the output PDF file. Even after you are done with the conversion, you have access to extra features to edit, merge, split and compress the PDF file.
Pros:
- Boasts an OCR feature
- Offers cloud-based collaboration
- High-quality output with layout preservation
- Offers PDF editing options
- Lets you restrict document access
Cons:
- A bit pricey monthly subscription
Supported Formats: DOC, DOCX, XLS, XLSX, PPT, PPTX, TXT, RTF, BMP, JPEG, GIF, TIFF, PNG, PCX, RLE, DIB, HTML, WPD, XPS, DWG, DWT, DXF, DWF, CSV, PDF, etc.
Supported OS: Windows, Mac
Best for: Organizations or businesses that handle tons of PDF conversions.
![]()
PDFelement Pro
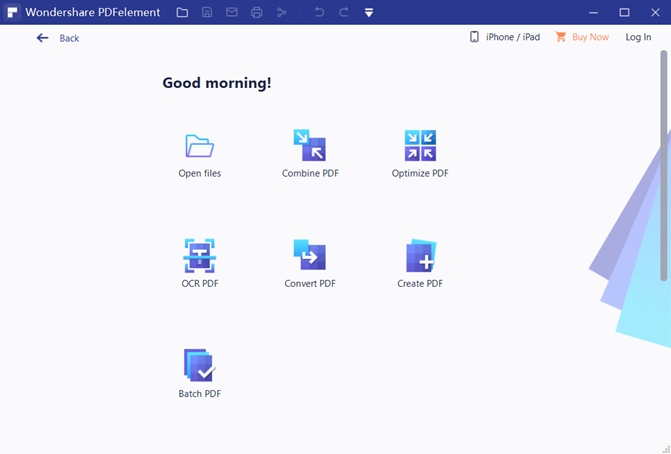
PDFelement Pro boasts quite some top-notch features like the ability to apply both partial and batch conversion when the need arises. Through batch conversion, multiple Word documents can be converted into PDFs all at the same time.
In the instance you have images with text, you can take advantage of the built-in OCR to extract the data and save it in PDF form. The good thing is that you are also opened up to editable PDFs just in case you need to tweak the output further before sharing.
Wondershare PDFelement Pro is very reliable thanks to the high levels of efficiency and ensuring that the output file looks exactly like the original Word file.
Pros:
- Offers file compression
- Provides OCR functionality
- Lets you perform a partial conversion
- Offers batch processing
- Office-like user interface
- Lets you edit converted PDFs
Cons:
- Slow at times
Supported Formats: PDF, DOCX, DOC, XLSX, XLS, PPT, PPTX, EPUB, TXT, RTF, HTML, HWPX, HWP
Supported OS: Windows, Mac
Best for: Individuals and businesses looking for a cheaper alternative to Adobe Acrobat.
![]()
Nitro PDF
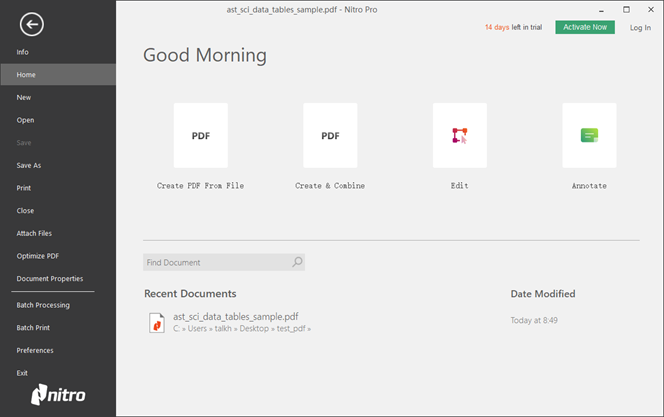
Nitro PDF is here to streamline your workflow by giving you the necessary tools to convert DOCX to PDF. The conversion is so precise that layout inconsistencies become a thing of the past. If your Word files are in the form of email attachments, Nitro PDF uses the incorporated Microsoft Outlook plugin to directly convert emails and attachments into PDF.
Collections of Word documents can also be converted simultaneously thanks to the batch conversion feature. While you are not converting Word to PDF, it is also possible to convert other Microsoft Office documents into PDF and vice versa.
Pros:
- Offers document signing options
- Boasts cloud integration for convenient sharing
- Integrates Microsoft Office for direct conversions
- Offers document security options
- Format and layout retention
- Very efficient
Cons:
- Some attributes may not be converted
- Programs crashes can occur
Supported Formats: DOC, DOCX, RTF, TXT, PDF, BMP, JPG, PNG, TIF, XML, PPTX, XLS, XLSX.
Supported OS: Windows
Best for: Easy Word to PDF conversion with no steep learning curve.
![]()
7-PDF Maker
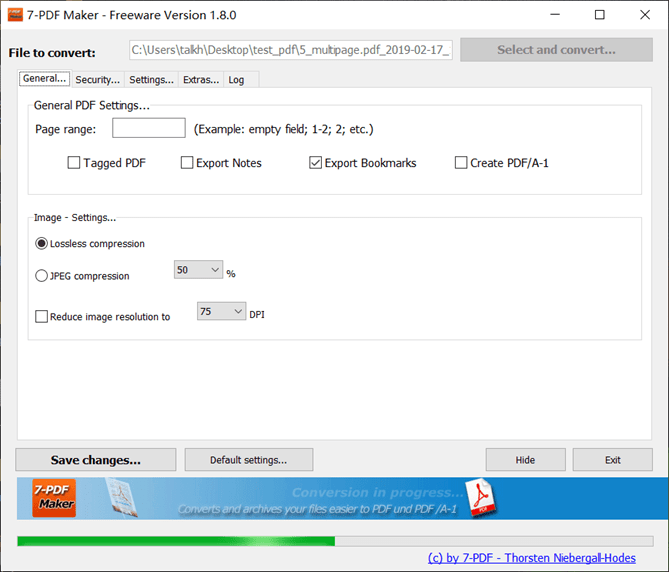
7-PDF Maker supports over 80 formats to bring you that comprehensive PDF conversion process. One of the notable features when converting Microsoft Word to PDF is that it carries over hyperlinks as they are into the final document, an element of format retention.
Instead of just converting, 7-PDF Maker gives you indexed PDFs that are searchable to the greatest extent. There is a Windows Explorer Shell integration option too that comes in handy to initiate the conversion process straight from the source folder.
You are also opened up to file encryption options if you need to restrict access to the output PDF file. Depending on your preference, you can also choose to rock the portable or command-line version of the 7-PDF Maker. Better yet, you have a built-in Sumatra PDF Viewer to open the PDFs with.
Pros:
- Batch processing
- Has a built-in PDF viewer
- Retains all the original bookmarks and hyperlinks
- Flexible license plans
- Boasts Windows Explorer integration for direct conversions
- Offers document access-restriction options
Cons:
- Does not convert PDFs to other formats
Supported Formats: DOC, DOCX, XLS, XLSX, PPT, PPTX, PDF, ODT, TXT, RTF.
Supported OS: Windows
Best for: Creating structured, barrier-free PDFs from Word documents.
![]()
The Best Online Word to PDF Converters
An online Word to PDF converter requires an internet connection to get the most out of the features. Most of the time, these tools call for the use of a good web browser coupled with a reliable internet connection and therefore rid you of the cumbersome process of setting up software on your computer. With that, here are the best online DOCX to PDF services;
SmallPDF
SmallPDF is one of the best online tools to convert DOC to PDF. It lets you import Word files from the local storage or the integrated cloud services comprising Google Drive, Dropbox, and SmallPDF’s service. Even after you have converted it into PDF, the output file can further be edited, adjusted, and compressed as you see fit. The privacy of your files is also guaranteed thanks to the use of encrypted connections.
With the processing happening in the cloud, expect very fast PDF conversions. Better yet, there are no file size limitations and no need for registration to access the features. Even better, it works on Windows, Linux, and Mac.
Pros:
- Integrates cloud services
- Guaranteed privacy
- No need for registration
- Multiplatform
- Format and layout retention
- Very efficient without file size restrictions
Cons:
- Limited free version
Supported Formats: DOC, DOCX, PDF
Supported OS: Windows, Mac, Web-based
Best for: Word to PDF conversion, collaboration, and convenient online sharing.
![]()
Soda PDF
Soda PDF is here to help you convert Word to PDF easily and offer extra features to edit, merge, compress, secure and sign the output documents. It accepts from both online and offline sources, and the conversion process is even more efficient using the batch convert feature.
The included security features see to it that document access is restricted to suit your needs. When it is unnecessary to convert the entire Word file, you can select a specific area, single pages, or a range of pages to save time. In the instance the Word file comes with images containing text, you can take advantage of the built-in OCR to extract the text data. Amazingly, the original layout and formatting are retained as much as possible.
Pros:
- Supports multiple platforms
- Offers Dropbox, Google Drive, SharePoint, and Evernote services
- Offers the batch conversion option
- Supports the PDF/A format for better archiving
- Built-in OCR
Cons:
- User support is not that reliable
Supported Formats: DOC, DOCX, XLSX, XLS, JPG, PPT, TIFF, PDF
Supported OS: Windows, Mac, Web-based
Best for: A simplified online process to convert Microsoft Office documents into PDF and still offer PDF editing options.
![]()
iLovePDF
iLovePDF is another powerful DOCX to PDF converter that is more than reliable as an online tool. It provides a clean and concise web page to work from with the options to import local files or import from the integrated Dropbox and Google Drive cloud services.
Through the use of encrypted connections, your input and output files remain safe from third-party access. Multiple Word files can also be converted into PDF to save you a ton of time and effort. Regarding the quality of the output, you can rest assured of little to no inconsistencies between the original Word document and the output PDF file. The same cloud services also help in sharing the output PDF more conveniently.
Pros:
- Retains original layout and formatting
- Supports multiple localization languages
- Supports multiple platforms
- Offers output compression options
- Offers both partial and batch conversion
Cons:
- Lacks the much-coveted OCR feature
Supported Formats: HTML, PDF, JPG, DOC, DOCX, XLS, XLSX, PPT, PPTX, PDF/A, SXW, SDW, STW, OTT, ODT.
Supported OS: Windows, Mac, Web-based
Best for: Online and offline Word to PDF conversion tasks, both personal and commercial.
![]()
Desktop Word to PDF Converter Software VS Online Word to PDF Converters

You have been presented with the online and offline PDF converter tools but still, you are not sure which one to settle for. Therefore, this section seeks to let you in on the comparison between the online and offline programs so that you can pick the one that suits best your needs. Here are the main aspects of comparison to consider;
Features
Desktop Word to PDF converter programs are crafted as standalone apps and therefore carry all the features necessary for a comprehensive experience. Contrary to this, online converters have features stripped-down, except for the core ones, so that they can be run from the web with ease. Therefore, offline tools have more features than their online counterparts.
Speed
Once you have set up the offline DOCX to PDF converter, the conversion process is very straightforward and takes a very short time to get started. An online tool will take you extra time to upload, wait for the conversion, and then download the converted PDF file, not forgetting that the internet speed matters too. As a result, you will take more time to convert a Word document online than when using offline software.
Output Quality
Quality retention is one of the top aspects with the biggest concern. It has been noted that offline programs can handle complex Word documents to retain the original layout and formatting but online tools may not meet the same level of quality considering that some features are stripped down. This factor is debatable though but most of the time, offline PDF converters give better output quality.
Security and Privacy
Document safety and privacy are of the biggest concern and having a tool that can assure this is the best thing that can happen. We all know that online tools have the most security concerns because you have to upload the source Microsoft Word documents.
These documents are more susceptible to third-party access, unlike the offline programs that perform all the conversions in an offline environment. Therefore, an offline Word to PDF converter proves to be more secure compared to an online tool.
Availability
Two approaches can be taken here depending on the scenario. While offline PDF conversion programs are accessible at any time, online programs are only available for use when you have an internet connection. In this case, offline PDF converters are preferred.
The other scenario is whereby, offline programs are available for use as long as you have the computer right next to you. Online DOCX to PDF converters work in a way that you can convert Word to PDF even while you are on the move. In this case, an online tool is preferred as you can work from just anywhere on the globe without relying on a desktop setup.
Pros and Cons
Desktop Word to PDF Converter
Pros
- High-quality output
- No need for an internet connection
- Fast and efficient
- High levels of security and privacy
- Can be accessed at any time
- Can handle complex DOCX documents
- Brings a ton of features to the table
Cons
- Trial versions are usually pretty limited
Online Word to PDF Converter
Pros
- Usually supports multiple platforms
- Can be accessed at any time
Cons
- Lots of features are stripped down
- Some require one to register
- Privacy and security are not guaranteed
- Slow PDF conversion
- Functionality relies on the internet
- Struggles with complex documents
There is no doubt that both the online and offline Word to PDF converters have their share of pros and cons. Each of these programs will perform differently depending on your working preferences. You are now able to pick the one that works the best for you.
Conclusion
The best Word to PDF converter, online or offline, is a program that is pivotal in delivering the best output at any one time. Luckily for you, the painstaking process of searching for such software has been lifted by narrowing down the number of tools to consider. You have a comprehensive breakdown of the main features, price, supported formats, supported operating system, pros, cons, and how online and offline software compare.
Среди встроенных функций Microsoft Word 2007 нет возможности сохранять документ в формате PDF, для этого зачастую приходится использовать сторонние сервисы или приложения. К слову, на эту тему написана отдельная статья на нашем сайте, с которой при необходимости рекомендуем ознакомиться.
Подробнее: Как выполнить конвертацию документа Word в формат PDF на компьютере / с помощью онлайн-сервисов
Но если необходимо преобразовать DOC или DOCX непосредственно в текстовом редакторе, можно воспользоваться специальным расширением, предоставленным для скачивания на нашем ресурсе.
Скачать надстройку для Word 2007
Для установки дополнения на компьютер выполните следующие действия:
-
Закройте все программы пакета Microsoft Office и разархивируйте скачанный инсталлятор. В Windows 10 это можно сделать через контекстное меню, выбрав опцию «Извлечь все».

В предыдущих версиях операционной системы потребуется прибегнуть к использованию стороннего программного обеспечения. Краткий обзор таких продуктов и их непосредственное использование описано у нас на сайте в отдельной статье.
Подробнее: Как распаковать архив ZIP в Windows
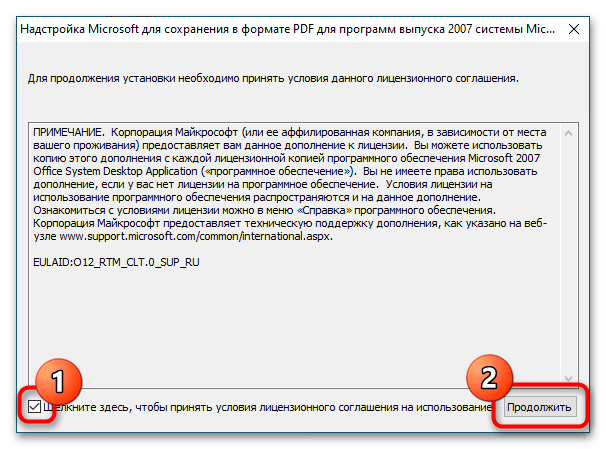
- После появления в корневой директории одноименного файла с расширением EXE запустите его, нажав дважды по иконке левой кнопкой мыши. При появлении окна с условиями лицензионного соглашения поставьте галочку у соответствующего пункта и нажмите по кнопке «Продолжить».
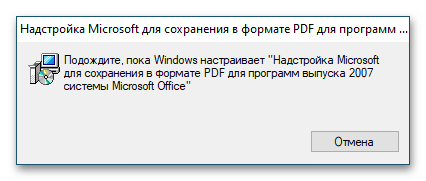
- Дождитесь, пока операционная система выполнит подготовку текстового редактора Microsoft Word для интеграции в него надстройки. Эта процедура может занимать до трех минут времени, в зависимости от мощности компьютера.
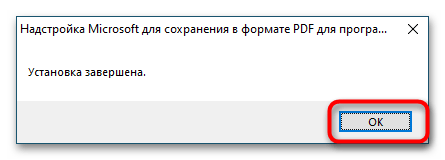
- После завершения операции дополнение будет установлено, а на экране появится соответствующее уведомление. Нажмите по кнопке «ОК», чтобы закрыть окно инсталлятора.

Сразу после этого в Word 2007 появится возможность сохранять документы в формате PDF. Для этого откройте главное меню, наведите курсор на пункт «Сохранить как» и на боковой панели справа выберите опцию «PDF или XPS».
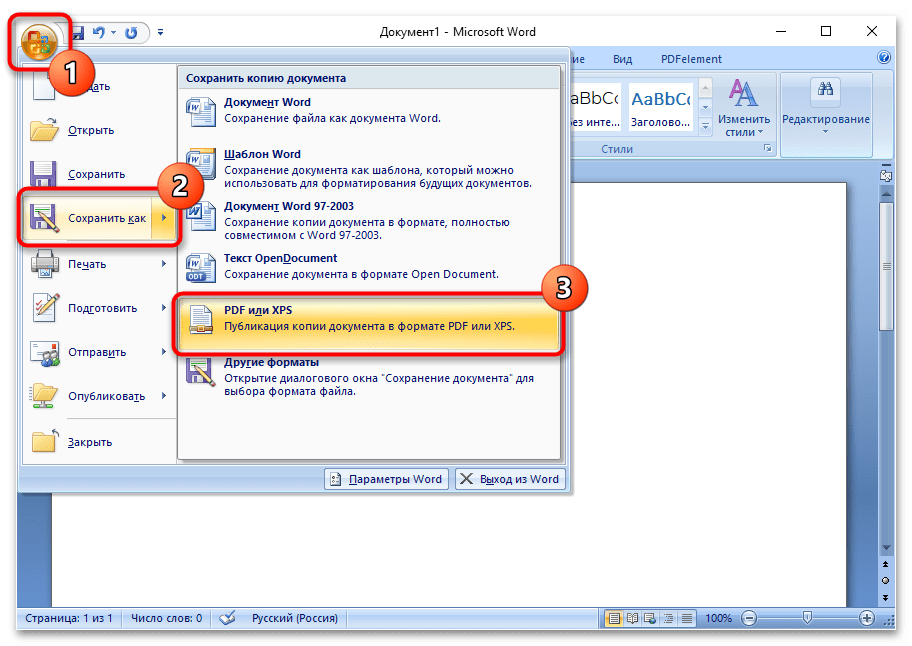
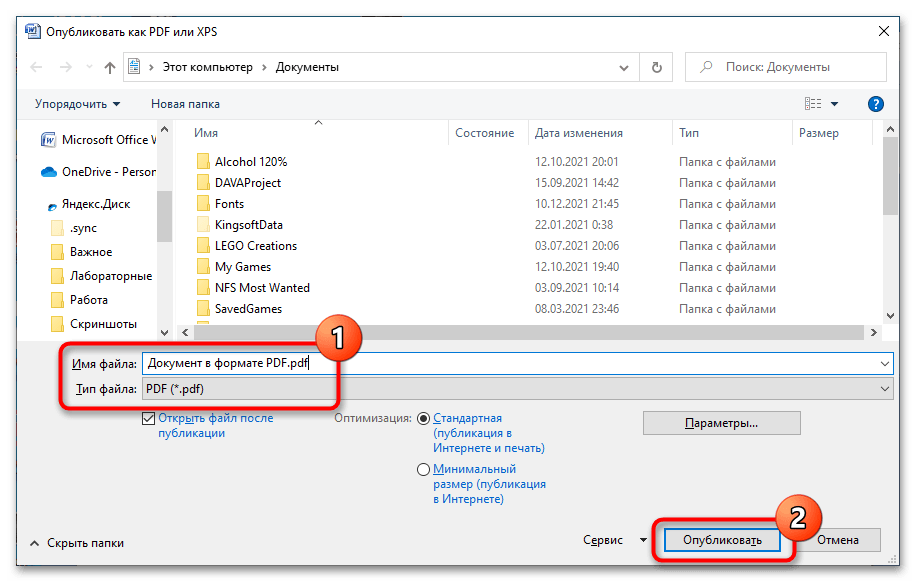
Далее в появившемся окне файлового менеджера перейдите в нужную директорию, введите имя файла и выберите из выпадающего списка «Тип файла» значение «PDF (*.pdf)». Чтобы завершить сохранение, кликните по кнопке «Опубликовать».

Обратите внимание! После установки надстройки в Word 2007 функция конвертации документа в PDF появится и во всех других продуктах Microsoft Office этого года выпуска.
Еще статьи по данной теме:
Помогла ли Вам статья?
Here are 17 best free Word to PDF converter software. These PDF converter software let you create PDF files easily from DOC and DOCX files. All these are completely free and can be downloaded to Windows PC. These PDF making software offer various features, like: conver Word document to PDF by giving print command, some let you convert your Word document to various popular image formats including JPG, JPEG, PNG, BMP, TIF, TIFF, GIF etc. Some also let you set the resolution setting like DPI of the output PDF, can set the page size, and many more.
Out of the ones I have listed below, my favorite are: 7-PDF Maker, doPDF and PDFill FREE PDF & Image Writer as these have some useful features and are easy to understand and use.
You can also try these best free Online Doc To PDF Converter, PDF To Word, and PDF To Excel software.
Here are the 17 Best Free Word To PDF Converter Software for Windows:
7-PDF Maker

![]()
7-PDF Maker is a free Word to PDF converter. Unlike most of the software in this list, it is a stand-alone DOC to PDF Converter, and does not require you to install any PDF printer. Just run the software, select the Word document that you want to convert, change the settings, and done. This free DOCX to PDF converter will immediately generate the PDF file.
Here are some other notable features of this software:
- Various methods of PDF conversion:
- Convert to PDF using GUI: As I mentioned above, run this software, and select the file that you want to convert. During conversion, you can specify various settings, like, specify the pages that you want to convert, choose image compression and resolution, save PDF in PDF/A-1 format, add security and permissions to PDF (password protection), etc.
- Command Line Word to PDF conversion: This software comes with a command line utility as well that you can use to convert Word to PDF from command line. You can also use it to do batch conversion by creating batch file.
- Windows Explorer Integration: Just right click on any Word file to convert to PDF. You can also select multiple files together to batch convert Word to PDF.
- Bulk Convert Word to PDF: It provides two methods to bulk convert DOC or DOCX to PDF. Using Windows Explorer integration, select multiple files and then right click on them to bulk convert. You can also create a batch file and then do bulk conversion using its command line utility.
- Supported formats: Apart from DOC and DOCX, it supports over 80 input file formats to convert to PDF. Some popular formats include: XLS, XLSX, PPT, PPTX, JPG, JPEG, PNG, BMP, RTF, TXT, CSV, HTML etc.
Foxit Reader

![]()
Foxit Reader is a useful program which lets you Read as well as Write PDF files. Just download and install this versatile PDF Reader program and start making your own PDFs. It installs a PDF printer as well as a PDF plugin in MS Word for making PDF from Word. Other input document formats are also supported. For e.g. To create PDF from DOC or DOCX file, open it in MS Word and click “Create PDF” from “Foxit Reader PDF” menu. This will convert your opened Word document to PDF. Another method can be invoked via Print command. Open the document and give a print command; now choose “Foxit Reader PDF Printer” from the printer list and click print button to save your PDF file. Drag & Drop feature is also supported, just run the Foxit Reader and drag & drop the Word file(s) in bulk on its window, your file(s) will now automatically converted to PDFs. You can save the converted PDF file(s) to the desired location one by one.
PDF24 Creator

PDF24 Creator is a free PDF creation software. You can convert Word documents to PDF with it. To do this, you have to first download it and install it on your PC. It installs a virtual printer in your PC. Now when you give a print command from your Word document, you can select “PDF24 PDF” as current printer from the printer list. When you click Print button, a new dialog box will open and here you can set parameters like quality etc. Click “Save as PDF” button to save the file in PDF format in the desired location. You can use its preview feature also before saving the final PDF.
doPDF

doPDF is a free PDF Printer or PDF creation software. You can convert Word file(s) to PDFs easily. It installs a PDF printer as well as a menu containing commands. You can create a PDF from your Word document by giving a print command or by clicking its menu and clicking “Save As PDF” button. You can set the quality of output PDF. It has an “Embed fonts” feature also. Various predefined paper sizes are available and you can set the custom size also. Various other customizations can be applied before creating the final PDF.
FreePDF

![]()
FreePDF is an easy to use PDF conversion program which lets you create PDFs from various types of documents including Doc and Docx files. It installs a virtual printer in your PC, and you can use it by giving a Print command from your opened Word document. It has 3 quality settings i.e. eBook, Medium Quality, and High Quality. You can apply password to PDF and lock it if required. It requires Ghostscript and it must be installed before installing FreePDF. You can use its save as feature too to apply quality settings. Overall it is an easy to understand Word to PDF creator.
Doro PDF Writer

![]()
Doro PDF Writer is a versatile PDF Writer for Windows. It installs as a virtual printer in your PC. You need to give a print command from the printable document to access it. You can create PDF from your Word files easily by using it. From the General tab you can set the Meta info like Title, Subject, Keywords, Author, and Producer. It has various security options in its Encryption tab like 128 bit encryption, set master password, allow copy and paste, allow printing etc. Its automatic update feature can be enabled or disabled from the Settings tab.
BullZip PDF Printer Standard

BullZip PDF Printer Standard is a free PDF Printer (free up to 10 users) for Windows. You can convert Word documents into PDF format by giving a normal print command. After downloading and installation, it installs a PDF Printer named “Bullzip PDF Printer” in your system. Open the Word document and give a print command, now choose it from the printer list. Click Print to start saving your PDF in the desired location. You can save lots of papers and environment by using these PDF printers.
PDFill FREE PDF & Image Writer

![]()
PDFill FREE PDF & Image Writer is a virtual printer available free for Windows. You can convert Word documents into PDF easily by using it. First you have to install it on your PC. Now after installing it open the Word document and give a print command as usual. Now from the printer list select “PDFill FREE PDF & Image Writer” and click Print. Type the name of the PDF and select the location where you want to save it. It also output or prints the document in the JPG, JPEG, BMP, TIF, TIFF, GIF, and PNG format. This is one of the best PDF and Image writer software.
Solid PDF Creator

![]()
Solid PDF Creator is another free PDF creation software. It lets you create PDF from any printable document, including DOC and DOCX files. You need to first install it on your PC. After successful installation you can open your Word document and give a print command. Now choose “Solid PDF Creator” as a printer from the installed printer list. Finally click Print to start printing by providing the name and clicking on Create button. You can set the document properties before creating it from the print dialog box. It also has an option to open or not to open the PDF document after conversion.
Bolt PDF Printer

![]()
Bolt PDF Printer is very small (just 1.1 MB) and easy to use PDF printer software. It lets you create PDF files from various types of documents, including Word files. It installs a PDF printer driver in your PC. You can give a print command from the Word file and choose “Bolt PDF” as a printer from the list. A new dialog box will open; provide the name of the PDF and save it to the desired location. Supported output formats other than PDF are: JPG, TIFF, and BMP. It works from almost every software which has a print feature.
WinPDF Easy PDF Creator

![]()
WinPDF is a free PDF making software. It installs “Easy PDF Creator” printer in the system. It can convert DOC to PDF and DOCX to PDF. It has various preference settings like: font embedding, PDF summary, page setup etc. You can set it as a default printer also. The program is very small in size (just 1 MB). To convert any Word document to PDF, give a print command and choose “Easy PDF Creator” from the printer list and click Print button. You can control its almost every feature from its main executable.
CutePDF Writer

CutePDF Writer is an easy to use program for creating PDF files from various sources, including Word. Just install it and give a print command from Word file. Now select the CutePDF Writer from the installed printer list and click print button. Type the name for a final PDF document and select the location to save it. The program is small in size and is easy to install and uninstall. If you regularly convert Word documents to PDF, then you can make it your default printer.
7-PDF Printer

![]()
7-PDF Printer is a small application which lets you print documents of various formats in PDF format. To convert a Word document in PDF format, you have to install this application first. After successful installation, you can give a print command from the File menu or use Ctrl + P from keyboard shortcut. Now choose “7-PDF Printer” from the list of printers installed and click Print button. Save the PDF in desired location by supplying a valid name to it.
Z-ViPrinter

![]()
Z-ViPrinter is a virtual PDF printer for Windows. It lets you create PDF files from Word documents as well as from other Office documents. Install it and give a print command from your Word file and select Z-ViPrinter from the printer list; a new dialog box will open. Now click “Save PDF” button and type the name of the document and click Save button to save the converted PDF. The program has other settings like: DPI, Paper Size, Separate PDF for each page, embed or not embed fonts in PDF etc.
TruePDF

TruePDF is a free virtual printer. It can create PDF files from printable documents including Word files. It creates PDF document(s) in A4 size only in the free version. After installation, give print command from a Word document. Type the name of the document you want to give and click Save button to save the PDF in the desired location.
MagicPDF

MagicPDF is a free PDF printer for Windows. It is small in size (just 923 KB) and is easy to install. It installs a virtual PDF printer in your PC and you can print to PDFs by giving print command from your Word document. You can choose MagicPDF from the installed printer list as a current printer after giving print command. Type the name and save the converted PDF in the desired location.
SomePDF Creator

![]()
SomePDF Creator is a PDF creation program available free for Windows. Some of the features available in the free version are: you can create PDF from any document which has a print option, you can save PDFs into a specific folder, and can send PDF via email automatically. You can covert Word to PDF easily by giving a print command from a file and then choose it as a printer. When you click Print a new dialog box will open; now click “Create PDF” button and type the name of a file and click Save button to save the PDF.
Published Date: 13 Jun, 2015
Modified Date: 16 Oct, 2019
- Acrobat User Guide
- Introduction to Acrobat
- Access Acrobat from desktop, mobile, web
- What’s new in Acrobat
- Keyboard shortcuts
- System Requirements
- Workspace
- Workspace basics
- Opening and viewing PDFs
- Opening PDFs
- Navigating PDF pages
- Viewing PDF preferences
- Adjusting PDF views
- Enable thumbnail preview of PDFs
- Display PDF in browser
- Working with online storage accounts
- Access files from Box
- Access files from Dropbox
- Access files from OneDrive
- Access files from SharePoint
- Access files from Google Drive
- Acrobat and macOS
- Acrobat notifications
- Grids, guides, and measurements in PDFs
- Asian, Cyrillic, and right-to-left text in PDFs
- Creating PDFs
- Overview of PDF creation
- Create PDFs with Acrobat
- Create PDFs with PDFMaker
- Using the Adobe PDF printer
- Converting web pages to PDF
- Creating PDFs with Acrobat Distiller
- Adobe PDF conversion settings
- PDF fonts
- Editing PDFs
- Edit text in PDFs
- Edit images or objects in a PDF
- Rotate, move, delete, and renumber PDF pages
- Edit scanned PDFs
- Enhance document photos captured using a mobile camera
- Optimizing PDFs
- PDF properties and metadata
- Links and attachments in PDFs
- PDF layers
- Page thumbnails and bookmarks in PDFs
- Action Wizard (Acrobat Pro)
- PDFs converted to web pages
- Setting up PDFs for a presentation
- PDF articles
- Geospatial PDFs
- Applying actions and scripts to PDFs
- Change the default font for adding text
- Delete pages from a PDF
- Scan and OCR
- Scan documents to PDF
- Enhance document photos
- Troubleshoot scanner issues when scanning using Acrobat
- Forms
- PDF forms basics
- Create a form from scratch in Acrobat
- Create and distribute PDF forms
- Fill in PDF forms
- PDF form field properties
- Fill and sign PDF forms
- Setting action buttons in PDF forms
- Publishing interactive PDF web forms
- PDF form field basics
- PDF barcode form fields
- Collect and manage PDF form data
- About forms tracker
- PDF forms help
- Send PDF forms to recipients using email or an internal server
- Combining files
- Combine or merge files into single PDF
- Rotate, move, delete, and renumber PDF pages
- Add headers, footers, and Bates numbering to PDFs
- Crop PDF pages
- Add watermarks to PDFs
- Add backgrounds to PDFs
- Working with component files in a PDF Portfolio
- Publish and share PDF Portfolios
- Overview of PDF Portfolios
- Create and customize PDF Portfolios
- Sharing, reviews, and commenting
- Share and track PDFs online
- Mark up text with edits
- Preparing for a PDF review
- Starting a PDF review
- Hosting shared reviews on SharePoint or Office 365 sites
- Participating in a PDF review
- Add comments to PDFs
- Adding a stamp to a PDF
- Approval workflows
- Managing comments | view, reply, print
- Importing and exporting comments
- Tracking and managing PDF reviews
- Saving and exporting PDFs
- Saving PDFs
- Convert PDF to Word
- Convert PDF to JPG
- Convert or export PDFs to other file formats
- File format options for PDF export
- Reusing PDF content
- Security
- Enhanced security setting for PDFs
- Securing PDFs with passwords
- Manage Digital IDs
- Securing PDFs with certificates
- Opening secured PDFs
- Removing sensitive content from PDFs
- Setting up security policies for PDFs
- Choosing a security method for PDFs
- Security warnings when a PDF opens
- Securing PDFs with Adobe Experience Manager
- Protected View feature for PDFs
- Overview of security in Acrobat and PDFs
- JavaScripts in PDFs as a security risk
- Attachments as security risks
- Allow or block links in PDFs
- Electronic signatures
- Sign PDF documents
- Capture your signature on mobile and use it everywhere
- Send documents for e-signatures
- Create a web form
- Request e-signatures in bulk
- Collect online payments
- Brand your account
- About certificate signatures
- Certificate-based signatures
- Validating digital signatures
- Adobe Approved Trust List
- Manage trusted identities
- Printing
- Basic PDF printing tasks
- Print Booklets and PDF Portfolios
- Advanced PDF print settings
- Print to PDF
- Printing color PDFs (Acrobat Pro)
- Printing PDFs in custom sizes
- Accessibility, tags, and reflow
- Create and verify PDF accessibility
- Accessibility features in PDFs
- Reading Order tool for PDFs
- Reading PDFs with reflow and accessibility features
- Edit document structure with the Content and Tags panels
- Creating accessible PDFs
- Searching and indexing
- Creating PDF indexes
- Searching PDFs
- Multimedia and 3D models
- Add audio, video, and interactive objects to PDFs
- Adding 3D models to PDFs (Acrobat Pro)
- Displaying 3D models in PDFs
- Interacting with 3D models
- Measuring 3D objects in PDFs
- Setting 3D views in PDFs
- Enable 3D content in PDF
- Adding multimedia to PDFs
- Commenting on 3D designs in PDFs
- Playing video, audio, and multimedia formats in PDFs
- Add comments to videos
- Print production tools (Acrobat Pro)
- Print production tools overview
- Printer marks and hairlines
- Previewing output
- Transparency flattening
- Color conversion and ink management
- Trapping color
- Preflight (Acrobat Pro)
- PDF/X-, PDF/A-, and PDF/E-compliant files
- Preflight profiles
- Advanced preflight inspections
- Preflight reports
- Viewing preflight results, objects, and resources
- Output intents in PDFs
- Correcting problem areas with the Preflight tool
- Automating document analysis with droplets or preflight actions
- Analyzing documents with the Preflight tool
- Additional checks in the Preflight tool
- Preflight libraries
- Preflight variables
- Color management
- Keeping colors consistent
- Color settings
- Color-managing documents
- Working with color profiles
- Understanding color management
Using PDFMaker within an authoring application is a simple, one-click procedure. It involves clicking an Acrobat PDFMaker toolbar button or choosing a command on the Adobe PDF menu.
About Acrobat PDFMaker
PDFMaker is an Acrobat feature that operates within many business applications, such as Microsoft Office applications, AutoCAD, and Lotus Notes. When you install Acrobat, PDFMaker controls appear in the work area of the authoring application.
Convert a file to PDF using PDFMaker
In Windows, Acrobat installs both an Acrobat PDFMaker toolbar and an Adobe PDF menu in many popular authoring applications. You can use either the toolbar buttons or the Adobe PDF menu (the Action menu in Lotus Notes) to create PDFs, but the menu also provides access to conversion settings. Although many of the conversion options are common to all authoring applications, a few are application-specific.
For Microsoft Office applications such as Word, Excel, and PowerPoint, the options for creating PDFs are available from the Acrobat ribbon.
Show or activate PDFMaker in Microsoft
Office and Lotus Notes
If the PDF toolbar buttons don’t appear in your Microsoft Office or Lotus Notes application, use one of the following methods to show or activate PDFMaker.
For Lotus Notes 9, choose File > Preferences. In the dialog box that appears, choose Toolbar > Toolbars, and select the Visible option for Acrobat PDFMaker.
For Microsoft Office, follow these steps:
-
- Click the File tab, and then click Options.
-
Click Add-Ins on the left side of the dialog box.
-
- If PDFMOutlook or Acrobat PDFMaker Office COM Add-in is not listed, choose COM Add-Ins from the Manage pop-up menu and click Go.
- If PDFMOutlook or Acrobat PDFMaker Office COM Add-in is listed under Disabled Application Add-ins, select Disabled Items from the Manage pop-up menu and click Go.
-
Select PDFMOutlook or Acrobat PDFMaker Office COM Add-in and click OK.
-
Restart the Office application.
Convert a file to PDF
-
Open the file in the application used to create
it. -
Click the Convert To Adobe PDF button
 on the Acrobat PDFMaker toolbar.
For Microsoft Office applications, such as Word, Excel, and PowerPoint, click the Create PDF button
on the Acrobat ribbon. -
Enter a filename and location for the PDF, and click Save.
-
(Optional) Check View Result to open the PDF or enable Protect PDF to specify the Security settings for the PDF.
Create a PDF as an email attachment
-
Open the file in the application used
to create it. -
Choose Adobe PDF > Convert To Adobe PDF And Email.
For Microsoft Office applications, such as Word, Excel, and PowerPoint, click the Create And Share button on the Acrobat ribbon.
When the conversion has finished, the PDF is opened in Adobe Acrobat. Click the Send File By Email icon (
) in Acrobat. For more information, see Share a PDF as an email attachment.
Attach a file as PDF (Outlook)
-
In the Outlook email Message window, click Acrobat > Attach as Adobe PDF button.
-
Select a file to attach, and click Open.
Convert files to a secured PDF
and attach it to an email message (Outlook)
-
In the Outlook email Message window, click the Attach As Secured Adobe PDF button
.The Attach As Secured Adobe PDF button appears only after you’ve configured an Adobe LiveCycle® Rights Management Server using the Tools > Protection > More Protection > Security Settings dialog box.
-
Click Browse, select a file to convert, and click Open.
-
Specify the users that can open the PDF, and then click OK:
- To specify only users that receive the PDF, select Restrict Access Only To People In This Message’s To:, Cc:, And Bcc: List. In this case, the PDF isn’t secured until you send the email message.
- To specify only users that are specified by a security policy, select Restrict Access By Applying The Following Security Policy, and then select a security policy in the list. In this case, the PDF is secured before it is attached to the email message.
-
If prompted, enter your user name and password to log in to the Adobe LiveCycleRights Management Server.
Create a PDF and send it for review
-
Open the file in the application used
to create it. -
Click the Convert To Adobe PDF And Send For Review button
on the Acrobat PDFMaker toolbar, or (if available) choose Adobe PDF > Convert To Adobe PDF And Send For Review.For Microsoft Office 2010 applications such as Word, Excel, and PowerPoint, click the Create And Send For Review button
on the Acrobat ribbon. -
When the Identity Setup dialog box appears, enter the appropriate information about yourself, and click Complete.
Create a PDF and run an action
-
Open the file in the application used
to create it. -
Click the Convert To Adobe PDF And Run Action button on the Acrobat PDFMaker toolbar, or (if available) choose Adobe PDF > Convert To Adobe PDF And Run Action.
For Microsoft Office 2010 applications such as Word, Excel, and PowerPoint, click the Create PDF And Run Action button on the Acrobat ribbon.
-
Click an action to from the button menu, and follow the onscreen prompts to save the files.
-
The PDF opens in Acrobat. Click Start in the right-hand pane to process the file.
View PDFMaker conversion settings
PDFMaker conversion settings
vary according to file types. For example, the options available
for PowerPoint files aren’t the same as the options available for Outlook
files. Once you’ve selected conversion settings, those choices apply
to all subsequent PDFs you create from that file type. It’s a good
idea to review the settings occasionally.
-
Open a PDFMaker-enabled application (such as Word
or Excel). -
- (Lotus Notes) Choose Actions > Change Adobe PDF Conversion Settings.
- (Office 2010 applications) In the Acrobat or Adobe PDF ribbon, click Preferences.
- (All other applications) Choose Adobe PDF > Change Conversion Settings.
-
(Optional) To revert to the original default settings, click Restore Defaults on the Settings tab.
Settings tab of the Adobe PDFMaker preferences
The settings available for PDFMaker depend
on the application in which you’re using PDFMaker.
Conversion Settings
Specifies the standard by which the PDF will be optimized. When you choose an item in the menu, a description of that preset appears immediately below it.
View Adobe PDF Result
Opens the converted document directly into Acrobat. (Exception: when you choose Convert To Adobe PDF And Email.)
Prompt For Adobe PDF File Name
Lets you enter a custom filename for the resulting PDF. Deselect this option to save the file in the same folder as the source file, using the same name but with a .pdf extension.
Convert Document Information
Adds document information from the Properties dialog box of the source file. This setting overrides the printer preferences and settings in the Advanced panel of the Adobe PDF Settings dialog box.
The Advanced Settings button opens the Adobe PDF Settings dialog box, which contains many additional conversion options. These conversion settings apply to all Acrobat features that create PDFs, such as Acrobat Distiller, PDFMaker, and the Acrobat application itself.
PDF/A Compliance
Creates the PDF so that it conforms to the selected ISO standard for long-term preservation of electronic documents.
Security tab of the Adobe PDFMaker preferences
The settings available for PDFMaker depend
on the application in which you’re using PDFMaker.
Require A Password To Open The Document
When selected, makes the Document Open Password option available, where you enter a password that users must use to open the document.
Restrict Editing And Printing Of The Document
When selected, makes the other Permissions options available.
Change Permissions Password
Specifies a password you set that users must use in order to do any allowable printing or editing.
Printing Allowed
Specifies whether users who use the Permissions Password can print the document and at what resolution.
Changes Allowed
Specifies what changes users who use the Permissions Password can make.
Enable Copying Of Text, Images, And Other Contents
Prevents or allows users from copying from the PDF.
Enable Text Access For Screen Reader Devices For The
Visually Impaired
Prevents or allows screen reader devices to read text. (Selected by default.)
Enable Plaintext Metadata
Specifies whether the search engine can read the document metadata. Available only when the PDF-compatibility is set to Acrobat 6.0 (PDF 1.5) or later.
Convert Microsoft Word, PowerPoint,
and Excel files to PDF
When creating a PDF from Microsoft Word, PowerPoint, or Excel, you can set conversion options for the current file. You can also select a range of content in the file to convert. The conversion options that you can set in the following steps are some of the most commonly used settings from the Acrobat PDFMaker dialog box. Any changes you make to the conversion options apply to the current conversion only.
Convert Excel files to PDF
-
Optionally, select the cells to convert.
-
- (Office 2010) From the Acrobat ribbon, select one of the Create options.
-
In the Acrobat PDFMaker dialog box, select a Conversion Range, then click Convert To PDF.
-
In the Save Adobe PDF File As dialog box, specify a filename and location for the PDF.
-
Optionally, click the Options button to change the conversion settings.
-
Click Save to create the PDF.
Convert Word and PowerPoint files
to PDF
-
Open a file in Word
or PowerPoint. -
Optionally, select objects and text (Word) or slides
(PowerPoint), as needed. -
(Office 2010) From the Acrobat ribbon, select Create PDF, Create And Attach to Email, or Create And Send For Review.
-
In the Save Adobe PDF File As dialog box, specify a filename and location for the PDF.
-
Optionally, click the Options button to change the conversion settings.
-
Select a Page Range (Word) or Slide Range (PowerPoint). The Selection option is available only if you have selected content in the file.
-
Click OK, then click Save to create the PDF.
Convert email messages to PDFs
You can use PDFMaker to convert one or more Microsoft Outlook or Lotus Notes email messages or entire folders of messages to a merged PDF or PDF Portfolio. Within a PDF Portfolio, each email message appears as a separate PDF file.
The Acrobat PDFMaker Conversion Settings dialog box contains the option that determines whether email messages are merged into one continuous PDF or assembled into a PDF Portfolio.
The controls that activate an email conversion to PDF appear in two places within the email application: on the Acrobat PDFMaker toolbar and on a menu. In Outlook, the menu is called Adobe PDF and appears to the right of the Outlook Help menu. In Lotus Notes, PDF commands appear under the Actions menu.
You can convert one currently open email message to PDF (not to a PDF Portfolio) by choosing File > Print, and selecting Adobe PDF as the printer in the Print dialog box. The PDFMaker conversion settings do not affect this process.
Specify whether email messages
become merged PDFs or PDF Portfolios
-
- (Outlook) Choose Acrobat > Change Conversion Settings.
- (Lotus Notes) Choose Actions > Change Adobe PDF Conversion Settings.
-
- To convert and merge email messages into a PDF as sequential pages of one document, deselect Output Adobe PDF Portfolio When Creating A New PDF File.
- To assemble converted email messages as components of a PDF Portfolio, select Output Adobe PDF Portfolio When Creating A New PDF File.
Convert an open email message to
PDF (Outlook)
-
Choose Acrobat > Convert To Adobe PDF.
You can also convert a different file to PDF from within an open Outlook email message if the Attach As Adobe PDF toolbar is shown. Clicking this button opens a series of dialog boxes for selecting and saving the new PDF and also starts Acrobat, if it is not already running. The resulting PDF is attached to the open email message.
Convert email messages to a new
PDF
-
In Outlook or Lotus Notes, select the individual email messages.
-
- (Outlook) Choose Acrobat > Selected Messages > Create New PDF.
- (Lotus Notes) Choose Actions > Convert Selected Messages To Adobe PDF.
-
In the Save Adobe PDF As dialog box, select a location, type a filename, and click Save.
Add email messages or folders to
an existing PDF
-
In Outlook or Lotus Notes, select the individual email messages or folders.
-
- (Outlook) Choose Acrobat > Selected Messages > Append To Existing PDF, or Acrobat > Selected Folders > Append To Existing PDF.
If you have already created one or more PDF Portfolios, you can choose from recently created PDF Portfolios in addition to the Append To Existing PDF option.
- (Lotus Notes) Choose Actions > Append Selected Message(s) To Existing Adobe PDF, or Actions > Append Selected Folder(s) To Existing Adobe PDF.
-
Locate and select the PDF or PDF Portfolio to which you want to add the converted emails, and click Open.
Do not type a new name for the PDF. If you do, a warning message appears telling you that the PDF was not found. Click OK, and select a PDF without changing its name.
-
(Outlook only) If a message appears, alerting you that
the existing PDF was created using an earlier version of PDFMaker,
do one of the following:- To create a PDF Portfolio from the original PDF archive, click Yes, and select a name and location for the new archive. (The default name adds _Portfolio to the original PDF filename.) When the conversion is complete and the Creating Adobe PDF dialog box closes, the new archive opens in Acrobat.
- Click No to cancel the process.
For PDF Portfolios of email converted or migrated
in Acrobat 8 or later, only new messages—that is, messages that
are not already part of the PDF Portfolio—are appended.
Convert email folders to a new
PDF
PDFMaker can convert multiple folders to PDF
in one procedure. It is not necessary to select the folders at the
beginning of the process because you can select them in a dialog
box that appears automatically.
-
- (Outlook) Choose Acrobat > Selected Folders > Create New PDF.
- (Lotus Notes) Choose Actions > Convert Selected Folder(s) To Adobe PDF.
-
In the Convert Folder(s) To PDF dialog box, select the folders. Then select or deselect the Convert This Folder And All Sub Folders option.
-
In the Save Adobe PDF File As, select a location and name for the PDF Portfolio.
When the conversion is complete, the new PDF opens in
Acrobat.
Set up automatic email archiving
-
- (Outlook) Choose Acrobat > Setup Automatic Archival.
- (Lotus Notes) Choose Actions > Setup Automatic Archival.
-
On the Automatic Archival tab of the Acrobat PDFMaker dialog box, select Enable Automatic Archival. Then select options for Frequency and the time of day at which automatic archiving occurs.
-
Select other options, according to your needs:
Maintain Log Of Archival
Creates a record of each archiving session.
Choose File
Specifies the name and location of the archiving log.
Embed Index For Faster Search
Creates an index that you can search to find specific words or characters instead of having to search each individual document.
-
Click Add, and select the email folders and subfolders. Then select or deselect the Convert This Folder And All Sub Folders option, as preferred, and click OK.
-
In the Save PDF Archive File As dialog box, select a name and location for the archived email PDF. Then click Open.
-
Review the settings and the archive folder names listed
in the Acrobat PDFMaker dialog box, and do any of the following:- To add other email folders to the list, click Add and select the folder.
- To remove folders from the list, select the folders and click Delete.
- To change an archive file, select any folder name from the list, click Change Archive File, and specify the name and location.
- To start archiving email immediately, click Run Archival Now.
Create PDFs from Word mail merges
Mail merges from Word generate documents like form letters—for one common example—that are personalized with information like the names and addresses of the recipients. With Acrobat PDFMaker, you can save steps by using a Word mail merge document and corresponding data file to output mail merges directly to PDF. You can even set up PDFMaker to attach those PDFs to email messages that are generated during the PDF-creation process.
For information on setting up files for the Word Mail Merge feature, see Microsoft Office Word Help.
-
In Microsoft Word, open the template that you have created as the basis of your mail merge, or create the file using the Word Mail Merge toolbar and Mail Merge wizard, as needed.
Do not complete the mail merge
in Word. Instead, set up and preview the mail merge as usual, so
that you can verify that the merge will work correctly. -
- Choose Acrobat > Mail Merge.
- Click the Mail Merge To Adobe PDF button on the Mail Merge toolbar (View > Toolbars > Mail Merge).
-
In the Acrobat PDFMaker — Mail Merge dialog box, select the options you want:
- To specify which records in the data file will be imported into the merged files, select All or Current, or enter a range of pages by typing in the From and To boxes.
- To name the PDF that will be created, type in the Specify PDF File Name box.
The PDF will be named using this text plus a series of numbers. For example, if you type JulyLetter in the Specify PDF File Name box, the mail-merged PDFs might appear as JulyLetter_0000123, JulyLetter_0000124, JulyLetter_0000125, and so forth.
-
For Automatically Send Adobe PDF Files By Email, do one of the following:
- To create and save merged PDFs for printing or sending later in email, leave the option deselected, and click OK.
- To create merged PDFs and attach each one to an email message to the appropriate recipient, select this check box, and fill in the other Email options.
-
When the Browse For Folder dialog box appears, navigate to the location you want to use and click OK.
Status indicators appear as PDFMaker generates the
individual PDFs, -
If you selected Automatically Send Adobe PDF Files By Email, a dialog box appears asking for your email profile. Enter the appropriate information and click OK.
When the job has finished, a message appears, telling
you that the process was successful.
Email options for PDF mail merges
To
Use the pop-up menu to select the field or column in the associated data file that contains the email addresses in each individual’s record.
Subject Line
Type the text that you want to appear in the subject line of each message.
Message
Type to add or edit text that you want to appear in the body of the email messages.
PDFs from Microsoft Project (Acrobat Pro)
There are specific differences to be aware of when you create PDFs from files authored in Microsoft Project.
You can create PDFs of only the current selected view. Views designated as non-printable in Project cannot be converted to PDF.
Convert Visio files to PDF (Acrobat
Pro)
PDFs created from Visio files preserve page sizes and support layers, searchable text, custom properties, links, bookmarks, and comments, depending on the conversion settings. To specify the properties
-
(Visio 2010) From the ribbon choose Acrobat > Preferences
When you convert your Visio file, only shapes and guides that are printable and visible in the Visio drawing are converted and appear in the PDF. Shapes are converted regardless of their protection or behavior. Shape custom properties can be converted to PDF object data.
When you convert the Visio file to a PDF, you can preserve all or just some layers, or you can flatten all layers. If you flatten layers, the PDF will look like the original drawing, but won’t contain any layer information. When flattened, the contents of only visible and printable layers will appear in the converted PDF.
Convert Visio files
-
If you want to change the PDFMaker conversion settings, do the following. (For information about a setting, place the pointer over the setting to display a tool tip below.)
- (Visio 2010) Choose Acrobat > Preferences
-
If you want to convert each page in the Visio file to a bookmarked page in the PDF file, choose Adobe PDF > Convert All Pages In Drawing. If this option is deselected, only the current page is converted.
-
- (Visio 2010) Choose Acrobat > Create PDF.
- (Visio 2010) Choose Acrobat > Convert To Adobe PDF.
- (Visio 2010) Choose Acrobat > Create and Attach To Email. The PDF file attaches to a new email message in your default email application.
- (Visio 2010) Choose Acrobat > Create and Send For Review. The file converts to an Adobe PDF file, and an email-based review process begins.
-
If you want to include the custom properties of shapes,
select that option. -
Select a layers option to retain or flatten layers in the resulting PDF, and click Continue.
If you select Retain Some Layers In The Selected Page,
you’ll be prompted to choose which Visio layers to include. -
Click Convert To Adobe PDF, specify a location and filename, and click Save.
Select Visio layers to convert
(Acrobat Pro)
You can convert a Visio drawing that contains layers to a PDF and retain some or all of the layers in the resulting PDF, or you can flatten the layers. You can also organize the Visio layers in layer sets, which are folders in the Acrobat Layers panel.
-
With the multilayered file open in Visio, click a button in the Adobe PDF toolbar, and select Retain Some Layers In The Selected Page.
If the Retain Some Layers In The Selected Page option
is not available, deselect the Convert All Pages In Drawing option. -
Select one or more layers in the Layers In Visio Drawing list.
-
To add the selected Visio layers to the list of layers
to convert to the PDF file, do one of the following:- To convert the selected Visio layers to individual PDF layers within a PDF layer set, click Create Layer Set, and optionally, type a layer name.
- To convert the selected Visio layers to individual layers (but not grouped under a layer set), click the Add Layer(s) button.
The name of a layer in the Layers In Visio Drawing list is unavailable if that layer is included in the Layers In PDF list. When you select that layer in the Layers In PDF list, a bullet appears next to the layer’s name in the Layers In Visio Drawing list.
-
Optionally, do any of the following:
- To reorder the layers in the Layers In PDF list, drag an item up or down in the list.
- To include a visibility property that can be switched on or off in Acrobat, deselect Locked On adjacent to the PDF layer; to lock the resulting PDF layer’s visibility on, select Locked On.
- To save the current settings of Visio layers selected, click Save PDF Settings, and click OK. These settings are used the next time you convert the current Visio file to a PDF file.
-
Click Convert To PDF, specify a folder in the Save In box in which to save the PDF file, type a filename, and then click Save.
Visio layers that were selected for conversion and that
have Visio settings for visible, printable, or lock are converted
to PDF layers; the visible and printable properties are included
in the resulting PDF layers. If the Visio file contains a background
page, header, or footer, the PDF file automatically has PDF layers
named for those items.
Convert AutoCAD files to PDF (Acrobat
Pro for Windows)
Use PDFMaker to convert AutoCAD files from within the AutoCAD application. You can also use the Batch Conversion feature to convert many AutoCAD files in one operation. Even if you don’t have AutoCAD, you can convert AutoCAD files to PDF from Acrobat.
Acrobat PDFMaker allows you to preserve selected layers and layouts when converting AutoCAD files to PDF.
Convert AutoCAD files when AutoCAD
is not installed
The default Acrobat installation installs
Autodesk filters. These filters allow you to convert files in DWG,
DWF, DST, DWT, and DXF format into PDF, without the native application
installed.
-
In Acrobat, choose File > Create > PDF From File.
-
(Optional) From the Files Of Type menu, select Autodesk AutoCAD, then click the Settings button and change the conversion settings as needed. The settings are the same as the AutoCAD-specific Acrobat PDFMaker settings, with the following additions:
Convert Model Space To 3D
When selected, the model space layout is converted to a 3D annotation in the PDF. Click Choose 3D Settings to specify 3D conversion options.
Configuration Preferences
Click this button to specify resource directories for SHX font files, plot configuration files, and plot style tables for AutoCAD drawings. If an SHX Font File Search Path is not specified, all SHX fonts are replaced with MyriadCAD in converted PDFs.
Always Show This Dialog During Conversion
When selected, this dialog box appears during the conversion process.
-
Locate and select the AutoCAD file.
-
If the Adobe PDF Settings For Autodesk AutoCAD Documents dialog box appears, specify the settings as needed, and click OK.
Convert AutoCAD files when AutoCAD
is installed
When converting individual AutoCAD
files, you don’t usually need to change page size and plotting settings.
PDFMaker uses the appropriate layout page size and plotting information
to create a correctly sized PDF file.
-
To change the PDF conversion settings, choose
Adobe PDF > Change Conversion Settings in AutoCAD. -
In the Choose Layouts dialog box, add or remove layouts as needed. To reorder the layouts, select a layout from the Layouts In PDF list, and click Move Up or Move Down.
-
To determine how the AutoCAD layers are converted, select one of the following, and then click Continue:
- Flatten All Layers. When layers are flattened, only those entities belonging to layers that are not frozen and are printable appear in the converted PDF.
- Retain All Or Some Layers. In the next dialog box, specify the layers to include in the resulting PDF.
-
Specify a filename and location in the Save As dialog box, and click Save.
Select AutoCAD layers to convert
If you choose to retain all or some AutoCAD
layers when converting to PDF, you can specify which layers are
preserved in the PDF.
-
In AutoCAD, start to convert an AutoCAD file and select the Retain All Or Some Layers option.
-
To show specific AutoCAD layers in the Layers In Drawing list, do any of the following:
- Choose an option from the Named Layer Filters menu to list all layers that fit that criterion.
- Select the Invert option to list all layers except those layers that are described by the selected choice in the Named Layer Filters menu.
- To change the sort order of the layers, click the headings.
To change the On, Frozen, or Plot properties for a layer, click Cancel, change the properties in the AutoCAD drawing, and restart the procedure.
-
To select the AutoCAD layers to convert, do any of the
following:- Choose a previously saved set of layers from the PDF Layer Settings menu.
- Select one or more layers from the Layers In Drawing List.
- To convert all of the layers in the drawing, click Add All Layers, and go to step 5.
-
To add the selected AutoCAD layers to the Layers In PDF
list, do one of the following:- To convert the selected AutoCAD layers to individual layers within a PDF layer set, click Create Layer Set. This action creates a folder of layers in the Layers navigation pane in Acrobat.
- To convert the selected AutoCAD layers to individual layers, click Add Layer(s).
-
Optionally, do any of the following in the Layers In PDF list:
- To reorder layers, drag an item up or down in the list.
- To include a visibility property that can be switched on or off in Acrobat, deselect Locked On for the PDF layer. To lock the resulting PDF layer’s visibility on, select Locked On.
- To save the current list of selected AutoCAD layers, click Add PDF Setting. Later, you can retrieve this list from the PDF Layer Settings menu.
-
Click Convert, specify a filename and location, and then click Save.
Convert AutoCAD files in batches
-
Choose Adobe PDF > Batch Conversion.
-
Specify your preferences for layers, page size, plot
style, and output PDFs. Click Conversion Settings to specify the
Acrobat PDFMaker settings. -
In the DWG List, do any of the following:
- Click Add Folder or Add Files, and then specify the folder or files.
- To load a previously saved list of files, click Append List, and then specify the list.
- As needed, expand individual files and select or deselect the items you want, such as model space and layouts. To exclude or include all model space, click the associated buttons.
- To exclude a file from the conversion, deselect the file box. As needed, select or deselect all of the files in the list, change the order of the files, remove files, or clear the list.
- To show the complete file paths, select Expand File Name(s).
- To save the DWG list for later use, click Save List. This action saves the list in its current state, including the file order and file selections. You can retrieve this list at any time by clicking Append List.
-
Once the conversion has finished, you can click Save Details to save a log file of the conversion.
Application-specific PDFMaker settings
Sometimes the conversion settings in one PDFMaker-enabled
application are different from the settings in a different application.
Some
PDFMaker settings are common to several or most applications. Some options
are unique to a specific application.
Settings tab options available
from within most applications
The following settings appear on the Settings tab available from within most PDFMaker-enabled applications.
Attach Source File
Includes the document being converted as an attachment to the PDF.
Create Bookmarks
Converts certain elements in original Office documents to PDF bookmarks: Word headings, Excel worksheet names, or PowerPoint titles. Selecting this option overrides any settings on the Bookmarks tab of the Conversion Settings dialog box.
Add Links
Includes active links and hypertext in the PDF.
If this option is deselected, but the recipient of the PDF has the create Links From URLs preference selected, URLs in the PDF are still active.
Enable Accessibility And Reflow With Tagged Adobe PDF
Embeds tags in the PDF.
Excel-specific options on the Settings
tab
Convert Comments
Converts user-created Excel comments to notes and lists them in the Acrobat Comments panel.
Actual Size
Uses actual size specified in the worksheet. Worksheets are not resized.
Fit Worksheet To A Single Page
Adjusts the size of each worksheet so that all the entries on that worksheet appear on the same page of the PDF.
Fit To Paper Width
Adjusts the width of each worksheet so that all the columns on that worksheet appear on one page in the PDF.
Prompt For Selecting Excel Sheets
Opens a dialog box at the beginning of the file conversion process. In this dialog box, you can specify which worksheets are included in the PDF and the order in which the sheets appear in the PDF.
PowerPoint-specific options on the Settings tab
Preserve Slide Transitions
Converts PowerPoint slide transition effects to PDF transition effects.
Convert Hidden Slides To PDF Pages
Converts any PowerPoint slides that are not seen in the usual playing of the presentation to PDF pages.
Convert Speaker Notes
Converts any speaker notes for the PowerPoint presentation into Text notes in the PDF.
Email-specific options on the Settings
tab
The following options appear when you open the PDFMaker settings from within Microsoft Outlook or Lotus Notes.
Compatibility
Sets the compatibility level of the PDF. Use the most recent version (in this case, version 1.7 ADBE-3) to include all the latest features and functionality. If you’re creating PDFs that are distributed widely, choose an earlier level to ensure that all users can view and print the document.
Attachments
Indicates whether all files attached to email messages are included in the PDF.
Output Adobe PDF Portfolio When Creating A New PDF
File
When selected, always converts individual messages as component files of a PDF Portfolio. When deselected, merges individual messages as separate pages of a PDF.
Do Not Include Folder Name Information
When selected, excludes mail folder names from PDFs.
Embed Index For Faster Search
Creates an embedded index, which speeds up searches, especially when you convert large numbers of email messages or message folders.
Block Download Of External Content
When selected, prevents the downloading of any external Internet content, such as images, CSS, and JavaScript.
Page Layout options
Specifies page properties, like the properties found in the Print dialog box: page dimensions, orientation, and margins.
Show This Number Of Recent Archives (Outlook only)
When converting email messages and folders, the Adobe PDF > [Convert Selected Messages and Convert Selected Folders] menus can list recently created PDFs to append. This option specifies the maximum number of PDFs to list in the menus.
Show “Attach As Adobe PDF” Buttons
If selected, the Attach As Adobe PDF button appears in the Outlook email message window.
AutoCAD-specific options on the
Settings tab (Acrobat Pro)
The following options appear when you open the PDFMaker settings from within Autodesk AutoCAD.
Compliance Standard
Specify the PDF/A or PDF/E compliance standard, or none.
Open Layers Pane When Viewed In Acrobat
Shows the layers structure when a PDF is opened in Acrobat.
Embed Scale Information
Preserves drawing-scale information, which is usable with the Acrobat measurement tools.
Do Not Convert Model Space To 3D
When selected, the model space layout is not converted to a 3D annotation in the PDF.
Choose Layout Option
Specifies whether Current Layout, All Layouts, or Selected Layouts are included in the PDF.
Exclude Model Space
(Available only when Convert All Layouts Without Prompting is selected from Choose Layout Option.) When selected, all layouts except the model space are included in the PDF.
Choose Layer Option
Specifies whether All Layers, Selected Layers, or No Layers are included as layers in the PDF.
Visio-specific options on the Settings
tab (Acrobat Pro)
The following options appear when you open the PDFMaker settings from within Microsoft Visio.
Include Visio Custom Properties As Object Data In The
Adobe PDF
Indicates whether custom properties of the Visio image are included as object data in the new PDF.
Exclude Visio Objects With No Custom Properties
Indicates whether the new PDF excludes Visio objects without custom properties.
Convert Comments To Adobe PDF Comments
Indicates whether the comments in the Visio file are converted to PDF comments in the new PDF.
Always Flatten Layers In Adobe PDF
Specifies if the layers are flattened. If you flatten layers, the PDF looks like the original drawing, but doesn’t contain any layer information. All shapes in the Visio drawing are converted, regardless of their protection or behavior, and shape custom properties can be converted to PDF object data.
Open Layers Pane When Viewed In Acrobat
Shows the layers structure when a PDF is opened in Acrobat.
Word tab settings (Microsoft Word)
Convert Displayed Comments To
Notes In Adobe PDF
Changes any Word comment entries to PDF comments. If the currently open Word document contains comments, more options appear in the Comments list on this tab:
Reviewer
Lists the names of reviewers who have entered comments in the current Word document.
Include
When deselected, does not include the comments in the PDF.
Notes Open
Specifies whether the PDF comment windows automatically open or are closed for that reviewer’s comments.
Color
Shows the color for that reviewer’s comment icons. Clicking the color icon repeatedly cycles through a limited set of available colors.
# Of Comments
Shows the number of comments that the reviewer made.
Convert Footnote And Endnote Links
Integrates these into the PDF.
Convert signature fields specified by pdfmarks
Converts signature fields indicated by pdfmarks.
Enable Advanced Tagging
Integrates this into the PDF.
Bookmarks tab settings (Microsoft
Word)
The options you specify on this tab determine
which items are converted into PDF bookmarks in the PDF.
To include bookmarks in the conversion process, you must select the Add Bookmarks To Adobe PDF option on the Settings tab. If you deselect that option, you override any options you select on this tab, and no bookmarks are created.
Convert Word Headings To Bookmarks
Selects all the headings in the Elements list for conversion to PDF bookmarks.
Convert Word Styles To Bookmarks
Selects all the text styles in the Elements list for conversion to PDF bookmarks (deselected by default).
Convert Word Bookmarks
Converts any user-created Word bookmarks to PDF bookmarks.
Element list
Specifies which Word headings and styles are converted to PDF bookmarks.
Element
Lists the names of all available Word headings and styles. The icons for Headings ![]() and Styles
and Styles ![]() indicate the element types.
indicate the element types.
Type
Also indicates whether the element is a heading or style in the Word document.
Bookmark
Displays X’s, indicating whether individual elements are converted to PDF bookmarks. Clicking an individual Bookmark option changes the selection status for that element.
Level
Specifies where the element fits in the hierarchy structure of the PDF Bookmarks panel. Clicking an individual Level number opens a menu that you can use to change the value.
When
some but not all of the available Word headings and styles are selected for
conversion to PDF bookmarks, the marker in the corresponding check
boxes at the top of the tab change. If all elements of the type
are selected, a check mark appears. If only some of the elements
of that type are selected, a colored square appears. Otherwise,
the check box is empty.
Excel for Microsoft 365 Word for Microsoft 365 Access for Microsoft 365 Project Online Desktop Client Publisher for Microsoft 365 Word for the web OneNote for the web PowerPoint for the web Excel 2021 Word 2021 Access 2021 Project Professional 2021 Project Standard 2021 Publisher 2021 OneNote 2021 Excel 2019 Word 2019 Access 2019 Project Professional 2019 Project Standard 2019 Publisher 2019 Excel 2016 Word 2016 Access 2016 OneNote 2016 Project Professional 2016 Project Standard 2016 Publisher 2016 Office 2016 for Mac Excel 2013 Word 2013 Access 2013 OneNote 2013 Project Professional 2013 Project Standard 2013 Publisher 2013 Project Online Excel 2010 Word 2010 Access 2010 OneNote 2010 Project 2010 Project Standard 2010 Publisher 2010 Office 2010 Excel Starter 2010 More…Less
You can use the Office programs to save or convert your files to PDFs so that you can share them or print them using commercial printers. And you won’t need any other software or add-ins.
Use PDF format when you want a file that:
-
Looks the same on most computers.
-
Has a smaller file size.
-
Complies with an industry format.
Examples include resumes, legal documents, newsletters, files that are intended to be read (not edited) and printed, and files that are intended for professional printing.
Important: Many programs, including Microsoft Word, have the ability to open and edit PDF files. Simply sharing something as a PDF is not sufficient to guarantee the recipient can’t edit the file.
To see step-by-step instructions, select an Office program from the drop-down list.
-
Open the table or report you want to publish as a PDF.
-
On the External Data tab, in the Export group, select PDF or XPS.
-
In the File Name field, type or select a name for the document.
-
In the Save as type list, select PDF (*.pdf) .
-
If the document requires high print quality, select Standard (publishing online and printing) .
-
If file size is more important than print quality, select Minimum size (publishing online).
-
-
Select Options to set the page to be printed, to choose whether markup should be printed, and to select output options. Select OK .
-
Select Publish.

Note: You can’t save Power View sheets as PDF files.
-
Select the File tab.
-
Select Save As .
To see the Save As dialog box in Excel 2013 or Excel 2016, you have to choose a location and folder. -
In the File Name box, enter a name for the file, if you haven’t already.
-
In the Save as type list, select PDF (*.pdf) .
-
If you want the file to open in the selected format after saving, select the Open file after publishing check box .
-
If the document requires high print quality, select Standard (publishing online and printing) .
-
If file size is more important than print quality, select Minimum size (publishing online) .
-
-
Select Options to set the page to be printed, to choose whether markup should be printed, and to select output options. For more information on the Options dialog box in Excel, see More about PDF options . Select OK when finished.
-
Select Save .
-
Select the File tab.
-
Select Export .
-
Under Export Current , select what part of the notebook you want to save as PDF.
-
Under Select Format , select PDF (*.pdf) , and then select Export .
-
In the Save As dialog box, in the File Name field, enter a name for the notebook.
-
Select Save .
-
Select the File tab.
-
Select Save As .
To see the Save As dialog box in PowerPoint 2013 or PowerPoint 2016 , you have to choose a location and folder. -
In the File Name box, enter a name for the file, if you haven’t already.
-
In the Save as type list, select PDF (*.pdf) .
-
If you want the file to open in the selected format after saving, select the Open file after publishing check box.
-
If the document requires high print quality, select Standard (publishing online and printing) .
-
If the file size is more important than print quality, select Minimum size (publishing online) .
-
-
Select Options to set the page to be printed, to choose whether markup should be printed, and to select output options. Select OK when finished.
-
Select Save .
-
On the File tab, choose Save As .
To see the Save As dialog box in Project 2013 or Project 2016, you have to choose a location and folder. -
In the File Name box, enter a name for the file, if you haven’t already.
-
In the Save as type list, select PDF Files (*.pdf) or XPS Files (*.xps) , and then choose Save .
-
In the Document Export Options dialog box, select a Publish Range , whether to Include Non-printing Information , and ISO 19500-1 compliance (PDF only).
Formatting tips
Project doesn’t support every PDF or XPS formatting feature, but you can still use some print options to change the look of the final doc.
Choose File > Print , and then change any of these options:
-
Dates
-
Orientation
-
Paper Size
-
Page Setup
In the Page Setup dialog box, you can change options on these tabs:
-
Margins
-
Legend
-
View
-
Select the File tab.
-
Select Save As .
To see the Save As dialog box in Publisher 2013 or Publisher 2016, you have to choose a location and folder. -
In the File Name box, enter a name for the file, if you haven’t already.
-
In the Save as type list, select PDF (*.pdf) .
-
If you want to change how the document is optimized, select Change . (Select Options in Publisher 2013 or Publisher 2016.)
-
Make any changes you want to the picture resolution and non-printing information.
-
Select Print Options to make changes to the printing options for the document.
-
Select OK when finished.
-
-
If you want the file to open in the selected format after saving, select the Open file after publishing check box.
-
Select Save .
-
Select the File tab.
-
Select Save As .
To see the Save As dialog box in Visio 2013 or Visio 2016, you have to choose a location and folder. -
In the File Name box, enter a name for the file, if you haven’t already.
-
In the Save as type list, select PDF (*.pdf) .
-
If you want the file to open in the selected format after saving, select the Automatically view file after saving check box.
-
If the document requires high print quality, select Standard (publishing online and printing) .
-
If file size is more important than print quality, select Minimum size (publishing online) .
-
-
Select Options to set the page to be printed, to choose whether markup should be printed, and to select output options. Select OK .
-
Select Save .
-
If the file was previously saved, select File > Save a Copy.
If the file is unsaved, select File > Save As. -
Select Browse to choose the location on your computer where you want to save the file.
-
In the drop-down list, select PDF.
-
Select Save.
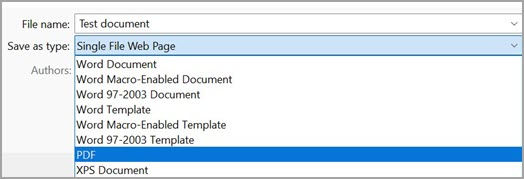
Select More Options > Options to customize your PDF.
-
To make a PDF file from only some of the pages in your document, choose an option under Page range.
-
To include tracked changes in the PDF, under Publish what, select Document showing markup. Otherwise, make sure Document is selected.
-
To create a set of bookmarks in the PDF file, select Create bookmarks using. Then, choose Headings or, if you added bookmarks to your document, Word Bookmarks.
-
If you want to include document properties in the PDF, make sure Document properties is selected.
-
To make the document easier for screen-reading software to read, select Document structure tags for accessibility.
-
ISO 19005-1 compliant (PDF/A) This option outputs the PDF document as version 1.7 PDF, which is an archiving standard. PDF/A helps to insure that a document will look the same when it’s opened later on a different computer.
-
Bitmap text when fonts may not be embedded If fonts can’t be embedded into the document, the PDF uses bitmap images of the text so that the PDF looks the same as the original document. If this option isn’t selected and the file uses a font that can’t be embedded, then the PDF reader might substitute another font.
-
Encrypt the document with a password To restrict access so only people with the password can open the PDF, select this option. When you select OK, Word opens the Encrypt PDF Document box, where you can type and re-enter a password.
Open and copy content from a PDF with Word
You can copy any content you want from a PDF by opening it in Word.
Go to File > Open and browse to the PDF file. Word opens the PDF content in a new file. You can copy any content you want from it, including images and diagrams.
To save your file as a PDF in Office for Mac, follow these easy steps:
-
Select File.
-
Choose Save As.
-
Select File Format at the bottom of the window.
-
Choose PDF from the list of available file formats.
-
Give your file a name, if it doesn’t already have one, then select Export.
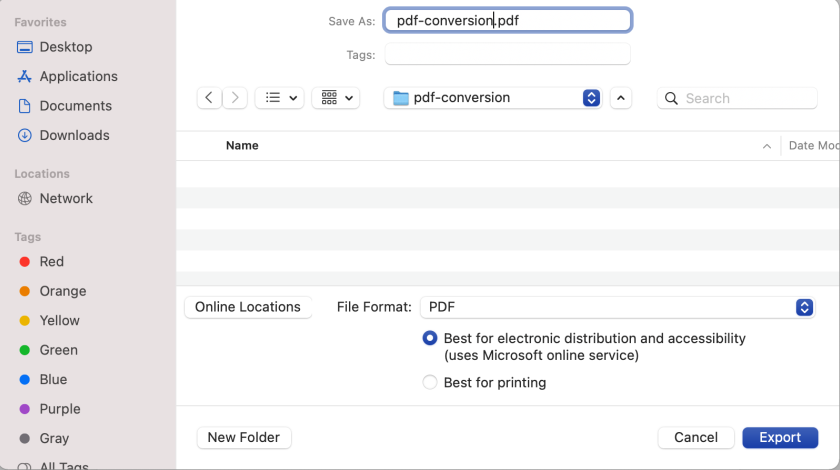
Note: When using Best for printing, the hyperlinks may not convert correctly. This is a known issue in Word for Mac.
Important:
-
When using Online Service , only font that Microsoft has the legal rights to can be used. If the documentation contains custom font, it will be substituted and may cause problems. This can be avoided by embedding the fonts into the document.
-
Learn more about embedding fonts by visiting:
-
Benefits of embedding custom fonts
-
Some of your fonts can’t be saved with the presentation
You can use Word, PowerPoint, and OneNote for the Web to convert your doc into a PDF.
-
Select File > Print > Print (in PowerPoint you will select one of three formats).
-
In the dropdown menu under Printer , select Save as PDF and then select Save.
-
Then in the Explorer menu that opens you can name the PDF and choose where to save it and then select Save.
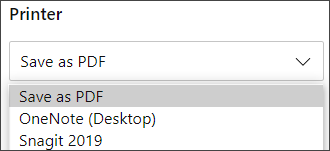
This will generate a basic PDF that preserves the layout and format of your original document.
If you need more control over the options for your PDF, such as adding bookmarks, use the desktop app to convert your doc to a PDF. Select Open in Desktop App in the toolbar of PowerPoint and OneNote to start using the desktop app, and in Word select the Editing dropdown first and then select Open in Desktop App .

If you don’t own the desktop app, you can try or buy Microsoft 365.
To export your Word document or Excel workbook to PDF format on iOS tap the File button at the top left, choose Export and then PDF.
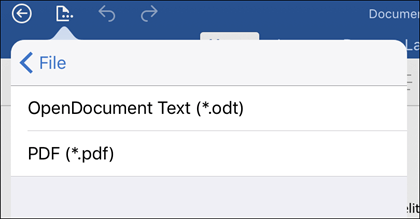
Portable Document Format (PDF) preserves document formatting and enables file sharing. When the PDF format file is viewed online or printed, it retains the format that you intended. The PDF format is also useful for documents that will be reproduced using commercial printing methods. PDF is accepted as a valid format by many agencies and organizations, and viewers are available on a wider variety of platforms than XPS.
XML Paper Specification (XPS) is an electronic file format that preserves document formatting and enables file sharing. The XPS format ensures that when the file is viewed online or printed, it retains exactly the format that you intended, and that data in the file cannot be easily changed.
Important: Most modern web browsers can open and display a PDF file. If you have an older operating system, however, you may need a PDF reader installed on your device such as the Acrobat Reader, available from Adobe Systems.
See also
-
Edit or make changes to a PDF file
-
Create accessible PDFs
Need more help?
Want more options?
Explore subscription benefits, browse training courses, learn how to secure your device, and more.
Communities help you ask and answer questions, give feedback, and hear from experts with rich knowledge.
Find solutions to common problems or get help from a support agent.

Рекомендуем популярное
![]() WinScan2PDF 8.55
WinScan2PDF 8.55
Небольшая бесплатная портативная утилита, позволяющая сканировать документы с помощью…
![]() Foxit Reader 12.1.0.15250
Foxit Reader 12.1.0.15250
Foxit Reader — компактная и шустрая программа просмотра и печати PDF файлов, добавления комментариев, заполнению форм и подписи документов PDF…
![]() Scan2PDF 1.7
Scan2PDF 1.7
Scan2PDF — небольшая программа, которая позволяет сканировать документы и изображения с…
 Free PDF Reader 1.2
Free PDF Reader — бесплатная программа для просмотра PDF-документов с расширенным функционалом…
![]()
Download Article
An easy-to-use guide to turn your Word documents into viewable PDFs
![]()
Download Article
Do you want to convert your Word document into an easy-to-send PDF file? PDFs are compatible with all platforms, so turning your Word document into a PDF ensures that more people can open the file. It’s incredibly easy to convert a Word document to PDF—we’ll show you how to do it on any PC or Mac!
-
1
Open the Microsoft Word document. Double-click the Word document to open it in Microsoft Word.
- If you haven’t yet created the document, open Word, then click Blank document and create the document as needed before proceeding.
-
2
Click File. It’s in the top-left corner of the Word window. Doing so opens a pop-out window.
Advertisement
-
3
Click Export. This option is in the left-hand column of options. You should see several new options appear in the middle of the window.
-
4
Click Create PDF/XPS Document. It’s in the upper-left corner of the window.
-
5
Click Create PDF/XPS. This option is in the middle of the window. Doing so prompts a pop-up window.
-
6
Select a save location. On the left side of the window, click the folder in which you want to store the PDF version of your Word file.
- Since the PDF is a different file type than the Word document, you can store the PDF in the same file location as the Word file.
- You can also enter a new file name in the «File name» text box if you like.
-
7
Click Publish. It’s in the bottom-right corner of the window. This will create a PDF copy of your Word document in your specified location.


Advertisement
-
1
Open the Microsoft Word document. Double-click the Word document to open it in Microsoft Word.
- If you haven’t yet created the document, open Word, then click Blank Document and create the document as needed before proceeding.
-
2
Click File. It’s in the upper-left corner of your Mac’s screen. A drop-down menu will appear.
-
3
Click Save As…. This option is in the drop-down menu. Doing so opens a new window.
-
4
Enter a file name. Type whatever you want to name the PDF into the «Name» text box at the top of the window.
-
5
Select a save location. On the left side of the window, click the folder in which you want to save your PDF.
-
6
Click the «File Format» text box. It’s at the bottom of the window. A drop-down menu will appear.
-
7
Click PDF. This option is in the «Export» section of the drop-down menu.
- You may have to scroll down in the drop-down menu to see this option.
-
8
Click Export. It’s a blue button in the bottom-right corner of the window. Doing so saves your PDF in the specified file location.


Advertisement
-
1
-
2
Click Choose file. It’s in the middle of the SmallPDF page. Doing so will open either a File Explorer (Windows) or a Finder (Mac) window.
-
3
Select your Word document. Go to your Word document’s location, then click the Word document to select it.
-
4
Click Open. It’s in the bottom-right corner of the window. Doing so will upload the Word document to SmallPDF.
- On a Mac, you may click Choose here instead.
-
5
Click Download File. This option is in the lower-left side of the SmallPDF page. Your PDF will download onto your computer, though you may have to select a storage location and/or confirm the download depending on your browser’s settings.
- It may take a few seconds for this option to appear if your Word document is large or your Internet connection is slow.


Advertisement
-
1
Open Google Drive. Go to https://drive.google.com/ in your computer’s web browser. This will open your Google Drive page if you’re logged in.
- If you aren’t logged in, click Go to Google Drive, then enter your email address and password when prompted.
-
2
Click + New. It’s in the top-left side of the Google Drive window. A drop-down menu will appear.
-
3
Click File upload. It’s in the drop-down menu. Doing this will open either a File Explorer (Windows) or a Finder (Mac) window.
-
4
Select your Word document. Go to your Word document’s location, then click the Word document to select it.
-
5
Click Open. It’s in the bottom-right corner of the window. Your Word document will upload to Google Drive.
- On a Mac, you may click Choose here instead.
-
6
Open the Word document. Once the Word file finishes uploading to Google Drive, double-click it in Google Drive to open it in your browser.
-
7
Click File. It’s in the upper-left side of the window. Doing so prompts a drop-down menu.
- On a Mac, make sure you’re clicking File in your browser window and not in the menu bar at the top of the screen.
-
8
Select Download as. This option is in the middle of the drop-down menu. Selecting it prompts a pop-out menu.
-
9
Click PDF document. It’s in the pop-out menu. A PDF version of the Word document will immediately download onto your computer.
- Depending on your browser’s settings, you may have to confirm the download and/or select a save location before the file will actually download.


Advertisement
Add New Question
-
Question
Why doesn’t Microsoft Word give me the option to «Save as PDF» in the file menu?

A special type of software (technically called add-in) has the ability to convert Microsoft Word documents to PDF. However, Word 2007 does not include this add-in by default. To convert to PDF with Microsoft Word 2007, you have to download the add-in from Microsoft’s website.
-
Question
I need to convert a PDF file to a Microsoft Word document. Is there a way to do this?
Open up your PDF document and select «Save as —> Word Document.» You’ll need to clean it up afterwards (remove paragraph signs, reformat, etc.).
-
Question
How do I fix the glitches and formatting errors that show up in the new PDF file?
The latest versions (after MS Office 2007) allow you to save the document as a pdf, thus avoiding formatting errors. Go to Files->Save As and select «.pdf format» from Save As Type. Click to save.
See more answers
Ask a Question
200 characters left
Include your email address to get a message when this question is answered.
Submit
Advertisement
-
To open your PDF in your computer’s default PDF reader, simply double-click it; if you have more than one PDF reader, you may be prompted to select one after double-clicking the PDF.
-
You can also use the «Save as» menu to convert your Word document to a PDF on a Windows computer.
Advertisement
-
When converting sensitive documents (e.g., credit card statements), avoid using SmallPDF. While their site is secure, it’s best to keep such documents offline as much as possible.
Advertisement
About This Article
Article SummaryX
1. Go to https://smallpdf.com/word-to-pdf in your web browser.
2. Click Choose file.
3. Double-click the Word file you want to convert.
4. Click Download File when the PDF is available.
Did this summary help you?
Thanks to all authors for creating a page that has been read 4,795,095 times.