
Use footnotes and endnotes to explain, comment on, or provide references to something in a document. Usually, footnotes appear at the bottom of the page, while endnotes come at the end of the document or section.
If you’re in Reading View, switch to Editing View by clicking Edit Document > Edit in Word for the web.

Add a footnote
-
Click where you want to add the footnote.
-
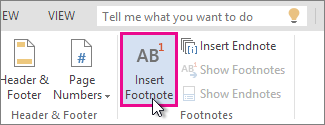
Click Insert > Insert Footnote.

Word inserts a reference mark in the text and adds the footnote mark at the bottom of the page.
-
Type the footnote text.
Add an endnote
-
Click where you want to add the endnote.
-
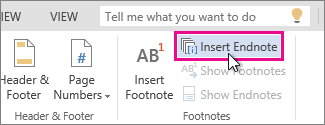
Click Insert > Insert Endnote.
Word inserts a reference mark in the text and adds the endnote mark at the end of the document.
-
Type the endnote text.
Customize your footnotes and endnotes
To customize a footnote or endnote:
-
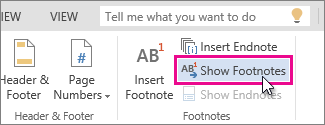
Click the reference number or mark in the body of the text or click Insert > Show Footnotes(for endnotes, click Insert > Show Endnotes).
-
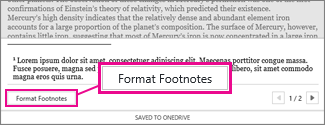
In the footnote/endnote view, click Format Footnotes or Format Endnotes to display the Format Options dialog, where you can change the size, font, and indentation of one or all of your footnotes or endnotes.

Note: If you want to convert footnotes to endnotes or the other way around, use the Open in Word command and convert them there. When you save the doc in Word, it’s saved where you opened it in Word for the web.
Need more help?
Want more options?
Explore subscription benefits, browse training courses, learn how to secure your device, and more.
Communities help you ask and answer questions, give feedback, and hear from experts with rich knowledge.
Во время совместной работы с документом Word пользователи могут добавлять примечания в Ворде, чтобы высказать свое мнение, замечание, предложение или отзыв — комментарий к текстовому содержимому. С помощью этого метода группового комментирования, вы получаете обратную связь от других пользователей или сами высказываете пожелания своим коллегам.
Если вы хотите привлечь внимание к определенной части документа, вы можете выделить некоторые части текста. Вы также можете добавить комментарий к какому-либо тексту, если вам есть, что сказать по этому поводу.
Содержание:
- Как сделать примечание в Ворде — 1 способ
- Как вставить примечание в Ворде — 2 способ
- Как создать примечание в Ворде — 3 способ
- Добавление кнопки вставки примечания на панель быстрого доступа
- Как изменить примечание в Ворде
- Как ответить на комментарий в Word
- Как посмотреть примечания в Ворде
- Как отобразить скрытые примечания в документе
- Как изменить шрифт примечания в Ворде
- Как распечатать Ворд с примечаниями
- Выводы статьи
- Как сделать примечание в Word (видео)
Комментарии в Ворде — это удобный способ пометить ваши документы без необходимости непосредственного редактирования содержимого документа Word. Это своего рода добавление напоминания для себя или своих коллег в виде заметок, не внося изменения в сам документ.
В этом случае сам текст документа не подвергается правке, потому что в Ворд примечания добавляются на полях документа без исправления основного текста. После добавления примечания, вы увидите в Ворде справа подсказку с комментарием.
Вы можете добавлять свои комментарии к чему угодно в Word, включая текст, изображения, диаграммы, таблицы и так далее.
Из этого руководства вы узнаете, как добавлять комментарии в Word. Инструкции этой статьи подходят к разным версиям программы: Word 2021, Word 2019, Word 2016, Word 2013, Word 2010, Word 2007.
Как сделать примечание в Ворде — 1 способ
Вы можете добавить примечание в Ворде несколькими способами. Сначала мы рассмотрим вариант с использованием вкладки «Рецензирование».
Выполните следующие действия:
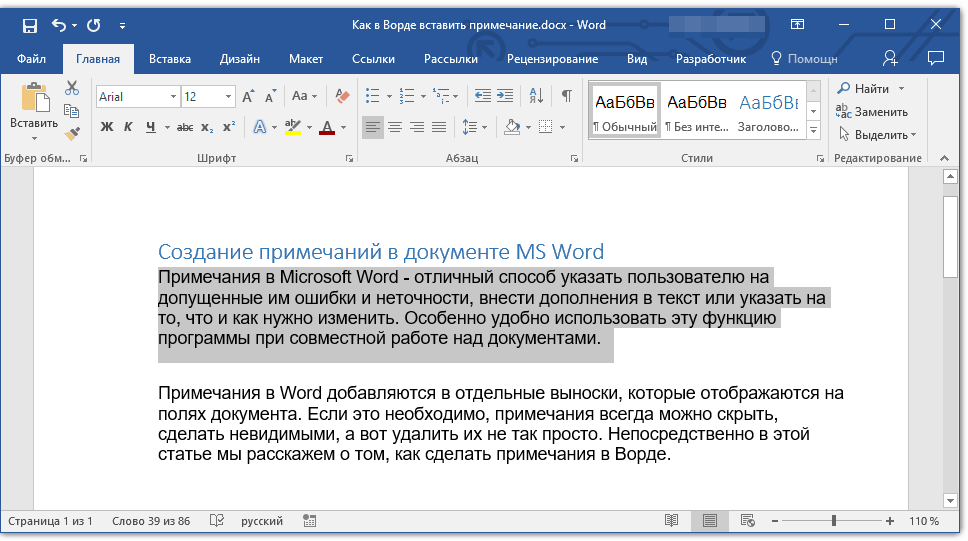
- В окне открытого документа Word перейдите во вкладку «Рецензирование».
- Поставьте курсор мыши в нужном месте документа для прикрепления примечания.
Чтобы добавить примечание к отдельному слову, поставьте курсор мыши перед, на или после слова. Если вам потребовалось вставить комментарий к фрагменту документа, то тогда вам нужно предварительно выделить этот фрагмент в тексте документа.
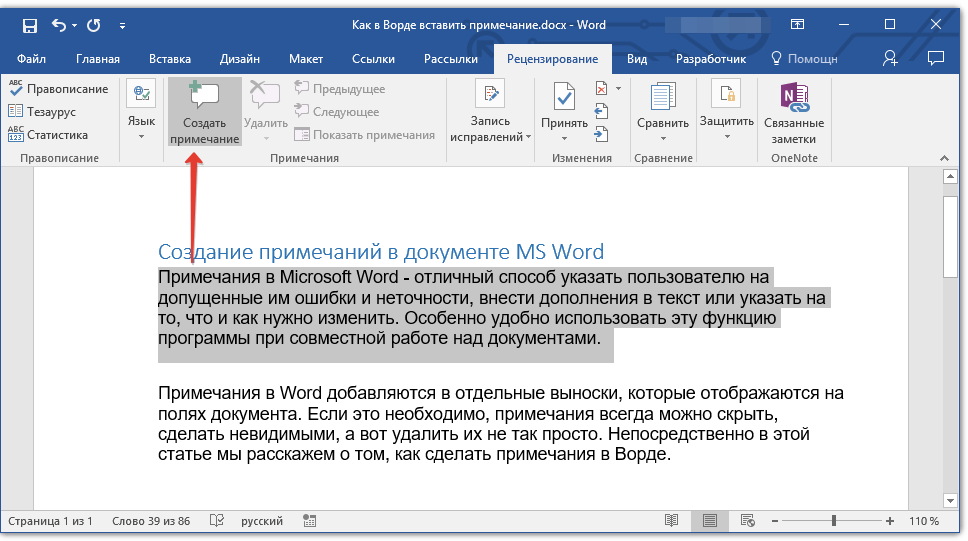
- На ленте в группе «Примечания» щелкните по кнопке «Создать примечание».

- Слово или фрагмент текста, к которому добавлено примечание, будет автоматически выделено красной заливкой.
В Word 2010 и Word 2007 заливка полностью исчезнет только при удалении примечания.
В версиях Word 2013, Word 2016, Word 2019, Word 2021 в обычном состоянии заливка не отображается, она появляется после наведения указателя мыши или щелчка по области выноски примечания.
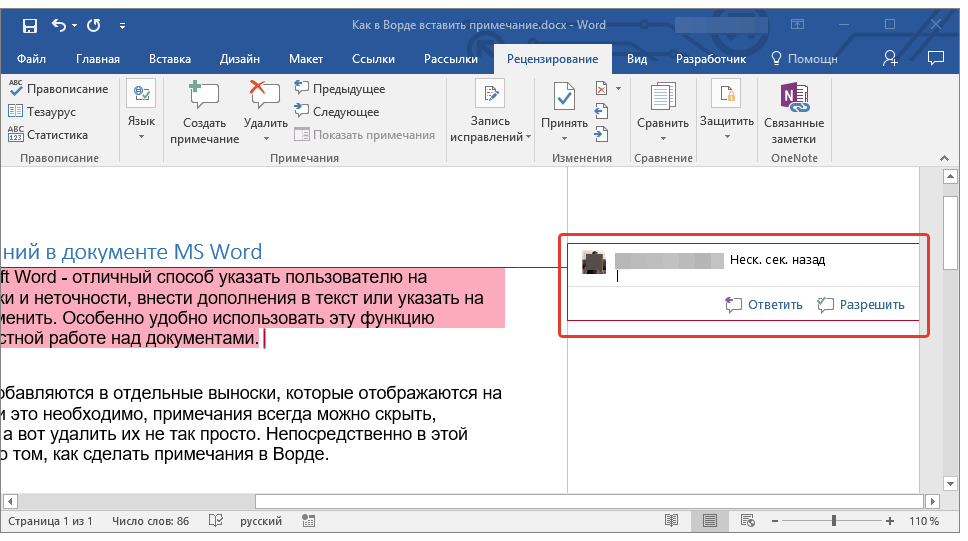
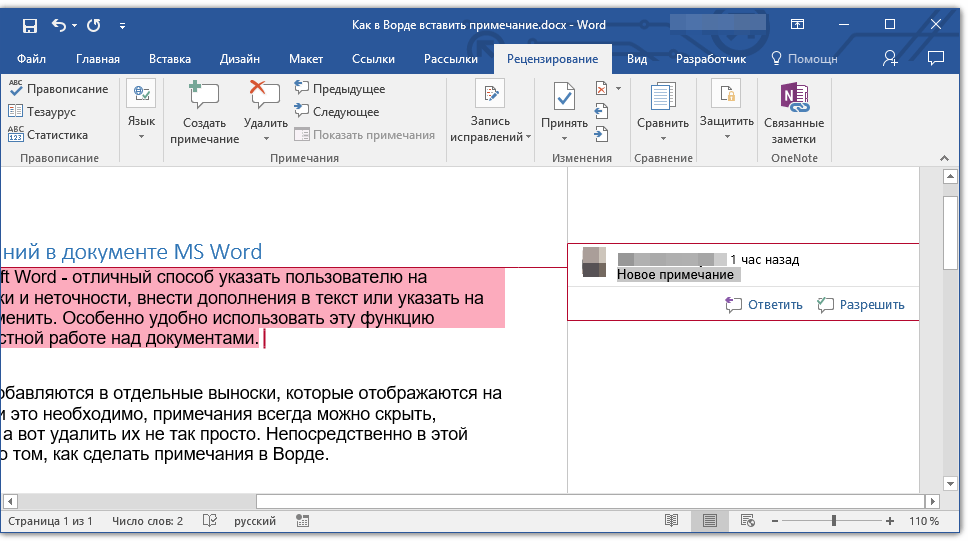
- В правой части страницы документа откроется дополнительная область примечаний, на которой в красном прямоугольнике-выноске вводится непосредственно текст комментария. Рядом с примечанием от отображается ваше имя в программе.

Если в документ Microsoft Word добавляют комментарии несколько человек, то значки имен пользователей отображаются разными цветами, чтобы вы могли видеть, кто написал какой комментарий. Каждое примечание также имеет отметку времени, указывающую, когда оно было вставлено.
- По мере ввода текста в красное поле примечания, его границы будут автоматически расширятся.

- Для возвращения к работе с основным текстом документа щелкните курсором мыши в нужном месте документа.
Все примечания останутся в документе MS Word после его сохранения на компьютере.
Как вставить примечание в Ворде — 2 способ
Ознакомьтесь с другим методом, как сделать примечание в Ворде справа, используя вкладку «Вставка».
Пройдите шаги:
- Откройте документ Word на компьютере.
- Щелкните по тексту (фрагмент текста нужно предварительно выделить) или объекту, который вы хотите прокомментировать.
- Перейдите на вкладку «Вставка».
- В группе «Примечание» нажмите на значок «Примечание», чтобы вставить свой комментарий к этой части документа.

- Напишите свой комментарий.
Как создать примечание в Ворде — 3 способ
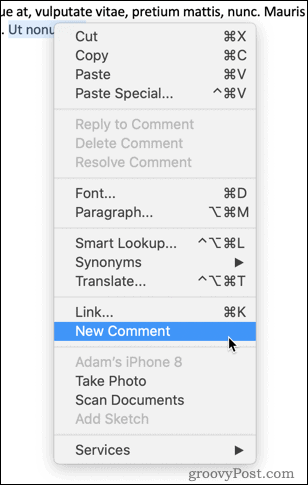
Сейчас мы рассмотрим еще один метод добавления комментария: вы узнаете, как в Ворде вставить примечание на полях из контекстного меню программы. Это самый быстрый способ добавления примечаний в Word, поскольку вам не нужно перемещаться между содержимым документа и вкладками «Рецензирование» или «Вставка».
Проделайте следующее:
- Выберите (выделите), а затем щелкните правой кнопкой мыши по тому, что вы хотите прокомментировать.
- Нажмите на пункт контекстного меню «Создать примечание», или нажмите на значок «Создать примечание» на появившейся горизонтальной панели.

- Напишите свое примечание.
Добавление кнопки вставки примечания на панель быстрого доступа
Если вам часто приходится добавлять комментарии в Microsoft Word, то вы можете добавить кнопку «Вставить примечание» на панель быстрого доступа.
Выполните следующее:
- Откройте вкладку «Вставка».
- В группе «Примечание» щелкните правой кнопкой мыши, а в контекстном меню выберите «Добавить на панель быстрого доступа».

- Установите курсор мыши в определенном месте документа Word, а затем щелкните по кнопке «Вставить примечание».

Как изменить примечание в Ворде
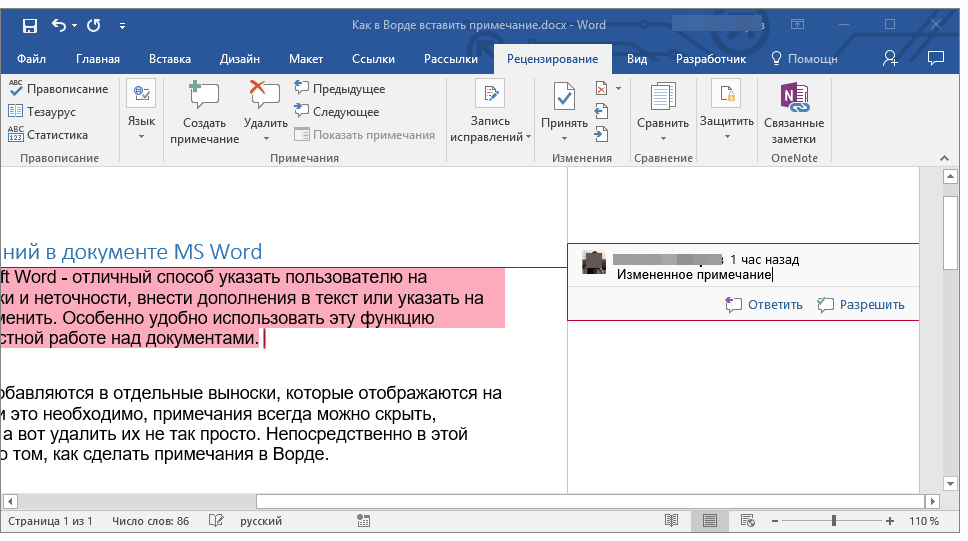
Вы можете изменить свой комментарий, если возникла необходимость дополнить текст примечания или откорректировать его.
Вам необходимо сделать следующее:
- В окне открытого документа щелкните в области примечания в красном прямоугольнике выноски в нужном месте текста примечания.
- Внесите любые изменения и дополнения в текст, который форматируется обычным способом.
- Щелкните указателем мыши за пределами поля примечания, чтобы вернуться к работе с основным текстом документа.
Обратите внимание на то, что любой пользователь, у которого есть доступ к этому файлу Word, может редактировать ваш комментарий, если документ не защищен от редактирования.
Как ответить на комментарий в Word
Помимо создания новых комментариев, вы можете вести беседу, отвечая на комментарии, оставленные другими пользователями. Используйте следующие методы, чтобы ответить на комментарий.
1 способ:
- В красном прямоугольнике выноски примечания нажмите на кнопку «Ответить».
- Напишите свой ответ.

2 способ:
- Кликните по примечанию правой кнопкой мыши.
- В открывшемся контекстном меню нажмите на пункт «Ответить на комментарий».

- Добавьте свое замечание.
Как посмотреть примечания в Ворде
Если необходимо просмотреть и отредактировать примечания, расположенные в различных местах документа, можно использовать предложенный алгоритм действий для навигации по комментариям.
Сделайте следующее:
- В окне открытого документа переходим к вкладке «Рецензирование».
- В группе «Примечание» щелкаем по кнопке «Предыдущее» или «Следующее» и передвигаемся по документу от примечания к примечанию.

Как отобразить скрытые примечания в документе
Примечания, добавленные в документ Word, могут быть скрыты, поэтому пользователь может их не увидеть.
Чтобы отобразить скрытые примечания в Word, сделайте следующее:
- В окне документа перейдите во вкладку «Рецензирование».
- Щелкните по кнопке «Показать исправления».
- В списке команд включите позицию «Примечания».

- Область примечания откроется вместе со всеми существующими примечаниями.
Как изменить шрифт примечания в Ворде
По умолчанию в примечаниях используется стандартный текст маленького размера, поэтому часто необходимо увеличить шрифт в примечании Word. Форматирование текста изменяется обычным способом: вы можете сделать полужирное начертание, курсив, подчеркивание, изменить цвет шрифта и так далее.
Выбор шрифта и размер шрифта в примечаниях настраивается иначе.
Пройдите несколько шагов:
- Выделите текст примечания.
- Во вкладке «Главная» нажмите на стрелку в нижнем правом углу группы «Стили».
- В открывшемся меню щелкните по кнопке «Управление стилями».

- В окне «Управление стилями», во вкладке «Изменение» в разделе «Выберите стиль для изменения» найдите и выделите «Текст выноски (Скрыть до использования)», а затем нажмите на кнопку «Изменить…».

- В окне «Изменение стиля» в разделе «Форматирование» выберите подходящий шрифт и размер шрифта.
Можете поставить флажок в пункте «Добавить в коллекцию стилей», чтобы использовать этот стиль в дальнейшем. По умолчанию активирована настройка «Только в этом документе». Можно выбрать параметр «В новых документах, использующих этот шаблон».

- Нажмите на кнопки «ОК» в этом и предыдущем окнах.
- В результате, шрифт и размер шрифта примечания изменятся.

Как распечатать Ворд с примечаниями
В некоторых случаях вам может понадобится печать примечаний в Word вместе с основным содержимым документа.
Печать примечаний в Ворде проходит в следующей последовательности:
- Зайдите во вкладку «Рецензирование».
- В группе «Запись исправлений» щелкните по «Показать исправления».
- В выпадающем меню убедитесь, что отмечен флажком пункт «Примечания».

Если нажать на пункт «Конкретные пользователи», то можно выбрать всех рецензентов или конкретных пользователей.
- Войдите в меню «Файл», нажмите «Печать».
- В разделе «Параметры» нажмите на кнопку «Напечатать все страницы. Все сразу».
- В открытом меню посмотрите, чтобы стояла галка в пункте «Напечатать исправления».

- Нажмите на кнопку «Печать».

Выводы статьи
Некоторым пользователям необходимо знать о том, как поставить примечание в Ворд, когда они совместно работают над одним документом. Добавление комментариев помогает получить от коллег мнения и замечания без редактирования основного содержимого документа. Благодаря примечаниям вы можете увидеть то, с чем вам необходимо поработать или что вам нужно изменить в будущем.
Как сделать примечание в Word (видео)
Похожие публикации:
- Как поставить ударение над буквой в Ворде — 3 способа
- Как написать дробь в Ворде
- Как удалить ссылки из текста Word
- Как удалить сноски в Word: все способы
- Как выделить текст в Word: разные способы
Insert a Comment
- Select the text you want to add a comment to.
- Click the Review tab.
- Click the New Comment button in the Comments group. Right-click in the document and select New Comment.
- Type your comment, then click outside the comment box when you’re finished.
Contents
- 1 How do you add notes to a Word document?
- 2 Can you insert sticky notes in Word?
- 3 Why can’t I add comments in Word?
- 4 How do I enable comments in Word?
- 5 What is the shortcut for adding a comment in Word?
- 6 How do you add a comment to a footnote in Word?
- 7 Why can’t I add a comment in track changes?
- 8 How do I show comments in simple markup?
- 9 Why are comments disabled in Word?
- 10 What is the shortcut key for copy comment?
- 11 Why are my keyboard shortcuts not working in Word?
- 12 How do I insert a comment in Windows 7?
- 13 How do you convert to footnotes?
- 14 What is an EndNote comment?
- 15 How do you add a comment in EndNote?
- 16 How do you add comments to edits in Word?
- 17 How do I add comments in Word with track changes?
- 18 How can we add comments to the changes made?
- 19 How do I show comments as bubbles in Word?
- 20 How do you display the contents of the comments in a document?
How do you add notes to a Word document?
Insert a comment
- Select the text you want to comment on, or click at the end of the text.
- On the Review tab, click New Comment.
- Type your comment. Word shows your comment in a balloon in the document’s margin.
Can you insert sticky notes in Word?
To stick a note to any Microsoft word document, right-click on the note title and choose the “Stick To Window” option from the menu, as shown in the below picture. Alternatively, press Ctrl+W from within the sticky note.The note will stick to the particular word document.
Word won’t allow you to add comments to text within a text box, as you can to regular text in your document.The first is to work around it by just adding hidden text in the text box. You can make the hidden text visible or invisible, as the need arises.
Allowing Only Comments In a Document
- Display the Review tab of the ribbon.
- Click the Protect Document tool within the Protect group.
- In the Editing Restrictions section of the pane, choose the Allow Only This Type of Editing in the Document check box.
- Using the drop-down list, choose Comments.
#9 Insert a Comment (in the Revision Task Pane)
The combination “Alt” + “R” + “C” is the easiest way of adding a comment.
The short answer is that there is no way; Word doesn’t allow you to add comments to either footnotes or endnotes.
Track Changes is turned on but you’re working in the Final mode of the document (in other words, you can’t see the balloons etc. for the tracked changes). You want to add a comment to the author so you click the Comment icon.
Try it!
- Select Review > Display for Review.
- Select the option you want: Simple Markup points out where changes are made with a red line in the margin. All Markup shows all edits with different colors of text and lines.
- In the Show Markup list, select the types of revisions you’d like to see: Comments.
The Show Comments command grayed out. To enable it, you must select Simple Markup instead of any other Display for Review option.
Copy/Paste Comments
Click Copy on the Home tab or use the CTRL-C keyboard shortcut.
Why are my keyboard shortcuts not working in Word?
If no standard keyboard shortcut is working in Word, try resetting keyboard shortcuts.Launch Word and go to the File > Options menu. In the Options window, move to the Customize Ribbon tab. Here, you will see Customize button present beside the Keyboard Shortcut option.
These steps are done in Draft view.
- Click the Review tab. Look for the Comments group.
- Click the New Comment button. The document shrinks a tad to make room for the markup area window that appears on the left.
- Type your comment. The comment text appears in the markup window.
How do you convert to footnotes?
How to Convert Footnotes To and From Endnotes in Microsoft Word
- Open your document and select the References tab.
- In the Footnotes group, click “Show Notes”.
- Select the notes you want to convert, then right-click.
- Select “Convert to Footnote” or “Convert to Endnote”.
An “endnote” is a reference, explanation, or comment placed at the end of an article, research paper, chapter, or book.
Inserting notes
In Word, click on the EndNote tab. Click on the Insert Citation drop-down menu, to the left of the EndNote toolbar. Select Insert Note. Type your note into the box and then click OK.
Microsoft Word 2013 and later versions
- Using your mouse, place the text cursor where you want to insert the comment.
- In the Ribbon menu, click the Insert tab.
- On the Insert tab, click the Comment option in the Comments group.
- The new comment is added to the document.
Display changes by type of edit or by reviewer
- On the Review tab, go to Tracking and select Show Markup.
- Do one of the following: Select the type of change that you want to display. For example, select Comments, Insertions and Deletions, or Formatting. The check mark next to the item indicates that the item is selected.
2. How can we add comments to the changes made?
- Select the text or item that you want to comment on, or click to insert the cursor near the text that you want to comment on.
- On the Review tab, under Comments, click New.
- Type the comment text in the comment balloon.
Click the Review tab on the Ribbon, then click the Balloons command. In the drop down list, click on Show Revisions in Balloons or Show Only Comments and Formatting in Balloons.
How do you display the contents of the comments in a document?
To see all comments in a document at one time, summon the Reviewing Pane button: Click the Reviewing Pane button, found in the Review tab’s Tracking group, to show or hide the Reviewing pane.
Follow these steps:
- Click the Review tab.
- Click the Display for Review button menu.
- Choose the All Markup command.
Содержание
- Вставка примечаний в документ
- Изменение примечаний в документе
- Изменение или добавление имени пользователя в примечаниях
- Удаление примечаний в документе
- Вопросы и ответы
Примечания в Microsoft Word — отличный способ указать пользователю на допущенные им ошибки и неточности, внести дополнения в текст или указать на то, что и как нужно изменить. Особенно удобно использовать эту функцию программы при совместной работе над документами.
Урок: Как в Ворде добавить сноски
Примечания в Word добавляются в отдельные выноски, которые отображаются на полях документа. Если это необходимо, примечания всегда можно скрыть, сделать невидимыми, а вот удалить их не так просто. Непосредственно в этой статье мы расскажем о том, как сделать примечания в Ворде.
Урок: Настройка полей в MS Word
Вставка примечаний в документ
1. Выделите фрагмент текста или элемент в документе, с которым нужно связать будущее примечание.
- Совет: Если примечание будет относиться ко всему тексту, перейдите в конец документа, чтобы добавить его там.
2. Перейдите во вкладку “Рецензирование” и нажмите там кнопку “Создать примечание”, расположенную в группе “Примечания”.
3. Введите необходимый текст примечания в выноски или области проверки.
- Совет: Если вы хотите ответить на уже существующее примечание, кликните по его выноске, а затем уже по кнопке “Создать примечание”. В появившейся выноске введите необходимый текст.

Изменение примечаний в документе
В случае, если примечания на отображаются в документе, перейдите во вкладку “Рецензирование” и нажмите на кнопку “Показать исправления”, расположенную в группе “Отслеживание”.
Урок: Как в Ворде включить режим правки
1. Кликните по выноске примечания, которое необходимо изменить.

2. Внесите необходимые изменения в примечание.
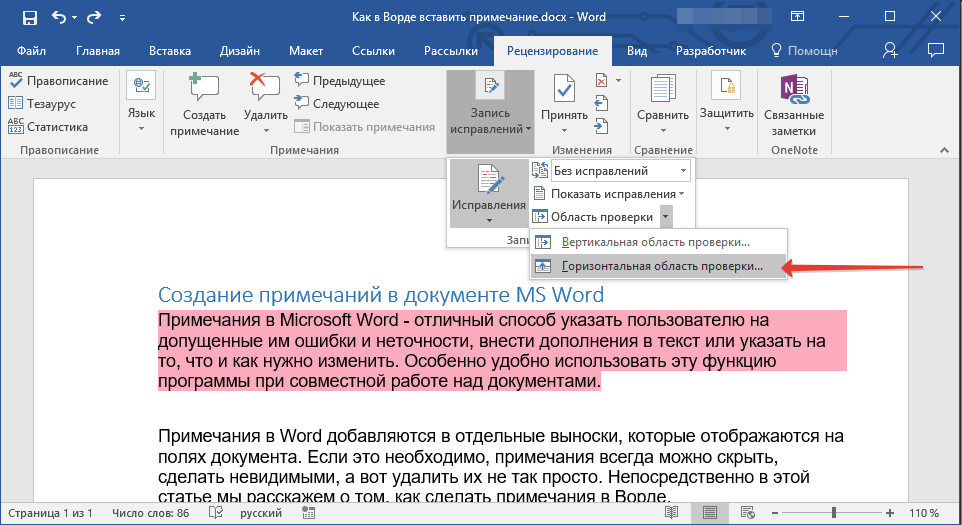
В случае, если выноски в документе скрыты или же отображается только часть примечания, изменить его можно в окне просмотра. Чтобы отобразить или скрыть это окно следует выполнить следующие действия:
1. Нажмите кнопку “Исправления” (ранее “Область проверки”), которая расположена в группе “Запись исправлений” (ранее “Отслеживание”).
Если необходимо переместить окно проверки в конец документа или нижнюю часть экрана, кликните по стрелке, расположенной около этой кнопки.
В выпадающем меню выберите “Горизонтальная область проверки”.
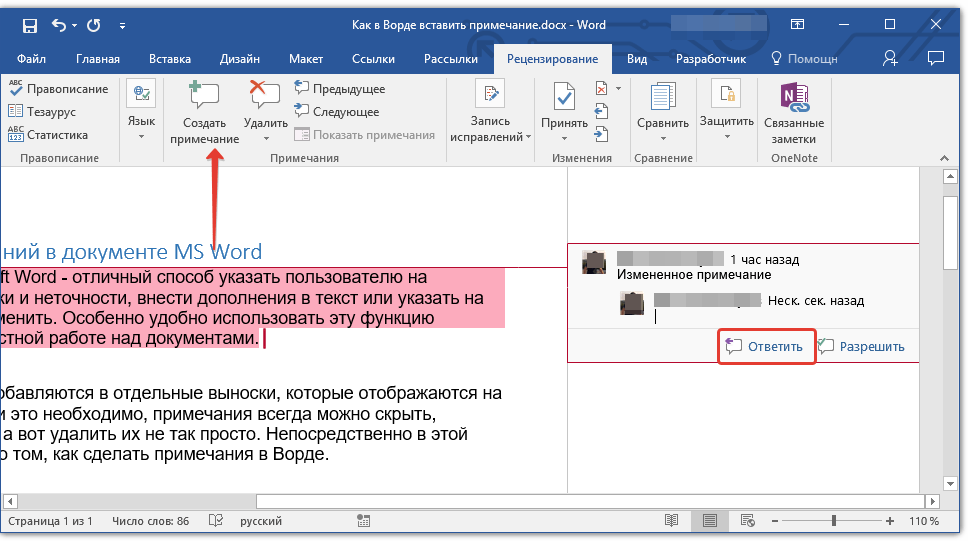
Если вы хотите ответить на примечание, кликните по его выноске, а затем нажмите на кнопку “Создать примечание”, расположенную на панели быстрого доступа в группе “Примечания” (вкладка “Рецензирование”).
Изменение или добавление имени пользователя в примечаниях
Если это необходимо, в примечаниях всегда можно изменить указанное имя пользователя или добавить новое.
Урок: Как в Word изменить имя автора документа
Чтобы это сделать, выполните следующие пункты:
1. Откройте вкладку “Рецензирование” и нажмите на стрелку возле кнопки “Исправления” (группа “Запись исправлений” или “Отслеживание” ранее).
2. Из выпадающего меню выберите пункт “Сменить пользователя”.
3. Выберите пункт “Личная настройка”.
4. В разделе “Личная настройка Office” введите или измените имя пользователя и его инициалы (в дальнейшем именно эта информация будет использоваться в примечаниях).
ВАЖНО: Имя и инициалы пользователя, введенные вами, изменятся для всех приложений пакета “Microsoft Office”.
Примечание: Если изменения в имени пользователя и его инициалах использовались только для его комментариев, то применены они будут только к тем комментариям, которые будут сделаны после внесения изменений в имени. Ранее добавленные комментарии не будут обновлены.
Удаление примечаний в документе
Если это необходимо, вы всегда можете удалить примечания, предварительно их приняв или отклонив. Для более детального ознакомления с данной темой рекомендуем вам прочесть нашу статью:
Урок: Как удалить примечания в Ворде
Теперь вы знаете, зачем в Word нужны примечания, как их добавлять и изменять, если это необходимо. Напомним, что, в зависимости от используемой вами версии программы, названия некоторых пунктов (параметров, инструментов) могут отличаться, но их содержание и местонахождение всегда примерно одинаков. Изучайте Microsoft Office, осваивая новые возможности этого программного продукта.
This tutorial shows how to insert footnotes and endnotes in Microsoft Word using the tools in the ribbon.
Manually inserting individual footnotes and endnotes in Word is relatively straightforward: type a superscript number in the main text and then scroll to the bottom of the page, section, or document to type your note.
But manually inserting notes can get tricky if your document is more than a couple of pages long or has a lot of notes because you also have to manually update number sequencing and text placement as notes are added or deleted.
That’s when Word’s footnote and endnote tools really come in handy. These tools automatically maintain sequential note numbers, create space for endnotes at the end of the document or section, and make sure that your footnotes stay with their associated text—even if that text moves to a different page. Best of all, the tools are easy to use.
The images below are from Word for Microsoft 365. The steps also apply to Word 2021, Word 2019, Word 2016, Word 2013, and Word 2010. However, your interface may look slightly different in those older versions.
This tutorial is available as a YouTube video showing all the steps in real time.
Watch more than 150 other writing-related software tutorials on my YouTube channel.
Don’t miss the three benefits of using Word’s footnote and endnote tools explained at the end of this tutorial.
1. Place your cursor where the superscript number for the first note should appear.

2. Select the References tab in the ribbon.

3. Select the dialog box launcher in the Footnotes group.

4. Select Footnotes or Endnotes in the Footnote and Endnote dialog box.

5. Select the note’s location from the drop-down menu.

You can also choose additional options in the Footnote and Endnote dialog box such as number formatting and whether the numbering applies to the whole document or to a specific section.
6. Select the Insert button to create the first note.

After Word creates the superscript number, your cursor will automatically move to the note location selected in the Footnote and Endnote dialog box.
7. Write your note.

8. Double-click on the number before the note to return to the location of the corresponding superscript number in the main text.

9. Place your cursor where the superscript number for the next note should appear in the text and then select Insert Footnote or Insert Endnote in the Footnotes group in the ribbon to insert the next note.

The options you selected in the Footnote and Endnote dialog box during step 5 will be maintained.
10. Save your document to save your new footnotes or endnotes.
Here are three benefits to keep in mind when working with footnotes and endnotes in Word:
1. You can use footnotes and endnotes in the same document. If you choose to use both, the first type inserted will be assigned superscript numbers and the second type inserted will be assigned superscript letters. However, these options can be changed in the Footnote and Endnote dialog box (see figures 4 and 5).
2. If you move the text connected to footnotes or endnotes, the sequencing of the superscript numbers (or letters) and the notes themselves will be automatically updated. Additionally, if you add or delete footnotes or endnotes between existing notes, the sequencing of the superscript numbers (or letters) and the notes themselves will be automatically updated.
3. You can modify the style of all the footnotes or all the endnotes, plus the reference numbers and the separator lines that appear above the notes.
Related Resources
How to Convert Individual Footnotes to Endnotes in Microsoft Word (and Convert Individual Endnotes to Footnotes)
Three Ways to Insert Superscripts and Subscripts in Microsoft Word
How to Insert Citations in Microsoft Word
Updated March 15, 2022
![]()
Download Article
Multiple easy-to-follow ways to add footnotes in Word
![]()
Download Article
Footnotes allow you to cite sources or explain a concept in detail without sidetracking the main text. Word makes managing footnotes easy, as new footnotes are numbered automatically, and the footnotes area expands and shrinks dynamically based on the amount of text. Give your document a professional feel by strategically using footnotes to clarify information and credit your sources.
-
1
Click the «References» tab. This is located at the top of the window, typically between «Page Layout» and «Mailings». This tab lets you insert various reference tools, such as a table of contents, footnotes and endnotes, citations, captions and more.
-
2
Place your cursor where you want the footnote to appear. By default, footnotes will be designated by increasing superscript numbers. Place the cursor where you want the number to appear.
Advertisement
-
3
Click the «Insert Footnote» button. This is located in the «Footnotes» section of the «References» tab. The footnote number will be inserted, and a separator bar will be added to the bottom of the page. Your cursor will automatically be taken to the footnote at the bottom of the page so that you can fill it out.
- An endnote is like a footnote except the reference occurs at the end of the document. By default, endnotes are numbered with Roman numerals (i, ii, iii, etc.).
- Alternatively, you can press Ctrl + Alt + F to create a footnote, or Ctrl + Alt + D to create an endnote.
-
4
Change when your footnotes numbering resets. By default, your footnotes will increase in number throughout your whole document. You can change this so that the numbers restart every page or at section breaks in the document.[1]
- Click the Menu button in the bottom-right corner of the «Footnotes» section. This will open the «Footnote and Endnote» window. In the «Format» section, use the «Numbering» drop-down menu to select when you want the footnote numbers to restart.
- You can insert section breaks into your document by clicking the «Page Layout» tab, clicking the «Breaks» button in the «Page Setup» section, and then selecting the type of break you’d like to insert. Besides changing the way footnotes are numbered, section breaks are great for making layout changing to specific portions of a document.
-
5
Change your footnote formatting. If you’d rather have symbols instead of numbers, want the footnotes to appear below the text instead of at the bottom of the page, or want the numbering to start at a different number, you can change this from the «Footnote and Endnote» window. Click the Menu button in the bottom right-corner of the «Footnotes» section to open it.
- Click Symbol… to choose a symbol from the Symbol menu. You can choose any character from any font, though the «Symbols» font will open by default.


Advertisement
-
1
Switch to Print Layout view. Click View and select Print Layout.
-
2
Place your cursor where you want the footnote to appear. Your footnote will appear at the cursor, so place the cursor at the end of the text that you want to create a footnote reference for.
-
3
Insert the footnote. Click the «Document Elements» tab, and then click the «Footnote» button in the «Citations» section. A footnote will be inserted at your cursor and you will be taken to the footnote text section to enter the contents of the footnote. The footnote text will be at the bottom of the same page as the footnote, separated by a line.
- Alternatively, you can press Command + Option + F to create a footnote, or Command + Option + E to create an endnote.
-
4
Change your footnote formatting. If you’d rather have symbols instead of numbers, want the footnotes to appear below the text instead of at the bottom of the page, or want the numbering to start at a different number, you can change this from the «Footnote and Endnote» window. Click Insert and select Footnote.
- Click Symbol… to choose a symbol from the Symbol menu. You can choose any character from any font, though the «Symbols» font will open by default.
- By default, your footnotes will increase in number throughout your whole document. You can change this so that the numbers restart every page or at section breaks in the document. In the «Format» section, use the «Numbering» drop-down menu to select when you want the footnote numbers to restart.
- You can apply your formatting changes to just your selected text, the current section, or your entire document.
- Click Symbol… to choose a symbol from the Symbol menu. You can choose any character from any font, though the «Symbols» font will open by default.


Advertisement
-
1
Switch to Print Layout view. Click View and select Print Layout.
-
2
Place your cursor where you want the footnote to appear. Your footnote will appear at the cursor, so place the cursor at the end of the text that you want to create a footnote reference for.
-
3
Insert the footnote. Click Insert → Reference → Footnote… to open the «Footnote and Endnote» window. Select «Footnote», and then choose your numbering option. You can have Word number your footnotes automatically, or you can choose a custom symbol to insert.
- In Word 2004/2008, click Insert → Footnote….
- Alternatively, you can press Ctrl + Alt + F to create a footnote, or Ctrl + Alt + D to create an endnote in Windows. On a Mac, press Command + Option + F to create a footnote, or Command + Option + E to create an endnote.
-
4
Enter your footnote text. Your footnote will be created and you will be taken to the footnote text section at the bottom of the page. You can enter the text you want for the footnote, and then click back in your document when you are finished.


Advertisement
Add New Question
-
Question
Why is my first footnote printing on the next page?

A header or footnote is applied to all pages when put in a document. Unless it is a page number generated by the document (which you select). Otherwise, the header and footnote follows you through all of your pages.
-
Question
How do I insert more information into a footnote that already exists?
You can double click on an existing footnote to edit it.
-
Question
When I create a footnote for a word, does it appear each time I use the word?
No, it doesn’t. Footnotes are bound to locations in the document, not to words. This means that, even if you change the word or the text around the footnote, the footnote remains where it is.
Ask a Question
200 characters left
Include your email address to get a message when this question is answered.
Submit
Advertisement
Video
Thanks for submitting a tip for review!
About This Article
Article SummaryX
1. Click References.
2. Click the desired location.
3. Click Insert Footnote.
4. Select a number format.
5. Select a symbol.
6. Click Insert.
Did this summary help you?
Thanks to all authors for creating a page that has been read 808,644 times.
Is this article up to date?

You can add comments and annotations to Microsoft Word documents, allowing you to collaborate with others. Here’s how.
They say that writing is mostly rewriting. Whether you use Microsoft work for work or for creative writing, if you have a document you need to edit, annotating the text can be an effective way of keeping track of the changes you need to make.
Thankfully, Microsoft Word comes with annotation tools built-in. These allow you to quickly and easily add notes to your document and keep track of changes.
Adding Comments
Annotations in Word are done by adding comments. This creates a highlighted area of text that you can hover over to read the attached comment. You can also view the comments in a panel at the side of the page. Each comment includes the author of the comment and the time it was created or edited.
There are several ways you can insert comments into your Microsoft Word document.
Using the Ribbon Bar
First of all, highlight the text you want to annotate in your Word document.
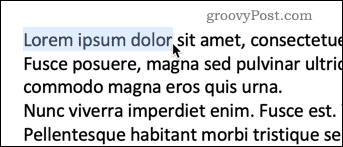
Under the Review tab on the ribbon bar, press on the Comments button and click New Comment.

Your text will now have a colored background, and the cursor will move to the comments pane, ready for you to start typing your annotation.
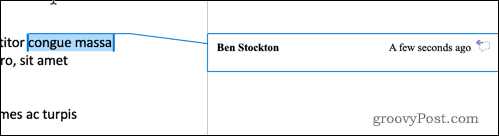
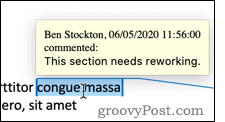
Type in your annotation and it will be visible in the comments pane. You can also hover over the highlighted text to bring up a pop-up box with your comment.
There are four other options under the Comments section, allowing you to make changes to your comments, as well as switch between them.
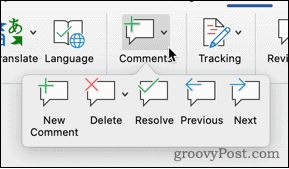
The Delete option gives you the option to remove the current comment, all comments, or just comments by the currently visible author.
Previous and Next allow you to navigate through the document from one annotation to the next, rather than having to search through the content for the next highlighted section.
Resolve allows you to mark an annotation as completed. For example, if the annotation suggested rephrasing a sentence, you could mark it as resolved once you’ve made the change. The comment is then grayed out, but will otherwise remain visible on your document.

The highlighted text also changes to a paler color so you can differentiate between resolved and unresolved annotations. You can’t mark a comment as resolved until you’ve made a change to the highlighted text.
Right Click to Add Comments
If you just want to add a new comment rather than resolving, deleting, or navigating through them, then you can quickly do this through the context menu.
Highlight the text you want to annotate, and right-click. Choose New Comment and your comment is created in the same way as before.
Using the Comments Button
There’s also a dedicated comments button in the top-right corner of the Word window.

Clicking on this button brings up the option to create a new comment, or to navigate to the previous or next comment in the document.

With all of these methods, if you don’t highlight any text before creating a new comment, Word will automatically select the single word at the cursor position.
If you want to annotate more than a single word, you must highlight the entire section before creating your comment.
Changing Author Name
Word automatically uses the name associated with your Word application as the author’s name for all of your comments. You may prefer to use a different name, however.
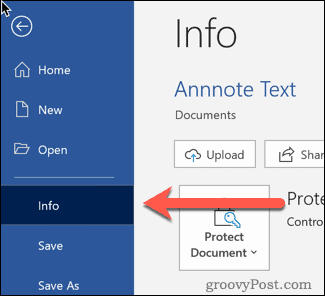
For an individual document, you can change this by clicking on File > Info.
To the right of the page towards the bottom you will see a section labeled Related People.
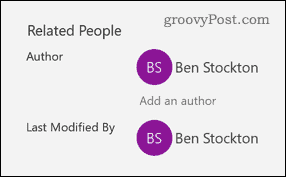
Right-click on your author name and choose Edit Property.

You can then type in the author’s name of your choosing.

If you want to change this permanently across all of your Word documents, then click File > Options.

In the Personalize your copy of Microsoft Office section, type in the User Name you want to use.

Check the Always use these values regardless of sign in to Office box to ensure that the author name you set takes precedence over your sign-in credentials.
Other Annotation Methods
Comments are a simple and effective way of annotating your Word documents. There are other options you could try too, such as inserting footnotes and endnotes into Word.
Using these techniques can help you minimize the time spent editing Word documents. Other tips such as creating a table of contents in Word or rearranging pages in your Word documents can also help to boost your productivity.
![]()
Как вставить музыкальный символ, ноты в Word
Знаете ли вы, что существуют музыкальные символы (ноты) которые вы можете вставить в Microsoft Word без добавления графических изображений? Давайте взглянем на них.
Начните с того, что установите указатель (курсор) в то место в документе, куда хотите вставить символ ноты. Во вкладке «Вставка» кликните на кнопку «Символ» и затем из раскрывающегося меню выберите «Другие символы»:

В окне символов откройте выпадающее меню «Шрифт» и выберите шрифт «MS Gothic»:

Откройте выпадающее меню «Набор» и там выберите опцию «Разные символы»:

Пролистните немного (четыре или пять строк) и вы увидите музыкальные символы:
- Quarter Note (четвертная нота)
- Eighth Note (восьмеричная нота)
- Beamed Eighth Note (двойная восьмеричная нота)
- Beamed Sixteenth Notes (двойная шестнадцатеричная нота)
- Music Flat Sign (музыкальный плоский знак)
- Music Natural Sign (музыкальный обычный знак)
- Music Sharp Sign (шарп)

Кликните на выбранную музыкальную ноту и затем кликните «Вставить» (или просто дважды кликните по символу) для вставки.
Вы можете вставить столько нот, сколько хотите пока открыто окно символов. Когда вы закончите вставлять ноты, нажмите кнопку «Отмена».

В этом примере я вставил восьмеричную ноту. Размер вставленного символа зависит от размера исходного шрифта в вашем документе. Чтобы увеличить размер символа, выберите символ, кликните «Размер шрифта» в выпадающем списке и выберите больший размер шрифта. В этом примере я выбрал размер 48 точек.

Вы можете пойти дальше и скопировать-вставить ваш символ несколько раз, чтобы создать изящную музыкальную границу для вашего документа.

Это было просто? Тогда у меня в запасе ещё парочка трюков для вас!
Знаете ли вы, что можете вставлять в Word ноты, если зажмёте клавишу Alt, а на цифровом блоке наберёте 14 или 13? То есть сочетания клавиш Alt + 14 или Alt + 13 выведут ноты! Но у вас должен быть цифровой блок на клавиатуре — есть не у всех.
Знаете ли вы, что для любого символа вы можете набрать шестнадцатеричный код Юникода, а затем с помощью сочетания клавиш Alt + x превратить его в символ?
Например, наберите в документе символы 2669, а затем нажмите Alt + x и эти цифры превратятся в ноту.
Коды всех музыкальных символов в Ubucode:
- 266A
- 266B
- 266C
- 266D
- 266E
- 266F
Между прочим, и это ещё не всё! Вы можете найти значок ноты на одном из многочисленных сайтов и скопировать-вставить его в свой документ Word — это также сработает.
Вот теперь действительно всё!
ОБНОВЛЕНИЕ : Смотрите продолжение в статье «Как вставить скрипичный ключ и любой другой музыкальный символ в Word, Excel и PowerPoint» в которой показано ещё больше способов и видов музыкальных символов, которые можно добавить в офисный документ!
Записать и распечатать ноты на компьютере
- Vlad Noskov
- 10/10/2015 05/24/2020
 Vlad Noskov
Задал себе вопрос, а как же написать, а затем распечатать ноты на компьютере? Я, конечно, не музыкант и в нотной записи понимаю мало, поэтому моё исследование свелось лишь к практической части, а именно, не к профессиональным платным программам, а к доступным и, надеюсь, понятным для большинства начинающих или студентов. Есть три способа делать нотные записи: распечатать нотную тетрадь и в традициях старых мастеров делать это от руки, повторяя красивые изгибы скрипичных ключей; использовать программу установленную на компьютере с обширным функционалом; превратить нажатие клавиш в ноты — расширение для браузера google chrome. Об этих способах и поговорим отдельно.
Способ первый • Ручная запись

Отличный сервис всевозможных шаблонов, которые доступны для скачивания, generatedpaper.com о нем я уже рассказывал. Так вот тут есть прекрасный раздел для музыкантов, есть и просто нотная тетрадь, но бланки для записи аккордов скачивайте в в формате PDF и распечатывайте.
Способ второй • Программа MuseScore

Популярная программа с богатым функционалом работы с нотным станом, также есть поддержка MIDI файлов. Вы можете сразу прослушать результат. Инструкции по работе с программой и весь функционал описан на этой странице, к сожалению, не все инструкции переведены на русский язык, но думаю встроенный переводчик вам поможет исправить недостающий текст. А несколько видео-уроков наглядно покажут работу программы.
Способ третий • приложение google chrome
Когда почти все задачи переместились в облака, и главным инструментом становится браузер, а, по моему мнению, google chrome лучший представитель. В богатом выборе приложений нашлось место и для музыкантов, которые могут творить композиции, записывая произведения в ноты, не прибегая к помощи программ. Flat, красота материального дизайна приложения и его возможности могут соперничать с профессиональными программами и, честно говоря, меня просто восхитили. Все абсолютно понятно, при том, что русского языка нет, к сожалению. Установка в один клик, регистрация через аккаунт google или facebook, и вам доступен мир творчества и сообщество музыкантов по всему миру. Вы можете поделится музыкой или послушать произведения других авторов. Можете использовать приложение, или просто добавить сайт в закладки.

В итоге лучшим на мой взгляд является последний Flat особенно его последнее преображение, которое сделало его еще стильней и удобней, а платная, хотя и не совсем дешевая делает этот замечательный сервис и вовсе для профессионалов.
Распознать ноты и сохранить на смартфоне
Нашел приложение My Sheets Music (Мои музыкальные партитуры), которое поможет отсканировать нотный лист и хранить его в электронном виде. Другими словами, всякий раз, когда вы захотите изучить новую мелодию или просто поиграть на музыкальном инструменте, не имея под рукой планшета с большим экраном, просто откройте это приложение, выберите понравившуюся нотную запись и начните играть.
Нотный редактор встраиваемый в Microsoft Office Word
Думаю, что кому-то пригодится.
Программа, которая встраивается в Ворд и можно набирать ноты прямо в Ворде.
http://narod.ru/disk/24210374000/MusMakWorfr.rar.html
Теперь при открытии вордовского документа, у вас есть кнопка вставки нот в текст.
У меня она здесь:
После нажатия на кнопку в документе появится один такт нотного стана:
Дважды щелкаем по нему левой кнопкой мышки и откроется нотный редактор.
Дальше щелкаем кнопку помощь и читаем как пользоваться программой. Помощь на русском языке и довольно подробно всё описывает.

Whether you use Microsoft Word for personal or professional writing, sometimes you may want to add supplemental notes to sections of your work. Maybe you want to make a side comment on one of your arguments, or you need to cite another author’s work without distracting from the main text. Luckily, Word has useful tools for adding footnotes and endnotes to your writing.
Note: We’re using Microsoft Word 2016, but Word has supported footnotes and endnotes since at least Word 2007. Depending on the version of Word you’re using, the menus we walk through in this guide may look a little different. But don’t worry—the features and functions are the same.
What Are Footnotes and Endnotes?
Footnotes and endnotes are both ways of adding extra bits of information to your writing outside of the main text. Think of them like verbal asides, only in writing. You can use footnotes and endnotes to add side comments to your work or to cite other publications like books, articles, or websites. The only difference between footnotes and endnotes is where they appear in your document.
As the name suggests, footnotes are attached to the bottom of the page containing the sentence they correspond to. Endnotes, on the other hand, are added to the end of a section or document. Which one you should use in your writing depends on your personal preference or—if you’re writing for school or work—your organization’s publication standards.
Fire up Microsoft Word, and then open the document to which you’d like to add footnotes (or create a new document if you’re just getting started). Switch to the “References” tab on Word’s Ribbon.

Here, you’ll find a bunch of useful features for annotating your text, including tools for inserting a table of contents, adding citations, and generating a bibliography. The second group on this tab contains the footnote and endnote features we want.
To add a footnote, place your insertion point in your text where you want the footnote to appear, and then click the “Insert Footnote” button.
Word adds a small superscript number where you placed the insertion point.
And then immediately shifts focus to the footnote pane and places the insertion point at your new footnote, so you can start typing it right away.
Footnotes appear at the bottom of the page beneath a short horizontal line. Each time you add a footnote on this page, another number will be added to the list.
Once you’ve added your footnotes, you can hover your cursor over each sentence’s reference marker to see a preview of the footnote within the text.
You can also quickly tab between footnotes in both the main text and the footnote list at the bottom of the page by clicking the “Next Footnote” button in the navigation bar.
Or, click the dropdown menu arrow on the “Next Footnote” button to select a different navigation option. You can choose to go to the previous footnote or navigate to the next or previous endnote.
The steps for inserting endnotes are essentially the same. Place your insertion point where you’d to annotate, and then click the “Insert Endnote” button on the “References” tab of Word’s Ribbon.
Just like with footnotes, Word attaches a superscript number containing an endnote. But this time, the list of notes it generates appears at the end of the current section or the end of the document (you can customize where they appear, and we’ll talk more about that in a bit).
How to Configure Footnotes and Endnotes in Word 2016
Word has basic default settings for footnotes and endnotes, but you can adjust these settings at any time from the menu on the References tab.
Click the arrow in the lower right corner of the “Footnotes” menu.
This brings up a Footnote and Endnote window where you can customize the location, appearance, and format of all your footnotes and endnotes.
Change the Location of Footnotes and Endnotes
By default, Word puts footnotes at the bottom of the page and endnotes at the end of the document, but you can change where these notes appear.
Under “Location” in the Footnote and Endnote menu, find the “Footnotes” option (it should be selected by default when you first open the menu). Open the dropdown menu to the right of that option and you can change your footnote location to either the bottom of the page or below the text. If you choose the latter option, Word places your footnotes immediately after the main body of text instead of at the bottom of the page.
To change the default location of endnotes, select the “Endnotes” option, and then open the dropdown menu to its right. There, you can change endnote placement to the end of the current section or the end of the document.
Convert Footnotes to Endnotes (and Vice Versa)
Another option is to convert all of your footnotes to endnotes or vice versa. Instead of changing each one individually, this option lets you change them all at once. If you’re working on a document with a lot of notes, this option can come in handy.
Under the “Location” section of the Footnote and Endnote menu, click the “Convert” button.
The Convert Notes dialog box pops up, giving you three options: 1) Convert All Footnotes to Endnotes, 2) Convert All Endnotes to Footnotes, and 3) Swap Footnotes and Endnotes. Select the option you want, and then click the “OK” button.
Change the Layout of Footnotes and Endnotes
By default, Word creates footnote and endnote lists with the same layout as the page on which they appear. However, you can adjust this from the Footnote and Endnote window by clicking the “Columns” dropdown menu and selecting the number of columns you’d like to use.
You can set your footnotes and endnotes to display in up to four different columns on the page.
Customize the Format of Footnotes and Endnotes
Word also lets you choose from several options for formatting how your footnotes and endnotes are numbered. It’s generally a good idea to choose a different numbering system for each note type, especially if you’re using a combination of footnotes and endnotes in the same document. This helps you and your reader quickly distinguish between the two at a glance.
In the Format section, click the dropdown arrow to the right of the “Number Format” option. Select your desired number format.
You can also label your notes with a custom symbol instead of a standard numbering system. Next to the Custom Mark option, click the “Symbol” button.
The Symbol menu will open. Select the symbol you’d like to use to label your notes, and then click the “OK” button.
Your selected icon should appear in the “Custom Mark” box, and Word will now use this symbol to label your notes.
By default, Word numbers footnotes and endnotes in individual series starting at “1” (or a, i, I, etc.) and continuing throughout the document. However, you can customize both the starting point and continuity of your notes.
If you want your footnotes or endnotes to start somewhere other than the first number in the series (for example, 2 instead of 1), click the arrows in the “Start At” dropdown box to increase or decrease the beginning value. One example of where this might be useful is if you’re writing a book that contains endnotes and you’re saving each chapter as a separate Word document. You could configure each chapter’s document to start numbering endnotes where the last chapter left off.
To change the continuity of your numbering series, click the dropdown menu arrow next to the “Numbering” option.
You’ll see three options for numbering your footnotes and endnotes: Continuous, Restart Each Section, and Restart Each Page. If you want your footnotes and endnotes to be numbered continuously from the beginning of your document to the end, select the “Continuous” option. If you’d prefer to have your notes numbered by chapter or section, select the “Restart Each Section” option. Or select “Restart Each Page” to number your notes by page.
Apply Your Changes to the Document
After configuring the above options, you’ll need to select how you want your changes applied to your document. At the bottom of the menu, click the dropdown menu arrow next to the “Apply Changes To” option.
If you want your changes to apply to every page and section of your document, select the “Whole Document” option. Or select “This Section” to apply changes only to the section of the document you’re currently in. (Note that this option will not appear if you have no section breaks in your document.)
Once you’re satisfied with your settings, click the “Apply” button in the bottom right of the menu.
You can also insert a new footnote using your selected settings by clicking the “Insert” button in the lower left corner of the menu.
How to Cross-Reference Footnotes and Endnotes in Word 2016
If you want to use the same footnote or endnote more than once throughout your text, there’s an easy way to do it without having to insert the same thing over and over again.
Place your insertion point where you want a reference inserted into the text. On the References tab, click the “Cross-Reference” button.
In the Cross-Reference window, choose either “Footnote” or “Endnote” from the “Reference Type” dropdown menu.
Next, click the “Insert Reference To” dropdown menu.
The “Footnote Number” option inserts the number of the footnote in regular text, while the “Footnote Number (Formatted)” option inserts the number of the footnote in superscript. The “Page Number” option inserts the number of the referenced page instead of the footnote number. The “Above/Below” option inserts either the word “Above” or “Below” depending on where the original footnote appears in relation to the cross-reference. Select your desired option.
Word lets you create hyperlinks between cross-references so you can easily find the same footnote everywhere it appears in your document. The “Insert as Hyperlink” option is checked by default, so you can click any cross-reference and automatically be taken to the part of the document containing the original footnote. We recommend leaving this option checked, but you can uncheck it if you prefer.
Under the “For Which Footnote” option, select the footnote you’d like to cross-reference, and then click the “Insert” button at the bottom of the menu.
READ NEXT
- › How to Add Footnotes in Google Docs
- › How to Cross-Reference in Microsoft Word
- › Learn These Microsoft Word Features to Make College Easier
- › How to Create Your Own Bibliography Template in Microsoft Word
- › Mozilla Wants Your Feature Suggestions for Thunderbird
- › How to Adjust and Change Discord Fonts
- › BLUETTI Slashed Hundreds off Its Best Power Stations for Easter Sale
- › Expand Your Tech Career Skills With Courses From Udemy
Whether you’re writing an academic paper or a business report, it’s important to reference your sources and explain specialist terminology. But when added to the main body of a text document, these additions can significantly distract the reader. To keep text readable, Microsoft 365 allows users to insert footnotes. Footnotes are sections that are found in the footer of a page. They are visually separated from the main body text. By contrast, endnotes are located right at the end of a text or chapter. Both footnotes and endnotes can be edited and formatted. In this article, we explain how you can add footnotes and endnotes in Microsoft Word.
Contents
- Inserting footnotes in Word: step-by-step tutorial
- Adding endnotes in Word: step-by-step tutorial
- Formatting footnotes and endnotes
Inserting footnotes in Word: step-by-step tutorial
Inserting a footnote in Word is quick and easy.
- First, click on the text passage that you wish to reference.
- Go to the “References” tab in the top menu bar.
- Here, you’ll find the “Footnotes” section.
- Select “Insert Footnote”.
- After you’ve placed a Word footnote, a number in superscript will appear in your text and you’ll be able to insert the reference text in the footer.

Alternatively, you can add a footnote using the key combination [Ctrl] + [Alt] + [F].
Adding endnotes in Word: step-by-step tutorial
- First, select the text where you want to insert the endnote.
- Now click on the “References” tab and navigate to the “Footnotes” section.
- Select “Insert Endnote”.
- Once you’ve inserted the endnote, it will be placed at the relevant position in the text as a superscript number.

Alternatively, you can use the following shortcut: [Ctrl] + [Alt] + [D]. When placing footnotes and endnotes, the program automatically adjusts the continuous numbering. Footnotes and endnotes in Word are always numbered continuously.
Formatting footnotes and endnotes
In Word, you’ve also got the option to format and edit footnotes and endnotes. You can alter the formatting after inserting footnotes in Word. You can also define the number the footnotes should begin at. You can access these settings by right-clicking on a footnote or endnote and then selecting “Footnote/Endnote Options”. If you want to modify the font size, select your preferred option from the “Format” menu.
Tip
If you want to see all your footnotes and endnotes at the same time, click on the “Show Notes” button for a full overview.
To remove a footnote or endnote, just delete the superscript number in the main body text. Word will then automatically adjust the numbering for the following footnotes or endnotes.
Tip
For a professional look, academic papers and long reports benefit from including a table of contents.
Word with Microsoft 365 and IONOS!
Easily go from pen and paper to digital inking with Word — included in all Microsoft 365 packages!
![]() Office Online
Office Online
![]() OneDrive with 1TB
OneDrive with 1TB
![]() 24/7 support
24/7 support

Word documents: how to save as a PDF file
If you want to send a Word document or prepare it for printing, it’s recommended you know how to save it as a PDF file. This way, you can be sure that the formatting of your document won’t change and that others will not be able to edit it without permission. For simple conversion tasks, the save function in Word is often sufficient. However, there are some dedicated tools which offer a wider…
Word documents: how to save as a PDF file

Activate and adjust hyphenation in Word
Hyphenation in Word is a handy tool that is often used to create a more legible document. This feature avoids excessive line breaks and large spaces that sometimes occur in Word documents. We’ll show you how to activate and customize automatic hyphenation in Word.
Activate and adjust hyphenation in Word
How to change line spacing in Word easily
The default settings for Microsoft Word line spacing are not always enough. Fortunately, the software offers several options for customizing your documents. Unfortunately, these options are often hard to find. For example, if you want to change the line spacing in Word, you might have to search for this. We’ll help you find this feature so you can learn how to double-space in Word and more.
How to change line spacing in Word easily

How to remove a watermark in Word
Watermarks are a handy way to label documents in Microsoft Word. You can insert a watermark so that your text or your company logo sits discreetly in the background of the page. However, sometimes you might not be happy with how the watermark looks, or you don’t need the watermark at all anymore. We’ll show you two ways to remove a watermark in Word.
How to remove a watermark in Word