
Содержание
- an Excel Add-in that installs itself
- Content
- Introduction
- Manually installing an add-in in Excel
- How does Excel manage the list of add-ins
- 1. The Add-ins folder:
- 2. The registry
- Which Add-ins are Selected
- How To Install An Excel Add-in using VBA code
- Triggering the install question
- Excel COM add-ins and Automation add-ins
- Summary
- More Information
- COM Add-ins
- Automation Add-ins
- Automation Add-ins That Implement IDTExtensibility2
an Excel Add-in that installs itself
Content
Introduction
As you probably know, I offer a number of tools for your daily Excel work:
- RefTreeAnalyser The best tool to dissect your formulas and find out where the data for a formula comes from
- FlexFind a tool with which you can do search and replace in all of Excel’s objects, not just cells
- Name Manager The best tool to work with range names
- Other free tools
There is a problem however. Many users struggle with getting the add-in installed. To make that easier I created a separate Excel file (quite a number of years ago) to install the add-in.
But you can make it even easier by incorporating the setup code in your add-in. In this article I show some VBA code that will ease that process: As soon as the user opens the add-in and enables macros, the add-in offers to install itself.
Manually installing an add-in in Excel
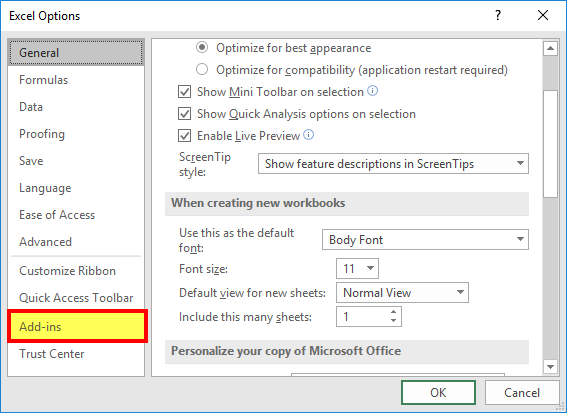
In modern Excel, even the first step to manually install an add-in is a difficult one: How do I get Excel to show the add-ins dialog? There are quite some steps involved:
- Click File
- Click Options
- Click the Add-ins tab
- Select Excel Add-ins from the drop-down
- Click the Go. button.
Here are these steps in an animated gif:
And even then, if your add-in file is not in the right location it is not listed in that dialog. The user has to click the browse button and look for it. Even if they find the add-in, Excel then pops up a difficult question if the add-in happens to be in their add-ins list already:
How does Excel manage the list of add-ins
Under the hood, Excel uses the registry and a special folder to manage which Add-ins are displayed in the Add-ins dialog and which are installed.
To build the list in the dialog, Excel looks in a couple of places:
1. The Add-ins folder:
You can get to this folder quickly by typing this into the address box: %appdata%Microsoftaddins
or altenatively (the exact path depends on your Office version and whether or not you are using 64 bit Office):
C:Program Files (x86)Microsoft OfficeRootOffice16Library
C:Program FilesMicrosoft OfficeRootOffice16Library
Any Add-ins in these folders are automatically included in the Add-ins dialog.
2. The registry
For Add-ins in a different location from the ones shown above, Excel will look in the registry:
For Excel 365 this is:
Keys are added there when you click the browse button to locate an Add-in. There is a value there for each Add-in which was browsed for. The value needed is simply the path to the Add-in and its name, e.g. :
Which Add-ins are Selected
In another location in the registry, Excel notes what Add-ins are selected (checked in the add-ins dialog). It does so using a number of values in this part of the registry:
For each selected Add-in, Excel adds an entry in this location, successively called «OPEN», «OPEN1», «OPEN2».
Registry showing entries for Add-ins that are selected.
These keys each contain the name of the add-in to be opened (and sometimes some command-line parameters). If an add-in is not in the add-ins folder, the full path is included.
Note that these registry keys are updated AFTER closing Excel.
How To Install An Excel Add-in using VBA code
I’ve written some simple code to enable an add-in to pop up a question like this:
The following VBA code triggers this message box:
Option Explicit
Option Private Module
Const GCSAPPREGKEY As String = «DemoAddInInstallingItself»
Const GCSAPPNAME As String = «DemoAddInInstallingItself»
Public Function IsInstalled() As Boolean
Dim oAddIn As AddIn
On Error Resume Next
If ThisWorkbook.IsAddin Then
For Each oAddIn In Application.AddIns
If LCase(oAddIn.FullName) <> LCase(ThisWorkbook.FullName) Then
Else
If oAddIn.Installed Then
IsInstalled = True
Exit Function
End If
End If
Next
Else
IsInstalled = True
End If
End Function
Public Sub CheckInstall()
Dim oAddIn As AddIn
If GetSetting(GCSAPPREGKEY, » Set tings», «PromptToInstall», «») = «» Then
If Not IsInstalled Then
If ThisWorkbook.Path Like Environ(«TEMP») & «*» Or InStr(LCase(ThisWorkbook.Path), «.zip») > 0 Then
MsgBox «It appears you have opened the add-in from a compressed folder» & vbNewLine & _
«(zip file) or from a temporary folder.» & vbNewLine & vbNewLine & _
«You are advised to save the add-in file to a dedicated folder» & vbNewLine & _
«in your Documents folder and then open the add-in from that location.» & vbNewLine & vbNewLine & _
«The add-in will now close.», vbExclamation + vbOKOnly, GCSAPPNAME
ThisWorkbook.Close False
End If
If MsgBox(«Do you wish to install ‘» & GCSAPPNAME & «‘ as an addin?», vbQuestion + vbYesNo, GCSAPPNAME) = vbYes Then
If ActiveWorkbook Is Nothing Then AddEmptyBook
Set oAddIn = Application.AddIns.Add(ThisWorkbook.FullName, False )
oAddIn.Installed = True
RemoveEmptyBooks
ElseIf MsgBox(«Do you want me to stop asking this question?», vbQuestion + vbYesNo, GCSAPPNAME) = vbYes Then
SaveSetting GCSAPPREGKEY, «Settings», «PromptToInstall», «No»
End If
End If
End If
End Sub
The key function here is the one called «CheckInstall».
The first thing that routine does is find out whether there is a registry key called «PromptToInstall» in the Settings section of the registry. If there is, it will not prompt to install. This is done to avoid annoying those people who are in the habit of only opening your add-in when they need it (like me!).
Next it calls the IsInstalled function. This function checks whether or not the add-in is already installed.
Next there are two checks concerning the location where the add-in file is stored. Most of my add-ins are available through my website and are zip downloads. If the user opens such a zip download directly and then opens the add-in, the xlam file will be stored in a temporary location (if they have unzipping software installed) or it will be in a folder that contains .zip in its name. Excel can open such files, but it cannot install add-ins which are in a zip folder. And WinZip deletes that folder in Temp as soon as it is closed. You then end up with an pointer in Excel to an installed add-in which does not have an accompanying xlam file. This has the following annoying side effect every time Excel starts:

So that is why the code then shows a message box like this one:
If all is well and the user first unpacked the zip file, then the code asks whether or not the user wants to install the add-in:
If Yes is clicked, it runs the mere two lines of code needed to install the addin:
Well, two lines? As you can see there are four lines. The first one ensures at least one workbook window is open in Excel. The last one closes any workbooks that were opened by the add-in. Why? Because you cannot open the add-ins dialog when there is no active workbook and apparently this also prevents Excel from adding a new add-in to the list through VBA.
If you click No, another dialog pops up asking the user if he (she/them) wants to keep being asked about installing the add-in:
If you click Yes, the code stores that decision so it will not bother the user again.
For completeness’ sake, here’s the code to add an empty workbook and delete it again:
Option Explicit
Option Private Module
Dim moWB As Workbook
Sub AddEmptyBook()
‘Adds an empty workbook if needed.
If ActiveWorkbook Is Nothing Then
Workbooks.Add
Set moWB = ActiveWorkbook
moWB.CustomDocumentProperties.Add «MyEmptyWorkbook», False , msoPropertyTypeString, «This is a temporary workbook added by » & GCSAPPNAME
moWB.Saved = True
End If
End Sub
Sub RemoveEmptyBooks()
Dim oWb As Workbook
For Each oWb In Workbooks
If IsIn(oWb.CustomDocumentProperties, «MyEmptyWorkbook») Then
oWb.Close False
End If
Next
End Sub
Function IsIn(col As Variant , name As String ) As Boolean
Dim obj As Object
On Error Resume Next
Set obj = col(name)
IsIn = (Err.Number = 0)
End Function
Triggering the install question
The last bit to get this all to work is making sure the CheckInstall routine is called when your add-in is opened. I’ve placed this in the ThisWorkbook module:
Источник
Summary
Microsoft Office Excel support Automation Add-ins in addition to Component Object Model (COM) Add-ins. This article explains the differences between these two types of Add-ins.
More Information
COM Add-ins
COM Add-ins present the developer with a way to extend the functionality of Office applications for custom tasks. COM Add-ins are typically used to automate Excel in response to a click of a CommandBar button, a form or dialog box, or some other event specific to Excel such as opening or closing workbooks or entering data on worksheets. COM Add-in functions cannot be directly called from cell formulas in worksheets.
A COM Add-in is an in-process COM server (an ActiveX DLL) that must implement the IDTExensibility2 interface. All COM Add-ins must implement each of the five methods of this interface: OnConnection, OnStartupComplete, OnAddinsUpdate, OnBeginShutDown, and OnDisconnection.
When a COM Add-in is installed on a user’s system, registry entries are created for the Add-in. In addition to normal COM registration, a COM Add-in is registered for each Office application in which it runs. COM Add-ins used by Excel are registered in the following registry key:
This key contains a subkey for each installed COM Add-in. The name of the subkey is the ProgID for the COM Add-in. The subkey for a COM Add-in also contains values that describe the COM Add-in’s friendly name, description, and load behavior. The load behavior describes how the Add-in is loaded in Excel: loaded at startup, loaded at next startup only, loaded on demand, or not loaded.
COM Add-ins can also be loaded and unloaded through the Excel user interface. To do this, follow these steps:
On the View menu, point to Toolbars and then click Customize.
In the Toolbars dialog box, click the Advanced tab. In the list of categories, select Tools. Locate COM Add-ins in the list of commands and drag the command to a menu or CommandBar of your choice. Close the Toolbars dialog box.
Click the COM Add-ins command that you added to display the COM Add-ins dialog box. The dialog box lists all COM Add-ins that are installed on your system, and the COM Add-ins that are currently loaded are selected.
COM Add-ins can also be loaded and unloaded through the Excel user interface. To do this, follow these steps:
Click the Microsoft Office Button, and then click Excel Options.
Under Manage, click COM Add ins, and then click Go .
The COM Add-ins dialog box lists all COM add-ins that are installed on the computer. The COM add-ins that are currently loaded are selected.
For additional information about COM Add-ins, click the following article numbers to view the articles in the Microsoft Knowledge Base:
238228 HOWTO: Build an Office 2000 COM Add-In in Visual Basic
230689 SAMPLE: Comaddin.exe Office 2000 COM Add-In Written in Visual C++
For more information, see the following Microsoft Web site:
Automation Add-ins
In addition to COM Add-ins, Excel supports Automation Add-ins. Automation Add-ins build on COM Add-ins in that functions in Automation Add-ins can be called from formulas in Excel worksheets. COM Add-ins must be in-process COM servers that support the IDTExtensibility2 interface; however, Automation Add-ins can be in-process or out-of-process COM servers and implementation of IDTExtensibility2 is optional.
To use functions from an Automation Add-in in Excel, follow these steps:
On the Tools menu, click Add-Ins.
In the Add-Ins dialog box, click Automation. From the list of registered COM servers, select your Automation Add-in and click OK.
The Automation Add-in appears in the Add-ins dialog box. Click OK to close the Add-Ins dialog box.
To use functions from an Automation Add-in in Excel 2007 and newer, follow these steps:
Click the Microsoft Office Button, and then click Excel Options.
Under Manage, click Excel Add ins, and then click Go.
In the Add-Ins dialog box, click Automation. In the list of registered COM servers, click your Automation Add-in, and then click OK.
The Automation Add-in appears in the Add-ins dialog box. Click OK to close the Add-Ins dialog box.
When you make additions to the list in the Add-Ins dialog box or when you select and clear Add-ins in the list, Excel stores your changes in the registry. First, Excel uses the following registry setting to determine whether or not an Automation Add-in in the Add-in list is loaded:
Note: Change the Office version number based upon the version you are using.
The /A switch that is used in the string value is new to Excel and older and is used specifically to load Automation Add-ins. All Automation Add-ins are loaded on demand; there is no setting that can change the load behavior for an Automation Add-in.
When an Automation Add-in that is listed in the Add-Ins dialog box is cleared, a subkey with a name equal to the Add-in’s ProgID is created in the following registry key:
HKEY_CURRENT_USERSoftwareMicrosoftOffice10.0ExcelAdd-in Manager
Excel 2003:
HKEY_CURRENT_USERSoftwareMicrosoftOffice11.0ExcelAdd-in Manager
This registry setting ensures that Automation Add-ins that you have added to the Add-ins list are retained in the list even when you have chosen not to load them.
For more information about Automation Add-Ins, see the following articles in the Microsoft Knowledge Base:
285337 HOWTO: Create a Visual Basic Automation Add-in for Excel Worksheet Functions
For more information, see the following Microsoft Web site:
Automation Add-ins That Implement IDTExtensibility2
As previously mentioned, an Automation Add-in may implement IDTExtensibility2, but it is not required in order for Excel to call the functions in the Add-in from a worksheet. If you require that your Automation Add-in obtains a reference to the Excel instance, you can implement IDTExtensibility2 and use the Application parameter of OnConnection to automate Excel.
An Automation Add-in that implements
IDTExtensibility2 can be loaded in the Excel user interface through both the COM Add-Ins dialog box and the Add-Ins dialog box. The following describes the behavior of an Automation Add-in based on whether it is loaded in one or both of these dialog boxes:
Loaded only in the Add-ins dialog box.
The Add-in is loaded on demand. Functions in the Add-in may be called from formulas in a worksheet.
Loaded only in the COM Add-ins dialog box.
The Add-in is loaded as a COM Add-in and its load behavior is determined from settings in the registry. Functions in the Add-in cannot be called from formulas in a worksheet.
Loaded in both the COM Add-ins dialog box and the Add-ins dialog box.
Two separate instances of the Add-in are loaded. One instance is loaded as a COM Add-in and the other instance is loaded as an Automation Add-in. The COM Add-in instance uses the load behavior indicated in the registry; the Automation Add-in instance loads on demand. The two instances work independently of one another and do not share global variables.
Because Automation Add-ins are loaded on demand, Excel may attempt to load the Add-in while it is in cell edit mode. Therefore, when you develop an Automation Add-in that supports IDTExtensibility2, you should be careful not to do anything that attempts to change Excel’s state while the Add-in loads. For more information, see the following article in the Microsoft Knowledge Base:
284876 BUG: Excel Fails When Automation Add-In Loads
(c) Microsoft Corporation 2001, All Rights Reserved. Contributions by Lori B. Turner, Microsoft Corporation.
Источник
Understanding Excel’s Add-In Manager
The most efficient way to load and unload add-ins is with Excel’s Add-Ins dialog box, which you access by choosing Office ![]() Excel Options
Excel Options ![]() Add-Ins. Then, in the Excel Options dialog box, choose Excel Add-Ins from the Manage drop-down box and click Go.
Add-Ins. Then, in the Excel Options dialog box, choose Excel Add-Ins from the Manage drop-down box and click Go.
| Tip |
The Alt+TI shortcut key sequence used in earlier versions of Excel is a quicker way to display the Add-Ins dialog box. Also, consider adding the Add-Ins button to your Quick Access Toolbar (QAT). Right-click the QAT and choose Customize. In the Excel Options dialog box, choose Commands Not in the Ribbon, select Add-ins, and click Add. |
Figure 21-2 shows the Add-Ins dialog box. The list contains the names of all add-ins that Excel knows about, and check marks identify add-ins that are open. You can open and close add-ins from this dialog box by clearing or marking the check boxes.

Figure 21-2: The Add-Ins dialog box.
| Caution |
You can also open most add-in files by choosing the Office Workbooks("myaddin.xlam").Close
Opening an add-in with the Office |
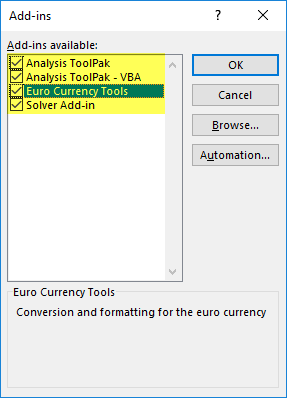
When you open an add-in, you might notice something different about Excel. In almost every case, the user interface changes in some way: Excel displays either a new command in the Ribbon or new menu items on a shortcut menu. For example, when the Analysis ToolPak add-in is installed, it gives you a new command: Data ![]() Analysis
Analysis ![]() Data Analysis. When you install Excel’s Euro Currency Tools add-in, you get a new group in the Formulas tab: Solutions.
Data Analysis. When you install Excel’s Euro Currency Tools add-in, you get a new group in the Formulas tab: Solutions.
If the add-in contains only custom worksheet functions, the new functions appear in the Insert Function dialog box.
What are Add-ins in Excel?
An add-ins is an extension that adds more features and options to Microsoft Excel. Providing additional functions to the user increases the power of Excel. An add-in needs to be enabled for usage. Once enabled, it activates as Excel is started.
For example, Excel add-ins can perform tasks like creating, deleting, and updating the data of a workbook. Moreover, one can add buttons to the Excel ribbon and run custom functions with add-ins.
The Solver, Data Analysis (Analysis ToolPakExcel’s data analysis toolpak can be used by users to perform data analysis and other important calculations. It can be manually enabled from the addins section of the files tab by clicking on manage addins, and then checking analysis toolpak.read more), and Analysis ToolPak-VBA are some essential add-ins.
The purposes of activating add-ins are listed as follows: –
- To interact with the objects of Excel
- To avail an extended range of functions and buttons
- To facilitate the setting up of standard add-ins throughout an organization
- To serve the varied needs of a broad audience
In Excel, one can access several Add-ins from “Add-ins” under the “Options” button of the “File” tab. In addition, one can select from the drop-down “Manage” in the “Add-ins” window for more add-ins.
By default, it might hide some add-ins. One can view the unhidden add-ins in the “Data” tab on the Excel ribbonThe ribbon is an element of the UI (User Interface) which is seen as a strip that consists of buttons or tabs; it is available at the top of the excel sheet. This option was first introduced in the Microsoft Excel 2007.read more. For example, it is shown in the following image.

Table of contents
- What are Add-ins in Excel?
- How to Install Add-ins in Excel?
- Types of Add-ins in Excel
- The Data Analysis Add-in
- Create Custom Functions and Install as an Excel Add-in
- Example #1–Extract Comments from the Cells of Excel
- Example #2–Hide Worksheets in Excel
- Example #3–Unhide the Hidden Sheets of Excel
- The Cautions While Creating Add-ins
- Frequently Asked Questions
- Recommended Articles
How to Install Add-ins in Excel?
If Excel is not displaying the add-ins, they need to be installed. The steps to install Excel add-ins are listed as follows:
- First, click on the “File” tab located at the top left corner of Excel.

- Click “Options,” as shown in the following image.

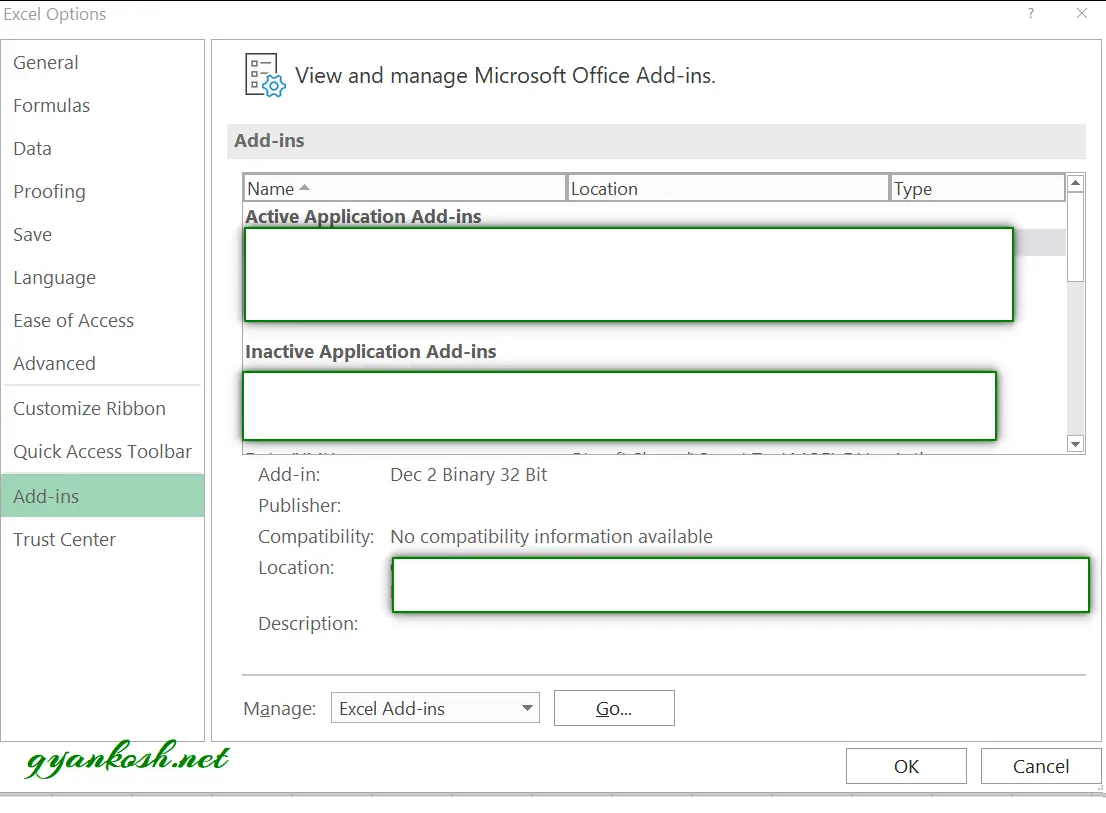
- The “Excel Options” window opens. Select “Add-ins.”

- There is a box to the right of “Manage” at the bottom. Click the arrow to view the drop-down menu. Select “Excel add-ins” and click “Go.”

- The “Add-ins” dialog box appears. Select the required checkboxes and click “OK.” We have selected all four add-ins.

- The “Data Analysis” and “Solver” options appear under the “Data tab” of the Excel ribbon.


Types of Add-ins in Excel
The types of add-ins are listed as follows:
- Inbuilt add-ins: These are built into the system. One can unhide them by performing the steps listed under the preceding heading (how to install add-ins in Excel?).
- Downloadable add-ins: These can be downloaded from the Microsoft website (www.office.com).
- Custom add-ins: These are designed to support the basic functionality of Excel. They may be free or chargeable.
The Data Analysis Add-in
The “Data Analysis Tools” pack analyzes statistics, finance, and engineering data.

The various tools available under the “Data Analysis” add-in are shown in the following image.

Create Custom Functions and Install them as an Excel Add-in
Generally, an add-in is created with the help of VBA macrosVBA Macros are the lines of code that instruct the excel to do specific tasks, i.e., once the code is written in Visual Basic Editor (VBE), the user can quickly execute the same task at any time in the workbook. It thus eliminates the repetitive, monotonous tasks and automates the process.read more. Let us learn to create an add-in (in all Excel files) for a custom functionCustom Functions, also known as UDF (User Defined Functions) in Excel, are personalized functions that the users create through VBA programming code to fulfill their particular requirements. read more. For this, first, we make a custom function.
Let us consider some examples.
You can download this Excel Add-Ins Excel Template here – Excel Add-Ins Excel Template
We want to extract comments from specific cells of Excel. Then, create an add-in for the same.
The steps for creating an add-in and extracting comments from cells are listed as follows:
Step 1: Open a new workbook.
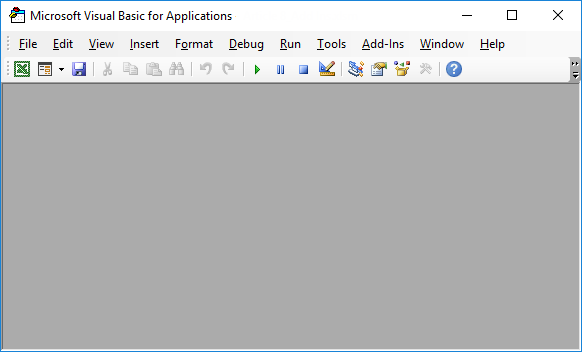
Step 2: Press the shortcutAn Excel shortcut is a technique of performing a manual task in a quicker way.read more “ALT+F11” to access the “Visual Basic Editor.” The following image shows the main screen of Microsoft Visual Basic for Applications.
Step 3: Click “Module” under the “Insert” tab, shown in the following image.

Step 4: Enter the following code in the “module” window.
Function TakeOutComment(CommentCell As Range) As String
TakeOutComment = CommentCell.Comment.Text
End Function

Step 5: Once the code is entered, save the file with the type “Excel add-in.”

Step 6: Open the file containing comments.
Step 7: Select ” Options ” in the “File” tab and select “Options.” Choose “Add-ins.” In the box to the right of “Manage,” select “Excel Add-ins.” Click “Go.”
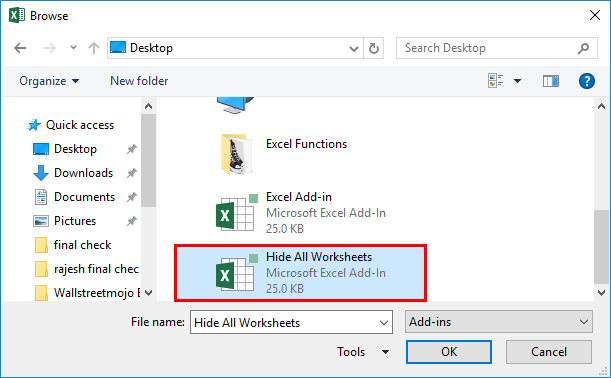
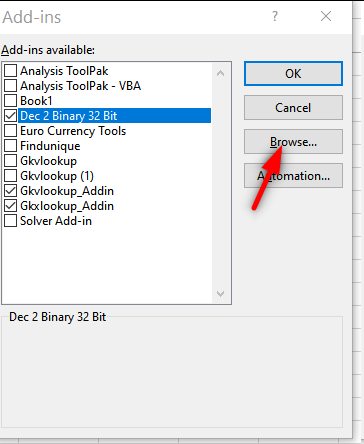
Click the “Browse” option in the “Add-ins” dialog box.

Step 8: Select the add-in file that had been saved. Click “Ok.”
We saved the file with the name “Excel Add-in.”

Step 9: The workbook’s name (Excel Add-in) that we had saved appears as an add-in, as shown in the following image.
This add-in can be applied as an Excel formula to extract comments.

Step 10: Go to the sheet containing comments. The names of three cities appear with comments, as shown in the following image.

Step 11: In cell B1, enter the symbol “equal to” followed by the function’s name. Type “TakeOutComment,” as shown in the following image.

Step 12: Select cell A1 as the reference. It extracts the comment from the mentioned cell.
Since there are no comments in cells A2 and A3, the formula returns “#VALUE!.”

Example #2–Hide Worksheets in Excel
We want to hide Excel worksheets except for the active sheet. Create an add-in and icon on the Excel toolbar for the same.
The steps to hide worksheets (except for the currently active sheet) and, after that, create an add-in and icon are listed as follows:
Step 1: Open a new workbook.
Step 2: In the “Visual Basic” window, insert a “Module” from the Insert tab. The same is shown in the following image.
Step 3: Copy and paste the following code into the module.
Sub Hide_All_Worksheets_()
Dim As Worksheet
For Each Ws In ActiveWorkbook.Worksheets
If Ws.Name <> ActiveSheet.Name Then
Ws.Visible = xlSheetVeryHidden
End If
Next Ws
End Sub

Step 4: Save this workbook with the type “Excel add-in.”
Step 5: Add this add-in to the new workbook. For this, click “Options” under the “File” tab. Select “Add-ins.” In the box to the right of “Manage,” select “Excel add-in” Click “Go.”
In the “Add-ins” window, choose “Browse.”

Step 6: Select the saved add-in file. Click “Ok.”
We have saved the file with the name “Hide All Worksheets.”
Step 7: The new add-in “Hide All Worksheets” appears in the “Add-ins” window.

Step 8: Right-click the Excel ribbon and select “Customize the Ribbon.”

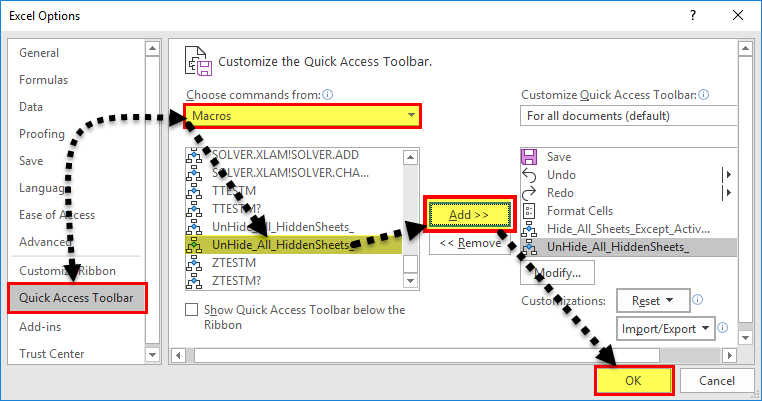
Step 9: The “Excel Options” window appears. Click “Quick Access Toolbar.” Under the drop-down of “Choose commands from,” select “macrosA macro in excel is a series of instructions in the form of code that helps automate manual tasks, thereby saving time. Excel executes those instructions in a step-by-step manner on the given data. For example, it can be used to automate repetitive tasks such as summation, cell formatting, information copying, etc. thereby rapidly replacing repetitious operations with a few clicks.
read more.”
In the box following this drop-down, choose the name of the macro. Then, click “Add” followed by “OK.” The tasks of this step are shown with the help of black arrows in the following image.

Step 10: A small icon appears on the toolbar. Clicking this icon hides all worksheets except for the currently active sheet.

Example #3–Unhide the Hidden Sheets of Excel
If we want to unhide the sheetsThere are different methods to Unhide Sheets in Excel as per the need to unhide all, all except one, multiple, or a particular worksheet. You can use Right Click, Excel Shortcut Key, or write a VBA code in Excel. read more hidden in the preceding example (example #2). Create an add-in and toolbar icon for the same.
The steps to unhide the sheets and, after that, create an add-in and toolbar icon are listed as follows:
Step 1: Copy and paste the following code to the “Module” inserted in Microsoft Visual Basic for Applications.
Sub UnHide_All_HiddenSheets_()
Dim Ws As Worksheet
For Each Ws In ActiveWorkbook.Worksheets
Ws.Visible = xlSheetVisible
Next Ws
End Sub

Step 2: Save the file as “Excel add-in.” Add this add-in to the sheet.
Right-click the Excel ribbon and choose the option “Customize the ribbon.” Then, in the “Quick Access Toolbar,” select “Macros” under the drop-down of “Choose commands from.”
Choose the macro’s name, click “Add” and “OK.” The tasks of this step are shown with the help of black arrows in the following image.
Step 3: Another icon appears on the toolbar. Clicking this icon unhides the hidden worksheets.

The Cautions While Creating Add-ins
The points to be observed while working with add-ins are listed as follows:
- First, remember to save the file in Excel’s “Add-in” extensionExcel extensions represent the file format. It helps the user to save different types of excel files in various formats. For instance, .xlsx is used for simple data, and XLSM is used to store the VBA code.read more of Excel.
- Be careful while selecting the add-ins to be inserted by browsing in the “Add-ins” window.
Note: It is possible to uninstall the unnecessary add-ins at any time.
Frequently Asked Questions
1. What is an add-in? where is it in Excel?
An add-in extends the functions of Excel. It provides more features to the user. It is also possible to create custom functions and insert them as an add-in in Excel.
An add-in can be created, used, and shared with an audience. One can find the add-ins in the “Add-ins” window of Excel.
The steps to access the add-ins in Excel are listed as follows:
a. Click “Options” in the “File” tab of Excel. Select “Add-ins.”
b. In the box to the right of “Manage,” select “Excel add-ins.” Click “Go.”
c. The “Add-ins” window opens. Click “Browse.”
d. Select the required add-in file and click “OK.”
Note: The add-ins already present in the system can be accessed by browsing. Select the corresponding checkbox in the “Add-ins” window and click “OK” to activate an add-in.
2. How to remove an Add-in from Excel?
For removing an add-in from the Excel ribbon, it needs to be inactivated. The steps to inactivate an add-in of Excel are listed as follows:
a. In the File tab, click “Options” and choose “Add-ins”.
b. From the drop-down menu of the “Manage” box, select “Excel add-ins.” Click “Go.”c.
c. In the “Add-ins” window, deselect the checkboxes of the add-ins to be inactivated. Click “OK.”
The deselected add-ins are inactivated. Sometimes, one may need to restart Excel after inactivation. It helps remove the add-in from the ribbon.
Note: Inactivation does not remove an add-in from the computer. For removing an inactivated add-in from the computer, it needs to be uninstalled.
3. How to add an Add-in to the Excel toolbar?
The steps to add an Add-in to the Excel toolbar are listed as follows:
a. In an Excel workbook, press “Alt+F11” to open the Visual Basic Editor. Enter the code by inserting a “module.”
b. Press “Alt+F11” to return to Excel. Save the file as “Excel add-in” (.xlam).
c. In File, select “Options” followed by “Add-ins.” Select “Excel add-ins” in the “Manage” box and click “Go.”
d. Browse this file in the “Add-ins” window. Select the required checkbox and click “OK.”
e. Right-click the ribbon and choose “Customize the Ribbon.” Click “Quick Access Toolbar.”
f. Select “Macros” from the drop-down of “Choose commands from.”
g. Choose the required macro, click “Add” and” OK.”
The icon appears on the toolbar. This icon works in all Excel workbooks as the add-in has been enabled.
Recommended Articles
This article is a step-by-step guide to creating, installing, and using add-ins in Excel. Here, we also discuss the types of Excel add-ins and create a custom function. Take a look at these useful functions of Excel: –
- What is the Quick Access Toolbar in Excel?
- “Save As” Shortcut in Excel
- Remove Duplicates in Excel
- How to Show Formula in Excel?
An Excel add-in can be really useful when you have to run a macro often in different workbooks.
For example, suppose you want to highlight all the cells that have an error in it, you can easily create an Excel add-in that will highlight errors with a click of a button.
Something as shown below (the macro has been added to the Quick Access Toolbar to run it with a single click):

Similarly, you may want to create a custom Excel function and use it in all the Excel workbooks, instead of copy pasting the code again and again.
If you’re interested in learning VBA the easy way, check out my Online Excel VBA Training.
Creating an Excel Add-in
In this tutorial, you’ll learn how to create an Excel add-in. There are three steps to create an add-in and make it available in the QAT.
- Write/Record the code in a module.
- Save as an Excel Add-in.
- Add the macro to the Quick Access Toolbar.
Write/Record the Code in a Module
In this example, we will use a simple code to highlight all the cells that have error values:
Sub HighlightErrors()
 Selection.SpecialCells(xlCellTypeFormulas, xlErrors).Select
 Selection.Interior.Color = vbRed
End Sub
If you are writing code (or copy-pasting it from somewhere), here are steps:
Note: If you are recording a macro, Excel automatically takes care of inserting a module and putting the code in it.
Now let’s go ahead and create an add-in out of this code.
Save and Install the Add-in
Follow the below steps when you are in the workbook where you have inserted the code.
Now the add-in has been activated.
You may not see any tab or option appear in the ribbon, but the add-in gets activated at this stage and the code is available to be used now.
The next step is to add the macro to the Quick Access Toolbar so that you can run the macro with a single click.
Note: If you are creating an add-in that has a custom function, then you don’t need to go to step 3. By the end of step 2, you’ll have the function available in all the workbook. Step 3 is for such codes, where you want something to happen when you run the code (such as highlight cells with errors).
Save and Install the Add-in
To do this:
Now to run this code in any workbook, select the dataset and click on the macro icon in the QAT.
This will highlight all the cells with errors in red color. You can also use this macro in any workbook since you have enabled the add-in.
Caution: The changes done by the macro can’t be undone using Control + Z.
You can also create custom functions and then save it as an Excel add-in. Now, when you enable the add-in, the custom functions would be available in all your Excel workbooks.
You May Also Like the Following Excel Tutorials:
- Working with Cells and Ranges in Excel VBA.
- Working with Worksheets in VBA.
- Working with Workbooks in VBA.
- Using Loops in Excel VBA.
- Using IF Then Else Statement in Excel VBA.
- How to Create and Use Personal Macro Workbook in Excel.
- Useful Excel Macro Code Examples.
- Using For Next Loop in Excel VBA.
- Excel VBA Events – An Easy (and Complete) Guide.
- Excel VBA Error Handling
Table of Contents
- INTRODUCTION
- WHAT IS AN ADDIN IN EXCEL?
- HOW TO CREATE AN EXCEL ADDIN ?
- FOLLOW THE STEPS TO CREATE AN ADDIN
- HOW TO INSTALL ADDIN IN EXCEL ?
- HOW TO USE ADDIN IN EXCEL?
- FOLLOW THE STEPS TO USE THE CUSTOM FUNCTION INSTALLED THROUGH ADDIN.
INTRODUCTION
In this article, we’ll learn the way to install addin in Excel.
Excel is a great tool and almost a ESSENTIAL TO KNOW kind of application these days.
Excel has completed over 25 years and every time they come up with the new and innovative utilities for the easy working. But even after that, there are so many more requirements which can be SPECIFIC and not addressed to by the Excel.
In such cases, Excel has given a complete option for the user to create his own functionality which will work for him.
This utility is known as an ADDIN.
AN ADDIN IS A SMALL FILE WHICH CAN BE CREATED FOR A CUSTOM FUNCTIONALITY AND CAN BE EASILY INSTALLED IN OUR COPY OF EXCEL.
The ADDIN will behave just like the integrated Excel Functionalities.
In this article we’ll try find out
- What is ADDIN in Excel ?
- How to Create an ADDIN?
- How to Install ADDIN in Excel ?
- How to use an ADDIN Functionality in Excel?
and a few more questions.
WHAT IS AN ADDIN IN EXCEL?
We can define the ADDIN as following.
An ADDIN is an additional utility which is installed in our copy of EXCEL and help us to extend the usability and ability of the EXCEL
For the example,
a function DEC2BIN converts the decimal numbers to binary numbers.
but there is a limitation.
DEC2BIN will convert the numbers up to 511 [ Decimal number ] only an after that it’ll create an error and won’t let us use the function further.
So, does it mean that we would never create binary numbers for the decimal numbers greater than 511?
The answer is , NO!!!
So, in this case , we have the option to program the function in VBA , create an ADDIN , install it and simply use it.
HOW TO CREATE AN EXCEL ADDIN ?
An EXCEL ADDIN is a simple file.
Most of the time it contains the CUSTOM FUNCTIONS and SUB PROCEDURES which are written in VBA and saved with an extension .XLAM
Let us take an example and we’ll go through the example as we learn the new steps with the complete installation.
Let us create a custom function to return the parameter of a rectangle.
FOLLOW THE STEPS TO CREATE AN ADDIN
- ENTER THE VBA CODE
- Open the EXCEL.
- Go to DEVELOPER TAB.
- Click VISUAL BASIC.
- The visual basic environment will open.
A COMPLETE PICTORIAL REPRESENTATION ABOUT OPENING THE VBA AND DIFFERENT AREAS IS GIVEN HERE.
- ENTER THE CODE
- In the project, right click and choose ADD MODULE. [ CLICK HERE TO LEARN THE DESCRIPTIVE PROCESS OF CREATING A CUSTOM FUNCTION ]
- Double click the module to open the workspace.
- Enter the following code in the workspace.
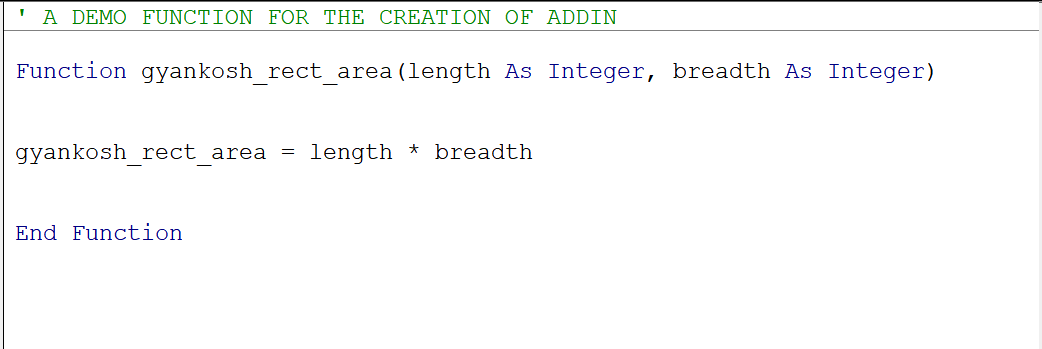
CODE:
' A DEMO FUNCTION FOR THE CREATION OF ADDIN

Function gyankosh_rect_area(length As Integer, breadth As Integer)
         gyankosh_rect_area = length * breadth
End Function
The code will look like the one shown in the picture below.
- SAVE THE FILE AS AN ADDIN [ WITH .XLAM EXTENSION]
- After the coding has been done, go to FILE > SAVE , either in the VBA WINDOW or the main EXCEL WINDOW.
- Choose the location, Enter the name of your choice, but choose the extension as .xlam.
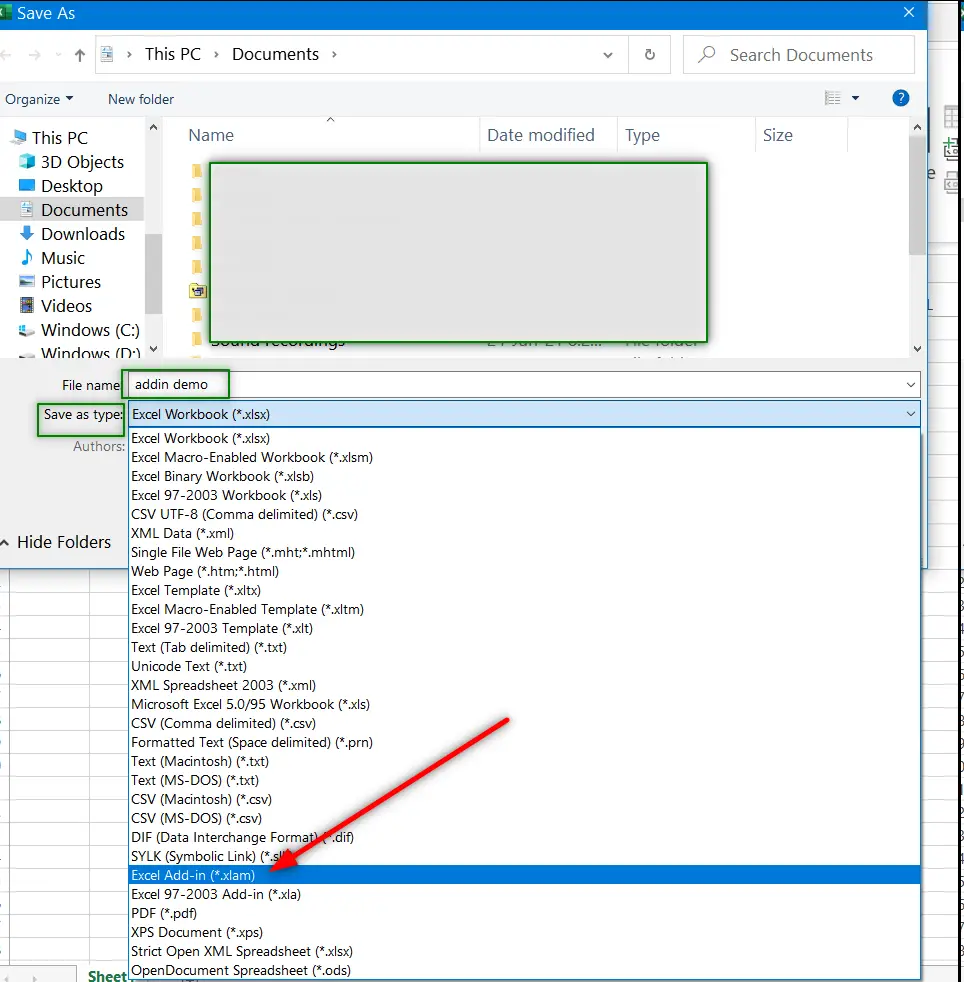
The file is saved as EXCEL ADDIN.
After the addin has been created ,let us learn to install this to our EXCEL.
FOLLOW THE STEPS TO INSTALL THE EXCEL ADDIN IN EXCEL
- Open the excel.
- Go to FILE OPTION.
.
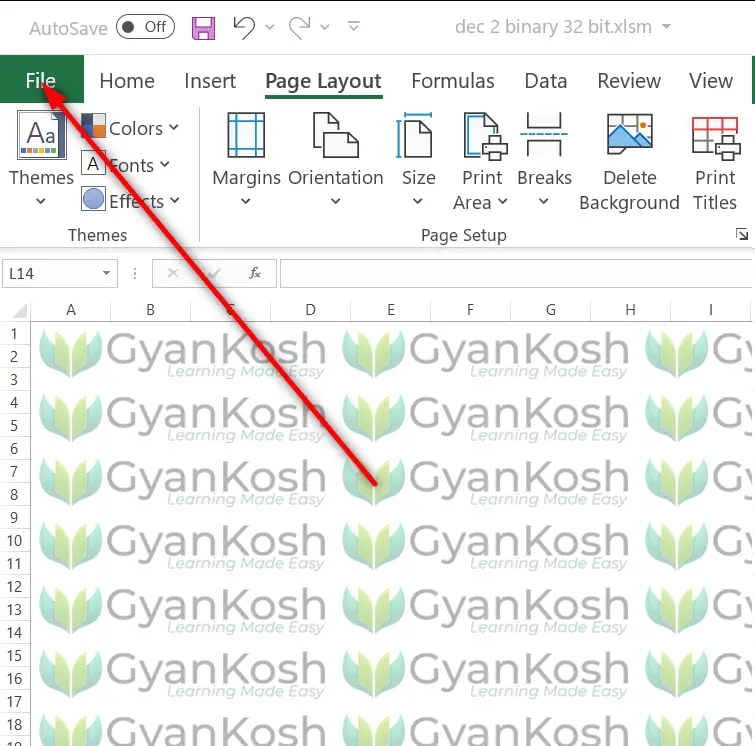
- After going to FILE MENU choose OPTIONS.

- An options windows will open.
- Go to ADDINS option from the left hand side pane.
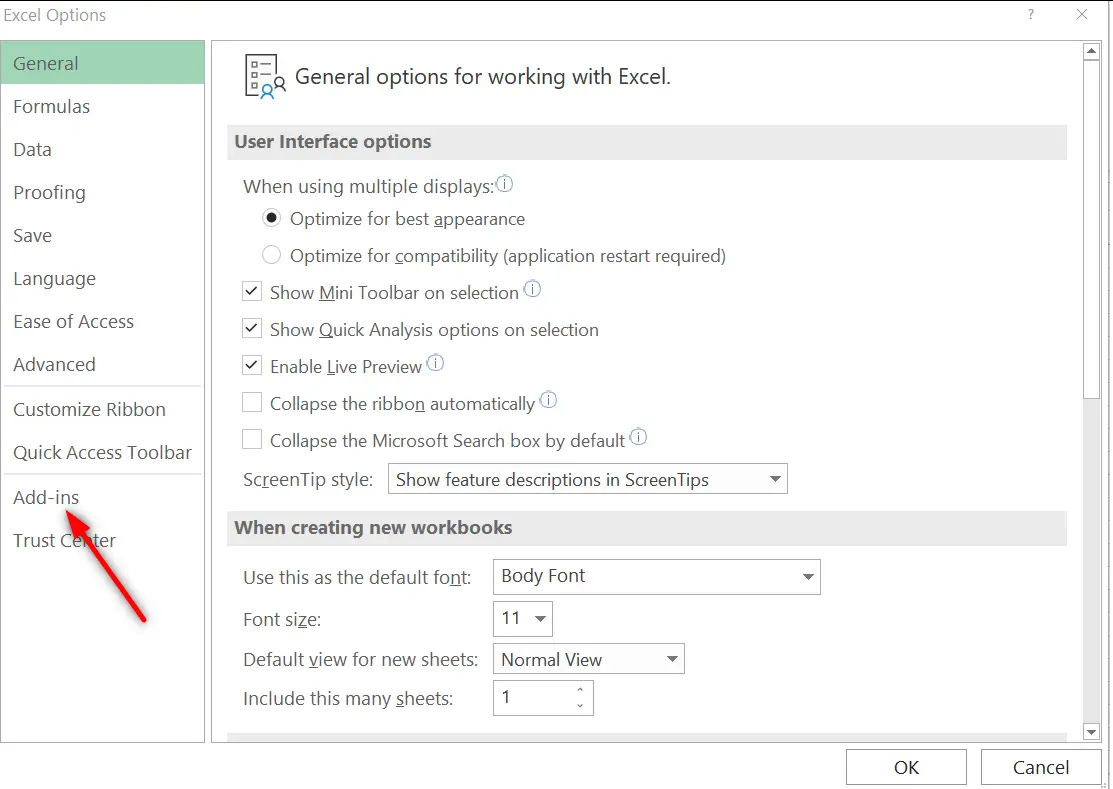
- Choose ADDINS from the left hand side options.
- Click on EXCEL ADD INS FROM THE MANAGE DROPDOWN in the lower portion of the window.
- Click GO.
- A small ADD-INS windows will open.
- Click BROWSE.
- As we click on the browse button , it will open the file browser.
- Locate your previously created ADD IN file and select it.
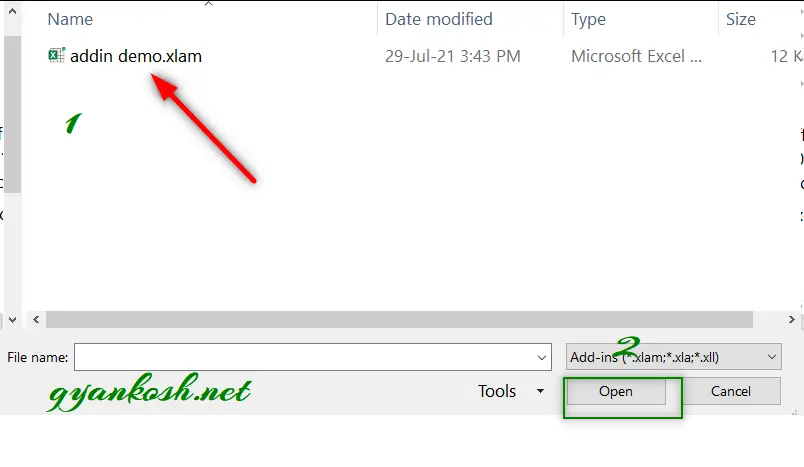
- After selecting the Addin File, click OPEN.
- The addin will be shown in the ADD INS window as shown in the picture below.
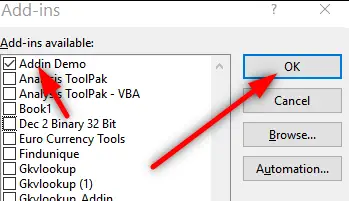
- CONGRATULATIONS!!!
The ADD-IN has been installed.
HOW TO USE ADDIN IN EXCEL?
After we have created and installed the Addin, let us try to use this.
An Addin has been installed and it’ll behave like the part of the EXCEL only.
THE SUB PROCEDURES CAN BE USED WITH THE HELP OF BUTTONS AND ASSIGNING THEM THE MACROS FROM THE ADDIN.
THE FUNCTIONS WILL BE AVAILABLE TO USE JUST LIKE THE STANDARD FUNCTIONS.
We have created an Addin which contains a function. We’ll try to use that function in Excel.
ALWAYS REMEMBER!
IF YOU RELY ON THE FUNCTIONS GIVEN IN ANY ADDIN , YOU SHOULD BE HAVING THE ADDIN INSTALLED IN THAT PARTICULAR COPY OF EXCEL, WHERE YOU WANT TO USE THOSE FUNCTION.
FOLLOW THE STEPS TO USE THE CUSTOM FUNCTION INSTALLED THROUGH ADDIN.
- Simply use the function as =GYANKOSH_RECT_AREA( LENGTH, BREADTH).
- Let us take the LENGTH AS 40 AND BREADTH AS 20 which can be put directly in the function or the cell address containing the values can also be used.
- So, the function becomes =GYANKOSH_RECT_AREA(40,20)
- The result comes out to be 800, which is correct.
You can see that we simply used the function, the same way we use the integrated functions.
IF WE HAVE MACROS OR SUB PROCEDURES IN THE ADDIN, WE CAN ADD THEM AND USE THEM BY ASSIGNING THE MACROS TO THE BUTTONS,
OR
MAUALLY USING THE MACROS OR
BY PUTTING THEM IN THE CUSTOM TABS.
So, in this article we learnt about the Excel Addins, How to create an addin, how to install an addin and how to use the addin in the Excel.