
Summary
Microsoft Office Excel support Automation Add-ins in addition to Component Object Model (COM) Add-ins. This article explains the differences between these two types of Add-ins.
More Information
COM Add-ins
COM Add-ins present the developer with a way to extend the functionality of Office applications for custom tasks. COM Add-ins are typically used to automate Excel in response to a click of a CommandBar button, a form or dialog box, or some other event specific to Excel such as opening or closing workbooks or entering data on worksheets. COM Add-in functions cannot be directly called from cell formulas in worksheets.
A COM Add-in is an in-process COM server (an ActiveX DLL) that must implement the IDTExensibility2 interface. All COM Add-ins must implement each of the five methods of this interface: OnConnection, OnStartupComplete, OnAddinsUpdate, OnBeginShutDown, and OnDisconnection.
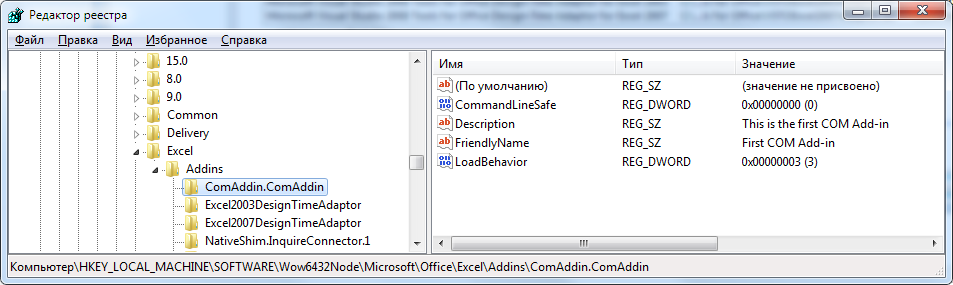
When a COM Add-in is installed on a user’s system, registry entries are created for the Add-in. In addition to normal COM registration, a COM Add-in is registered for each Office application in which it runs. COM Add-ins used by Excel are registered in the following registry key:
HKEY_CURRENT_USERSoftwareMicrosoftOfficeExcelAddins
This key contains a subkey for each installed COM Add-in. The name of the subkey is the ProgID for the COM Add-in. The subkey for a COM Add-in also contains values that describe the COM Add-in’s friendly name, description, and load behavior. The load behavior describes how the Add-in is loaded in Excel: loaded at startup, loaded at next startup only, loaded on demand, or not loaded.
COM Add-ins can also be loaded and unloaded through the Excel user interface. To do this, follow these steps:
-
On the View menu, point to Toolbars and then click Customize.
-
In the Toolbars dialog box, click the Advanced tab. In the list of categories, select Tools. Locate COM Add-ins in the list of commands and drag the command to a menu or CommandBar of your choice. Close the Toolbars dialog box.
-
Click the COM Add-ins command that you added to display the COM Add-ins dialog box. The dialog box lists all COM Add-ins that are installed on your system, and the COM Add-ins that are currently loaded are selected.
COM Add-ins can also be loaded and unloaded through the Excel user interface. To do this, follow these steps:
-
Click the Microsoft Office Button, and then click Excel Options.
-
Click Add-Ins.
-
Under Manage, click COM Add ins, and then click Go .
The COM Add-ins dialog box lists all COM add-ins that are installed on the computer. The COM add-ins that are currently loaded are selected.
For additional information about COM Add-ins, click the following article numbers to view the articles in the Microsoft Knowledge Base:
238228 HOWTO: Build an Office 2000 COM Add-In in Visual Basic
230689 SAMPLE: Comaddin.exe Office 2000 COM Add-In Written in Visual C++
For more information, see the following Microsoft Web site:
Office Add-ins
http://support.microsoft.com/ofd
Automation Add-ins
In addition to COM Add-ins, Excel supports Automation Add-ins. Automation Add-ins build on COM Add-ins in that functions in Automation Add-ins can be called from formulas in Excel worksheets. COM Add-ins must be in-process COM servers that support the IDTExtensibility2 interface; however, Automation Add-ins can be in-process or out-of-process COM servers and implementation of IDTExtensibility2 is optional.
To use functions from an Automation Add-in in Excel, follow these steps:
-
On the Tools menu, click Add-Ins.
-
In the Add-Ins dialog box, click Automation. From the list of registered COM servers, select your Automation Add-in and click OK.
-
The Automation Add-in appears in the Add-ins dialog box. Click OK to close the Add-Ins dialog box.
To use functions from an Automation Add-in in Excel 2007 and newer, follow these steps:
-
Click the Microsoft Office Button, and then click Excel Options.
-
Click Add-Ins.
-
Under Manage, click Excel Add ins, and then click Go.
-
In the Add-Ins dialog box, click Automation. In the list of registered COM servers, click your Automation Add-in, and then click OK.
The Automation Add-in appears in the Add-ins dialog box. Click OK to close the Add-Ins dialog box.
When you make additions to the list in the Add-Ins dialog box or when you select and clear Add-ins in the list, Excel stores your changes in the registry. First, Excel uses the following registry setting to determine whether or not an Automation Add-in in the Add-in list is loaded:
Excel 2002
Key: HKEY_CURRENT_USERSoftwareMicrosoftOffice10.0ExcelOptions
String: OPENx
Sample Value: /A "ServerName.ClassName"Excel 2003
Key: HKEY_CURRENT_USERSoftwareMicrosoftOffice11.0ExcelOptions
String: OPENx
Sample Value: /A "ServerName.ClassName"
Excel 2007
Key: HKEY_CURRENT_USERSoftwareMicrosoftOffice12.0ExcelOptions
String: OPENx
Sample Value: /A "ServerName.ClassName"
Note: Change the Office version number based upon the version you are using.
The /A switch that is used in the string value is new to Excel and older and is used specifically to load Automation Add-ins. All Automation Add-ins are loaded on demand; there is no setting that can change the load behavior for an Automation Add-in.
When an Automation Add-in that is listed in the Add-Ins dialog box is cleared, a subkey with a name equal to the Add-in’s ProgID is created in the following registry key:
HKEY_CURRENT_USERSoftwareMicrosoftOffice10.0ExcelAdd-in Manager
Excel 2003:
HKEY_CURRENT_USERSoftwareMicrosoftOffice11.0ExcelAdd-in Manager
HKEY_CURRENT_USERSoftwareMicrosoftOffice11.0ExcelAdd-in Manager
This registry setting ensures that Automation Add-ins that you have added to the Add-ins list are retained in the list even when you have chosen not to load them.
For more information about Automation Add-Ins, see the following articles in the Microsoft Knowledge Base:
285337 HOWTO: Create a Visual Basic Automation Add-in for Excel Worksheet Functions
For more information, see the following Microsoft Web site:
Office Add-ins
http://support.microsoft.com/ofd
Automation Add-ins That Implement IDTExtensibility2
As previously mentioned, an Automation Add-in may implement IDTExtensibility2, but it is not required in order for Excel to call the functions in the Add-in from a worksheet. If you require that your Automation Add-in obtains a reference to the Excel instance, you can implement IDTExtensibility2 and use the Application parameter of OnConnection to automate Excel.
An Automation Add-in that implements
IDTExtensibility2 can be loaded in the Excel user interface through both the COM Add-Ins dialog box and the Add-Ins dialog box. The following describes the behavior of an Automation Add-in based on whether it is loaded in one or both of these dialog boxes:
-
Loaded only in the Add-ins dialog box.
The Add-in is loaded on demand. Functions in the Add-in may be called from formulas in a worksheet.
-
Loaded only in the COM Add-ins dialog box.
The Add-in is loaded as a COM Add-in and its load behavior is determined from settings in the registry. Functions in the Add-in cannot be called from formulas in a worksheet.
-
Loaded in both the COM Add-ins dialog box and the Add-ins dialog box.
Two separate instances of the Add-in are loaded. One instance is loaded as a COM Add-in and the other instance is loaded as an Automation Add-in. The COM Add-in instance uses the load behavior indicated in the registry; the Automation Add-in instance loads on demand. The two instances work independently of one another and do not share global variables.
Because Automation Add-ins are loaded on demand, Excel may attempt to load the Add-in while it is in cell edit mode. Therefore, when you develop an Automation Add-in that supports IDTExtensibility2, you should be careful not to do anything that attempts to change Excel’s state while the Add-in loads. For more information, see the following article in the Microsoft Knowledge Base:
284876 BUG: Excel Fails When Automation Add-In Loads
(c) Microsoft Corporation 2001, All Rights Reserved. Contributions by Lori B. Turner, Microsoft Corporation.
Need more help?
Обзор
Microsoft Office Excel поддерживает надстройки автоматизации Кроме надстройки для модели компонентных объектов (COM). В этой статье описаны различия между этих двух типов надстройки.
Дополнительные сведения
Надстройки COM
COM-надстройки предоставить разработчику способ расширить функциональные возможности приложений Office для пользовательских задач. Надстройки COM обычно используются для автоматизации работы в ответ на щелчок кнопки панели команд, формы или диалогового окна или некоторые другие события, относящиеся к Excel, таких как открытие или закрытие книги или ввод данных на листах Excel. Функции надстройки COM не может вызываться непосредственно из формул в ячейках в листах.
COM-надстройка представляет собой сервер COM в процессе (ActiveX DLL), который должен реализовывать интерфейс IDTExensibility2 . Все COM-надстройки должен реализовывать каждый из пяти методов этого интерфейса: OnConnection, OnStartupComplete, OnAddinsUpdate, OnBeginShutDownи OnDisconnection.
Когда COM-надстройка установлена на компьютере пользователя, записи реестра создаются для надстройки. Помимо обычной регистрации COM надстройка COM регистрируется для каждого приложения Office, в котором он работает. Надстройки COM используется Excel зарегистрированы в следующем разделе реестра:
HKEY_CURRENT_USERSoftwareMicrosoftOfficeExcelAddins
Этот раздел содержит подраздел для каждого установленного COM-надстройку. Имя подраздела — идентификатор ProgID для надстройки COM. Подраздел для надстройки COM также содержит значения, описывающие COM-надстройки понятное имя и описание и загрузки. Описывает поведение загрузки как надстройка загружается в Excel: загружать при запуске, загружены только, при следующем запуске загружается по требованию или не загружен.
COM-надстройки можно загружать и выгружается посредством пользовательского интерфейса Excel. Чтобы сделать это, выполните следующие действия.
-
В меню Вид выберите команду панели инструментов и выберите команду Настройка.
-
В диалоговом окне панели инструментов перейдите на вкладку Дополнительно . В списке категории выберите Сервис. В списке команды найдите COM-надстройки и перетащите нужную команду в меню или панели команд по вашему выбору. Закройте окно инструментов .
-
Выберите команду надстройки COM , добавленный для отображения в диалоговом окне « надстройки COM ». Диалоговое окно содержит список всех COM-надстройки, которые установлены на вашей системе и надстройки COM, загруженных в настоящий момент выбраны.
COM-надстройки можно загружать и выгружается посредством пользовательского интерфейса Excel. Чтобы сделать это, выполните следующие действия.
-
Нажмите Кнопку Microsoft Office, а затем нажмите кнопку Параметры Excel.
-
Нажмите кнопку Надстройки.
-
В разделе Управлениевыберите команду надстройки COMи нажмите кнопку Перейти .
В диалоговом окне « надстройки COM » перечислены все COM-надстройки, установленные на компьютере. Надстройки COM, загруженных в настоящий момент выбраны.
Дополнительные сведения о COM-надстройки щелкните следующий номер статьи базы знаний Майкрософт:
Методические УКАЗАНИЯ 238228 : построение Office 2000 надстройки COM в Visual Basic
Образец 230689 : Comaddin.exe Office 2000 надстройки COM в Visual C++
Дополнительные сведения см. ниже на веб-сайте корпорации Майкрософт:
Надстройки Office
http://support.microsoft.com/ofd
Автоматизированные надстройки
В дополнение к COM-надстройки Excel поддерживает сборки надстройки в автоматизации автоматизации которые запускаются добавить на COM-надстройки в том, что функции в автоматизации надстройки могут быть вызваны из формул на листах Microsoft Excel. COM-надстройки должны быть в процесс COM-серверов, которые поддерживают интерфейс IDTExtensibility2 ; Однако надстройки автоматизации может быть в процессе или out-of-process COM-серверов и реализации IDTExtensibility2 является необязательным.
Чтобы использовать функции из надстройки автоматизации Excel, выполните следующие действия:
-
В меню Сервис выберите команду Надстройки.
-
Нажмите Автоматизацияв диалоговом окне Надстройки . В списке зарегистрированных серверов COM выберите надстройки автоматизации и нажмите кнопку ОК.
-
Надстройки автоматизации отображается в диалоговом окне « надстройки ». Нажмите кнопку ОК , чтобы закрыть диалоговое окно Add-Ins .
Чтобы использовать функции из автоматизированных надстроек в Excel 2007 и более поздних версиях, выполните следующие действия.
-
Нажмите Кнопку Microsoft Office, а затем нажмите кнопку Параметры Excel.
-
Нажмите кнопку Надстройки.
-
В разделе Управлениевыберите пункт надстройки Excelи нажмите кнопку Перейти.
-
Нажмите Автоматизацияв диалоговом окне Надстройки . В списке зарегистрированных серверов COM выберите команду надстройки автоматизации и нажмите кнопку ОК.
Надстройки автоматизации отображается в диалоговом окне « надстройки ». Нажмите кнопку ОК , чтобы закрыть диалоговое окно Add-Ins .
При внесении дополнения в список в диалоговом окне Надстройки или при выборе и снятии надстройки в списке, Excel сохраняет изменения в реестре. Во-первых Microsoft Excel использует следующий параметр реестра, чтобы определить ли автоматизации надстройки в списке надстройки загружается:
Excel 2002
Key: HKEY_CURRENT_USERSoftwareMicrosoftOffice10.0ExcelOptions
String: OPENx
Sample Value: /A "ServerName.ClassName"Excel 2003
Key: HKEY_CURRENT_USERSoftwareMicrosoftOffice11.0ExcelOptions
String: OPENx
Sample Value: /A "ServerName.ClassName"
Excel 2007
Key: HKEY_CURRENT_USERSoftwareMicrosoftOffice12.0ExcelOptions
String: OPENx
Sample Value: /A "ServerName.ClassName"
Примечание: Изменение номера версии Microsoft Office на основе версии, которую вы используете.
Параметр /a, используемый в строковое значение старого и нового в Excel и используется специально для загрузки надстройки автоматизации. Все модели автоматизации надстройки загружаются по требованию; Нет нет параметра, можно изменить поведение загрузки надстройки автоматизации.
При снятии надстройки автоматизации, перечисленных в диалоговом окне « Надстройки » подраздел с именем, равным ProgID надстройки создается в следующем разделе реестра:
HKEY_CURRENT_USERSoftwareMicrosoftOffice10.0ExcelAdd-in Manager
Excel 2003:
HKEY_CURRENT_USERSoftwareMicrosoftOffice11.0ExcelAdd-in Manager
HKEY_CURRENT_USERSoftwareMicrosoftOffice11.0ExcelAdd-in Manager
Этот параметр реестра гарантирует, что даже в том случае, если вы решили не загружать надстройки автоматизации, которые были добавлены в список надстроек, сохраняются в списке.
Дополнительные сведения об автоматизации надстройки см. ниже статьях базы знаний Майкрософт:
285337 Практическое руководство: создание надстройки автоматизации Visual Basic для функции листа Excel
Дополнительные сведения см. ниже на веб-сайте корпорации Майкрософт:
Надстройки Office
http://support.microsoft.com/ofd
Автоматизированные надстройки, реализующие интерфейс IDTExtensibility2
Как упоминалось ранее надстройки автоматизации может реализовать интерфейс IDTExtensibility2, но это не требуется в порядке для вызова функций в надстройку из рабочего листа Excel. Если требуется надстройки автоматизации получает ссылку на экземпляр Excel, можно реализовать интерфейс IDTExtensibility2 и использовать параметр приложения OnConnection для автоматизации Excel.
Надстройки автоматизации, реализующий
IDTExtensibility2 могут быть загружены в интерфейсе пользователя Excel в диалоговом окне « Надстройки COM » и диалоговом окне « Надстройки ». Ниже описаны поведения автоматизации надстройки на основании она загружается в одном или обоих этих диалоговых окон.
-
Загрузить только в диалоговом окне « надстройки ».
Надстройка загружается по требованию. Функции надстройки может вызываться из формул на листе.
-
Загрузить только в диалоговом окне « надстройки COM ».
Надстройка загружается как надстройки COM и его поведение при загрузке определяется на основе параметров в реестре. Функции в окне не может вызываться из формул на листе.
-
Загружен в диалоговом окне « надстройки COM » и диалоговом окне « надстройки ».
Два отдельных экземпляра надстройки загружаются. Один экземпляр загружается как надстройки COM и другого экземпляра будет загружен в виде надстройки автоматизации. Экземпляр надстройки COM использует режим загрузки указано в реестре; Загружает экземпляр надстройки автоматизации по требованию. Два экземпляра работают независимо друг от друга и не имеют глобальные переменные.
Поскольку надстройки автоматизации загружаются по требованию, Excel может попытаться загрузить надстройку, находящегося в режиме редактирования ячейки. Таким образом при разработке надстройки автоматизации, поддерживающий интерфейс IDTExtensibility2, должен быть осторожны, чтобы не предпринимать попытки изменить состояние программы Excel при загрузке надстройки. Дополнительные сведения см. ниже статьи базы знаний Майкрософт:
Ошибка 284876 : Excel происходит сбой надстройки автоматизации загрузки
(c) Корпорация Майкрософт, 2001, все права защищены. Взносы в Лори б. Тернер, корпорация Майкрософт.
Нужна дополнительная помощь?
В статье описывается процесс создания COM надстройки для Microsoft Excel средствами .NET Framework. Описаны этапы создания настройки, регистрации в системе и управления объектной моделью Excel.

Первым делом добавим к проекту две ссылки:
- Microsoft.Office.Interop.Excel
- Extensibility


Заметим, что Microsoft.Office.Interop.Excel имеет несколько версий, при этом главный номер соответствует версии Excel. Например, 11 – это Excel 2003, 12 – Excel 2007 и т.д.. С высокой долей вероятности, сборки взаимодействия для Excel 2007 будут работать и в других версиях, однако не стоит забывать, что различия в функциональности этих сборок все же существуют.
Для создания надстройки необходимо создать класс и реализовать интерфейс ITDExtensibility2. Для последующей регистрации надстройки необходимо пометить класс атрибутом ComVisible(true).
[ComVisible(true)]
public class ComAddin : IDTExtensibility2
{
private _Application _xlApp;
public void OnConnection(object application, ext_ConnectMode connectMode, object addInInst, ref Array custom)
{
_xlApp = (_Application) application;
_xlApp.StatusBar = «Hello,
world»;
Debug.WriteLine(«OnConnection»);
}
public void OnDisconnection(ext_DisconnectMode removeMode, ref Array custom)
{
Debug.WriteLine(«OnDisconnection»);
}
public void OnAddInsUpdate(ref Array custom)
{
Debug.WriteLine(«OnAddInsUpdate»);
}
public void OnStartupComplete(ref Array custom)
{
Debug.WriteLine(«OnStartupComplete»);
}
public void OnBeginShutdown(ref Array custom)
{
Debug.WriteLine(«OnBeginShutdown»);
}
}
Интерфейс предоставляет 5 методов. OnConnection вызывается
при загрузки надстройки в Excel.
При этом параметр connectMode указывает каким именно образом надстройка была загружена,
при запуске Excel автоматически или
же вручную, путем активации соответствующего флажка в окне надстроек. Интересным
параметром здесь также является application типа object,
который содержит ссылку на объектную модель Excel. Приведение этой переменной к типу _Application позволяет
управлять объектной моделью. В нашем случае, мы изменяем строку состояния и
устанавливаем в нее текст Hello,
world.
_xlApp = (_Application) application;
//Получаем ссылку на объектную модель Excel,
_xlApp.StatusBar = «Hello, world«; //изменяем строку состояния.
Метод OnDisconnection вызывается при выгрузки надстройки, т.е. когда
соответствующий флажок снимается в окне надстроек или при закрытии Excel.
Метод OnStartupComplete срабатывает только в том случае, если надстройка настроена
на загрузку при запуске Excel,
и происходит это после того как Excel загружен. В противном, случае метод не вызывается.
Метод OnBeginShutdown вызывается при закрытии Excel. Метод OnAddinsUpdate срабатывает при загрузке или выгрузке надстройки в Excel.
Регистрация надстройки
Надстройка готова, теперь необходимо зарегистрировать ее
соответствующим образом. Для этого необходимо выполнить следующие шаги:
- Зарегистрировать полученную DLL с помощью
утилиты regasm.exe; - Добавить несколько записей в реестр.
Regasm.exe позволяет
зарегистрировать .NET сборку в качестве COM компонента. В нашем случае будет
зарегистрирован класс ComAddin,
отмеченный атрибутом ComVisible(true).
Необходимо помнить, что Excel бывает как 32-, так и 64-битный.
Таким образом .NET сборку необходимо регистрировать дважды, используя как 32-,
так и 64-битную версию утилиты regasm.exe.
Прежде чем зарегистрировать сборку с помощью этой утилиты, посмотрим
второй пункт. Для того, чтобы Excel понял, что COM компонент представляет собой именно надстройку для Excel, необходимо добавить
новую запись в раздел реестра HKLMSoftwareMicrosoftOfficeExcelAddIns. При этом имя нового раздела совпадает с именем класса,
реализующего надстройку, включая namespace. Автоматизируем этот процесс. Для этого, добавим к
нашему классу два новых статических метода.
[ComRegisterFunction]
private static void Register(Type type)
{
var path = Registry.LocalMachine.Name + @»SoftwareMicrosoftOfficeExcelAddIns» + type.FullName;
Registry.SetValue(path, «CommandLineSafe», 0, RegistryValueKind.DWord);
Registry.SetValue(path, «Description», «This is the
first COM Add-in», RegistryValueKind.String);
Registry.SetValue(path, «FriendlyName», «First COM
Add-in», RegistryValueKind.String);
Registry.SetValue(path, «LoadBehavior», 3, RegistryValueKind.DWord);
}
[ComUnregisterFunction]
private static void Unregister(Type type)
{
var comAddinsKey = Registry.LocalMachine.OpenSubKey(@»SoftwareMicrosoftOfficeExcelAddIns», true);
if (comAddinsKey == null)
{
return;
}
comAddinsKey.DeleteSubKeyTree(type.FullName);
comAddinsKey.Close();
}
Обратим внимание, что методы отмечены аттрибутами ComRegisterFunction и ComUnregisterFunction. Согласно
документации, методы, отмеченные этими атрибутами будут вызваны при регистрации
сборки с помощью утилиты regasm.exe или
с помощью метода RegistrationServices.RegisterAssembly. При этом
методы должны быть статичными, возвращать тип void и принимать
объект типа Type в качестве единственного аргумента.
Таким образом, метод Register будет вызван при регистрации
сборки с помощью утилиты regasm.exe. Сам метод, в свою
очередь, добавляет новый подраздел в раздел реестра HKLMSoftwareMicrosoftOfficeExcelAddIns, который
содержит информацию о всех COM надстройках.
Registry.SetValue(path, «CommandLineSafe», 0, RegistryValueKind.DWord);
Registry.SetValue(path, «Description», «This is the first COM Add-in», RegistryValueKind.String);
Registry.SetValue(path, «FriendlyName», «First COM Add-in», RegistryValueKind.String);
Registry.SetValue(path, «LoadBehavior», 3, RegistryValueKind.DWord);
Ключ FriendlyName содержит имя надстройки, а ключ Description – его описание. Здесь можно
указать любой текст. Наиболее интересным является ключ LoadBehavior, который указывает способ
загрузки надстройки в Excel.
Этот ключ имеет несколько возможных значений, однако наиболее интересными
являются значения 2 и 3. В первом случает надстройка не будет загружена в Excel при запуске, во втором – будет.
Установим этот ключ в значение 3 для того чтобы загружать надстройку каждый раз
при запуске Excel
автоматически. Заметим, что LoadBehavior является единственным обязательным ключом. В случае его отсутствия, надстройка не будет загружена в Excel и также не будет доступна для загрузки в окне Add-ins.
Метод Unregister,
отмеченный атрибутом ComUnregisterFunction,
соответственно, удаляет информацию о надстройке из списка, таким образом в Excel она
доступна не будет. Метод будет вызван при вызове утилиты regasm.exe с ключом /unregister.
Соберем проект и пробуем зарегистрировать полученную сборку.
Для удобства, создадим в папке с надстройкой .bat файл со следующими командами
C:WindowsMicrosoft.NETFrameworkv4.0.30319regasm.exe «%~dp0ComAddin.dll» /codebase
C:WindowsMicrosoft.NETFramework64v4.0.30319regasm.exe «%~dp0ComAddin.dll» /codebase
pause
Ключ /codebase
указывает на то, что необходимо добавить полный путь к сборке в реестр. В
противном случае, если ключ не указан, сборка будет также успешно
зарегистрирована, однако при последующем запуске Excel он попытается найти сборку в GAC. В результате надстройка
не будет загружена, потому что ее просто нет в GAC.
Соответственно, если сборка предварительно добавлена в GAC, ключ /codebase необходимо
опустить.
Сразу заметим, что для регистрации сборки необходимы права администратора. Если вы работаете под обычным пользователем, необходимо запускать скрипт от имени администратора.
Для удаления надстройки, необходимо использовать ключ /unregister. При этом скрипт
принимает следующий вид.
C:WindowsMicrosoft.NETFrameworkv4.0.30319regasm.exe «%~dp0ComAddin.dll» /unregister
C:WindowsMicrosoft.NETFramework64v4.0.30319regasm.exe «%~dp0ComAddin.dll» /unregister
pause
После вызова скрипта имеем следующее

Сборка зарегистрирована успешно, однако regasm.exe указывает на отсутствие подписи у сборки. В данном случае проигнорируем это предупреждение.
После регистрации в реестре создан новый раздел.
Запускаем Excel. В строке состояния видим ‘Hello, world’, что свидетельствует о том, что надстройка была успешно загружена.

Откроем окно надстроек

При этом видим, что имя и описание надстройки имеют значения, добавленные ранее в реестр, а сама надстройка расположена в группе “Active Application Add-ins”, т.е. является активной.
Отладка
Отладка надстройки осуществляется достаточно просто. Для этого необходимо зарегистрировать надстройку, после чего в настройках проекта в разделе Debug указать Excel в качестве программы для запуска.

После чего запускаем отладчик. При этом в окне Output в Visual Studio видим последовательность вызова методов класса.

С исходниками и готовой сборкой можно ознакомиться тут.
I need to enable COM addins through VBA. The addins already exists under COM addins, but become unchecked when Excel crashes.
Sub hyp()
    Dim objAddIn As Object
    For i = 1 To Application.COMAddIns.Count

        Set objAddIn = Application.COMAddIns.Item(i)
        On Error Resume Next
        If Application.COMAddIns.Item(i).Description = "Oracle Smart View for Office" Then
            'MsgBox Application.COMAddIns.Item(i).Description
            'NEED TO ENABLE THE COM ADDIN

        Else
        End If
    Next i
End Sub
![]()
asked Feb 1, 2018 at 14:57
![]()
Public Sub Connect_COM_AddIn(Name As String)

    Dim ndx As Integer

    For ndx = 1 To Application.COMAddIns.Count
        If Application.COMAddIns(ndx).Description = Name Then
            Application.COMAddIns(ndx).Connect = True
            Exit For
        End If
    Next
End Sub
answered Feb 1, 2018 at 14:59
![]()
Excel DevelopersExcel Developers
2,7752 gold badges20 silver badges34 bronze badges
5
Note: Please see the comment of BigBen below — this approach may not always work as the indexer does not always coincide with the description. If you need to search by description, then the Excel Developers answer is probably applicable (though I haven’t personally tried it or needed it).
A simpler alternative to the answer of Excel Developers that worked for me is to index the com add in directly by its string name instead of looping through the com add ins using an integer index and comparing to the description. In particular, this code worked for me (I’ve included a connect and disconnect version):
Public Sub Connect_COM_AddIn(Name As String)
    Application.COMAddIns(Name).Connect = True
End Sub

Public Sub Disconnect_COM_AddIn(Name As String)
    Application.COMAddIns(Name).Connect = False
End Sub
answered Jun 20, 2019 at 8:34
![]()
Colm BhandalColm Bhandal
3,1532 gold badges17 silver badges27 bronze badges
2
I have the same system block mentioned earlier where system privileges won’t allow me to use Application.COMAddIns(Name).Connect = True. This is a bit of a workaround, but to get the COM add ins box to pop up you can use SendKeys to pull it up. Keep in mind that SendKeys only excutes at the end of a run on Excel 2010 onwards, so to get it working correctly you would need to check if the user is connected to the add-in first thing. If so, call another sub; if not use SendKeys to get the dialog open and end the sub. These are the keystrokes that worked for me, there may need to be some edits depending on how many options are in your menus.
Sub test()

'Checks if COM is installed and active
comFound = False
comRibbon = True
For i = 1 To Application.COMAddIns.Count
    If Application.COMAddIns(i).Description = "NAME" Then
        comFound = True
        If Application.COMAddIns(i).Connect = False Then
            comRibbon = False
        End If
        Exit For
    End If
Next i

'Exits sub if not installed
If comFound = False Then
    MsgBox ("You do not have NAME installed.")
    Exit Sub
End If

'Directs user to rest of code if active, otherwise opens dialog
If comRibbon = True Then
    Call test2
Else
    MsgBox ("Please select NAME in the following dialog before rerunning.")
End If

SendKeys "%FT{DOWN}{DOWN}{DOWN}{DOWN}{DOWN}{DOWN}{DOWN}{DOWN}{TAB}{TAB}{TAB}{DOWN}{DOWN}{TAB}~", True

End Sub

Sub test2()
    'Rest of code
End Sub
answered Jan 28, 2020 at 16:09
![]()

![]()
Your Google Ads Data, Your Way!
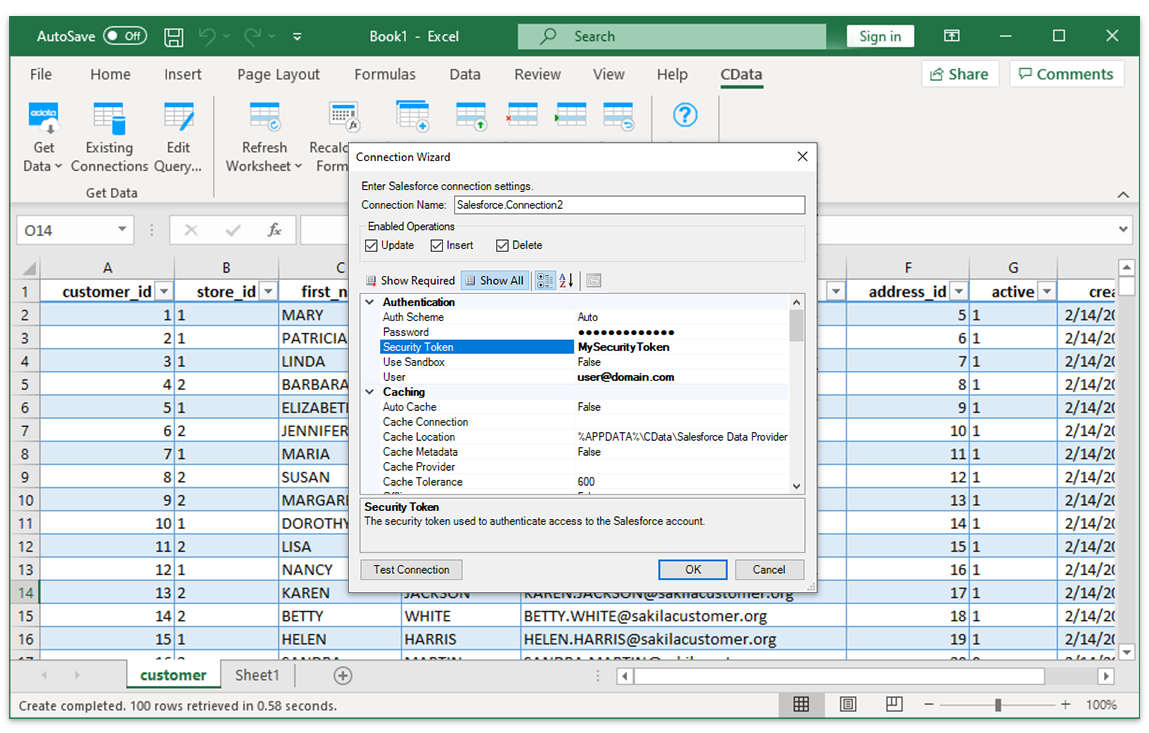
The Excel Add-In for Google AdWords provides the easiest way to connect with Google Ads data.
Users simply supply their credentials via the connection wizard to create a connection and can immediately begin
working with live Google Ads tables of data. The Excel Add-In is completely self-contained; no additional
software installation is required.
Direct Access To Live Google Ads Data From Excel
The Excel Add-In for Google AdWords is integrated with the Excel toolbar and ribbon, providing direct access to
live data with a single click.

Easy-To-Use, Straightforward Configuration:
- Install the Add-In
- Login with User & Password
- Select Tables
Installing any of the Excel Add-Ins creates a new CData data access toolbar in Excel that users can
access to connect to remote data. From the Excel toolbar, users can select any of the installed CData Add-Ins
to configure a connection.
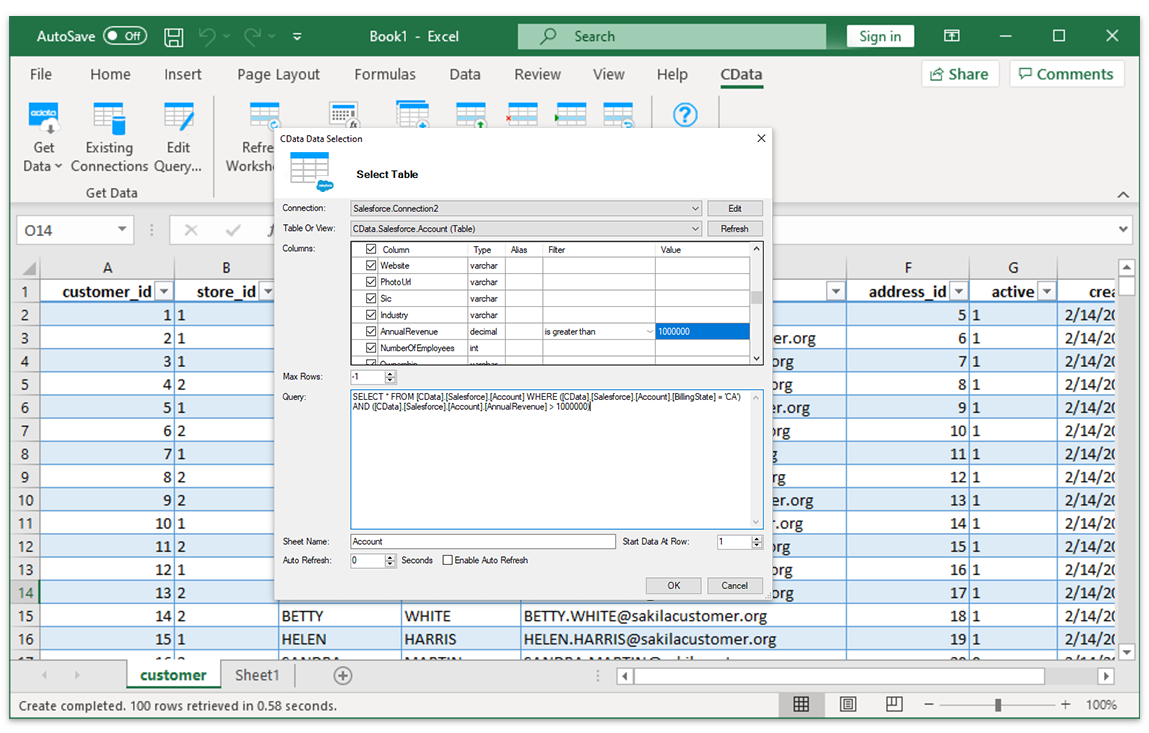
Select Tables and Columns
Once the data connection is configured, just specify the table and the Excel Add-In will populate a new Excel
sheet with live Google Ads Data.
Google Ads Data With The Full Power of Excel
Perfect for mass imports / exports / updates, data cleansing & de-duplication, Excel based data analysis, and more!
- Quickly export and backup data.
- Operate on data with Charts and Pivot Tables.
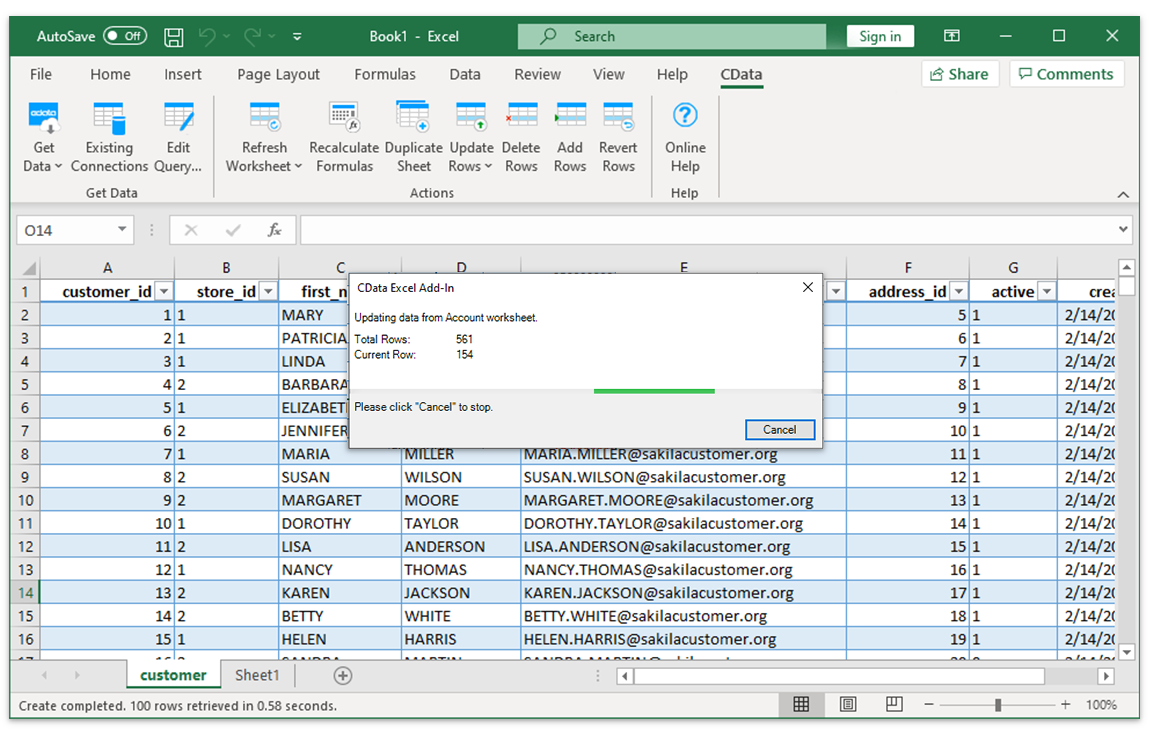
Building custom dashboards & reports that connect with live Google Ads data has never
been easier. Download the CData Excel Add-In for Google AdWords now, and get connected.
Download Now
Whereas Automation Add-Ins enable you to create your own worksheet functions, COM Add-Ins provide a way to extend the user interface of Excel and all the other Office applications. They have a number of advantages over normal xla or xlam Add-Ins, including:
□ They’re much faster to open.
□ They’re less obtrusive (not showing up in the VBE Project Explorer).
□ They’re more secure (being compiled DLLs).
□ They’re not specific to a single application — the same mechanism works with all the Office applications and the VBE itself (and any other application that uses VBA 6), allowing you to create a single Add-In that can extend all the Office applications.
The IDTExtensibility2 Interface (Continued)
The previous section introduced the IDTExtensibility2 interface, where you used the OnConnection and OnDisconnection methods to obtain a reference to the Excel Application. The remaining methods defined in the interface can be used by COM Add-Ins to respond to specific events in Excel’s lifetime. The methods are outlined in the following table.
|
Method |
Occurs |
Typical Usage |
|
OnConnection |
When the COM Add-In is loaded by Excel. |
Store a reference to the Excel application, add menu items to Excel’s CommandBars, and set up event hooks. |
|
OnStartupComplete |
After Excel has finished loading all Add-Ins and initial files. |
Show a startup dialog (such as those in Access and PowerPoint) or change behavior depending on whether other Add-Ins are loaded. |
|
OnAddInsUpdate |
Whenever any other COM Add-Ins are loaded or unloaded. |
If the COM Add-In depends on another Add-In being loaded, this Add-In can unload itself. |
|
OnBeginShutdown |
When Excel starts its shutdown process. |
Stop the shutdown in certain circumstances or perform any pre-shutdown tidy-up routines. |
|
OnDisconnection |
When the COM Add-In is unloaded, either by the user or by Excel shutting down. |
Save settings. If unloaded by the user, delete any CommandBar items that were created at connection. |
Most COM Add-Ins use only the OnConnection method (to add their menu items) and OnDisconnection method (to remove them), though code has to exist in the class module for all five methods to correctly implement the interface.
Registering a COM Add-In with Excel
For Automation Add-Ins, you told Excel that the Add-In exists by selecting it in the Automation Add-Ins dialog (resulting in some entries being written to the registry). You tell Excel that a COM Add-In exists by writing specific keys and values to specific places in the registry. When Excel starts, it looks in those keys to see which COM Add-Ins exist, then checks the values in those keys to see how to display them in the COM Add-Ins list, whether or not to load them, and so on. The keys for COM Add-Ins targeted to Excel are:
□ Registered for the current user: HKEY_CURRENT_USERSoftwareMicrosoftOfficeExcelAddinsAddInProgID
□ Registered for all users: HKEY_USERS.DEFAULTSoftwareMicrosoftOfficeExcelAddinsAddInProgID
□ Registered for the machine:
HKEY_LOCAL_MACHINESoftwareMicrosoftOfficeExcelAddinsAddInProgID
|
Name |
Type |
Use |
|
FriendlyName |
String |
The name shown in the COM Add-Ins list. |
|
Description |
String |
The description shown in the COM Add-Ins dialog. |
|
LoadBehavior |
Number |
Whether it is unloaded, loaded at startup, or demand-loaded. |
|
SatelliteDllName |
Number |
The name of a resource DLL that contains localized names and descriptions. If used, the name and description will be #Num, where Num is the numeric resource ID in the Satellite DLL. Most of the standard Office Add-Ins use this technique for their localization. |
|
CommandLineSafe |
String |
Whether the DLL could be called from the command line (not applicable to Office COM Add-Ins). |
Once registered correctly, the COM Add-In will show up in Excel’s COM Add-Ins dialog, where it can be loaded and unloaded like any other Add-In. You can find the COM Add-Ins dialog by clicking Office Menu O Excel Options O Add-Ins O Manage: COM Add-Ins O Go.
The COM Add-In Designer
Microsoft has provided a COM Add-In Designer class to assist in the creation and registration of COM Add-Ins. It provides the following benefits:
□ Implements the IDTExtensibility2 interface, exposing the methods as events that you can either hook or ignore. You don’t, therefore, have to include code for unused interface methods in your class module.
□ Provides a form to fill in to provide the values for the registry entries used to register the COM Add-In, and to select which application to target.
□ When compiled, it adds code to the standard DllRegisterServer entry point in the DLL that writes all the registry entries for you when the DLL is registered on the system (though only for the Current User key). This greatly simplifies installation, because you can install the Add-In by running the following command: RegSvr32°c:MyPathMyComAddIn.DLL.
By way of an example, you’ll create a COM Add-In that provides a Wizard for entering the RandUnique Automation Add-In function created in the previous section. You will continue to use Visual Basic, building on the Excel2 007ProgRef DLL from the previous section.
Open the Excel2007ProgRef project in Visual Basic. Add a new Add-In class to the project by clicking Project O Add Addin Class (if that menu item doesn’t exist, click Project O Components O Designers and check the Addin Class entry). This adds a new Designer class and gives it the name AddlnDesignerl. Using the Properties window, change the name to COMAddln and set the Public property to True (ignoring any warnings). Fill in the Designer form as follows:
|
Add-In Display Name |
Excel 2007 Prog Ref Wizards |
|
Addin Description |
Displays a Wizard dialog for entering the Sequence and RandUnique Automation Addin functions, documented in the Excel 2007 VBA Programmers Reference |
|
Application |
Microsoft Excel |
|
Application Version |
Microsoft Excel 12.0 |
|
Initial Load Behavior |
Startup |
The Designer only creates registry entries for the current user. If you wish to install the Add-In for all users on the machine, you will need to add your own registry entries in the Advanced tab of the Designer form, as documented in Microsoft KnowledgeBase article Q290868 at http://support.microsoft.com/kb/q2 90868/.
Linking to Excel
Click View O Code to get to the Designer’s code module, and copy in the following code to hook into the lDTExtensibility2 interface and link the COM Add-In to Excel by storing a reference to the Excel Application object, passed to the Add-In in the OnConnection method:
Dim WithEvents moXL As Excel.Application
‘ The IDTExtensibility2_OnConnection method is handled by the Designer, ‘ and exposed to us through the AddInInstance_OnConnection method Private Sub AddInInstance_OnConnection( _
ByVal Application As Object, _
ByVal ConnectMode As AddInDesignerObjects.ext_ConnectMode, _ ByVal AddInInst As Object, custom() As Variant)
Set moXL = Application MsgBox «Connected»
End Sub
‘ The IDTExtensibility2_OnDisconnection method is handled by the Designer, ‘ and exposed to us through the AddInInstance_OnDisconnection method Private Sub AddInInstance_OnDisconnection( _
ByVal RemoveMode As AddInDesignerObjects.ext_DisconnectMode, _ custom() As Variant)
Set moXL = Nothing MsgBox «Disconnected»
End Sub
Save the project and make the Add-In DLL by clicking File O Make Excel2007ProgRef.dll, and then open Excel 2007 (note that you will not be able to subsequently rebuild the DLL if it is being accessed by Excel at the time). As Excel opens, you’ll see a Connected message pop up as the Add-In is connected, and a Disconnected message when Excel is closed. You will also get these messages if you load or unload the Add-In using the COM Add-Ins dialog.
Responding to Excel’s Events
The Designer code module is a type of class module that allows you to declare a variable WithEvents, to hook into their events. In the previous code, you hooked into the Excel Application events, enabling the COM Add-In to respond to the users opening or closing workbooks, changing data in cells, and so on, in the same way you can in a normal Excel Add-In. See Chapters 8 and 16 for more information about these events.
Adding CommandBar Controls
Prior to Excel 2007, you used the CommandBars objects to create all menus and toolbars. In Excel 2007, the Ribbon replaced the top-level menus and toolbars, but you still use the CommandBars objects for the popup menus. This example COM Add-In adds two menu items to the cell’s right-click popup menu to show Wizard forms to assist in the entry of Automation Add-In formulas. Using the Ribbon with COM Add-Ins is explained later in the chapter.
Once you have a reference to the Excel Application object, you can add buttons to command bars in the same way as described in Chapter 15. The only difference is how the code responds to a button being clicked.
When adding a CommandBarButton from within Excel, set its OnAction property to be the name of the VBA procedure to run when the button is clicked.
When adding a CommandBarButton from outside Excel (from within a COM Add-In), hook the button’s Click event using a variable declared WithEvents inside the Add-In.
To use CommandBarButtons, you need a reference to the Office object library, so click Project O References and check the Microsoft Office 12.0 Object Library.
Delete any code that may already exist in the Designer’s code module (such as the example code added in the previous section), and replace it with the following. This defines the class-level variables you’ll be using to store the reference to the Excel Application object, and to hook the CommandBarButton’s events:
Dim WithEvents moXL As Excel.Application
Dim WithEvents moBtn As Office.CommandBarButton
Const msAddInTag As String = «Excel2007ProgRefTag»
When you hook a command bar button’s events using the WithEvents keyword, the variable (moBtn) is associated with the Tag property of the button it’s set to reference. All buttons that share the same Tag will cause the Click event to fire. In this way, you can handle the click events for all your buttons using a single WithEvents variable, by ensuring they all have the same Tag. You can distinguish between buttons by giving them each a unique Parameter property as you create them in the OnConnection method, which should be copied into the Designer’s code module:
‘ The IDTExtensibility2_OnConnection method is handled by the Designer, ‘ and exposed to us through the Add-InInstance_OnConnection method Private Sub AddInInstance_OnConnection( _
ByVal Application As Object, _
ByVal ConnectMode As AddInDesignerObjects.ext_ConnectMode, _ ByVal AddInInst As Object, custom() As Variant)
Dim oToolsBar As CommandBar, oBtn As CommandBarButton
Set moXL = Application
‘ Get a reference to the cell right-click menus Set oToolsBar = moXL.CommandBars(«Cell»)
‘ If our controls don’t exist on the menu bar, add them
‘ Handle errors in-line (such as the button not existing) On Error Resume Next
‘ Check for, and add, the ‘Sequence Wizard’ button Set oBtn = oToolsBar.Controls(«Sequence Wizard») If oBtn Is Nothing Then
Set oBtn = oToolsBar.Controls.Add( _
msoControlButton, ,»SequenceWiz», , True)
With oBtn
.Caption = «Sequence Wizard» .Style = msoButtonCaption .Tag = msAddInTag End With End If
‘ Check for, and add, the ‘RandUnique Wizard’ button Set oBtn = Nothing
Set oBtn = oToolsBar.Controls(«RandUnique Wizard») If oBtn Is Nothing Then
Set oBtn = oToolsBar.Controls.Add( _
msoControlButton, , «RandUniqueWiz», , True)
With oBtn
.Caption = «RandUnique Wizard» .Style = msoButtonCaption .Tag = msAddInTag End With End If
‘ Set the WithEvents object to hook these buttons. All buttons ‘ that share the same Tag property will fire the moBtn_Click event Set moBtn = oBtn
End Sub
Although you set the Temporary parameter to True when adding the controls, it is good practice to delete them when the Add-In is unloaded, using the OnDisconnection event:
‘ The IDTExtensibility2_OnDisconnection method is handled by the Designer, ‘ and exposed to us through the AddInInstance_OnDisconnection method Private Sub AddInInstance_OnDisconnection( _
ByVal RemoveMode As AddInDesignerObjects.ext_DisconnectMode, _ custom() As Variant) Dim oCtl As CommandBarControl
‘ Find and remove the buttons
For Each oCtl In moXL.CommandBars.FindControls(Tag:=msAddInTag) oCtl.Delete
Next
Set moBtn = Nothing Set moXL = Nothing
End Sub
In the Click event, you check the Parameter property of the button that was clicked and show the appropriate form. For this example, just add two blank forms to the project, giving them the names frmSequenceWiz and frmRandUniqueWiz:
‘ The moBtn_Click event is fired when any of our commandbar buttons are ‘ clicked. This is because the event handler is associated with the Tag ‘ property of the button, not the button itself. Hence, all buttons that ‘ have the same Tag will fire this event.
Private Sub moBtn_Click(ByVal Ctrl As Office.CommandBarButton, _
CancelDefault As Boolean)
‘ Check that a cell range is selected If TypeOf moXL.Selection Is Range Then
‘ Run the appropriate form, depending on the control’s Parameter Select Case Ctrl.Parameter Case «SequenceWiz»
frmSequenceWiz.Show vbModal
Case «RandUniqueWiz»
frmRandUniqueWiz.Show vbModal End Select
Else
‘ Display an error message if a range is not selected MsgBox «A range must be selected to run the Wizard.», vbOKOnly, _ «Excel 2007 Prog Ref Wizards»
End If End Sub
Save the project and use File O Make Excel2007ProgRef.dll to create the DLL, which also adds the registry entries for Excel to see it. Start Excel 2007, right-click a cell, and click the Sequence Wizard menu to show the Wizard form.
Using a COM Add-In from VBA
It is possible (though unfortunately quite rare) for the creator of a COM Add-In to provide programmatic access to the Add-In from VBA. This would be done either to:
□ Expose the Add-In’s functionality for use through code
□ Provide a mechanism for controlling or customizing the Add-In
It is achieved by setting the Add-In instance’s Object property to reference the COM Add-In class (or a separate class within the Add-In), and then exposing the required functionality using Public properties and methods, just like any other class. This example provides yet another way of getting to the Sequence and RandUnique functions.
Add the following lines to the bottom of the AddInInstance_OnConnection routine, to provide a reference to the Add-In class using the Add-In’s Object property:
‘ Set the Add-In instance’s Object property to be this class, providing ‘ access to the Com Add-In’s object model from within VBA. Note that we ‘ don’t use Set here! AddInInst.Object = Me
And add the following code to the bottom of the Designer’s class module, to create and return new instances of our Simple and Complexclasses:
‘ Property to return a reference to our Simple class, providing access ‘ from VBA:
‘vaSeq = Application.ComAddIns(«Excel2007ProgRef.ComAddIn»).Object _
Public Property Get SimpleFuncs() As Simple
Set SimpleFuncs = New Simple End Property
‘ Property to return a reference to our Complex class, providing access ‘ from VBA:
‘vaRU = Application.ComAddIns(«Excel2007ProgRef.ComAddIn»).Object _
‘ .ComplexFuncs.RandUnique(…)
Public Property Get ComplexFuncs() As Complex
Set ComplexFuncs = New Complex End Property
From within Excel, you can then use the following code to access the Sequence function, going through the COM Add-In and its Object property:
Private Sub CommandButton1_Click()
Dim vaSequence As Variant
‘ Get the sequence using the COM Add-In
|
vaSequence = Application.ComAddIns(«Excel2007ProgRef.ComAddIn») |
|
|
.Object.SimpleFuncs.Sequence(5, 10, 2) |
|
|
‘ Write the sequence to the sheet |
|
|
ActiveCell.Resize(1, 5) = vaSequence |
|
|
End Sub |
The key point about using this method is that you are accessing the same instance of the class that Excel is using for the Add-In, allowing you to manipulate, query, or control that Add-In from VBA. For more complex COM Add-Ins, the same method can be used to provide access to a full object model for controlling the Add-In.
Continue reading here: Creating Custom Task Panes
Was this article helpful?
Starting with V6R1 System i Access for Windows, the Excel data transfer add-in no longer uses Excel SDK. The newer Excel 2007 limits are not supported in the old SDK. The V6R1/V7R1 Excel data transfer add-in uses the Component Object Model (COM) instead of SDK. COM is the interoperability standard for Windows-based applications and allows users to upload data from many Excel instances simultaneously.
When installing the COM-based Excel data transfer add-in, CWBTFCAI.DLL is used instead of CWBTFXLA.XLL.
Following are instructions for installing the COM-based Excel data transfer add-in. Data transfer can identify which Excel version is installed and set the corresponding limits.
Excel 2002/2003 Loading the COM-based Add-in
1. On the View menu, select Toolbars -> Customize…:

2. Click the Commands tab and under Categories, click Tools.

3. Under the Commands tab, click COM Add-Ins… and drag your selection to the Excel toolbar:

4. Click COM Add-Ins on the toolbar and select Data Transfer Excel Add-in:

5. If the Data Transfer Excel Add-in does not appear in the COM Add-ins list, do the following:
a) Click Add (see previous screen).
b) Browse to the folder where you installed System i Access for Windows (default path C:Program FilesIBMClient AccessShared).
c) Double-click the Shared folder.
d) Double-click cwbtfcai.dll.
Excel 2002/2003 Removing COM-Based Add-In
To unload the data transfer add-in (keeps name in the list), clear the box for the Data Transfer Excel Add-in and select OK.
To remove the data transfer add-in (removed from list), select the box for the Data Transfer Excel Add-in and select Remove:

Excel 2007/Excel 2010: Load COM-Based Add-in
Note: Data transfer is a 32-bit application and will not work with the 64-bit version of Excel 2010 until 64-bit support was added starting with i Access for Windows V7R1 service pack SI42424. No Excel data transfer add-in 64-bit support is planned for earlier versions of the client.
Also, Excel 2013 is not supported. This includes Office 365 which has been upgraded to Office 2013. To view the support statement and some circumventions when using Excel 2013 see technote N1019966 IBM i Access for Windows Data Transfer and Excel 2013.
1. Select the Quick Access toolbar in the upper left corner of the Excel session when using Excel 2007:

When using Excel 2010, click on File and then Options to take you to the Excel Options window where you can select Add-ins (shown in point 3 below).
2. Select Excel Options when using Excel 2007:

3. Select Add-Ins:

4. From the Manage list, select COM Add-ins and then select Go…:

5. Select Data Transfer Excel Add-in:

6. If Data Transfer Excel Add-in is not listed, do the following:
a) Select Add (see previous screen).
b) Browse to the folder where you installed System i Access for Windows.
c) Double-click the Shared folder.
d) Double-click cwbtfcai.dll.
Note: When using a Windows 64-bit operating system such as Windows 7 64-bit, the path by default will be Program Files(x86)IBMClient Access. If using Office 2007 or Office 2010 32-bit, select the Shared directory under Client Access. If using Office 2010 64-bit, select the Shared64 directory. Then select cwbtfcai.dll. A minimum of System i Access V7R1 with service pack SI42424 is needed if using Office 2010 64-bit.
Browsing for the data transfer add-in per item b) above:

7. The data transfer add-in download and upload options will then be shown under the Add-ins drop down menu or tab in Excel 2007/2010.

Unloading the COM based Excel Add-in
To unload the data transfer add-in from Excel do the following:
1. Select the Quick Access toolbar.
2. Select Excel Options.
3. Select Add-ins.
4. In the Manage list, select COM Add-ins and click Go.
5. Clear the checkbox associated with Data Transfer Excel Add-in.
6. Select OK.

Removing the COM-Based Excel Add-in
1. Select the Quick Access toolbar.
2. Select Excel Options.
3. Select Add-ins.
4. In the Manage list, select COM Add-ins and select Go.
5. Highlight the checked Data Transfer Excel Add-in.
6. Select the Remove button.
