
Find and replace text

-
Go to Home > Replace.
-
Enter the word or phrase you want to replace in Find what.
-
Enter your new text in Replace with.
-
Choose Replace All to change all occurrences of the word or phrase. Or, select Find Next until you find the one you want to update, and then choose Replace.
-
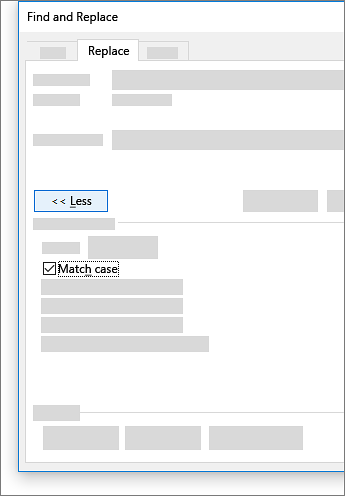
To specify only upper or lowercase in your search, select More > Match case. There are several other ways to search in this menu.
For other options, see Find and replace text
Find and replace basic text
In the upper-right corner of the document, in the search box  , type the word or phrase that you want to find, and Word will highlight all instances of the word or phrase throughout the document.
To replace found text:
-
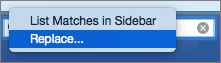
Select the magnifying glass, and then select Replace.

-
In the Replace With box, type the replacement text.
-
Select Replace All or Replace.
Tips:
-
You can also open the basic Find and Replace pane with the keyboard shortcut CONTROL + H.
-
When you replace text, it’s a good idea to select Replace instead of Replace All. That way you can review each item before replacing it.
-
You can find text with special formatting, such as bold or highlight, by using the Format menu.
-
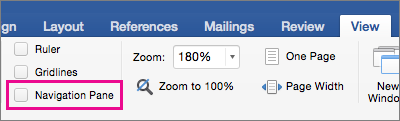
Select View > Navigation Pane.
-
In the Navigation Pane, select the magnifying glass.
-
Select Settings
, and then select Advanced Find & Replace.
Notes:
-
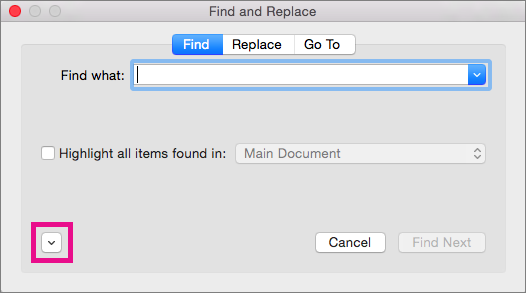
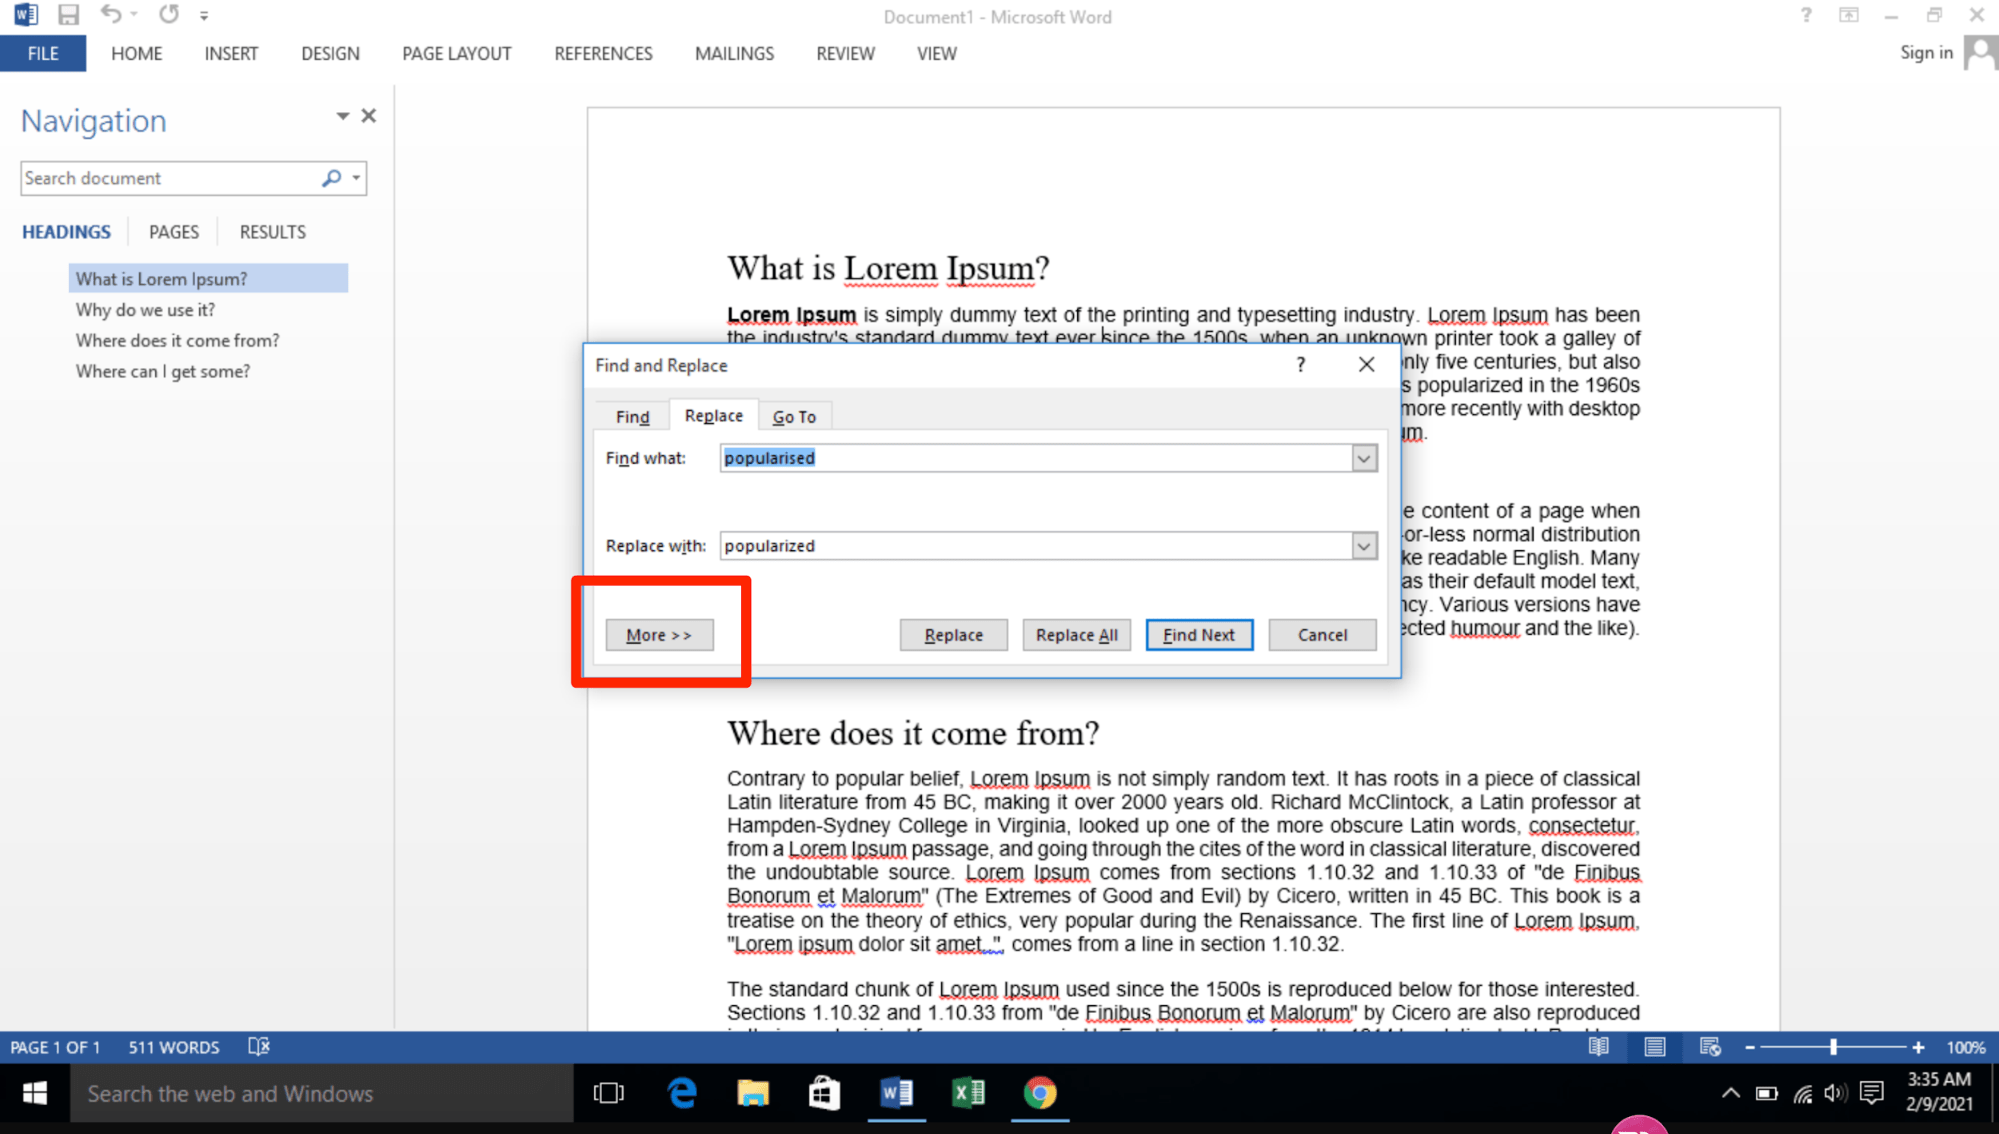
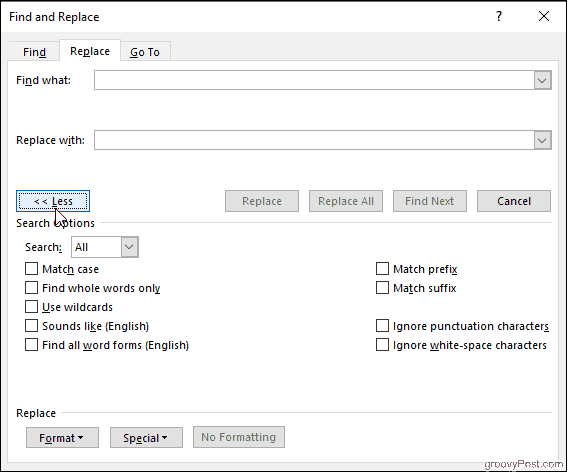
Select the arrow at the bottom of the Find and Replace dialog box to show all options.
-
-
-
On the Format menu, select the option that you want.
If a second dialog box opens, select the options that you want, and then select OK.
-
In the Find and Replace dialog box, select Find Next or Find All.
 , and then select Advanced Find & Replace.
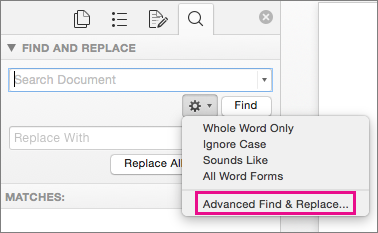
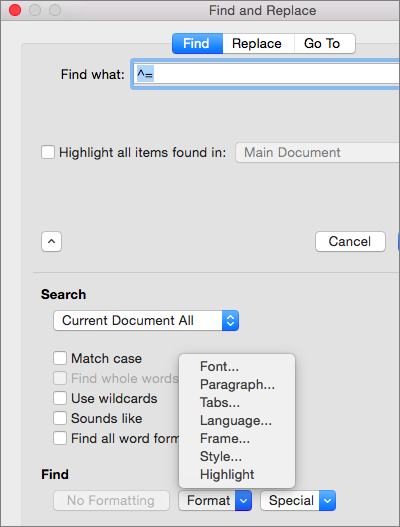
You can find and replace text with special formatting, such as bold or highlight, by using the Format menu.
-
Select View > Navigation Pane.
-
In the Navigation Pane, select the magnifying glass.
-
Select Settings
, and then select Advanced Find & Replace.
-
At the top of the dialog box, select Replace.
Notes:
-
Select the arrow at the bottom of the Find and Replace dialog box to show all options.
-
-
-
On the Find what box, type the text that you want to find.
-
On the Format menu, select the formatting that you want to find.
If a second dialog box opens, select the options that you want, and then select OK.
-
Select in the box next to Replace with.
-
On the Format menu, select the replacement formatting. If a second dialog box appears, select the formats that you want, and then select OK.
-
Select Replace, Replace All, or Find Next.
-
Select View > Navigation Pane.
-
In the Navigation Pane, select the magnifying glass.
-
Select Settings
, and then select Advanced Find & Replace.
Notes:
-
Select the arrow at the bottom of the Find and Replace dialog box to show all options.
-
-
-
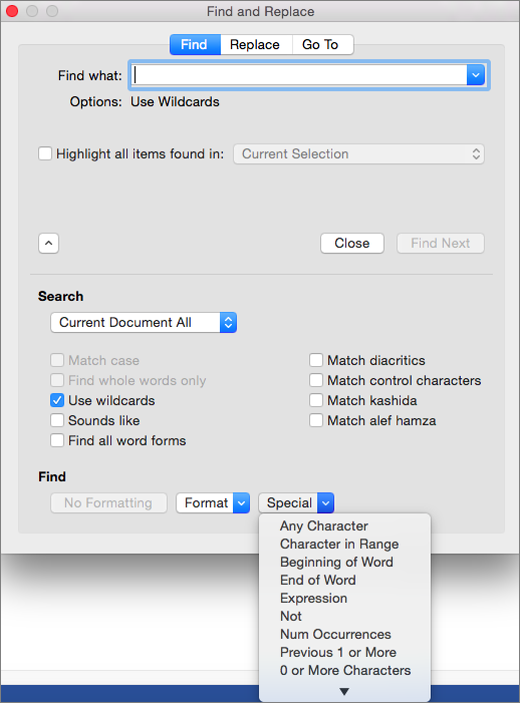
On the Special menu, select the special character that you want to find.
-
Select Find Next.

-
Select View > Navigation Pane.
-
In the Navigation Pane, select the magnifying glass.
-
Select Settings
, and then select Advanced Find & Replace.
Notes:
-
Select the arrow at the bottom of the Find and Replace dialog box to show all options.
-
-
-
At the top of the Find and Replace dialog box, select Replace and then select in the Find What box, but don’t type anything there. Later, when you select a special character, Word will automatically put the character code in the box for you.
Note: Select the arrow at the bottom of the Find and Replace dialog box to show all options.
-
On the Special menu, select the special character that you want to find.
-
Select in the Replace with box.
-
On the Special menu, select the special character that you want to use as a replacement.
-
Select Replace or Find Next.
-
Select View > Navigation Pane.
-
In the Navigation Pane, select the magnifying glass.
-
Select Settings
, and then select Advanced Find & Replace.
-
Select the Use wildcards check box.
If you don’t see the Use wildcards check box, select
. -
Select the Special menu, select a wildcard character, and then type any additional text in the Find what box.
-
Select Find Next.
Tips:
-
To cancel a search in progress, press
+ PERIOD. -
You can also enter a wildcard character directly in the Find what box instead of selecting an item from the Special pop-up menu.
-
To search for a character that’s defined as a wildcard character, type a backslash () before the character. For example, type ? to find a question mark.
-
You can use parentheses to group the wildcard characters and text and to indicate the order of evaluation. For example, search for <(pre)*(ed)> to find «presorted» and «prevented.»
-
You can search for an expression and use the n wildcard character to replace the search string with the rearranged expression. For example, type (Newman) (Belinda) in the Find what box and 2 1 in the Replace with box. Word will find «Newman Belinda» and replace it with «Belinda Newman.»
-
-
To replace found text:
-
Select the Replace tab, and then select the Replace with box.
-
Select Special, select a wildcard character, and then type any additional text in the Replace with box.
-
Select Replace All, Replace, or Find Next.
Tip: When you replace text, it’s a good idea to select Replace instead of Replace All. That way you can confirm each replacement to make sure that it’s correct.
-
 .
.
 + PERIOD.
You can refine a search by using any of the following wildcard characters.
|
To find |
Use this |
For example |
|---|---|---|
|
Any single character |
? |
s?t finds «sat» and «set.» |
|
Any string of characters |
* |
s*d finds «sad» and «started.» |
|
One of the specified characters |
[ ] |
w[io]n finds «win» and «won.» |
|
Any single character in this range |
[-] |
[r-t]ight finds «right» and «sight» and «tight.» Ranges must be in ascending order. |
|
Any single character except the characters inside the brackets |
[!] |
m[!a]st finds «mist» and «most» but not «mast.» |
|
Any single character except characters in the range inside the brackets |
[!x-z] |
t[!a-m]ck finds «tock» and «tuck» but not «tack» or «tick.» Ranges must be in ascending order. |
|
Exactly n occurrences of a character or expression |
{ n} |
fe{2}d finds «feed» but not «fed.» |
|
At least n occurrences of a character or expression |
{ n,} |
fe{1,}d finds «fed» and «feed.» |
|
A range of occurrences of a character or expression |
{ n, n} |
10{1,3} finds «10,» «100,» and «1000.» |
|
One or more occurrences of a character or expression |
@ |
lo@t finds «lot» and «loot.» |
|
The beginning of a word |
< |
<(inter) finds «interesting» and «intercept» but not «splintered.» |
|
The end of a word |
> |
(in)> finds «in» and «within,» but not «interesting.» |
Word for the web lets you find and replace basic text. You can match case or fine whole words only. For more varied options, open your document in Word for the desktop.
Need more help?
Want more options?
Explore subscription benefits, browse training courses, learn how to secure your device, and more.
Communities help you ask and answer questions, give feedback, and hear from experts with rich knowledge.
Add and edit text
Try it!
Follow these steps to add, replace, and format text in Word.
Add text
-
Place the cursor where you want to add the text.
-
Start typing.
Replace text
-
Select the text you want to replace.
-
To select a single word, double-click it.
-
To select a line, click to the left of it.
-
-
Start typing.
Format text
-
Select the text you want to format.
-
From the pop up toolbar or the Home tab, select an option to change the Font, Font Size, Font Color, or make the text bold, italics, or underline.
Copy formatting
-
Select the text with the formatting you want to copy.
-
Click
Format painter, and then select the text you want to copy the formatting to.Tip: Double-click
Format painter if you want to copy the formatting in more than one place.
 Format painter, and then select the text you want to copy the formatting to.
Want more?
Video: Change the look of text
Select text
Word Quick Start
Need more help?
Want more options?
Explore subscription benefits, browse training courses, learn how to secure your device, and more.
Communities help you ask and answer questions, give feedback, and hear from experts with rich knowledge.
Exchange one text string for another in any version of Word
Updated on October 29, 2021
What to Know
- Open the Find and Replace tool in Word with the keyboard shortcut CTRL+H.
- Find and Replace doesn’t take capitalization into account unless you specifically tell it to.
- To replace capitalization, select More in the Find and Replace box, then Match Case > Replace or Replace All > OK.
All editions of Microsoft Word offer a feature called Find and Replace. Use this tool to search for a specific word, number, or phrase in a document and replace it with something else. You can also make several replacements at once—like changing a name or fixing something you’ve consistently misspelled. Use it, also, to replace numbers or punctuation and cap or uncap words.
If you turn on Track Changes before you begin, you can reject the replacement or deletion of any unintended word.
Find and Replace a Word
The Microsoft Word Find and Replace dialog box, in its simplest form, prompts you to type the word you’re looking for and the word you want to replace it with. Then, click Replace, and either allow Word to change every entry for you or, go through them one at a time.
To open the tool, press Ctrl+H (Cmd+H on Mac).
Change Capitalization in Microsoft Word
The Find and Replace feature doesn’t take into account anything about capitalization unless you specifically tell it to. To get to that option you’ll need to click the More option in the Find and Replace dialog box:
- Open the Find and Replace dialog box using your favorite method. We prefer Ctrl+H.
- Click More.
- Type the appropriate entry in the Find What and Replace With lines.
- Click Match Case.
- Click Replace and Replace again, or, click Replace All.
- Click OK.
Advanced Options
When you select the More expander in the Search and Replace dialog box, you’ll encounter several customizations. The list of items varies according to which version of Word you’re running.
Search Options
Select the check boxes to include or exclude things like punctuation, white-space characters, or substrings. Plus, apply tools like word-form matching (i.e., walked also matches walking) and Soundex matching (Karin matches Karen).
Replace Options
Word supports more advanced substitutions, too. Use special characters to substitute text markup with symbols. For example, replace a character code like & with an ampersand. This approach is useful for de-cluttering pasted HTML text that uses HTML codes to render certain symbols.
Thanks for letting us know!
Get the Latest Tech News Delivered Every Day
Subscribe
You’ve just finished typing a presentation that’s due in about 15 minutes. But before you can celebrate your moment of victory, you realize that you’ve spelled your client‘s name wrong and have missed the double Rs in their company name multiple times throughout your document.
Cue: An aggravated scream.
The good news is that changing these small errors is an easy fix on Office 365. You can replace as many words as you want within seconds on Microsoft Word using its super helpful Find and Replace functionality.
This article will guide you through the necessary steps to help you find and replace text in MS Word.
Ready? Let’s begin.
How to Use Microsoft Word’s Find and Replace Feature
Microsoft is one of the leading companies in the world. It’s because it prioritizes its customers and comes up with innovations that can make their lives easier and more convenient.
The Find and Replace feature on MS Word is a shining example of this effort.
You can use this feature to find specific words in your file and then replace them in case there are some last-minute changes. This can even be useful when you make mistakes in the doc while typing or want to accommodate those last-minute client changes.
We’ll show you how to replace text in Microsoft Word, depending on the computer device you use.
How to Change and Replace Text in MS Word on Windows
It’s no wonder that all Windows devices have built-in Microsoft programs considering it’s a product developed by the Microsoft company themselves. If you find yourself using the word processor often for making notes or presentations, you’ll be especially thankful for the Find and Replace functionality.
Here’s a short step-by-step guide to using the feature in MS Word on Windows devices:
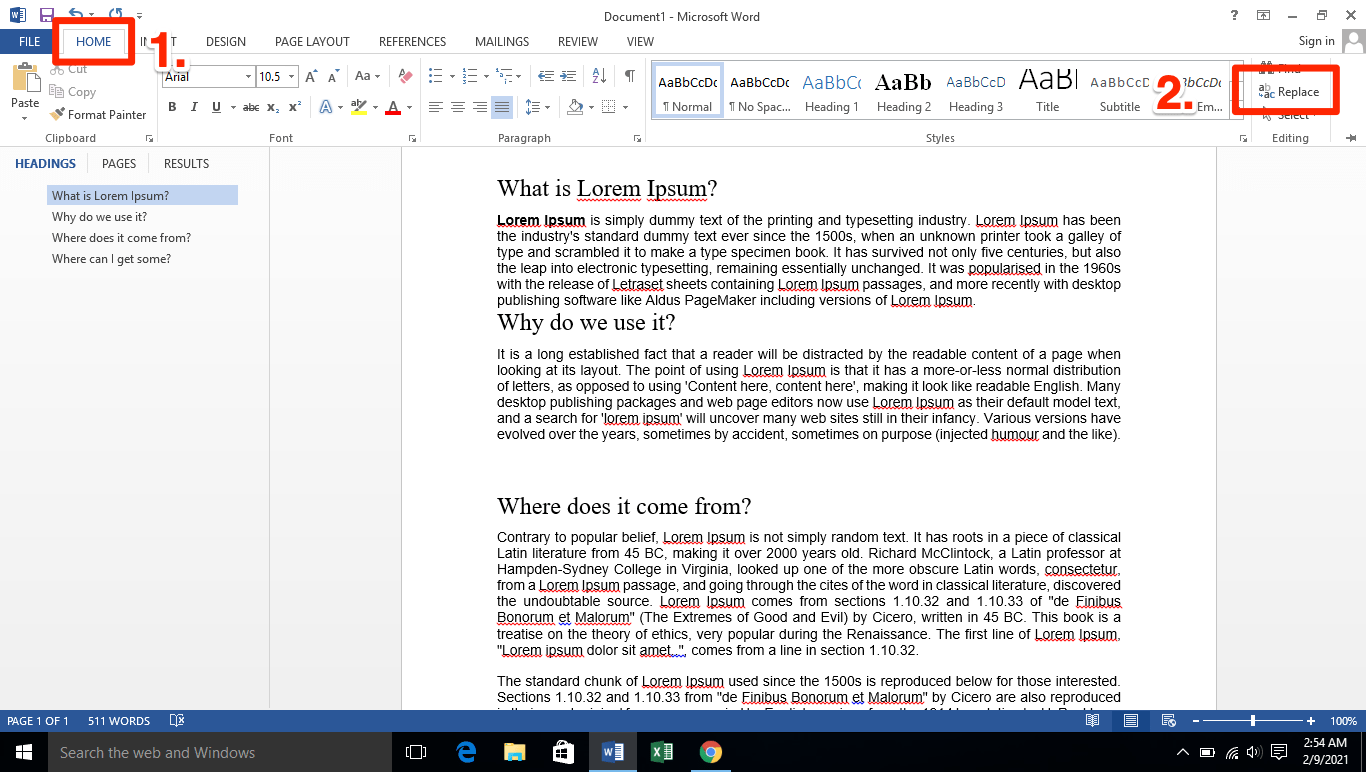
Step #1 Open Microsoft Word on your Windows device.
Step #2 Click on the Home tab on your top menu bar. A secondary menu will appear on your screen.
Step #3 Select the Replace option located on the top-right-hand side of your screen. Alternatively, you can also press Ctrl + H. The Find and Replace pop-up box will appear immediately.
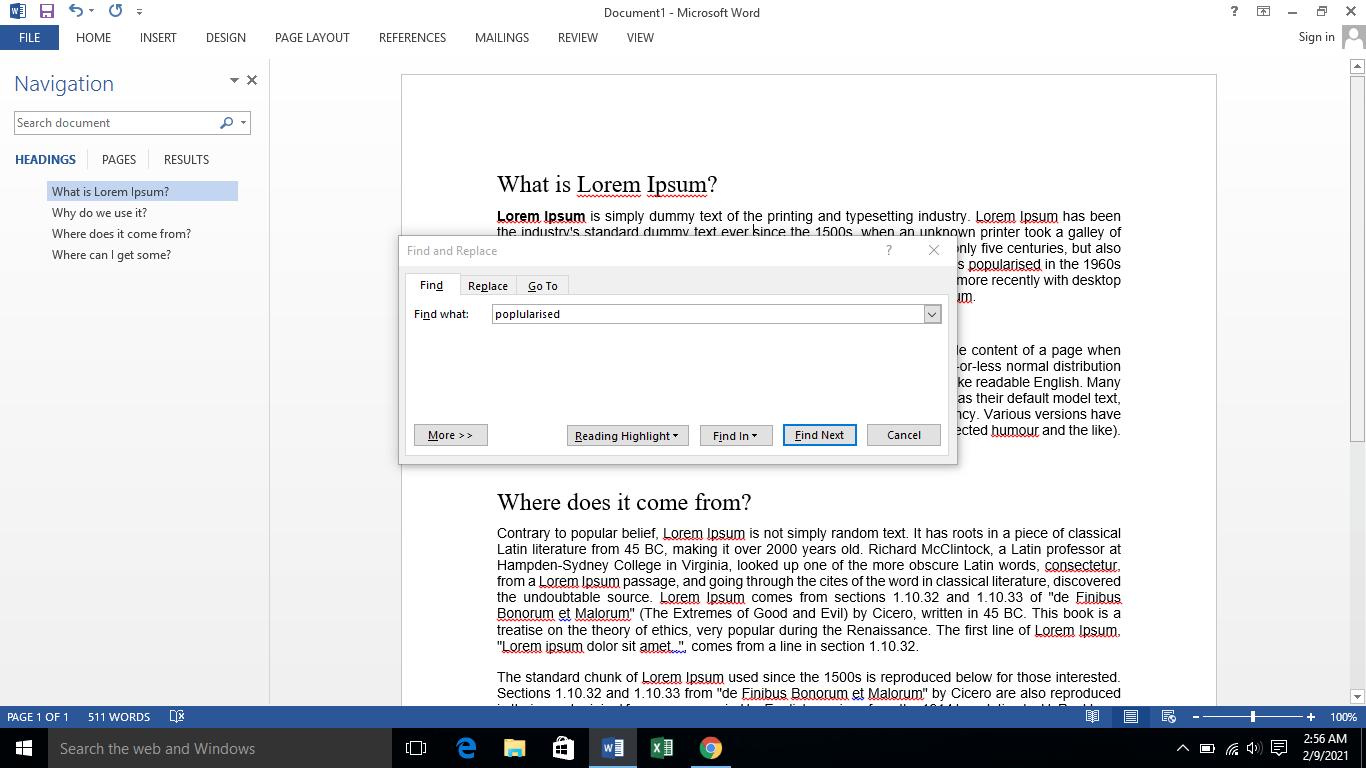
Step #4 Type in the phrase or word you want to locate in your Word doc in the Find what field under the Find tab.
Step #5 Click on the Replace tab on the top menu bar. Type in the word you want to update in the Replace with field.
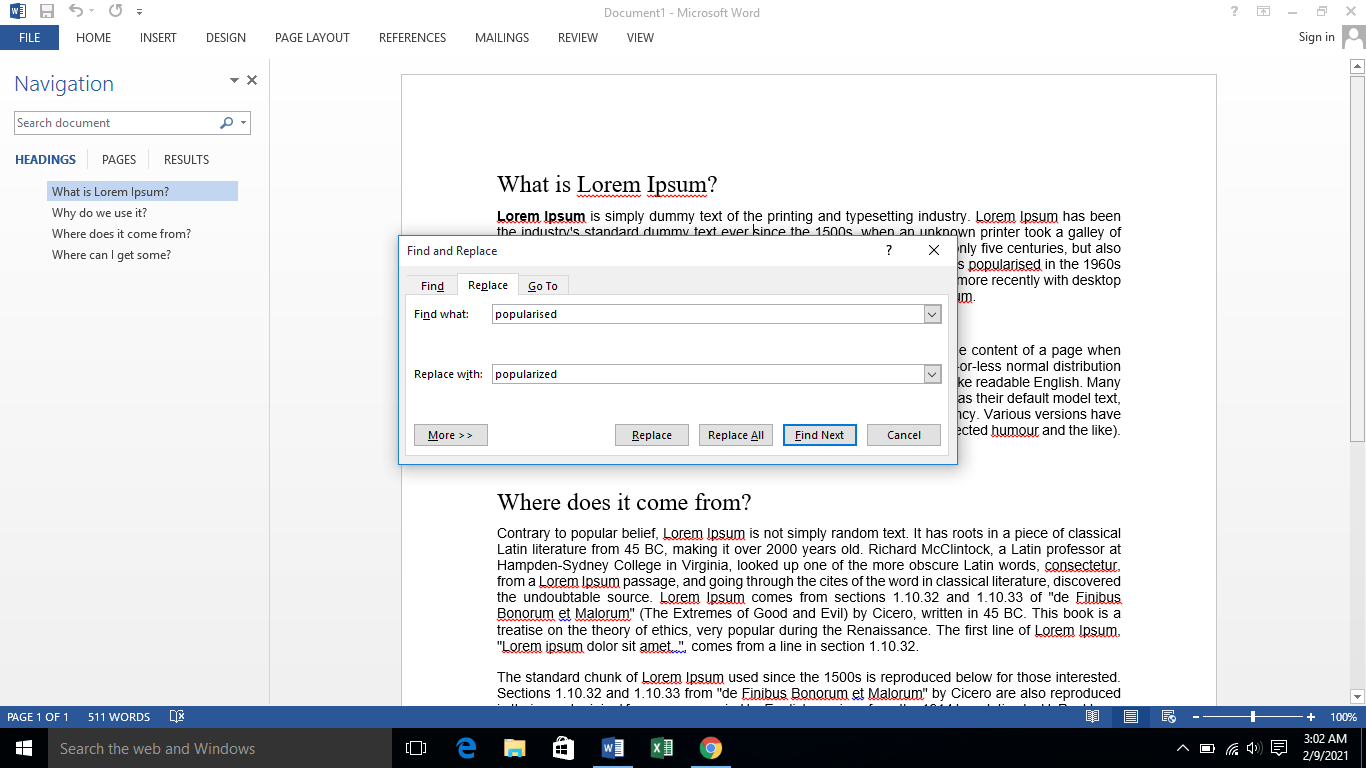
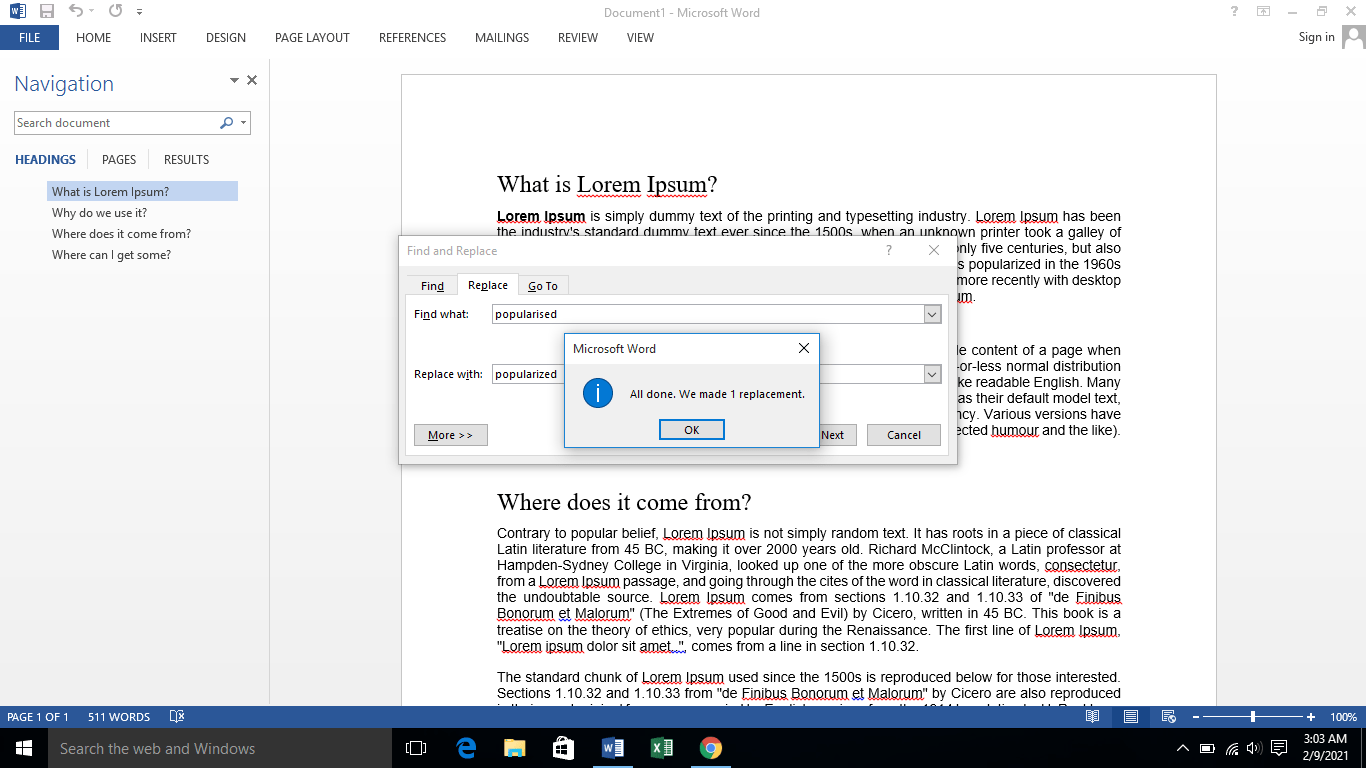
On clicking on the Replace button, the changes you want will be made one by one in the Word doc. However, if you want to update all fitting instances at once, you can click on Replace All instead.
Microsoft Word will give you a confirmation of the replacements made in your Word doc. It’ll look something like this:
How to Change and Replace Text in MS Word on Mac
Now that we’ve covered Windows, let’s see how you can use the Find and Replace feature on a MacBook. Here’s how to proceed in MS Word when you’re using an iOS device:
Step #1 Open the Microsoft Word document on your Mac.
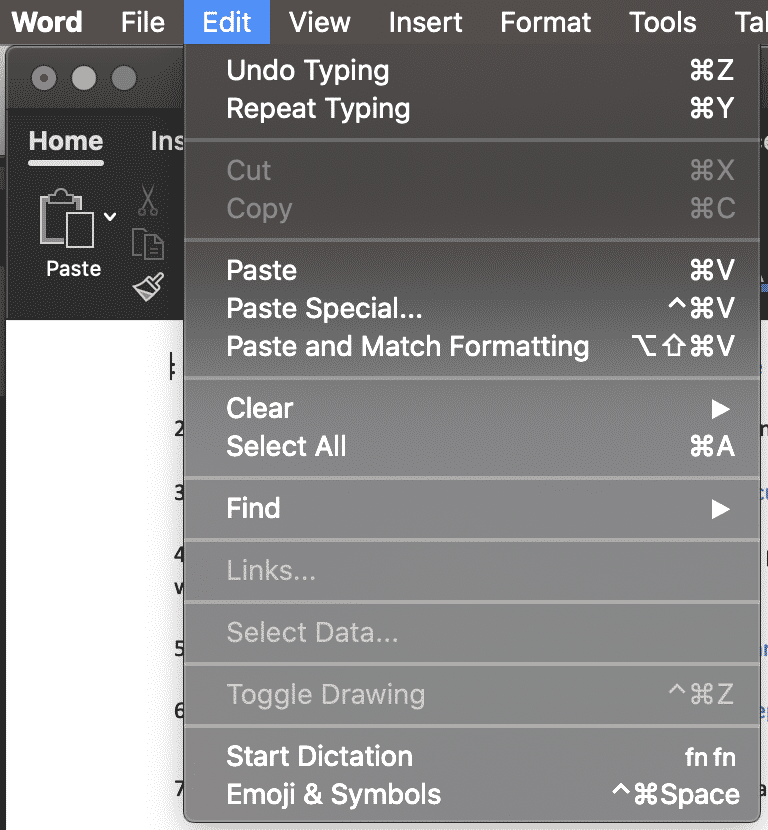
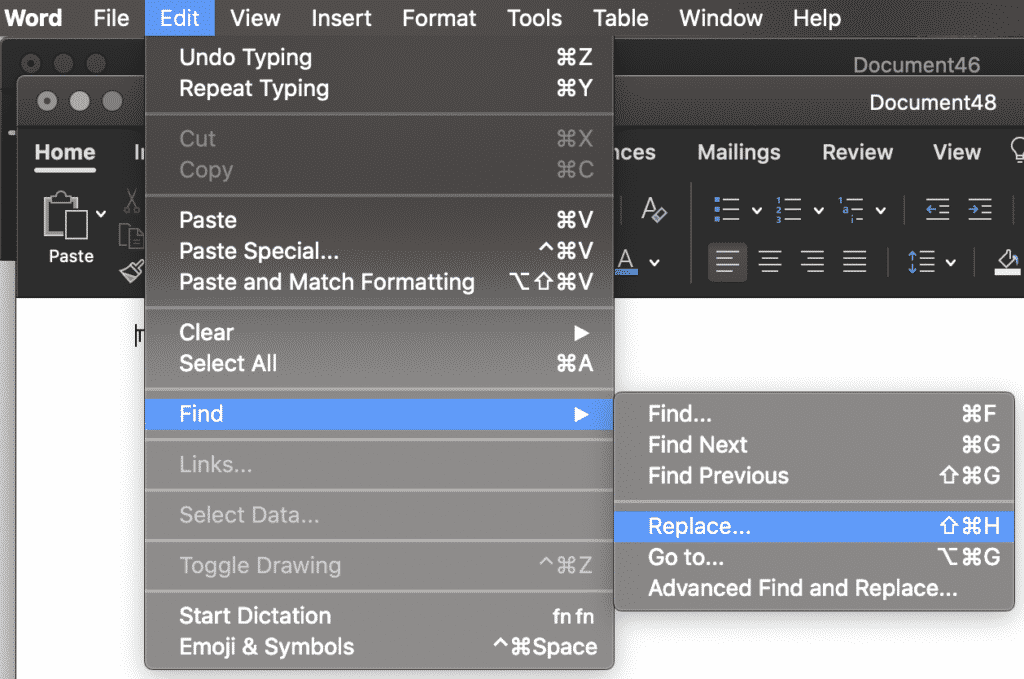
Step #2 Take your cursor towards the top of your screen until you see your Mac’s top toolbar. Click on the Edit tab. A dropdown menu will appear.
Step #3 Click on Find from the displayed menu options. You’ll typically see a Replace… option on your screen.
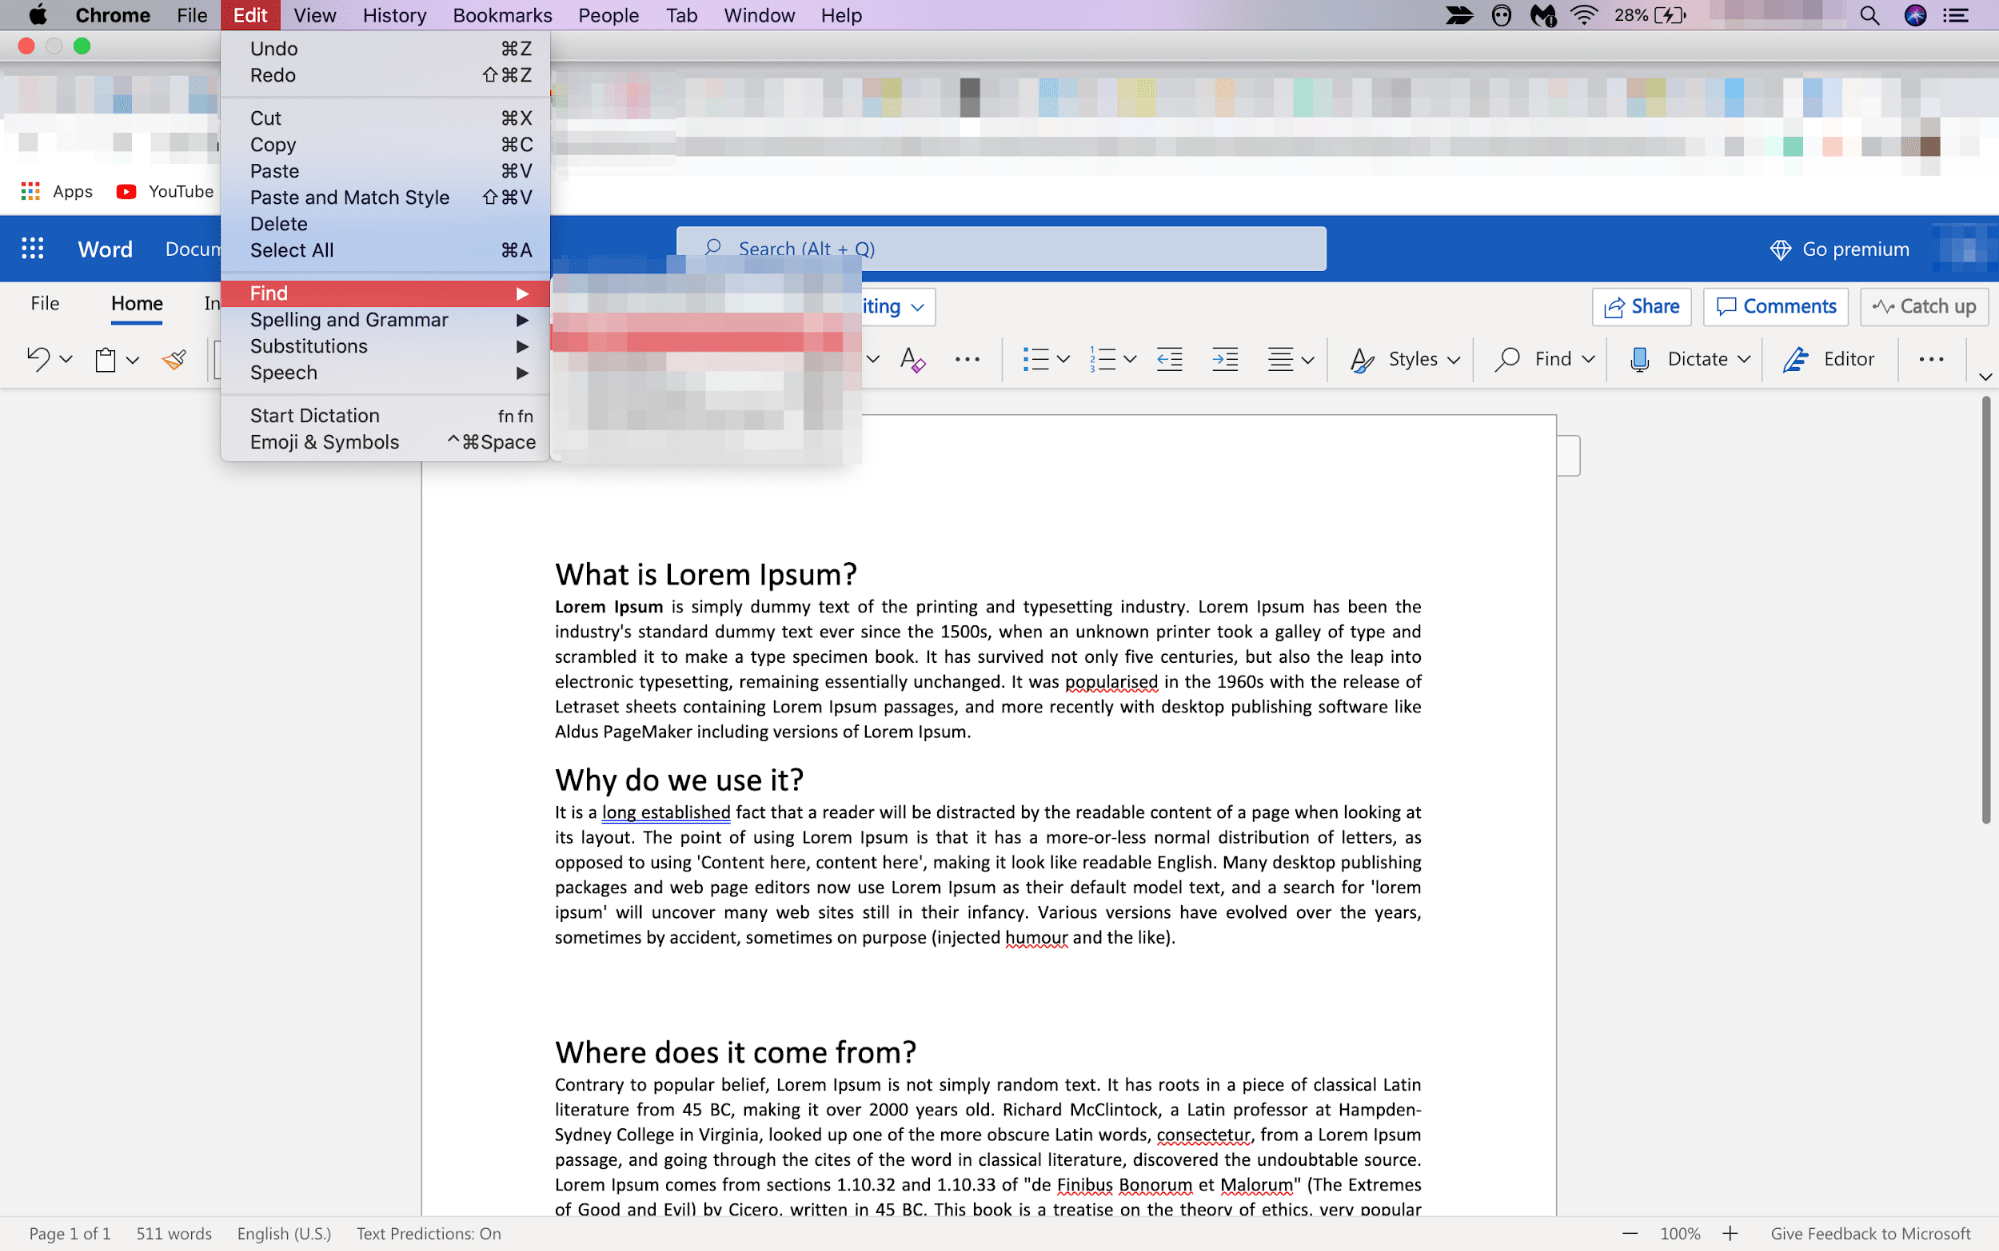
But if you don’t, simply press Shift + Command + H on your keyboard. A side navigation bar will appear on the left-hand side of your computer screen.
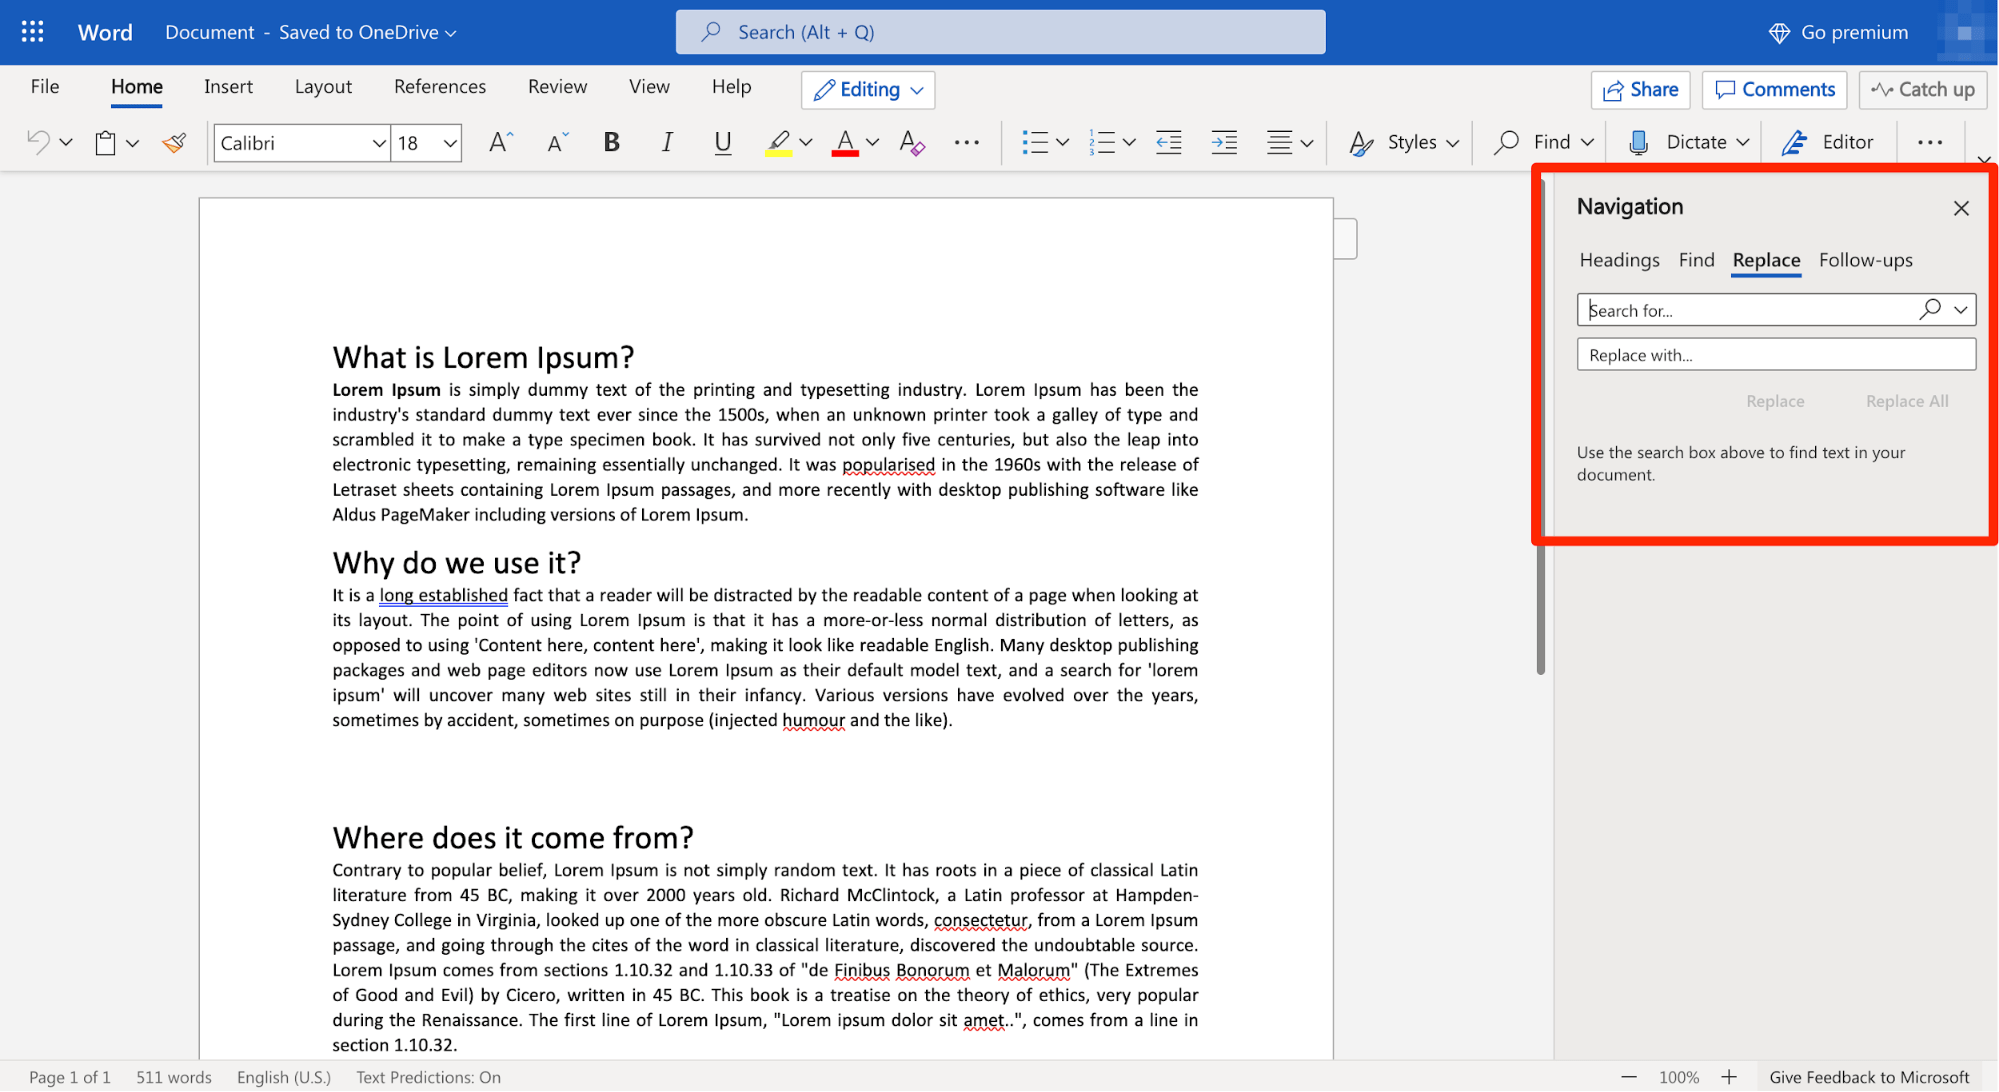
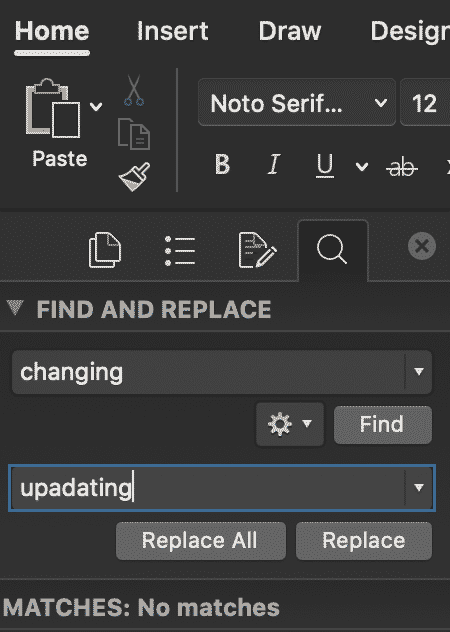
Step #4 Enter the word or phrase you want to replace in the doc in the Search for… field.
Once you’ve finished typing the incorrect word or phrase, type in the right word or phrase that you want to replace the incorrect one with in the Replace with… field.
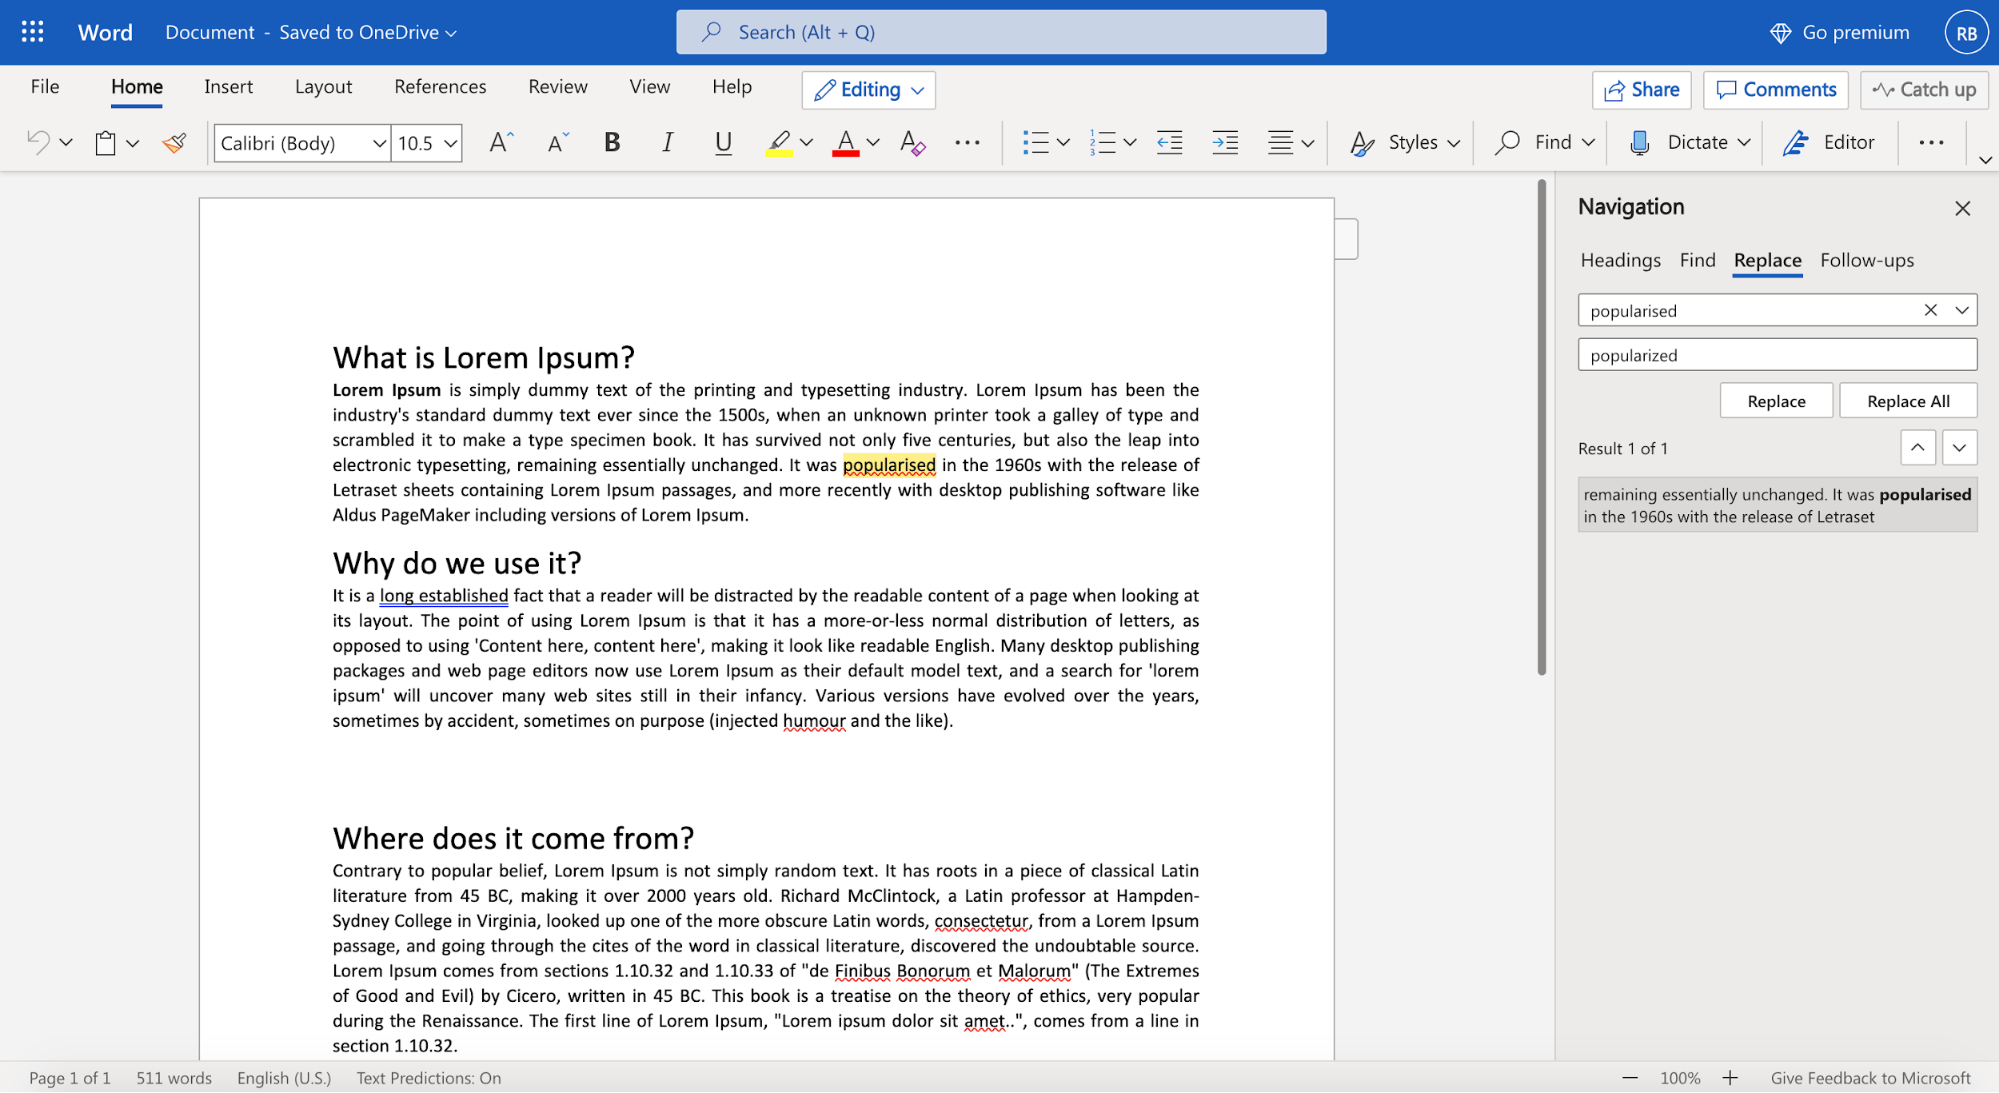
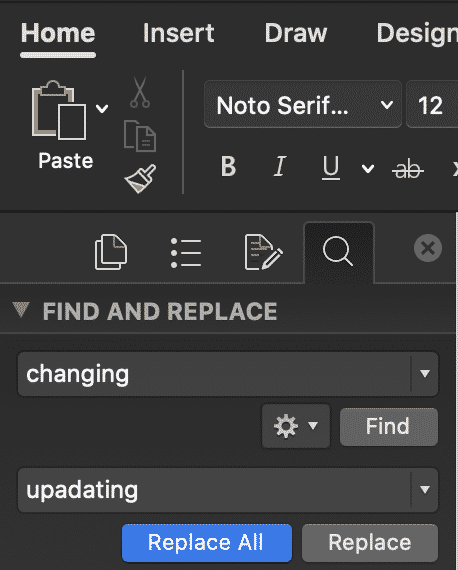
Step #5 Click on the Find tab to locate the matches. Once you’re sure the match is right and highlighting the words you want to change, select Replace. This will replace every individual match one by one.
Again, if you click on the Replace All button, all the matching words and phrases will be changed at once.
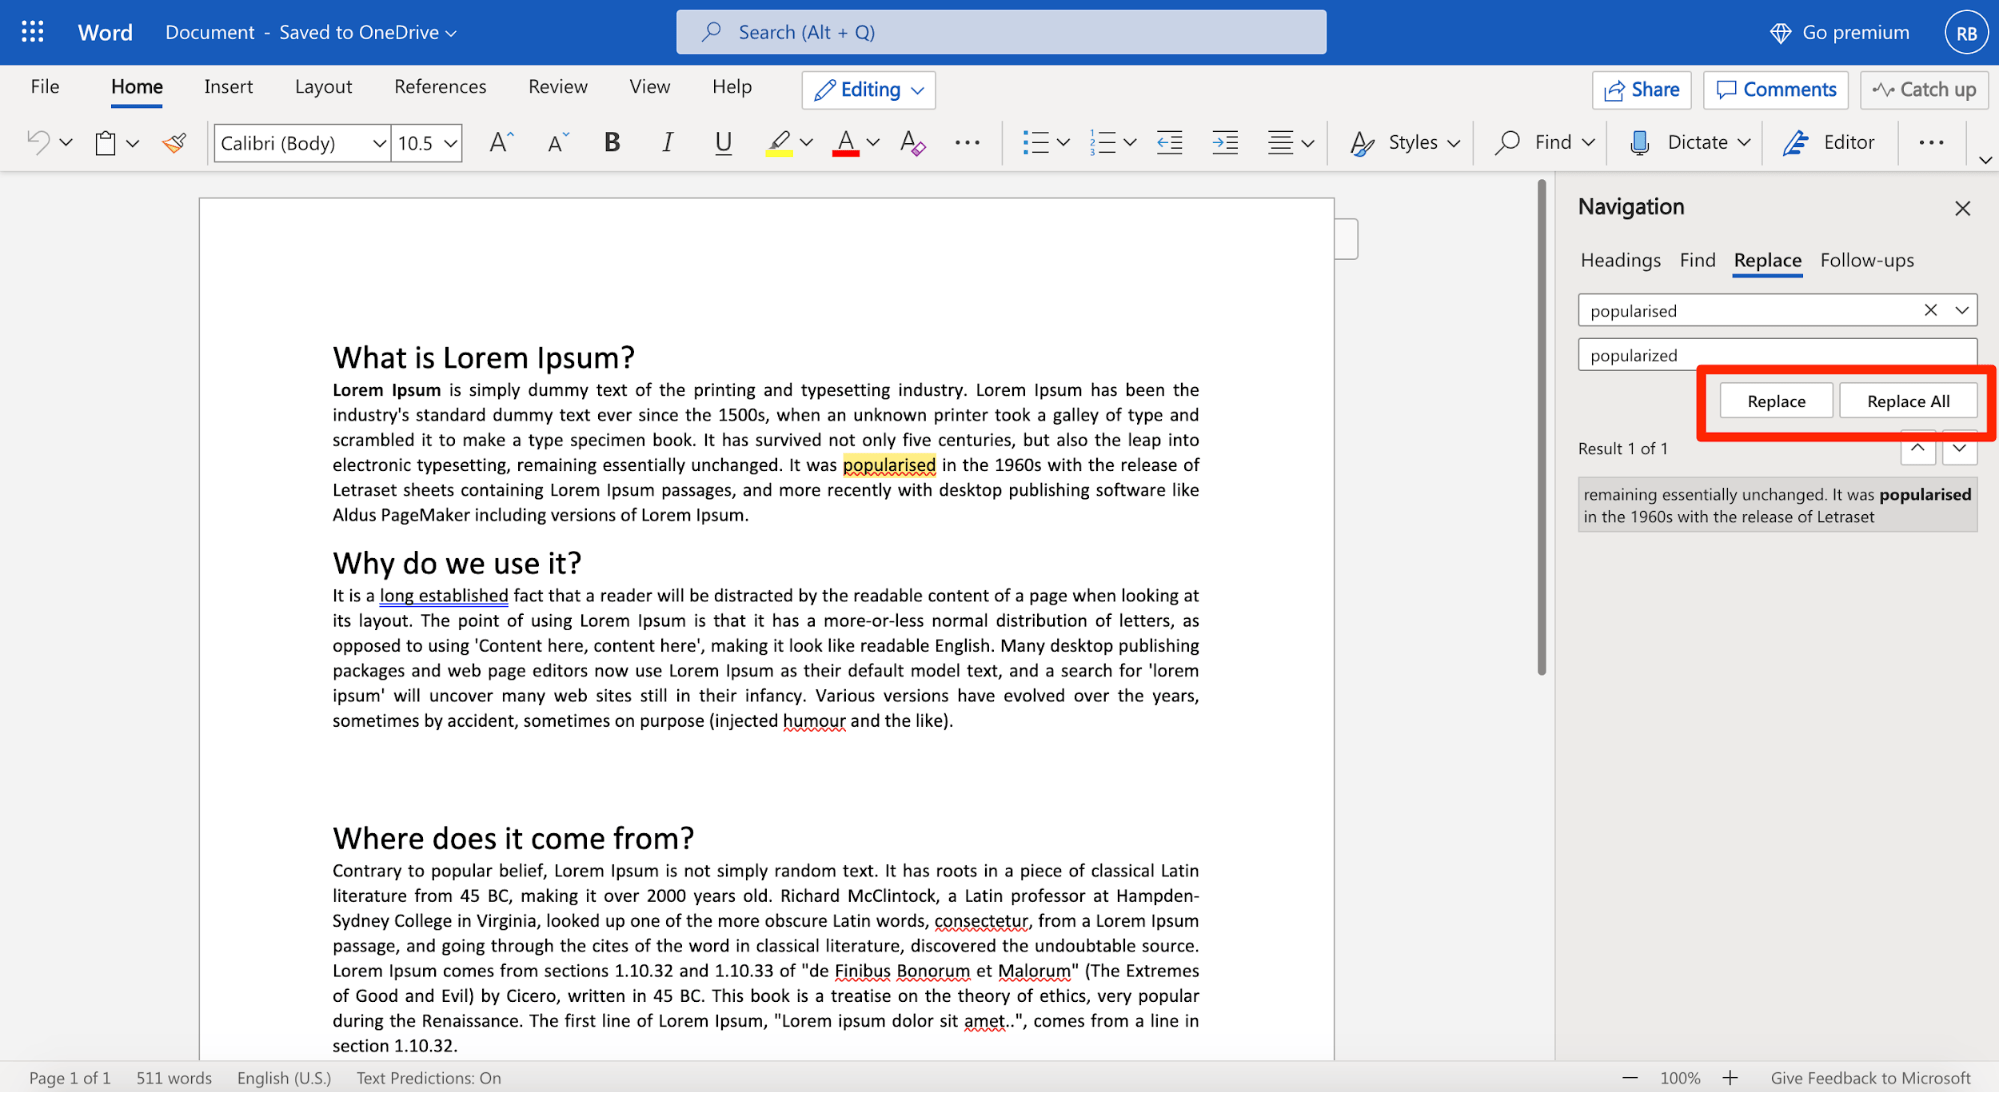
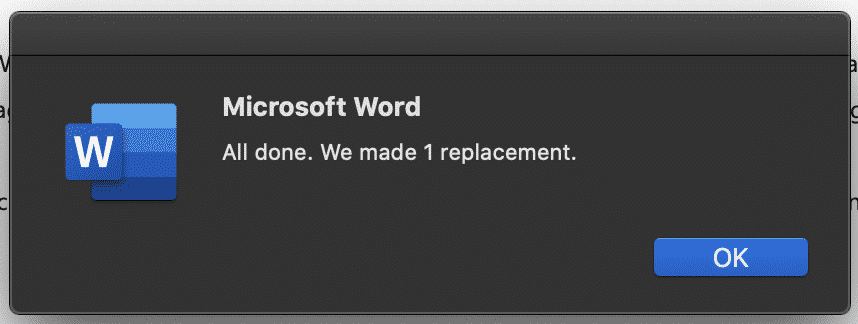
After the changes are made, you’ll see an “All Done” message just below the Replace and Replace All buttons that indicate the replacement of the intended word or phrase.
Advanced Find and Replace Features: Everything You Need to Know
You can take this whole shebang of replacing words and phrases to the next level thanks to Microsoft Word’s Advanced Find and Replace option. In other words, you can use the Advanced settings to simplify the process further and make the results even more accurate.
Follow the previously stated steps to open the Find and Replace pop-up box. On it appears on your screen, click on More.
You’ll immediately see a slew of additional options like Match case, Use wildcards, Match prefix, Match suffix, and so on. Here’s how the Advanced Find and Replace settings look like:
Each one of these has its own unique functions. Let’s discuss them in more detail below:
Find whole words only
If you check on the Find whole words only box, MS Word will treat your search term as an entire word and won’t look for your search term within other words.
Example: If you’re searching for the word “stand,“ the search feature won’t show you the word “standard.”
Use wildcards
Use wildcards is one of the more advanced search options that allows you to use question marks, brackets, asterisks, and other similar symbols to modify your search.
You see, a wildcat is a short string of characters – or a character – that represents multiple characters in a search.
Example: <(int)*(net)>
Sounds like (English)
As the name suggests, the Sounds like option finds similar-sounding words to your search term. This is best for finding homonyms and words that have varying spellings.
Example: This is common for words that have both UK and US variants. For instance, you can have both “colours” and “colors” on a document.
Find all word forms (English)
This option allows you to look for the word you searched for, along with other instances that are either plural or in a different tense.
Example: If you search for the word “be” after enabling the Find all word forms option, you’ll also find the words “are“ and “is“ highlighted as they are the different tense forms of “be.”
Match prefix and Match suffix
Checking off the Match prefix or Match suffix fields will limit your search to words that have the same beginning or the same ending, respectively.
Example: Suppose you enable Match prefix. When you search for the word “love,” Microsoft Word will find the words “love“ and “lovely.“ However, you won’t find the word “beloved“ highlighted in the search results as it’s a suffix of love.
Ignore punctuation characters and Ignore white-space characters
Again, this search option is self-explanatory. It tells Microsoft Word not to take up spaces, periods, hyphens, and similar attitudes into consideration.
Example: After clicking on the search options, when you type in “color block”, you’ll also see “color-block.”
When to Use the Find and Replace Feature of Microsoft Word
The whole point of the Find and Replace function in Microsoft Word is to allow MS Word users to search for target text – whether it’s a specific word, a type of formatting, or a string of wildcard characters – and replace them with whatever you want.
Typically, here’s why you should use this feature:
- When you want to maintain absolute consistency in your document
- When you want to speed up typing and formatting tasks
- When you realize last-minute mistakes and want to find and then replace your errors
- When you’re writing a document that includes words with varying spellings. For instance, if you typically follow US English, and are typing a doc according to the rules of UK English, the Find and Replace feature would be super helpful to identify and change spelling errors.
- Adding special characters to words
- editing partial words and phrases
- Correcting words that you may have misspelled in a hurry. For instance, if you type “h?t” instead of “hat” and enable Use wildcards, you’ll find it highlighted in your search.
- Eliminating extra spaces
- Changing the separator character in numerals
- Reversing currency symbols
Concluding Thoughts
As you may have realized, the Find and Replace feature of Microsoft is a lifesaver, to say the least.
It can help you save tons of time, which would otherwise have been wasted in looking for errors and then replacing them. Whether you are a student, an intern, or the CEO of a company, this is a functionality that we all can be very thankful for.
![]()
Загрузить PDF
![]()
Загрузить PDF
Из данной статьи вы узнаете, как использовать функцию «Найти и заменить» в Microsoft Word для поиска и замены слов в документе.
-
1
Откройте документ Microsoft Word. Для этого дважды щелкните по документу Word или откройте программу Word и выберите документ из списка недавно открывавшихся документов (если нужный документ есть в этом списке).
-
2
Поставьте курсор в начало документа. Для этого щелкните слева от первого слова документа. Функция «Найти и заменить» ищет слова, которые расположены только после курсора.
- Если вы хотите найти слово в определенном фрагменте текста (а не во всем документе), выделите этот фрагмент.
-
3
Перейдите на вкладку Главная. Она находится сверху слева на ленте инструментов Word (это синяя полоса в верхней части окна).
-
4
Щелкните по Найти. Этот параметр находится справа на панели инструментов в разделе «Редактирование». В левой части окна откроется панель поиска.
-
5
Введите слово, которое нужно найти, и нажмите ↵ Enter. Искомое слово будет выделено в документе.
-
6
Щелкните по ▼ или по ▲. Эти стрелки находятся справа снизу на панели поиска. Если щелкнуть по стрелке, курсор перейдет к следующему (или предыдущему) повтору искомого слова.
- Также можно щелкнуть по одному из результатов посередине панели поиска.
-
7
Щелкните по значку
. Он находится справа на панели поиска. Откроется выпадающее меню.
-
8
Щелкните по Заменить. Эта опция находится в выпадающем меню. Откроется окно «Найти и заменить».
-
9
Введите слово в строке «Заменить на». Эта строка находится в нижней части окна «Найти и заменить». Введите слово, на которое будет заменено слово, отображаемое в строке «Найти».
-
10
Щелкните по Заменить все. Эта кнопка находится в нижней части окна «Найти и заменить». Это приведет к замене всех повторений слова из строки «Найти» на слово из строки «Заменить на».
- Например, если в строке «Найти» ввести «банан», а в строке «Заменить на» ввести «яблоко» и нажать «Заменить все», все найденные (в документе или выделенном фрагменте) слова «банан» будут заменены на «яблоко».
- Чтобы заменить только некоторые (не все) повторения определенного слова, нажмите «Заменить» и заменяйте слова по одному. Возможно, перед этим вам придется поставить курсор в начало документа.
Реклама


-
1
Откройте документ Microsoft Word. Для этого дважды щелкните по документу Word или откройте программу Word и выберите документ из списка недавно открывавшихся документов (если нужный документ есть в этом списке).
-
2
Поместите курсор в начало документа. Для этого щелкните слева от первого слова документа. Функция «Найти и заменить» ищет слова, которые расположены только после курсора.
- Если вы хотите найти слово в определенном фрагменте текста (а не во всем документе), выделите этот фрагмент.
-
3
Перейдите на вкладку Главная. Она находится сверху слева на ленте инструментов Word (это синяя полоса в верхней части окна).
-
4
Щелкните по панели поиска. Она находится справа на панели инструментов Word.
-
5
Введите слово, которое нужно найти, и нажмите ⏎ Return. Искомое слово будет выделено в документе.
-
6
Щелкните по ► или по ◄. Эти стрелки находятся справа на панели поиска. Если щелкнуть по стрелке, курсор перейдет к следующему (или предыдущему) повтору искомого слова.
-
7
Щелкните по
. Этот значок находится справа от значка в виде лупы, который расположен слева на панели поиска. Откроется выпадающее меню.
-
8
Щелкните по Заменить. Эта опция находится в выпадающем меню. Слева откроется боковая панель.
-
9
Введите слово в строке «Заменить на». Эта строка находится в верхней части боковой панели «Найти и заменить». Введите слово, на которое будет заменено слово, отображаемое в строке «Найти».
-
10
Щелкните по Заменить все. Эта кнопка находится под строкой «Заменить на». Это приведет к замене всех повторений слова из строки «Найти» на слово из строки «Заменить на».
- Например, если в строке «Найти» ввести «мыло», а в строке «Заменить на» ввести «шампунь» и нажать «Заменить все», все найденные (в документе или выделенном фрагменте) слова «мыло» будут заменены на «шампунь».
- Чтобы заменить только некоторые (не все) повторения определенного слова, нажмите «Заменить» и заменяйте слова по одному. Возможно, перед этим вам придется поставить курсор в начало документа.
Реклама


Советы
- Чтобы открыть окно/панель «Найти и заменить», нажмите Ctrl+H (Windows) или ⌘ Command+H (Mac OS X).
- Если документ большой, поиск и замена слов может занять некоторое время. Чтобы прекратить поиск, нажмите клавишу «ESC».
- Функцию «Найти и заменить» можно использовать для поиска как слов, так и форматов и специальных символов.
Реклама
Предупреждения
- Перед тем как воспользоваться функцией «Найти и заменить» сохраните документ на случай, если что-то пойдет не так.
Реклама
Об этой статье
Эту страницу просматривали 41 970 раз.
Была ли эта статья полезной?
Working with documents or spreadsheets on your computer or laptop, you can instantly find and edit text and data without manually combing through printed or handwritten pages. Word provides a very convenient «find and replace» feature that allows you to use wildcards and even find similar words.
Find and replace
To help you in finding some text in the document, Word offers two different options:
1. Using the Navigation pane:
Like in the most popular applications, to find a text in the document, you can use the Ctrl+F shortcut. That combination opens the Navigation pane in Microsoft Word:

If you have any text in the Clipboard or selected text in the document, it will automatically be shown in the search text box. You can type or insert any text you want to find and click Enter to show the results.
To see the next result, click Shift+F4, or use the Navigation pane and Next and Previous buttons for easy navigating between the next or previous results.
For example:

2. Using the Find and Replace dialog box:
To open the Find and Replace dialog box, do one of the following:
- On the Home tab, in the Editing group, click the Find list and then choose Advanced Find…:

- Click Ctrl+H,
- On the Home tab, in the Editing group, click the Replace button:


For example:

Word will show the next found result.
Advanced find and replace
To show the advanced find and replace options, do the following:
- On the Navigation pane, click the arrow down on the right side of the search text box and choose Options… in the list:

Word opens the Find Options dialog box:

- In the Find and Replace dialog box, click the More >> button (it doesn’t matter, which tab do you open: Find or Replace):

Word added several options that you can use to refine the search criteria:


The advanced find and replace options:
- Match case — Find and replace words that only match specific capitalization. For example, you can find one «Wolf» and 11 words «wolf» in the document.
- Find Whole words only — Avoid partial matches. For example, if you want to find «puff», Word doesn’t show the words «puffed».
- Use wildcards — Get partial matches. See Using wildcards for more details.
- Sounds like (English) — Find and replace words that sound like others. For example, «there», «their», and «three».
- Find all word forms (English) — Find and replace all verb tenses. For example, type «find», and Word will return «finds», «finding», and «found».
- Match prefix — Works with other settings to find and replace words with common prefixes or beginnings. For example, «be» returns «best» and «because».
- Match suffix — Works with other settings to find and replace words with common suffixes or endings. For example, «id» returns «said» and «did».
- Ignore punctuation characters — Ignore differences in hyphenation.
- Ignore white-space characters — Ignore spacing between characters.
The Format button — Find and replace page formatting options like Font types or colors, Paragraph formatting (left, right, center), or highlighted words.
The Special button — Find and replace page and character elements such as Em dashes, tabs, or Section Breaks. See Replacing special characters for more details.
The No Formatting button — Turn off formatting selections.
Highlight search results
On the Navigation pane, enter what you want to find in the search box to highlight all occurrences of the searching in the document and display them on the Results page of the Navigation pane:

If you use the Find and Replace dialog box, Word highlights only the next found result. To highlight all results, click the Reading Highlight button and choose Highlight All:

For example:


on
August 23, 2021, 9:27 AM PDT
How to use Replace to remove or add hard returns in a Word document
Too many or too few hard returns can ruin an otherwise professional looking Microsoft Word document. Fortunately, it’s easy to add and replace those hard returns using Word’s Replace feature.

In a Word document, you usually allow Word to wrap to the next line as you enter content. You press Enter only when you’re ready to start a new paragraph. It’s not uncommon though, especially with older documents that you inherit to find more than one hard return between paragraphs. That’s because someone used hard returns instead of altering the text style to add white space. It’s not right or wrong, but in this article, I’ll show you how to use the Replace feature to delete and add hard returns.
SEE: 83 Excel tips every user should master (TechRepublic)
I’m using Microsoft 365 on a Windows 10 64-bit system, but you can use earlier versions. Word Online doesn’t support special-character searches yet. There’s no demonstration file; you don’t need one. Enter =Rand() into a blank document to create a few paragraphs of text, as I did.
What’s a hard return?
Before we get started, I want to mention that the term hard return refers to manually pressing Enter to wrap text to the next line. Word refers to it as a paragraph mark. You’ll see the terms used interchangeably. In this article, I’ll use hard return when speaking generally and I’ll use paragraph mark when referring to the actual symbol circled in Figure A. To see this symbol, click Show/Hide in the Paragraph group on the Home tab.
As you can see in Figure A, there’s only one paragraph mark (hard return) between paragraphs. By default, newer versions of Word automatically add white space between paragraphs using a Spacing setting (more about that later). That’s how you get so much white space between paragraphs with only one hard return. You can adjust the setting, but let’s don’t. Instead, let’s remove it using Replace and see what happens.
Figure A

Deleting hard returns using Replace in Word
Now let’s suppose that you don’t want all that white space between he paragraphs, and you incorrectly assume that there are two hard returns instead of one because the paragraphs. In this case, you might do the following using Replace:
- On the Home tab, click Editing and then choose Replace, or click Ctrl + G. Click the Replace tab if necessary.
- Click More if necessary to expose more options.
- Click inside the Find What control.
- Click the Special button at the bottom of the dialog and choose Paragraph Mark from the resulting list (Figure B). Do this again, so Word looks for two paragraph marks (Figure C). The characters ^p represent a paragraph mark. It’s worth noting that you should use the Special button to enter special characters. Entering the carat character (^) manually doesn’t always work.
- Click inside the Replace With control.
- Use the Special button to enter only one Paragraph Mark (Figure C).
- Take a shortcut and click Replace All. Word confirms the task but makes no replacement (Figure D). (If you have one, don’t worry, it’s probably an extra hard return at the end of the text.)
Figure B

Figure C

Figure D

Are you surprised that nothing happened? By replacing two paragraph marks with only one, you might think you’re removing a paragraph mark between each paragraph, but that didn’t work because there’s only one paragraph mark. Word didn’t find two paragraph marks together.
Let’s delete just one paragraph mark and see what happens. Repeat the steps above, but in step 4, you need only one Paragraph Mark and in step 6, leave the Replace With control blank (delete the original paragraph mark from the first run if necessary). When you click Replace All, Word deletes all of the paragraph marks (a total of 5) and you end up with the single paragraph shown in Figure E.
Figure E

Before we move on to the section on adding hard returns, press Ctrl + Z to undo the Replace task and reset the text to its original space formatting.
SEE: Windows 10: Lists of vocal commands for speech recognition and dictation (free PDF) (TechRepublic)
How to add hard returns using Replace in Word
Now we already know that there’s only one hard return between each paragraph and that a space setting is creating all that white space, so let’s delete it so we can practice adding a hard return using Replace. First, let’s change that space setting as follows:
- Select the content (all of it).
- Click the More button in the Paragraph group on the Home tab.
- On the Indents and Spacing tab, check the Don’t Add Space Between Paragraphs of the Same Style option (Figure F).
- Click OK.
Figure F

The extra spacing is gone, but the single hard returns are still in place. What we need to do now is add a hard return to add more spacing. (I know it seems like we’re not actually solving anything, and we’re not; we’re simply working through examples of how to add and delete paragraph returns using Replace.)
Repeat the instructions for the replace task used above. You’re looking for one paragraph return (^p), and you want to replace it with two (^p^p). You’re reversing the first replace task. Figure G shows the results. The spacing is similar to the earlier space setting.
Figure G

I’m not suggesting that you eliminate the default spacing between paragraphs and then replace it with two hard returns using Replace. That’s not the point of the exercises. We’re deleting and adding hard returns using Replace because it’s easier than manually removing and adding them. You’ve learned that you can use Replace to add and delete them and that ^p represents a paragraph mark when searching a document.
Also See
-
How to make fewer mistakes and work more efficiently using predictive text in Microsoft 365
(TechRepublic) -
How to use the many text wrapping options in Microsoft Word
(TechRepublic) -
Microsoft 365: A cheat sheet
(TechRepublic) -
Zoom vs. Microsoft Teams, Google Meet, Cisco WebEx and Skype: Choosing the right video-conferencing apps for you (free PDF)
(TechRepublic) -
Checklist: Securing Windows 10 systems
(TechRepublic Premium) -
Must-read coverage: Windows 10
(TechRepublic on Flipboard)
-
Microsoft
-
Software
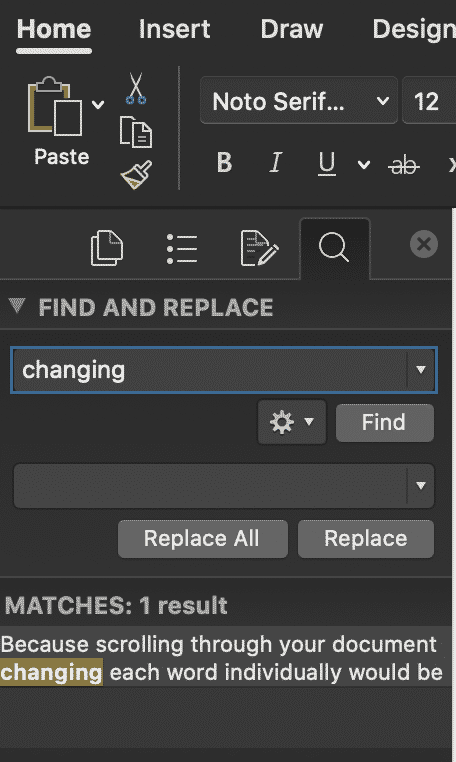
Often when working in Microsoft Word we only need to change one or two words in the file to make it relevant to another client or project. For Example, updating a client’s name in a 30-page contract or updating the address of a company or speakers name in a briefing document.
Because scrolling through your document changing each word individually would be a tedious and time-consuming task Microsoft has built-in a hand tool called ‘Find and Replace’.
Find and Replace allows you to replace one word with another, across the entirety of your Microsoft Word Document at the click of a button.
There is no limit to how many times you can use this tool, but it does need to be done word by word, we can’t yet find and replace multiple words at once. But still, it’s a huge time saver and will guarantee you don’t miss a word that needs replacing.
In this post we will show you how to use the Find and Replace tool in Microsoft Word and leave you updating your document in seconds.
Using Microsoft Word’s Find and Replace
- Open Word
- Find and click Edit in the Home bar
- Under Edit click Find

- In the Find tab press Replace….
- This will open a navigation box on the left-hand side of your Word Document
- Type the word you wish to replace in the Find box
- Type the word you wish to replace this word with, in the second text box
- Choose Replace. To replace all instances at the same time, select Replace All.
- Press OK.
You have no successfully used Words Find and Replace feature to update your Microsoft Word Document.
Advanced Word Replacement
If your word search shows multiple options, as shown below.
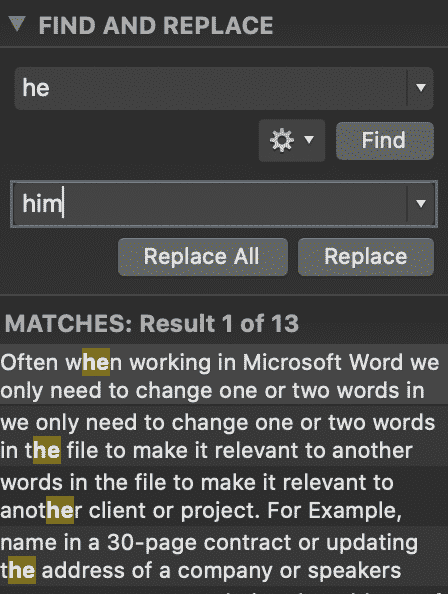
You can scroll through the highlighted words until you find the word you would like to replace. This will narrow down the word search and ensure you only replace the exact word you are looking for.

Looking for an easier solution to your collaboration frustrations?
When collaborating in Microsoft Word, your email inbox can quickly become filled with updated versions of a document being sent back and forward between colleagues.
John made an edit, sent an email ‘see updated attached’.
Then Lucy made an edit, sent an email 30minutes later ‘updated version attached’, and it goes on for days.
Sending updated versions via email is one way to know a new version is available and required your attention. But it can also clutter your inbox with internal emails, with a single line or sometimes nobody of text in the email.

The alternative is to send them via a group chat channel such as Slack or Microsoft Teams, but you should make a new channel for the document updates so that you don’t miss one, or lose it in an open channel as other conversations start happening around the document being sent.
With overflowing inboxes and your slack channel constantly telling you there are un-read messages there needs to be a solution for collaborating alone. Somewhere your updated versions can live in peace, with no other noise around them to allow you to easily review and check them at any time.
The solution is here and it comes in the form of a great new purpose-built tool called Simul Docs.
Simul was built just for Microsoft Word and for you, to help you collaborate with ease.
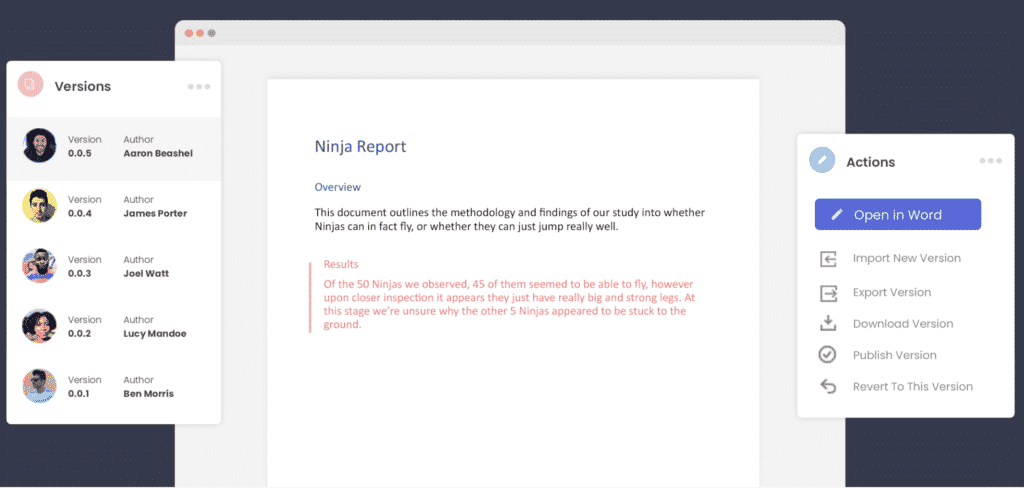
First and foremost, Simul will store and manage every version of your document in an easy to navigate toolbar that you can access from anywhere you have an internet connection (or offline if you do a quick download before losing your connection).
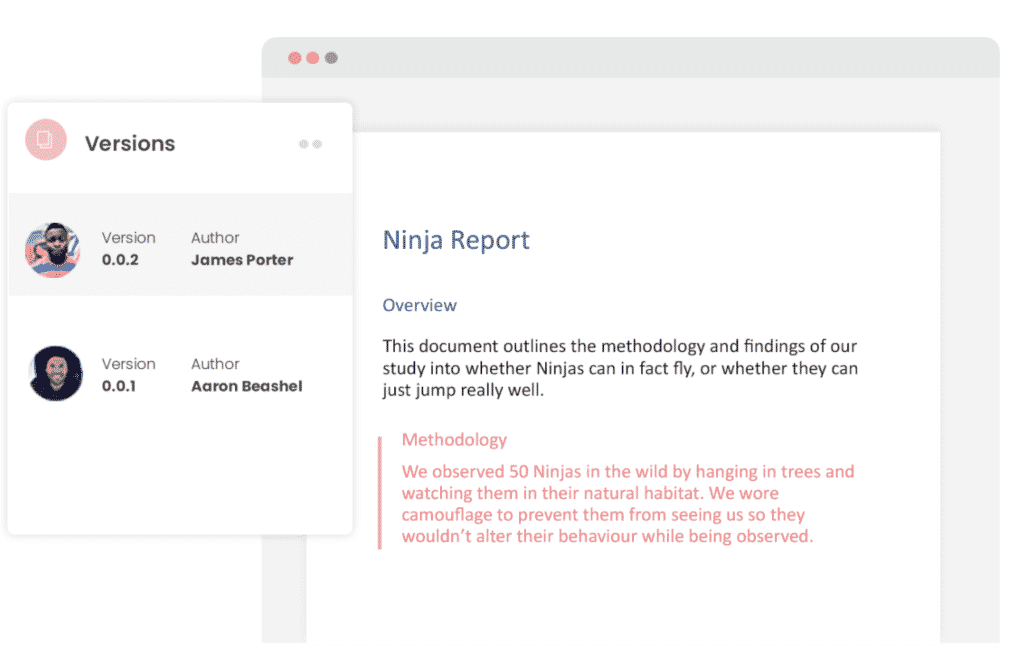
As a new version of your document is created, Simul will automatically save the file under a numerical version number that makes sense. The first version is named 0.0.1, the second 0.0.2, the third 0.0.3 and so on. Making it easy for you to keep track of how many versions have been made and which one is the most recent.
But what about any extra notes or comments the author wanted to make, ones they would usually put in the email such as ‘Tim, this is my final round of edits before we send onto client’? No worries, Simul allows you to add comments and notes to any version as well, so your team can see what is going on at all times.

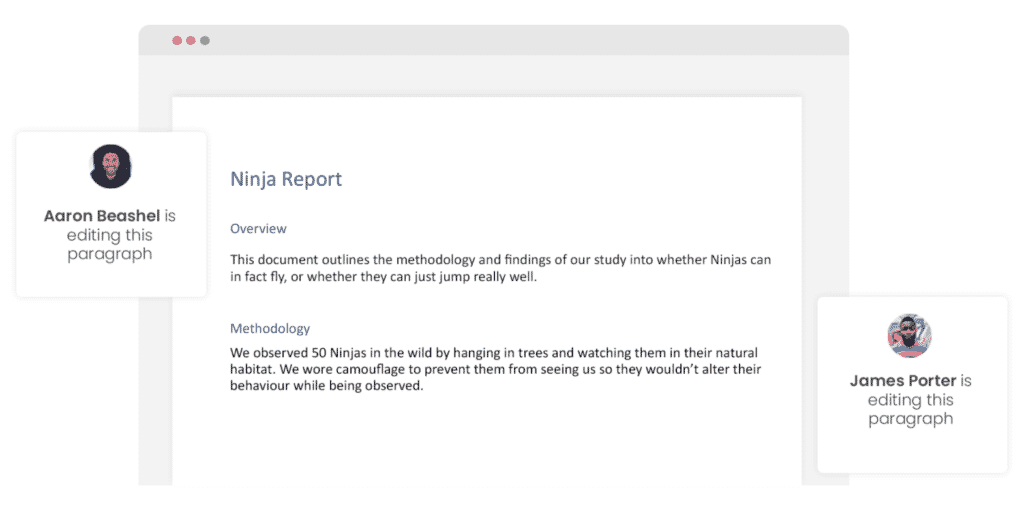
Speaking of comments and notes, Simul will also track every comment, change or edit made to a version for you, without you having to remember to turn tracked changes on. That’s pretty cool, right?
So a tool that manages your version control, saves your files and stores them and tracks all of your edits and changes without you thinking about any of it, it sounds too good to be true or as though it would be difficult to use or implement. Well, don’t worry it’s not, it’s here and it is called Simul Docs and it’s so easy to use, after walking through the in-app tutorial we had it down within 3 minutes.
It’s a bit like an apple product, it just makes sense. It’s clean and simple, nothing too complicated, but with everything you need all in the one spot.
If you’re not convinced already, head over to Simul now and give their free trial a go.
Collaboration just got a whole lot easier with Simul Docs.
Find and Replace Text and Numbers in Word
by Avantix Learning Team | Updated March 7, 2022
Applies to: Microsoft® Word® 2013, 2016, 2019, 2021 or 365 (Windows)
You can find and replace in Word using the Find and Replace dialog box as well as the Navigation Pane. If you use the dialog box, you can find and replace text and numbers and use wildcards for more advanced find and replace tasks. Wildcards are useful when you are not able to find an exact match. You can display the Find and Replace dialog box using a keyboard shortcut or the Home tab in the Ribbon.
Recommended article: How to Quickly Remove Hard Returns in Word Documents
Do you want to learn more about Microsoft Word? Check out our virtual classroom or in-person Word courses >
Note: Screenshots in this article are from Word 365 but are similar in previous versions of Word.
The Replace command appears on the Home tab in the Ribbon in the Editing group:

Using the Find and Replace dialog box to replace words or characters (and match case)
You can perform simple find and replace tasks using the Replace dialog box in its collapsed state. To access more advanced options, you will need to click More in the Replace dialog box to expand it.
To use the Find and Replace dialog box to find and replace text in Word (words or characters) and match case if needed:
- Click the Home tab in the Ribbon.
- In the Editing group, click Replace to display the Replace dialog box. Alternatively, press Ctrl + H if you prefer to use a keyboard shortcut to open the Replace dialog box.
- Enter the text you want to find in the Find What box. You can specify whether Word should locate only matches with the exact capitalization by clicking More and then selecting or checking Match case.
- Enter the text you want to replace in the Replace box.
- Click Find Next and then click Replace for each occurrence or click Replace All.
- Click Close.
In the following example, the Replace dialog box has been expanded to display other options including Match case:

Finding and replacing using wildcards
To use wildcards, you will need to use the Find and Replace dialog box and expand it to display more options. You can then select the option to Use wildcards. A wildcard can replace one or more characters in a string of text or numbers. The most common wildcard is the asterisk (*).
It’s important to note that wildcard searches are case sensitive. Also, Word uses «lazy» pattern matching so it will stop matching as soon as possible. This means that you could enter part of a word and find that part without using wildcards.
To find and replace text using wildcards in Word:
- Position the cursor at the location in the document where you want to start finding and replacing. If you want to start at the beginning of the document, you can press Ctrl + Home.
- Click the Home tab in the Ribbon.
- In the Editing group, click Replace. Alternatively, press Ctrl + H. A dialog box appears.
- Select More to expand the dialog box.
- Click in the Find What box.
- Select or check the Use wildcards checkbox.
- Enter the text and wildcard(s) you want to use. For example, enter s*l to find any text starting with s and ending with l.
- Click in the Replace with box.
- Enter the text you want to use to replace the text in the Find what box.
- Click Find Next to find the first instance of the characters you want to find.
- Click Replace or Replace All. If you click Replace, Word will select the next matching characters in the Find what box. If you click Replace All, Word will display a dialog box with the number of replacements. In this case, click OK.
- If necessary, click Replace again. Repeat for each instance.
- Click Close to close the dialog box.
In the following example, b*s has been entered in the Find what box to find any word starting with starting with b and ending with s:

If you want to undo a Replace or Replace All action, close the dialog box and press Ctrl + Z.
Using common wildcards
The most common wildcards you can use in the Find and Replace dialog box are the asterisk (*) to find multiple characters and the question mark (?) to find a single character.
For example:
b*l will find ball and barrel (a character followed any characters and ending with a specific character)
h?ll will find hill and hall (a character followed by any single character and then followed by 2 characters)
Using wildcards to find one or more instances of the same character
You can also use @ as a wildcard to find one or more instances of the same character.
For example:
catchal@ will find catchal or catchall
Using wildcards for alternate characters and ranges
You can also use wildcards to find alternate characters or ranges of characters. These are entered in square brackets [ ] and may be combined with other wildcards.
[ ] can be used to find each of a set of characters
[ – ] can be used to find each of a set of characters in a range
You can use any character or series of characters in a range within the square brackets (including the space character). Characters are processed in alphanumeric order from lowest to highest.
For example:
[abc] will find any of the letters a, b, or c
[G] will find the upper case letter G
[A-Z] will find any upper case letter
[0-9] will find any single number
[13579] will find any odd number
[0-9A-z] will find any number or letter
f[ai]n will find each of the characters in square brackets such as fan or fin
[b-f]at will find each of a range of characters such as bat, cat, and fat
Using wildcards to omit characters
If you want to omit specific characters, you can use an exclamation mark (!) combined with square brackets.
For example:
[!f]ast will find last and past but not fast
Using wildcards to find the beginning or end of a word
You can use the less than symbol (<) to find the beginning of a word and the greater than symbol (>) to find the end of a word. These wildcards are combined with characters in round brackets or parentheses.
For example,
<(watch) will find watching or watchman
(all)> will find wall or stall
These wildcards can be problematic if you are using a wildcard and you want to find > or < as characters in the document. If this is the case, enter a backslash () in front of the character so that it is not treated as a wildcard.
For example,
<*> will find <h1> or <h2>
Using wildcards to find instances of a character
You can use curly brackets { } to specify the number of instances of a character. These brackets can be combined with a comma to specify the number of instances. Counting can be used with individual characters or with sets of characters.
{n} is used to find the number of instances of a character
{n,} is used to find at least n instances of a character
{n,m} is used to find between n and m instances of a character
For example:
^p{2} will find two consecutive paragraph marks or hard returns (^p is a special character for a paragraph mark in Word)
{3} will find three spaces (there is a space entered before the first curly bracket)
30{2,} will find at least 2 instances of the preceding character such as 3000 or 30000
30{3,4} will find between 3 and 4 instances of the preceding character such as 30000 or 300000 not 300
These last wildcards are particularly useful if you are finding and replacing numbers in Word.
The Find and Replace dialog box offers more functionality as well. For example, you can also Find and Replace Formatting in Word.
Subscribe to get more articles like this one
Did you find this article helpful? If you would like to receive new articles, join our email list.
More resources
How to Add Page Numbers in Word (Step by Step)
How to View Document Statistics in Microsoft Word
How to Update All Figure Numbers in Microsoft Word
How to Check Word Count in Microsoft Word (4 Ways)
How to Superscript or Subscript in Word (with Shortcuts)
Related courses
Microsoft Word: Intermediate / Advanced
Microsoft Word: Designing Dynamic Word Documents Using Fields
Microsoft Word: Long Documents Master Class
Microsoft Word: Accessible Word Documents
Microsoft Excel: Intermediate / Advanced
Microsoft PowerPoint: Intermediate / Advanced
VIEW MORE COURSES >
Our instructor-led courses are delivered in virtual classroom format or at our downtown Toronto location at 18 King Street East, Suite 1400, Toronto, Ontario, Canada (some in-person classroom courses may also be delivered at an alternate downtown Toronto location). Contact us at info@avantixlearning.ca if you’d like to arrange custom instructor-led virtual classroom or onsite training on a date that’s convenient for you.
Copyright 2023 Avantix® Learning
Microsoft, the Microsoft logo, Microsoft Office and related Microsoft applications and logos are registered trademarks of Microsoft Corporation in Canada, US and other countries. All other trademarks are the property of the registered owners.
Avantix Learning |18 King Street East, Suite 1400, Toronto, Ontario, Canada M5C 1C4 | Contact us at info@avantixlearning.ca