Excel for Microsoft 365 Word for Microsoft 365 Outlook for Microsoft 365 PowerPoint for Microsoft 365 Access for Microsoft 365 OneNote for Microsoft 365 Project Online Desktop Client Publisher for Microsoft 365 Visio Plan 2 Word for Microsoft 365 for Mac Word for the web Excel 2021 Word 2021 Outlook 2021 PowerPoint 2021 Access 2021 Project Professional 2021 Project Standard 2021 Publisher 2021 Visio Professional 2021 Visio Standard 2021 OneNote 2021 Word 2021 for Mac Excel 2019 Word 2019 Outlook 2019 PowerPoint 2019 Access 2019 Project Professional 2019 Project Standard 2019 Publisher 2019 Visio Professional 2019 Visio Standard 2019 Word 2019 for Mac Excel 2016 Word 2016 Outlook 2016 PowerPoint 2016 Access 2016 OneNote 2016 Project Professional 2016 Project Standard 2016 Publisher 2016 Visio Professional 2016 Visio Standard 2016 Word 2016 for Mac Excel 2013 Word 2013 Outlook 2013 PowerPoint 2013 Access 2013 OneNote 2013 Project Professional 2013 Project Standard 2013 Publisher 2013 Visio Professional 2013 Visio 2013 Excel 2010 Word 2010 Outlook 2010 PowerPoint 2010 Access 2010 OneNote 2010 Project 2010 Project Standard 2010 Publisher 2010 Visio 2010 Visio Standard 2010 Office 2010 Excel 2007 Word 2007 Outlook 2007 PowerPoint 2007 Access 2007 Project 2007 Publisher 2007 Visio 2007 More…Less
Note: Adding a word to a custom dictionary in one Office program makes that word available for spelling checks in other Office programs.
All custom dictionaries are managed through the Custom Dictionaries dialog box, and any custom dictionaries you want to use must be enabled (selected) in this dialog box. Follow these steps to open the dialog box, and then choose a specific task below.

Open the Custom Dictionaries dialog box
-
Open the proofing options:
-
In most Office programs: Go to File > Options > Proofing.
-
In Outlook: Go to File > Options > Mail > Spelling and Autocorrect > Proofing.
-
-
Make sure the Suggest from main dictionary only check box is cleared.
-
Select Custom Dictionaries.
All dictionaries are listed here, with the default dictionary at the top.
Note: To quickly add a word to a dictionary, right click the word in a document, and select Add to dictionary. The word is added to your default dictionary.
-
Open the Custom Dictionaries dialog box by following the steps in the preceding section.
-
Select the dictionary that you want to edit. Don’t clear the check box.
-
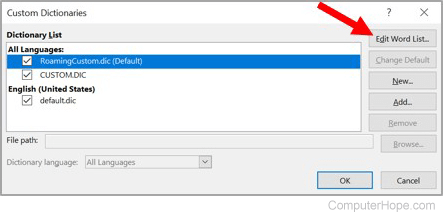
Select Edit Word List.
-
Do one of the following:
-
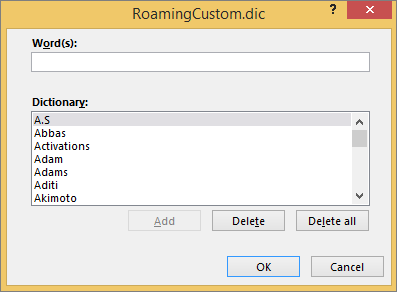
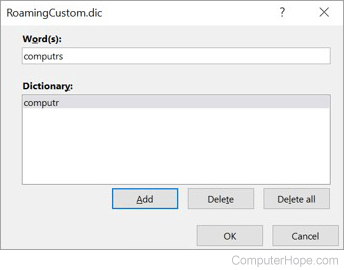
To add a word, type it in the Word(s) box, and then select Add.
-
To delete a word, select it in the Dictionary box, and then select Delete.
-
To edit a word, delete it, and then add it with the spelling you want.
-
To remove all words, select Delete all.
-
If you want this custom dictionary to be the default dictionary, where any new words you add will be saved, see Change the custom dictionary to which the spelling checker adds words, below.
Select the headings below for more information
If the spell checker flags certain words as misspelled but you want it to ignore these words, you can add them to the default custom dictionary. To change the default custom dictionary where these words are added, see Change the custom dictionary to which the spelling checker adds words, below.
-
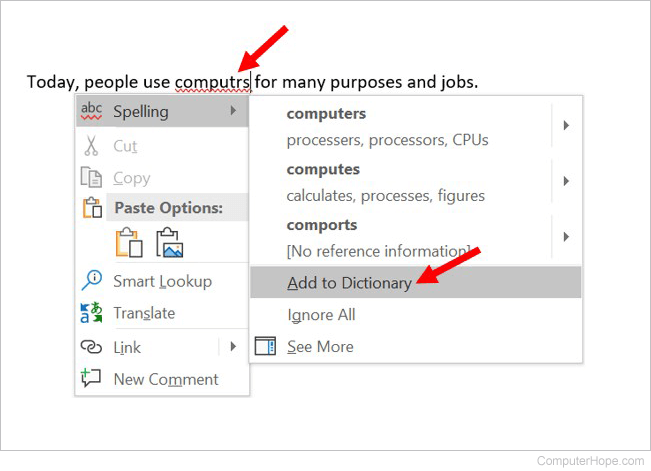
When checking spelling and grammar automatically, right-click the word with the red squiggly line, and then select Add to Dictionary.
-
When running the spelling and grammar checking tool, select Add or Add to Dictionary for the flagged word.
Note: If the Add to Dictionary option is not available, make sure you have a default custom dictionary selected in the Custom Dictionaries dialog box. See the section Change the custom dictionary to which the spelling checker adds words, below, to learn how to select a default custom dictionary.
To learn more, see Check spelling and grammar.
-
Open the Custom Dictionaries dialog box by following the steps in the Open the Custom Dictionaries dialog box section, above.
-
Select New.
-
In the File name box, type a name for the custom dictionary.
-
Select Save.
-
If you want the new dictionary to be used for another language, while the new dictionary is still selected in the Dictionary List, select the language on the Dictionary language menu.
If you want your new custom dictionary to be the default dictionary, where any words you add will be saved, see the next task, Change the custom dictionary to which the spelling checker adds words.
When you add words while checking spelling, new words are added to the default custom dictionary, which is the one at the top of the list when you open the Custom Dictionaries dialog box. You can change the default custom dictionary used for all Office programs:
-
Open the Custom Dictionaries dialog box by following the steps in the Open the Custom Dictionaries dialog box section, above.
-
In the Dictionary list box, do one of the following:
-
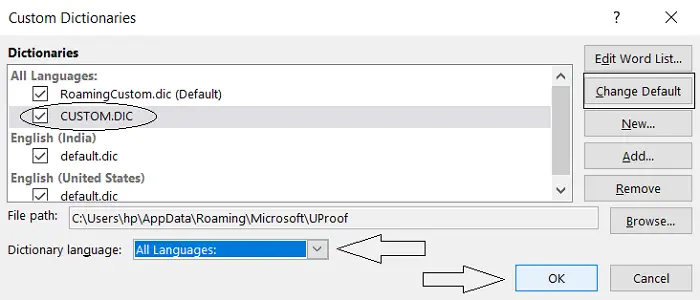
To change the default dictionary for all languages, select the dictionary name under All Languages.
-
To change the default dictionary for a particular language, select the dictionary name under the language heading.
-
-
Select Change Default.
Note: If there is only one dictionary under a heading, it must be the default dictionary. In this case, the button isn’t available.
The next time that you check spelling, the program uses the default custom dictionaries that you selected.
By default, when you create a new custom dictionary, the program sets the dictionary to All Languages, which means that the dictionary is used when you check the spelling of text in any language. However, you can associate a custom dictionary with a particular language so that the program uses the dictionary only when you check the spelling of text in a particular language.
-
Open the Custom Dictionaries dialog box by following the steps in the Open the Custom Dictionaries dialog box section, above.
-
In the Dictionary list box, select the dictionary that you want to change.
-
On the Dictionary language menu, select the language for which the dictionary should be used.
The Custom Dictionaries dialog box lists the available custom dictionaries the program can use to check spelling. If the dictionary you want to use, such as one purchased from a third-party company, is installed on your computer but not listed in the Dictionary list box, you can add it.
-
Open the Custom Dictionaries dialog box by following the steps in the Open the Custom Dictionaries dialog box section, above.
-
Select Add.
-
Locate the folder containing the custom dictionary you want, and then double-click the dictionary file.
If you want this custom dictionary to be the default dictionary, where any new words you add will be saved, see the section Change the custom dictionary to which the spelling checker adds words above.
-
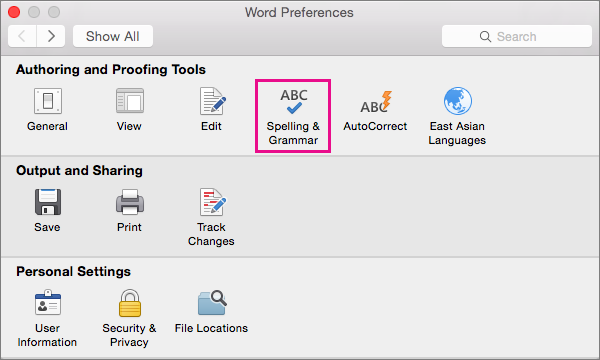
Go to Word > Preferences.
-
Under Authoring and Proofing Tools, select Spelling & Grammar.
-
If you want to use custom dictionaries, make sure the Suggest from main dictionary only check box is cleared.
-
Select Dictionaries.
-
Select the dictionary that you want to edit.
Don’t accidentally clear the check box for the dictionary.
-
Select Edit.
The custom dictionary opens as a document for editing.
-
Save the document.
Note: When you edit a custom dictionary, Word stops checking your spelling as you type. When you are done modifying a custom dictionary, if you want Word to resume checking your spelling as you type, navigate to the Spelling & Grammar dialog box, shown in Step 2 above, and select Check spelling as you type.
-
Open the Custom Dictionaries dialog box by following the steps above.
-
In Custom Dictionaries, make sure the check box next to each custom dictionary that you want to use is selected, and then click OK.
-
Open the Custom Dictionaries dialog box by following the steps above.
-
Select New.
-
In the Save As box, type a name for the custom dictionary.
-
Select Save.
-
If you want the new dictionary to be used for another language, while the new dictionary is still selected in the Custom Dictionaries dialog box, select the language from the Language list.
-
Select OK.
The Custom Dictionaries dialog box lists the available custom dictionaries that Word can use to check spelling. If the dictionary that you want to use — for example, one that you purchased from a third-party company — is installed on your computer but not listed in the Custom Dictionaries dialog box, you can add it.
-
Open the Custom Dictionaries dialog box by following the steps above.
-
Select Add.
-
Locate the folder that contains the custom dictionary you want to add, and then double-click the dictionary file.
If you want additional help installing a third-party dictionary, see the installation instructions for that dictionary.
By default, when you create a new custom dictionary, the program sets the dictionary to All Languages, which means that the dictionary is used when you check the spelling of text in any language. However, you can associate a custom dictionary with a particular language so that the program uses the dictionary only when you check the spelling of text in a particular language.
-
Open the Custom Dictionaries dialog box by following the steps above.
-
In the Custom Dictionaries dialog box, select the dictionary that you want to change.
-
On the Language list, select the language for which the dictionary should be used.
Whenever you check the spelling of a document, you have an option to add a word flagged as misspelled to a custom dictionary. The default custom dictionary is the dictionary to which Microsoft Word adds the word when you do this.
-
Open the Custom Dictionaries dialog box by following the steps above.
-
In Spelling & Grammar, select a dictionary in the Custom dictionary list.
-
Close the Spelling & Grammar dialog box.
Note: If there is only one dictionary under a heading, it must be the default dictionary. In this case, the button isn’t available.
The next time that you check spelling, the program uses the default custom dictionaries that you selected.
When a word that isn’t recognized in the Word for the web dictionary appears in a document, Word will mark it as misspelled by underlining it with a wavy red line. If you want Word to recognize the spelling as correct, you can add it to the dictionary.
-
Select a misspelled word marked with a wavy red underline.
-
Choose More options > Add to Dictionary.
See also
Spelling and Grammar in Word
Need more help?
Download Article
Download Article
Sometimes when you work on a word processing document in Microsoft Word, you will type a word that the program doesn’t recognize, so a red line will appear under words that are actually spelled correctly. Understand how to add a word to the dictionary in Microsoft Word so it will recognize the correct word and stop trying to correct it. Moreover, learn how to take advantage of the custom dictionaries in MS Word so spell check doesn’t confuse your special terms between the different types of writing you do in the program.
-
1
Determine what type of word you want to add to your dictionary. Decide if it is one that will apply to all your writing, such as your name, or if it is special jargon specific to a type of writing you do, like the name of a particular scientist or story character?
-
2
Open the custom dictionary settings for MS Word.
- In Word 2003 for Windows or 2004 for Mac, go to the «Tools» menu, select «Spelling and Grammar�», and click «Options�».
- In Word 2007 or 2010 for Windows, click the File menu button> select options then click «Proofing.»
- In Word 2008 or 2011 for Mac, go to the «Word» menu, select «Preferences,» and click «Authoring and Proofing Tools.» Choose the «Spelling and Grammar» option.
Advertisement
-
3
Make sure there isn’t a check in the «Suggest from main dictionary only» check box.
-
4
Find the drop-down menu to select your custom dictionary.
- If the word to be added will apply to special writing projects, select the default, «Custom Dictionary,» if it isn’t already selected.
- If the word to be added is specific to a certain type of writing you do (for example, technical documents written for work or stories set in a particular fantasy world), click the «Dictionaries�» button if you don’t already have a dictionary slotted for that purpose in the drop-down menu.
- Find the «New�» button in the «Custom Dictionaries» dialog box that pops up.
- Pick a location on your computer to save the custom dictionary.
- Make sure that new custom dictionary has a check mark beside it to indicate that it’s active.
- Make sure the correct custom dictionary is selected as default dictionary.
-
5
Click «OK.» and Close the «Custom Dictionaries» dialog box.
-
6
Close the «Spelling and Grammar» dialog box if it’s open.
-
7
Highlight the word you want to add to your selected custom dictionary.
-
8
Run spell check. Spell check will tell you that your special word is misspelled.
-
9
Click the «Add» button to add the word to your dictionary in Microsoft Word.
Advertisement
Ask a Question
200 characters left
Include your email address to get a message when this question is answered.
Submit
Advertisement
Video
-
Customizing dictionaries for different types of writing has a twofold benefit. First, it reduces the risk that you’ll create too large a custom dictionary. If a custom dictionary file gets too large, MS Office can no longer add to it. Second, changing your custom dictionary between your different writing types avoids situations where spell check sees «raine» in your essay and assumes it’s correct, because you have a character in your story with that name.
-
When running spell check with your overall «Custom Dictionary» dictionary, hit «Ignore all» for any terms that are to be checked by your specialized dictionary, and vice versa. That will prevent term overlap when you customize your MS Word dictionary.
Thanks for submitting a tip for review!
Advertisement
About This Article
Thanks to all authors for creating a page that has been read 77,762 times.
Is this article up to date?
Updated: 11/30/2020 by
When typing a document in Microsoft Word, you can use a tool to make sure you have spelled all your words correctly. Sometimes, you may need to add a word to the dictionary if Microsoft Word does not recognize it.
In Microsoft Word, there are two ways you can add a new word to the dictionary. Select a link below for the method you want to use and follow the steps provided.
Add new word through a custom dictionary
- In the menu bar, click the File tab, then click Options.
- In the Word Options window, click the Proofing option in the left navigation pane.
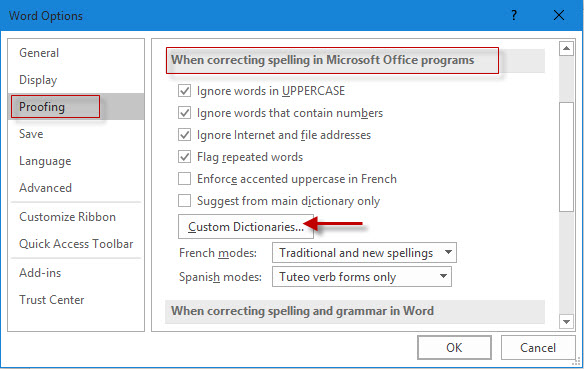
- Under the When correcting spelling in Microsoft Office programs header, make sure the box is unchecked for the Suggest from main dictionary only option.
- Click the Custom Dictionaries button.
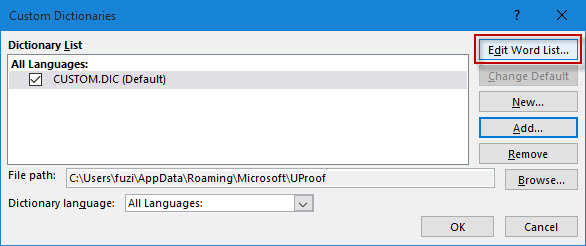
- In the Custom Dictionaries window, select the dictionary set as the default dictionary, then click the Edit Word List button.
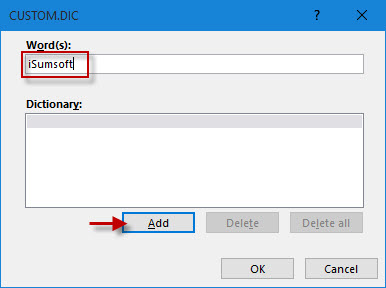
- Type the word you want to add in the Word(s) text field.
- Click the Add button to add the word to the Microsoft Word dictionary.
- Click the OK button on each of the open windows to save the dictionary changes.
Add new word during a spell check
- As you are typing text in the document, any words that Microsoft Word considers to be misspelled have a red squiggly line underneath them. Right-click the word with a red squiggly line under it.
- In the pop-up menu that opens, select Spelling, then the Add to Dictionary option.
Over the years Microsoft Word has played a key role in our professional lives. It is pretty much our go-to application every time we want to prepare an article or a proposal of any sort. Similarly, it has a fair share of programmers depending on it as their primary IDE (Integrated Development Environment).
One of the most useful features in Microsoft Word, or any text editing application, is the autocorrect, but that can get a tad bit annoying at times. Sometimes, you repeatedly mention words that aren’t a part of Word’s dictionary or write a line of code where the objects aren’t identified as legitimate English words. Thus, today we will be showing you how you can add or remove words from the Microsoft Word Dictionary.
I can’t fathom the countless times I have been saved from the embarrassment of foolish typing errors just because of the autocorrect feature, but in cases where the words we intend to type aren’t a part of the dictionary, those red lines that appear under them can both be annoying and make your work look untidy. On the flip side, it’s possible for you to mistakenly add a word to the MS Word dictionary, meaning that each time you type that work thereon out, it won’t be corrected. This guide will help you out with both these issues.
While this guide was centered around Microsoft Word, Microsoft has kept a unique UI across the various utilities of its Office Suite, so you can find similar steps to make these tweaks in other Office applications like Excel, PowerPoint, Outlook too.
You have the following ways using which you can add or remove words from Microsoft Word Dictionary:
- Using the Word context menu
- From the DEFAULT.dic dictionary file
- Using the Custom Dictionaries dialog box
1] Using the Word context menu
This is pretty much the most basic and elementary way to get the job done. All you have to do here is open Microsoft Word and type out the word that you want to add to the dictionary.
If it isn’t already a part of it, you’ll find a red line below it. Right-click on the word and from the context menu, select ‘Add to dictionary.’ If this option is greyed out on your end, you will have to enable the Custom Dictionaries option. Here is how that can be done.
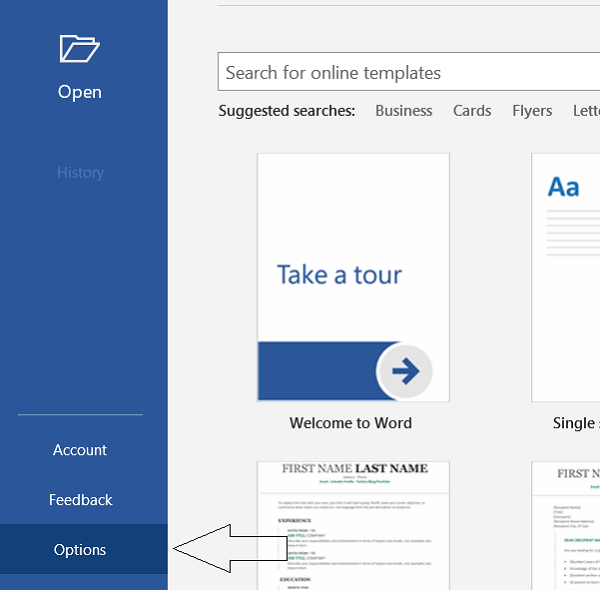
Click on the File option from the menu up top. From the panel of settings on the left, click on ‘Options’. This is going to open the Word Options window.
Here, select proofing from the left side and further click on Custom Dictionaries. You will now see a separate Custom Dictionaries window.
Under Dictionary List, checkmark CUSTOM.dic. This will enable the Change Default option which would, otherwise, be greyed out. Click on that and from the Dictionary Language drop-down, select All Languages. Save these settings by clicking on Ok and exit the window. You will now be able to add words to the MS Word dictionary using the context menu.
Read: How to link PPT or PDF objects in Word document.
2] From the DEFAULT.dic dictionary file
The DEFAULT.dic file is a directory of all the words that you have added manually to your dictionary. It, too, can be modified to make space for more words.
Open the Run command by pressing the Windows + ‘R’ key combination. In the command line box, copy and paste the following path.
%AppData%MicrosoftSpellingen-US
You can, alternatively, open your File Manager and paste the path there.
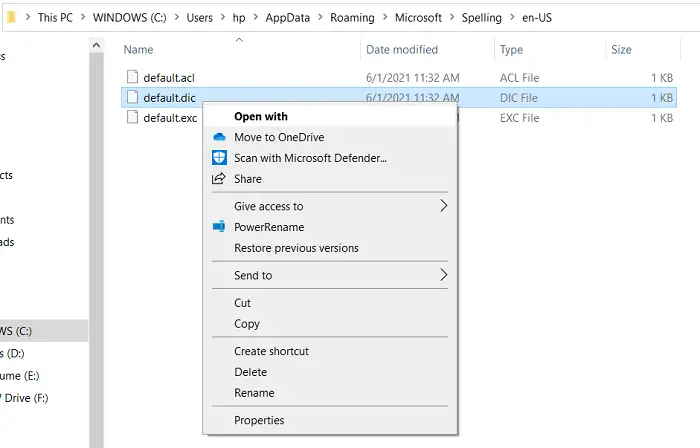
This will take you to a folder named Spelling, where you will see three files. We have to work with the DEFAULT.dic file. Unfortunately, there is no standard application that can open ‘.dic’ extension files, so we will be making use of Notepad.
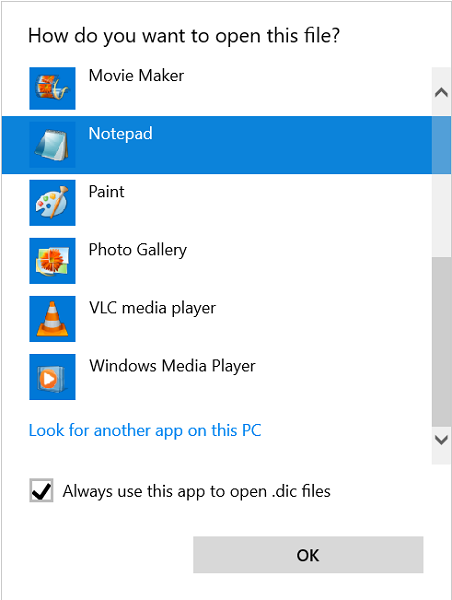
Right-click on the DEFAULT.dic file and click on Open With. It would then show a list of apps you can open ‘.dic’ files with, which would normally be empty. So, click on ‘More Apps’, and from the list that is subsequently shown select Notepad.
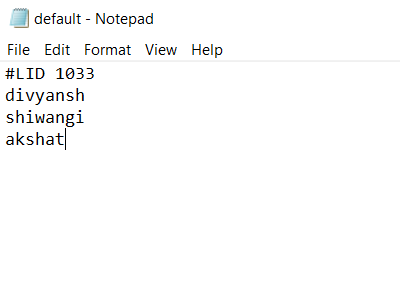
This will open a Notepad file with the words ‘#LID 1033’ in its first line. All you have to do now is simply add words you want to be a part of the dictionary to this notepad file. If you have to delete a word from your system’s dictionary, simply delete it from this document.
Keep in mind that you should only input one word per line. A sample file looks like this:
Save the file and you can now observe these newly added words to not show a red line below them.
3] Using the Custom Dictionaries dialog box
If you remember, we opened the Custom Dictionaries dialog box to enable the Add to Dictionary feature earlier on. You can use this dialog box to add words of your choice to the dictionary too.
Open MS Word and from the Top Menu, click on File. From the settings and show up on the left-side pane, select Options.
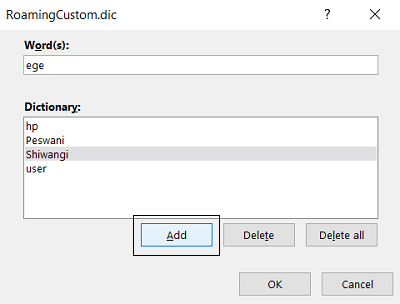
Click on Proofing and further select Custom Dictionaries. In the Custom Dictionaries window, click on CUSTOM.dic, or any dictionary of your choice, and further click on Edit Word List.
Under the Word(s) option, type the words that you wish to be a part of your dictionary and click on Add to save that. Words using this method can be added one by one, so repeat the process and close the window once you are done.
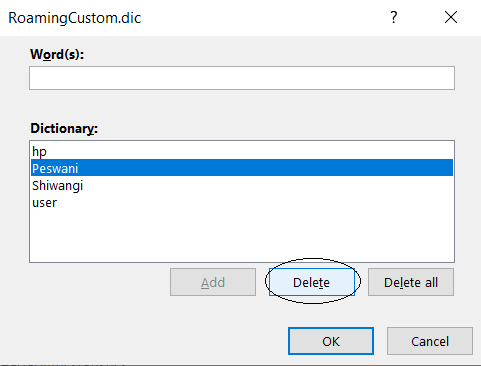
All the words that you have added, now or previously, will appear under the Dictionary. If you want to delete a word, simply click on it and select Delete.
We hope that this guide was able to satisfactorily answer your queries on how to add or remove words from your MS Word Dictionary.
Related: How to add a custom dictionary in Word, Excel, and Outlook.
Автозамена – это очень удобная функция, которую Microsoft Word предлагает пользователям. Если неправильно пишем какое-либо слово или делаем грамматические ошибки, автозамена показывает его с красным или зеленым подчеркиванием. Когда щелкаем правой кнопкой мыши по слову, отображается список предложений для их исправления. Но это в определенной степени вызывает раздражение, когда набираем команды или коды.
Иногда нужно написать слово определенным образом. Допустим, вы собираетесь использовать это слово несколько раз в документе. Вместо того чтобы игнорировать варианты из контекстного меню, можно добавить это слово в словарь Word. Узнаем несколько способом добавления или удаления слов из словаря.
Добавление слов из контекстного меню
Откройте тестовый редактор любого офисного приложения. Для примера используем Microsoft Word. Внесение изменений в любое другое приложение (например, WPS Office) будет аналогичным.
Откройте документ и введите или выделите существующее слово.
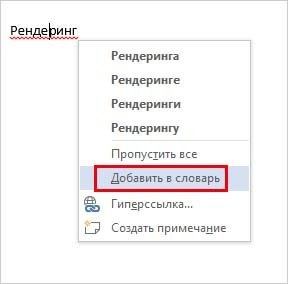
Щелкните правой кнопкой по нему и перейдите в пункт «Добавить в словарь». В дальнейшем при наборе этого слова, оно не будет выделяться красным подчеркиванием, поскольку система при сверке правописания обнаружит его в словаре.
Иногда можем обнаружить, что опция «Добавить в словарь» неактивна. Чтобы сделать ее доступной, выполните указанные шаги.
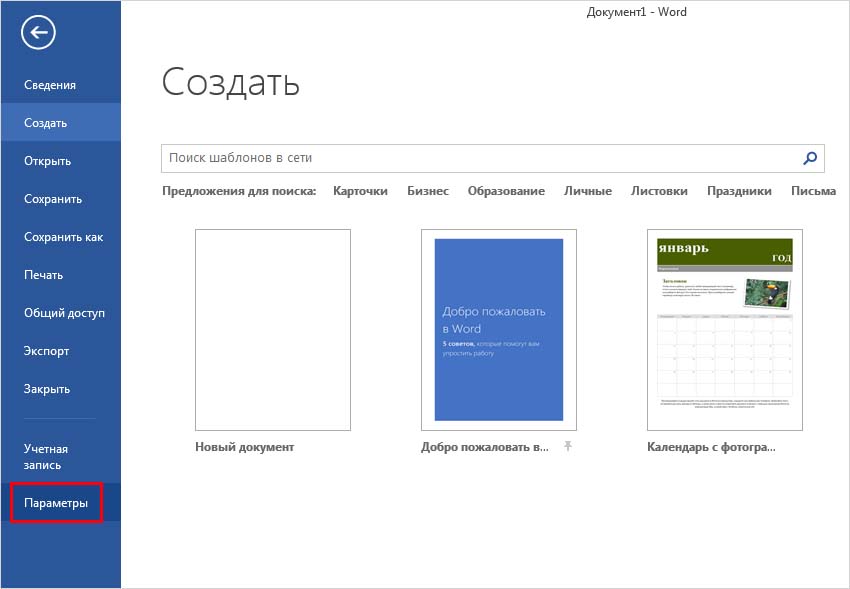
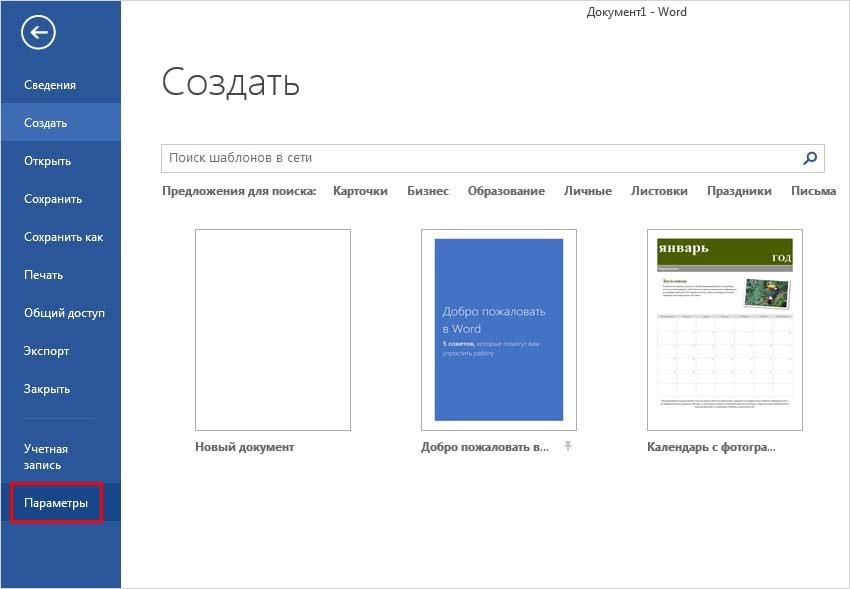
Перейдите в верхнем меню на вкладку Файл. В боковой панели слева выберите «Параметры».
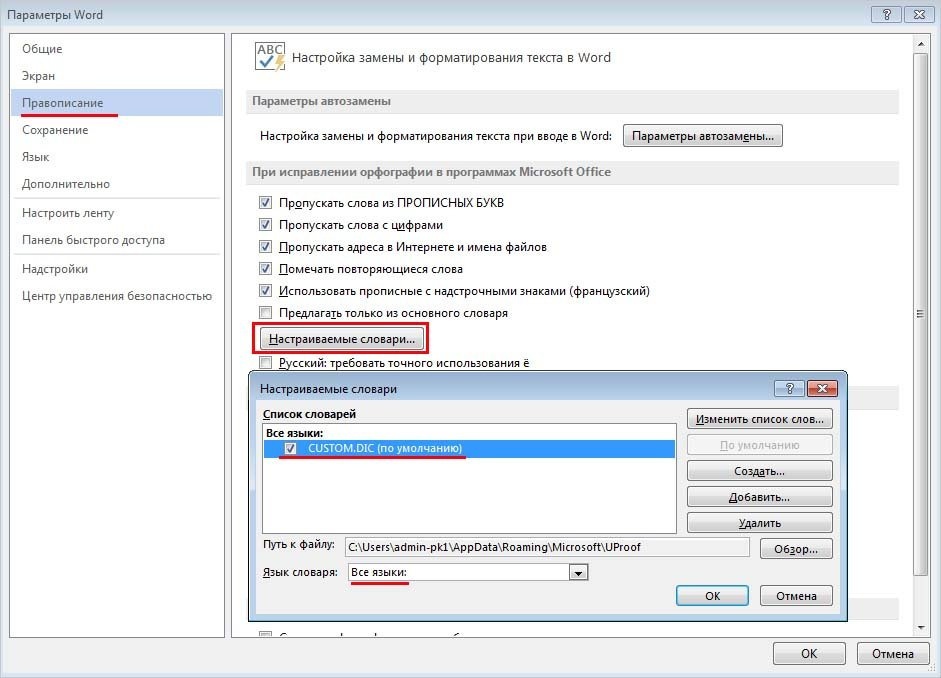
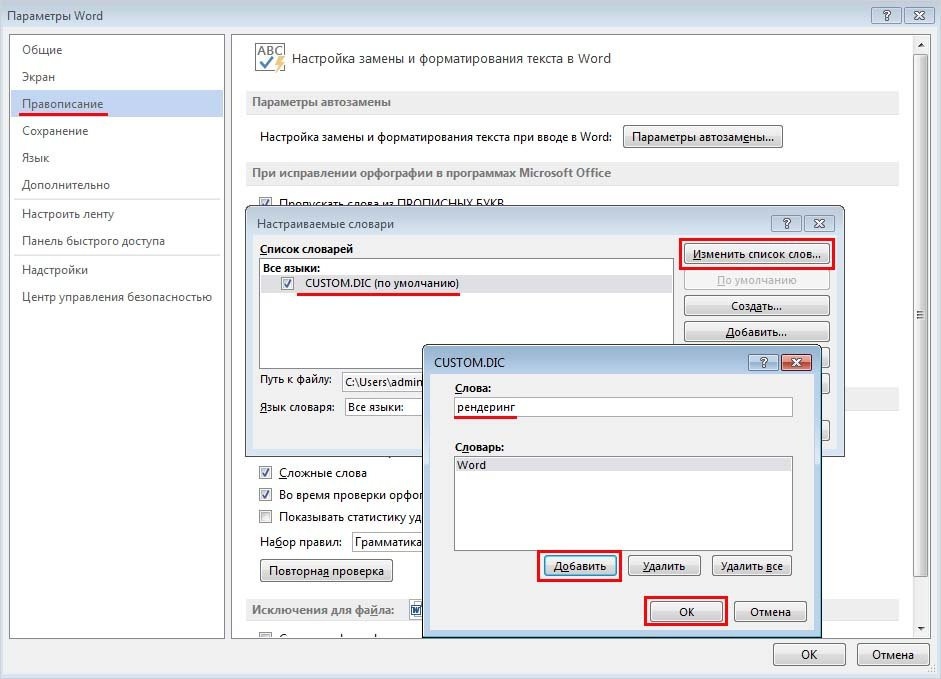
Затем откройте пункт Правописание и щелкните на Настраиваемые словари.
В списке выберите CUSTOM.DIC. Нажмите на кнопку «По умолчанию». В выпадающем списке Язык словаря установите значение «Все языки» и сохраните на «ОК».
Еще раз кликните на «ОК» в окне параметров Word. После этих изменений будет включена опция добавления.
Добавление или удаление слов из файла DEFAULT.dic
Откройте Проводник Windows командой explorer из окна Win + R.
В адресную строку проводника вставьте указанный путь и нажмите на Enter:
%AppData%MicrosoftSpellingru-RU
Щелкните правой кнопкой мыши на default.dic, в контекстном меню выберите пункт «Открыть с помощью». В следующем окне «Как хотите открыть этот файл», кликните на опцию Другие программы и выберите Блокнот.
Введите слова, которые хотите добавить, или найдите то, что требуется удалить. Имейте в виду, что в строке должно присутствовать только одно слово.
После совместно нажмите Ctrl + S, чтобы сохранить изменения, и закройте файл.
Добавление или удаление слов с позиции настраиваемых словарей
В документе Word перейдите на вкладку Файл. На панели слева перейдите в раздел Параметры. Затем выберите «Правописание» — «Настраиваемые словари».
Кликните на CUSTOM.DIC или другой файл по выбору. Нажмите на опцию «Изменить список слов».
В текстовом поле «Слова» введите то, которые хотите добавить. Затем кликните на «Добавить». Если хотите ввести еще одно, повторите эти шаги. Когда слова будут добавлены, нажмите на «ОК». Для удаления выделите слово и кликните на соответствующую кнопку.
Затем нажмите на «ОК» в окнах «Настраиваемые словари» и «Параметры Word», чтобы сохранить изменения.
Автозамена — очень полезная функция, которую Microsoft Word предлагает пользователям. Если мы сделаем орфографическую ошибку или сделаем грамматические ошибки, автозамена покажет это с красным или зеленым подчеркиванием. Если щелкнуть слово правой кнопкой мыши, отобразится список предложений по его исправлению. Но это немного раздражает при наборе команд или кодов.
Иногда необходимо написать слово определенным образом. Допустим, вы будете использовать это слово в своем документе несколько раз. Вместо того, чтобы игнорировать варианты контекстного меню, вы можете добавить это слово в словарь Word. Давайте узнаем, как добавлять или удалять слова из словаря.
Добавление слов из контекстного меню
Откройте тестовый редактор для любого офисного приложения. В качестве примера возьмем Microsoft Word. Внесение изменений в любое другое приложение (например, WPS Office) будет таким же.
Откройте документ и введите или выделите существующее слово.
Щелкните его правой кнопкой мыши и перейдите в «Добавить в словарь». В дальнейшем при наборе этого слова оно не будет выделяться красным подчеркиванием, так как система при проверке орфографии найдет его в словаре.
Иногда мы можем обнаружить, что опция «Добавить в словарь» неактивна. Выполните следующие действия, чтобы сделать его доступным. Перейдите в верхнее меню на вкладке «Файл». На левой боковой панели выберите Параметры».
Затем откройте «Орфография и грамматика» и нажмите «Пользовательские словари.
Выберите CUSTOM.DIC из списка. Щелкните кнопку «По умолчанию». В раскрывающемся списке Язык словаря установите значение «Все языки» и сохраните в «ОК».
Снова нажмите «ОК» в окне «Параметры Word». После этих изменений опция добавления будет включена.
Добавление или удаление слов из файла DEFAULT.dic
Откройте проводник Windows с помощью команды проводника в окне Win + R.
В адресной строке проводника вставьте указанный путь и нажмите Enter:
% AppData% Microsoft Spelling ru-RU
Щелкните правой кнопкой мыши default.dic и выберите «Открыть с помощью» в контекстном меню. В следующем окне «Как вы хотите открыть этот файл» нажмите «Другие программы» и выберите «Блокнот.
Введите слова, которые хотите добавить, или найдите то, которое хотите удалить. Обратите внимание, что в каждой строке должно быть только одно слово.
Затем нажмите Ctrl + S вместе, чтобы сохранить изменения и закрыть файл.
Добавление или удаление слов с позиции настраиваемых словарей
В документе Word щелкните вкладку Файл. На левой панели перейдите в раздел Настройки. Затем выберите «Орфография» — «Пользовательские словари».
Щелкните CUSTOM.DIC или другой файл по вашему выбору. Нажмите на опцию «Редактировать список слов».
В текстовом поле «Слова» введите то, что вы хотите добавить. Затем нажмите «Добавить». Если вы хотите ввести другой, повторите эти шаги. Когда слова будут добавлены, нажмите «ОК». Чтобы удалить, выберите слово и нажмите соответствующую кнопку.
Затем нажмите «ОК» в окнах «Настраиваемые словари» и «Параметры Word», чтобы сохранить изменения.
Here’s how to add or remove words from the Office 2010 Dictionary. This lets you customize your dictionary and makes creating Word documents easier.
Have you ever been working in Microsoft Word and “Oops, I didn’t mean to add that word to the dictionary!”? If you’ve ever accidentally added a word to the Office dictionary, then you aren’t alone. With Office 2010, this can become very problematic because now every Office 2010 application shares the same dictionary. If you want to perfect your spell-checker, then this groovy guide will show you how to add or remove words from the custom word list.
How To Edit The Office 2010 Custom Word Dictionary
1. In any Office application (Word, Outlook, Powerpoint, etc.) Click File > Options.
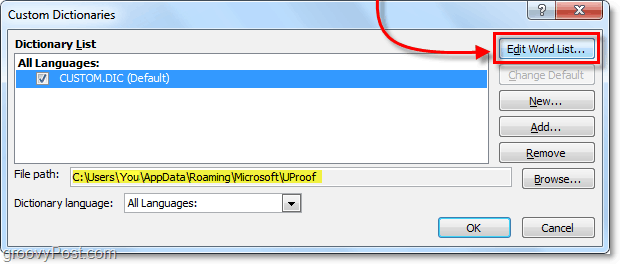
2. In the Options menu click the Proofing tab, and then click the Custom Dictionaries button.
3. The Custom Dictionaries list should appear. Click Edit Word List.
4. In the custom.dic dialog you can type in Word(s) and then Add them to the dictionary. Or if you need to remove a word just click the word from the Dictionary list, and then click Delete. When done, be sure to click OK to save changes.
Alternatively, you can edit the Office dictionary custom words list using Notepad.
5. You can also edit the Dictionary from its .dic text file located at:
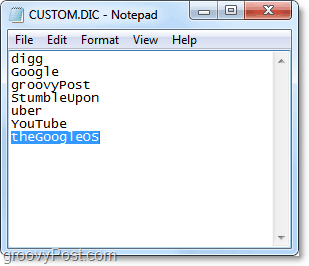
%AppData%MicrosoftUProofCustom.dic

6. Just open up custom.dic and start typing in the words that you want to add to the custom dictionary. Keep it to one word per line and remember that words are case sensitive when being spell-checked later. Once you’ve finished, Save and exit notepad.
Any word you’ve added to the custom.dic file no longer gets flagged by Office 2010 spellchecker. So be wary of typos too.
All Microsoft Word users have a default custom dictionary that acts as a catchall for their spelling preferences. In fact, every time you right-click on a flagged word (which may or may not be misspelled) and select “Add to Dictionary,” that word goes to your default custom dictionary. However, you can create additional custom dictionaries in Microsoft Word for specific documents.
This tutorial explains the following:
1. How to create a custom dictionary
2. How to add words to a custom dictionary
3. How to add or remove a custom dictionary for a specific file
This tutorial is available as a YouTube video showing all the steps in real time.
Watch more than 100 other writing-related software tutorials on my YouTube channel.
The images below are from Word for Microsoft 365. These steps also apply to Word 2021, Word 2019, Word 2016, and Word 2013. In addition, the steps are similar for Word 2010.
1. Select the File tab.
2. Select Options in the Backstage view.
3. Select Proofing in the Word Options dialog box.
4. Select the Custom Dictionaries button.
5. Select any of the available options in the Custom Dictionaries dialog box to make the New button available. (If All Languages or English is selected, the New button will be grayed out, which means it is unavailable.)
6. Select the New button.
7. Choose a file location for your new dictionary in the Create Custom Dictionary dialog box. Note that the default location chosen by Word will be appropriate for most users. See the Pro Tip below for additional information.
Pro Tip: By default, Word will save your new custom dictionary in the UProof folder connected to your user name, which means that only you can access that dictionary. If you want to share your new dictionary, save the file in another folder accessible by other Word users in your organization.
See step 6 in How to Add or Remove a Custom Dictionary for a Specific File, below, for instructions on adding dictionaries saved in other locations.
8. Type the name of your new custom dictionary in the File name text box.
9. Select the Save button.
The Create Custom Dictionary dialog box will close automatically, and your new dictionary will appear in the Custom Dictionary dialog box.
10. (Optional Step) Uncheck the new dictionary if you do not want it to be automatically applied to current or future documents.
11. Select the OK button in the Custom Dictionary dialog box.
Now, let’s populate your newly created custom dictionary.
How to Add Words to a Custom Dictionary
This section assumes that you closed the Custom Dictionary dialog box after completing the previous section. If your Custom Dictionary dialog box is still open, you can skip to step 5.
If you want to edit the existing words in your default custom dictionary or another custom dictionary, visit “How to Edit Your Custom Dictionary in Microsoft Word.”
1. Select the File tab (see figure 1).
2. Select Options in the Backstage view (see figure 2).
3. Select Proofing in the Word Options dialog box (see figure 3).
4. Select the Custom Dictionaries button (see figure 4).
5. Select your new dictionary in the Custom Dictionaries dialog box (see figure 10).
6. Select the Edit Word List button.
7. Type one word at a time into the Word(s) text box in the Edit Word List dialog box.
8. Select the Add button for each word.
9. Select the OK button when you are finished adding words to save your changes. The Custom Dictionaries dialog box will close automatically.
In an upcoming tutorial, we’ll use a simple text editor such as Notepad to add multiple words at once to a custom dictionary.
How to Add or Remove a Custom Dictionary for a Specific File
By default, Word’s Editor (which is the new name for the spelling and grammar check) applies all custom dictionaries to your documents unless specific dictionaries are manually unchecked in the Custom Dictionary dialog box. Therefore, I strongly encourage you to review the Custom Dictionary dialog box regularly to ensure that Word is using the dictionaries that you want—and none that you don’t.
The following steps show how to (1) add or remove a custom dictionary already connected to your document and (2) add a custom dictionary currently unconnected to your document (i.e., a dictionary saved outside of the UProof folder).
Add or Remove a Custom Dictionary Already Connected to Your Document
1. Select the File tab (see figure 1).
2. Select Options in the Backstage view (see figure 2).
3. Select Proofing in the Word Options dialog box (see figure 3).
4. Select the Custom Dictionaries button (see figure 4).
5. Check or uncheck specific dictionaries in the Custom Dictionaries dialog box (see figure 10).
6. Select the OK button to save your changes. The Custom Dictionaries dialog box will close automatically (see figure 16).
Add a Custom Dictionary Currently Unconnected to Your Document (Outside File)
1. Select the File tab (see figure 1).
2. Select Options in the Backstage view (see figure 2).
3. Select Proofing in the Word Options dialog box (see figure 3).
4. Select the Custom Dictionaries button (see figure 4).
5. Select any of the available options in the Custom Dictionaries dialog box to make the Add button available (see figure 5). (If All Languages or English is selected, the Add button will be grayed out, which means it is unavailable)
6. Select the Add button in the Custom Dictionaries dialog box.
7. Navigate to the location of the dictionary you want to add in the Add Custom Dictionary dialog box and select the dictionary file.
8. Select the Open button.
The Add Custom Dictionary dialog box will close automatically, and the dictionary you just selected will appear in the Custom Dictionaries dialog box.
9. Select the OK button to save your changes and close the Custom Dictionaries dialog box (see figure 16).
Related Resources
How to Create an Exclusion Dictionary in Microsoft Word
How to Create and Customize Headings in Microsoft Word
Updated January 06, 2022
When you type some special or custom words such as a person name, a company name, a product name or something other in Microsoft Word document, generally the special words will be underlined in red and considered spelling mistakes. That’s because the special or custom words are not included in the default dictionary built-in Microsoft Word. To prevent Microsoft Word always considering your special words spelling mistakes, you can add the words into its custom dictionary. Now, this post will show you how to add words to the custom dictionary in Word 2016. There are two options as below.
- Option 1: through the context menu
- Option 2: through Word Options settings
Option 1: Add words to the custom dictionary in Word through the context menu
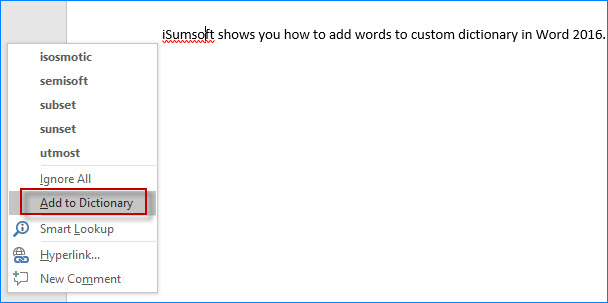
In your Word 2016 document, right-click on the target word and then from the context menu select Add to Dictionary.
Option 2: Add words to custom dictionary through Word Options settings
Step 1: Open your Word 2016 document.
Step 2: Click the File tab, and then click the Options tab.
Step 3: In the Word Options dialog, select Proofing on the left-side pane. Then on the right-side pane, locate the “When correcting spelling in Microsoft Office programs” section, and click the Custom Dictionaries button.
Step 4: After the “Custom Dictionaries” dialog opens, select the default custom dictionary and then click the “Edit Word List” button.
Step 5: In the “CUSTOM.DIC” dialog, type the word(s) you want to add to the custom dictionary, click the Add button, and click OK.
Step 6: When you return to the “Custom Dictionaries” dialog, click OK. Click OK again in the Word Options dialog. Then the words are added into the custom dictionary in Word 2016.
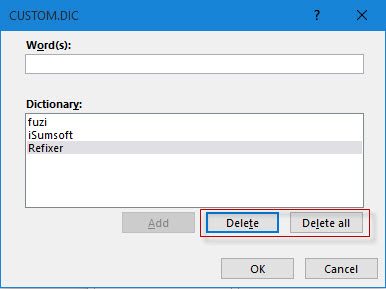
Tips: In future, if you want to remove the words from the dictionary, just select the words and click Delete, or click Delete all.

