
Хитрости »
1 Май 2011 162355 просмотров
Как защитить лист от пользователя, но не от макроса?
Иногда бывает полезно защитить данные на листе от изменений другими пользователями, но при этом так же надо будет работать с данными на листе из VBA(т.е. вносить изменения с помощью кода). Обычная защита листа, конечно, подходит, хоть и есть небольшой недостаток: надо перед каждым обращением к листу снимать с него защиту, выполнять необходимые действия и защищать заново:
Sub Write_in_ProtectSheet()
    'снимаем защиту с листа
    Worksheets("Лист1").Unprotect
    'если лист защищен с паролем 1234: Worksheets("Лист1").Unprotect "1234"
    'действия на листе.Например,изменение значения ячейки А1
    Cells("A1").Value = "www.excel-vba.ru"
    'устанавливаем защиту на лист
    Worksheets("Лист1").Protect
    'если лист был защищен с паролем 1234: Worksheets("Лист1").Protect "1234"
End Sub
Но есть метод проще.
Если выполнить ниже приведенную строчку кода, то пользователю невозможно будет изменить данные на листе(кроме тех, которые Вы сами разрешите), однако код VBA(макрос) сможет преспокойно вносить любые изменения, не снимая защиту.
Sub Protect_for_User_Non_for_VBA()
    ActiveSheet.Protect Password:="1111", UserInterfaceOnly:=True
End Sub
Основную роль здесь играет параметр UserInterfaceOnly. Если его установить в True, то это говорит Excel-ю, что коды VBA могут выполнять действия по изменению ячеек, не снимая защиты методом Unprotect. Однако сама защита листа при этом не снимается и вручную изменить данные ячеек, не сняв защиту с листа, невозможно.
Код выше устанавливает такую защиту только на активный лист книги. Но можно указать лист явно(например установить защиту на лист с именем Лист1 в активной книге и лист, идущий вторым по порядку в книге(Sheets(2))):
Sub Protect_for_User_Non_for_VBA()
    Sheets(2).Protect Password:="1111", UserInterfaceOnly:=True
    Sheets("Лист1").Protect Password:="1111", UserInterfaceOnly:=True
End Sub
Так же приведенный код можно еще чуть модернизировать и разрешить пользователю помимо изменения ячеек еще и использовать автофильтр:
Sub Protect_for_User_Non_for_VBA()
    Sheets(2).Protect Password:="1111", UserInterfaceOnly:=True
    'на лист "Лист1" поставим защиту и разрешим пользоваться фильтром
    Sheets("Лист1").Protect Password:="1111", AllowFiltering:=True, UserInterfaceOnly:=True
End Sub
Можно разрешить и другие действия(выделение незащищенных ячеек, выделение защищенных ячеек, форматирование ячеек, вставку строк, вставку столбцов и т.д. Чуть подробнее про доступные параметры можно узнать в статье Защита листов и ячеек в MS Excel). А как будет выглядеть строка кода с разрешенными параметрами можно узнать, записав макрорекордером установку защиты листа с нужными параметрами:

После этого получится строка вроде такой:
ActiveSheet.Protect DrawingObjects:=True, Contents:=True, Scenarios:=True _
        , AllowInsertingColumns:=True, AllowInsertingRows:=True, AllowFiltering:=True
здесь я разрешил использовать автофильтр(AllowFiltering:=True), вставлять строки(AllowInsertingRows:=True) и столбцы(AllowInsertingColumns:=True).Чтобы добавить возможность изменять данные ячеек только через код VBA, останется добавить параметр UserInterfaceOnly:=True:
ActiveSheet.Protect DrawingObjects:=True, Contents:=True, Scenarios:=True _
        , AllowInsertingColumns:=True, AllowInsertingRows:=True, AllowFiltering:=True, UserInterfaceOnly:=True
и так же неплохо бы добавить и пароль для снятия защиты, т.к. запись макрорекордером не записывает пароль:
ActiveSheet.Protect DrawingObjects:=True, Contents:=True, Scenarios:=True _
        , AllowInsertingColumns:=True, AllowInsertingRows:=True, AllowFiltering:=True, UserInterfaceOnly:=True, Password:="1111"
Этот метод всем хорош, все отлично, но. Параметр UserInterfaceOnly сбрасывается сразу после закрытия книги. Т.е. если установить таким образом защиту на лист и закрыть книгу, то при следующем открытии защиты этой уже не будет — останется лишь стандартная защита. Поэтому, если необходимо такую защиту видеть постоянно, то данный макрос лучше всего прописывать на событие открытия книги(модуль ЭтаКнига(ThisWorkbook)).
Сделать это можно таким кодом:
Private Sub Workbook_Open()
    Sheets("Лист1").Protect Password:="1111", UserInterfaceOnly:=True
End Sub
Этот код сработает только после того, как книга будет открыта. А это значит, чтобы увидеть результат необходимо после записи этого кода в ЭтаКнига сохранить книгу, закрыть её и открыть заново. Тогда в сам момент открытия книги код сработает и установит на «Лист1» правильную защиту.
Часто так же бывает необходимо устанавливать одинаковую защиту на все листы книги. Сделать это можно таким кодом, который так же должен быть размещен в модуле ЭтаКнига(ThisWorkbook):
Private Sub Workbook_Open()
    Dim wsSh As Object
    For Each wsSh In Me.Sheets
        Protect_for_User_Non_for_VBA wsSh
    Next wsSh
End Sub
Sub Protect_for_User_Non_for_VBA(wsSh As Worksheet)
    wsSh.Protect Password:="1111", UserInterfaceOnly:=True
End Sub
Плюс во избежание ошибок лучше перед установкой защиты снимать ранее установленную(если она была):
Sub Protect_for_User_Non_for_VBA(wsSh As Worksheet)
    wsSh.Unrotect "1111"
    wsSh.Protect Password:="1111", UserInterfaceOnly:=True
End Sub
Ну и если надо такую защиту установить только на конкретные листы, то убираем цикл и вызываем процедуру только для нужных листов. Если известны их имена, то можно прибегнуть к использованию массивов:
Private Sub Workbook_Open()
    Dim arr, sSh
    arr = Array("Отчет", "База", "Бланк")
    For Each sSh in arr
        Protect_for_User_Non_for_VBA Me.Sheets(sSh)
    Next
End Sub
Sub Protect_for_User_Non_for_VBA(wsSh As Worksheet)
    wsSh.Protect Password:="1111", AllowFiltering:=True, UserInterfaceOnly:=True
End Sub
Для применения в своих задачах в данном коде необходимо лишь изменить(добавить, удалить, вписать другие имена) имена листов в этой строке: Array(«Отчет», «База», «Бланк»)
Примечание: Метод защиты через UsefInterface всем хорош, но есть одно ограничение: метод невозможно использовать в книге с общим доступом(Рецензирование -Доступ к книге), т.к. при общем доступе существуют ограничения, среди которых и такое, которое запрещает изменять параметры защиты для книги в общем доступе.
Также см.:
Как разрешить изменять только выбранные ячейки?
Защита листов/снятие защиты
Как оставить возможность работать со структурой на защищенном листе?
Статья помогла? Поделись ссылкой с друзьями!
![]() Видеоуроки
Видеоуроки
Поиск по меткам
Access
apple watch
Multex
Power Query и Power BI
VBA управление кодами
Бесплатные надстройки
Дата и время
Записки
ИП
Надстройки
Печать
Политика Конфиденциальности
Почта
Программы
Работа с приложениями
Разработка приложений
Росстат
Тренинги и вебинары
Финансовые
Форматирование
Функции Excel
акции MulTEx
ссылки
статистика
Protecting and unprotecting sheets is a common action for an Excel user. There is nothing worse than when somebody, who doesn’t know what they’re doing, overtypes essential formulas and cell values. It’s even worse when that person happens to be us; all it takes is one accidental keypress, and suddenly the entire worksheet is filled with errors. In this post, we explore using VBA to protect and unprotect sheets.
Protection is not foolproof but prevents accidental alteration by an unknowing user.
Sheet protection is particularly frustrating as it has to be applied one sheet at a time. If we only need to protect a single sheet, that’s fine. But if we have more than 5 sheets, it is going to take a while. This is why so many people turn to a VBA solution.
The VBA Code Snippets below show how to do most activities related to protecting and unprotecting sheets.
Download the example file: Click the link below to download the example file used for this post:
Adapting the code for your purposes
Unless stated otherwise, every example below is based on one specific worksheet. Each code includes Sheets(“Sheet1”)., this means the action will be applied to that specific sheet. For example, the following protects Sheet1.
Sheets("Sheet1").ProtectBut there are lots of ways to reference sheets for protecting or unprotecting. Therefore we can change the syntax to use one of the methods shown below.
Using the active sheet
The active sheet is whichever sheet is currently being used within the Excel window.
ActiveSheet.ProtectApplying a sheet to a variable
If we want to apply protection to a sheet stored as a variable, we could use the following.
Dim ws As Worksheet

Set ws = Sheets("Sheet1")

ws.Protect
Later in the post, we look at code examples to loop through each sheet and apply protection quickly.
Let’s begin with some simple examples to protect and unprotect sheets in Excel.
Protect a sheet without a password
Sub ProtectSheet()

'Protect a worksheet
Sheets("Sheet1").Protect

End Sub
Unprotect a sheet (no password)
Sub UnProtectSheet()

'Unprotect a worksheet
Sheets("Sheet1").Unprotect

End Sub
Protecting and unprotecting with a password
Adding a password to give an extra layer of protection is easy enough with VBA. The password in these examples is hardcoded into the macro; this may not be the best for your scenario. It may be better to apply using a string variable, or capturing user passwords with an InputBox.
VBA Protect sheet with password
Sub ProtectSheetWithPassword()

'Protect worksheet with a password
Sheets("Sheet1").Protect Password:="myPassword"

End Sub
VBA Unprotect sheet with a password
Sub UnProtectSheetWithPassword()

'Unprotect a worksheet with a password
Sheets("Sheet1").Unprotect Password:="myPassword"

End Sub
NOTE – It is not necessary to unprotect, then re-protect a sheet to change the settings. Instead, just protect again with the new settings.
Using a password based on user input
Using a password that is included in the code may partly defeat the benefit of having a password. Therefore, the codes in this section provide examples of using VBA to protect and unprotect based on user input. In both scenarios, clicking Cancel is equivalent to entering no password.
Protect with a user-input password
Sub ProtectSheetWithPasswordFromUser()

'Protect worksheet with a password
Sheets("Sheet1").Protect Password:=InputBox("Enter a protection password:")

End Sub
Unprotect with a user-input password
Sub UnProtectSheetWithPasswordFromUser()

'Protect worksheet with a password
Sheets("Sheet1").Unprotect _
    Password:=InputBox("Enter a protection password:")

End Sub
Catching errors when incorrect password entered
If an incorrect password is provided, the following error message displays.
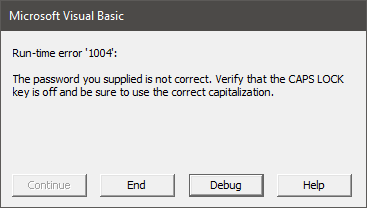
The code below catches the error and provides a custom message.
Sub CatchErrorForWrongPassword()

'Keep going even if error found
On Error Resume Next

'Apply the wrong password
Sheets("Sheet1").Unprotect Password:="incorrectPassword"

'Check if an error has occured
If Err.Number <> 0 Then
    MsgBox "The Password Provided is incorrect"
    Exit Sub
End If

'Reset to show normal error messages
On Error GoTo 0

End Sub
If you forget a password, don’t worry, the protection is easy to remove.
Applying protection to different parts of the worksheet
VBA provides the ability to protect 3 aspects of the worksheet:
- Contents – what you see on the grid
- Objects – the shapes and charts which are on the face of the grid
- Scenarios – the scenarios contained in the What If Analysis section of the Ribbon
By default, the standard protect feature will apply all three types of protection at the same time. However, we can be specific about which elements of the worksheet are protected.
Protect contents
Sub ProtectSheetContents()

'Apply worksheet contents protection only
Sheets("Sheet1").Protect Password:="myPassword", _
    DrawingObjects:=False, _
    Contents:=True, _
    Scenarios:=False

End Sub
Protect objects
Sub ProtectSheetObjects()

'Apply worksheet objects protection only
Sheets("Sheet1").Protect Password:="myPassword", _
    DrawingObjects:=True, _
    Contents:=False, _
    Scenarios:=False

End Sub
Protect scenarios
Sub ProtectSheetScenarios()

'Apply worksheet scenario protection only
Sheets("Sheet1").Protect Password:="myPassword", _
    DrawingObjects:=False, _
    Contents:=False, _
    Scenarios:=True

End Sub
Protect contents, objects and scenarios
Sub ProtectSheetAll()

'Apply worksheet protection to contents, objects and scenarios
Sheets("Sheet1").Protect Password:="myPassword", _
    DrawingObjects:=True, _
    Contents:=True, _
    Scenarios:=True

End Sub
Applying protection to multiple sheets
As we have seen, protection is applied one sheet at a time. Therefore, looping is an excellent way to apply settings to a lot of sheets quickly. The examples in this section don’t just apply to Sheet1, as the previous examples have, but include all worksheets or all selected worksheets.
Protect all worksheets in the active workbook
Sub ProtectAllWorksheets()

'Create a variable to hold worksheets
Dim ws As Worksheet

'Loop through each worksheet in the active workbook
For Each ws In ActiveWorkbook.Worksheets

    'Protect each worksheet
    ws.Protect Password:="myPassword"

Next ws

End Sub
Protect the selected sheets in the active workbook
Sub ProtectSelectedWorksheets()

Dim ws As Worksheet
Dim sheetArray As Variant

'Capture the selected sheets
Set sheetArray = ActiveWindow.SelectedSheets

'Loop through each worksheet in the active workbook
For Each ws In sheetArray

    On Error Resume Next

    'Select the worksheet
    ws.Select

    'Protect each worksheet
    ws.Protect Password:="myPassword"

    On Error GoTo 0

Next ws

sheetArray.Select

End Sub
Unprotect all sheets in active workbook
Sub UnprotectAllWorksheets()

'Create a variable to hold worksheets
Dim ws As Worksheet

'Loop through each worksheet in the active workbook
For Each ws In ActiveWorkbook.Worksheets

'Unprotect each worksheet
ws.Unprotect Password:="myPassword"

Next ws

End Sub
Checking if a worksheet is protected
The codes in this section check if each type of protection has been applied.
Check if Sheet contents is protected
Sub CheckIfSheetContentsProtected()

'Check if worksheets contents is protected
If Sheets("Sheet1").ProtectContents Then MsgBox "Protected Contents"

End Sub
Check if Sheet objects are protected
Sub CheckIfSheetObjectsProtected()

'Check if worksheet objects are protected
If Sheets("Sheet1").ProtectDrawingObjects Then MsgBox "Protected Objects"

End Sub
Check if Sheet scenarios are protected
Sub CheckIfSheetScenariosProtected()

'Check if worksheet scenarios are protected
If Sheets("Sheet1").ProtectScenarios Then MsgBox "Protected Scenarios"

End Sub
Changing the locked or unlocked status of cells, objects and scenarios
When a sheet is protected, unlocked items can still be edited. The following codes demonstrate how to lock and unlock ranges, cells, charts, shapes and scenarios.
When the sheet is unprotected, the lock setting has no impact. Each object becomes locked on protection.
All the examples in this section set each object/item to lock when protected. To set as unlocked, change the value to False.
Lock a cell
Sub LockACell()

'Changing the options to lock or unlock cells
Sheets("Sheet1").Range("A1").Locked = True

End Sub
Lock all cells
Sub LockAllCells()

'Changing the options to lock or unlock cells all cells
Sheets("Sheet1").Cells.Locked = True

End Sub
Lock a chart
Sub LockAChart()

'Changing the options to lock or unlock charts
Sheets("Sheet1").ChartObjects("Chart 1").Locked = True

End Sub
Lock a shape
Sub LockAShape()

'Changing the option to lock or unlock shapes
Sheets("Sheet1").Shapes("Rectangle 1").Locked = True

End Sub
Lock a Scenario
Sub LockAScenario()

'Changing the option to lock or unlock a scenario
Sheets("Sheet1").Scenarios("scenarioName").Locked = True

End Sub
Allowing actions to be performed even when protected
Even when protected, we can allow specific operations, such as inserting rows, formatting cells, sorting, etc. These are the same options as found when manually protecting the sheet.
Allow sheet actions when protected
Sub AllowSheetActionsWhenProtected()

'Allowing certain actions even if the worksheet is protected
Sheets("Sheet1").Protect Password:="myPassword", _
    DrawingObjects:=False, _
    Contents:=True, _
    Scenarios:=False, _
    AllowFormattingCells:=True, _
    AllowFormattingColumns:=True, _
    AllowFormattingRows:=True, _
    AllowInsertingColumns:=False, _
    AllowInsertingRows:=False, _
    AllowInsertingHyperlinks:=False, _
    AllowDeletingColumns:=True, _
    AllowDeletingRows:=True, _
    AllowSorting:=False, _
    AllowFiltering:=False, _
    AllowUsingPivotTables:=False

End Sub
Allow selection of any cells
Sub AllowSelectionAnyCells()

'Allowing selection of locked or unlocked cells
Sheets("Sheet1").EnableSelection = xlNoRestrictions

End Sub
Allow selection of unlocked cells
Sub AllowSelectionUnlockedCells()

'Allowing selection of unlocked cells only
Sheets("Sheet1").EnableSelection = xlUnlockedCells

End Sub
Don’t allow selection of any cells
Sub NoSelectionAllowed()

'Do not allow selection of any cells
Sheets("Sheet1").EnableSelection = xlNoSelection

End Sub
Allowing VBA code to make changes, even when protected
Even when protected, we still want our macros to make changes to the sheet. The following VBA code changes the setting to allow macros to make changes to a protected sheet.
Sub AllowVBAChangesOnProtectedSheet()

'Enable changes to worksheet by VBA code, even if protected
Sheets("Sheet1").Protect Password:="myPassword", _
    UserInterfaceOnly:=True

End Sub
Unfortunately, this setting is not saved within the workbook. It needs to be run every time the workbook opens. Therefore, calling the code in the Workbook_Open event of the Workbook module is probably the best option.
Allowing the use of the Group and Ungroup feature
To enable users to make use of the Group and Ungroup feature of protected sheets, we need to allow changes to the user interface and enable outlining.
Sub AllowGroupingAndUngroupOnProtectedSheet()

'Allow user to group and ungroup whilst protected
Sheets("Sheet1").Protect Password:="myPassword", _
    UserInterfaceOnly:=True

Sheets("Sheets1").EnableOutlining = True

End Sub
As noted above the UserInterfaceOnly setting is not stored in the workbook; therefore, it needs to be run every time the workbook opens.
Conclusion
Wow! That was a lot of code examples; hopefully, this covers everything you would ever need for using VBA to protect and unprotect sheets.
Related posts:
- Office Scripts – Workbook & worksheet protection
- VBA Code to Password Protect an Excel file
- VBA code to Protect and Unprotect Workbooks

About the author
Hey, I’m Mark, and I run Excel Off The Grid.
My parents tell me that at the age of 7 I declared I was going to become a qualified accountant. I was either psychic or had no imagination, as that is exactly what happened. However, it wasn’t until I was 35 that my journey really began.
In 2015, I started a new job, for which I was regularly working after 10pm. As a result, I rarely saw my children during the week. So, I started searching for the secrets to automating Excel. I discovered that by building a small number of simple tools, I could combine them together in different ways to automate nearly all my regular tasks. This meant I could work less hours (and I got pay raises!). Today, I teach these techniques to other professionals in our training program so they too can spend less time at work (and more time with their children and doing the things they love).
Do you need help adapting this post to your needs?
I’m guessing the examples in this post don’t exactly match your situation. We all use Excel differently, so it’s impossible to write a post that will meet everybody’s needs. By taking the time to understand the techniques and principles in this post (and elsewhere on this site), you should be able to adapt it to your needs.
But, if you’re still struggling you should:
- Read other blogs, or watch YouTube videos on the same topic. You will benefit much more by discovering your own solutions.
- Ask the ‘Excel Ninja’ in your office. It’s amazing what things other people know.
- Ask a question in a forum like Mr Excel, or the Microsoft Answers Community. Remember, the people on these forums are generally giving their time for free. So take care to craft your question, make sure it’s clear and concise. List all the things you’ve tried, and provide screenshots, code segments and example workbooks.
- Use Excel Rescue, who are my consultancy partner. They help by providing solutions to smaller Excel problems.
What next?
Don’t go yet, there is plenty more to learn on Excel Off The Grid. Check out the latest posts:
Home / VBA / How to PROTECT and UNPROTECT a Sheet using VBA in Excel
In VBA, there’s the PROTECT method that you can use with a sheet. In this method, you have the option to protect a sheet, with or without a password. And you can also protect an object from the sheet. We will see all these in detail in this tutorial.
In the tutorial, we will look at how to protect and unprotect a single sheet or multiple sheets using a VBA code.
Write a VBA Code to Protect a Sheet
To protect a sheet, you need to specify the sheet first and then use the protect method. Here are the steps.
- Use the sheets object to specify the sheet.
- Enter the name of the sheet that you want to protect.
- Type a dot to get the list of the methods and properties.
- Select the project method or type it.

Sheets("Sheet1").ProtectHelpful Links: Run a Macro – Macro Recorder – Visual Basic Editor – Personal Macro Workbook
Write a VBA Code to Unprotect a Sheet
To protect a sheet, you need to specify the sheet first and then use the unprotect method. Here are the steps.
- Specify the sheet using the sheet object.
- And then, enter the name of the sheet that you want to protect.
- Enter a dot to get the list of the methods and properties.
- Select the “Unprotect” method or type it.

Sheets("Sheet1").UnprotectProtect a Sheet with Password
If you want to set a password while protecting a sheet, in that case, you need to use the password argument to specify a password. Let’s say if you want to set a password “test123” to the sheet for protecting it, the code would be like the below.

Sheets("Sheet1").Protect Password:="test123"Unprotect a Sheet with Password
In the same way, if you want to unprotect a sheet, you need to mention the password in the password argument. Let’s say the password that you have used to protect the sheet is “ADSBP” so the code to unprotect it would be like below.
Sheets("Sheet1").Unprotect Password:="ADSBP"There’s one thing that you need to take care, take care of capital letter as VBA differentiate between capital and small letters.
Other Things to Know
As I said, we are using VBA’s “Protect” method, and there are arguments other than “Password” with this method that you can use.
expression.Protect (Password, DrawingObjects, Contents, Scenarios, UserInterfaceOnly, AllowFormattingCells, AllowFormattingColumns, AllowFormattingRows, AllowInsertingColumns, AllowInsertingRows, AllowInsertingHyperlinks, AllowDeletingColumns, AllowDeletingRows, AllowSorting, AllowFiltering, AllowUsingPivotTables)- DrawingObjects: To protect and unprotect shapes.
- Contents: TO protect cells that are locked and the entire chart.
- Scenarios: To protect scenarios in the worksheet.
- UserInterfaceOnly: To only protect the user interface not macros.
- AllowFormattingCells: To allow the user to apply formatting to cells.
- AllowFormattingColumns: To allow the user to apply formatting to columns.
- AllowFormattingRows: To allow the user to apply formatting to rows.
- AllowInsertingColumns: To allow the user to insert new columns.
- AllowInsertingRows: To allow the user to insert new rows.
- AllowInsertingHyperlinks: To allow the user to create hyperlinks.
- AllowDeletingColumns: To allow the user to delete columns.
- AllowDeletingRows: To allow the user to delete rows.
- Allow Sorting: To allow the user to sort rows, columns, and tables.
- AllowFiltering: To allow filtering columns.
- AllowUsingPivotTables: To let the user use a pivot table.
Notes
- Make sure to use strong passwords that combine uppercase and lowercase letters, numbers, and symbols.
- If you forget your password, Microsoft cannot retrieve it. So, make sure to write down your password somewhere in a safe place.
- If a sheet protected without a password, and now you want to protect it with a password, you need to unprotect it first. And then reprotect it with a password using the code you have seen above.
More Tutorials on VBA Worksheets
- Back to VBA Worksheet / VBA Tutorial
Protect and UnProtect Worksheets in Excel VBA
Description:
Protect and UnProtect Worksheets in Excel VBA is useful when we work with the templates or some worksheets which structure will not change but data may change. Or we may want to restrict the users to not to modify the structure of the worksheet.
Protect UnProtect Worksheet in Excel VBA – Solution:
![]()
We can use Protect and UnProtect Methods of a Worksheet to Protect and UnProtect Worksheets in Excel using VBA.
Protect UnProtect Worksheet in Excel VBA – Examples:
The following example will show you how to protect and unprotect worksheets in Excel using VBA.
Example to Protect Worksheet
Sub sbProtectSheet()

    ActiveSheet.Protect "password", True, True

End Sub
Here the left side part is the sheet which you want to protect. the first parameter will be password: you an provide any password to protect worksheet.
Example to UnProtect Worksheet
Sub sbUnProtectSheet()

    ActiveSheet.Unprotect "password"

End Sub
Here the leftside part is the worksheet which you want to un-protect and the right side is the password to unprotect it which you have provided while protecting the worksheet.
Instructions:
- Open an excel workbook
- Press Alt+F11 to open VBA Editor
- Insert a Module for Insert Menu
- Copy the above code and Paste in the code window
- Save the file as macro enabled workbook
- Press F5 to execute it
Protect All Worksheets in Workbook
We can Protect All Worksheets in Workbook using VBA. If you want to restrict all worksheets from users not to modify the structure, we can protect all worksheets.
Protect All Worksheets in Workbook using VBA – Solution:
![]()
We can use Protect method and iterate all the worksheets in a workbook.
Protect All Worksheets in Workbook using VBA – Exmaple:
Follwoing is the example code will show you how to Protect All Worksheets in Workbook using VBA.
Code
Sub sbProtectAllSheets()

    Dim pwd1 As String, pwd2 As String
    pwd1 = InputBox("Please Enter the password")
    If pwd1 = "" Then Exit Sub
    pwd2 = InputBox("Please re-enter the password")

    If pwd2 = "" Then Exit Sub

     'Check if both the passwords are identical
    If InStr(1, pwd2, pwd1, 0) = 0 Or _
    InStr(1, pwd1, pwd2, 0) = 0 Then
        MsgBox "You entered different passwords. No action taken"
        Exit Sub
    End If

    For Each ws In Worksheets
        ws.Protect Password:=pwd1
    Next

    MsgBox "All sheets Protected."

    Exit Sub

End Sub
Instructions:
- Open an excel workbook
- Press Alt+F11 to open VBA Editor
- Insert a Module for Insert Menu
- Copy the above code and Paste in the code window
- Save the file as macro enabled workbook
- Press F5 to execute it
UnProtect All Worksheets in Workbook using VBA
We can UnProtect All Worksheets in Workbook using VBA. If you want to delete the restrictions of all worksheets, we can unprotect all worksheets at a time.
UnProtect All Worksheets in Workbook using VBA- Solution:
![]() We can use Unprotect method and iterate all the worksheets in a workbook.
We can use Unprotect method and iterate all the worksheets in a workbook.
UnProtect All Worksheets in Workbook using VBA – Example:
Following is the example code will show you how to UnProtect All Worksheets in Workbook using VBA.
Code
Sub sbUnProtectAll()

    On Error GoTo ErrorOccured

    Dim pwd1 As String
    pwd1 = InputBox("Please Enter the password")
    If pwd1 = "" Then Exit Sub
    For Each ws In Worksheets
        ws.Unprotect Password:=pwd1
    Next
    MsgBox "All sheets UnProtected."

    Exit Sub

ErrorOccured:
    MsgBox "Sheets could not be UnProtected - Password Incorrect"
    Exit Sub

End Sub
Instructions:
- Open an excel workbook
- Press Alt+F11 to open VBA Editor
- Insert a Module for Insert Menu
- Copy the above code and Paste in the code window
- Save the file as macro enabled workbook
- Press F5 to execute it
Show Worksheet Protect dialog in Excel VBA
You can Show Worksheet Protect dialog to give the user to enter password to protect worksheets. So that user can have the option to enter required password.
Show Worksheet Protect dialog – Solution:
![]()
We can use Application.Dialogs(xlDialogProtectDocument).Show method to Show Worksheet Protect dialog.
Show Worksheet Protect dialog – Example:
Following is the example to Show you how to do this.
Code
Sub sbShowProtectDialogBox()
'This code will do the required task...
Application.Dialogs(xlDialogProtectDocument).Show

End Sub
Instructions:
Follow the instructions below to execute the code.
- Open an excel workbook
- Press Alt+F11 to open VBA Editor
- Insert a Module for Insert Menu
- Copy the above code and Paste in the code window
- Save the file as macro enabled workbook
- Press F5 to execute it
A Powerful & Multi-purpose Templates for project management. Now seamlessly manage your projects, tasks, meetings, presentations, teams, customers, stakeholders and time. This page describes all the amazing new features and options that come with our premium templates.
Save Up to 85% LIMITED TIME OFFER

All-in-One Pack
120+ Project Management Templates
Essential Pack
50+ Project Management Templates
Excel Pack
50+ Excel PM Templates
PowerPoint Pack
50+ Excel PM Templates
MS Word Pack
25+ Word PM Templates
Ultimate Project Management Template
Ultimate Resource Management Template
Project Portfolio Management Templates
Related Posts
VBA Reference
Effortlessly
Manage Your Projects
120+ Project Management Templates
Seamlessly manage your projects with our powerful & multi-purpose templates for project management.
120+ PM Templates Includes:
7 Comments
-
Davdi Harding
February 8, 2015 at 4:47 PM — ReplyJust bear in mind that under Excel 2013 this process takes over 4000 times longer to do than it did under previous version, so it’s probably best not to do ‘All sheets’ if it’s already after lunch, because it won’t finish before you want to go home, and in the meantime Excel 2013 will be completely unusable, and you can’t ctrl- break to stop it from running.
Please also note that this is NOT a bug, it is by design and will not be changed -
Avishek
February 23, 2015 at 5:26 PM — ReplyGreat. It’s really helpful.
-
Chad
April 3, 2015 at 12:57 AM — ReplyThis is exactly true. Due the the performance hit this has caused, Microsoft needs to let the user assign levels of encryption. Reasons for protecting a sheet are not always to protect sensitive data. Many times the only reason for protection a sheet is to prevent the user from making inadvertent changes. There are many instances where you cannot get away from unprotecting and protecting sheet such as importing data from several protected files, or using a query which will not run protected even in interface only. Excel 2013 is a hug disappointment performance wise. We can only hope serious changes are made with the next version.
-
Iain
October 13, 2015 at 5:51 AM — ReplyHello
Thanks for all this code, it’s so helpful when everyone shares.
I have a question relating to this topic. Can one protect a sheet, but allow for the following
1. Select Locked Cells
2. Select Unlocked Cells
3. Sort
4. filterThanks in advance
-
Frank
November 2, 2016 at 1:26 PM — ReplyI’m also interested in knowing if this is possible
-
amit
September 28, 2018 at 5:32 AM — ReplyI used this formula its working but need password in form or mask
Sub sbUnProtectAll()
On Error GoTo ErrorOccured
Dim pwd1 As String
pwd1 = InputBox(“Please Enter the password”)
If pwd1 = ” Then Exit Sub
For Each ws In Worksheets
ws.Unprotect Password:=pwd1
Next
MsgBox “All sheets UnProtected.”Exit Sub
ErrorOccured:
MsgBox “Sheets could not be UnProtected – Password Incorrect”
Exit SubEnd Sub
-
amit
September 28, 2018 at 5:33 AM — Replyin form of mask not in word “password” should be shown as “xxxxxxxxx”
Effectively Manage Your
Projects and Resources
ANALYSISTABS.COM provides free and premium project management tools, templates and dashboards for effectively managing the projects and analyzing the data.
We’re a crew of professionals expertise in Excel VBA, Business Analysis, Project Management. We’re Sharing our map to Project success with innovative tools, templates, tutorials and tips.
Project Management
Excel VBA
Download Free Excel 2007, 2010, 2013 Add-in for Creating Innovative Dashboards, Tools for Data Mining, Analysis, Visualization. Learn VBA for MS Excel, Word, PowerPoint, Access, Outlook to develop applications for retail, insurance, banking, finance, telecom, healthcare domains.
Page load link
Go to Top
Содержание
- Метод Worksheet.Protect (Excel)
- Синтаксис
- Параметры
- Замечания
- Поддержка и обратная связь
- VBA Protect / Unprotect Worksheets
- Unprotect Excel Worksheet Without Password
- Unprotect Excel Worksheet With Password
- Unprotect Sheet – Lost Password
- Protect Worksheets
- Protect Worksheet – Without Password
- Protect Worksheet – Password Protect
- VBA Coding Made Easy
- Protect Worksheet Settings
- Protect Sheet – Allow VBA to Make Changes
- Unprotect All Sheets Macro
- Protect All Sheets Macro
- VBA Code Examples Add-in
- Worksheet.Protect method (Excel)
- Syntax
- Parameters
- Remarks
- Support and feedback
Метод Worksheet.Protect (Excel)
Защищает лист, чтобы его нельзя было изменить.
Синтаксис
expression. Защита (Password, DrawingObjects, Contents, Scenarios, UserInterfaceOnly, AllowFormattingCells, AllowFormattingColumns, AllowFormattingRows, AllowInsertingColumns, AllowInsertingRows, AllowInsertingHyperlinks, AllowDeletingColumns, AllowDeletingRows, AllowSorting, AllowFiltering, AllowUsingPivotTables )
Выражение Переменная, представляющая объект Worksheet .
Параметры
| Имя | Обязательный или необязательный | Тип данных | Описание |
|---|---|---|---|
| Password | Необязательный | Variant | Строка, указывающая пароль для листа или книги с учетом регистра. Если этот аргумент опущен, можно снять защиту листа или книги, не используя пароль. В противном случае необходимо указать пароль для отмены защиты листа или книги. Если вы забыли пароль, вы не сможете снять защиту листа или книги. |
Используйте надежные пароли, содержащие строчные и прописные буквы, цифры и знаки. В слабых паролях эти элементы не комбинируются. Надежный пароль: Y6dh!et5. Слабый пароль: House27. Длина паролей должна быть не меньше 8 символов. В парольной фразе лучше использовать 14 или более символов.
Очень важно запомнить пароль. Если вы его забудете, корпорация Майкрософт не сможет его восстановить. Храните пароли, записанные на бумаге, в безопасном месте вдали от информации, которую они защищают. DrawingObjects Необязательный Variant Значение true для защиты фигур. Значение по умолчанию — True. Contents Необязательный Variant Значение true для защиты содержимого. Для диаграммы это защищает всю диаграмму. Для листа это защищает заблокированные ячейки. Значение по умолчанию — True. Scenarios Необязательный Variant Значение true для защиты сценариев. Этот аргумент действителен только для листов. Значение по умолчанию — True. UserInterfaceOnly Необязательный Variant Значение true для защиты пользовательского интерфейса, но не макросов. Если этот аргумент опущен, защита применяется как к макросам, так и к пользовательскому интерфейсу. AllowFormattingCells Необязательный Variant Значение True позволяет пользователю форматировать любую ячейку на защищенном листе. Значение по умолчанию — False. AllowFormattingColumns Необязательный Variant Значение True позволяет пользователю форматировать любой столбец на защищенном листе. Значение по умолчанию — False. AllowFormattingRows Необязательный Variant Значение True позволяет пользователю форматировать любую строку на защищенном листе. Значение по умолчанию — False. AllowInsertingColumns Необязательный Variant Значение True позволяет пользователю вставлять столбцы на защищенный лист. Значение по умолчанию — False. AllowInsertingRows Необязательный Variant Значение True позволяет пользователю вставлять строки на защищенный лист. Значение по умолчанию — False. AllowInsertingHyperlinks Необязательный Variant Значение True позволяет пользователю вставлять гиперссылки на защищенный лист. Значение по умолчанию — False. AllowDeletingColumns Необязательный Variant Значение True позволяет пользователю удалять столбцы на защищенном листе, где каждая ячейка удаляемого столбца разблокирована. Значение по умолчанию — False. AllowDeletingRows Необязательный Variant Значение True позволяет пользователю удалять строки на защищенном листе, где каждая ячейка в удаляемой строке разблокирована. Значение по умолчанию — False. AllowSorting Необязательный Variant Значение True позволяет пользователю выполнять сортировку на защищенном листе. Каждая ячейка в диапазоне сортировки должна быть разблокирована или не защищена. Значение по умолчанию — False. AllowFiltering Необязательный Variant Значение True позволяет пользователю задавать фильтры на защищенном листе. Пользователи могут изменять условия фильтра, но не могут включать или отключать автоматический фильтр. Пользователи могут задавать фильтры для существующего автофильтра. Значение по умолчанию — False. AllowUsingPivotTables Необязательный Variant Значение True позволяет пользователю использовать отчеты сводной таблицы на защищенном листе. Значение по умолчанию — False.
Замечания
В предыдущих версиях, если применить этот метод с аргументом UserInterfaceOnly , равным True , а затем сохранить книгу, при повторном открытии книги будет полностью защищен весь лист (а не только интерфейс). Чтобы повторно включить защиту пользовательского интерфейса после открытия книги, необходимо снова применить этот метод, если параметр UserInterfaceOnly имеет значение True.
Если вы хотите внести изменения в защищенный лист, можно использовать метод Protect на защищенном листе, если указан пароль. Кроме того, другой метод — снять защиту листа, внести необходимые изменения, а затем снова защитить лист.
Незащищено означает, что ячейка может быть заблокирована (диалоговое окно Форматирование ячеек ), но включена в диапазон, определенный в диалоговом окне Разрешить пользователям изменять диапазоны , и пользователь отключил защиту диапазона паролем или был проверен с помощью разрешений NT.
Поддержка и обратная связь
Есть вопросы или отзывы, касающиеся Office VBA или этой статьи? Руководство по другим способам получения поддержки и отправки отзывов см. в статье Поддержка Office VBA и обратная связь.
Источник
VBA Protect / Unprotect Worksheets
In this Article
This tutorial will teach you everything about Excel Worksheet protection in VBA – How to Protect or Unprotect Worksheets in Excel.
Unprotect Excel Worksheet Without Password
To unprotect a Worksheet that isn’t password-protected use this simple line of code:
Unprotect Excel Worksheet With Password
To unprotect a Worksheet that’s password-protected, you must also enter the password:
Unprotect Sheet – Lost Password
To unprotect a Worksheet without knowing the password, you must use a password recovery add-in.
Protect Worksheets
Worksheet Protection allows you to lock certain aspects of the sheet from editing.
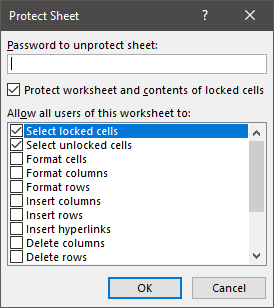
This menu is found in Home > Format > Protect sheet or by right-clicking on the Sheet tab name:
Most commonly this is used to protect “Locked” cells from editing, only allowing the end-user to edit certain cells.
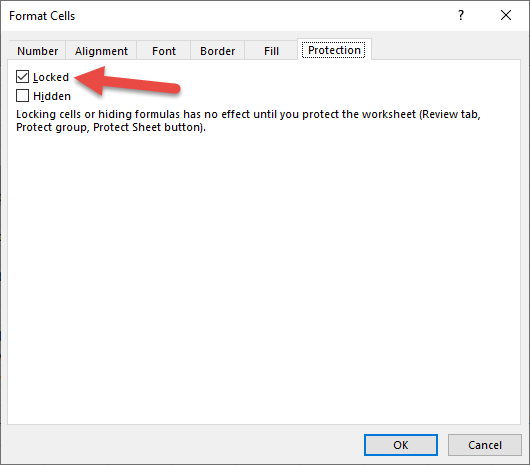
You can lock cells by selecting them, and opening the Protection tab of the Cell Formatting Menu (CTRL + 1).
You can also prevent the user from changing the worksheet structure (inserting, deleting, or resizing Rows & Columns), or from interacting with AutoFilters, and much more.
Protect Worksheet – Without Password
You might want to protect a Worksheet without entering a password. This will prevent accidental changes to the worksheet, while giving the user access to make changes if desired.
Protect Worksheet – Password Protect
VBA Coding Made Easy
Stop searching for VBA code online. Learn more about AutoMacro — A VBA Code Builder that allows beginners to code procedures from scratch with minimal coding knowledge and with many time-saving features for all users!

Protect Worksheet Settings
The above examples will protect Worksheets with the standard protection settings. Instead you might want to customize what is protected:
Instead of using the syntax above, I recommend recording a Macro with your desired settings (chosen with the Worksheet Protection menu above) and copying + pasting the recorded code into your procedure.
Protect Sheet – Allow VBA to Make Changes
By default, when you protect a sheet, the protection applies to VBA operations in addition to user actions. If VBA attempts to modify a locked cell, you will see a runtime error 1004. To avoid this, you could unprotect and re-protect your worksheets whenever VBA needs to interact with them:
However, it’s easy to forget to unprotect and/or re-protect your worksheets. This can can increase the probability of a coding error.
Instead, you can use the UserInterFaceOnly setting. When TRUE, worksheets will ONLY be protected from users, NOT from VBA. Your VBA code will be free to edit the worksheet just like if it was unlocked.
Two important points about UserInterFaceOnly:
- This setting is not available from the Worksheet Protection menu (shown above). It’s a setting that must be defined in VBA.
- The setting is not saved when you close a workbook. It must be re-defined each time a workbook is opened.
So in order to set the UserInterFaceOnly property, you should place the following Workbook_Open event procedure in ThisWorkbook module:
Workbook_Open is a special event procedure that will run each time the workbook is open. It must be placed in the ThisWorkbook module. Alternatively, you could use the Auto_Open event procedure (not covered here).
Unprotect All Sheets Macro
This Macro will unprotect all Sheets in a workbook:
Protect All Sheets Macro
This Macro will protect all Sheets in a Workbook:

VBA Code Examples Add-in
Easily access all of the code examples found on our site.
Simply navigate to the menu, click, and the code will be inserted directly into your module. .xlam add-in.
Источник
Worksheet.Protect method (Excel)
Protects a worksheet so that it cannot be modified.
Syntax
expression.Protect (Password, DrawingObjects, Contents, Scenarios, UserInterfaceOnly, AllowFormattingCells, AllowFormattingColumns, AllowFormattingRows, AllowInsertingColumns, AllowInsertingRows, AllowInsertingHyperlinks, AllowDeletingColumns, AllowDeletingRows, AllowSorting, AllowFiltering, AllowUsingPivotTables)
expression A variable that represents a Worksheet object.
Parameters
| Name | Required/Optional | Data type | Description |
|---|---|---|---|
| Password | Optional | Variant | A string that specifies a case-sensitive password for the worksheet or workbook. If this argument is omitted, you can unprotect the worksheet or workbook without using a password. Otherwise, you must specify the password to unprotect the worksheet or workbook. If you forget the password, you cannot unprotect the worksheet or workbook. |
Use strong passwords that combine uppercase and lowercase letters, numbers, and symbols. Weak passwords don’t mix these elements. Strong password: Y6dh!et5. Weak password: House27. Passwords should be 8 or more characters in length. A pass phrase that uses 14 or more characters is better.
It’s critical that you remember your password. If you forget your password, Microsoft cannot retrieve it. Store the passwords that you write down in a secure place away from the information that they help protect. DrawingObjects Optional Variant True to protect shapes. The default value is True. Contents Optional Variant True to protect contents. For a chart, this protects the entire chart. For a worksheet, this protects the locked cells. The default value is True. Scenarios Optional Variant True to protect scenarios. This argument is valid only for worksheets. The default value is True. UserInterfaceOnly Optional Variant True to protect the user interface, but not macros. If this argument is omitted, protection applies both to macros and to the user interface. AllowFormattingCells Optional Variant True allows the user to format any cell on a protected worksheet. The default value is False. AllowFormattingColumns Optional Variant True allows the user to format any column on a protected worksheet. The default value is False. AllowFormattingRows Optional Variant True allows the user to format any row on a protected worksheet. The default value is False. AllowInsertingColumns Optional Variant True allows the user to insert columns on the protected worksheet. The default value is False. AllowInsertingRows Optional Variant True allows the user to insert rows on the protected worksheet. The default value is False. AllowInsertingHyperlinks Optional Variant True allows the user to insert hyperlinks on the protected worksheet. The default value is False. AllowDeletingColumns Optional Variant True allows the user to delete columns on the protected worksheet, where every cell in the column to be deleted is unlocked. The default value is False. AllowDeletingRows Optional Variant True allows the user to delete rows on the protected worksheet, where every cell in the row to be deleted is unlocked. The default value is False. AllowSorting Optional Variant True allows the user to sort on the protected worksheet. Every cell in the sort range must be unlocked or unprotected. The default value is False. AllowFiltering Optional Variant True allows the user to set filters on the protected worksheet. Users can change filter criteria but can not enable or disable an auto filter. Users can set filters on an existing auto filter. The default value is False. AllowUsingPivotTables Optional Variant True allows the user to use PivotTable reports on the protected worksheet. The default value is False.
In previous versions, if you apply this method with the UserInterfaceOnly argument set to True and then save the workbook, the entire worksheet (not just the interface) will be fully protected when you reopen the workbook. To re-enable the user interface protection after the workbook is opened, you must again apply this method with UserInterfaceOnly set to True.
If you want to make changes to a protected worksheet, it is possible to use the Protect method on a protected worksheet if the password is supplied. Also, another method would be to unprotect the worksheet, make the necessary changes, and then protect the worksheet again.
Unprotected means that the cell may be locked (Format Cells dialog box) but is included in a range defined in the Allow Users to Edit Ranges dialog box, and the user has unprotected the range with a password or has been validated via NT permissions.
Support and feedback
Have questions or feedback about Office VBA or this documentation? Please see Office VBA support and feedback for guidance about the ways you can receive support and provide feedback.
Источник