Table of Contents
- Introduction
- Building the Environment for Testing
- Creating an Excel File to test
- Installing the necessary components in Windows Server
- Enabling SQL Server Instance to Read File
- Querying and Importing the Spreadsheet
- Conclusion
- References
- See Also
- Other Languages
Introduction
We often have to perform data integration in SQL Server, with different data sources such as «.txt» files (tabular text or with separator character), «.csv» files or «.xls» (Excel) files.
It is always not possible to create a SSIS package to do this data import, a useful alternative is to use OPENROWSET method for importing data.
In this article, we will use data import from Excel files (.xls e .xlsx).
Building the Environment for Testing
So that we see the data import process steps from an Excel file to a table from database, we need:
- Create an Excel file to import sample;
- Configure Windows Server, installing the necessary components;
- Configure the necessary permissions to the SQL instance that we need to obtain data files.
Let’s prepare environment for data import!
Creating an Excel File to test
In this step, we will create an Excel file sample with just a few rows to demo.
Add a header row, to explicitly define the data: «ID», «Item Name» and «Date Created».
The data sequences is only to facilitate the visualization of the content that is being manipulated.
See this Excel file in the image below (click to enlarge)
Installing the necessary components in Windows Server
To get the data through a query inside SQL Server, use an OLE DB Data Provider.
Most files can now use the
Microsoft.ACE.OLEDB.12.0 Data Provider that can be obtained free through Data Connectivity Components.
This package will provide all ODBC and OLEDB drivers for data manipulation, as follow below:
| File Type (extension) | Extended Properties |
| Excel 97-2003 Workbook (.xls) | Excel 8.0 |
| Excel 2007-2010 Workbook (.xlsx) | Excel 12.0 XML |
| Excel 2007-2010 Macro-enabled workbook (.xlsm) | Excel 12.0 Macro |
| Excel 2007-2010 Non-XML binary workbook (.xlsb) | Excel 12.0 |
There are two versions of this package: «AccessDatabaseEngine.exe» for x86 platform and other «AccessDatabaseEngine_x64.exe» for x64 platform.
The minimum system requirements for this installation can be obtained in the same
download package page.
If you are installing the x86 package you must ensure that your user is allowed access to the Temporary directory of your Windows OS.
To know what your Temporary directory open the «Control Panel», click «Advanced System Settings» option. A window will open, select the «Advanced» tab and click the «Environment Variables» button.
A new window will open with your environment variables, including «TEMP» and «TMP» variables, indicating your Temporary directory.
See this windows in the image below (click to enlarge)
So if your operating system is Windows 32-bit (x86) is necessary to include read and write access to the user of your SQL Server instance.
It’s important to remember that the user of your SQL Server instance must be a local user or the default «Local System» account to grant this access.
See this window Service Properties in the image below
Enabling SQL Server Instance to Read File
The settings and permissions to execute a query external data has some details that should be performed to be able to get the data from an Excel files (.xls ou .xlsx) and also other formats.
The execution of distributed queries as OPENROWSET is only possible when the SQL Server instance has the
Ad Hoc Distributed Queries configuration enabled. By default, every SQL Server instance maintains this permission denied.
 Note Note |
|---|
|
The Advanced Settings should only be changed by an experienced professional or a certified professional in SQL Server. It’s important to note not use these commands in Production Databases without previous analysis. |
To enable this feature just use the sp_configure system stored procedure in your SQL instance to display its Advanced Settings in
show advanced options parameter and soon to follow, enable the Ad Hoc Distributed Queries setting to enabling the use of distributed queries.
USE [master]
GO
—CONFIGURING SQL INSTANCE TO ACCEPT ADVANCED OPTIONS
EXEC
sp_configure ‘show advanced options’, 1
RECONFIGURE
GO
—ENABLING USE OF DISTRIBUTED QUERIES
EXEC
sp_configure ‘Ad Hoc Distributed Queries’, 1
RECONFIGURE
GO
These changes in the Advanced settings only take effect after the execution of the RECONFIGURE command.
To get permission granted to use the Data Provider through sp_MSset_oledb_prop system stored procedure to link Microsoft.ACE.OLEDB.12.0 in
SQL Server using AllowInProcess parameter so we can use the resources of the Data Provider and also allow the use of dynamic parameters in queries through of
DynamicParameters parameter for our queries can use T-SQL clauses.
USE [master]
GO
—ADD DRIVERS IN SQL INSTANCE
EXEC
master.dbo.sp_MSset_oledb_prop
N’Microsoft.ACE.OLEDB.12.0′,
N’AllowInProcess’, 1
GO
EXEC
master.dbo.sp_MSset_oledb_prop
N’Microsoft.ACE.OLEDB.12.0′,
N’DynamicParameters’, 1
GO
See
this output SQL script in the image below
After setting up your SQL instance to use the
Microsoft.ACE.OLEDB.12.0 Data Provider and make the appropriate access permissions, we can implement the distributed queries of other data sources,
in this case to Excel files.
Querying and Importing the Spreadsheet
As this demo is for Excel files (.xls) we will perform a query using an OPENROWSET method with the Excel test file that was created earlier in this article.
We use some parameters for this method to be able to data query:
- Data Provider — In this case, using Microsoft.ACE.OLEDB.12.0
- BULK Options — File Version;Where it’s stored; Header (HDR); Import Mode (IMEX)
- Query —
T-SQL statement with or without clauses to data filter and process.
—CONSULTING A SPREADSHEET
SELECT
* FROM
OPENROWSET(‘Microsoft.ACE.OLEDB.12.0’,
‘Excel 12.0; Database=C:MicrosoftTest.xls; HDR=YES; IMEX=1’,
‘SELECT * FROM [Plan1$]’)
GO
See
this output SQL script in the image below
To data group and perform other tasks for data manipulation, the ideal is always load the data into the database. You can insert data into an existing table using the INSERT statement or you can create a table through of INTO command in SELECT statement.
—CONSULTING A SPREADSHEET
SELECT *
INTO
TB_EXAMPLE
FROM OPENROWSET(‘Microsoft.ACE.OLEDB.12.0’,
‘Excel 12.0; Database=C:MicrosoftTest.xls; HDR=YES; IMEX=1’,
‘SELECT * FROM [Plan1$]’)
GO
SELECT * FROM TB_EXAMPLE
GO
See
this output SQL script in the image below
It’s also important to check if the SQL Server Service user has access in Windows directory where Excel files
are stored.
Conclusion
Have the possibility to use an alternative resource for importing data with T-SQL command is very useful, especially when we have to manipulate files in proprietary formats, as for .xlsx files where it’s necessary to use the Data Provider appropriate to obtain
the data correctly and with ease use.
It’s important to watch out that only users that have actually need to manipulate these files can use these resources, while minimizing the vulnerability of their environment through a permission in your SQL Server.
References
- OPENROWSET (Transact-SQL)
- Import Bulk Data by Using BULK INSERT or OPENROWSET(BULK…) (SQL Server)
- OLE DB Providers Tested with SQL Server
- Excel Source
See Also
- Transact-SQL Portal
- Wiki: Portal of TechNet Wiki Portals
Other Languages
- Importando uma planilha Excel para um Banco de Dados SQL Server (pt-BR)
This article was awarded the silver medal in the TechNet
Guru of April 2014
| title | description | author | ms.author | ms.date | ms.service | ms.subservice | ms.topic | monikerRange |
|---|---|---|---|---|---|---|---|---|
|
Import data from Excel to SQL Server or Azure SQL Database |
This article describes methods to import data from Excel to SQL Server or Azure SQL Database. Some use a single step, others require an intermediate text file. |
rwestMSFT |
randolphwest |
03/30/2023 |
sql |
data-movement |
conceptual |
=azuresqldb-current||>=sql-server-2016||>=sql-server-linux-2017||=azuresqldb-mi-current |
Import data from Excel to SQL Server or Azure SQL Database
[!INCLUDE SQL Server Azure SQL Database]
There are several ways to import data from Excel files to [!INCLUDE ssnoversion-md] or to Azure SQL Database. Some methods let you import data in a single step directly from Excel files; other methods require you to export your Excel data as text (CSV file) before you can import it.
This article summarizes the frequently used methods and provides links for more detailed information. A complete description of complex tools and services like SSIS or Azure Data Factory is beyond the scope of this article. To learn more about the solution that interests you, follow the provided links.
List of methods
There are several ways to import data from Excel. You may need to install SQL Server Management Studio (SSMS) to use some of these tools.
You can use the following tools to import data from Excel:
| Export to text first ([!INCLUDE ssnoversion-md] and SQL Database) | Directly from Excel ([!INCLUDE ssnoversion-md] on-premises only) |
|---|---|
| Import Flat File Wizard | SQL Server Import and Export Wizard |
| BULK INSERT statement | SQL Server Integration Services (SSIS) |
| BCP | OPENROWSET function |
| Copy Wizard (Azure Data Factory) | |
| Azure Data Factory |
If you want to import multiple worksheets from an Excel workbook, you typically have to run any of these tools once for each sheet.
[!IMPORTANT]
To learn more, see limitations and known issues for loading data to or from Excel files.
Import and Export Wizard
Import data directly from Excel files by using the [!INCLUDE ssnoversion-md] Import and Export Wizard. You also can save the settings as a SQL Server Integration Services (SSIS) package that you can customize and reuse later.
-
In [!INCLUDEssManStudioFull], connect to an instance of the [!INCLUDEssNoVersion] [!INCLUDEssDE].
-
Expand Databases.
-
Right-click a database.
-
Select Tasks.
-
Choose to Import Data or Export Data:
:::image type=»content» source=»../../integration-services/import-export-data/media/start-wizard-ssms.jpg» alt-text=»Start wizard SSMS»:::
This launches the wizard:
:::image type=»content» source=»media/excel-connection.png» alt-text=»Connect to an Excel data source»:::
To learn more, review:
- Start the SQL Server Import and Export Wizard
- Get started with this simple example of the Import and Export Wizard
Integration Services (SSIS)
If you’re familiar with SQL Server Integration Services (SSIS) and don’t want to run the [!INCLUDE ssnoversion-md] Import and Export Wizard, create an SSIS package that uses the Excel Source and the [!INCLUDE ssnoversion-md] Destination in the data flow.
To learn more, review:
- Excel Source
- SQL Server Destination
To start learning how to build SSIS packages, see the tutorial How to Create an ETL Package.
:::image type=»content» source=»media/excel-to-sql-data-flow.png» alt-text=»Components in the data flow»:::
OPENROWSET and linked servers
[!IMPORTANT]
In Azure SQL Database, you cannot import directly from Excel. You must first export the data to a text (CSV) file.
[!NOTE]
The ACE provider (formerly the Jet provider) that connects to Excel data sources is intended for interactive client-side use. If you use the ACE provider on [!INCLUDE ssnoversion-md], especially in automated processes or processes running in parallel, you may see unexpected results.
Distributed queries
Import data directly into [!INCLUDE ssnoversion-md] from Excel files by using the Transact-SQL OPENROWSET or OPENDATASOURCE function. This usage is called a distributed query.
[!IMPORTANT]
In Azure SQL Database, you cannot import directly from Excel. You must first export the data to a text (CSV) file.
Before you can run a distributed query, you have to enable the ad hoc distributed queries server configuration option, as shown in the following example. For more info, see ad hoc distributed queries Server Configuration Option.
sp_configure 'show advanced options', 1;
RECONFIGURE;
GO
sp_configure 'ad hoc distributed queries', 1;
RECONFIGURE;
GO
The following code sample uses OPENROWSET to import the data from the Excel Sheet1 worksheet into a new database table.
USE ImportFromExcel;
GO
SELECT * INTO Data_dq
FROM OPENROWSET('Microsoft.ACE.OLEDB.12.0',
    'Excel 12.0; Database=C:TempData.xlsx', [Sheet1$]);
GO
Here’s the same example with OPENDATASOURCE.
USE ImportFromExcel;
GO
SELECT * INTO Data_dq
FROM OPENDATASOURCE('Microsoft.ACE.OLEDB.12.0',
    'Data Source=C:TempData.xlsx;Extended Properties=Excel 12.0')...[Sheet1$];
GO
To append the imported data to an existing table instead of creating a new table, use the INSERT INTO ... SELECT ... FROM ... syntax instead of the SELECT ... INTO ... FROM ... syntax used in the preceding examples.
To query the Excel data without importing it, just use the standard SELECT ... FROM ... syntax.
For more info about distributed queries, see the following articles:
- Distributed Queries (Distributed queries are still supported in [!INCLUDE sssql19-md], but the documentation for this feature hasn’t been updated.)
- OPENROWSET
- OPENDATASOURCE
Linked servers
You can also configure a persistent connection from [!INCLUDE ssnoversion-md] to the Excel file as a linked server. The following example imports the data from the Data worksheet on the existing Excel linked server EXCELLINK into a new [!INCLUDE ssnoversion-md] database table named Data_ls.
USE ImportFromExcel;
GO
SELECT * INTO Data_ls FROM EXCELLINK...[Data$];
GO
You can create a linked server from SQL Server Management Studio (SSMS), or by running the system stored procedure sp_addlinkedserver, as shown in the following example.
DECLARE @RC INT;
DECLARE @server NVARCHAR(128);
DECLARE @srvproduct NVARCHAR(128);
DECLARE @provider NVARCHAR(128);
DECLARE @datasrc NVARCHAR(4000);
DECLARE @location NVARCHAR(4000);
DECLARE @provstr NVARCHAR(4000);
DECLARE @catalog NVARCHAR(128);

-- Set parameter values
SET @server = 'EXCELLINK';
SET @srvproduct = 'Excel';
SET @provider = 'Microsoft.ACE.OLEDB.12.0';
SET @datasrc = 'C:TempData.xlsx';
SET @provstr = 'Excel 12.0';

EXEC @RC = [master].[dbo].[sp_addlinkedserver] @server,
    @srvproduct,
    @provider,
    @datasrc,
    @location,
    @provstr,
    @catalog;
For more info about linked servers, see the following articles:
- Create Linked Servers
- OPENQUERY
For more examples and info about both linked servers and distributed queries, see the following article:
- How to use Excel with SQL Server linked servers and distributed queries
Prerequisite — Save Excel data as text
To use the rest of the methods described on this page — the BULK INSERT statement, the BCP tool, or Azure Data Factory — first you have to export your Excel data to a text file.
In Excel, select File | Save As and then select Text (Tab-delimited) (*.txt) or CSV (Comma-delimited) (*.csv) as the destination file type.
If you want to export multiple worksheets from the workbook, select each sheet, and then repeat this procedure. The Save as command exports only the active sheet.
[!TIP]
For best results with data importing tools, save sheets that contain only the column headers and the rows of data. If the saved data contains page titles, blank lines, notes, and so forth, you may see unexpected results later when you import the data.
The Import Flat File Wizard
Import data saved as text files by stepping through the pages of the Import Flat File Wizard.
As described previously in the Prerequisite section, you have to export your Excel data as text before you can use the Import Flat File Wizard to import it.
For more info about the Import Flat File Wizard, see Import Flat File to SQL Wizard.
BULK INSERT command
BULK INSERT is a Transact-SQL command that you can run from SQL Server Management Studio. The following example loads the data from the Data.csv comma-delimited file into an existing database table.
As described previously in the Prerequisite section, you have to export your Excel data as text before you can use BULK INSERT to import it. BULK INSERT can’t read Excel files directly. With the BULK INSERT command, you can import a CSV file that is stored locally or in Azure Blob storage.
USE ImportFromExcel;
GO
BULK INSERT Data_bi FROM 'C:Tempdata.csv'
   WITH (
      FIELDTERMINATOR = ',',
      ROWTERMINATOR = 'n'
);
GO
For more info and examples for [!INCLUDE ssnoversion-md] and SQL Database, see the following articles:
- Import Bulk Data by Using BULK INSERT or OPENROWSET(BULK…)
- BULK INSERT
BCP tool
BCP is a program that you run from the command prompt. The following example loads the data from the Data.csv comma-delimited file into the existing Data_bcp database table.
As described previously in the Prerequisite section, you have to export your Excel data as text before you can use BCP to import it. BCP can’t read Excel files directly. Use to import into [!INCLUDE ssnoversion-md] or SQL Database from a test (CSV) file saved to local storage.
[!IMPORTANT]
For a text (CSV) file stored in Azure Blob storage, use BULK INSERT or OPENROWSET. For an examples, see Example.
bcp.exe ImportFromExcel..Data_bcp in "C:Tempdata.csv" -T -c -t ,
For more info about BCP, see the following articles:
- Import and Export Bulk Data by Using the bcp Utility
- bcp Utility
- Prepare Data for Bulk Export or Import
Copy Wizard (ADF)
Import data saved as text files by stepping through the pages of the Azure Data Factory (ADF) Copy Wizard.
As described previously in the Prerequisite section, you have to export your Excel data as text before you can use Azure Data Factory to import it. Data Factory can’t read Excel files directly.
For more info about the Copy Wizard, see the following articles:
- Data Factory Copy Wizard
- Tutorial: Create a pipeline with Copy Activity using Data Factory Copy Wizard.
Azure Data Factory
If you’re familiar with Azure Data Factory and don’t want to run the Copy Wizard, create a pipeline with a Copy activity that copies from the text file to [!INCLUDE ssnoversion-md] or to Azure SQL Database.
As described previously in the Prerequisite section, you have to export your Excel data as text before you can use Azure Data Factory to import it. Data Factory can’t read Excel files directly.
For more info about using these Data Factory sources and sinks, see the following articles:
- File system
- SQL Server
- Azure SQL Database
To start learning how to copy data with Azure data factory, see the following articles:
- Move data by using Copy Activity
- Tutorial: Create a pipeline with Copy Activity using Azure portal
Common errors
Microsoft.ACE.OLEDB.12.0″ hasn’t been registered
This error occurs because the OLEDB provider isn’t installed. Install it from Microsoft Access Database Engine 2010 Redistributable. Be sure to install the 64-bit version if Windows and [!INCLUDE ssnoversion-md] are both 64-bit.
The full error is:
Msg 7403, Level 16, State 1, Line 3
The OLE DB provider "Microsoft.ACE.OLEDB.12.0" has not been registered.
Cannot create an instance of OLE DB provider «Microsoft.ACE.OLEDB.12.0» for linked server «(null)»
This indicates that the Microsoft OLEDB hasn’t been configured properly. Run the following Transact-SQL code to resolve this:
EXEC sp_MSset_oledb_prop N'Microsoft.ACE.OLEDB.12.0', N'AllowInProcess', 1;
EXEC sp_MSset_oledb_prop N'Microsoft.ACE.OLEDB.12.0', N'DynamicParameters', 1;
The full error is:
Msg 7302, Level 16, State 1, Line 3
Cannot create an instance of OLE DB provider "Microsoft.ACE.OLEDB.12.0" for linked server "(null)".
The 32-bit OLE DB provider «Microsoft.ACE.OLEDB.12.0» cannot be loaded in-process on a 64-bit SQL Server
This occurs when a 32-bit version of the OLD DB provider is installed with a 64-bit [!INCLUDE ssnoversion-md]. To resolve this issue, uninstall the 32-bit version and install the 64-bit version of the OLE DB provider instead.
The full error is:
Msg 7438, Level 16, State 1, Line 3
The 32-bit OLE DB provider "Microsoft.ACE.OLEDB.12.0" cannot be loaded in-process on a 64-bit SQL Server.
The OLE DB provider «Microsoft.ACE.OLEDB.12.0» for linked server «(null)» reported an error.
Cannot initialize the data source object of OLE DB provider «Microsoft.ACE.OLEDB.12.0» for linked server «(null)»
Both of these errors typically indicate a permissions issue between the [!INCLUDE ssnoversion-md] process and the file. Ensure that the account that is running the [!INCLUDE ssnoversion-md] service has full access permission to the file. We recommend against trying to import files from the desktop.
The full errors are:
Msg 7399, Level 16, State 1, Line 3
The OLE DB provider "Microsoft.ACE.OLEDB.12.0" for linked server "(null)" reported an error. The provider did not give any information about the error.
Msg 7303, Level 16, State 1, Line 3
Cannot initialize the data source object of OLE DB provider "Microsoft.ACE.OLEDB.12.0" for linked server "(null)".
Next steps
- Get started with this simple example of the Import and Export Wizard
- Import data from Excel or export data to Excel with SQL Server Integration Services (SSIS)
- bcp Utility
- Move data by using Copy Activity
Introduction
This article describes the complete steps for Microsoft Excel data import to SQL Server using linked servers technique.
The article describes the steps for all modern platforms:
- Microsoft SQL Server 2005-2016 on the x86/x64 platform.
- Microsoft Excel 2003-2016 files like *.xls, *.xlsx, *.xlsm, *.xlsb.
Bonus
You can develop amazing Microsoft Excel applications for working with Microsoft SQL Server using database development skills only!
Visit www.savetodb.com, download and install SaveToDB Add-In for Microsoft Excel.
That’s all!
Connect to tables, views, and stored procedures, edit the data and save it back to a database.
Add features to your Microsoft Excel applications step by step configuring apps via SQL.
Table of Contents
- Introduction
- The basics of Excel data import to SQL Server using linked servers
- Configuration steps for Excel data import to SQL Server using linked servers
- Install Microsoft.ACE.OLEDB.12.0 driver
- Grant rights to TEMP directory
- Configure ACE OLE DB properties
- Configure linked servers
- How-To: Import Excel 2003 to SQL Server x86
- How-To: Import Excel 2007 to SQL Server x86
- How-To: Import Excel 2003/2007 to SQL Server x64
- Conclusion
- See Also
The Basics of Excel Data Import to SQL Server Using Linked Servers
To import data from Microsoft Excel 2003 files to 32-bit SQL Server the Microsoft.Jet.OLEDB.4.0 provider can be used. Use the T-SQL code like this to add a linked server to Excel 2003 workbook:
EXEC sp_addlinkedserver
    @server = 'ExcelServer1',
    @srvproduct = 'Excel',
    @provider = 'Microsoft.Jet.OLEDB.4.0',
    @datasrc = 'C:Testexcel-sql-server.xls',
    @provstr = 'Excel 8.0;IMEX=1;HDR=YES;'
To import data from Microsoft Excel 2007 to 32-bit SQL Server or from any Microsoft Excel files to 64-bit SQL Server the Microsoft.ACE.OLEDB.12.0 provider should be used. Use the T-SQL code like this:
EXEC sp_addlinkedserver
    @server = 'ExcelServer2',
    @srvproduct = 'Excel',
    @provider = 'Microsoft.ACE.OLEDB.12.0',
    @datasrc = 'C:Testexcel-sql-server.xlsx',
    @provstr = 'Excel 12.0;IMEX=1;HDR=YES;'
IMEX=1 defines to import all Excel column data including data of mixed types.
HDR=YES defines that Excel data contain column headers.
The way to modify a linked server is to drop and create it again. Use the T-SQL code like this:
EXEC sp_dropserver
    @server = N'ExcelServer1',
    @droplogins='droplogins'
There are two ways to use linked server data. The first way is like this:
SELECT * FROM ExcelServer1...[Sheet1$]
and the second one is the use of the OPENQUERY function:
SELECT * FROM OPENQUERY(ExcelServer1, 'SELECT * FROM [Sheet1$]')
The use of the OPENQUERY function is more flexible because queries can contain Excel ranges unlike the entire sheet in the first case.
Configuration Steps for Excel Data Import to SQL Server Using Linked Servers
Install Microsoft.ACE.OLEDB.12.0 driver
To import Excel 2007-2016 files to SQL Server the Microsoft.ACE.OLEDB.12.0 driver should be installed.
To download the driver use the following link:
Microsoft Access Database Engine 2010 Redistributable
Don’t worry about «Access» in the name.
Warning! x64 driver cannot be installed if Microsoft Office 2007-2016 x86 is already installed!
So, there is no way to import Excel data to SQL Server x64 using Linked Servers technique on a machine with Microsoft Office x86!
The SQL Server Error Message if Microsoft.ACE.OLEDB.12.0 is not installed
OLE DB provider "Microsoft.ACE.OLEDB.12.0" for linked server "ExcelServer2" returned message "The Microsoft Access database engine cannot open or write to the file ''.
It is already opened exclusively by another user, or you need permission to view and write its data.".
Msg 7303, Level 16, State 1, Line 1
Cannot initialize the data source object of OLE DB provider "Microsoft.ACE.OLEDB.12.0" for linked server "ExcelServer2".
Grant rights to TEMP directory
This step is required only for 32-bit SQL Server with any OLE DB provider.
The main problem is that an OLE DB provider creates a temporary file during the query in the SQL Server temp directory using credentials of a user who run the query.
The default directory for SQL Server is a default directory for SQL Server service account.
If SQL Server is run under the Network Service account the temp directory is like:
C:WindowsServiceProfilesNetworkServiceAppDataLocalTemp
If SQL Server is run under the Local Service account the temp directory is like:
C:WindowsServiceProfilesLocalServiceAppDataLocalTemp
Microsoft recommends two ways for the solution:
- A change of SQL Server TEMP directory and a grant of full rights for all users to this directory.
- Grant of read/write rights to the current SQL Server TEMP directory.
See details: PRB: «Unspecified error» Error 7399 Using OPENROWSET Against Jet Database
Usually, only a few accounts are used for import operations. So, we can just add the rights for these accounts.
For example, icacls utility can be used for the rights setup:
icacls C:WindowsServiceProfilesNetworkServiceAppDataLocalTemp /grant vs:(R,W)
if SQL Server is started under Network Service and login «vs» is used to run the queries.
The SQL Server Error Message if a user has no rights for SQL Server TEMP directory
OLE DB provider "Microsoft.Jet.OLEDB.4.0" for linked server "ExcelServer1" returned message "Unspecified error".
Msg 7303, Level 16, State 1, Line 1
Cannot initialize the data source object of OLE DB provider "Microsoft.Jet.OLEDB.4.0" for linked server "ExcelServer1".
or the message for Microsoft.ACE.OLEDB.12.0 provider:
OLE DB provider "Microsoft.ACE.OLEDB.12.0" for linked server "ExcelServer2" returned message "Unspecified error".
Msg 7303, Level 16, State 1, Line 1
Cannot initialize the data source object of OLE DB provider "Microsoft.ACE.OLEDB.12.0" for linked server "ExcelServer2".
Configure ACE OLE DB properties
This step is required only if the Microsoft.ACE.OLEDB.12.0 provider is used.
Use the following T-SQL code:
EXEC sp_MSset_oledb_prop N'Microsoft.ACE.OLEDB.12.0', N'AllowInProcess', 1
GO
EXEC sp_MSset_oledb_prop N'Microsoft.ACE.OLEDB.12.0', N'DynamicParameters', 1
GO
The SQL Server Error Messages if OLE DB properties are not configured
Msg 7399, Level 16, State 1, Line 1
The OLE DB provider "Microsoft.ACE.OLEDB.12.0" for linked server "ExcelServer2" reported an error. The provider did not give any information about the error.
Msg 7330, Level 16, State 2, Line 1
Cannot fetch a row from OLE DB provider "Microsoft.ACE.OLEDB.12.0" for linked server "ExcelServer2".
Configure linked servers
The configuring of linked servers is discussed in the Basics topic.
Use the T-SQL code like this for Excel 2003 linked servers:
EXEC sp_addlinkedserver
    @server = 'ExcelServer1',
    @srvproduct = 'Excel',
    @provider = 'Microsoft.Jet.OLEDB.4.0',
    @datasrc = 'C:Testexcel-sql-server.xls',
    @provstr = 'Excel 8.0;IMEX=1;HDR=YES;'
Use the T-SQL code like this for Excel 2007 linked servers or on SQL Server x64:
EXEC sp_addlinkedserver
    @server = 'ExcelServer2',
    @srvproduct = 'Excel',
    @provider = 'Microsoft.ACE.OLEDB.12.0',
    @datasrc = 'C:Testexcel-sql-server.xlsx',
    @provstr = 'Excel 12.0;IMEX=1;HDR=YES;'
How-To: Import Excel 2003 to SQL Server x86
Step 1. Grant rights to TEMP directory
icacls C:WindowsServiceProfiles<SQL Server Account>AppDataLocalTemp /grant <User>:(R,W)
The most commonly used paths:
C:WindowsServiceProfilesNetworkServiceAppDataLocalTemp
C:WindowsServiceProfilesLocalServiceAppDataLocalTemp
Step 2. Configure linked server using Microsoft.Jet.OLEDB.4.0 provider
EXEC sp_addlinkedserver
    @server = 'ExcelServer1',
    @srvproduct = 'Excel',
    @provider = 'Microsoft.Jet.OLEDB.4.0',
    @datasrc = 'C:Testexcel-sql-server.xls',
    @provstr = 'Excel 8.0;IMEX=1;HDR=YES;'
How-To: Import Excel 2007 to SQL Server x86
Step 1. Install the 32-bit Microsoft.ACE.OLEDB.12.0 driver
Microsoft Access Database Engine 2010 Redistributable
Step 2. Grant rights to TEMP directory
icacls C:WindowsServiceProfiles<SQL Server Account>AppDataLocalTemp /grant <User>:(R,W)
The most commonly used paths:
C:WindowsServiceProfilesNetworkServiceAppDataLocalTemp
C:WindowsServiceProfilesLocalServiceAppDataLocalTemp
Step 3. Configure ACE OLE DB properties
EXEC sp_MSset_oledb_prop N'Microsoft.ACE.OLEDB.12.0', N'AllowInProcess', 1
GO
EXEC sp_MSset_oledb_prop N'Microsoft.ACE.OLEDB.12.0', N'DynamicParameters', 1
GO
Step 4. Configure linked server using Microsoft.ACE.OLEDB.12.0 provider
EXEC sp_addlinkedserver
    @server = 'ExcelServer2',
    @srvproduct = 'Excel',
    @provider = 'Microsoft.ACE.OLEDB.12.0',
    @datasrc = 'C:Testexcel-sql-server.xlsx',
    @provstr = 'Excel 12.0;IMEX=1;HDR=YES;'
How-To: Import Excel 2003/2007 to SQL Server x64
Step 1. Install 64-bit Microsoft.ACE.OLEDB.12.0 driver
Microsoft Access Database Engine 2010 Redistributable
Step 2. Configure ACE OLE DB properties
EXEC sp_MSset_oledb_prop N'Microsoft.ACE.OLEDB.12.0', N'AllowInProcess', 1
GO
EXEC sp_MSset_oledb_prop N'Microsoft.ACE.OLEDB.12.0', N'DynamicParameters', 1
GO
Step 3. Configure linked server using Microsoft.ACE.OLEDB.12.0 provider
EXEC sp_addlinkedserver
    @server = 'ExcelServer2',
    @srvproduct = 'Excel',
    @provider = 'Microsoft.ACE.OLEDB.12.0',
    @datasrc = 'C:Testexcel-sql-server.xlsx',
    @provstr = 'Excel 12.0;IMEX=1;HDR=YES;'
Conclusion
Using the described techniques you can import data from Microsof Excel 2003-2016 to SQL Server 2005-2016 on the 32-bit or 64-bit platform.
See Also
- References
- OPENQUERY (Transact-SQL)
- How-To
- How to use Excel with SQL Server linked servers and distributed queries
- Downloads
- Microsoft Access Database Engine 2010 Redistributable
- Microsoft Access Database Engine 2016 Redistributable

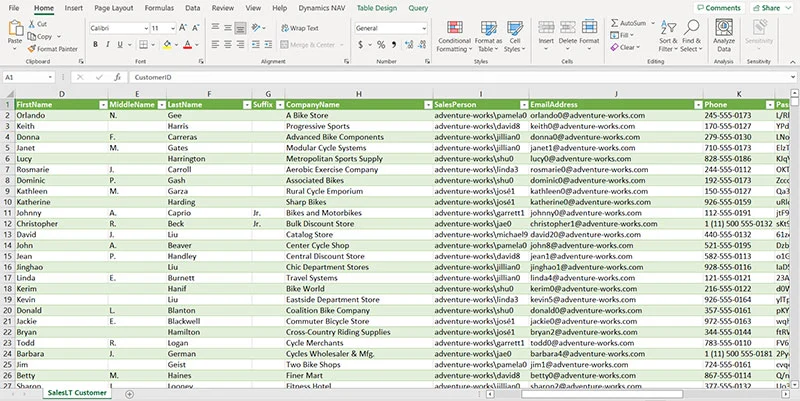
Microsoft Excel can be a powerful tool to evaluate SQL data. In Excel, a connection can be created to directly link to a particular database filtered according to your requirements. This allows you to report SQL data, attach a table of data into Excel, create a pivot table and have better manipulation of your SQL data.
This connection must be validated by a SQL login to ensure the contents of your databases remain secure. The connection can be refreshed to update the content from the SQL database.
How to Create an Excel Connection
- Open Microsoft Excel
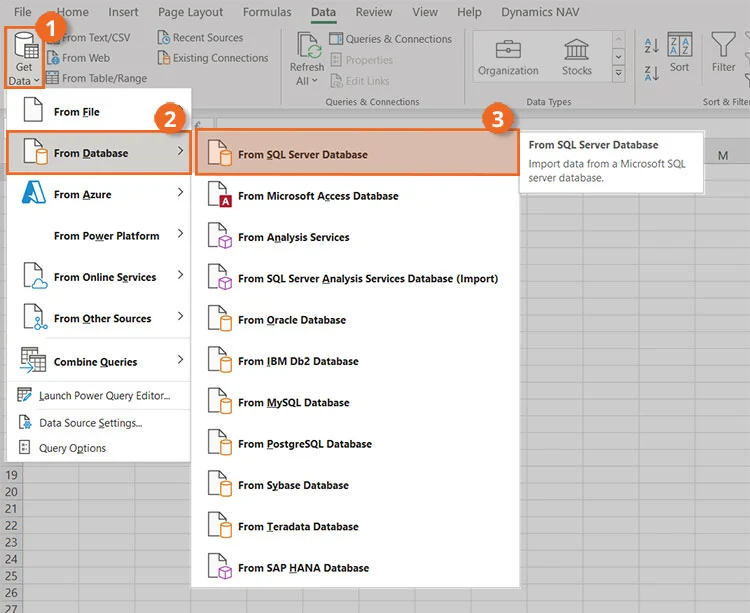
- Select the Data tab
- Click on Get Data
-
- Select “From Database”
-
- Select From SQL Server database
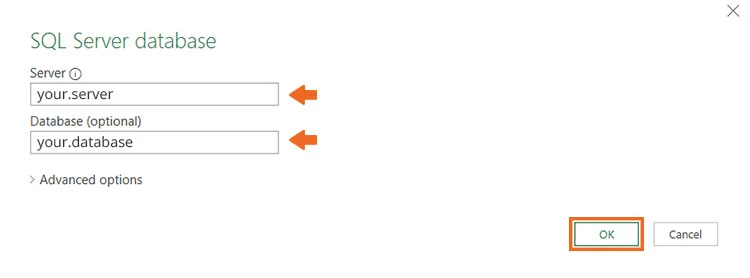
- Enter the SQL Server Name
-
- Optionally, you can enter the database name here if you know it.
- Otherwise, you will be able to select the database in a future step
-
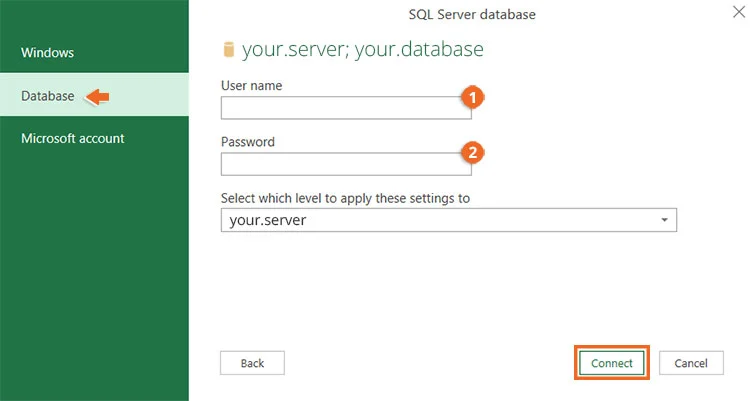
- Determine the credential you are going to use.
-
- “Use my current credentials” is the default. This will use your windows login that you used to connect to windows.
- “Use Alternate Credentials” is using a different windows login than the current.
- Select Database on the left-hand side to use SQL Database Credentials.
- Select Microsoft Account on the left-hand side to use your Microsoft365 login
-
- Click Connect
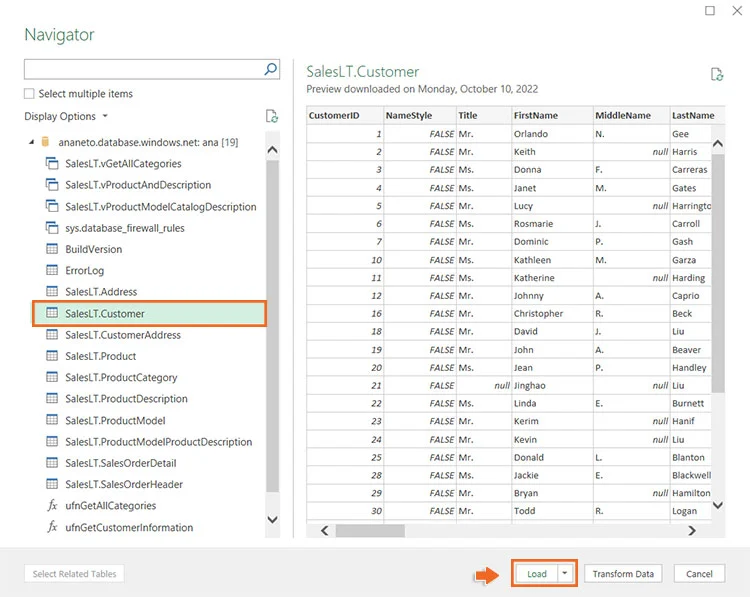
- Select the database and the table that you want to use for the query
-
- You can use the search bar to search for a table
- You can check the box for “Select Multiple Items” to pull in more than one table.
-
- Now you can choose 1) How you want to load the data; either Load which puts the data into an Excel table or “Load To” which allows you to load the data as a query instead of a table. «Load To” is for more complex reporting. 2) You can “Transform Data”; this opens Microsoft Power Query Editor and allows you to add fields, remove fields, change data types, Etc.
- After click on “Load” this loads the data into an Excel Table.
How to Refresh an Excel Connection to a SQL Database
To refresh the Excel Connection:
- Select the Data tab
- Select Refresh
-
- Refresh: Will refresh the current query that you are on.
- Refresh All: Will refresh all queries in the Workbook.
-
Contact ArcherPoint with assistance with all your Microsoft Dynamics 365 Business Central and reporting needs. We’re here to help!
К концу этой статьи вы будете знать, как просто подключить базу данных SQL Server к вашей надежной среде Microsoft Excel. Все, что вам нужно для поддержки этой интеграции, — это устройство, на котором может работать Microsoft Excel, сам Microsoft Excel и база данных SQL Server для подключения. Просто, правда?
Многие компании предпочитают использовать Microsoft Excel в качестве собственной базы данных клиентов, и хотя это может быть достаточно эффективным для компаний на ранних стадиях, в конечном итоге требуется более эффективный способ обработки данных, чтобы соответствовать росту операций, который происходит естественным образом по мере расширения бизнеса. Microsoft SQL Server — это реляционная система управления базами данных, которая служит хорошим инструментом для перехода от классической базы данных таблиц Excel к более эффективной и менее трудоемкой базе данных. Однако если вы ищете постоянное, прямое и надежное соединение между Excel и SQL, этого, вероятно, будет недостаточно, но об этом подробнее в конце учебника!
Давайте начнем!
Шаг 1 — Откройте рабочую книгу Excel, все должно быть просто.
Шаг 2 — Выберите вкладку «Данные».
Шаг 3 — Войдите в меню «Получить данные», выберите опцию «Из базы данных» и выберите «Из базы данных SQL Server».
Шаг 4 — Вы должны увидеть меню, показанное ниже. Здесь вы введете данные базы данных SQL, к которой хотите подключиться, т.е. адрес сервера и имя (необязательно). Как только вы закончите, нажмите «OK».
Шаг 5 — Появится меню. На боковой панели вам нужно выбрать меню «База данных», поскольку мы пытаемся подключиться к базе данных (логично, правда?). Как только вы окажетесь в меню «База данных», все, что вам нужно сделать, это ввести имя пользователя и пароль, которые вы установили для базы данных SQL Server. Что касается поля «Выберите, к какому уровню применить эти настройки», оно должно совпадать с адресом сервера для базы данных, к которой вы пытаетесь подключиться, который вы ввели во время настройки. Шаг 4. Когда вы закончите, нажмите «Connect».
Шаг 6 — Вы почти у цели! Для наших последний шагпоявится окно «Навигатор». Здесь вы увидите список таблиц, которые содержатся в вашей базе данных SQL Server. Для этой демонстрации мы выберем таблицу, содержащую информацию о фиктивных клиентах фиктивной компании. После того как вы выбрали таблицу, к которой хотите подключиться, вам остается только нажать кнопку «Загрузить».
И вуаля! Вы только что подключили Microsoft Excel к базе данных SQL Server.
Заключение
Мы надеемся, что это простое руководство помогло вам успешно подключить Excel к SQL, поскольку это послужит достойной заменой классической базе данных таблиц Excel, которая встречается во многих компаниях. Однако, как мы уже упоминали в начале статьи, если вы ищете более последовательный и эффективный способ подключения Excel к SQL, максимально используя его возможности, мы предлагаем вам взглянуть на Connect Bridge.
Connect Bridge — это наша мощная платформа интеграции программного обеспечения собственной разработки. По сути, она устраняет необходимость использования API программного обеспечения, используя вместо этого синтаксис SQL, и именно поэтому она так невероятно удобна! Еще в марте 2022 года мы написали статью для CRM Software Blog (которую вы можете прочитать на сайте здесь), в котором объясняется, как можно подключить Excel к SQL, Dynamics 365, SharePoint и многое другое с помощью нашей платформы. Не стесняйтесь прочитать или, если хотите, свяжитесь с нами напрямую! Мы будем рады помочь.


