
Excel для Microsoft 365 Excel 2021 SharePoint Server по подписке Excel 2019 SharePoint Server 2019 Excel 2016 SharePoint Server 2016 Excel 2013 SharePoint Server 2013 SharePoint в Microsoft 365 Excel 2010 SharePoint Server 2010 Excel 2007 Еще…Меньше
Данные из таблицы Excel можно экспортировать в список SharePoint. При экспорте списка Excel создает на сайте новый список SharePoint. После этого вы можете работать с данными на сайте, как с любым другим списком SharePoint.
Примечание: При экспорте таблицы в список не создается подключение к данным списка SharePoint. Если обновить таблицу в Excel после экспорта, изменения не отразятся в списке SharePoint.
Для экспорта таблицы Excel в список на сайте SharePoint вам необходимы:
-
Сайт SharePoint, на котором создается список.
-
Разрешение на создание списков на этом сайте. Если вы сомневаетесь, что оно у вас есть, обратитесь к администратору сайта SharePoint.
Для просмотра списка в режиме таблицы на сайте SharePoint вам необходимы:
-
Excel или Access. Эти приложения нужны для использования режима таблицы на сайте SharePoint.
Примечание: Режим таблицы не поддерживается в 64-разрядной версии Microsoft Office. Если вам нужно использовать режим таблицы для списка на сайте SharePoint, установите 32-разрядную версию Office.
Экспорт таблицы в список SharePoint
-
Щелкните внутри таблицы.
-
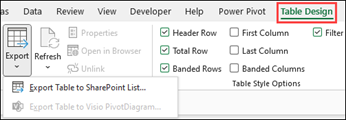
Щелкните Конструктор таблиц > Экспорт > Экспорт таблицы в список SharePoint.

-
В поле Адрес введите URL-адрес сайта SharePoint.
Важно: Введите все, что находится в веб-адресе, перед параметром «/default.aspx». Например, если адрес http://contoso/default.aspx, введите http://contoso. Если адрес http://contoso/teams/accounting/sitepages/home.aspx, введите http://contoso/teams/accounting.
-
В поле Имя введите уникальное название списка.
-
При желании можете ввести описание в поле Описание.
-
Нажмите кнопку Далее.
Примечание: Вам может быть предложено ввести Microsoft 365 учетные данные, учетные данные домена организации или и то, и другое.
-
Проверьте данные в разделах Столбцы и Типы данных, затем нажмите кнопку Готово.
-
Нажмите кнопку ОК.

Появится сообщение о том, что ваша таблица опубликована, а также унифицированный указатель ресурсов (URL-адрес). Чтобы перейти к списку, щелкните URL-адрес. Добавьте URL-адрес в избранное в своем браузере.
Примечание: Можно открыть список и другим способом. Перейдите на сайт SharePoint, в правом верхнем углу щелкните значок шестеренки и выберите элемент Контент сайта.
Поддерживаемые типы данных
Некоторые типы данных Excel невозможно экспортировать в список на сайте SharePoint. При экспорте таких данных они преобразуются в типы, совместимые со списками SharePoint. Например, формулы, созданные в Excel, преобразуются в значения списка SharePoint. После преобразования данных вы можете создать формулы для столбцов на сайте SharePoint.
При экспорте таблицы Excel на сайт SharePoint каждому столбцу в списке SharePoint назначается один из следующих типов данных:
-
Текст (однострочный)
-
Текст (многострочный)
-
Денежный
-
Дата и время
-
Числовой
-
Гиперссылка (URL-адрес)
Если столбец содержит ячейки с разными типами данных, применяется тип данных, который может использоваться для всех ячеек. Например, если столбец содержит числа и текст, в списке SharePoint будет использоваться текстовый тип.
Нужна дополнительная помощь?
How to Import and Export Data from Excel to SharePoint Lists and Vice Versa
Many users who use SharePoint Online like to use lists because SharePoint lists look just like Excel tables. For better integration, Microsoft allows you to export Excel tables to SharePoint lists and vice versa. Users usually ask: How do I import data from SharePoint to Excel? How do I extract data from SharePoint? How do I create a SharePoint list in Excel? This blog post can help you answer these questions and explains how to export tables from Excel to SharePoint lists and vice versa. Four methods of exporting data from Excel and one method of exporting data from SharePoint lists are covered.
Method 1 – How to Export Data from Excel to SharePoint Lists Manually
The idea of the first method is that you should create an empty list that contains the same columns as in the Excel table. The data format of columns must be the same to preserve data consistency. Then you should manually copy data from each column of the Excel table and paste this data to the appropriate column of the SharePoint list.
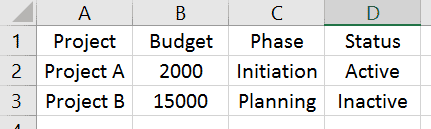
Open an XLS, XLSX, CSV file, or a file of another format that contains a table in Microsoft Excel that is installed on your computer. In my example, I’ve created a simple table for demonstration. You can see this table opened in Excel in the screenshot below.

Open a web browser and log into your Office 365 account (Microsoft 365 account). Open your team site in SharePoint Online, and create a new list. Let’s call our test list List02 and enter a description, for example, Import Excel into SharePoint list. You can also read this blog post about SharePoint Online to learn more about sites, lists, and libraries.

Once you have created a new SharePoint list, create the appropriate columns by clicking +Add column. The columns must have the same names and data format as the columns in the source Excel table.

In the window that opens, enter a name, description, and type, and define other needed parameters for a column. Then hit Save.

The list now contains all the needed columns but remains empty. To start copying data to a SharePoint list, you have to view the list as a table. To do this, click Edit in grid view. You are ready to copy data from Excel to SharePoint list.

Select data in a column of an Excel table, and press Ctrl+C to copy the selected data to clipboard. On the screenshot below you can see the data in the Name column selected.

You can move columns (left and right) after creating them in a SharePoint list. Select the empty cell in the needed column (the Names column in our case), and press Ctrl+V to paste data you have copied to the clipboard. The Name column now contains all the needed data in our example. Similarly copy paste data for the other columns.

Once you have transferred data to all columns of your SharePoint list, you can exit grid view. We have finished copying data from an Excel table to a SharePoint list. On the screenshot below you can see how our list looks after copying all the data.

The advantage of this method is that it’s easy to use when you don’t have that many tables or columns.
The disadvantage is that it’s time-consuming and inconvenient when you have too many columns and tables to copy.
Method 2 – How to Export Data Directly from Excel to a SharePoint List
The idea of this method is that you should export your table to a SharePoint list directly from Excel installed on your computer. Excel must be able to connect to your SharePoint site. You should provide your credentials, and your Office 365 account must have sufficient permissions to create a SharePoint list on a SharePoint site.
Open Microsoft Excel installed on your computer, and open the table you want to export to SharePoint Online. Let’s create a test table for our blog post with some equipment items and create columns with vendors who manufactured these items, users who are owners of the appropriate item, and the price for each item.
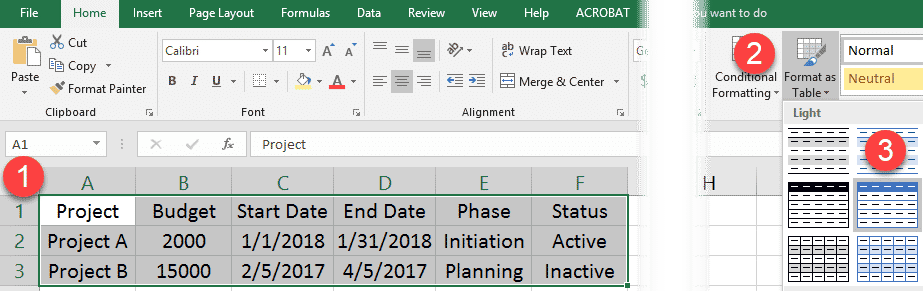
Convert a spreadsheet to a table before you start exporting. Click Insert > Table.

In the Create Table window, you can leave default values and hit OK.

Now the view of the table is a little bit different, as headers are marked with another color.
Select any column name in your table, go to the Design tab (Table Tools), and enter a table name, for example, TestTable01. There should be no spaces in the name.
Select the Design tab, click Export, then click Export Table to SharePoint List…

A pop-up window is displayed. There are two steps to complete.
Enter the address of your team site in SharePoint, which is the destination for the Excel table that you want to export. In my case, I’m using the following address: https://nakivo.sharepoint.com/sites/BlogTeamSite
Enter a name for your table, for example: Excel to SharePoint list. This name will be used as the SharePoint list name after export.
Enter a description, for example: Import Excel to SharePoint list.
Hit Next to continue.

Define the correct data types for each column of the exported table, then hit Finish.

Now Microsoft Excel connects to your SharePoint site you have selected as destination to export the Excel table into a SharePoint list. Excel needs to pass authentication in Office 365 to export a table to a SharePoint list. You should enter the username and password for your Office 365 account.

If everything is correct, the export process will be completed successfully, and you should see the message:
The table was successfully published and may be viewed on: <address>

Open the link provided in the window in a web browser.
Now you can see the exported Excel table as a list in SharePoint Online.

You can open this list manually in SharePoint Online by opening your team site and going to the Site Contents section in the navigation pane of the web interface.

The advantage of this method is that it’s convenient to export data directly from Excel to a SharePoint list. All you need is Excel and access to SharePoint Online. No third-party apps are required.
Method 3 – How to Export Data from Excel to a SharePoint List with an App
The idea of the third method is that you should use a special SharePoint App to import spreadsheets from Excel to SharePoint lists. You need the Import Spreadsheet app and a web browser that supports ActiveX controls, for example, Internet Explorer.
Open your team site in SharePoint Online, click the Settings icon, and, in the menu that opens, hit Add an app.

In the window that opens, you can see a list of different SharePoint apps. Type “import” in the search field on this page. When the Import Spreadsheet app is found, click it.

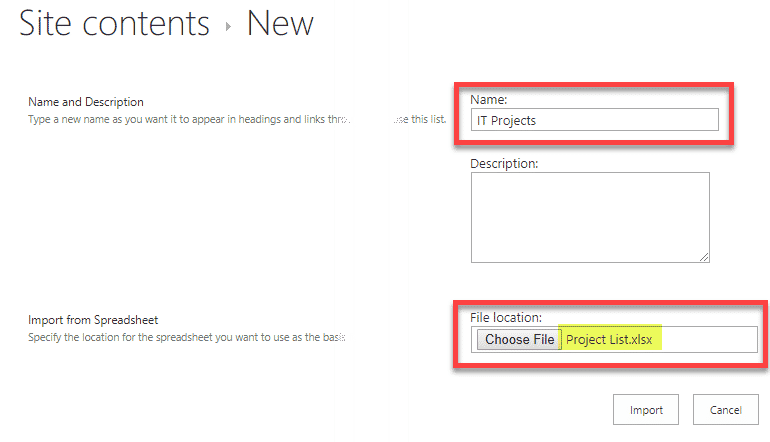
On the page that opens, you should enter a name and description of the new SharePoint list that is created after import with the app.
Name: Excel to SharePoint list
Description: Import Excel to SharePoint list
Click Browse, and select the XLSX file (or another Excel file format that is supported by the app) that you want to import to SharePoint as a list.
Hit Import.

ActiveX controls must be enabled in your web browser. If ActiveX controls is not enabled, you will see a warning message in your web browser. Refer to documentation for your web browser to learn how to enable ActiveX controls. ActiveX controls is a piece of software allowing you to interact with content you browse in the web. They can have access to your computer and may lead security issues. ActiveX controls are also known as plug-ins for Internet Explorer.
The advantage of this method is that it doesn’t take much manual intervention.
The disadvantages of the method are that you need to configure ActiveX controls that can be difficult or not supported in your web browser and that you need to use a special web app for SharePoint.
Method 4 – How to Export Data from Excel when Creating a New SharePoint List
There is one more method that allows you to import an Excel table to a SharePoint list when creating a new list in SharePoint Online. You don’t need Excel or other applications to use this method. Just open your web browser and log in to SharePoint Online with your Office 365 account (Microsoft 365) credentials.
Open you team site in SharePoint Online, click the Settings icon, and hit Site contents.

On the Site contents page that opens, click New > List.

A new page opens suggesting that you create a list. On the left side of the page, select From Excel to create a list from Excel. Enter a name for your new list, for example, SharePoint import Excel. Click Upload file, and select an Excel file (XLS, XLSX, or other supported formats) you want to import as a SharePoint list to SharePoint Online. As an alternative, you can select a file that has been already uploaded to a SharePoint site. Hit Next to continue.

A table in the file we have uploaded is recognized. Check the column types and make sure that the data format is correct to preserve consistency. Hit Create when ready to finish.

A SharePoint list has been created successfully and data has been exported from an Excel table to a SharePoint list.

The advantages of this method is that you don’t need to install Excel on your computer to export a table to SharePoint as a list and you don’t need to use a SharePoint app.
How to Export SharePoint List to Excel
You can export a SharePoint list to an Excel table with a few clicks by using a web interface of SharePoint Online.
Open your team site in SharePoint Online, then open the SharePoint list you want to export. Click Export to Excel.

A window notifies you that query.iqy must be opened in Excel. Select Excel as an application to open the downloaded query.iqy file, and hit OK. A Microsoft Excel security notice is displayed when you open a file downloaded from the internet in Microsoft Excel. The purpose of this notification message is to reduce risks of ransomware attacks and infection with other viruses. Click Enable to open the SharePoint list you are exporting to an Excel table.

Now a table opens in Excel and the export of the SharePoint list is finished. Save the table as a file in the needed format, for example, XLS or XLSX.

Refreshing data in Excel
If changes are written to your SharePoint list stored on a team site in SharePoint Online, you can refresh data in the table you have imported to Excel and update your table without the need to perform a new export/import operation. The data in Excel is not refreshed automatically right after changes are saved in a SharePoint list; you should perform one manual operation to do this. You should know how to connect Excel to SharePoint lists in this case.
Let’s add a new Switches line in the SharePoint list.

As you can see, the Excel table we have imported before is not updated automatically with the data we added to our SharePoint list (the Switches line). We need to update it by going to the Data tab and clicking Connections in Excel.

The Workbook Connections window opens. Click Refresh to refresh the data in your Excel table, then you can close this window.

Data has been updated in Excel, and the Switches line is added in the bottom of our Excel table without the need to re-export all data.

Be aware that data is refreshed only in one direction. If you change data in your Excel table and click Refresh, the SharePoint list is not updated.
If you don’t need to update data in the current Excel table, go to Data > Connections, select a query, and click Remove.

Conclusion
Microsoft provides good integration between SharePoint Online and Excel as they both are Microsoft products. There are at least four methods to export data from Excel tables to SharePoint lists. Methods covered in this blog post have advantages and disadvantages you should be aware of when selecting a method that is suitable for you. Select the right method depending on whether you want to do it manually, use Excel, or use another app. Data export from a SharePoint list to Excel is straightforward and affordable for all SharePoint Online users.
When you use SharePoint Online and Office 365 in general, don’t forget to back up your data. NAKIVO Backup & Replication supports Office 365 data backup for Exchange Online, OneDrive for Business, and SharePoint Online. Download the latest version of the product, and back up all needed data in your environment.
Содержание
- Import data from Excel, Access, SharePoint sites, SQL Server, and other external sources
- Step 1: Import your data
- Step 2: Link rows of data to shapes in your drawing
- Method 1: Link rows to existing shapes one at a time
- Method 2: Link rows to existing shapes automatically
- Method 3: Create shapes from your data
- Open or check out a SharePoint-based file from within an Office app
- Open an Office file
- Check out an open file for exclusive editing
- What do you want to do?
- Open an Microsoft 365 file
- Check out an Microsoft 365 file you have already opened
- Export an Excel table to SharePoint
- Export a table to a SharePoint list
- Supported data types
- Import data from Excel, Access, SharePoint sites, SQL Server, and other external sources
- Step 1: Import your data
- Step 2: Link rows of data to shapes in your drawing
- Method 1: Link rows to existing shapes one at a time
- Method 2: Link rows to existing shapes automatically
- Method 3: Create shapes from your data
You can quickly import and display data directly on your shapes in Visio. The first step is to connect to the data source and import data into your drawing. The second step is to link the imported data to shapes.
Step 1: Import your data
In this first step, you use the Data Selector Wizard to import your data.
The data that appears in the External Data window is a snapshot of your source data at the time of import. You can update the data in your drawing to match the changes in your source data. However, you cannot refresh your data source by changing the data in your drawing. See Refresh imported data.
On the Data tab, in the External Data group, click Link Data to Shapes.
On the first page of the Data Selector Wizard, choose which of the following types of data sources you want to use:
Microsoft Excel workbook
Microsoft Access database
Microsoft SharePoint Foundation list
Microsoft SQL Server database
Other OLEDB or ODBC data source
Previously created connection
Complete the remainder of the wizard.
Note: If you choose an option other than an Excel workbook, Access database, or SharePoint list on the first page of the wizard, you may be temporarily diverted to the Data Connection Wizard in the course of completing the Data Selector Wizard.
After you click Finish on the last page of the Data Connection Wizard, the External Data window appears with your imported data shown in a grid.
Step 2: Link rows of data to shapes in your drawing
There are three methods to link rows of data to shapes in your drawing: You can link rows to existing shapes one at a time, you can link the rows to shapes automatically, or you can create shapes from the data.
Method 1: Link rows to existing shapes one at a time
This approach is best for existing drawings with relatively few shapes.
Drag a row from External Data Window onto a shape in your drawing.
Note: If you don’t see the External Data Window, go to the Data tab, and in the Show/Hide group, select the checkbox next to External Data Window.
Your data appears in the shape, and a link icon appears to the left of the row in the External Data Window.
You can link a single row to multiple shapes, but you cannot link multiple rows to a single shape.
To change or enhance the appearance of the shapes and data, see Enhance your data with data graphics.
To display the External Data window, on the View menu, click External Data Window.
Method 2: Link rows to existing shapes automatically
This approach is best for existing drawings with a large number of shapes. This works only if the shapes have data already in them that you can match to data in the data source.
In Visio 2016 and newer versions: On the Data menu, click Refresh All and select AutoLink After Refresh is checked if not already.
In Visio 2013 and older versions: On the Data menu, click Automatically Link.
Follow the steps in the Automatic Link Wizard.
Your data will appear in your shapes. To change or enhance the appearance of the shapes and data, see Enhance your data with data graphics.
Method 3: Create shapes from your data
This approach is best if your drawing doesn’t already have shapes, and you don’t need to use specific shapes.
Click a shape in the Shapes pane.
Drag a row or set of rows from the External Data window onto a blank space in your drawing.
One instance of the shape that you click appears for each row that you drag onto the drawing.
Источник
You can open or check out a file from a SharePoint library from within your Microsoft 365 app.
After you open a file from the library, Word, Excel, and PowerPoint also keep a link to that SharePoint location on the File tab under Recent Places.
Open an Office file
In your app, select File > Open.
On the left, under the Open heading, select the  entry in the list.
A scrollable list of SharePoint document libraries that you’re connected to appears.
Select the document library that contains the file you want to open.
Select the file you want to open.
You’re ready to edit the file.
(Optional) If the document library requires that the file be checked out in order to edit it, a yellow bar appears near the top of the window indicating that check-out is necessary. Just select Check Out to proceed:

Check out an open file for exclusive editing
By default, when you open a file from a SharePoint document library, it is a co-authoring situation. Other people may open the file at the same time as you to contribute to it. That is fine in many cases, but at times it may be best to check out the file so only you can edit it.
When you check out a file, you are the only person who can change it. This reduces the potential for confusion and conflicting edits.
After you make changes to a file, you must check in the file so that other people can see your changes when they open the file.
With the file open in the app, select File > Info.
Select Manage . > Check Out.
If the Check Out option is grayed out, it means that someone else currently has the file open for editing. You can co-author with them, but you can’t check out the file for exclusive editing while someone else has the file open.
What do you want to do?
Open an Microsoft 365 file
Note: This procedure assumes that you have already opened at least one Microsoft 365 file from a SharePoint site, or that a shortcut has been added to the SharePoint Sites folder in your favorites list in Windows Explorer by using SharePoint. For more information on opening files directly from a SharePoint library and using the Connect to Office command on the SharePoint library library ribbon, see the SharePoint Help system.
To open an Microsoft 365 file from a previously accessed SharePoint site
Click the File tab.
Under Favorites, click SharePoint Sites.
Click the SharePoint site where your file is located, and then click Open.
If you don’t see your server in SharePoint Sites, type the URL for the SharePoint site in the File Name box.
Click the name of the library that contains the file, such as Shared Documents, and then click Open.
Click the name of the file that you want to open and then click Open.
If you do not want to make changes to the file, you can open it as read-only. Click the arrow on the Open button, and then click Open Read Only.
Check out an Microsoft 365 file you have already opened
If multiple people work on the same files, you may want to check out files after you have opened them and before you work on them. When you check out a file, you are the only person who can change it while it is checked out to you. This reduces the potential for confusion and conflicting edits.
After you make changes to a file, you must check in the file before other people can see your changes when they view or edit the file.
To check out a file while it is open in an Microsoft 365 program, use the following steps. You can also check out a file from the library on the SharePoint site. For more information on checking out files, see the SharePoint Help system.
To check out a file fromSharePoint that you have already opened
Click the File tab.
Click Manage Versions.
Click Check Out.
If your library requires checking out, a Check Out command appears on the Message Bar when you open a file from your Microsoft 365 program.
Источник
You can export data from an Excel table to a SharePoint list. When you export the list, Excel will create a new SharePoint list on the site. You can then work with the data on the site, just like you would for any other SharePoint list.
Note: Exporting a table as a list does not create a data connection to the SharePoint list. If you were to update the table in Excel after exporting it, the updates will not be reflected in the SharePoint list.
To export a table in an Excel spreadsheet to a list on a SharePoint site, you need:
A SharePoint site where you are creating the list.
Permissions to create lists on the site. If you are not sure, contact your SharePoint site administrator.
To view the list in datasheet view on the SharePoint site you need:
Excel or Access. These programs are required for using the datasheet view on the SharePoint site.
Note: Datasheet view is not supported in 64-bit version of Microsoft Office. It is recommended that you install 32-bit version of Office in order to be able to use Datasheet view in a list on a SharePoint site.
Click inside the table.
Click Table Design > Export > Export Table to SharePoint List.
In the Address box, type the address, or URL of the SharePoint site.
Important: Type everything that’s in your Web address before the “/default.aspx”. For example, if the address is http://contoso/default.aspx, type http://contoso. If the address is http://contoso/teams/accounting/sitepages/home.aspx, type http://contoso/teams/accounting.

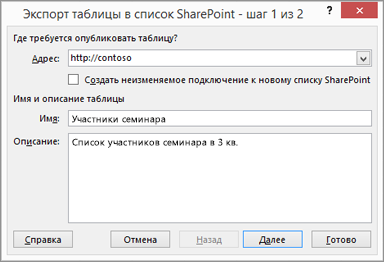
In the Name box, type a unique name for the list.
Optionally, enter a description in the Description box.
Note: You may be asked to enter your Microsoft 365 credentials, or organizational domain credentials, or both.
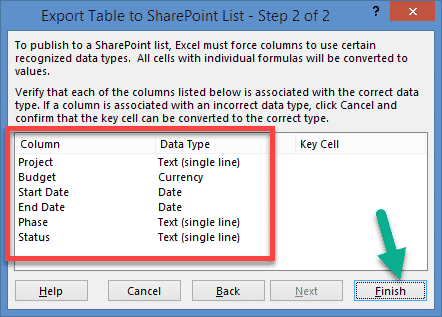
Review the information given in Columns and Data Types and then click Finish.
A message indicating that your table is published, along with the Uniform Resource Locator (URL) appears. Click on the URL to go to the list. Add the URL as a favorite in your browser.
Note: Another way to open the list is to go the SharePoint site, click the gear icon on the upper-right corner, and click Site Contents.
Supported data types
Some Excel data types cannot be exported to a list on the SharePoint site. When unsupported data types are exported, these data types are converted to data types that are compatible with SharePoint lists. For example, formulas that you create in Excel are converted to values in a SharePoint list. After the data is converted, you can create formulas for the columns on the SharePoint site.
When you export an Excel table to a SharePoint site, each column in a SharePoint list is assigned one of the following data types:
Text (single line)
Text (multiple lines)
If a column has cells with different data types, Excel applies a data type that can be used for all of the cells in the column. For example, if a column contains numbers and text, the data type in the SharePoint list will be text.
Источник
You can quickly import and display data directly on your shapes in Visio. The first step is to connect to the data source and import data into your drawing. The second step is to link the imported data to shapes.
Step 1: Import your data
In this first step, you use the Data Selector Wizard to import your data.
The data that appears in the External Data window is a snapshot of your source data at the time of import. You can update the data in your drawing to match the changes in your source data. However, you cannot refresh your data source by changing the data in your drawing. See Refresh imported data.
On the Data tab, in the External Data group, click Link Data to Shapes.
On the first page of the Data Selector Wizard, choose which of the following types of data sources you want to use:
Microsoft Excel workbook
Microsoft Access database
Microsoft SharePoint Foundation list
Microsoft SQL Server database
Other OLEDB or ODBC data source
Previously created connection
Complete the remainder of the wizard.
Note: If you choose an option other than an Excel workbook, Access database, or SharePoint list on the first page of the wizard, you may be temporarily diverted to the Data Connection Wizard in the course of completing the Data Selector Wizard.
After you click Finish on the last page of the Data Connection Wizard, the External Data window appears with your imported data shown in a grid.
Step 2: Link rows of data to shapes in your drawing
There are three methods to link rows of data to shapes in your drawing: You can link rows to existing shapes one at a time, you can link the rows to shapes automatically, or you can create shapes from the data.
Method 1: Link rows to existing shapes one at a time
This approach is best for existing drawings with relatively few shapes.
Drag a row from External Data Window onto a shape in your drawing.
Note: If you don’t see the External Data Window, go to the Data tab, and in the Show/Hide group, select the checkbox next to External Data Window.
Your data appears in the shape, and a link icon appears to the left of the row in the External Data Window.
You can link a single row to multiple shapes, but you cannot link multiple rows to a single shape.
To change or enhance the appearance of the shapes and data, see Enhance your data with data graphics.
To display the External Data window, on the View menu, click External Data Window.
Method 2: Link rows to existing shapes automatically
This approach is best for existing drawings with a large number of shapes. This works only if the shapes have data already in them that you can match to data in the data source.
In Visio 2016 and newer versions: On the Data menu, click Refresh All and select AutoLink After Refresh is checked if not already.
In Visio 2013 and older versions: On the Data menu, click Automatically Link.
Follow the steps in the Automatic Link Wizard.
Your data will appear in your shapes. To change or enhance the appearance of the shapes and data, see Enhance your data with data graphics.
Method 3: Create shapes from your data
This approach is best if your drawing doesn’t already have shapes, and you don’t need to use specific shapes.
Click a shape in the Shapes pane.
Drag a row or set of rows from the External Data window onto a blank space in your drawing.
One instance of the shape that you click appears for each row that you drag onto the drawing.
Источник
A while back, I published a post where I explained how to export SharePoint lists from SharePoint to Excel. Today, I am going to cover the opposite of this – how to import Excel to SharePoint. Say, you have an Excel list/table and want to bring it to SharePoint (because SharePoint custom list kicks ass!). How do you achieve this? Well, let me explain. You have a few options to choose from!
July 2020 Update – READ THIS FIRST!
Below techniques describe the “old way” of importing Excel to SharePoint. If you are in SharePoint on-premises, below tips are the only options you have. However, if you are in SharePoint Online (Office 365), we now have a new and easier way to import Excel data, which would be the easiest and preferred option to use. Please reference this most recent post for instructions.
Option 1: Import using Quick Edit
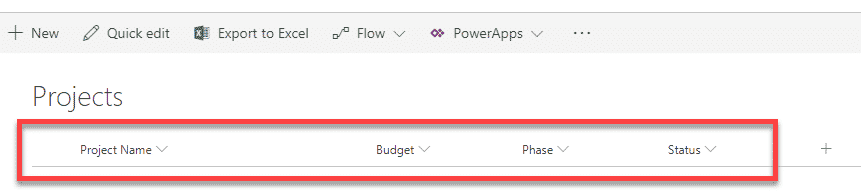
The first option assumes that you already have a SharePoint list with all the corresponding columns, and just need to copy/paste the content from Excel to SharePoint. Here is what you need to do to achieve this:
- Build out all the columns exactly as they appear in Excel

- Make sure columns in a view are in the same order as in Excel (otherwise when you do copy/paste, you will get a mismatch)

- If you are taking advantage of metadata (drop-downs), make sure to populate all the possible choices into respective columns (otherwise, when you paste, and pasted text does not match the drop-down choice, the row will be rejected)
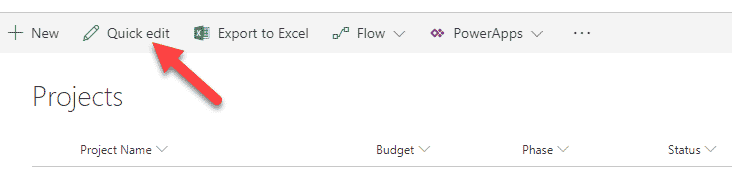
- Open your list in Quick Edit (Datasheet view for those in SharePoint 2010)

- Copy the rows you want to copy from Excel
- Paste into Quick Edit View
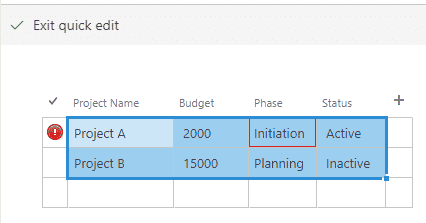
- You will notice the rows being pasted one by one. You might need to give it some time if you have lots of rows. In case you get a mismatch in data being imported, you will get a red warning just like in the image below

- When all data is successfully pasted/mismatches resolved, just click on Exit Quick Edit. You are all set!
Pros
- Allows to take advantage of metadata and different types of columns in the existing list (i.e., Text, Choice, Date, Currency, etc.)
Cons
- It takes time to set up the list and view before you can import/paste
- Might not be a good technique for importing large data sets
- Error handling capabilities are limited (if you have a row that fails, might take time to figure out the issue/field causing the issue and you might need to redo the whole import)
- Import will not work if you set up metadata drop-down using Term Store (managed metadata). Click here to read more about this issue

Option 2: Import Spreadsheet Web part
Another option that is available to import Excel to SharePoint is to use a Web Part called “Import Spreadsheet.” These are the steps to follow:
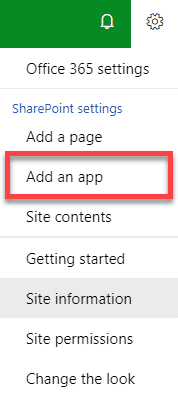
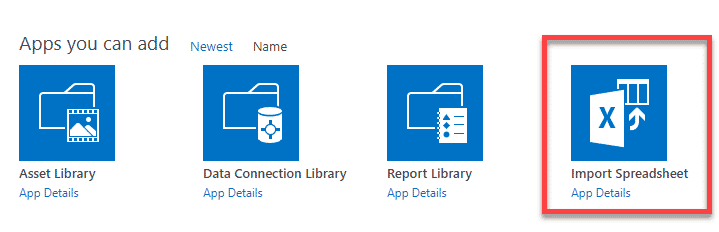
- Gear Icon > Add an App

- Scroll down to Import Spreadsheet App. Click on it.

- On the next screen, give your new app/list a name, then choose an Excel file. Click Import

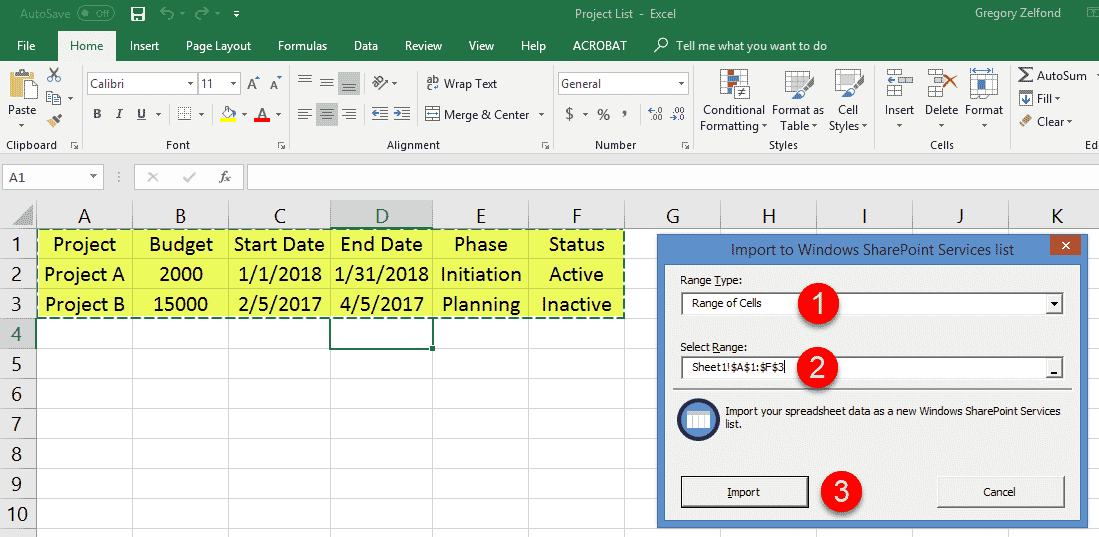
- You will now notice an Excel file open up with a pop-up window where you need to select a range of cells to import. Once you choose the range of cells in the pop-up, click Import.

- The table will now be imported to SharePoint. It will go ahead and create a custom list with proper column headers and values.


Pros
- Relatively easy to use
- Does not require much prep time like Option 1
Cons

Option 3: Import directly from Excel
Another great option is to import data right from within Excel. This is what you have to do:
- In Excel spreadsheet, select the data range and Format it as a Table

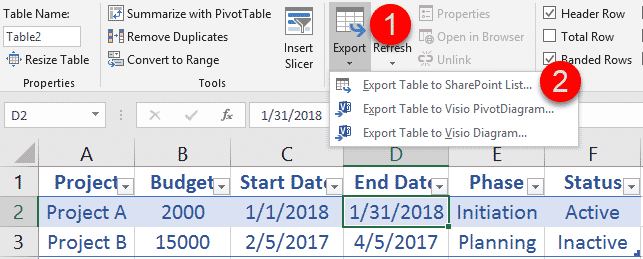
- While still in Excel, highlight the table, then choose Export from the top ribbon, then Export Table to SharePoint list

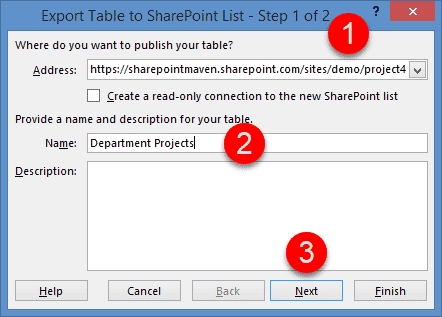
- From the pop-up that appears, specify the URL of the site you are importing to, then give the list a name, then hit Next. You can also (optionally) check the box next to Create a read-only connection to the new SharePoint list. What it does is make your Excel physically linked to SharePoint list. Any changes in the SharePoint list will propagate down to Excel when you refresh the data there.

- On the next screen, you will see all the columns with corresponding recognized column types (Currency, Date, etc.). Just click Finish
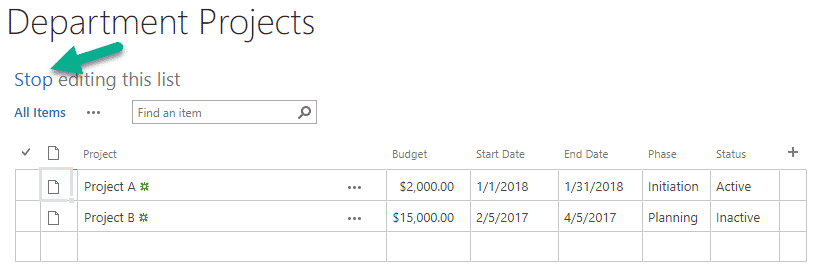
- You should be getting a success message/pop-up.

- You should now see your list created in SharePoint. It will default to Datasheet view, just click Stop to view it as a normal list.


Pros
Same as Option 2
Cons
- Same as with Option 2, some drop-down choices are recognized as Text.
- The list created is a classic list and not a modern one (for those who are in SharePoint Online)
- By default, the list opens up in Datasheet view. You always have to click Stop Editing to see a “normal” list

Это статья серии “Введение в SharePoint 2010”
В предыдущей главе рассматривалась работа с рабочими процессами в SharePoint 2010.
В этой главе рассматривается интеграция с офисными приложениями.
В этой части руководства рассматриваются следующие темы
- Введение
- Office Web Apps
- Excel 2010
- Импорт данных из электронной таблицы в список
- Веб-часть импорта таблицы
- Экспорт из Excel 2010
- Экспорт списка/библиотеки в Excel
- Импорт данных из электронной таблицы в список
Введение
Одно из самых важных преимуществ SharePoint 2010 – его интеграция с Microsoft Office 2010. Самый простой способ интеграции – в офисных приложениях при сохранении документа можно указать сайт SharePoint. Рассмотрим подробнее возможные сценарии работы в Office 2010 и SharePoint 2010.
Office Web Apps
SharePoint 2010 используется как централизованное хранилище документов. Естественное желание пользователей – просматривать и редактировать документы в браузере. Но данная возможность отсутствует в поставке по умолчанию.
На помощь могут прийти Office Web Apps, которые позволяют работать с Microsoft Word, Excel, PowerPoint и OneNote (аналогично тому, как работает SkyDrive). Статьи по развертыванию веб-приложений Office Web Apps и ссылки на загрузки можно найти здесь. После развертывания пользователи получают инструментарий, позволяющий работать с документами прямо в браузере, в том числе с мобильных устройств. Также можно отметить удобный механизм совместной работы над документами, который появился в первом пакете обновления. Замечу, что Office Web Apps уже настроены для использования в SharePoint Online.
Excel 2010
Как уже было сказано, SharePoint 2010 тесно интегрирован с Office 2010, в частности, Excel 2010. Рассмотрим ниже некоторые сценарии интеграции.
Импорт данных из электронной таблицы в список
Рассмотрим два способа для выполнения указанной задачи.
Веб-часть импорта таблицы
Откройте сайт, на который вы хотите импортировать данные. Кликните на Действия сайта, затем на Дополнительные параметры. В появившемся окне нужно выбрать Импорт из электронной таблицы, и кликнуть Создать (рис. 7.1).

Рис. 7.1. Окно выбора шаблона списка
После чего нужно указать имя нового списка, описание и расположение файла (рис. 7.2). Если у вас при импорте появилась ошибка “Указанный файл не является допустимой электронной таблицей или не содержит данных для импорта”, то способ ее исправления можно найти здесь.

Рис. 7.2. Страница создания списка с помощью импорта из Excel
Далее открывается указанная книга Excel, и нужно указать, какие данные будут импортированы (рис. 7.3).
Доступны следующие типы диапазонов:
- Диапазон ячеек – указываются произвольные ячейки таблицы;
- Диапазон таблицы – предлагается выбрать таблицы из списка;
- Именованный диапазон – предлагается выбрать именованные диапазоны (если они есть)

Рис. 7.3. Окно выбора данных для импорта в список
Список создан, при желании можно изменить его параметры, например, название, или создать представления. Обращаю ваше внимание, что в этом случае синхронизация между содержимым файла и списка НЕ происходит.
Экспорт из Excel 2010
Рассмотрим еще один вариант импорта электронной таблицы в список. Для начала нужно создать таблицу (рис. 7.4).

Рис. 7.4. Окно создания таблицы
После чего при клике на любой ячейке таблицы на ленте появляется конструктор для работы с таблицами (рис. 7.5). Кликнем на Экспорт таблицы в список SharePoint.

Рис. 7.5. Кнопка для экспорта таблицы в список
В появившемся окне (рис. 7.6) указываем адрес сайта, на который нужно опубликовать список, имя и описание. Если создать неизменяемое подключение к новому списку, то книга будет связана со списком (как и в первом случае, связь односторонняя), в противном случае – связи между книгой и списком не будет. Кликаем на Далее.

Рис. 7.6. Первый шаг экспорта таблицы в список SharePoint
На втором шаге осуществляется проверка типов данных (рис. 7.7). При этом стоит учесть, что формулы будут удалены и вместо них будет подставлено вычисленное значение соответствующего типа.

Рис. 7.7. Второй шаг экспорта таблицы в список SharePoint
Кликаем на Готово, и список опубликован, о чем оповестит окно со ссылкой на список.
Особенность данного подхода заключается в том, что представление списка – таблица данных (рис. 7.8). В правой части можно обнаружить панель со ссылками на полезные команды. Безусловно, при желании можно изменить представление.

Рис. 7.8. Внешний вид списка с экспортированной электронной таблицей
Экспорт списка/библиотеки в Excel
При необходимости можно экспортировать список/библиотеку в Excel. При этом нужно учитывать, что экспортируется только текущее представление.
Для экспорта списка воспользуемся лентой (рис. 7.9). Кликаем на Экспорт в Excel, и откроем появившийся файл owssvr.iqy, который представляет собой файл подключения.

Рис. 7.9. Кнопка на ленте для экспорта списка в Excel
В Excel появляется извещение системы безопасности (рис. 7.10). Так как мы уверены в надежности источника файла, то кликаем на Включить. Далее будет предложено авторизоваться, вводим туда учетные данные, используемые для входа на портал SharePoint 2010.

Рис. 7.10. Извещение системы безопасности Microsoft Excel
В книгу загрузятся данные активного представления списка в виде таблицы. Интересно, что в этом случае нельзя добавлять данные в список путем добавления их в файл, можно лишь получать содержимое списка. Обновлять данные можно вручную с помощью кнопки Обновить. Также можно настроить автоматическое обновление, кликнув на Свойства, в появившемся окне можно изменить интересующие параметры. Свойства обновления указываются непосредственно в свойствах подключения, куда можно попав, кликнув по соответствующей кнопке (рис. 7.11).

Рис. 7.11. Свойства подключения к списку
Данные вид экспорта удобно использовать для подготовки печатных отчетов.
Важная составляющая интеграции Excel 2010 и SharePoint 2010 – службы Excel, которые рассматривались в главе 5.
В этой части руководства рассматривалась интеграция Excel 2010 и SharePoint 2010.
В следующей части руководства рассматривается интеграция Access 2010 и SharePoint 2010