
Microsoft SQL Server 2005 Standard Edition Microsoft SQL Server 2005 Enterprise Edition Microsoft SQL Server 2005 Developer Edition Microsoft SQL Server 2005 Workgroup Edition More…Less
Summary
Microsoft SQL Server supports connections to other OLE DB data sources on a persistent or an ad hoc basis. The persistent connection is known as a linked server; an ad hoc connection that is made for the sake of a single query is known as a distributed query.
Microsoft Excel workbooks are one type of OLE DB data source that you can query through SQL Server in this manner. This article describes the syntax that is necessary to configure an Excel data source as a linked server, as well as the syntax that is necessary to use a distributed query that queries an Excel data source.
More Information
Querying an Excel data source on a linked server
You can use SQL Server Management Studio or Enterprise Manager, a system stored procedure, SQL-DMO (Distributed Management Objects), or SMO (SQL Server Management Objects) to configure an Excel data source as a SQL Server linked server. (SMO are only available for Microsoft SQL Server 2005.) In all of these cases, you must always set the following four properties:
-
The name that you want to use for the linked server.
-
The OLE DB Provider that is to be used for the connection.
-
The data source or complete path and file name for the Excel workbook.
-
The provider string, which identifies the target as an Excel workbook. By default, the Jet Provider expects an Access database.
The system stored procedure sp_addlinkedserver also expects the @srvproduct property, which can be any string value.
Note If you are using SQL Server 2005, you must specify a value that is not empty for the Product name property in SQL Server Management Studio or for the @srvproduct property in the stored procedure for an Excel data source.
Using SQL Server Management Studio or Enterprise Manager to configure an Excel data source as a linked server
SQL Server Management Studio (SQL Server 2005)
-
In SQL Server Management Studio, expand Server Objects in Object Explorer.
-
Right-click Linked Servers, and then click New linked server.
-
In the left pane, select the General page, and then follow these steps:
-
In the first text box, type any name for the linked server.
-
Select the Other data source option.
-
In the Provider list, click Microsoft Jet 4.0 OLE DB Provider.
-
In the Product name box, type Excel for the name of the OLE DB data source.
-
In the Data source box, type the full path and file name of the Excel file.
-
In the Provider string box, type Excel 8.0 for an Excel 2002, Excel 2000, or Excel 97 workbook.
-
Click OK to create the new linked server.
-
Note In SQL Server Management Studio, you cannot expand the new linked server name to view the list of objects that the server contains.
Enterprise Manager (SQL Server 2000)
-
In Enterprise Manager, click to expand the Security folder.
-
Right-click Linked Servers, and then click New linked server.
-
On the General tab, follow these steps:
-
In the first text box, type any name for the linked server.
-
In the Server type box, click Other data source.
-
In the Provider name list, click Microsoft Jet 4.0 OLE DB Provider.
-
In the Data source box, type the full path and file name of the Excel file.
-
In the Provider string box, type Excel 8.0 for an Excel 2002, Excel 2000, or Excel 97 workbook.
-
Click OK to create the new linked server.
-
-
Click to expand the new linked server name to expand the list of objects that it contains.
-
Under the new linked server name, click Tables. Notice that your worksheets and named ranges appear in the right pane.
Using a stored procedure to configure an Excel data source as a linked server
You can also use the system stored procedure sp_addlinkedserver to configure an Excel data source as a linked server:
DECLARE @RC int
DECLARE @server nvarchar(128)
DECLARE @srvproduct nvarchar(128)
DECLARE @provider nvarchar(128)
DECLARE @datasrc nvarchar(4000)
DECLARE @location nvarchar(4000)
DECLARE @provstr nvarchar(4000)
DECLARE @catalog nvarchar(128)
-- Set parameter values
SET @server = 'XLTEST_SP'
SET @srvproduct = 'Excel'
SET @provider = 'Microsoft.Jet.OLEDB.4.0'
SET @datasrc = 'c:book1.xls'
SET @provstr = 'Excel 8.0'
EXEC @RC = [master].[dbo].[sp_addlinkedserver] @server, @srvproduct, @provider,
@datasrc, @location, @provstr, @catalog
As noted above, this stored procedure requires an additional, arbitrary string value for the @srvproduct argument, which appears as «Product name» in the Enterprise Manager and SQL Server Management Studio configuration. The @location and @catalog arguments are not used.
Using SQL-DMO to configure an Excel data source as a linked server
You can use SQL Distributed Management Objects to configure an Excel data source as a linked server programmatically from Microsoft Visual Basic or another programming language. You must supply the same four arguments that are required in the Enterprise Manager and SQL Server Management Studio configuration.
Private Sub Command1_Click()
    Dim s As SQLDMO.SQLServer
    Dim ls As SQLDMO.LinkedServer
    Set s = New SQLDMO.SQLServer
    s.Connect "(local)", "sa", "password"
    Set ls = New SQLDMO.LinkedServer
    With ls
        .Name = "XLTEST_DMO"
        .ProviderName = "Microsoft.Jet.OLEDB.4.0"
        .DataSource = "c:book1.xls"
        .ProviderString = "Excel 8.0"
    End With
    s.LinkedServers.Add ls
    s.Close
End Sub
Using SMO to configure an Excel data source as a linked server
In SQL Server 2005, you can use SQL Server Management Objects (SMO) to configure an Excel data source as a linked server programmatically. To do this, you can use Microsoft Visual Basic .NET or another programming language. You must supply the arguments that are required in the SQL Server Management Studio configuration. The SMO object model extends and supersedes the Distributed Management Objects (SQL-DMO) object model. Because SMO is compatible with SQL Server version 7.0, SQL Server 2000, and SQL Server 2005, you can also use SMO for configuration of SQL Server 2000.
Imports Microsoft.SqlServer.Management.Smo
Imports Microsoft.SqlServer.Management.CommonPublic Class Form1
Private Sub Button1_Click(ByVal sender As System.Object, ByVal e As System.EventArgs) Handles Button1.Click
Dim s As Server
Dim conn As ServerConnection
Dim ls As LinkedServerconn = New ServerConnection("ServerNameInstanceName", "YourUesrName", "YourPassword")
s = New Server(conn)
Try
ls = New LinkedServer(s, "XLTEST_DMO")
With ls
.ProviderName = "Microsoft.Jet.OLEDB.4.0"
.ProductName = "Excel"
.DataSource = "c:book1.xls"
.ProviderString = "Excel 8.0"
End With
ls.Create()
MessageBox.Show("New linked Server has been created.")
Catch ex As SmoException
MessageBox.Show(ex.Message)
Finally
ls = Nothing
If s.ConnectionContext.IsOpen = True Then
s.ConnectionContext.Disconnect()
End If
End TryEnd Sub
End Class
Querying an Excel data source on a linked server
After you configure an Excel data source as a linked server, you can easily query its data from Query Analyzer or another client application. For example, to retrieve the rows of data that are stored in Sheet1 of your Excel file, the following code uses the linked server that you configured by using SQL-DMO:
SELECT * FROM XLTEST_DMO...Sheet1$
You can also use OPENQUERY to query the Excel linked server in a «passthrough» manner, as follows:
SELECT * FROM OPENQUERY(XLTEST_DMO, 'SELECT * FROM [Sheet1$]')
The first argument that OPENQUERY expects is the linked server name. Delimiters are required for worksheet names, as shown above.
You can also obtain a list of all the tables that are available on the Excel linked server by using the following query:
EXECUTE SP_TABLES_EX 'XLTEST_DMO'
Querying an Excel data source by using distributed queries
You can use SQL Server distributed queries and the OPENDATASOURCE or OPENROWSET function to query infrequently accessed Excel data sources on an ad hoc basis.
Note If you are using SQL Server 2005, make sure that you have enabled the Ad Hoc Distributed Queries option by using SQL Server Surface Area Configuration, as in the following example:
SELECT * FROM OPENDATASOURCE('Microsoft.Jet.OLEDB.4.0',
   'Data Source=c:book1.xls;Extended Properties=Excel 8.0')...Sheet1$
Note that OPENROWSET uses an uncommon syntax for the second («Provider String») argument:
SELECT * FROM OPENROWSET('Microsoft.Jet.OLEDB.4.0',
   'Excel 8.0;Database=c:book1.xls', Sheet1$)
The syntax that an ActiveX Data Objects (ADO) developer may expect to use for the second («Provider String») argument with OPENROWSET:
SELECT * FROM OPENROWSET('Microsoft.Jet.OLEDB.4.0',
   'Data Source=c:book1.xls;Extended Properties=Excel 8.0', Sheet1$)
This syntax raises the following error from the Jet Provider:
Could not find installable ISAM.
Note This error also occurs if you enter DataSource instead of Data Source. For example, the following argument is incorrect:
SELECT * FROM OPENROWSET('Microsoft.Jet.OLEDB.4.0', 'DataSource=c:book1.xls;Extended Properties=Excel 8.0', Sheet1$)
References
Because SQL Server linked servers and distributed queries use the OLE DB Provider, the general guidelines and cautions about using ADO with Excel apply here.
For more information, click the following article number to view the article in the Microsoft Knowledge Base:
257819 How to use ADO with Excel data from Visual Basic or VBA
For more information about SQL Server Management Objects, visit the following Microsoft Developer Network (MSDN) Web site:
http://msdn2.microsoft.com/en-us/library/ms162169(ide).aspxFor more information about how to enable the Ad Hoc Distributed Queries option, visit the following MSDN Web site:
http://msdn2.microsoft.com/en-us/library/ms189978(ide).aspx
Need more help?

Table of Contents
- Introduction
- Description
- Base Excel export
- Base Access export
- Base XML export
- Summary
- See also
- Source code
Introduction

This article will demonstrate how to export a table within
SQL-Server database to Microsoft Excel, Microsoft Access or a standard XML file utilizing
Transact-SQL
OPENROWSET. Using this method means no dealing with reading table data from a database into a client container such as a DataTable as an intermediate step to saving the table data to Microsoft Excel, Microsoft Access or an XML file where the intermediate
step can be simple or complex dependent on the chosen logic which could be using Open XML, Excel automation, a third party library or using a
StreamWriter. What follows are static code samples and dynamic code samples to build upon for your solution.
All base code resides in a class project while execution is performed in a windows form project. This by no means that this code is solely for windows form projects as the code to export data can run in any C# project type be it WPF, web solution etc.
Description
↑Back to top
Before writing code there is configuration to be performed, otherwise the following error will be raised when executing the code presented:
The requested operation could not be performed because OLE DB provider «Microsoft.ACE.OLEDB.12.0» for linked server «(null)» does not support the required transaction interface.
The configuration can be done in SQL-Server Management Studio (SSMS)
as demonstrated here, or SQL Operations Studio (SOS) for example.
Open SSMS, open Object Explorer, open to the following tree node.

Right click on the node above and select properties.

Select and check the following properties.

Select the Database node, right-click, select Refresh for validation. This concludes setting up SQL-Server for exporting data from tables in databases.
Setting up to run the code samples, unzip the attached Visual Studio solution, find CreateDatabase.sql, run this script in SSMS following by running the script SQL_Scripts.sql to create and populating a table. Both scripts are located in the root folder of
the attached solution.
All code samples are executed from a Windows form project as presented below:

Before getting into the code for exporting there are several classes that need to be discussed. In the main class for performing export operations, there is a base class, BaseSqlServerConnections which is responsible for centralizing properties for connecting
to the intended database. There are two properties, IsKarenMachine and IsKarensDatabaseServer. Both properties are only needed for these code samples. They are responsible for determining if you the reader have changed the server and catalog from the defaults
if they are not changed your connection will fail.
BaseSqlServerConnection inherits
BaseExceptionsHandler which provides properties which are used in each method of the main data class
SqlServerOperations to assist dealing with runtime exceptions.
On each build of the main project several commands run which are setup under project properties, Build Events in Pre-Build which will delete any Excel, Access or XML file. Each code sample copies a fresh Excel or Access file from a folder one level below the
application folder to use for the current code sample.
Pre-build command

Base Excel export
↑Back to top
The following utilizes a SqlClient connection and command to export, in this case the SQL-Server Customers table in the catalog ExcelExporting on the server KARENS-PC (remember to change this to your server name or to .SQLEXPRESS or localdb).
Inspecting the CommandText for the command object note the only variable is the Database set to the file name passed in. The actual table name and fields are static.
public
bool
ExportAllCustomersToExcel(string
pFileName, ref
int
pRowsExported)
{
using
(SqlConnection cn = new
SqlConnection { ConnectionString = ConnectionString })
{
using
(SqlCommand cmd = new
SqlCommand { Connection = cn })
{
cmd.CommandText =
$"INSERT INTO OPENROWSET('Microsoft.ACE.OLEDB.12.0', 'Excel 12.0;Database={pFileName}',"
+
"'SELECT * from [Customers$]') "
+
"SELECT CustomerIdentifier,CompanyName,ContactName,ContactTitle,"
+
"[Address],City,Region,PostalCode,Country,Phone "
+
"FROM Customers";
cn.Open();
try
{
pRowsExported = cmd.ExecuteNonQuery();
return
pRowsExported > 0;
}
catch
(Exception e)
{
mHasException =
true;
mLastException = e;
}
}
}
return
IsSuccessFul;
}
The data provider in the above example is exactly the same as for the code sample for exporting to Microsoft Access as shown in the partial code sample.
cmd.CommandText = $"INSERT INTO OPENROWSET('Microsoft.ACE.OLEDB.12.0','{pFileName}';'Admin';'',"
+
For the base SQL INSERT INTO, this is a standard SQL command up to OPENROWSET. OPENROWSET is the critical aspect of the entire command in combination with the initial setup at the start of this document.
Within OPENROWSET the provided is indicated along with extended properties for Excel which is not required for working with Microsoft Access.
In the second SELECT statement list field names, this could also be SELECT * too which is fine if all fields are to be exported yet it’s better to list each field and consider wrapping each field with brackets e.g. CustomerName bracketed would be [CustomerName].
This is to safeguard against fields with spaces in their name such as Customer Name which would cause an exception when executing the intended statement so wrapping all fields in brackets is a safety net.
The line, pRowsExported = cmd.ExecuteNonQuery executes the command to export and on success returns how many rows were exported.
Base Access export
↑Back to top
In this case, the code below is almost the same as the Excel export.
For the first two arguments to OPENROWSET the provider is exactly the same as the Excel OPENROWSET but with Microsoft Access the extended property is not required. Database is missing, instead, the file name is next followed by specifying ‘Admin’ which indicates
this is an admin. This could be an issue with a customer running this operation where their machine may be locked down by company security policies.
Fields are dynamic rather than hardcoded as with the Excel code sample. Excel can also have dynamic field names.
The WHERE condition is similar to another Excel method included in the attached solution which permits some or all records to be exported.
public
bool
ExportAllCustomersToAccess(string
pFileName, string
pCountry, ref
int
pRowsExported)
{
string
fields = "CompanyName,ContactName,ContactTitle,Phone";
using
(SqlConnection cn = new
SqlConnection { ConnectionString = ConnectionString })
{
using
(SqlCommand cmd = new
SqlCommand { Connection = cn })
{
/*
* If using .mdb use Microsoft.Jet.OLEDB.4.0 rather than Microsoft.ACE.OLEDB.12.0 as the provider name
*/
cmd.CommandText = $"INSERT INTO OPENROWSET('Microsoft.ACE.OLEDB.12.0','{pFileName}';'Admin';'',"
+
$"'SELECT {fields} FROM Customers') "
+
$" SELECT {fields} "
+
" FROM Customers";
if
(pCountry != "*")
{
cmd.CommandText = cmd.CommandText +
" WHERE Country = @Country";
cmd.Parameters.AddWithValue("@Country", pCountry);
}
try
{
cn.Open();
pRowsExported = cmd.ExecuteNonQuery();
return
pRowsExported > 0;
}
catch
(Exception e)
{
mHasException =
true;
mLastException = e;
}
}
}
return
IsSuccessFul;
}
Base XML export
↑Back to top
The main focus on exporting to XML is working with
FOR XML clause in a SELECT statement. If there is a large data set to export the common method of reading data into a DataSet then writing to XML may truncate the data which does not happen when using XmlReader in tanget with an instance of XmlDocument
as shown below.
public
bool
WriteCustomerTableToXmlFile(string
pFileName)
{
// Using SQL here or in a stored procedure write data to xml
// table is stored in this variable TempTable
using
(SqlConnection cn = new
SqlConnection() { ConnectionString = ConnectionString })
{
using
(SqlCommand cmd = new
SqlCommand() { Connection = cn })
{
// replace sql to match the temp table structure
string
selectStatement = @"
SELECT ( SELECT Cust.CustomerIdentifier ,
Cust.CompanyName ,
Cust.ContactName ,
Cust.ContactTitle
FROM dbo.Customers AS Cust
FOR
XML PATH('Customer') ,
TYPE
)
FOR XML PATH('') ,
ROOT('Customers');";
cmd.CommandText = selectStatement;
try
{
cn.Open();
XmlReader reader = cmd.ExecuteXmlReader();
var doc =
new
XmlDocument();
doc.Load(reader);
doc.Save(pFileName);
}
catch
(Exception e)
{
mHasException =
true;
mLastException = e;
}
}
}
return
IsSuccessFul;
}
Summary
↑Back to top
In this article you have learned the basics for exporting SQL-Server table data to Microsoft Excel, Microsoft Access and XML along with using base classes to handle data connections and a base class for handling runtime exceptions.
From here consider using stored procedures for exporting data to Microsoft Excel, Microsoft Access and XML if dealing with large datasets.
See also
Import and Export Excel Files into Varbinary (Max) in SQL Server
Source code
The full source code is provided in the following Github repository.
Мало пользователей, да и начинающих программистов, которые знают о возможности Excel подключаться к внешним источникам, и в частности к SQL серверу, для загрузки данных из этих источников. Эта возможность достаточно полезна, поэтому сегодня мы займемся ее рассмотрением.
Функционал Excel получения данных из внешних источников значительно упростит выгрузку данных с SQL сервера, так как Вам не придется просить об этом программиста, к тому же данные попадают сразу в Excel. Для этого достаточно один раз настроить подключение и в случае необходимости получать данные в Excel из любых таблиц и представлений Views, из базы настроенной в источнике, естественно таких источников может быть много, например, если у Вас несколько баз данных.
И для того чтобы более понятно рассмотреть данную возможность, мы это будем делать как обычно на примере. Другими словами допустим, что нам надо выгрузить данные, одной таблицы, из базы SQL сервера, средствами Excel, т.е. без помощи вспомогательных инструментов, таких как Management Studio SQL сервера.
Примечание! Все действия мы будем делать, используя Excel 2010. SQL сервер у нас будет MS Sql 2008.
И для начала разберем исходные данные, допустим, есть база test, а в ней таблица test_table, данные которой нам нужно получить, для примера будут следующими:
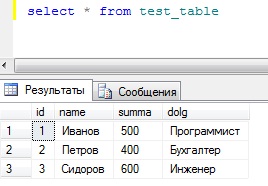
Эти данные располагаются в таблице test_table базы test, их я получил с помощью простого SQL запроса select, который я выполнил в окне запросов Management Studio. И если Вы программист SQL сервера, то Вы можете выгрузить эти данные в Excel путем простого копирования (данные не большие), или используя средство импорта и экспорта MS Sql 2008. Но сейчас речь идет о том, чтобы простые пользователи могли выгружать эти данные.
Заметка! Если Вас интересует SQL и T-SQL, рекомендую посмотреть мои видеокурсы по T-SQL, с помощью которых Вы «с нуля» научитесь работать с SQL и программировать с использованием языка T-SQL в Microsoft SQL Server.
Настройка Excel для получения данных с SQL сервера
Настройка, делается достаточно просто, но требует определенных навыков и консультации администратора SQL сервера. Вы, конечно, можете попросить программиста настроить Excel на работу или сделать это сами, просто спросив пару пунктов, а каких мы сейчас узнаем.
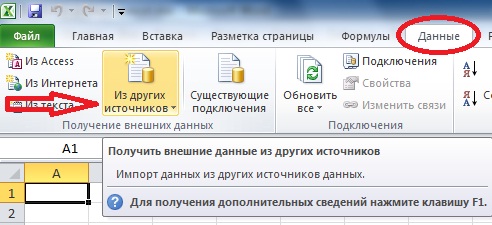
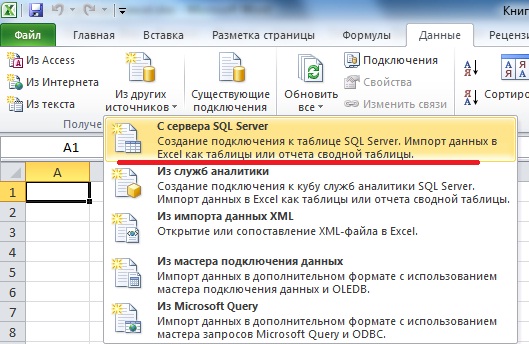
И первое что нам нужно сделать, это конечно открыть Excel 2010. Затем перейти на вкладку «Данные» и нажать на кнопку «Из других источников» и выбрать «С сервера SQL Server»
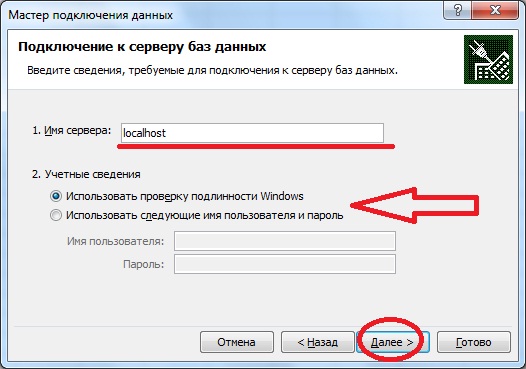
Затем у Вас откроется окно «Мастер подключения данных» в котором Вам необходимо, указать на каком сервере располагается база данных и вариант проверки подлинности. Вот именно это Вам придется узнать у администратора баз данных, а если Вы и есть администратор, то заполняйте поля и жмите «Далее».

Где,
- Имя сервера – это адрес Вашего сервера, здесь можно указывать как ip адрес так и DNS имя, в моем случае сервер расположен на этом же компьютере поэтому я и указал localhost;
- Учетные данные – т.е. это логин и пароль подключения к серверу, здесь возможно два варианта, первый это когда в сети Вашей организации развернута Active directory (Служба каталогов или домен), то в этом случае можно указать, что использовать те данные, под которыми Вы загрузили компьютер, т.е. доступы доменной учетки, и в этом случае никаких паролей здесь вводить не надо, единственное замечание что и на MSSql сервере должна стоять такая настройка по проверки подлинности. У меня именно так и настроено, поэтому я и выбрал этот пункт. А второй вариант, это когда администратор сам заводит учетные данные на SQL сервере и выдает их Вам, и в этом случае он должен их Вам предоставить.
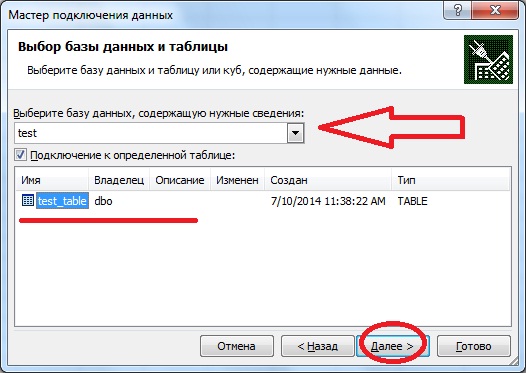
Далее необходимо выбрать базу, к которой подключаться, в нашем примере это база test. Также это подключение можно настроить сразу на работу с определенной таблицей или представлением, список таблиц и представлений у Вас будет отображен, давайте мы сделаем именно так и настроем подключение сразу на нашу таблицу test_table. Если Вы не хотите этого, а хотите чтобы Вы подключались к базе и потом выбирали нужную таблицу, то не ставьте галочку напротив пункта «Подключаться к определенной таблице», а как я уже сказал, мы поставим эту галочку и жмем «Далее».
В следующем окне нам предложат задать имя файла подключения, название и описание, я например, написал вот так:

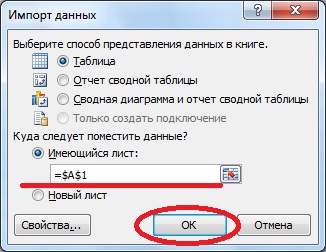
После того как Вы нажмете «Готово» у Вас откроется окно импорта этих данных, где можно указать в какие ячейки копировать данные, я например, по стандарту выгружу данные, начиная с первой ячейки, и жмем «ОК»:
В итоге у меня загрузятся из базы вот такие данные:
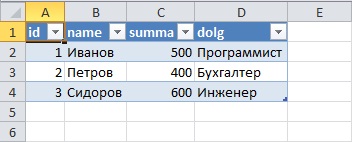
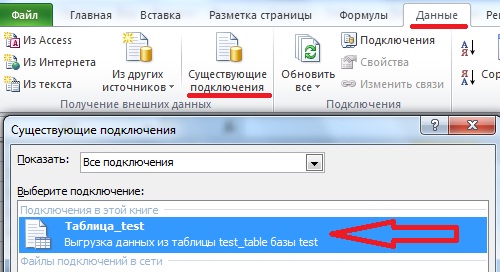
Т.е. в точности как в базе. Теперь когда, например, изменились данные в этой таблице, и Вы хотите выгрузить их повторно Вам не нужно повторять все заново, достаточно в excel перейти на вкладку «Данные» нажать кнопку «Существующие подключения» и выбрать соответствующее, т.е. то которое Вы только что создали.
Вот собственно и все, как мне кажется все достаточно просто.
Таким способом получать данные в Excel из базы SQL сервера очень удобно и главное быстро, надеюсь, Вам пригодятся эти знания полученные в сегодняшнем уроке. Удачи!
Phil and I have teamed up on this workbench, which demonstrates how to create, read, update and delete information in Excel using T-SQL, from SQL Server. As always, the workbench is structured so that it can be pasted into Query Analyser and SSMS, and the individual examples executed – you can download the .sql from the “Code Download” link at the bottom of the article, load it up and start experimenting!
We start by showing you how to create an Excel Spreadsheet from SQL Server in TSQL(Transact SQL), create a worksheet, attach to it as a linked server, write to it, read from it, update it as if it was an ordinary SQL Server Database table, and then synchronise the data in the worksheet with SQL Server. We also illustrate the use of OPENQUERY, OPENDATASOURCE and OPENROWSET.
To create the Excel spreadsheet, we show how to attach to an ADODB source from SQL Server and execute SQL against that source. We then show you an alternative ‘quick cheat’ way (using sp_makewebtask) to create and populate an Excel spreadsheet from Transact SQL.
If you need more control over the Excel Spreadsheet that you are creating, we then show you how to do it via OLE automation. This will enable you to do anything you can do via keystrokes, and allow you to generate full Excel reports with pivot tables and Graphs.
Using this technique, you should be able to populate the data, or place data in particular calls or ranges. You can even do ‘macro substitutions’.
A word of caution before you start. If you have your security wide open, it is not just you who would be able to write out data as a spreadsheet. An intruder would be able to do it with that list of passwords or credit-card numbers. In a production system, this sort of operation needs to be properly ring-fenced. We tend to create a job queue and have a special user, with the appropriate permissions, on the Task Scheduler, to do anything that involves OLE automation or xp_CMDShell. Security precautions can get quite complex, but they are outside the scope of the article.
Some of what we illustrate can be done using DTS or SSIS. Unfortunately, these are outside the scope of this article. In fact, transferring data between Excel and SQL Server can be done in a surprising variety of ways and it would be fun one day to try to list them all.
|
1 2 3 4 5 6 7 8 9 10 11 12 13 14 15 16 17 18 19 20 21 22 23 24 25 26 27 28 29 30 31 32 33 34 35 36 37 38 39 |
CREATE TABLE ##CambridgePubs (Pubname VARCHAR(40), Address VARCHAR(80), Postcode VARCHAR(8)) INSERT INTO ##CambridgePubs (PubName, Address, Postcode) SELECT ‘Bees In The Wall’,’36 North Road, Whittlesford, Cambridge’,‘CB2 4NZ’ INSERT INTO ##CambridgePubs (PubName, Address, Postcode) SELECT ‘Blackamoors Head’,‘205 Victoria Road, Cambridge’,‘CB4 3LF’ INSERT INTO ##CambridgePubs (PubName, Address, Postcode) SELECT ‘Blue Lion’,‘2 Horningsea Road, Fen Ditton, Cambridge’,‘CB5 8SZ’ INSERT INTO ##CambridgePubs (PubName, Address, Postcode) SELECT ‘Cambridge Blue’,’85-87 Gwydir Street, Cambridge’,‘CB1 2LG’ INSERT INTO ##CambridgePubs (PubName, Address, Postcode) SELECT ‘Champion Of The Thames’,’68 King Street, Cambridge’,‘CB1 1LN’ INSERT INTO ##CambridgePubs (PubName, Address, Postcode) SELECT ‘Cross Keys’,’77 Ermine Street, Caxton, Cambridge’,‘CB3 8PQ’ INSERT INTO ##CambridgePubs (PubName, Address, Postcode) SELECT ‘Crown Inn’,’11 High Street, Linton, Cambridge’,‘CB1 6HS’ INSERT INTO ##CambridgePubs (PubName, Address, Postcode) SELECT ‘Devonshire Arms’,‘1 Devonshire Road, Cambridge’,‘CB1 2BH’ INSERT INTO ##CambridgePubs (PubName, Address, Postcode) SELECT ‘Duke Of Argyle’,’90 Argyle Street, Cambridge’,‘CB1 3LS’ INSERT INTO ##CambridgePubs (PubName, Address, Postcode) SELECT ‘Duke Of Wellington’,’49 Alms Hill, Bourn, Cambridge’,‘CB3 7SH’ INSERT INTO ##CambridgePubs (PubName, Address, Postcode) SELECT ‘Eagle Public House’,‘Benet Street, Cambridge’,‘CB2 3QN’ |
And so on. (The full import file is in the ZIP, as is the Excel file!).
Create the table and then execute the contents of CambridgePubs.SQL.
First, we need to create the spreadsheet with the correct headings (PubName, Address, PostCode).
There are two possible ways one might do this. The most obvious way is using the CREATE statement to create the worksheet and define the columns, but there seems to be no way of doing this by linking the Excel file, unless the Excel file already exists. We need a utility stored procedure to get at ADODB in order to create databases and execute DDL and SQL against it.
|
1 2 3 4 5 6 7 8 9 10 11 12 13 14 15 16 17 18 19 20 21 22 23 24 25 26 27 28 29 30 31 32 33 34 35 36 37 38 39 40 41 42 43 44 45 46 47 48 49 50 51 52 53 54 55 56 57 58 |
CREATE PROCEDURE spExecute_ADODB_SQL @DDL VARCHAR(2000), @DataSource VARCHAR(100), @Worksheet VARCHAR(100)=NULL, @ConnectionString VARCHAR(255) = ‘Provider=Microsoft.Jet.OLEDB.4.0; Data Source=%DataSource; Extended Properties=Excel 8.0′ AS DECLARE @objExcel INT, @hr INT, @command VARCHAR(255), @strErrorMessage VARCHAR(255), @objErrorObject INT, @objConnection INT, @bucket INT SELECT @ConnectionString =REPLACE (@ConnectionString, ‘%DataSource’, @DataSource) IF @Worksheet IS NOT NULL SELECT @DDL=REPLACE(@DDL,‘%worksheet’,@Worksheet) SELECT @strErrorMessage=‘Making ADODB connection ‘, @objErrorObject=NULL EXEC @hr=sp_OACreate ‘ADODB.Connection’, @objconnection OUT IF @hr=0 SELECT @strErrorMessage=‘Assigning ConnectionString property «‘ + @ConnectionString + ‘»‘, @objErrorObject=@objconnection IF @hr=0 EXEC @hr=sp_OASetProperty @objconnection, ‘ConnectionString’, @ConnectionString IF @hr=0 SELECT @strErrorMessage =‘Opening Connection to XLS, for file Create or Append’ IF @hr=0 EXEC @hr=sp_OAMethod @objconnection, ‘Open’ IF @hr=0 SELECT @strErrorMessage =‘Executing DDL «‘+@DDL+‘»‘ IF @hr=0 EXEC @hr=sp_OAMethod @objconnection, ‘Execute’, @Bucket out , @DDL IF @hr<>0 BEGIN DECLARE @Source VARCHAR(255), @Description VARCHAR(255), @Helpfile VARCHAR(255), @HelpID INT EXECUTE sp_OAGetErrorInfo @objErrorObject, @source output, @Description output,@Helpfile output,@HelpID output SELECT @strErrorMessage=‘Error whilst ‘ +COALESCE(@strErrorMessage,‘doing something’)+‘, ‘ +COALESCE(@Description,») RAISERROR (@strErrorMessage,16,1) END EXEC @hr=sp_OADestroy @objconnection GO |
Now we have it, it is easy.
The Excel file will have been created on the Database server of the database you currently have a connection to.
We can now link to the created Excel file as follows.
As we are directly manipulating the Excel data in the worksheet as if it was a table we can do JOINs.
To try this out, you’ll need to DELETE, ALTER and INSERT a few rows from the Excel spreadsheet, remembering to close it after you’ve done it.
Firstly, we’ll delete any rows from ##CambridgePubs that do not exist in the Excel spreadsheet.
Then we insert into ##CambridgePubs any rows in the spreadsheet that don’t exist in ##CambridgePubs.
All done (reverse syncronisation would be similar).
You can read and write to the Excel sheet using OpenRowSet, if the mood takes you.
Instead of creating the Excel spreadsheet with OLEDB One can use the sp_makewebtask.
Users must have SELECT permissions to run a specified query and CREATE PROCEDURE permissions in the database in which the query will run. The SQL Server account must have permissions to write the generated HTML document to the specified location. Only members of the sysadmin server role can impersonate other users.
This is fine for distributing information from databases but no good if you subsequently want to open it via ODBC.
So far, so good. However, we really want rather more than this. When we create an Excel file for a business report, we want the data and we also want nice formatting, defined ranges, sums, calculated fields and pretty graphs. If we do financial reporting, we want a pivot table and so on in order to allow a degree of data mining by the recipient. A different approach is required.
We can, of course, use Excel to extract the data from the database. However, in this example, we’ll create a spreadsheet, write the data into it, fit the columns nicely and define a range around the data.
|
1 2 3 4 5 6 7 8 9 10 11 12 13 14 15 16 17 18 19 20 21 22 23 24 25 26 27 28 29 30 31 32 33 34 35 36 37 38 39 40 41 42 43 44 45 46 47 48 49 50 51 52 53 54 55 56 57 58 59 60 61 62 63 64 65 66 67 68 69 70 71 72 73 74 75 76 77 78 79 80 81 82 83 84 85 86 87 88 89 90 91 92 93 94 95 96 97 98 99 100 101 102 103 104 105 106 107 108 109 110 111 112 113 114 115 116 117 118 119 120 121 122 123 124 125 126 127 128 129 130 131 132 133 134 135 136 137 138 139 140 141 142 143 144 145 146 147 148 149 150 151 152 153 154 155 156 157 158 159 160 161 162 163 164 165 166 167 168 169 170 171 172 173 174 175 176 177 178 179 180 181 182 183 184 185 186 187 188 189 190 191 192 193 194 195 196 197 198 199 200 201 202 203 204 205 206 207 208 209 210 211 212 213 214 215 216 217 218 219 220 221 222 223 224 225 226 227 228 229 230 231 232 233 234 235 236 237 238 239 240 241 242 243 244 245 246 247 248 249 250 251 252 253 254 255 256 257 258 259 260 261 262 263 264 265 266 267 268 269 270 271 272 273 274 275 276 277 278 |
*/ ALTER PROCEDURE [dbo].[spDMOExportToExcel] ( @SourceServer VARCHAR(30), @SourceUID VARCHAR(30)=NULL, @SourcePWD VARCHAR(30)=NULL, @QueryText VARCHAR(200), @filename VARCHAR(100), @WorksheetName VARCHAR(100)=‘Worksheet’, @RangeName VARCHAR(80)=‘MyRangeName’ ) AS DECLARE @objServer INT, @objQueryResults INT, @objCurrentResultSet INT, @objExcel INT, @objWorkBooks INT, @objWorkBook INT, @objWorkSheet INT, @objRange INT, @hr INT, @Columns INT, @Rows INT, @Output INT, @currentColumn INT, @currentRow INT, @ResultSetRow INT, @off_Column INT, @off_Row INT, @command VARCHAR(255), @ColumnName VARCHAR(255), @value VARCHAR(255), @strErrorMessage VARCHAR(255), @objErrorObject INT, @Alphabet VARCHAR(27) SELECT @Alphabet=‘ABCDEFGHIJKLMNOPQRSTUVWXYZ’ IF @QueryText IS NULL BEGIN RAISERROR (‘A query string is required for spDMOExportToExcel’,16,1) RETURN 1 END — Sets the server to the local server IF @SourceServer IS NULL SELECT @SourceServer = @@servername SET NOCOUNT ON SELECT @strErrorMessage = ‘instantiating the DMO’, @objErrorObject=@objServer EXEC @hr= sp_OACreate ‘SQLDMO.SQLServer’, @objServer OUT IF @SourcePWD IS NULL OR @SourceUID IS NULL BEGIN —use a trusted connection IF @hr=0 SELECT @strErrorMessage= ‘Setting login to windows authentication on ‘ +@SourceServer, @objErrorObject=@objServer IF @hr=0 EXEC @hr=sp_OASetProperty @objServer, ‘LoginSecure’, 1 IF @hr=0 SELECT @strErrorMessage= ‘logging in to the requested server using windows authentication on ‘ +@SourceServer IF @SourceUID IS NULL AND @hr=0 EXEC @hr=sp_OAMethod @objServer, ‘Connect’, NULL, @SourceServer IF @SourceUID IS NOT NULL AND @hr=0 EXEC @hr=sp_OAMethod @objServer, ‘Connect’, NULL, @SourceServer ,@SourceUID END ELSE BEGIN IF @hr=0 SELECT @strErrorMessage = ‘Connecting to ‘»+@SourceServer+ »‘ with user ID ‘»+@SourceUID+»», @objErrorObject=@objServer IF @hr=0 EXEC @hr=sp_OAMethod @objServer, ‘Connect’, NULL, @SourceServer, @SourceUID, @SourcePWD END —now we execute the query IF @hr=0 SELECT @strErrorMessage=‘executing the query «‘ +@querytext+‘», on ‘+@SourceServer, @objErrorObject=@objServer, @command = ‘ExecuteWithResults(«‘ + @QueryText + ‘»)’ IF @hr=0 EXEC @hr=sp_OAMethod @objServer, @command, @objQueryResults OUT IF @hr=0 SELECT @strErrorMessage=‘getting the first result set for «‘ +@querytext+‘», on ‘+@SourceServer, @objErrorObject=@objQueryResults IF @hr=0 EXEC @hr=sp_OAMethod @objQueryResults, ‘CurrentResultSet’, @objCurrentResultSet OUT IF @hr=0 SELECT @strErrorMessage=‘getting the rows and columns «‘ +@querytext+‘», on ‘+@SourceServer IF @hr=0 EXEC @hr=sp_OAMethod @objQueryResults, ‘Columns’, @Columns OUT IF @hr=0 EXEC @hr=sp_OAMethod @objQueryResults, ‘Rows’, @Rows OUT —so now we have the queryresults. We start up Excel IF @hr=0 SELECT @strErrorMessage=‘Creating the Excel Application, on ‘ +@SourceServer, @objErrorObject=@objExcel IF @hr=0 EXEC @hr=sp_OACreate ‘Excel.Application’, @objExcel OUT IF @hr=0 SELECT @strErrorMessage=‘Getting the WorkBooks object ‘ IF @hr=0 EXEC @hr=sp_OAGetProperty @objExcel, ‘WorkBooks’, @objWorkBooks OUT —create a workbook IF @hr=0 SELECT @strErrorMessage=‘Adding a workbook ‘, @objErrorObject=@objWorkBooks IF @hr=0 EXEC @hr=sp_OAGetProperty @objWorkBooks, ‘Add’, @objWorkBook OUT —and a worksheet IF @hr=0 SELECT @strErrorMessage=‘Adding a worksheet ‘, @objErrorObject=@objWorkBook IF @hr=0 EXEC @hr=sp_OAGetProperty @objWorkBook, ‘worksheets.Add’, @objWorkSheet OUT IF @hr=0 SELECT @strErrorMessage=‘Naming a worksheet as «‘ +@WorksheetName+‘»‘, @objErrorObject=@objWorkBook IF @hr=0 EXEC @hr=sp_OASetProperty @objWorkSheet, ‘name’, @WorksheetName SELECT @currentRow = 1 —so let’s write out the column headings SELECT @currentColumn = 1 WHILE (@currentColumn <= @Columns AND @hr=0) BEGIN IF @hr=0 SELECT @strErrorMessage=‘getting column heading ‘ +LTRIM(STR(@currentcolumn)) , @objErrorObject=@objQueryResults, @Command=‘ColumnName(‘ +CONVERT(VARCHAR(3),@currentColumn)+‘)’ IF @hr=0 EXEC @hr=sp_OAGetProperty @objQueryResults, @command, @ColumnName OUT IF @hr=0 SELECT @strErrorMessage=‘assigning the column heading ‘+ + LTRIM(STR(@currentColumn)) + ‘ from the query string’, @objErrorObject=@objExcel, @command=‘Cells(‘+LTRIM(STR(@currentRow)) +‘, ‘ + LTRIM(STR(@CurrentColumn))+‘).value’ IF @hr=0 EXEC @hr=sp_OASetProperty @objExcel, @command, @ColumnName SELECT @currentColumn = @currentColumn + 1 END —format the headings in Bold nicely IF @hr=0 SELECT @strErrorMessage=‘formatting the column headings in bold ‘, @objErrorObject=@objWorkSheet, @command=‘Range(«A1:’ +SUBSTRING(@alphabet,@currentColumn/26,1) +SUBSTRING(@alphabet,@currentColumn % 26,1) +‘1’+‘»).font.bold’ IF @hr=0 EXEC @hr=sp_OASetProperty @objWorkSheet, @command, 1 —now we write out the data SELECT @currentRow = 2 WHILE (@currentRow <= @Rows+1 AND @hr=0) BEGIN SELECT @currentColumn = 1 WHILE (@currentColumn <= @Columns AND @hr=0) BEGIN IF @hr=0 SELECT @strErrorMessage= ‘getting the value from the query string’ + LTRIM(STR(@currentRow)) +‘,’ + LTRIM(STR(@currentRow))+‘)’, @objErrorObject=@objQueryResults, @ResultSetRow=@CurrentRow—1 IF @hr=0 EXEC @hr=sp_OAMethod @objQueryResults, ‘GetColumnString’, @value OUT, @ResultSetRow, @currentColumn IF @hr=0 SELECT @strErrorMessage= ‘assigning the value from the query string’ + LTRIM(STR(@CurrentRow—1)) +‘, ‘ + LTRIM(STR(@currentcolumn))+‘)’ , @objErrorObject=@objExcel, @command=‘Cells(‘+STR(@currentRow) +‘, ‘ + STR(@CurrentColumn)+‘).value’ IF @hr=0 EXEC @hr=sp_OASetProperty @objExcel, @command, @value SELECT @currentColumn = @currentColumn + 1 END SELECT @currentRow = @currentRow + 1 END —define the name range —Cells(1, 1).Resize(10, 5).Name = «TheData» IF @hr=0 SELECT @strErrorMessage=‘assigning a name to a range ‘ + LTRIM(STR(@CurrentRow—1)) +‘, ‘ + LTRIM(STR(@currentcolumn—1))+‘)’ , @objErrorObject=@objExcel, @command=‘Cells(1, 1).Resize(‘+STR(@currentRow—1) +‘, ‘ + STR(@CurrentColumn—1)+‘).Name’ IF @hr=0 EXEC @hr=sp_OASetProperty @objExcel, @command, @RangeName —Now autofilt the columns we’ve written to IF @hr=0 SELECT @strErrorMessage=‘Auto-fit the columns ‘, @objErrorObject=@objWorkSheet, @command=‘Columns(«A:’ +SUBSTRING(@alphabet,(@Columns / 26),1) +SUBSTRING(@alphabet,(@Columns % 26),1)+ ‘»).autofit’ IF @hr=0 —insert into @bucket(bucket) EXEC @hr=sp_OAMethod @objWorkSheet, @command, @output out IF @hr=0 SELECT @command =‘del «‘ + @filename + ‘»‘ IF @hr=0 EXECUTE master..xp_cmdshell @Command, no_output IF @hr=0 SELECT @strErrorMessage=‘Saving the workbook as «‘+@filename+‘»‘, @objErrorObject=@objRange, @command = ‘SaveAs(«‘ + @filename + ‘»)’ IF @hr=0 EXEC @hr=sp_OAMethod @objWorkBook, @command IF @hr=0 SELECT @strErrorMessage=‘closing Excel ‘, @objErrorObject=@objExcel EXEC @hr=sp_OAMethod @objWorkBook, ‘Close’ EXEC sp_OAMethod @objExcel, ‘Close’ IF @hr<>0 BEGIN DECLARE @Source VARCHAR(255), @Description VARCHAR(255), @Helpfile VARCHAR(255), @HelpID INT EXECUTE sp_OAGetErrorInfo @objErrorObject, @source output,@Description output, @Helpfile output,@HelpID output SELECT @hr, @source, @Description,@Helpfile,@HelpID output SELECT @strErrorMessage=‘Error whilst ‘ +COALESCE(@strErrorMessage,‘doing something’) +‘, ‘+COALESCE(@Description,») RAISERROR (@strErrorMessage,16,1) END EXEC sp_OADestroy @objServer EXEC sp_OADestroy @objQueryResults EXEC sp_OADestroy @objCurrentResultSet EXEC sp_OADestroy @objExcel EXEC sp_OADestroy @objWorkBookks EXEC sp_OADestroy @objWorkBook EXEC sp_OADestroy @objRange RETURN @hr |
Now we can create our pubs spreadsheet, and can do it from any of our servers.
Although this is a very handy stored procedure, you’ll probably need to modify and add to it for particular purposes.
We use the DMO method because we like to dump build data into Excel spreadsheets e.g. users, logins, Job Histories. However, an ADODB version is very simple to do and can be made much faster for reads and writes.
We have just inserted values, but you can insert formulae and formatting numberformat) and create or change borders. You can, in fact, manipulate the spreadsheet in any way you like. When we do this, we record macros in Excel and then convert these macros to TSQL! Using the above example, it should be simple.
In this informative article, we will explore how to create an Excel connection to MS SQL database and load data from SQL Server to Microsoft Excel.
Microsoft Excel is a powerful tool to evaluate and analyze the data in various ways. Excel provides features to connect to various databases; for example — MS SQL Server database, Access database, etc. Using these database connections, you can import external data into Excel using SQL query or statements. You can then sort it, analyze it, and perform any calculation that you might need.
This database connection must be validated by a SQL login to ensure that the content of your databases remains secure and safe.
The main advantage of these database connections is — you update or refresh the Microsoft Excel data directly from the database on a real-time basis using the Excel refresh command.
How to create an Excel Connection to SQL database
To create an Excel connection, follow the below-mentioned steps.
Step 1
Open Microsoft Excel file and go to the Data tab on the Excel Ribbon (Under menu bar).

Step 2
Click «From other sources» icon in the «Get External Data» section and select «From SQL Server» on the dropdown menu.

Step 3
After the selection of «From SQL Server», the Data Connection Wizard window opens.

Enter the server name and click on «Use the following User Name and Password» radio button under the Log on credentials and enter the database username and password in appropriate boxes. Then, click the «Next» button.
- Server name — Server name box must contain the name of the computer where SQL Server is installed.
- User name — your SQL Server user name. Required only for SQL Server authentication.
- Password — your SQL Server password. Required only for SQL Server authentication.
Step 4
After clicking on the «Next >» button, a new popup window will open. Select the required database from the “select the database that contains the data you want” dropdown list. After selection of database, a list of tables appears, as in the below-given screenshot. Then, select the required table (which you want to load data) and click on the «Next>» button.
Database — The name of the SQL database to connect to Microsoft Excel.

Step 5
Click on the «Finish» button to load data from SQL Server Database to Microsoft Excel file.


Refresh/Update an Excel Connection to a SQL database
To refresh the Excel Connection follow the below-given steps.
- On your worksheet, click any cell that contains your SQL Server data.
- On the Data tab, in the Connections group, click the arrow next to Refresh All, and then click «Refresh».

Clicking the «Refresh All» button in the Connections group on the Data tab will instantly update the information from all data sources connected to the excel sheet.
Change the SQL query statement using external data properties
- Click any cell that contains your SQL Server data.
- In the Connections group, click the arrow next to Refresh All, and click Connection Properties.

Then Click on connection properties icon (marked in red) to open connection property window and go on the Definition tab,

Modify the Connection string to connect to a different database using a connection string.
Modify the Command Type to SQL for Queries or Table for a table. There are three options (Default, SQL and table).
Modify the Command text to enter a SQL query to select or load particular data.
Click the “OK” button to close the Connection Properties window. Edit other data in the spreadsheet and save the workbook as needed.
That is it for this article. I hope you have learned something new from this article. Please comment below for your feedback and queries.
Using a SQL Server SELECT Statement to Query an Excel Workbook
Occasionally you may find that some of the data you need to reference in a SQL Server query is located outside of the database in an Excel Workbook.
In this article we look at how you can query an Excel workbook as if it were a table in a SQL Server Database.
The SQL Server OPENROWSET function can be used to connect to a variety of data sources by means of a data provider:
OPENROWSET
( { 'provider_name' , { 'datasource' ; 'user_id' ; 'password'
   | 'provider_string' }
   , {   [ catalog. ] [ schema. ] object
       | 'query'
     }
   | BULK 'data_file' ,
       { FORMATFILE = 'format_file_path' [ <bulk_options> ]
       | SINGLE_BLOB | SINGLE_CLOB | SINGLE_NCLOB }
} )

<bulk_options> ::=
   [ , CODEPAGE = { 'ACP' | 'OEM' | 'RAW' | 'code_page' } ]
   [ , DATASOURCE = 'data_source_name' ]
   [ , ERRORFILE = 'file_name' ]
   [ , ERRORFILE_DATASOURCE = 'data_source_name' ]
   [ , FIRSTROW = first_row ]
   [ , LASTROW = last_row ]
   [ , MAXERRORS = maximum_errors ]
   [ , ROWS_PER_BATCH = rows_per_batch ]
   [ , ORDER ( { column [ ASC | DESC ] } [ ,...n ] ) [ UNIQUE ] ]

   -- bulk_options related to input file format
   [ , FORMAT = 'CSV' ]
   [ , FIELDQUOTE = 'quote_characters']
   [ , FORMATFILE = 'format_file_path' ]
Supported Data Providers include:
- SQLNCLI for accessing remote SQL Server Databases
- Microsoft.Jet.OLEDB.4.0 for accessing Microsoft Access Databases and Excel Workbooks
- Microsoft.ACE.OLEDB.12.0 for accessing Microsoft Access Databases and Excel Workbooks
The older JET data provider is only available for 32 bit platforms, but ACE is available for 64 bit platforms as well.
ACE is an abbreviation for Access Connectivity Engine, but is now generally known as the Access Database Engine. ACE is backewardly compatible with JET so can be used to query older versions of Access databases and Excel workbooks.
ACE is going to be used in this article as it is the more modern and flexible implementation.
We will us a sample Workbook that contains some Order Records:
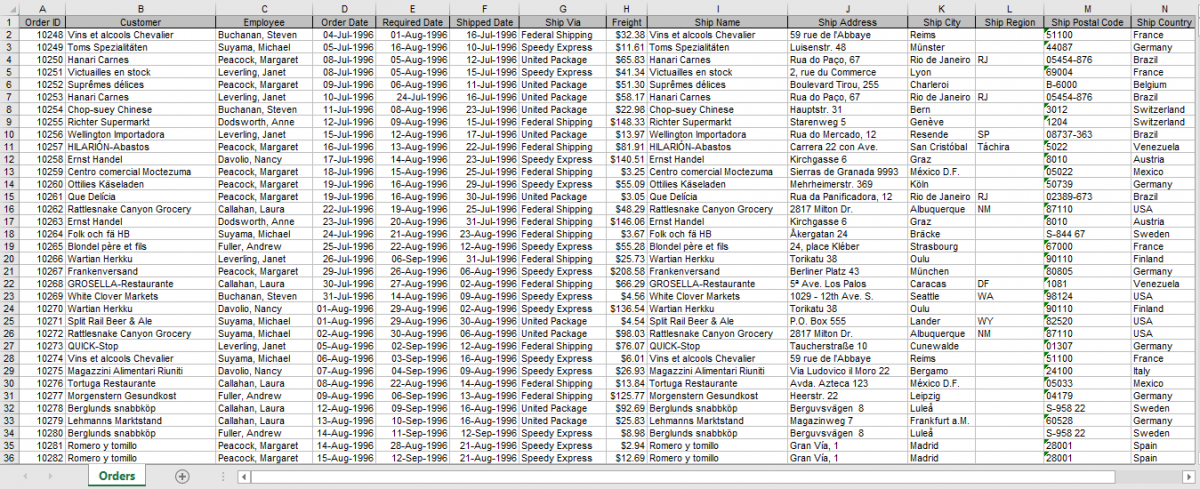
Obviously we could import this data into a SQL Server database, but if the data is generated by a Legacy system that is limited in export capabilities, or a person is manually constructing the data set, and it frequently changes and is replaced it may be more practical to simply query the data in place.
As already mentioned the ACE library can be used to query the data in an Excel Workbook, using the OPENROWSET function.
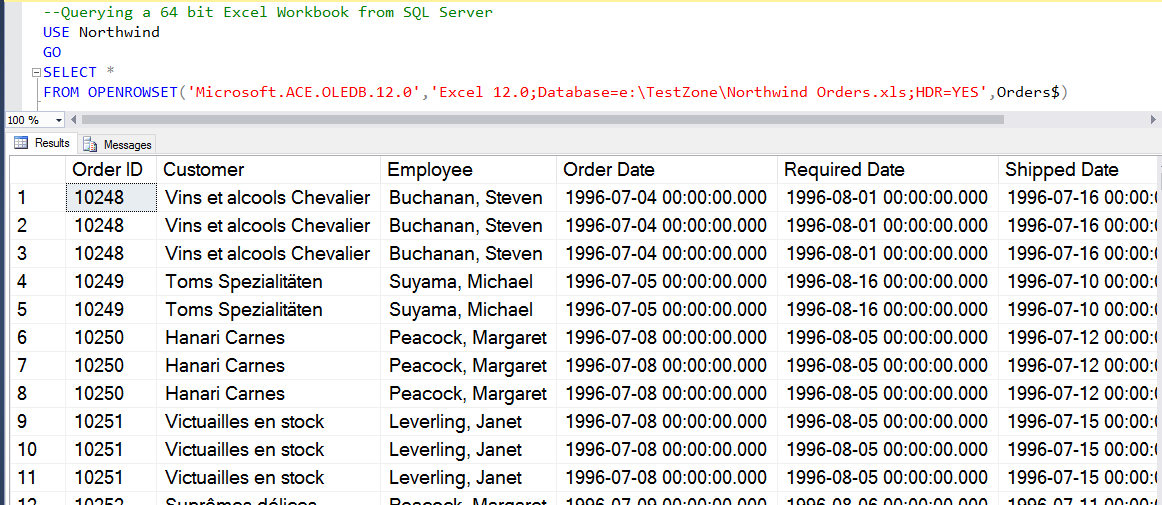
The following example retrieves all columns for all records in an Excel workbook called Northwind Orders.xls, on a worksheet called Orders.
USE Northwind
GO
SELECT *
FROM OPENROWSET('Microsoft.ACE.OLEDB.12.0','Excel 12.0;Database=e:TestZoneNorthwind Orders.xls;HDR=YES',Orders$)
The arguments to the OPENROWSET function to connect to the Excel Worksheet data are:
- Data Provider: ACE (Microsoft.ACE.OLEDB.12.0)
- Workbook version: Excel 2007 format (Excel 12.0)
- Workbook: e:TestZoneNorthwind Orders.xls
- Woksheet Range Name: Orders$
The results from this query are as follows:
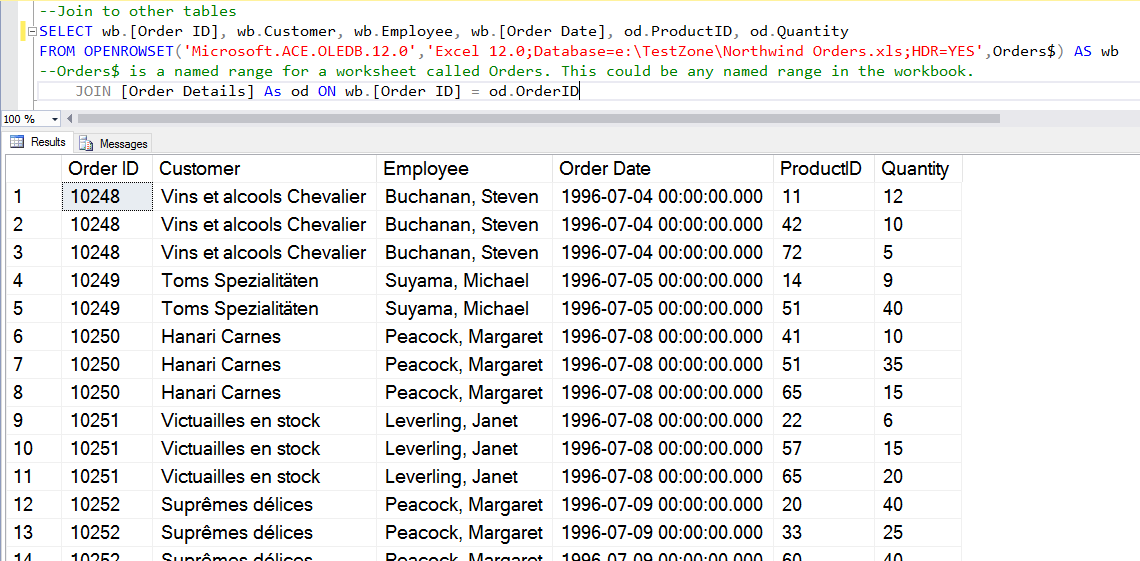
Joining OPENROWSET results sets to Database Tables with JOINs
The OPENROWSET can be used in a JOIN clause.
--Join to other tables
SELECT wb.[Order ID], wb.Customer, wb.Employee, wb.[Order Date], od.ProductID, od.Quantity
FROM OPENROWSET('Microsoft.ACE.OLEDB.12.0','Excel 12.0;Database=e:TestZoneNorthwind Orders.xls;HDR=YES',Orders$) AS wb
--Orders$ is a named range for a worksheet called Orders. This could be any named range in the workbook.
	JOIN [Order Details] As od ON wb.[Order ID] = od.OrderID
This query pulls four columns from the workbook and one from the table called [Order Details] in a database called Northwind. Mote the alias of wb created for the “table” created by the OPENROWSET query. This is not required, but makes it easier to reference and identify columns when multiple tables are in the query.
I hope you have found this helpful. Do share this article on Social Media if you like it.